by Contributed | Apr 14, 2021 | Technology
This article is contributed. See the original author and article here.
Contributors:
Rob Garrett – Sr. Customer Engineer, Microsoft Federal
John Unterseher – Sr. Customer Engineer, Microsoft Federal
Martin Ballard – Sr. Customer Engineer, Microsoft Federal
This article replaces the previous article, which used the – now legacy – version of PnP PowerShell.
What are Learning Pathways?
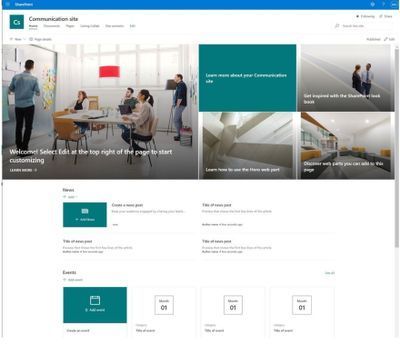
Microsoft 365 learning pathways is a customizable, on-demand learning solution designed to increase usage and adoption of Microsoft 365 services in your organization. |
Microsoft 365 learning pathways is a customizable, on-demand learning solution designed to increase usage and adoption of Microsoft 365 services in your organization. Learning Pathways consists of a fully customizable SharePoint Online Communication site collection, with content populated from the Microsoft online catalog; so, your content is always up to date. Learning Pathways provide integrated playlists to meet the unique needs of your organization.
M365 Learning Pathways build atop of the Look Book Provisioning Service and templates (https://lookbook.microsoft.com). In a previous blog post, we detailed the nuances of the Look Book Provisioning Service and additional steps required to deploy templates to GCC High tenants. Since Learning Pathways depend on the provisioning service to create a Communication site with customizations, via a Look Book template, this post details the additional steps to follow those from the earlier blog post.
Challenge – Using Learning Pathways in GCC High
Because of provisioning limitations in the GCC High sovereign cloud, documented installation instructions result in errors. |
Microsoft strives to implement functionality parity between all sovereign clouds. However, since each Office 365 cloud type serves a different customer audience and requirements, functionality will differ between these cloud types. Of the M365 clouds – Commercial, Government Community Cloud, Government Community Cloud High, and DOD Cloud, the last two offer the least functionality to observe US federal mandates and compliance.
As Microsoft develops new functionality for Microsoft 365 and Azure clouds, we typically release new functionality to commercial customers first, and then to the other GCC, GCC High, and DOD tenants later as we comply with FedRAMP and other US Government mandates. Open-source offerings add another layer of complexity since open-source code contains community contribution and is seldom developed with government clouds in mind.
Apply Learning Pathways to GCC High
Manual configuration steps detailed below make Learning Pathways in GCC High possible.
|
Microsoft 365 Learning Pathways offers manual steps to support deployment to an existing SharePoint Online Communication site. Recall from the earlier blog post that the Look Book Provisioning Service is unable to establish a new site collection in GCC High, because of necessary restrictions. We, therefore, deploy Learning Pathways using the manual steps with a pre-provisioned Communication site collection.
Manual setup of Learning Pathways requires experience working with Windows PowerShell and the PnP PowerShell module.
Prerequisites
Before getting into the manual steps, we must meet prerequisites for manual install of Learning Pathways, the following is a summary:
- Create and designate a new Communication in SharePoint Online for Learning Pathways.
- Create a tenant-wide application catalog (steps below).
- Install the latest SharePoint PnP.
- Perform all steps as a SharePoint Tenant Administrator.
We begin by creating a new Communication site via the SharePoint Administration site:
https://mytenant-admin.sharepoint.us/_layouts/15/online/AdminHome.aspx#/siteManagement/view/ALL%20SITES
Ensure the appropriate permissions for users of the Learning Pathways site:
- Open the Learning Pathways site collection in your web browser.
- From the home page, click the Share link.
- Add students to the Site Visitors group.
- Add playlist editors of the pathways site to the Site Members group.
- Add site administrators of the pathways site to the Site Owners group.

We shall now create the tenant app catalog (if it does not already exist):
- Open the SharePoint Admin center in your browser.
https://mytenant-admin.sharepoint.us
- Select More Features in the left sidebar.
- Locate the Apps section and click Open.
https://mytenant-admin.sharepoint.us/_layouts/15/online/TenantAdminApps.aspx
- Select the App Catalog.
- If you do not already have an app catalog, provide the following details:
- Title: App Catalog
- Web Site Address Suffix: preferred suffix for the app catalog, e.g. apps.
- Administrator: SharePoint Administrator.
We shall now turn our attention to installing the latest version of PnP.PowerShell. At the time of writing this blog, the latest version of PnP.PowerShell is 1.5.x. Follow the instructions, in the box below, to install the latest pre-release version (required).
You can check the available versions of installed PnP.PowerShell with the Get-Module PnP.PowerShell -ListAvailable. If you do not have version 1.5.x or greater follow the instructions in the below box. |
PnP PowerShell installation is a prerequisite for deploying Look Book templates via PowerShell. The previous edition of this article used the – now legacy – SharePointPnpPowerShell module. At the time of writing, the new steps require the latest bits for PowerShellGet, Nuget Package Provider and PnP.PowerShell module. You only need follow these side-line steps once for a specified Windows machine.
- Open a PowerShell console as an administrator (right-click, Run As Administrator).
Note: The latest version of PnP.PowerShell is cross-platform and works with PowerShell Core (v7.x).
- Ensure unrestricted execution policy with:
Set-ExecutionPolicy Unrestricted
- Check the installed version of PowerShellGet with the following cmdlet:
Get-PackageProvider -Name PowerShellGet -ListAvailable
- If you see version 2.2.5.0 or greater, proceed to step #5.
Note: if you have PowerShell 5.1 and 7.x installed, you may have different versions of PowerShellGet for each version of PowerShell.
- Install the required version of PowerShellGet with:
Install-PackageProvider -Name Nuget -Scope AllUsers -Force
Install-PackageProvider -Name PowerShellGet -MinimumVersion 2.2.5.0 -Scope AllUsers -Force
- If you ran step #4, close and reopen your PowerShell console (again, as an administrator).
- Install PnP.PowerShell with the following:
Install-Module -Name PnP.PowerShell -AllowPrerelease -SkipPublisherCheck -Scope AllUsers -Force
- Close and reopen your PowerShell console (run as administrator not required this time).
- Confirm that PnP.PowerShell is installed with the following:
Get-Module -Name PnP.PowerShell -ListAvailable
|
- Open a new PowerShell console (v5.1 or Core 7.x).
- Ensure the PnP.PowerShell module is loaded with the following:
Import-Module -Name PnP.PowerShell
- Run the following script ONCE per tenant to create an Azure App Registration for PnP:
Note: Replace tenant with your tenant name.
Register-PnPAzureADApp -ApplicationName "PnP PowerShell" `
-Tenant [TENANT].onmicrosoft.us -Interactive `
-AzureEnvironment USGovernmentHigh `
-SharePointDelegatePermissions AllSites.FullControl User.Read.All
Login with user credentials assigned Global Administrator role.
If you previously registered PnP.PowerShell, check the App Registration in the Azure portal and make sure it has delegated permissions for AllSites.FullControl and User.Read.All.
- Make a note of the GUID returned from step 4. This is the App/Client ID of the new PnP Azure App Registration.
Deploy Learning Pathways Template
Learning Pathways deploys as from a dedicated Look Book template. The following steps details downloading the template and deploying it via PnP.PowerShell.
- Open a new PowerShell console (v5.1 or Core 7.x).
- Ensure the PnP.PowerShell module is loaded with the following:
Import-Module -Name PnP.PowerShell
- Connect to your Learning Pathways site collection with the following:
Connect-PnPOnline `
-Url "Url of your Learning Pathways Site" `
-AzureEnvironment USGovernmentHigh `
-Interactive `
-Tenant "[TENANT].onmicrosoft.us `
-Client ID "Client ID from AAD app registration in Step #16"
- Enable custom scripts on your site with the following (note: check with you security team before enabling this feature):
Set-PnPTenantSite -Identity "Url of your Learning Pathways Site" -DenyAddAndCustomizePages:$false
- Apply the template with the following:
Invoke-PnPSiteTemplate -Path M365LP.pnp
- Connect the SharePoint Framework Web Part to your learning site with the following:
Set-PnPStorageEntity `
-Key MicrosoftCustomLearningSite `
-Value "<URL of Learning Pathways site collection>" `
-Description "Microsoft 365 learning pathways Site Collection";
Set-PnPStorageEntity `
-Key MicrosoftCustomLearningTelemetryOn `
-Value $false `
-Description "Microsoft 365 learning pathways Telemetry Setting";

by Contributed | Apr 14, 2021 | Technology
This article is contributed. See the original author and article here.
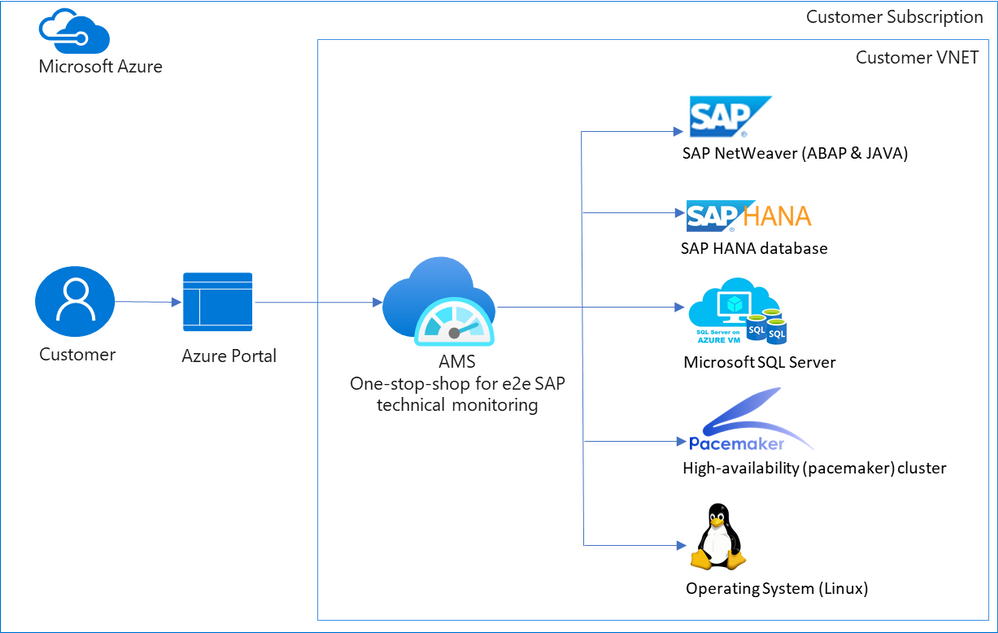
When customers move their mission critical SAP applications to Azure, a decision on which monitoring tool to use is carefully made. Various tools are evaluated, older pain points are reconsidered, and new cloud-specific monitoring needs are identified. Microsoft built Azure Monitor for SAP Solutions (AMS), currently in public preview, to address some of these needs. AMS is an Azure native monitoring solution that provides end-to-end SAP technical monitoring at one place in Azure portal.
AMS can be used by customers running their SAP workloads on Azure virtual machines as well as Azure large instances to monitor their SAP on Azure landscapes. Currently, telemetry collections for the following are supported: SAP HANA, Microsoft SQL Server and High-availability (pacemaker) clusters. And the following regions are supported: East US, East US 2, West US 2, West Europe.
Today I am excited to share the following capabilities in public preview:
- SAP NetWeaver (ABAP & JAVA)
- Operating system (SUSE & RHEL)
- Additional metrics for High-availability (pacemaker) cluster
- North Europe region
SAP NetWeaver data is collected from functions in SAP Start service which are provided on SAPControl SOAP Web Service. Following metrics are supported with this release: SAP instance availability, process availability, work process utilization, enqueue lock statistics, queue statics and trends. More to follow. Data for high-availability (pacemaker) clusters is collected from ha cluster exporter, which runs on every node in a cluster. Previously, statuses for nodes and resources were available, now customers can see information about location constraints, failure counts and trends on node and resource status. Operating systems (SUSE and RHEL) data is collected through node exporter which is required to run on each host. Metrics like:
- CPU usage by process
- Persistent memory
- Swap memory
- Memory usage
- Disk utilization,
- Network information
and more are available. OS monitoring in AMS is specifically useful for customers running workloads on Azure large instances (BareMetal).
 Screenshots of visualizations from AMS
With this release, AMS provides end-to-end technical monitoring for all layers in SAP’s 3-tier architecture at one place. Customers can use AMS to visualize, monitor and troubleshoot all layers and visually corelate data across them. Further, customers can create Azure dashboards, with few clicks, to visualize SAP telemetry and non-SAP telemetry (other Azure services) in single-pane-of-glass. This can be done by combining telemetry from AMS and Azure monitor.
Since end-to-end technical monitoring is available within Azure portal, both BASIS administrators and infrastructure teams in customer’s organization can use AMS to monitor SAP on Azure. Moreover, Hosters/service integrations/partners can use AMS to monitor SAP systems for their customers and view cross-tenant SAP telemetry in Azure portal through integration between AMS and Azure Light house.
To get started, log into Azure portal and search ‘Azure Monitor for SAP Solutions’ in Azure Marketplace. Please see the links below for further information.
Share your thoughts with AMS product group: AMS asks & feedback form
Learn more:
Other helpful links:
by Contributed | Apr 14, 2021 | Technology
This article is contributed. See the original author and article here.
SAP NetWeaver monitoring- Azure Monitoring for SAP Solutions
By
@Ramakrishna Ramadurgam
AZURE MONITOR FOR SAP SOLUTIONS
Microsoft previously announced the launch of Azure Monitor for SAP Solutions (AMS) in Public Preview– an Azure native monitoring solution for customers who run SAP workloads on Azure. With AMS, customers can view telemetry of their SAP landscapes within the Azure Portal and efficiently correlate telemetry between various layers of SAP viz-viz NetWeaver, Database and Infrastructure etc. AMS is available through Azure Marketplace in the following regions: East US, East US 2, West US 2, West Europe and North Europe. AMS does not have a license fee.
SAP NetWeaver Monitoring
SAP Systems are very complex and mission critical for many enterprises, it is imperative that we identify issues and alert based on threshold breaches with “No” human involvement. Ability to detect failures early can prevent system degradation/reliability dips of SAP systems during critical periods like Finance period closes, Payroll Processing, Holiday Sales etc. A robust and Azure native monitoring platform helps the SAP Admins to gain near real-time visibility and insights into system availability, performance and work process usage trends.
With Azure Monitor for SAP Solutions (AMS), customers can add a new provider type “SAP NetWeaver”, this provider type enables “SAP on Azure” customers to monitor SAP NetWeaver components and processes on Azure estate in Azure portal. The solution also allows for easy creation of custom visualizations and custom alerting, this new provider type ships with default visualizations that can either be used out of the box or extended to meet your requirements.
SAP NetWeaver telemetry is collected by configuring SAP NetWeaver ‘provider’ within AMS. As part of configuring the provider, customers need to provide the hostname (Central, Primary and/or Secondary Application server) of SAP system and its corresponding Instance number, Subdomain and the System ID (SID).
How SAP NW Telemetry is captured
By leveraging SAP Control Web service interface:
- The SAP start service runs on every computer where an instance of an SAP system is started.
- It is implemented as a service(sapstartsrv.exe) on Windows, and as a daemon(sapstartsrv) on UNIX.
- The SAP start service provides the following functions for monitoring SAP systems, instances, and processes.
- These services are provided on SAPControl SOAP Web Service, and used by SAP monitoring tools.
SAPStartsrv binds at port(s):
- HTTP port 5<xx>13 or HTTPS port 5<xx>14, where <xx> is the number of the instance.
- The webservice interface can be implemented via the WSDL interface definition , and this can be obtained from the below WSDL
- https://<host>:<port>?/wsdl
- The above URL is used, to generate a client proxy in web service enabled programming environments like .Net, Python.
Pre-Requisite steps to onboard to AMS-NW Provider
- The SAPcontrol webservice interface of sapstartsrv differentiates between protected and unprotected Webservice Methods, Protected methods are executed only after a successful user Authentication, this is not required for unprotected methods.
- The parameter “service/protectedwebmethods”(RZ10) , determines what methods are protected, it can have two different _Default_ values, DEFAULT or SDEFAULT.
- Customers have to do the below to unprotect any methods to enable “SAP NW Provider”
- service/protectedwebmethods = SDEFAULT -GetQueueStatistic –ABAPGetWPTable –EnqGetStatistic –GetProcessList
- After you have changed the parameter, you have to restart the sapstartsrv service using the below:
sapcontrol -nr <NR> -function RestartService
- Below are the standard out of the box SOAP Webmethods that are used for V1 Release:
Web method
|
ABAP
|
JAVA
|
Metrics
|
GetSystemInstanceList
|
X
|
X
|
Instance Availability,Message Server,Gateway,ICM, ABAP Availability
|
GetProcessList
|
X
|
X
|
If instance list is RED, we can get what Process causing that server to be RED
|
GetQueueStatistic
|
X
|
X
|
Queue Statistics(DIA/BATCH/UPD)
|
ABAPGetWPTable
|
X
|
|
Work process utilization
|
EnqGetStatistic
|
X
|
X
|
Locks
|
Asks & Feedback:
AMS asks & feedback form
AMS links:
by Contributed | Apr 14, 2021 | Dynamics 365, Microsoft 365, Technology
This article is contributed. See the original author and article here.
Major shocks to supply and demand over the course of the pandemic have exposed the fragility and vulnerabilities of the global supply chain. One silver lining is the realization, across industries, that a more agile approach is needed. To stabilize supply chains, whether localized or on a global scale, every organization must architect resiliency into their supply chains, scaling operations to meet customers’ needs, and proactively overcome disruptions to ensure business continuity and operate profitably.
This year, at Hannover Messe Digital Edition, we are showcasing new Microsoft Dynamics 365 capabilities to help companies easily scale production and distribution, keep critical processes running, and ensure continuity on the frontlines of manufacturing. Learn more about how Microsoft Cloud for Manufacturing is helping create a more resilient and sustainable future through open standards and ecosystems.
Looking back to move forward: The ripple effect of semiconductor shortages
The ripple effect created by semiconductor shortages in the past year underpins the need for greater agility and resilience across supply chains. As demand for automobiles slowed down at the beginning of the pandemic, automobile manufacturers stocked less inventory of critical semiconductor components to keep operational costs low. During the same period, demand for consumer electronics like computers and tablets grew due to the surge in remote work and online schools. As a result, the same semiconductor manufacturing company that was supplying raw materials to automobile manufacturers increased its allocation to consumer electronics manufacturing companies.
When the demand for automobiles started to rise again in the latter part of 2020, automobile manufacturers struggled to ramp up production to meet demand due to shortages in critical semiconductor components, resulting in decreased revenue and temporary plant closures. To strengthen the supply chains of these critical raw materials and wither any geopolitical storms that can disrupt the supply chain for critical components coming from Asia and Europe, organizations worldwide have started to reconfigure their supply chain network and build new agile factories.
How Microsoft is helping to create more agile, resilient supply chains
IDC’s 2020 Supply Chain Survey1 explored how companies would manage risk and enable supply chain visibility to achieve supply chain resiliency. The focus for risk and visibility from most respondent companies were primarily in supply chain planning (57 percent) and end-to-end supply chain (56 percent) including visibility into factory (39 percent). The tools that the companies expected to use to enhance visibility includes best of breed and edge supply chain application, enterprise collaboration tools, specialized BI and analysis tools, and supplier or customer portal and workflow management solutionssolutions that align to our focus areas of innovation to help organizations architect resiliency into every level of the business, from supply chains to distribution to finance and service.
At Hannover Messe Digital Edition, we are also showcasing the new cloud and edge scale unit add-ins for Microsoft Dynamics 365 Supply Chain Management, which were previewed in October 2020, that enables companies to easily scale production and distribution during peaks and keep critical processes running at high throughput on the edge.
![Customers can set up a scale unit manager to activate an Edge scale unit or a cloud scale unit to scale production or distribution activities and overcome latency]()
We are also showcasing how manufacturers can use Mixed Reality with Dynamics 365 Supply Chain Management by integrating with Microsoft Dynamics 365 Guides. This enables manufacturers to reskill and cross-skill the frontline workers and augment their knowledge while they rapidly change factory layouts and bring new plants online.
![Customers can scan a QR code to see work instructions at their work cell while performing the task]()
Supply chain resiliency in action: Two success stories from the supply chain frontlines
Although the focus is now on resiliency, cost still needs to be controlled, and so simply ordering and holding more inventory is not the answer. What does hold promise is tighter integration and collaboration with both internal and external trading partners, faster access to data, and a new level of transparency and visibility into the end-to-end value chain made possible by digital transformation.
Wonder Cement builds a better foundation by connecting and scaling key business apps
Wonder Cement is a cutting-edge cement manufacturing company that has built its corporate culture on the values of quality, trust, and transparency. The company attributes its success to its relentless focus on customer service coupled with an emphasis on technological superiority.
Headquartered in Udaipur, Rajasthan, Wonder Cement operates three integrated cement plants and two grinding plants, with another scheduled to be online in the first quarter of 2021. Underpinning their success and growth is a reliance on innovative data technologies that enable them to maintain close connections with their markets and operations.
Wonder Cement recently brought wide-ranging process improvements to its business through the implementation of Microsoft Dynamics 365. The company is creating an improved foundation by connecting and scaling its most critical business apps. In the process, Wonder Cement has lowered inventory costs and reduced the time spent on transferring data between disparate systems. The company now has new visibility into its data and the resilience to succeed in the years ahead.
“We save 80 to 85 percent of the time we used to spend on moving data from the production system to our ERP now that everything runs on Dynamics 365. That’s a huge win for our company.” Arun Attri, Vice President (IT)
Explore how this customer-first cement company builds a better foundation by connecting and scaling key business apps with Dynamics 365.
CRC Industries aligns finance, operations, and supply chain management globally
CRC Industries has successfully created specialty products for the automotive, industrial, marine, aviation, and other markets for over 60 years. With customers in over 120 countries, seven manufacturing plants, and 26 facilities around the world, CRC has experienced almost continuous expansion over the past six decades.
As CRC grew, several unintegrated business solutions for finance, operations, and supply chain management were pieced together. The result was a mix of diverse systems that couldn’t communicate without significant manual intervention. This led to CRC being unable to take advantage of the cloud’s benefits and instead, having separate systems that reside on-premises at different locations across the globe.
“I consider Dynamics 365 the leading edge of the ERP frontier. Microsoft is listening to the customer and adapting quickly.”William McLendon, Global Manager Business Applications
In contemplating its future growth plans, CRC realized that its fragmented and disparate solutions were unsustainable. A push to standardize business processes, break down data silos, and create a single source of truth began. After considering other options, CRC selected Dynamics 365 Supply Chain Management.
“We made it our goal to standardize our business systems globally. We wanted to put the company on one enterprise resource planning solution throughout the world and have one way of doing business going forward.”Brent Laurin, Vice President of Global Operations
Learn more about how this specialty products and formulations company aligns finance, operations, and supply chain management globally with Dynamics 365.
What’s new in Dynamics 365 Supply Chain Management in April
Increase visibility of inbound goods and automate landed cost calculation to maximize profitability
The new landed cost module in Dynamics 365 Supply Chain Management provides an innovative way to streamline inbound shipping by giving users complete financial and logistical control over imported freight, from the manufacturer to the warehouse.
With this visibility, arrivals are predictable, and warehouse planning and efficiency are improved.
Some key business outcomes are:
- Optimize the receiving process: Shipment of inbound orders such as purchase orders or transfer orders can be defined and organized into various transportation legs that will provide immediate visibility of stock delays that might impact customer deliveries.
- Help organizations predict costs: Automatic cost calculations can be configured for various transportation modes, duties, and other fees incurred to get a product to the warehouse.
- Help reduce administration and costing errors: Simulate shipping scenarios to predict a standard cost price for an item.
Citt uses Dynamics 365 Supply Chain Management to streamline sourcing, procurement, and management of inbound goods in transit. Now, staff members know when to replenish inventory at each store in a timely manner so that products are in stock and aren’t overstocked.
Streamline and automate rebates and royalty management to increase your bottom line
Rebates and royalty have a significant impact on a company’s margin. The rebate calculation complexity and post-event timing of claims can cause challenges for businesses to accrue, automate and track the rebate in a cost-effective way.
Rebate management provides a central place to manage customer rebates, customer royalty, or vendor rebates. It will help to identify and trace the eligibility against overlapping and concurrent agreement with accuracy and automate the claim and payment process.
Some key business outcomes are:
- Centralize, streamline, and automate rebates and royalty program management with customers and vendors. It supports tiered pricing and volume rebates.
- Increase sales, improve margins, and remain competitive with simplified trade planning and real-time reporting such as spend versus rebates.
Overcome disruptions due to quality issues and obsolete parts to keep production running
Strong product data management, formula management, and change tracking of formulations are required to succeed in a world of constantly shrinking product lifecycles, increased quality and reliability requirements, and increased focus on product safety. This helps streamline and reduce the cost of managing product data, reduce errors in production, reduce waste when making design changes, and enable new formulas to be introduced in a controlled way.
Now, companies can manage changes in your process manufacturing master data, including formulas, planning items, co-products, by-products, and catch weight items.
Some key business outcomes are:
- Ensure compliance and on-time delivery by quickly responding to changing customer or supplier specifications, regulations, and safety standards, and seamlessly managing multiple formulations.
- Minimize disruptions caused by quality issues and obsolete ingredients by quickly assessing the impact and adjusting formulas through change management to ensure production lines are running every day.
Empower frontline workforce to work with confidence and improve overall warehouse operating efficiency
The warehouse management mobile application includes a fresh, contemporary design that is intuitive, easy to use, and supported by robust enhancements to core warehouse management logic that streamline processing. The solution is designed to help workers be more efficient, productive, and better able to complete work accurately.
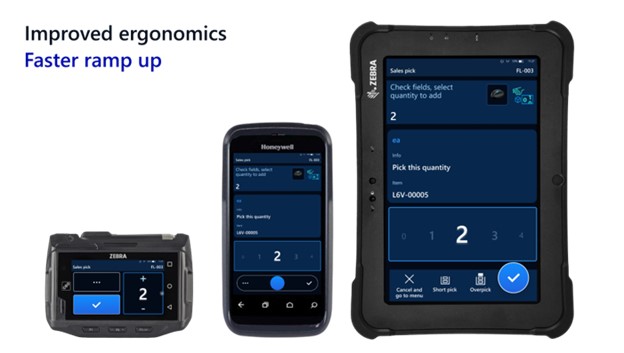
Some key business outcomes are:
- Improved worker efficiency with the most important information made easy to read and in large font, large input controls to quickly dial in quantities, and saved worker preferences and device-specific settings that can be managed centrally.
- Faster ramp-up of new workers with clear titles and illustrations for each step and full-screen photos to verify product selections.
- Improved ergonomics with a high-contrast design that provides clear text even on dirty screens, custom button locations to match each worker’s grip, device, and handedness, large touch targets that make the app easy to use with gloves, and possibilities to scale font and button size independent of each other.
- Alignment with Fluent Design System visual style and interaction, a similar user interface across Dynamics 365 Guides, and production floor execution interface.
Learn more about Dynamics 365 Supply Chain Management
Learn more about Dynamics 365 Supply Chain Management, how to build resilience with an agile supply chain, or if you are ready to take the first step towards implementing one of the most forward-thinking enterprise resource planning (ERP) solution available, then contact us to see a demo or start a free trial.
Find out what’s new and planned for Dynamics 365 Supply Chain Management and listen to our recent podcast “Preparing for your supply chain’s next normal” with Frank Della Rosa and Simon Ellis.
Learn how Microsoft Cloud for Manufacturing is helping create a more resilient and sustainable future through open standards and ecosystems.
1 IDC White Paper, sponsored by Microsoft, title, doc # US47207320 published in January 2021 – “A New Breed of Cloud Applications Powers Supply Chain Agility and Resiliency.”
The post Architecting resiliency in supply chains with Microsoft Dynamics 365 appeared first on Microsoft Dynamics 365 Blog.
Brought to you by Dr. Ware, Microsoft Office 365 Silver Partner, Charleston SC.

by Contributed | Apr 14, 2021 | Technology
This article is contributed. See the original author and article here.
This blog post is the second in a series of three that examines the results of a recent IDC study, Leveraging Microsoft Learning Partners for Innovation and Impact.* The first post, New study shows the value of Microsoft Learning Partners, provides a high-level look at the benefits of using a Learning Partner to meet your technical skilling needs.
We commissioned IDC researchers to explore the value of Microsoft Learning Partners, a worldwide network of authorized training providers that work with organizations to fill skill gaps and meet their strategic learning and business goals. In the first post, we explored how Microsoft Learning Partners can play a key role in delivering learning results that make a measurable difference in organizations’ cloud initiatives and digital transformation efforts.
Among the findings, four areas consistently stood out as essential capabilities. In this post, we dive into two of them—specifically, that organizations benefit from working with a Learning Partner which provides:
- An end-to-end solution that starts with consultation to identify needs and wraps up by evaluating the program’s success.
- Value-added services that support learners, such as hands-on labs and custom content.
The study identified two other top-of-mind areas that we’ll cover in our third post—the quality of the training content and delivery, and the flexibility, scale, and speed of the partner.
To learn more about all four qualities, download Top reasons to get IT training from a Microsoft Learning Partner.
Customized, end-to-end services help you assess gaps, simplify learning, and meet goals
Learning initiatives are usually complex, involving many people and moving parts. Rather than spin out various tasks to different providers, organizations can benefit from working with one provider that can deliver an end-to-end training solution.
Microsoft Learning Partners provide a range of capabilities that help enterprises build and execute successful training initiatives, including:
- Identifying an organization’s skill gaps. As consultants, Learning Partners work with their clients to offer proactive guidance and solutions. They work with organizations to identify the requirements and then align their services to meet a client’s specific needs, coordinating and delivering the resources that meet the objectives.
- Simplifying the learning initiative. By shifting the task to a Learning Partner, organizations can efficiently move their training programs forward. Learning Partners take care of the details, aligning the curriculum to the requirements, coordinating activities, and managing learning outcomes for their clients.
A mix of value-added services meet learners’ needs and deliver results
People learn best from a variety of tools and approaches, and flexibility is important, as Dan O’Brien notes. O’Brien is the President, United States and Canada, of Fast Lane, a worldwide provider of advanced IT education for leading technical vendors. “When we train [a large professional services firm], many of their staff are billable resources who can’t sit in a five-day class. We built a tailored training model specifically for this use case: We trained one day a week over five weeks, minimizing the impact on work performance.”*
Learning Partners make a difference in their scope of offerings, including hands-on labs, a mix of self-paced and instructor-led training, custom content, role-based learning paths, mentoring and discussion groups, and assessments before, during, and after the training. Services may also extend to preparation for certification exams.
Learning Partners give organizations the tools they need to successfully meet their business and learning goals through:
- Customized learning programs. Authorized Microsoft Learning Partners make training programs as relevant as possible for learners. They can use standard courses and learning paths, and they can tailor the content or flow to suit an organization’s unique situation.
- Training delivery aligned to client requirements. Some organizations want instructor-led training and boot camps, and some prefer e-learning. Learning Partners are experts at finding the right delivery model and experience for their customers.
Next step: Get the training program that’s right for you
Microsoft Learning Partners can help organizations get the most impact from their learning initiatives. The key is to find providers that offer end-to-end solutions and value-added services for learners of all types.
Find a Microsoft Learning Partner

Related posts
Sharpen your technical skills with instructor-led training
Leading Learning Partners Association—a unique organization for delivering Microsoft training
Need another reason to earn a Microsoft Certification?
Technical certifications could help drive business optimization
by Scott Muniz | Apr 14, 2021 | Security, Technology
This article is contributed. See the original author and article here.
Google and Microsoft recently published reports on advanced persistent threat (APT) actors targeting cybersecurity researchers. The APT actors are using fake social media profiles and legitimate-looking websites to lure security researchers into visiting malicious websites to steal information, including exploits and zero-day vulnerabilities. APT groups often use elaborate social engineering and spear phishing schemes to trick victims into running malicious code through malicious links and websites.
CISA recommends cybersecurity practitioners to guard against this specific APT activity and review the following reports for more information:
Additionally, CISA strongly encourages cybersecurity practitioners use sandbox environments that are isolated from trusted systems or networks when examining untrusted code or websites.

by Contributed | Apr 14, 2021 | Technology
This article is contributed. See the original author and article here.
Global AI Student Conference is an online streaming event, organized by Global AI Community and Microsoft Learn Student Ambassadors. The conference is being held for a second time; last time it was attended by more than 2500 people from all around the globe. You can check our sessions from the previous conference to get inspired to the upcoming event.
The main audience for this conference are students: both those who are just doing their first steps in AI, as well as more experienced ones. In fact, we call it “a conference organized for students, by students” – because it is largely organized by Microsoft Learn Student Ambassadors community.
All conference sessions are 30 minutes each, to accommodate comfortable online viewing. They can be grouped into 3 categories:
- 9 introductory sessions on AI, ranging from different ML algorithms, to Low Code/No Code ways to train your neural network model using visual tools. This section is coordinated by Kunal Kushwaha, founder or “Code for Cause” YouTube channel, where you can find a lot of introductory materials on AI and ML.
- 5 research sessions, in which students will describe their own projects in the area of AI and ML. You can check out complete schedule.
- 2 roundtables:
- In “How students can start with research, and why it is important” session we will discuss the best ways for students to start their research career. We will hear stories from students, doing research internships at large IT companies, as well as from university professors.
- A session “Grow your skills and empower others as a Microsoft Learn Student Ambassador” will focus more on Student Ambassador program. You will hear from Global program director, Pablo Veramendi, as well as from student ambassadors themselves.
We believe this conference is a good way for students both to make their first steps into the world of AI, and to get inspired by what other students are doing. Therefore we encourage our readers to share this news with students, and we would welcome them to join the conference as well. It is recommended to register, but one can also join live streaming on conference site on Saturday, April 24th!
by Contributed | Apr 14, 2021 | Technology
This article is contributed. See the original author and article here.
I recently had a need for a web part for a frequently asked questions list that was a bit more interactive than what I could find on the internet. So I decided to build one and once it was finished I thought it was a great resource to share.
Here’s what the web part looks like and an idea how it functions
TLDR: For a tutorial of how to build the whole thing from scratch check out this video: https://www.youtube.com/watch?v=oIr-rgGvUUk
A main driver for creating this web part was wanting something that didn’t look like SharePoint or an intranet. I spent some time looking for examples and inspiration from code samples, the Look Book, and intranet examples but I felt like I kept landing on the same accordion look and feel. Don’t get me wrong, I appreciate the accordion, I’ve even added it into my web part when you’re viewing all questions under a specific category – but was this really my only option? So I started looking at external sites and finally found something I thought was cool enough to build and the react-docCard-faq idea was born!
Now that I had a general idea of my data (questions and answers) and I’ve picked a layout I need to break out my questions into sub groups, something to separate them out by. That’s where the categories comes in, questions are grouped into categories. But I wasn’t finished there, what if, you don’t want to show every category. It could be that open enrollment questions only need displayed around that time or you’re launching a new product and only want to highlight it for a short period of time! So instead of always displaying every category in the FAQ list you can select which categories you want to view from the property pane when you add the web part to the page.
Use cases:
- A site can host a single FAQ list and only display certain categories on specific pages.
- Season change, Holiday’s, Enrollment time – all reasons you might want to change which categories (or how many) you’re showing
Once I had the idea that you might want to change which categories are showing and not just always display the same categories, the featured toggle came in. Adding an additional boolean column let’s us not only select which questions will be showing in main display, but it makes it incredibly easy for anyone managing the list (not the site) to add or change which questions will display in the document card.
Why in the world did I do a document card for FAQ? A few reasons for the specific design that includes so much white space.
First, I wanted something that doesn’t look like a standard intranet/internal site. The layout gives a modern, professional feel that could be on any external facing site.
Second, not every department/group/team knows what to share on their site or page but everyone needs FAQ’s! Because you control how many categories and questions are on the page, it can take up more or less depending on how you lay it out.
Third, it’s a great way to drive adoption to your questions. Tired of answering the same 3-6 questions over and over? Direct questions to your SharePoint site where all the answers are! Added bonus, no one has to wait on you to get back from vacation for an 1 sentence answer
Lastly, it drives whoever’s maintaining the list to keep it up to date. It’s not a set of boring questions and answers to go stale. With category options, a featured toggle, and the ability to write beautiful answers using rich text you’re empowered to take your FAQ to the next level!
I hope I’ve inspired you to think outside of the box and get creative!
Code: https://github.com/pnp/sp-dev-fx-webparts/tree/master/samples/react-doccard-faq
by Contributed | Apr 14, 2021 | Technology
This article is contributed. See the original author and article here.
In this technical blogpost we’re going to talk about the powerful combination of Azure Live Video Analytics (LVA) 2.0 and Intel OpenVINO DL Streamer Edge AI Extension. In our sample setup we will use an Intel NUC device as our edge device. You can read through this blogpost to get an understanding of the setup but it requires some technical skills to repeat the same steps so we rely on existing tutorials and samples as much as possible. We will show the seamless integration of this combination where we will use LVA to create and manage the media pipeline on the edge device and extract metadata using the Intel OpenVINO DL – Edge AI Extension module which is also managed through a single deployment manifest using Azure IoT Edge Hub. For this blogpost we will use an Intel NUC from the 10th generation but it can run on any Intel device. We will look at the specifications and performance of this little low power device and how well it performs as an edge device for LVA and AI inferencing by Intel DL Streamer. The device will receive a simulated camera stream and we will use gRPC as the protocol to feed images to the inference service from the camera feed at the actual framerate (30fps).
The Intel OpenVINO Model Server (OVMS) and Intel Video Analytics Serving (VA Serving) can utilize the iGPU of the Intel NUC device. The Intel DL Streamer – Edge AI Extension we are using here is based on Intel’s VA Serving with native support for Live Video Analytics. We will show you how easy it is to enable iGPU for the AI inferencing thanks to this native support from Intel.
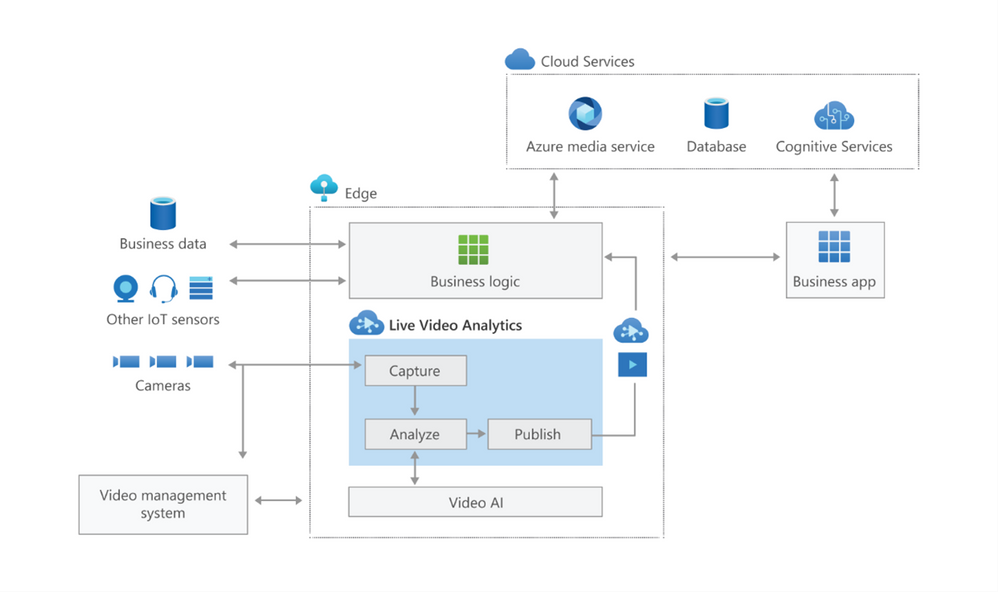
Live Video Analytics (LVA) is a platform for building AI-based video solutions and applications. You can generate real-time business insights from video streams, processing data near the source and applying the AI of your choice. Record videos of interest on the edge or in the cloud and combine them with other data to power your business decisions.
LVA was designed to be a flexible platform where you can plugin AI services of your choice. These can be from Microsoft, the open source community or your own. To further extend this flexibility we have designed the service to allow integration with existing AI models and frameworks. One of these integrations is the OpenVINO DL Streamer Edge AI Extension Module.
The Intel OpenVINO™ DL Streamer – Edge AI Extension module is a based on Intel’s Video Analytics Serving (VA Serving) that serves video analytics pipelines built with OpenVINO™ DL Streamer. Developers can send decoded video frames to the AI extension module which performs detection, classification, or tracking and returns the results. The AI extension module exposes gRPC APIs.

Setting up the environment and pipeline
We will walk through the steps to set up LVA 2.0 with Intel DL Streamer Edge AI Extension module and set it up on my Intel NUC device. I will use the three different pipelines offered by the Intel OpenVINO DL Streamer Edge AI Extension module. These include Object Detection, Classification and Tracking.

Once you’ve deployed the Intel OpenVINO DL Streamer Edge AI Extension module you will be able to use the different pipelines by setting environment variables, PIPELINE_NAME, PIPELINE_VERSION in the deployment manifest. The supported pipelines are:
PIPELINE_NAME |
PIPELINE_VERSION |
object_detection |
person_vehicle_bike_detection |
object_classification |
vehicle_attributes_recognition |
object_tracking |
person_vehicle_bike_tracking |
The hardware used for the demo
For this test I purchased an Intel NUC Gen10 for around $1200 USD. The Intel NUC is a small form device with good performance to power ratio. It puts full size PC power in the palm of your hands, so it is convenient as a powerful edge device for LVA. It comes in different configurations so you can trade off performance vs costs. In addition, it comes as a ready-to-run, Performance Kit or just the NUC boards for custom applications. I went for the most powerful i7 Performance Kit and ordered the maximum allowed memory separately. The full specs are:
- Intel NUC10i7FNH – 6 cores at 4.7Ghz
- 200GB M.2 SSD
- 64GB DDR4 memory
- Intel® UHD Graphics for 10th Gen Intel® Processors


Let’s set everything up
These steps expect that you have already set up your LVA environment by using one of our quickstart tutorials. This includes:
- Visual Studio Code with all extensions mentioned in the quickstart tutorials
- Azure Account
- Azure IoT Edge Hub
- Azure Media Services Account
In addition to the prerequisites for the LVA tutorials, we also need an Intel device where we will run LVA and extend it with the Intel OpenVINO DL Streamer Edge AI Extension Module.
- Connect your Intel device and install Ubuntu. In my case I will be using Ubuntu 20.10
- Once we have the OS installed follow these instructions to set up IoT Edge Runtime
- Install Intel GPU tools: Intel GPU Tools: sudo apt-get install intel-gpu-tools (optional)
- Now install LVA. Assuming you already have a LVA set up, you can start with this step
When you’re done with these steps your Intel device should be visible in your IoT Extension in VS Code.

Now I’m going to follow this tutorial to set up the Intel OpenVINO DL Streamer Edge AI Extension module: https://aka.ms/lva-intel-openvino-dl-streamer-tutorial
Once you’ve completed these steps you should have:
- Intel edge device with IoT Edge Runtime connected to IoT Hub
- Intel edge device with LVA deployed
- Intel OpenVINO DL Streamer Edge AI Extension module deployed
The use cases
Now that we have our setup up and running Let’s go through some of the use cases where this setup can help you. We’ll use the sample videos we have available to us and observe the results we get from the module..
Since the Intel NUC is a very small form factor it can easily be deployed in close proximity to a video source like an IP camera. It is also very quiet and does not generate a lot of heat. You can mount it above a ceiling, behind a door, on top or inside a bookshelf or underneath a desk to name a few examples. I will be using sample videos like a recording of a parking lot and a cafeteria. You can imagine a situation where we have this NUC located at these venues to analyze the camera feed.
Highway Vehicle Classification and Event Based Recording
Let’s imagine a use case where I’m concerned about the specific vehicle type and color using a specific piece of highway and want to know and see the video frames where these vehicles appear. We can use LVA together with the Intel DL Streamer – Edge AI Extension module to analyze a highway and trigger on a specific combination of vehicle type, color and confidence level. For instance a white van with a confidence above 0.8. Within LVA we can deploy a custom module like this objectsEventFilter module. The module will create a trigger to the Signal Gate node when these three directives are met. This will create an Azure Media Services asset which we can playback from the cloud. The diagram looks like this:

When we run the pipeline the rtsp source is split into the signal gate node that will hold a buffer of the video and it is send to the gRPC Extension node. The gRPC Extension will create images out of the video frames and feed into the Intel DL Streamer – Edge AI Extension module. When using the classification pipeline it will return inference results containing type attributes. These are forwarded as IoT messages and will feed into the objectsEventFilter module. We can filter on specific attributes to send a IoT message trigger the Signal Gate node with an Azure Media Services Asset as result.
In the inference results you will see a message like this:
{
      "type": "entity",
      "entity": {
        "tag": {
          "value": "vehicle",
          "confidence": 0.8907926
        },
        "attributes": [
          {
            "name": "color",
            "value": "white",
            "confidence": 0.8907926
          },
          {
            "name": "type",
            "value": "van",
            "confidence": 0.8907926
          }
        ],
        "box": {
          "l": 0.63165444,
          "t": 0.80648696,
          "w": 0.1736759,
          "h": 0.22395049
        }
      }
This is meeting our objectsEventFilter module thresholds which will give the following IoT Message:
[IoTHubMonitor] [2:05:28 PM] Message received from [nuclva20/objectsEventFilter]:
{
  "confidence": 0.8907926,
  "color": "white",
  "type": "van"
}
This will trigger the Signal Gate to open and forward the video feed to the Asset Sink node.
[IoTHubMonitor] [2:05:29 PM] Message received from [nuclva20/lvaEdge]:
{
  "outputType": "assetName",
  "outputLocation": "sampleAssetFromEVR-LVAEdge-20210325T130528Z"
}
The Asset Sink Node will store a recording on Azure Media Services for cloud playback.

Deploying objectsEventFilter module
You can follow this tutorial to deploy a custom module for Event Based Recording. Only this time we will use the objectsEventFilter module instead of the objectCounter. You can copy the module code from here. The steps are the same to build and push the image to your container registry as with the objectCounter tutorial.
I will be using video samples that I upload to my device in the following location: /home/lvaadmin/samples/input/
Now they are available through the RTSP simulator module by calling rtsp://rtspsim:554/media/{filename}
Next we deploy a manifest to the device with the environment settings that specify the type of model. In this case I want to detect and classify vehicles that show up in the image.
"Env":[
                    "PIPELINE_NAME=object_classification",
                    "PIPELINE_VERSION=vehicle_attributes_recognition",
Next step is to change the “operations.json” file of the c2d-console-app to reference the rtsp file. For instance if I want to use the “co-final.mkv” I set the operations.json file to:
{
  "name": "rtspUrl",
  "value": "rtsp://rtspsim:554/media/co-final.mkv"
}
Now that I have deployed the module to my device I can invoke the media graph by executing the c2d-console-app (i.e. press F5 in VS Code)
Note: Remember to listen for event messages by clicking on “Start Monitoring Built-in Event Endpoint” in the VS Code IoT Hub Extension.
In the output window of VS Code we will see messages flowing in a json structure. For the co-final.mkv using the object tracking for vehicles, persons and bikes we see output like this:
Timestamp: of the media, we maintain the timestamp end to end so you can always relate messages across media timespan.
Entity tag: Which type of object was detected (vehicle, person or bike)
Entity Attributes: The color of the entity (white) and the type of the entity (van)
Box: The box size and location on the picture where we detected this entity.
Let’s have a look at the CPU load of the device. When we SSH into the device we can type the command “sudo htop”. This will show details of the device load like CPU/Memory.

We see a load of ~32% for this model on the Intel NUC. It is extracting and analyzing at 30fps. So we can safely say we can run multiple camera feeds on this small device as we have plenty of headroom. We could also trade off fps to a allow even more camera feeds density per device.
iGPU offload support
- Right-click on this template and “generate a deployment manifest”. The deployment manifest is now available in the “edge/config/” folder
- Right click the deployment manifest and deploy to single device, select your Intel device
- Now execute the same c2d-console-app again (press F5 in VS Code). After about 30 seconds you will see the same data again in your output window.


Here you can see the iGPU is showing a load of around ~44% to run the AI tracking model. At the same time we see a 50% decrease of CPU usage compared to the first run which was using only CPU. We still observe some CPU activity because the LVA media graph still uses the CPU.
To summarize
In this blogpost and during the tutorial we have walked through the steps to:
- Deploy IoT Edge Runtime on an Intel NUC.
- We connected the device to our IoT Hub so we can control and manage the device using the IoT Hub together with the VS Code IoT Hub Extension.
- We used the LVA sample to deploy LVA onto the Intel device.
- In addition we took the Intel OpenVINO – Edge AI Extension Module and deployed this onto the Intel Device using IoT Hub.
This enables us to use the combination of LVA and Intel OpenVINO DL Streamer Edge AI Extension module to extract metadata from the video feed using the Intel pre-trained models. The Intel OpenVINO DL Streamer Edge AI Extension module allows us to change the pipeline by simply changing variables in the deployment manifest. It also enables us to make full use of the iGPU capabilities of the device to increase throughput, inference density (multiple camera feeds) and use more sophisticated models. With this setup you can bring powerful AI inferencing close to the camera source. The Intel NUC packs enough power to run the model for multiple camera feeds with low power consumption, low noise and in a small form factor. The inference data can be used for your business logic.
Call to actions
by Contributed | Apr 14, 2021 | Technology
This article is contributed. See the original author and article here.
We all sometimes create presentations with some PowerShell demos. And often, we need to use credentials to log in to systems for example PowerShell when delivering these presentations. This can lead that we don’t use very strong passwords because we don’t want to type them during a presentation, you see the problem? So, here is how you can use the PowerShell SecretManagement and SecretStore modules to store your demo credentials on your machine.
Doing this is pretty simple:
Install the SecretManagement and SecretStore PowerShell modules.
Install-Module Microsoft.PowerShell.SecretManagement, Microsoft.PowerShell.SecretStore
Register a SecretStore to store your passwords and credentials. I this example we are using a local store to do that. Later in this blog post, we will also have a look at how you can use Azure Key Vault to store your secrets. This is handy if you are working on multiple machines.
Register-SecretVault -Name SecretStore -ModuleName Microsoft.PowerShell.SecretStore -DefaultVault
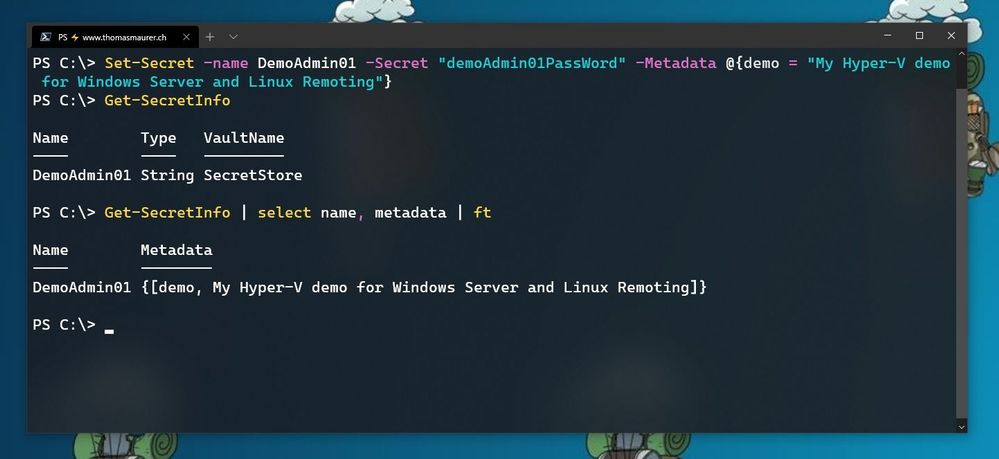
Now we can store our credentials in the SecretStore. In this example, I am going to store the password using, and I will add some non-sensitive data as metadata to provide some additional description.
Set-Secret -name DemoAdmin01 -Secret "demoAdmin01PassWord" -Metadata @{demo = "My Hyper-V demo for Windows Server and Linux Remoting"}
Store Secret in PowerShell SecretStore
Now you can start using this secret in the way you need it. In my case, it is the password of one of my admin users.
$DemoAmdin01secret = Get-Secret -Vault SecretStore -Name DemoAdmin01
$DemoAmdin01Cred = New-Object -TypeName PSCredential -ArgumentList "DemoAdmin01", $DemoAmdin01secret
These two lines, I could also store in my PowerShell profile I use for demos, or in my demo startup script. In this case, the credential object is available for you to use.
 Use SecretStore crednetials
If you are using multiple machines and you want to keep your passwords in sync, the Azure Key Vault extension.
Install-Module Az.KeyVault
Register-SecretVault -Module Az.KeyVault -Name AzKV -VaultParameters @{ AZKVaultName = $vaultName; SubscriptionId = $subID}
Now you can store and get secrets from the Azure Key Vault and you can simply use the -Vault AzKV parameter instead of -Vault SecretStore.
I hope this blog provides you with a short overview of how you can leverage PowerShell SecretManagement and SecretStore, to store your passwords securely. If you want to learn more about SecretManagement check out Microsoft Docs.
I also highly recommend that you read @Pierre Roman blog post on leveraging PowerShell SecretManagement to generalize a demo environment.

Recent Comments