by Contributed | Apr 20, 2021 | Technology
This article is contributed. See the original author and article here.
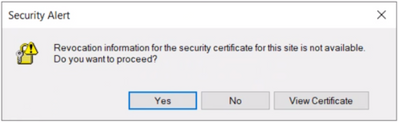
User may get the following security alert on certificate resigning SSL when trying to connect with any of the AAD options from SSMS:
“Revocation information for the security certificate for this site is not available. Do you want to proceed?”
Yes No View Certificate
This happens when a client using Internet Explorer (IE) sends a request to an Online Certificate Status Protocol (OCSP ) server to verify if the certificate has been revoked. If the IE browser is configured to expect an OCSP response and it’s not able to determine the revocation status of the certificate, the user gets prompted with the above security alert. Chrome is not affected because it disabled OCSP checks by default in 2012, due to latency and privacy issues.
Mitigation steps:
To fix Server certificate revocation failed problems, a workaround is to turn off this setting – “Check for server certification revocation” in IE options, which will disable this for all OAUTH negotiations system-wide. To disable this option, perform the following steps.
- Type gpedit.msc in windows search and click OK.
- Navigate to Computer Configuration > Administrative Templates > Windows Components > Internet Explorer > Internet Control Panel > Advanced Page or Internet Explorer > Tools > Internet options > Advanced
 check for server certificate revocation
- Uncheck “Check for server certificate revocation”.
- Reboot the server. *IMPORTANT: It takes effect after you restart your computer.
- Remove CRL/OCSP disk cache entries on the client machine. From the Windows command line run:
> certutil -urlcache CRL delete
> certutil -urlcache OCSP delete
- Perform “Clear SSL state” in Internet Explorer > Internet Options > Content.
On the client machine run gpupdate /force in the CMD window to force update the group policy. You can apply the GPO under user configuration, so the corresponding registry change will be under HKEY_CURRENT_USER.
Open Registry Editor and go to the path HKEY_CURRENT_USERSOFTWAREPoliciesMicrosoftWindowsCurrentVersionInternet SettingsCertificateRevocation with REG_DWORD 0
Open IE and check the setting, it should be disabled.
Troubleshooting connectivity with AAD options:
Open a PowerShell with administrative rights from the troublemaking machine and run below commands.
#OPTION 1 – bypass SQL Azure DB to see if your communication works with Azure AD from your machine
> Install-Module MSOnline > Import-Module MSOnline > $Msolcred = Get-credential
# use your federated credenaials (i.e john@contoso.com + password)

> Connect-MsolService -Credential $MsolCred
and check the federated authentication group
> Get-MsolGroup -MaxResults 10 –Searchstring  mygroup@contoso.com | format-list
# displays group info as it is represented in Azure AD (i.e. mygroup or check the individual user)

> Get-MsolUser -UserPrincipalName john@contoso.com | format-list
You should see what is stored in Azure AD under a specific user or group alias/name.
#OPTION 2 – Check the minimum connectivity requirement
Check connectivity to AAD endpoint for Password and Integrated authentication:
> tnc login.windows.net -port 443
Check connectivity to AAD endpoint for Universal with MFA authentication:
> tnc login.microsoftonline.com -port 443
Note that additional endpoints might be required, depending on AAD and on-premises AD setup. Capturing and debugging network or Fiddler traces is what usually helps in those situations.
Additional points to check – Make sure the firewall configuration is correctly set up
- Check your firewall settings and make sure it allows communication with the above AAD endpoints: login.windows.net and login.microsoftonline.com.
- Ensure the AAD required ports are not blocked by the firewall.
Note: The above error is mostly triggered when using SSMS. Azure Data Studio doesn’t have this issue because it has a custom MFA implementation that doesn’t use an old embedded IE browser.
by Contributed | Apr 20, 2021 | Technology
This article is contributed. See the original author and article here.
Hello folks,
A couple weeks ago I wrote about how I leveraged PowerShell SecretManagement to generalize a demo environment. In that article I only talked about Windows virtual machines running in Azure. However, my colleague Thomas Maurer revisited the topic in his article, Stop typing PowerShell credentials in demos using PowerShell SecretManagement. Thomas really concentrated on how the local Secret Store can help when you have demos of local scripts that need secrets, versus my article that concentrated more on how the SecretManagement module paired with the Az.KeyVault module can help manage not only demo environment but help manage local accounts across production environments.
In response to both these articles we got a lot of questions, so I decided to address one of them here.
Will it work for linux?
Absolutely, you can have PowerShell on Linux, and import the modules mentioned in the articles.
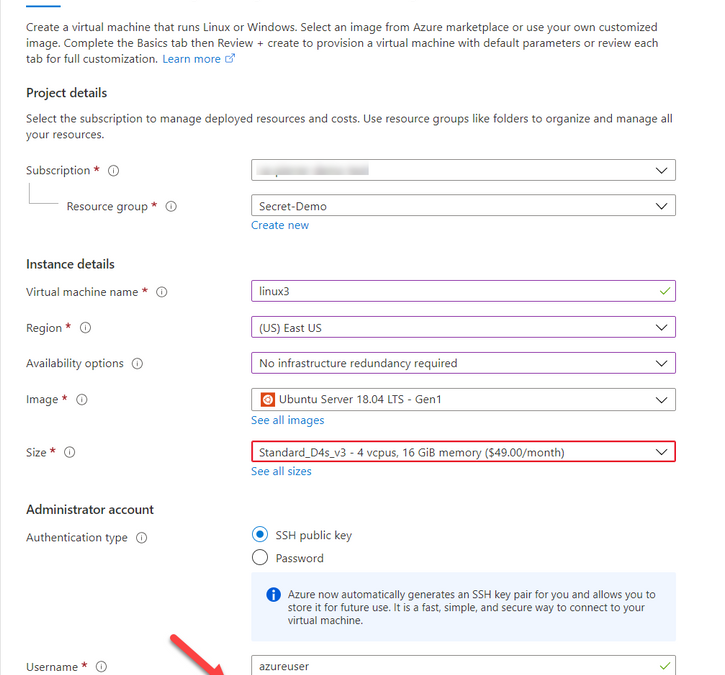
One of the differences that in most case we use SSH keys to access a VM running in Azure. And Azure has a couple ways of storing that information. When creating a VM you can Generate one at deployment, upload your own, or use an existing one already in azure.

When using “Use existing one stored in Azure” it refers to a separate repo in azure different than Azure Key Vault. It actually saves the key in a portal service SSK Keys.

The SSH Keys portal service does give you the ability to get the public key so you can connect to the appropriate VMs.

In the production environment that I’m currently involved we do not allow public IP assigned to VMs without a proper business case. I actually agree with this policy. So, we use Azure Bastion. Connecting using Azure Bastion offers the possibility to use one of several ways to authenticate to the VMs.
- Password
- SSH Private Key
- SSH Private Key from Local File
- SSH Private Key from Azure Key Vault
By using Azure Key Vault you can also manage the SSH keys by setting expiration dates, apply proper versioning, assign tags AND have them available to the Azure Bastion with the option of requesting the Passphrase.

Just like my previous article. You can even schedule an Azure Automation task, or an Azure Function to monitor the expiration dates and renewregenerate the SSH Keys for you.
I used the same Azure automation as the last article with a new runbook to create the SSH keys for my environment and store them in Azure Key Vault
param(

    [string]$ResourceGroupName = "Secret-Demo",
    [string]$vaultname = "SecretDemoVault"

)
Disable-AzContextAutosave -Scope Process

$VERSION = "1.0"
$SecretStoreName = "AzKeyVault"
$currentDay = (get-date).ToString("dMyyyyhhmmtt")
$ExpirationDate = (GET-DATE).AddMonths(2)

Write-Output "Runbook started. Version: $VERSION at $currentDay"
Write-Output "---------------------------------------------------"

# Authenticate with your Automation Account
	$connection = Get-AutomationConnection -Name AzureRunAsConnection
    # Wrap authentication in retry logic for transient network failures
    $logonAttempt = 0
    while(!($connectionResult) -and ($logonAttempt -le 10))
    {
        $LogonAttempt++
        # Logging in to Azure...
        $connectionResult = Connect-AzAccount `
                                -ServicePrincipal `
                                -Tenant $connection.TenantID `
                                -ApplicationId $connection.ApplicationID `
                                -CertificateThumbprint $connection.CertificateThumbprint

        Start-Sleep -Seconds 30
    }

# Set Azure Context

    $AzureContext = Get-AzSubscription -SubscriptionId $connection.SubscriptionID
    $SubID = $AzureContext.id
    Write-Output "Subscription ID: $SubID"
    Write-Output "Resource Group: $ResourceGroupName"
    Write-Output "VaultName: $vaultname"
    Write-Output "Local store name: $SecretStoreName"

#Create Password

    $Length = 24
    $characters = @([char[]]@(48..57),[char[]]@(65..90),[char[]]@(97..122),@('!','#','%','^','*','(',')','-','+','/','{','}','~','[',']'))
    $SSH_KEY_PASSWORD = ($Characters | Get-Random -Count $Length ) -join ''

# Register keyvault

Register-SecretVault -Name $SecretStoreName -ModuleName Az.KeyVault -VaultParameters @{ AZKVaultName = $vaultname; SubscriptionId = $SubID }

# create key and set it in Key Vault

$KeyPath = $env:TEMP
Write-Output "Key File path: $KeyPath"


New-RSAKeyPair -Length 2048 -Password $password -Path $KeyPathid_rsa -Force

$SSH_PRIVATE_KEY = Get-Content $KeyPath/id_rsa
$SSH_PUBLIC_KEY = Get-Content $KeyPath/id_rsa.pub
$SSH_PUBLIC_PEM = Get-Content $KeyPath/id_rsa.pem


Write-Output "SSH Passphrase: $SSH_KEY_PASSWORD"
Write-Output "SSH private Key: $SSH_PRIVATE_KEY"
Write-Output "SSH public Key - pub: $SSH_PUBLIC_KEY"
Write-Output "SSH public Key - pem: $SSH_PUBLIC_PEM"


Set-Secret -Name "SSH-Passphrase-demo" -Secret $SSH_KEY_PASSWORD -Vault $SecretStoreName
Set-Secret -Name "SSH-PrivateKey-demo" -Secret $SSH_PRIVATE_KEY -Vault $SecretStoreName
Set-Secret -Name "SSH-PublicKey-demo" -Secret $SSH_PUBLIC_KEY -Vault $SecretStoreName
Set-Secret -Name "SSH-PublicKeypem-demo" -Secret $SSH_PUBLIC_PEM -Vault $SecretStoreName
Please note that this runbook uses the New-RSAKeyPair cmdlet from the PEMEncrypt module imported in my Automantion environment from the PowerShell Galery.
Now, again this is a proof-of-concept piece of code. For production use a lot of changes would be required (not an exhaustive list)
- Expiration dates you be set.
- A function to validate that the afore mentioned expiration is not imminent.
- A function to update the key on each Linux VM in a set environment.
- …
So, in conclusion, yes, you can use these new module on a Linux VM of you can use these new modules to help you manage the access to these VMs.
I hope this helps.
Cheers!
by Contributed | Apr 19, 2021 | Technology
This article is contributed. See the original author and article here.
Final Update: Tuesday, 20 April 2021 00:58 UTC
We’ve confirmed that all systems are back to normal with no customer impact as of 04/20, 00:45 UTC. Our logs show that the incident started on 04/20, 00:04 UTC and that during 41 minutes that it took to resolve the issue some of the customers might have experienced data access issue and delayed or missed Log Search Alerts in Australia South East region.
- Root Cause: The failure was due to an issue in one of our backend services.
- Incident Timeline: 41 minutes – 04/20, 00:04 UTC through 04/20, 00:45 UTC
We understand that customers rely on Azure Log Analytics as a critical service and apologize for any impact this incident caused.
-Saika
by Contributed | Apr 19, 2021 | Technology
This article is contributed. See the original author and article here.
Last month at Ignite we announced the Preview of new M-series VMs and after a successful preview, we are pleased to announce the general availability (GA) of Msv2/Mdsv2 Medium Memory VMs. This offering complements the Msv2 High Memory sizes launched in Oct 2019 and now provides the high performing CPU even for medium memory workload needs. With this new GA offering, M-series customers have three options to select from based on their workload needs:
Msv2/Mdsv2 Medium Memory: Based on Cascade Lake processor providing up to 4TiB of memory and 192vCPU.
Msv2 High Memory: Based on Skylake processor providing up to 12TB of memory and 416 vCPU.
Msv1 (aka M-series) Medium Memory: Based on Haswell processor (can run on Cascade Lake as well) providing up to 4TB of memory and 128vCPU.
These Msv2/Mdsv2 Medium Memory virtual machines are targeting in memory workloads like SAP database, including SAP HANA. The virtual machines are delivering more throughput for the same price as their predecessor units and lower the TCO for CPU intensive SAP database workloads.
Key features of the new M-series VMs for memory-optimized workloads
- Runs on Intel® Xeon® Platinum 8280 (Cascade Lake) processor offering a 20% performance increase compared to the previous version.
- Available in both disk and diskless offerings, allowing customers the flexibility to choose the option that best meets their workload needs.
- New isolated VM sizes with more CPU and memory that supports up to 192 vCPU with 4TiB of memory, so customers have an intermediate option to scale up before going to a 416 vCPU VM size.
Spec
For the VM Sizes spec please take a look here.
Regional Availability and Pricing
The VMs are available in the following regions at GA
- West US 2
- West Europe
- Central US
- South Central US
- East US
For pricing details, please take a look at Mdsv2/Msv2 Medium Memory series for Windows and Linux.
by Contributed | Apr 19, 2021 | Technology
This article is contributed. See the original author and article here.
CSI: Redmond – Episode 1 “Mistaken Identity”
Episode Story Line:
A mild mannered IT administrator is doing routine patching when things go south. At first it seems like maybe just a case of the wrong patch for the wrong system but there is more to this story. Time to put our detective skills to use and find out what’s going on.
The Investigation:
Any patch installation investigation failure should start with the basics, aka the Application/System/Security event logs. In this case, the normal logs simply re-state the error message displayed on screen so no help there…it looks like we’re already past the basics.

If you have ever performed troubleshooting on in-depth patch installation, the CBS log (c:WindowsLogsCBSCBS.log) is your go to source and contains a wealth of information on the installation process, some would say too much information. But that’s why we’re here today, to help find the clues to solve the crime.
In this case, if you go directly to the end of the CBS log after attempting to install the patch, you should see the tail end of the process. We don’t have to look too far before seeing signs of a problem: ERROR_NOT_SAME_DEVICE… what’s that all about?

One trick I use in sifting through the large amount of data in the CBS.log is to search for key words, like “ERROR” or “FAIL”, but in the clues we are searching for can quickly be found by searching for the term “CSI” (see where the title of this post comes from?). CSI stands for Component Servicing Infrastructure and is responsible for putting the patch files on the system. If you are getting errors due to permissions or possibly from antivirus products, this is the category you want to look for. Don’t forget to search in the “Up” direction…gets me every time. Note the line below found while searching the CSI messages. The reference to Volume serial number as well as the name of the target file, which references a group policy administrative template, were instrumental fingerprints in this case.

Now, let’s go take a look at that location to see if anything looks wonky. The first thing we notice is that there is a PolicyDefinitions_old folder, which appears to be a backup of the unchanged folder…at least our suspect is cautious. Notice the “Shortcut” icon on the new PolicyDefinitions folder. Things are starting to heat up…getting warmer.

To get more information on the folder, let’s go to PowerShell and take a look at the object with Get-Item C:WindowsPolicyDefinitions | fl *. While the FullName field looks correct, the Target field references another volume entirely. This is what is causing the patch installation to fail. After talking to the server owner, it came to light that a GPO management tool was installed on the system and the link was created to assist the product manage the admin templates. The actual software had been installed on a different volume, hence the Junction point going to a different drive.

The Fix:
The fix for this situation was to remove the Junction point and re-create the PolicyDefinitions folder so that the patch could install the new templates. Since the Junction was a requirement, we had to copy the new admin templates to the target folder and then restore that junction point temporarily but are actively working to come up with a solution that does not trigger the different volume problem.
Another tough issue put to bed but I’m sure many more will follow.
by Contributed | Apr 19, 2021 | Technology
This article is contributed. See the original author and article here.
Initial Update: Monday, 19 April 2021 23:25 UTC
We are aware of issues within Log Analytics and are actively investigating. Some customers may experience data access issue and delayed or missed Log Search Alerts in West Europe region.
- Work Around: None
- Next Update: Before 04/20 02:30 UTC
We are working hard to resolve this issue and apologize for any inconvenience.
-Saika
![[Guest Blog] My Journey from McDonald's to Microsoft](https://www.drware.com/wp-content/uploads/2021/04/fb_image-148.jpeg)
by Contributed | Apr 19, 2021 | Technology
This article is contributed. See the original author and article here.
This blog is written by by Taiki Yoshida, a Microsoft employee who specializes in Power Apps and low-code development. He shares his non-traditional career journey, from an entry-level job at McDonald’s to landing his dream job in Microsoft’s product engineering team. He hopes to empower individuals to do more through low-code at Microsoft.
I still remember the day I first touched a computer – a Windows 95 that my mother had setup for work. I was 5 years old but I remember the spark of excitement that was in me. Today, after 25 years, I have that same spark inside me.
I was born and raised in Japan by my mother. As a single parent, she did her best to give me an opportunity to learn. One of which was for me to go to a boarding school in the United Kingdom at 11 years old. I studied hard with a choice of Math, Further Math, and Physics in A-Levels (University entry qualifications in UK), and it was natural for me to apply for a masters degree in computer science. I was given an offer at the University of London and Imperial College London. It was all going well.
When everything changed
After graduating high school in the summer of 2009, my mother fell ill. I could no longer afford to go to university. I had to take care of her and had no choice but to return to Japan, giving up my university offers. Upon arrival back to Japan, I became the single source of income. My mother had debts to pay off and I needed to quickly find a job. There was nothing that I could apply for in IT with no degree or work experience. I couldn’t apply for university in Japan as I had not met the Japanese educational requirements since I studied abroad.
After many job offer declines, the only remaining place I could apply was McDonald’s. I felt devastated at the time, but now looking back, it was a great experience to have. With people from the most diverse set of backgrounds – High school students, University students, pensioners, moms, dads, this was the first place where I learned about “community”.
 At McDonald’s store
My first IT job
After several months working full-time in McDonald’s I ended up a “swing manager” (temp-store manager) but my passion to work in IT remained deep. I continuously applied for jobs in IT. Seven months in, I finally started my IT-career at a mat manufacturing company Kleen-Tex – where they were looking for a temporary IT helpdesk at the Japan subsidiary. Although I had no IT work experience, they gave me a chance. After 3 months, they offered me full-time work. Initially, my work was focused on answering and solving problems from employees, but then came my first big opportunity. The company decided to implement Microsoft Dynamics NAV (an ERP system now known as Dynamics 365 Business Central). As you may have noticed by now, I had no knowledge or experience around that. The only thing I could do was to web search my way through. Being able to experience an ERP implementation was a huge game changer for me. From Finance, Inventory, Sales, Purchase, Logistics, Manufacturing – I got firsthand experience with it all and actually saw it in action at the company. The project eventually expanded to implementing it to a subsidiary in Thailand where I acted as a project manager based on the experiences in the Japan subsidiary.
.jpg") ERP Project team at Kleen-Tex
ERP Project team at Kleen-Tex
Moving from an End-User to Consulting company
By the time I finished implementing Dynamics NAV, I was 21. I was fully in love with the product and how it had the power to be able to capture and assist all aspects of the business. I wanted to scale this experience. I wanted to do the same as Kleen-Tex, but for more companies. I tried applying to many IT companies but almost all of them declined because I didn’t have a university degree with one exception. Ryo – the director from the Microsoft partner, Pacific Business Consulting who had helped me in the first company, reached out to me as he noticed my work and did not have prejudice over my education. Once I joined the team, I was immediately assigned to work as an application consultant, mainly working on global and cross-continent projects as I could speak both English and Japanese. Two years had gone by and with the total of five years in Dynamics NAV, I didn’t want to just focus on becoming an ERP specialist, and decided to move on to another partner, Japan Business Systems, where they focused on Dynamics CRM (a.k.a. Dynamics 365). My boss, Masa, was coincidently a Microsoft MVP.
A community newbie to a Microsoft MVP
I didn’t really know what a Microsoft MVP was, but Masa shared and introduced me to how great Microsoft communities are. I started visiting the Office 365 User Group, then the Japan Azure User Group, and so on. I was reaching a point where I was going to at least one community event each week to learn about new things! I found it absolutely amazing to know that these user groups and communities were being held for free. Until I knew about the community, I was always alone, searching for knowledge, but in these events, you gain so much more than that. That was when I realized I wanted to present too – I want to output what I learned from others so that I could “Pay it forward.” Presenting and writing blog posts also helped me as it allowed me to have a better knowledge and deeper understanding of things. Through the contributions, in 2016, I became a Microsoft MVP for the Business Solutions category.
 Microsoft MVP
Joining Microsoft
2016 was a very special year. Microsoft MVP was definitely one reason, but the other, was that I was introduced to Power Apps (a low-code/no-code tool for application development). I was given access to a private preview and could immediately see the world it would become. With PowerApps, people no longer had to be pro-developers or an IT guru to build apps. Although I had blog posts about Dynamics 365 and others, I had already fallen in love with this product and it became the most passionate thing on my blog and community events.
After 1 year as an MVP, I was working at EY and in late autumn 2017 a Microsoft recruiter reached out to me via LinkedIn. I remember it very clearly as I picked up the phone and the lady said “I have an interesting role for you, it is a Global Black Belt role for a product you’ve probably never heard of… It’s called PowerApps.” I was only just 7 months into the role at EY, but there was no way I was going to let that opportunity go. In fact, I wanted that job so badly, I presented my resume in PowerApps (I still keep a copy of it in my personal Office tenant).
 Microsoft Redmond Campus
Scaling my Power Apps love
With a big company like Microsoft, I imagined a designated team focusing on Power Apps in Japan, but in reality, I was the first person in Japan hired for this. I had to quickly think of a way I could let people know of Power Apps, but with myself as the only person to do so. In April 2018, I started the Japan Power Apps user group (JPAUG). I felt that the best way to share my passion was through the community. I wanted to create a user group where not just pro-devs and IT admins join, but a group where all you had to believe in was Paying it forward. That was all I asked for. I would spend every day on Twitter and Facebook posts, replying to each and every Japanese tweets. Today, the group has grown to over 1700 users, with great MVPs based not just in Tokyo, but widely spread across all of Japan.
 Japan Power Platform User Group – Summer 2019
Senior Program Manager in Power Platform engineering team
I was a technical a salesperson at the time, but my passion to the product was beyond what was written in the job description and sales targets. I wanted to empower everyone to be able to create apps.
I was naturally in tears when I first saw the story of Samit Saini from London Heathrow at Microsoft Ignite 2018.
Samit’s story was just one of many other success stories to follow, and I saw the great stories and experiences that were published from Power Apps Customer Advisory Team (a.k.a. Power CAT) – a small team that is part of the product engineering team focusing on Power Apps, Power Automate and Power Virtual Agents. Working as a Global Black Belt was definitely an awesome experience without a doubt, but I wanted to go beyond just selling the product and see the customers use the product in action—make sure that all of the customers are successful as much as Samit was and to scale the success to others. So I reached out to the manager, Saurabh, to apply for a position in the UK. The team was only a five person team. Unfortunately, having no degree also stopped me from being able to relocate to the UK due to restrictions in visas, but Saurabh was kind enough to open a position for me in Japan (this really doesn’t happen often!!) and even support me to explore options to work abroad as that was one of my dreams.
Since then, I have helped customers in Japan, Singapore, Australia, Prague, the Netherlands, Qatar, and the United States, as well as published content through blog posts and Microsoft Docs—allowing me to be able to work on something that I’m truly passionate about 24/7. And now, after nearly two years with this awesome Power CAT team, I will be relocating to Redmond in May 2021 to continue being a Power CAT. I hope to further empower people through low-code with bigger impacts than ever before!
Since then, I have helped customers in Japan, Singapore, Australia, Prague, Netherlands, Qatar and United States, as well as publish contents through blog posts and Microsoft Docs – being able to work on something that I’m truly passionate with 24/7.
And now, after nearly two years in this awesome Power CAT team, I will be relocating to Redmond in May continue being a Power CAT – and I hope to further empower people through low-code even more with bigger impacts than ever before!
 Power CAT – Sept 2019
Lastly…
I just would like to send kudos to the awesome MVPs who’ve helped my Power Apps journey – Taichi, Hiro, Ryota, Makoto, Teruchika, Noriko, Jun, Kazuya, Yoshio, Takeshi, Yugo, Ai, Masayuki, Hirofumi and Ryo, my two awesome managers, Marc and Saurabh for supporting my dreams, my wife who has always been fully supportive of my passion, and lastly, to Microsoft for providing me with this opportunity to become who I am today.
by Contributed | Apr 19, 2021 | Technology
This article is contributed. See the original author and article here.
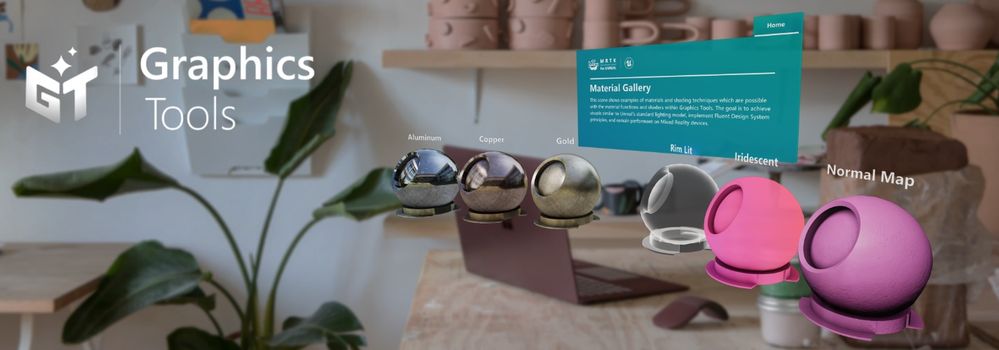
Unreal Engine allows developers to create industry-leading visuals for a wide array of real-time experiences. Compared to other platforms, mixed reality provides some new visual challenges and opportunities. MRTK-Unreal’s Graphics Tools empowers developers to make the most of these visual opportunities.
Graphics Tools is an Unreal Engine plugin with code, blueprints, and example assets created to help improve the visual fidelity of mixed reality applications while staying within performance budgets.
When talking about performance in mixed reality, questions normally arise around “what is visually possible on HoloLens 2?” The device is a self-contained computer that sits on your head and renders to a stereo display. The mobile graphics processing unit (GPU) on the HoloLens 2 supports a wide gamut of features, but it is important to play to the strengths and avoid the weaknesses of the GPU.
On HoloLens 2 the target framerate is 60 frames per second (or 16.66 milliseconds for your application to preset a new frame). Applications which do not hit this frame rate can result in deteriorated user experiences such as worsened hologram stabilization, hand tracking, and world tracking.
One common bottleneck in “what is possible” is how to achieve efficient real-time lighting techniques in mixed reality. Let’s outline how Graphics Tools solves this problem below.
Lighting, simplified
By default, Unreal uses the mobile lighting rendering path for HoloLens 2. This lighting path is well suited for mobile phones and handhelds, but is often too costly for HoloLens 2. To ensure developers have access to a lighting path that is performant, Graphics Tools incudes a simplified physically based lighting system accessible via the MF_GTDefaultLit material function. This lighting model restricts the number of dynamic lights and enforces some graphics features are disabled.
If you are familiar with Unreal’s default lighting material setup, the inputs to the MF_GTDefaultLit function should look very similar. For example, changing the values to the Metallic and Roughness inputs can provide convincing looking metal surfaces as seen below.

If you are interested in learning more about the lighting model it is best to take a peek at the HLSL shader code that lives with the Graphics Tools plugin and read the documentation.
What is slow?
More often than not, you are going to get to a point in your application development where your app isn’t hitting your target framerate and you need to figure out why. This is where profiling comes into the picture. Unreal Engine has tons of great resources for profiling (one of our favorites is Unreal Insights which works on HoloLens 2 as of Unreal Engine 4.26).
Most of the aforementioned tools require connecting your HoloLens 2 to a development PC, which is great for fine grained profiling, but often you just need a high-level overview of performance within the headset. Graphics Tools provides the GTVisualProfiler actor which gives real-time information about the current frame times represented in milliseconds, draw call count, and visible polygon count in a stereo friendly view. A snapshot of the GTVisualProfiler is demonstrated below.

In the above image a developer can, at a glance, see their application is limited by GPU time. It is highly recommended to always show a framerate visual while running & debugging an application to continuously track performance.
Performance can be an ambiguous and constantly changing challenge for mixed reality developers, and the spectrum of knowledge to rationalize performance is vast. There are some general recommendations for understanding how to approach performance for an application in the Graphics Tools profiling documentation.
Peering inside holograms
Many developers ask for tools to “peer inside” a hologram. When reviewing complex assemblies, it’s helpful to cut away portions of a model to see parts which are normally occluded. To solve this scenario Graphics Tools has a feature called clipping primitives.
A clipping primitive represents an analytic shape that passes its state and transformation data into a material. Material functions can then take this primitive data and perform calculations, such as returning the signed distance from the shape’s surface. Included with Graphics Tools are the following clipping primitive shapes.

Note, the clipping cone can be adjusted to also represent a capped cylinder. Clipping primitives can be configured to clip pixels within their shape or outside of their shape. Some other use cases for clipping primitives are as a 3D stencil test, or as a mechanism to get the distance from an analytical surface. Being able to calculate the distance from a surface within a shader allows one to do effects like the orange border glow in the above image.
To learn more about clipping primitives please see the associated documentation.
Making things “look good”
The world is our oyster when it comes to creating visual effects for HoloLens 2. Unreal Engine has a powerful material editor that allows people without shader experience to create and explore. To bootstrap developers, Graphics Tools contains a few out-of-the-box effects.

Effects include:
- Proximity based lighting (docs)
- Procedural mesh texturing & lighting (docs)
- Simulated iridescence, rim lighting, + more (docs)
To see all of these effects, plus everything described above in action, Graphics Tools includes an example plugin which can be cloned directly from GitHub or downloaded from the releases page. If you have a HoloLens 2, you can also download and sideload a pre-built version of the example app from the releases page.
Questions?
We are always eager to hear more from the community for ways to improve the toolkit. Please feel free to share your experiences and suggestions below, or on our newly created GitHub discussions page.
by Contributed | Apr 19, 2021 | Technology
This article is contributed. See the original author and article here.
Since we announced in 2019 that we would be retiring Basic Authentication for legacy protocols we have been encouraging our customers to switch to Modern Authentication. Modern Authentication, based on OAuth2, has a lot of advantages and benefits as we have covered before, and we’ve yet to meet a customer who doesn’t think it is a good thing. But the ‘getting there’ part might be the hard part, and that’s what this blog post is about.
This post is specifically about enabling Modern Authentication for Outlook for Windows. This is the client most widely used by many of our customers, and the client that huge numbers of people spend their day in. Any change that might impact those users is never to be taken lightly.
As Admin, you know you need to get those users switched from Basic to Modern Auth, and you know all it takes is one PowerShell command. You took a look at our docs, found the article called Enable or disable Modern Authentication for Outlook in Exchange Online | Microsoft Docs and saw that all you need to do is read the article (which it says will take just 2 minutes) and then run:
Set-OrganizationConfig -OAuth2ClientProfileEnabled $true
That sounds easy enough. So why didn’t you do it already?
Is it because it all sounds too easy? Or because there is a fear of the unknown? Or spiders? (We’re all scared of spiders, it’s ok.)
We asked some experts at Microsoft who have been through this with some of our biggest customers for their advice. And here it comes!
Expert advice and things to know
“Once Exchange Online Modern Authentication is enabled for Outlook for Windows, wait a few minutes.”
That was the first response we got. It was certainly encouraging, but wasn’t exactly a lot of information we realized, so we dug in some more, and here’s what we found.
One thing you need to remember that enabling Modern Authentication for Exchange Online using the Set-OrganizationConfig parameter only impacts Outlook for Windows. Outlook on the Web, Exchange ActiveSync, Outlook Mobile or for Mac etc., will continue to authenticate as they do today and will not be impacted by this change.
Once Modern Authentication is turned on in Exchange Online, a Modern Authentication supported version of Outlook for Windows will start using Modern Authentication after a restart of Outlook. Users will get a browser-based pop up asking for UPN and Password or if SSO is setup and they are already logged in to some other services, it should be seamless.
If the login domain is setup as Federated, the user will be redirected to login to the identity provider (ADFS, Ping, Okta, etc.) that was set up. If the domain is managed by Azure or set up for Pass Through Authentication, the user won’t be redirected but will authenticate with Azure directly or with Azure on behalf of your Active Directory Domain Service respectively.
Take a look at your Multi-Factor Authentication (MFA)/Conditional Access (CA) settings. If MFA has been enabled for the user and/or Conditional Access requiring MFA has been setup for the user account for Exchange Online (or other workloads that have a dependency on Exchange Online), then the user/computer will be evaluated against the Conditional Access Policy.
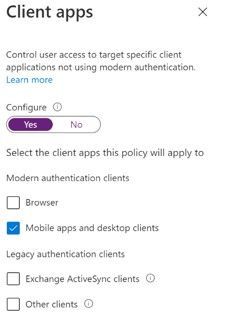
- Here is an example of a CA policy with Condition of Client App “Mobile apps and desktop clients”. This will impact Outlook for Windows with Modern Authentication whereas “Other Clients” would impact Outlook for Windows using Basic Authentication, for example.
- Next is Access Control Grant in CA requiring MFA. If Outlook for Windows was using Basic Authentication, this would not apply since MFA depends on Modern Authentication. But once you enable Modern Authentication, users in the scope of this CA policy would be required to use MFA to access Exchange Online.

The Modern Authentication setting for Exchange Online is tenant-wide. It’s not possible to enable it per-user, group or any such structure. For this reason, we recommend turning this on during a maintenance period, testing, and if necessary, rolling back by changing the setting back to False. A restart of Outlook is required to switch from Basic to Modern Auth and vice versa if roll back is required.
It may take 30 minutes or longer for the change to be replicated to all servers in Exchange Online so don’t panic if your clients don’t immediately switch, it’s a very big infrastructure.
Be aware of other apps that authenticate with Exchange Online using Modern Authentication like Skype for Business. Our recommendation is to enable Modern Authentication for both Exchange and Skype for Business.
Here is something rare, but we have seen it… After you enable Modern Authentication in an Office 365 tenant, Outlook for Windows cannot connect to a mailbox if the user’s primary Windows account is a Microsoft 365 account that does not match the account they use to log in to the mailbox. The mailbox shows “Disconnected” in the status bar.
This is due to a known issue in Office which creates a miscommunication between Office and Windows that causes Windows to provide the default credential instead of the appropriate account credential that is required to access the mailbox.
This issue most commonly occurs if more than one mailbox is added to the Outlook profile, and at least one of these mailboxes uses a login account that is not the same as the user’s Windows login.
The most effective solution to this issue is to re-create your Outlook profile. The fix was shipped in the following builds:
- For Monthly Channel Office 365 subscribers, the fix to prevent this issue from occurring is available in builds 16.0.11901.20216 and later.
- For Semi-Annual Customers, the fix is included in builds 16.0.11328.20392 (Version 1907) and later.
You can find more info on this issue here and here.
That’s a list of issues we got from the experts. Many customers have made the switch with little or no impact.
How do you know Outlook for Windows is now using Modern Auth?
When using Basic Auth, the Outlook Connection Status “Authn” column shows “Clear*”

Once you switch to Modern Auth, the Connection Status in Outlook showing Modern Authentication “Authn” column shows “Bearer*”

And that’s it!
The biggest thing to check prior to making the change are your CA/MFA settings, just to make sure nothing will stop access from happening and making sure your users know there will be a change that might require them to re-authenticate.
Now you know what to expect, there is no need to be afraid of enabling Modern Auth. (Spiders, on the other hand… are still terrifying, but that’s not something we can do much about.)
Huge thanks to Smart Kamolratanapiboon, Rob Whaley and Denis Vilaca Signorelli for the effort it took to put this information into a somewhat readable form.
If you are aware of some other issues that might be preventing you from turning this setting on, let us know in comments below!
The Exchange Team
by Contributed | Apr 19, 2021 | Technology
This article is contributed. See the original author and article here.
The Microsoft 365 compliance center provides easy access to solutions to manage your organization’s compliance needs and delivers a modern user experience that conforms to the latest accessibility standards (WCAG 2.1). From the compliance center, you can access popular solutions such as Compliance Manager, Information Protection, Information Governance, Records Management, Insider Risk Management, Advanced eDiscovery, and Advanced Audit.
Over the coming months, we will begin automatically redirecting users from the Office 365 Security & Compliance Center (SCC) to the Microsoft 365 compliance center for the following solutions: Audit, Data Loss Prevention, Information Governance, Records Management, and Supervision (now Communication Compliance). This is a continuation of our migration to the Microsoft 365 compliance center, which began in September 2020 with the redirection of the Advanced eDiscovery solution.
We are continuing to innovate and add value to solutions in the Microsoft 365 compliance center, with the goal of enabling users to view all compliance solutions within one portal. While redirection is enabled by default, should you need additional transition time, Global admins and Compliance admins can enable or disable redirection in the Microsoft 365 compliance center by navigating to Settings > Compliance Center and using the Automatic redirection toggle switch under Portal redirection.
We will eventually retire the Security & Compliance Center experience, so we encourage you to explore and transition to the new Microsoft 365 compliance center experience. Learn more about the Microsoft 365 compliance center.

Recent Comments