
by Contributed | Apr 18, 2021 | Technology
This article is contributed. See the original author and article here.
Intro
A function is a log query in Azure Monitor that can be used in other log queries as though it’s a command. Functions allow developers to provide solutions to different customers and for you to reuse query logic in your own environment.
We have upgraded the functions experience in Log Analytics, providing new UI and capabilities to allow you to do more with functions.
Log Analytics supports the following types of functions:
- Solution function: Pre-built functions included with Azure Monitor. These are available in all Log Analytics workspaces and can’t be modified.
- Workspace functions: Functions installed in a particular Log Analytics workspace and can be modified and controlled by the user
The new Functions experience
Discover functions in the sidebar
Functions are now a part of Log Analytics sidebar. As any other Log Analytics sidebar, functions are searchable, filterable and you can group the functions tree according to the function’s metadata:
You may also set your own favorite functions per workspace for quicker access.
Functions have a popover with additional data, including parameters defined for the function:

Use functions in your queries with intellisense
Functions are integrated with Log Analytics intellisense. Intellisense supports auto complete for functions and will also assist with the defined parameters per function:

Workspace functions
Workspace functions were upgraded and they now support parameters and default parameter values.
You can create and save your own workspace functions per Log Analytics workspace.
Compose your query with parameters and use the “save” ->”Save as function” to define your own workspace functions in LA.
 Note: you must have sufficient workspace permissions to save a function.
Edit and mange your functions
Once a function is saved, you can still edit and mange it. Load the function’s code to an empty Log Analytics tab to change the function’s code or it’s metadata.
Summary
Functions are a great way to do more with Log Analytics.
Use our solution functions or define your own functions to re-use logic and queries and shorten your way to insight.
Read our in depth functions documentation to learn more about functions in Log Analytics.
Feedback
We appreciate your feedback! comment on this blog post and let us know what you think of the this feature.
You may also use our in app feedback feature to provide us with additional feedbacks:

by Contributed | Apr 17, 2021 | Technology
This article is contributed. See the original author and article here.
One of the beautiful things about Azure VMware Solution is integrating directly with other Azure services. As you may be aware, Azure VMware Solution is an Azure service that allows for running VMware workloads natively in Azure. Microsoft maintains and manages the platform components, allowing the user to focus on the workloads. As expected, periodically the platform receives upgrades and patches which are all done by Microsoft. Knowing when those patches and updates are coming is critical to the user in production operations.
Upgrades or patches should not impact workloads running on Azure VMware Solution, but knowing when they are taking place for many organizations is required to support change management protocols. The best way organizations can keep abreast of planned Azure VMware Solution maintenance, Azure service incidents, health advisories, or security advisories is to use Azure Service Health.
To configure these alerts, you will need to know which subscription and region Azure VMware Solution private cloud was deployed. From there, using Azure Service Health, you can send texts, voice calls, or emails about any combination of the previously mentioned categories.
Additionally, Azure Service Health can trigger other actions when an event occurs. For example, when an event occurs, like a pending upgrade, an Azure Logic App can be called that logs the event into your enterprise change management system. This is just one example of the very powerful use of Azure Service Health and its integrations with not only Azure VMware Solution but any Azure service.
If you would like to see step-by-step details of how to configure alerts for Azure VMware Solution, check out this blog article.

by Contributed | Apr 17, 2021 | Technology
This article is contributed. See the original author and article here.
One of the big new things that the Hyperscale (Citus) option in the Azure Database for PostgreSQL managed service enables you to do—in addition to being able to scale out Postgres horizontally—is that you can now shard Postgres on a single Hyperscale (Citus) node. With a new Hyperscale (Citus) feature in preview called “Basic tier”, you can start small and start cost-effectively while being ready to scale out horizontally any time.
With the new Basic tier feature in Hyperscale (Citus)—in Preview—you can now:
- Try out Hyperscale (Citus) at a much lower price point, starting at $0.27 USD/hour[1]
- Shard Postgres on a single Hyperscale (Citus) node so your application is “scale-out-ready”
- Provision your Dev & Test environments in a more cost-effective manner
With Basic tier, you can use all the features you’ve come to expect in a standard Hyperscale (Citus) server group. In other words, Basic tier is not limited in any way: with Basic tier, you don’t have to sacrifice any Hyperscale (Citus) capabilities.
You can read all about the Citus feature that underpins this new Basic tier feature in my recent open source blog post about sharding Postgres on a single Citus node, which we first rolled out in the new and spectacular Citus 10 open source release.
In this post, let’s walk through how to provision Basic tier on Hyperscale (Citus) in the Azure portal. And then, how to scale out your Hyperscale (Citus) node from Basic tier to Standard tier by adding more nodes in the portal.
What’s the Standard tier you ask? Standard tier is the new name for a multi-node Hyperscale (Citus) cluster, to differentiate a multi-node cluster from a Basic tier with just a single Hyperscale (Citus) node.
Also in this post, we’ll show you some of the ways it can be useful to shard Postgres on a single Hyperscale (Citus) node—with the new Basic tier. In particular, I like the cost-effective angle, since at $0.27 USD/hour, you can try out Hyperscale (Citus) for ~8 hours and you’ll only pay $2-3 USD.
A “How-to” guide for trying out Basic tier in Hyperscale (Citus)
To start using Basic tier in Hyperscale (Citus) in the Azure Database for PostgreSQL managed service, as always, a good place to start is docs.microsoft.com:
All the instructions you need to provision are in the Quickstart doc (link above) for provisioning a Basic tier in Hyperscale (Citus). Still, I want to highlight some of the steps in this visual guide, with screenshots from the Azure portal. Starting with:
- Enable Preview Features: As of the date of publication of this blog post, Basic tier is a preview feature in Hyperscale (Citus), so make sure to click Enable Preview Features. If you read this post in the future, you may not need this step.
 Figure 1: As of the date of publication of this blog post, the Basic tier is a preview feature, so make sure to click Enable Preview Features.
Once you enable the preview features and get to the Compute + storage screen in the Azure portal’s provisioning workflow, remember to choose Basic tier:
- Choose Basic tier: your choices are Basic tier and Standard tier. In this post, we’ll provision the Basic tier, which only costs ~$200 USD/month—or $0.27 USD/hour. Later in the post, we’ll add worker nodes and seamlessly scale out to Standard tier.
 Figure 2: Pick Basic tier to provision a single Hyperscale (Citus) node, to start small and be scale-out-ready. Later in the post, we’ll scale out to Standard tier as well.
As you follow the Basic tier quickstart documentation to provision Hyperscale (Citus), be sure to pay special attention to:
- Set your Firewall rules: In the Networking tab, set your firewall rules per the instructions in the docs, by allowing the client IP address(es) that will be allowed to access the database.
Provisioning can take a few minutes. After you’ve provisioned your Hyperscale (Citus) server group with Basic tier, you’ll see a “Your deployment is complete screen.” You can click the blue “Go to resource” button to go to the Basic tier instance you just created in Azure portal. Now you’re ready to follow the steps below to connect to the database.
- Get your connection strings from the Azure Portal: As you can see in Figure 3 below, you can find the Connection strings tab in the Settings column on the left of the Azure portal screen. When you click on Connection strings, you can see the different choices for database connection strings to connect to your freshly-provisioned Basic tier in Hyperscale (Citus).
 Figure 3: Find the “Connection strings” which we’ll use to connect to the Hyperscale (Citus) server group.
In this post, I’ll use psql—an interactive terminal front-end for PostgreSQL—to connect to the Hyperscale (Citus) database and start sharding Postgres by creating distributed tables. (Azure Tip: You can also use psql as part of Azure Cloud Shell, too!)
- Update the password in the connection string: In the screenshot above “your_password” is a placeholder in the connection string. You will want to update “your_password”, to use your actual password in the connection string.
- Use psql: Execute the
psql command in the command line and connect to the database.
- Start sharding your Postgres tables: Next, you can start creating distributed tables on the Hyperscale (Citus) server group.
-- Create a table with the usual PostgreSQL syntax
CREATE TABLE users_table (user_id bigserial primary key, age int);

-- Convert the table to a distributed table
SELECT create_distributed_table('users_table', 'user_id');
The Hyperscale (Citus) create_distributed_table function divides the Postgres table across 32 shards, but you can still query Postgres as if all the data were in one table. Because the shards are regular Postgres tables, you can still rely on the wealth of Postgres relational database features like transactions, indexes, database constraints, JOINs, and more.
As you can see above, in just a few clicks, we were able to provision a Hyperscale (Citus) database using Basic tier—and then create a distributed table on a single Hyperscale (Citus) node.
Next, let’s explore why you would want to use this newfangled Basic tier thing anyway? How can sharding Postgres on a single node help you?
Shard Postgres on a single Hyperscale (Citus) node with Basic tier, to be “scale-out-ready”
Sharding Postgres has long been associated with large-scale data sizes. In fact, when most of you think about how Citus shards Postgres, you probably imagine a Hyperscale (Citus) cluster with 2 or 4 worker nodes, or perhaps 20 or 50 or even 100 worker nodes. But with the introduction of Basic tier on Hyperscale (Citus), we can all think about sharding differently.
Even if the data sizes are not large, sharding Postgres on a single Hyperscale (Citus) node may provide immediate benefits. By using a distributed data model, you can get:
- query parallelization for multi-shard queries
- smaller indexes to create/maintain
- smaller tables to auto-vacuum (in parallel!), and
- faster bulk data loads
For example, after sharding the users_table above with the create_distributed_table function, the following SQL commands will now run in parallel across the Hyperscale (Citus) shards, which can significantly decrease execution times:
-- load data, ingestion happens in parallel across shards
INSERT INTO users_table (age)
       SELECT 20 + (random() * 70)::int
       FROM generate_series(0, 100000);

-- this query runs in parallel across all shards
SELECT avg(age) FROM users_table;

-- index created in parallel across all shards
CREATE INDEX user_age ON users_table (age);
When your data no longer fits in memory—or if the database server becomes CPU bound—then with Basic tier in Hyperscale (Citus), your data will already be sharded and you’ll be able to easily add more nodes to your cluster to keep your database performant.
In other words, with Basic tier in Hyperscale (Citus) you are already prepared to scale out, or what I like to call “scale-out-ready.”
 Figure 4: Sharding Postgres on a single node with Basic tier in Hyperscale (Citus)—thereby adopting a distributed data model from the beginning—can make it easy for you to scale out your Postgres database at any time, to any scale. I like to call this being “scale-out-ready” with Hyperscale (Citus) in Azure Database for PostgreSQL.
What happens when you need to add worker nodes to your Hyperscale (Citus) Basic tier?
When you’re ready to scale, it’s easy to add worker nodes to your Hyperscale (Citus) Basic tier. After all, your data model is already distributed. And you don’t need to migrate, or to upgrade, or to go through any kind of hassle. You simply add more worker nodes in the portal and graduate from the Basic tier to the Standard tier, as we’ll do together below.
When you add worker nodes to an Hyperscale (Citus) cluster, there’s no data on them yet. This is because all the shards are still on the old nodes—in this case, with Basic tier, all the data is on the single Hyperscale (Citus) node. So, initially all these new worker nodes will just be doing nothing.
This is where the Hyperscale (Citus) shard rebalancing feature comes in. Shard rebalancing ensures that the shards are distributed fairly across all the nodes in the cluster. The Citus shard rebalancer does this by moving shards from one node to another.
While a shard is being moved, all read and write queries can continue. In other words, Hyperscale (Citus) enables online rebalancing—or what some people call zero-downtime rebalancing—of the data.
Below, we’ll add new nodes to the Hyperscale (Citus) database cluster and rebalance shards across the cluster. We’ll just add 2 worker nodes, but you can scale out your Hyperscale (Citus) server group to as many nodes as you think required.
- Go to your Settings in the Azure portal: Look for the Compute + storage tab in the Settings column on the left of the Azure portal screen.
- Choose Standard tier: Choose Standard tier[2] to configure a multi-node cluster.
- Add worker nodes: Using the slider in the screenshot below, pick any number of worker nodes you need. Remember that with Basic tier, you only have one Coordinator node and you don’t have any worker nodes. In this post, let’s add 2 worker nodes below.
- Make it so: Click the “Save” button at the bottom of the portal screen.
 Figure 5: Switch from Basic tier to Standard tier in Hyperscale (Citus) on the Azure Portal’s Compute + storage screen.
Once you’ve added the new Hyperscale (Citus) worker nodes and you’ve graduated your Basic tier to a Standard tier, you are ready to do some shard rebalancing.
- You decide when to initiate a shard rebalance operation: For maximum control, the choice of when to run the shard rebalancer is left to you. Hyperscale (Citus) does not automatically rebalance when you add new worker nodes.
- What if you forget to rebalance shards? If you forget to rebalance you will have some empty worker nodes without any data. The good news is, you will see a recommendation to rebalance in the “Shard rebalancer” tab, per the screenshot below.
 Figure 6: Screenshot of the Azure portal’s Shard rebalancer screen when rebalancing is recommended. In this scenario, you can see that the 2 newly-added worker nodes (blogtest-w0 and blogtest-w1) each have 0 MiB of data—they are empty!
You can connect back to the coordinator via psql with the same connection string used earlier.
As I mentioned earlier, during the rebalance operation, all read and write queries can continue on the Hyperscale (Citus) database. In other words, your production workloads are not affected by the shard rebalancing.
- Rebalance shards: Once you are ready, rebalance the data with a single command,
rebalance_table_shards.
-- move shards to new worker node(s)
SELECT rebalance_table_shards();
NOTICE:  Moving shard 102008 from c.blogtest.postgres.database.azure.com:5432 to w1.blogtest.postgres.database.azure.com:5432 ...
NOTICE:  Moving shard 102009 from c.blogtest.postgres.database.azure.com:5432 to w0.blogtest.postgres.database.azure.com:5432 ...
....
NOTICE:  Moving shard 102028 from c.blogtest.postgres.database.azure.com:5432 to w1.blogtest.postgres.database.azure.com:5432 ...
During the shard rebalance operation in Hyperscale (Citus), you can monitor its progress. To do that, follow the steps below:
- Monitor the shard rebalancer: Go to the Azure portal. Open the Shard rebalancer page in Server group management. You will see the message that Rebalancing is underway. And you can follow the progress of the rebalance operation in this page.
 Figure 7: Follow the rebalance progress on the Azure Portal’s Shard Rebalancer screen while the rebalance is in progress.
Now that the shards have been distributed across the Hyperscale (Citus) cluster, your application can use the resources on the worker node(s) as well as the coordinator node. Other than the increased compute, memory, and disk available to your application though—from your application’s perspective, nothing has changed.
After adding 2 worker nodes to the Hyperscale (Citus) database cluster, and after rebalancing shards across the cluster, your application is still talking to the same Postgres database. Congratulations, you have seamlessly scaled out your Postgres database with Hyperscale (Citus)!
Why use Basic tier in Hyperscale (Citus) to shard on a single node, if you don’t need to scale out Postgres right now?
You may be wondering:
“Why use Hyperscale (Citus) if I don’t need to scale out Postgres right now?”
Well, if you think that your database is not going to grow in the future (and that your database will remain less than ~100GB), then one of the other deployment options in our Azure Database for PostgreSQL managed service—such as Single Server or Flexible Server—is likely to handle your workload quite well. However, if you expect your application (and therefore your Postgres database) to grow over time, then the answer becomes relevant to you.
If you start small with Hyperscale (Citus)—by sharding Postgres on a single Hyperscale (Citus) node Basic tier—then as your application grows (in terms of users or activity or features or database size), you’ll be able to easily add nodes and use the zero downtime shard rebalancer on Hyperscale (Citus). Adding more nodes to your Hyperscale (Citus) server group will enable you to fit more data into memory, have higher I/O bandwidth, and provide more compute power (CPU) for your Postgres database. In other words, you will have all the means to keep your database performant for your application even as your application grows.
How to prepare your Postgres database to be scale-out-ready?
There are a few things you need to take into account to make Hyperscale (Citus) scale-out-ready with the new Basic tier. In scale-out architectures, the data is distributed based on a sharding key (what we call a distribution column in Citus.) The sharding key you choose will influence not only how the data gets distributed, but also what kind of query performance you will get. So a bit of up-front thinking about your query patterns and your data model can go a long way. For example, it is often not performant (or even possible) to enforce UNIQUE constraints on the Postgres columns that do not include distribution keys.
If you follow the data modeling best practices of a distributed database when using the Basic tier in Hyperscale (Citus) in Azure Database for PostgreSQL, you can easily scale out your database. The Citus best practices for scaling out your Postgres database seamlessly include:
If you build your database conforming to the best practices outlined above, the promise of Hyperscale (Citus) is that you’ll be able to scale out your Postgres database to some pretty large database cluster sizes. The key point here is that once you get used to the mindset of scale-out systems, you’ll realize how easy it is to follow the data modeling best practices.
 Figure 8: Start small and cost-effectively with the new Hyperscale (Citus) “Basic tier” feature (in Preview), and then if and when you need to, you can easily graduate to “Standard tier” by adding more Hyperscale (Citus) nodes.
Using Basic tier for your development & test environments
Another interesting scenario for using Basic tier in Hyperscale (Citus) is with your development and test environments. As I mentioned earlier, the Basic tier does not have any limitations compared to Standard tier. So, for many users, Basic tier can be a practical and cost-effective way of provisioning development and testing databases.
And there are more Preview features available in Hyperscale (Citus)
As I mentioned earlier in the blog, the Basic tier is currently in preview. In fact, there are several super useful Hyperscale (Citus) features in preview, including:
- Basic tier: Run a server group using only a coordinator node and no worker nodes. An economical way to do initial testing and development and handle small production workloads.
- PostgreSQL 12 and 13: You can now choose among the latest Postgres versions for your Hyperscale (Citus) server group.
- Citus 10: Installed automatically on server groups running these Preview features and PostgreSQL 13.
- Columnar storage: Store selected tables’ columns (rather than rows) contiguously on disk. Supports on-disk compression. Good for analytic and data warehousing workloads. (You might also find our open source blog post on Citus 10 columnar compression useful.)
- Read replicas (currently same-region only): Any changes that happen to the primary server group get reflected in its replica, and queries against the replica cause no extra load on the original. Replicas are a useful tool to improve performance for read-only workloads.
- Managed PgBouncer: A connection pooler that allows many clients to connect to the server group at once, while limiting the number of active connections. Having an inbound PgBouncer satisfies connection requests while keeping the coordinator node running smoothly.
The Basic tier in Hyperscale (Citus) opens the door to new possibilities
We are so excited to bring you a preview of the new Basic tier feature (in preview!) in Hyperscale (Citus) on Azure Database for PostgreSQL.
And while “opens the door to new possibilities” may sound lofty, it’s true. Basic tier in Hyperscale (Citus) gives you a way to be “scale-out-ready” on day zero in the cloud. If your application is already running on a single-node Postgres, you now have a way to adopt a sharded data model that allows you to scale your Postgres database as much as you need in the future. In essence, as your application grows and you need to scale out, you won’t be faced with any type of database migration challenges.
Some useful links & resources when you are ready to try out Citus:
- Getting started: This Getting Started page, created by one of my teammates, has useful resources no matter which way you prefer to learn: reading, watching, or doing. It’s a +1 for getting started with Citus open source as well as with Hyperscale (Citus) in the Azure Database for PostgreSQL managed service.
- Quickstart documentation for Hyperscale (Citus): These Quickstart docs for provisioning Basic tier in Hyperscale (Citus) are helpful. (And if you don’t yet have an Azure subscription, just create a free Azure account first.)
- Citus open source: Check out the Citus open source repo on GitHub to report issues, check out the source code, and learn more. To try Citus open source, you can follow the installation instructions on the GitHub README or you can download Citus packages to try Citus locally. And you can find all the details about sharding Postgres on a single Citus node in my open source blog post, too.
- Deep dive into Citus internals: If you want to understand the internals of how Citus shards Postgres as an extension, this recent blog post about one of my teammate’s Citus talks at Carnegie Mellon (with video recording by the CMU team) is a great place to start.
And if you have any questions about our Hyperscale (Citus) option in our Azure Database for PostgreSQL managed service, my product teammates would love to hear from you. You can always reach out to us over email at AskAzureDBforPostgreSQL. Or follow us on Twitter @AzureDBPostgres. We’d love to know what you think.
Footnotes
- In the East US region on Azure, the cost of a Hyperscale (Citus) Basic tier with 2 vCores, 8 GiB total memory, and 128 GiB of storage on the coordinator node is $0.27/hour or ~$200/month. ↩
- The minimum Hyperscale (Citus) coordinator size for Standard tier is 4 vCores with 16 GiB memory and 512 GiB disk. So if you have the smallest Basic tier configuration, then switching to Standard tier will increase your Coordinator node size from 2 vCores to 4vCores (or more if you choose) and from 128 GiB storage to 512 GiB storage (or more if you choose.) If your coordinator node needs to change size when moving from Basic to Standard tiers, your coordinator will need to be restarted. Restarting the coordinator requires a brief downtime. You’ll see a warning before the restart happens, so you can confirm that the downtime is OK at that moment. You would avoid the restart if your Basic Tier already had 4 vCores (or 8 vCores) and 512 GiB storage. ↩

by Contributed | Apr 17, 2021 | Technology
This article is contributed. See the original author and article here.
Which community project do you maintain?
PnP Modern Search
How does it help people?
Coming from classic SharePoint many customers were used to the flexible search web parts available. In modern SharePoint there is a gap between what the highlighted content web part can do and what Microsoft Search delivers of customization, and this is where the PnP Modern Search web parts fills the gap.
What have you been working on lately?
Lately I’ve been fixing minor issues and bugs with v3 of the web parts which have now moved to a support state only, while the innovation goes into the new v4, which also allows use of the Microsoft Graph Search API. A similar journey to other API’s, where they move out of SharePoint, cover more scenarios and great new innovations.
What do you do at work?
I work as a PM on the Microsoft Search UX seen in SharePoint and Office.com where my focus area is to improve the experience around file items in search results. You might think it’s a narrow area, but there is a lot happening with signals in the Graph and AI on content which we can bring back to search results to help people searching find the right content quicker. Combining technical innovation with intuitive UX is both challenging and fun :)
Why are you a part of the M365 community?
As I used to be a consultant on M365 and an MVP, community has been a core part of my life for so long. I love sharing and love learning, and being part of the community is by far the best way to combine those.
What was you first community contribution?
Probably answering a question on TechNet back in 2010.
One tip for someone who’d like to start contributing
If you are a developer and you use open source projects via GitHub, reach out via the issue lists and ask if there is something you can help out with. Most projects have a list of bugs or improvements people are asking for, and by helping out you are putting yourself out there and you will get a lot of gratitude.
by Contributed | Apr 16, 2021 | Technology
This article is contributed. See the original author and article here.
Recently I worked on a scenario where we had to set up client cert authentication for WCF service hosted as an App service in Azure: We followed the below steps to achieve the same and was able to parse the client certificate in service end using custom certificate validator:
Here I have highlighted in detail the steps of how to create and publish a WCF Service with Client Certificate enabled in Azure Web App.
Create an Azure Web App:
===========================
- Navigate to the Azure Portal and login with your Azure account and click on App services.
- Click on Add Web Apps and enter the details for Name, Subscription, Resource Group, OS and click Create.
- The Web App with name WCFCLIENTCERTSAMPLE is created at my end.
Deploying the WCF service to the Web App:
======================================
We will be able to publish the created WCF Service or any other type of application directly into the created Web APP.
- Open Visual studio and create a new project by selecting WCF service application as the project type and name it as CertForAppServiceInAzure.
- Let the Default generated code be in the operation contract and Service class for the sample. Modify it according to requirement. I modified it to print the certificate subject passed later:
IService1.cs:
[ServiceContract]
    public interface IService1
    {
        [OperationContract]
        string GetData(int value);
    }
Service1.cs:
public class Service1 : IService1
    {
        public static string str { get; set; }
        public string GetData(int value)
        {
           return string.Format(str+ value);
       } }
- We need to make the following changes in the Service’s web config inside system.servicemodel section to enable client cert authentication:
- In the binding at my end I have used basicHttpsBinding and enabled the security mode as Transport with clientCredentialType as Certificate.
<system.serviceModel>
<bindings>
<basicHttpsBinding>
<binding name="CertBind">
<security mode="Transport">
<transport clientCredentialType="Certificate"/>
</security>
</binding>
</basicHttpsBinding>
</bindings>
<services>
<service name="CertForAppServiceInAzure.Service1">
<endpoint address="" binding="basicHttpsBinding" bindingConfiguration="CertBind" contract="CertForAppServiceInAzure.IService1"/>
</service>
</services>
<behaviors>
<serviceBehaviors>
<behavior>
<serviceMetadata httpGetEnabled="true" httpsGetEnabled="true"/>
<serviceDebug includeExceptionDetailInFaults="false"/>
<serviceCredentials>
<clientCertificate>
<authentication certificateValidationMode="Custom" customCertificateValidatorType="CertForAppServiceInAzure.MyX509CertificateValidator, CertForAppServiceInAzure"/>
</clientCertificate>
</serviceCredentials>
</behavior>
</serviceBehaviors>
</behaviors>
<protocolMapping>
<add binding="basicHttpsBinding" scheme="https"/>
</protocolMapping>
<serviceHostingEnvironment aspNetCompatibilityEnabled="true" multipleSiteBindingsEnabled="true"/>
</system.serviceModel>
Note: I have defined the client certificate validator in the service end as a custom validator so that I can verify if the client certificate is fetched in service end and parse the client certificate details. You can ignore step 5 if you are not using custom validator.
- To add the custom validator class, Create a Class file named MyX509CertificateValidator.cs in the service end with the below code to read the client certificate sent by the client and print the subject details (You can add your own condition check).
using System;
using System.IdentityModel.Selectors;
using System.Security.Cryptography.X509Certificates;

namespace CertForAppServiceInAzure
{
 public class MyX509CertificateValidator : X509CertificateValidator
    {
        public override void Validate(X509Certificate2 certificate)
        {
            // Check that there is a certificate.
            if (certificate == null)
            {
                throw new ArgumentNullException("certificate");
            }
            Service1.str = certificate.Subject;
            }
    }
}
- Right Click on your Project and select Publish, Select the Publish Location as Azure App Service.
- Select the Subscription, Resource Group and App service name from the dropdown which you have created on Azure and select Finish to publish the WCF service directly to the created Azure Web App.
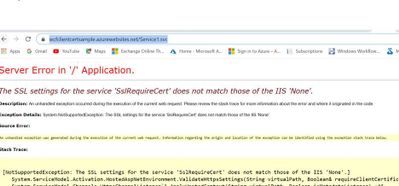
- Browse the Service Over the Azure App service public URL https://wcfclientcertsample.azurewebsites.net/Service1.svc
- We get the below error:
Enable Client certificate for the same App published in Azure:
=============================================
- Run the below command to enable the Client certificate for the Azure Web App:
az webapp update –set clientCertEnabled=true –name WCFCLIENTCERTSAMPLE –resource-group MyResGroup
Note: Give your App service name and Resource Group name

- To fix the Server Error we add the below section in the Web.config system.WebServer Section and re-publish the same:
<system.webServer>

    <modules runAllManagedModulesForAllRequests="true"/>

    <security>

      <access sslFlags="Ssl,SslRequireCert,SslNegotiateCert" />

    </security>

    <directoryBrowse enabled="true"/>

  </system.webServer>
- Browse the application again over the same https://wcfclientcertsample.azurewebsites.net/Service1.svc we get the pop up to select the client certificate we select the client cert and we are able to access the service:


- Now Consume the same service in the client application by creating a test console application project and adding the service Reference by the url https://wcfclientcertsample.azurewebsites.net/Service1.svc
- Pass the client certificate details in the web.config and map it with the binding, In my scenario the client app is running on my Windows server. Make Sure the Client certificate is installed on the client machine and present in mmc under Current User.
<system.serviceModel>

      <bindings>

        <basicHttpBinding>

          <binding name="BasicHttpsBinding_IService1">

            <security mode="Transport">

              <transport clientCredentialType="Certificate" />

            </security>

          </binding>

        </basicHttpBinding>

      </bindings>

      <client>

        <endpoint address="https://wcfclientcertsample.azurewebsites.net/Service1.svc"

          binding="basicHttpBinding" bindingConfiguration="BasicHttpsBinding_IService1" behaviorConfiguration="endpointCredentialBehavior"

          contract="ServiceReference1.IService1" name="BasicHttpsBinding_IService1" />

      </client>

      <behaviors>

        <endpointBehaviors>

          <behavior name="endpointCredentialBehavior">

            <clientCredentials>

              <clientCertificate findValue="9c8a3857851e653ff22f0161914a1accf8ac5e76"

                                 storeLocation="CurrentUser"

                                 storeName="My"

                                 x509FindType="FindByThumbprint" />

            </clientCredentials>

          </behavior>

        </endpointBehaviors>

      </behaviors>

    </system.serviceModel>
- As in the Service end I have used a custom client certificate validator and for testing purpose I am printing the subject name of the client certificate passed via the custom validator in the service end. Now when we run the client we see the below Console Output.

by Contributed | Apr 16, 2021 | Technology
This article is contributed. See the original author and article here.
Recently I worked on a scenario where we had to disable the proxy output for /jsdebug or /js endpoint for security concerns: We were able to achieve the same using following steps:
When we consume a Wcf service or Webservice using Java script client or ASP.NET Ajax page via a servicehost factory defined as WebScriptServiceHostFactory, We expose the client side javascript proxy information via the endpoint /WcfService.svc/jsdebug or /WcfService.svc/js which we use in the client end to invoke the Wcf service.
Here we have highlighted the steps for creating Wcf Service and exposing the client side javascript proxy information using Factory type as WebScriptServiceHostFactory so the same can be consumed via javascript or an ASP.NET Ajax page:
Also, How to disable the proxy output exposed via /jsdebug or /js due to security constrains or hide the proxy information when required.
Step 1: Creating the wcf service and exposing the javascript client end proxy information over the /jsdebug endpoint.
- Open Visual Studio and create the WCF Service Library named WCFService1.
- Now we will create the Operation Contract in the interface as below:
namespace WcfService1

{

    [ServiceContract]

    public interface IService1

    {

[OperationContract]

        string GetData(int value);


        // TODO: Add your service operations here

    }

}
- Create the Service Class with the following code:
namespace WcfService1

{

    public class Service1 : IService1

    {

        public string GetData(int value)

        {

            return string.Format("You entered: {0}", value);

        }

    }

}
- In your Web.config file add the below section:
<system.serviceModel>

    <services>

      <service name="WcfService1.Service1" behaviorConfiguration="beh">

        <endpoint address="" binding="basicHttpBinding"  name="soap" contract="WcfService1.IService1"/>

      </service>

    </services>

<serviceBehaviors>

<behavior name="beh">

<serviceMetadata httpGetEnabled="true" httpsGetEnabled="true"/>

</behavior>

</serviceBehaviors>

</system.serviceModel>
The rest is configured automatically.
- Now we will create another ASP.NET project and add it to the solution which will be the client application.
Now add a text file in the application and save it as “Ajaxservice.svc”. Add the WCFService1 project reference in the asp.net Web Application. Copy the following code to the file “Ajaxservice.svc” :
<%@ServiceHost language="C#" debug="false"
Service="WcfService1.Service1"
Factory="System.ServiceModel.Activation.WebScriptServiceHostFactory"%>
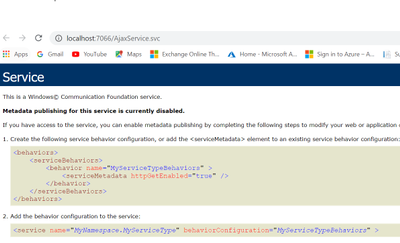
Build the Project. Right click on the Ajaxservice.svc file and browse it in the browser.
- Now we will modify the url to add jsdebug http://localhost:10253/Ajaxserv.svc/jsdebug to get the javascript proxy information and we see the below output:

Step 2: To disable the output for the /jsdebug or /js endpoint so that the proxy information is not exposed and other security reasons please follow the below approach in your client application consuming the service:
- We need to use the approach of filtering it out using message inspector.
- We need to create a behavior which iterates through ServiceHostBase.ChannelDispatchers to find it’s index and then remove it. We need to do it in IServiceBehavior.ApplyDispatchBehavior.
We need to use endpointDispatcher.ChannelDispatcher.Host to get the instance of ServiceHostBase, then access ChannelDispatchers to get the collection of ChannelDispatcher instances. We can use ChannelDispatcher.Listener.Uri to get the listen address to see if the instance is the right one.
- We add a class file to the ASP.net Web Application and add the below code as a part of the message inspector to block the output for .jsdebug and .js
public class DisableJSDebugServiceBehavior : IServiceBehavior, IEndpointBehavior

    {

        #region IServiceBehavior

        public void AddBindingParameters(ServiceDescription serviceDescription, ServiceHostBase serviceHostBase, Collection<ServiceEndpoint> endpoints, BindingParameterCollection bindingParameters) { }


        public void ApplyDispatchBehavior(ServiceDescription serviceDescription, ServiceHostBase serviceHostBase)

        {

            foreach (var endpoint in serviceHostBase.Description.Endpoints)

            {

                endpoint.EndpointBehaviors.Add(this);

            }

        }


        public void Validate(ServiceDescription serviceDescription, ServiceHostBase serviceHostBase) { }

        #endregion // IServiceBehavior

        #region IEndpointBehavior

        public void AddBindingParameters(ServiceEndpoint endpoint, BindingParameterCollection bindingParameters) { }

        public void ApplyClientBehavior(ServiceEndpoint endpoint, ClientRuntime clientRuntime) { }

        public void ApplyDispatchBehavior(ServiceEndpoint endpoint, EndpointDispatcher endpointDispatcher)

        {

            ServiceHostBase host = endpointDispatcher.ChannelDispatcher.Host;

            for(int i=0; i< host.ChannelDispatchers.Count; i++)

            {

                if(host.ChannelDispatchers[i].Listener.Uri.ToString().IndexOf("jsdebug", StringComparison.OrdinalIgnoreCase) >= 0)

                {

                    host.ChannelDispatchers.RemoveAt(i);

                }


            }


            for (int i = 0; i < host.ChannelDispatchers.Count; i++)

            {

                if (host.ChannelDispatchers[i].Listener.Uri.ToString().IndexOf("js", StringComparison.OrdinalIgnoreCase) >= 0)

                {

                    host.ChannelDispatchers.RemoveAt(i);

                }


            }

        }

        public void Validate(ServiceEndpoint endpoint) { }

        #endregion // IEndpointBehavior

    }


    public class DisableJSDebugServiceBehaviorElement : BehaviorExtensionElement

    {

        public override Type BehaviorType => typeof(DisableJSDebugServiceBehavior);


        protected override object CreateBehavior()

        {

            return new DisableJSDebugServiceBehavior();

        }

    }


Recent Comments