by Contributed | Apr 27, 2021 | Technology
This article is contributed. See the original author and article here.
By Neil Johnson – Principal Program Manager | Microsoft Endpoint Manager – Intune
The recommended methods of deploying apps with Microsoft Intune are the built-in app deployment features for Edge, Office and Defender. We also support Mac App Store and line-of-business apps. However, there are occasions where an application you need is not made by Microsoft, is not in the Mac App Store, and is not supported by the Intune line of business App Wrapping Tool.
Before we get into the details, it’s important that you understand the supportability of the process we are about to discuss:
Important: From a support perspective, Microsoft fully supports Intune and its ability to deploy shell scripts to macOS. However, Microsoft does not support the scripts themselves, even if they are on our GitHub repository. They are provided for example only and you are responsible for anything that they may do within your environment. Always test!
For the remainder of this post, I’m going to walk you through an example for how to approach the scenario where you need to do a bit of scripting. The steps we’re going to take are as follows:
- Identify a web location from which to download the app.
- Write a bash script to download the installer and install the app.
- Deploy the bash script using the Intune scripting agent.
Again, please do see the caveat above regarding supportability and also testing! I work with several customers who are really familiar with scripting and deploying so I’m sharing best practices and a few things we’ve all learned along the way.
Example Application Deployment: GNU Imagine Manipulation Program (GIMP)
We’re using Gimp here for a simple example. Gimp you can completely deploy following the steps outlined in our app wrapping post. The app makes a great example, too, to deploy through the scripting agent.
Step 1 – Obtaining the binary
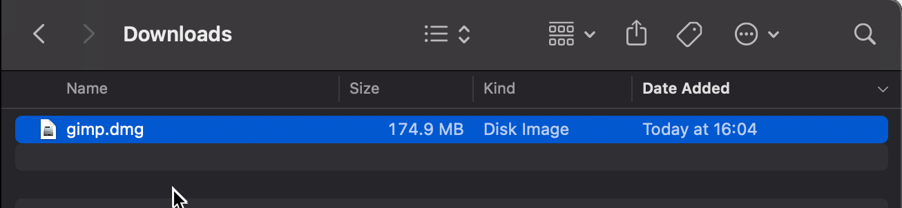
First things first, we need to get a copy of Gimp. To do that we’ll head to the Gimp website and download the latest stable version. Save the file as gimp.dmg in the Downloads directory.
Screenshot of the gimp.dmg macOS app in the Downloads directory
Step 2 – Uploading to Azure Blob storage
Now that we have our installation file, we can upload to Azure so it’s ready for us to use. Setting up Azure Blob storage is outside the scope of this article, but you can find documentation here: Introduction to blob storage – Azure Storage | Microsoft Docs.
Note: It is not a requirement to use Azure storage – see the note on download URL later in this post.
Upload gimp.dmg to Azure Blob storage:
- Go to portal.azure.com > Storage Accounts > “your storage account” and select the container you wish to use for macOS app deployments.
- Click Upload > Provide the file path to gimp.dmg and click upload again.
- Once uploaded, you will see your file listed in the container.
 Example of gimp.dmg uploaded in an Azure storage account
- Click on gimp.dmg and make a note of the URL in the properties. In my case, the URL is https://neiljohn.blob.core.windows.net/macapps/gimp.dmg
Note on Blob storage security: If you do not want to permit anonymous access to your Blob storage binaries you can set the access level to your container to ‘Private’ (no anonymous access) and generate a SAS access URL instead. The rest of this process will remain the same but the URL you use will have additional information encoded at the end.
 Screenshot showing that setting container “macapps” public access level is Private when public access disallowed
Note on download URLs: If you don’t have Azure Blob storage, you can use the public download URL for Gimp from their website here instead. I like using Azure because it gives us more control over the process and the version that we install, but the rest of the process in this post will work fine using either Azure Blob storage or the public download URL from the Gimp servers.
Step 3 – Write the bash script to download and install Gimp
In this section we will walk through an example shell script from the Intune Shell Script GitHub Repository to download and install Gimp.
We’re going to require a couple of things before we begin:
- Download the example installGimp.sh file from here and save it to your local drive.
- Download and install a copy of Visual Studio Code.
Open the installGimp.sh file in Visual Studio Code. The bits we might want to change are shown on lines 20-27. These variables control how the script will behave. Let’s look at them in some more detail.
# User Defined variables
weburl="https://neiljohn.blob.core.windows.net/macapps/gimp.dmg"
appname="Gimp"
app="Gimp.app"
logandmetadir="/Library/Logs/Microsoft/IntuneScripts/installGimp"
processpath="/Applications/Gimp.app/Contents/MacOS/gimp"
terminateprocess="false"
autoupdate=”false”
- weburl is the http URL of the installation files that we need. In this example we are using Azure Blob storage to host the file, but it could be any http endpoint that will be accessible from the client. The script will attempt to autodetect the installer type based on the file that is downloaded.
- appname is mostly used in the log, but is also used to generate the metadata file path for storing the last updated date.
- app is the actual name of the Application. It is used by the script to check if the app is already installed. The script will copy the application files found on the DMG to /Applications/$app. The best way to find out what this should be set to is to install the application manually on your Mac and then run ls -la /Applications from a terminal prompt and use the same name in the app variable.
- logandmetadir this is the directory that the script will use to store the installation log and to store the metadata for the last version update. This should be unique for each application that you deploy.
- processpath this is used to check if the application is running or not. Mac applications have a strict directory format, so one of the quickest methods is to run ls -Fl /Applications/Gimp.app/Contents/MacOS/*. This will return a list of files, it’s usually easy to guess which one is the main application by the name, in our case /Applications/Gimp.app/Contents/MacOS/gimp.
- terminateprocess is used to control what the script does if it finds the application is running. If this value is set to false, the script will check for the applications process and wait for it to be closed before installing. If the value is set to true, the script will detect that the application is running and terminate the main process before installing. For most end user applications leave this set to false.
- autoupdate is used to control how the script behaves when it’s run after the app is installed. If autoupdate is set to true the script will exit since it assumes that the app will handle updates itself. If set to false, the script will compare current and last update times on the URL header and update if there is a newer version.
For this example, the only thing that you need to change here is the weburl to your Azure Blob storage location (or use the public download URL https://download.gimp.org/mirror/pub/gimp/v2.10/osx/gimp-2.10.22-x86_64-3.dmg). The rest of the script can be left as is, but it is a good idea to read through it to ensure that you understand what it does.
Now we have our script, we need to test it. The easiest way to do that is to run it on a test device.
We need to make the script executable with chmod which we will run in a terminal window.
Neils-MacBook-Pro:Gimp neiljohnson$ chmod +x ~/Downloads/installGimp.sh
Next, we can give the script a test run to check that it works. We need to run it as root so don’t forget the sudo command.
Neils-MacBook-Pro:Gimp % sudo ./installGimp.sh
Fri  9 Apr 2021 15:12:42 BST | Creating [/Library/Logs/Microsoft/IntuneScripts/installGimp] to store logs

##

# Fri  9 Apr 2021 15:12:42 BST | Logging install of [Gimp] to [/Library/Logs/Microsoft/IntuneScripts/installGimp/Gimp.log]


Fri  9 Apr 2021 15:12:42 BST | Checking if we need Rosetta 2 or not
Fri  9 Apr 2021 15:12:42 BST | Waiting for other [/usr/sbin/softwareupdate] processes to end
Fri  9 Apr 2021 15:12:42 BST | No instances of [/usr/sbin/softwareupdate] found, safe to proceed
Fri  9 Apr 2021 15:12:42 BST | [Intel(R) Core(TM) i9-9880H CPU @ 2.30GHz] found, Rosetta not needed
Fri  9 Apr 2021 15:12:42 BST | Checking if we need to install or update [Gimp]
Fri  9 Apr 2021 15:12:42 BST | [Gimp] not installed, need to download and install
Fri  9 Apr 2021 15:12:42 BST | Dock is here, lets carry on
Fri  9 Apr 2021 15:12:42 BST | Starting downlading of [Gimp]
Fri  9 Apr 2021 15:12:42 BST | Waiting for other [curl] processes to end
Fri  9 Apr 2021 15:12:42 BST | No instances of [curl] found, safe to proceed
Fri  9 Apr 2021 15:12:42 BST | Downloading Gimp
Fri  9 Apr 2021 15:13:13 BST | Downloaded [Gimp.app] to [/var/folders/zz/zyxvpxvq6csfxvn_n0000000000000/T/tmp.WlgvmHH8/gimp.dmg]
Fri  9 Apr 2021 15:13:13 BST | Detected install type as [DMG]
Fri  9 Apr 2021 15:13:13 BST | Waiting for other [/Applications/Gimp.app/Contents/MacOS/gimp] processes to end
Fri  9 Apr 2021 15:13:13 BST | No instances of [/Applications/Gimp.app/Contents/MacOS/gimp] found, safe to proceed
Fri  9 Apr 2021 15:13:13 BST | Waiting for other [installer -pkg] processes to end
Fri  9 Apr 2021 15:13:13 BST | No instances of [installer -pkg] found, safe to proceed
Fri  9 Apr 2021 15:13:13 BST | Waiting for other [rsync -a] processes to end
Fri  9 Apr 2021 15:13:13 BST | No instances of [rsync -a] found, safe to proceed
Fri  9 Apr 2021 15:13:13 BST | Waiting for other [unzip] processes to end
Fri  9 Apr 2021 15:13:13 BST | No instances of [unzip] found, safe to proceed
Fri  9 Apr 2021 15:13:13 BST | Installing [Gimp]
Fri  9 Apr 2021 15:13:13 BST | Mounting Image
Fri  9 Apr 2021 15:13:30 BST | Copying app files to /Applications/Gimp.app
Fri  9 Apr 2021 15:22:28 BST | Un-mounting [/var/folders/zz/zyxvpxvq6csfxvn_n0000000000000/T/tmp.WlgvmHH8/Gimp]
Fri  9 Apr 2021 15:22:28 BST | [Gimp] Installed
Fri  9 Apr 2021 15:22:28 BST | Cleaning Up
Fri  9 Apr 2021 15:22:28 BST | Fixing up permissions
Fri  9 Apr 2021 15:22:30 BST | Application [Gimp] succesfully installed
Fri  9 Apr 2021 15:22:31 BST | Writing last modifieddate [Tue, 06 Apr 2021 14:04:10 GMT] to [/Library/Logs/Microsoft/IntuneScripts/installGimp/Gimp.meta]
Once that’s done, try to launch the Gimp application to check that it installed correctly and that it works ok. Press CMD+Space and type in ‘Gimp’, then press Return. The Gimp splash screen should appear, and the application should start.
 Screenshot of the GIMP splash screen
Assuming everything went well to this point, all we need to do now is to deploy the script via Intune.
Step 4 – Deploy the bash script via the Intune scripting agent.
At this point we have a script that we’re confident works when we run it locally and so the next step is to upload it to Intune and assign it to some test users to check that it behaves as we expect when it’s run via the Intune Scripting Agent.
To deploy the script via Intune:
- Sign in to the Microsoft Endpoint Manager admin center.
- Select Devices > macOS > Shell scripts > Add
- Enter a Name and Description for the script and click Next
- Enter the script details
- Select the ~/Downloads/InstallGimp.sh script file
- Run script as signed in user: No
- Hide script notification on devices: Yes
- Script frequency: Every 1 day (this is to handle updates, more on this later)
- Number of times to retry if script fails: 3
 Example script properties for macOS scripts in Intune
- Click Next.
- Assign Scope Tags if you need them, click Next.
- Under Required click Add group and search for an appropriate group to target the script to. Note: At this stage a test group would probably be wise.
- Click Next, review and then Add to complete the assignment.
Next, we need to find a test device that we can use to check the deployment on.
- Identify a test device that is enrolled into Intune as a user in the group that you assigned the script to.
- On that device press CMD+Space and type ‘Company Portal’ and press Enter.
- If prompted, click Sign In and enter the users’ credentials.
- In the Company Portal app, press Option+CMD+S to trigger a device check-in. Note, doing this on the device via Company Portal calls the script agent to check-in. Also, if you do this from the Microsoft Endpoint Manager admin center, the script agent will not check-in at the same time.
The final step on the client Mac is to check that the app has installed, and we can launch it. Press CMD+Space and type “Gimp” and press Enter. The Gimp app should launch.
 Example of launching the Gimp app to validate app installation on a macOS device
At this stage we’re happy that the script deploys the app successfully. All that is left is to set the assignment policy of the script to include all the users that you need to install the Gimp app to.
Handling version updates
Some apps handle updates automatically and some apps don’t. For this example, Gimp doesn’t automatically update so we’re going to need to handle that. Luckily, the example script already handles updates so all that we need to do is to upload a newer version of gimp.dmg to Blob storage or change the URL in the script to a newer version on the Gimp website. It’s really that simple.
If you want more detail, when we created our script policy in Intune, we set the schedule to run every day. To prevent the script from installing Gimp every time it runs, there are a few functions to handle updates and downloads.
- updateCheck()
This function first checks the autoupdate variable. If set to true and the app is already installed, the script exits, If set to false it compares the last-modified http header of the file that we downloaded to install last time against the current last-modified date of the download URL. If the dates are the same, the script drops out with nothing to do. If they are different, the script will attempt to download and install the update.
- waitForProcess()
This function is called just before the app is installed. It pauses the script while the given process is running. If the app is running the script will wait until it is closed by the end user. The end user is not prompted, the script will run silently in the background. If you set terminateprocess=”true” the function will attempt to terminate the app.
We can see these functions in action simply by running the script twice. On a test machine, if we download installGimp.sh and run it twice, on the second time through we’ll see the following log entry.
Neils-MacBook-Pro:Gimp % % sudo ./installGimp.sh

##
# Tue  6 Apr 2021 14:46:09 BST | Logging install of [Gimp] to [/Library/Logs/Microsoft/IntuneScripts/installGimp/Gimp.log]


Tue  6 Apr 2021 14:46:09 BST | Checking if we need Rosetta 2 or not
Tue  6 Apr 2021 14:46:09 BST | [Intel(R) Core(TM) i9-9880H CPU @ 2.30GHz] found, Rosetta not needed
Tue  6 Apr 2021 14:46:09 BST | Checking if we need to install or update [Gimp]
Tue  6 Apr 2021 14:46:09 BST | [Gimp] already installed, let's see if we need to update
Tue  6 Apr 2021 14:46:10 BST | No update between previous [Tue, 06 Apr 2021 12:03:05 GMT] and current [Tue, 06 Apr 2021 12:03:05 GMT]
Tue  6 Apr 2021 14:46:10 BST | Exiting, nothing to do
We can see from the log that there has been no update and so the script doesn’t re-install Gimp.
To show the update process working, update the gimp.dmg file in Azure Blob storage. Repeat steps 1 and 2 above.
- Download the application DMG.
- Upload the DMG to Azure Blob storage.
During step 2, make sure that you use the same file name and that you check the Overwrite if files already exist checkbox.
 Screenshot of the Overwrite if files already exist checkbox option in Intune
Once the upload is complete, re-run the script on the test device.
Neils-MacBook-Pro:Gimp % sudo ./installGimp.sh

##
# Tue  6 Apr 2021 15:05:23 BST | Logging install of [Gimp] to [/Library/Logs/Microsoft/IntuneScripts/installGimp/Gimp.log]


Tue  6 Apr 2021 15:05:23 BST | Checking if we need Rosetta 2 or not
Tue  6 Apr 2021 15:05:23 BST | [Intel(R) Core(TM) i9-9880H CPU @ 2.30GHz] found, Rosetta not needed
Tue  6 Apr 2021 15:05:23 BST | Checking if we need to install or update [Gimp]
Tue  6 Apr 2021 15:05:23 BST | [Gimp] already installed, let's see if we need to update
Tue  6 Apr 2021 15:05:23 BST | Update found, previous [Tue, 06 Apr 2021 12:03:05 GMT] and current [Tue, 06 Apr 2021 14:04:10 GMT]
Tue  6 Apr 2021 15:05:23 BST | Starting downlading of [Gimp]
Tue  6 Apr 2021 15:05:23 BST | Waiting for other Curl processes to end
Tue  6 Apr 2021 15:05:23 BST | No instances of Curl found, safe to proceed
Tue  6 Apr 2021 15:05:23 BST | Octory found, attempting to send status updates
Tue  6 Apr 2021 15:05:23 BST | Updating Octory monitor for [Gimp] to [installing]
Tue  6 Apr 2021 15:05:24 BST | Downloading Gimp
Tue  6 Apr 2021 15:06:00 BST | Downloaded [Gimp.app]
Tue  6 Apr 2021 15:06:00 BST | Checking if the application is running
Tue  6 Apr 2021 15:06:00 BST | [Gimp] isn't running, lets carry on
Tue  6 Apr 2021 15:06:00 BST | Installing [Gimp]
Tue  6 Apr 2021 15:06:00 BST | Octory found, attempting to send status updates
Tue  6 Apr 2021 15:06:00 BST | Updating Octory monitor for [Gimp] to [installing]
Tue  6 Apr 2021 15:06:00 BST | Mounting [/tmp/gimp.dmg] to [/tmp/Gimp]
Tue  6 Apr 2021 15:06:21 BST | Copying /tmp/Gimp/*.app to /Applications/Gimp.app
Tue  6 Apr 2021 15:15:43 BST | Un-mounting [/tmp/Gimp]
Tue  6 Apr 2021 15:15:44 BST | [Gimp] Installed
Tue  6 Apr 2021 15:15:44 BST | Cleaning Up
Tue  6 Apr 2021 15:15:44 BST | Fixing up permissions
Tue  6 Apr 2021 15:15:46 BST | Application [Gimp] succesfully installed
Tue  6 Apr 2021 15:15:46 BST | Writing last modifieddate [Tue, 06 Apr 2021 14:04:10 GMT] to [/Library/Logs/Microsoft/IntuneScripts/installGimp/Gimp.meta]
Tue  6 Apr 2021 15:15:46 BST | Octory found, attempting to send status updates
Adapting the example script to something else: Yammer
We have our Gimp script working as we want, but what about other installer files? In this example, we are going to look at modifying the InstallGimp.sh script to handle Yammer, which is also provided as a DMG file.
The completed script for Yammer is available here. If we look at a comparison of changes between the installGimp.sh and installYammer.sh scripts, we can see that the only differences are on lines 21-27.
 Comparison of changes between the installGimp.sh and installYammer.sh scripts
The changes on line 6 are just a description of the script. Lines 20-27 are variables that are discussed in more detail in Step 3 above.
# User Defined variables
weburl="https://aka.ms/yammer_desktop_mac"
appname="Yammer"
app="Yammer.app"
logandmetadir="/Library/Logs/Microsoft/IntuneScripts/installYammer"
processpath="/Applications/Yammer.app/Contents/MacOS/Yammer"
terminateprocess="false"
autoUpdate=”false”
Note: That in this example we are not using Azure blob storage but the normal download URL for Yammer. After editing the script we then follow the steps in Step 4 – Deploy the bash script via the Intune scripting agent above. Once deployed, we can go to the Mac and trigger a manual check-in and then check the logs on our target Mac.
For Yammer, our new policy ID is: 010f31ef-1cfc-441b-a409-fc75e838c5d0
From the IntuneMDMDaemon*.log file we see the following:
IntuneMDM-Daemon | I | *10068 | ScriptPolicyHandler | Running script policy PolicyID: 010f31ef-1cfc-441b-a409-fc75e838c5d0
IntuneMDM-Daemon | I | *10068 | ScriptPolicyHandler | Delivering user notification. PolicyID: 010f31ef-1cfc-441b-a409-fc75e838c5d0, BlockExecutionNotifications: true
IntuneMDM-Daemon | I | 12959 | ScriptPolicyHandler | Script ran PolicyID: 010f31ef-1cfc-441b-a409-fc75e838c5d0, TotalRetries: 0, Status: Success, ExitCode: 0
IntuneMDM-Daemon | I | 12959 | ScriptPolicyHandler | Script policy succeeded PolicyID: 010f31ef-1cfc-441b-a409-fc75e838c5d0, TotalRetries: 0, ExitCode: 0
IntuneMDM-Daemon | I | 12959 | ScriptPolicyHandler | Adding script to scheduler PolicyID: 010f31ef-1cfc-441b-a409-fc75e838c5d0
And from the /Library/Logs/Microsoft/IntuneScripts/installYammer/Yammer.log we see the following:
Sat 10 Apr 2021 17:38:30 BST | Creating [/Library/Logs/Microsoft/IntuneScripts/installYammer] to store logs

##
# Sat 10 Apr 2021 17:38:30 BST | Logging install of [Yammer] to [/Library/Logs/Microsoft/IntuneScripts/installYammer/Yammer.log]


Sat 10 Apr 2021 17:38:30 BST | Checking if we need Rosetta 2 or not
Sat 10 Apr 2021 17:38:30 BST | Waiting for other [/usr/sbin/softwareupdate] processes to end
Sat 10 Apr 2021 17:38:30 BST | No instances of [/usr/sbin/softwareupdate] found, safe to proceed
Sat 10 Apr 2021 17:38:30 BST | [Intel(R) Core(TM) i9-9880H CPU @ 2.30GHz] found, Rosetta not needed
Sat 10 Apr 2021 17:38:30 BST | Checking if we need to install or update [Yammer]
Sat 10 Apr 2021 17:38:30 BST | [Yammer] not installed, need to download and install
Sat 10 Apr 2021 17:38:30 BST | Dock is here, lets carry on
Sat 10 Apr 2021 17:38:30 BST | Starting downlading of [Yammer]
Sat 10 Apr 2021 17:38:30 BST | Waiting for other [curl] processes to end
Sat 10 Apr 2021 17:38:30 BST | No instances of [curl] found, safe to proceed
Sat 10 Apr 2021 17:38:30 BST | Downloading Yammer
Sat 10 Apr 2021 17:38:49 BST | Unknown file type [/var/folders/zz/zyxvpxvq6csfxvn_n0000000000000/T/tmp.U6LKs7Fb/yammer_desktop_mac], analysing metadata
Sat 10 Apr 2021 17:38:49 BST | Downloaded [Yammer.app] to [/var/folders/zz/zyxvpxvq6csfxvn_n0000000000000/T/tmp.U6LKs7Fb/install.dmg]
Sat 10 Apr 2021 17:38:49 BST | Detected install type as [DMG]
Sat 10 Apr 2021 17:38:49 BST | Waiting for other [/Applications/Yammer.app/Contents/MacOS/Yammer] processes to end
Sat 10 Apr 2021 17:38:49 BST | No instances of [/Applications/Yammer.app/Contents/MacOS/Yammer] found, safe to proceed
Sat 10 Apr 2021 17:38:49 BST | Installing [Yammer]
Sat 10 Apr 2021 17:38:49 BST | Mounting Image
Sat 10 Apr 2021 17:38:56 BST | Copying app files to /Applications/Yammer.app
Sat 10 Apr 2021 17:39:14 BST | Un-mounting [/var/folders/zz/zyxvpxvq6csfxvn_n0000000000000/T/tmp.U6LKs7Fb/Yammer]
Sat 10 Apr 2021 17:39:14 BST | [Yammer] Installed
Sat 10 Apr 2021 17:39:14 BST | Cleaning Up
Sat 10 Apr 2021 17:39:14 BST | Fixing up permissions
Sat 10 Apr 2021 17:39:14 BST | Application [Yammer] succesfully installed
To validate the installation, launch the Yammer app by pressing CMD+Space and typing “Yammer” and then Enter. Assuming everything works as expected, the next step is to repeat step 4 above (Deploy the bash script with Intune Scripting Agent) and assign it to your users.
What about other package types? APP or PKG?
This approach can be used for any macOS installer that can be triggered from the shell. The script attempts to determine the correct installer type from the downloaded file.
More examples using the same script can be found here:
The best way to get started is to download one of the example scripts and modify it for your application.
Some of the examples use weburls on Azure blob storage and others pull directly from the source download sites (like Company Portal). The script uses curl -OJL <url> to download the installer and create the temp file.
Note: If the app you are trying to deploy is provided to you as an .app file, you can compress the app into a ZIP and use the examples above.
All the examples include a function to handle Rosetta 2 deployment for Apple Silicon devices. That means these scripts can be deployed straight to an M1 Mac and it will automatically handle the installation of Rosetta 2 so that the application can run.
Troubleshooting
Using Microsoft Endpoint Manager admin center
Intune also reports the status of each script in the UI.
- Open the Microsoft Endpoint Manager admin center.
- Select Devices > macOS > Shell scripts and select the script you want to troubleshoot.
- Click on Device Status and then select the device you are troubleshooting.
- Click on Show details and Intune will display the last output from the script.
 Example screenshot of the GIMP app Device status in Intune
If we need more information, we can use the Intune script agent to gather logs from the Mac for us remotely.
- Click on Collect Logs and enter in the name of the log file you want to retrieve. In our example that is /Library/Logs/Microsoft/IntuneScripts/installGimp/Gimp.log.
 Example screenshot of collecting logs with the GIMP application in Intune
- The next time that the script agent checks in (8 hour cycle), the logs will be returned to Intune. You can force this by having the end user open Company Portal and clicking Check Settings.
Note: On the device, in the IntuneMDMDaemon log file you can see log upload requests and completions by searching for “LogUploadResultItem”.
IntuneMDM-Daemon | I | 255380 | PersistenceManager | Storing LogUploadResultItem
IntuneMDM-Daemon | I | 256078 | PersistenceManager | Getting all LogUploadResultItem
IntuneMDM-Daemon | I | *235677 | PersistenceManager | Deleting all LogUploadResultItem
IntuneMDM-Daemon | I | 256953 | PersistenceManager | Getting all LogUploadResultItem
- Once the logs have been returned, the Download logs button will be shown. Click this to download the device logs as a zip file.
 Example screenshot of the “Download logs” button in Intune
- Inside the zip file will be the file we requested, plus the two Intune script agent (user) and daemon (root) logs, which are always returned.
 Example screenshot of the Downloaded logs from Intune
To make sense of the logs, it’s useful to know the policy ID of the script we are troubleshooting. We can get this from the Microsoft Endpoint Manager admin center.
- Open the Microsoft Endpoint Manager admin center.
- Select Devices > macOS > Shell scripts.
- Find the script in the list and click on it, make a note of the policyID in the browser URL. We will use it to filter the log
In my example, the URL is: https://endpoint.microsoft.com/#blade/Microsoft_Intune_DeviceSettings/ConfigureWMPolicyMenu/overview/policyId/7edf5358-c157-437a-8bc0-0a4889b20ae4/policyType/1.
The easiest way to view the logs is via the Console app.
- Press CMD+Space and type ‘Console’ and press Enter, this will open the Console app.
- Click on File > Open and navigate to the IntuneMDMDaemon*log.
- Paste the policyID from step 3 above into the search box and it should filter the log for only the lines referring to our script.
 Example screenshot of filtering out the IntuneMDMDaemon*log on a macOS device
The key things to look for in the IntuneMDMDaemon log are as follows:
- Running script policy PolicyID: 7edf5358-c157-437a-8bc0-0a4889b20ae4
- Script policy succeeded PolicyID: 7edf5358-c157-437a-8bc0-0a4889b20ae4
Note: You can also view the logs directly on the Mac if you have access. Use Console again to view them.
- /Library/Logs/Microsoft/Intune [For scripts that do not run as the end user]
- ~/Library/Logs/Microsoft/Intune [For scripts that do run as the end user]
Script Log
This is the log that is generated by each script so the output will be different depending on what you put in your script. The best way to view is in the Console app. Search for ‘Gimp’. The log file output should look very similar to the output we saw when we ran the script manually.
 Example screenshot of the log output for the GIMP app on a macOS device
Version Reporting
One of the biggest problems with this approach of app deployment is that apps deployed in this way do not show up in the ‘managed apps’ list for each managed Mac in Intune. To help mitigate this a little, we can use Intune’s custom attribute feature to run a shell script on the Mac and return the version of our app.
We have an example custom attribute script to return the version of a Mac app here.
To deploy the custom attribute script:
- Download the example script to ~Downloads. Open in Visual Studio Code and modify/test as required
- Open the Microsoft Endpoint Manager admin center
- Select Devices > macOS > Custom attributes > Add
- Enter a Name and Description for the script and click Next
- Set the data type of attribute to String
- Select the ~/Downloads/fetchGimpversion.sh
- Click Next
- Assign Scope Tags if you need them, click Next
- Under Required click Add group and search for an appropriate group to target the script to
- Click Next, review and then Add to complete the assignment
The next time that the Intune macOS script agent checks-in to Intune, it will run the script and return the value. To see a list of the returned values:
- Open the Microsoft Endpoint Manager admin center
- Select Devices > macOS > Custom attributes
- Select the custom attribute you created > Device Status
 Example screenshot of the previously created Custom attributes in Intune
This report can be exported to a CSV file if required.
Obviously, this is a basic example, but it could be expanded to return any information that you can gather from a shell script.
Summary
Hopefully this blog and example scripts have provided some guidance around the possibilities of deploying apps via the Intune script agent and Azure Blob storage (or other web hosting sites).
This approach is especially useful for applications that cannot be deployed via the other App deployment scenarios that Intune provides.
Advantages |
Disadvantages |
- Extremely flexible.
- No need for build certificate to sign custom packages.
- More detailed logging capabilities.
- Can handle dependencies (such as Rosetta on M1 devices).
|
- Requires some bash scripting skills.
- Apps deployed via this method don’t show up in “Managed Apps” UI in Intune. Can mitigate this somewhat with ‘custom attributes’.
- The scripts deployed run at your own risk and you are entirely responsible for them and any damage they may do.
|
For more information on deploying scripts with Intune see our documentation here. We also have a broader set of shell script examples on the Intune team GitHub Repository.
Let us know if you have any questions by replying to this post or reaching out to @IntuneSuppTeam on Twitter.
by Contributed | Apr 27, 2021 | Technology
This article is contributed. See the original author and article here.
Introduction:
This document provides information about overall working of LLAP daemons and performance considerations. In general, performance tuning is an ongoing act and there is no silver bullet to solve all your performance issues. Performance improvements should be done in two stages, performance analysis and performance tuning. In the performance analysis step, goal is to find the bottlenecks and areas to focus; and the second step is do incremental tuning for the bottlenecks identified.
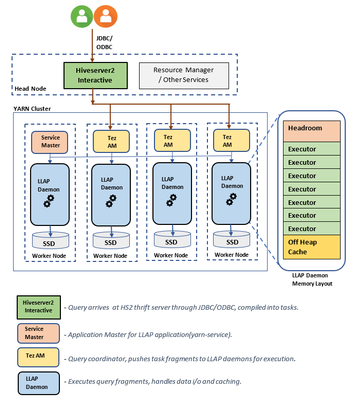
LLAP Architecture/Components:
LLAP execution and sizing configurations:
The following are some of the configurations that can be adjusted based on your workload for improved performance. Please refer to Azure HDInsight LLAP sizing guide for detailed information here.
- Use dedicated YARN queue for LLAP daemons, this ensures the priority scheduling and resource management for other applications.
Total Memory available for LLAP queue per worker node can be calculated as follows:
This value depends on the total amount of memory available for all YARN containers on a node(yarn.nodemanager.resource.memory-mb) and the percentage of capacity configured for llap queue (yarn.scheduler.capacity.root.llap.capacity).
Total memory for LLAP queue on worker node = Total memory available for all YARN containers on a node x Percentage of capacity for llap queue.
Please note: If your workload is read-only operations, then setting it as high as 90% of the capacity should work. However, if your workload is mix of update/delete/merge operations using managed tables, it’s recommended to give 85% of the capacity for llap queue. The remaining 15% capacity can be used by other tasks such as compaction etc. to allocate containers from the default queue. That way tasks in the default queue won’t deprive YARN of resources.
For E32 v3 worker, this value is (200 GB x 0.85) = 170 GB.
- Configure number of concurrent queries same to the for the peak usage scenario to avoid manual intervention because Autoscale events don’t change the Hive configuration Maximum Total Concurrent Queries in Ambari. This means that the Hive Server 2 Interactive Service can handle only the given number of concurrent queries at any point of time even if the Interactive Query daemons count are scaled up and down based on load and schedule.
Note (Limitation wrt AutoScaling):
In case of autoscale-enabled Interactive Query clusters, an autoscale up/down event also scales up/down the number of Interactive Query daemons to the number of active worker nodes. The change in the number of daemons is not persisted in the num_llap_nodes configuration in Ambari. If Hive services are restarted manually, the number of Interactive Query daemons is reset as per the configuration in Ambari.
If the Interactive Query service is manually restarted, you need to manually change the num_llap_node configuration (the number of node(s) needed to run the Hive Interactive Query daemon) under Advanced hive-interactive-env to match the current active worker node count.
- Configure yarn.scheduler.maximum-allocation-vcores.
This value indicates the maximum number of virtual CPU cores for every container request at the Resource Manager. Requesting a higher number of vcores than this value won’t take effect. It’s a global property of the YARN scheduler. For LLAP daemon container, this value can be set to 75% of total available vcores. The remaining 25% should be reserved for Node Manager, Data Node, and other services running on the worker nodes.
For E32 v3 VMs and 75% of total 32 vcores can be used by LLAP daemon container, the recommended value is 24.
- Configure LLAP daemon size:
LLAP daemon container size = (Total memory for LLAP queue on a workernode) – (Tez AM memory per node) – (Service Master container size)
There is only one Service Master (Application Master for LLAP service) on the cluster spawned on one of the worker nodes. For calculation purpose, we consider one service master per worker node.
For E32 v3 worker node, HDI 4.0 - the recommended value is (170 GB - 4 GB - 1 GB)) = 165 GB
- Number of executors per LLAP daemon:
This value depends on the number of vcores, the amount of memory used per executor, and the amount of total memory available for LLAP daemon container. The number of executors can be oversubscribed to 120% of available vcores per worker node.
For E32 v3, the recommended value for num of executors is (32 vcores x 120%) ~= 38 on each worker node considering 3GB per executor.
- Configure hive.llap.io.threadpool.size to value same as number of executors.
Recommendation is to monitor heap usage at peak workloads and increase the number of executors making sure that Number of executors times heap usage per executor does not exceed total llap daemon heap size.
For example, let’s assume that the LLAP daemon is configured for 20 executors and 80 GB of heap size, but your max heap space usage is 60GB. Then the average use per executor is 3 GB (60 GB divided by 20 executors). In such cases, your configured heap is underutilized, and you still have a 20GB room (80 GB – 60 GB). You can increase number of executors by 6 (20 GB/3GB ~= 6) from 20 to 26. This provides increased task parallelism and may result into higher throughput.
A thumb rule would be, for each LLAP daemon,
(Number of executors x Heap size per executor (Tez container size)) <= (total heap size for LLAP daemon)
You can get the information for heap space usage and executor’s usage from Grafana dashboards for each individual daemon as well as the average for all daemons. Pick the max value for calculations.
Increasing number of executors beyond the above-mentioned thumb rule may provide you better performance at a times but can also result into occasional failures and instability. Please refer to HDInsight Hive/LLAP sizing guide for details.
- Configuration: hive.llap.daemon.yarn.container.mb:
LLAP daemon runs as a YARN container on each worker node. The total memory size for the LLAP daemon container depends on the following factors. LLAP daemon container memory consists of the following components :
- Head room
- Heap memory used by executors (Xmx)
- In-memory cache per daemon (its off-heap memory size, not applicable when SSD cache is enabled)
- In-memory cache metadata size (applicable only when SSD cache is enabled)
Headroom size: This size indicates a portion of off-heap memory used for Java VM overhead (metaspace, threads stack, GC, data structures, etc.). Generally, this overhead is about 6% of the heap size (Xmx). To be on the safer side, this value can be calculated as 6% of total LLAP daemon memory size.
For E32 v3, the recommended value is ceil(170 GB x 0.06) ~= 10 GB.
Heap size(Xmx:( It is amount of heap memory available for all executors. Total Heap size = Number of executors x 3 GB
For E32 v3, this value is 38 x 3 GB = 114 GB
LLAP cache size: LLAP supports both in-memory (RAM) and SSD cache. The cache size calculation would differ when SSD cache is enabled. Setting hive.llap.io.allocator.mmap = true will enable SSD caching. When SSD cache is enabled, some portion of the RAM memory will be used to store the metadata (headers, index, etc) for the cached data on SSD. The metadata is expected to be approximately 8% of SSD cache size and it is stored in off-heap memory.
SSD Cache in-memory metadata size = LLAP daemon container size – (Head room + Heap size)
For E32 v3, with HDI 4.0, SSD cache in-memory metadata size = 170 GB - (4 GB + 114 GB) = 52 GB
When SSD cache is disabled, the in-memory cache is amount of memory that is left after taking out Headroom size and Heap size from the LLAP daemon container size.
In-memory(off-heap) cache size = LLAP daemon container size – (Head room + Heap size)
Recommendation is to monitor the LLAP cache uses by checking Grafana dashboards or running sample workload queries via beeline and checking execution summary. LLAP is optimized for interactive queries, if you are running ETL workloads that refer to data only once would not benefit from caching. In such cases, you can disable caching by setting “hive.llap.io.enabled=false” at session level.
- Adjusting Map Join memory:
This configuration determines the threshold for MapJoin selection by Hive optimizer that considers over subscription of memory from other executors to have more room for in-memory hash tables to allow more map join conversions. Considering 3 GB per executor, this size can be oversubscribed to 3 GB, but some heap memory may also be used for sort buffers, shuffle buffers, etc. by the other operations.
For E32 v3, with 3 GB memory per executor, it's recommended to set this value to 2048 MB.
- The values for num_llap_nodes, num_llap_nodes_for_llap_daemons are recommended to be set as same as the number of LLAP worker nodes.
- Depending the volume of data being queried and result, tune tez.grouping.max.size and tez.grouping.min.size. Decrease for better latency or Increase for more throughput.
Data Storage Format:
Data storage format plays a critical role in Hive/LLAP performance.
- It is recommended to use ORC data storage format for taking advantage of efficient compression, fast reads. ORC gives the best performance overall.
- Avoid using Text-based storage formats for large production systems. If you have data generated in Text formats (CSV, JSON, etc.) , you can create a Hive external hive table, and then convert it to ORC format for regular querying and analysis. (For example: CREATE TABLE orc_table STORED AS ORC AS SELECT * FROM text_table)
Both ORC and Parquet provide a highly efficient way to store Hive data in a columnar format. LLAP implementation natively supports ORC and Parquet where LLAP does not have to perform additional encoding/decoding steps. Also, it supports efficient vectorized operations on the data stored in these formats.
Hive/LLAP optimizer and execution engine can make use of metadata/indexes that are stored alongside data in ORC or Parquet format. Some of the queries can directly be served from metadata/indexes without requiring scanning through the whole data.
In the case of text formats (CSV, JSON, etc.), LLAP would require additional steps to encode/decode data before it is stored in the cache and used in vectorized operations. This overhead may contribute to delays in processing the data.
Depending on your environment, you can further tune your ORC storage formats to optimize Hive/LLAP performance by using bloom filters, configuring compression type, stripe size, using partitions, and buckets.
Hiveserver2 Interactive High Availability
Hiveserver2 Interactive (HSI) supports high availability (HA) in the form of an Active/Passive standby configuration. Only one HSI can be in Active mode, whilst one or more additional HSI instances are in passive standby mode and ready to takeover on Active HSI failure.
To connect to the active leader HSI instance, clients use dynamic service discovery. For example:
jdbc:hive2://<zookeeper_quorum>;serviceDiscoveryMode=zooKeeperHA;zooKeeperNamespace=hiveserver2-interactive
It is important to note that zooKeeperHA service discovery mode is distinct from zooKeeper discovery mode used with traditional Hiveserver2.
With zooKeeperHA, the Hive connection will iterate through the list of HSI instances registered in ZooKeeper and identify the elected leader. The node information (hostname:port) for the leader is returned to the client, allowing it to connect to the Active HSI instance.
If the Active HSI loses its leadership (for example, a long GC pause resulting in session/connection timeout or network split) leadership is revoked.
Before implementing HSI HA you should confirm that all JDBC and ODBC drivers used within your organization include support for zooKeeperHA service discovery.
LLAP Resource Monitoring and Recommendations
- Hive Interactive UI:
Currently, Hive Interactive UI does not work for ESP LLAP clusters. The following workaround can be applied to make it work.
Step-1: Add the below configs in Ambari:
hive.server2.webui.use.spnego -> true
hive.server2.webui.spnego.principal -> HTTP/_HOST@domain.com e.g. HTTP/_HOST@SECUREHADOOPRC.ONMICROSOFT.COM for tip clusters
hive.server2.webui.spnego.keytab ->/etc/security/keytabs/spnego.service.keytab
Custom hive-site:
hive.users.in.admin.role -> Comma Separated list of users who can access UI e.g. rsadmin2 (for tip clusters) or * if we want all users to be able to access.
Step – 2: Restart Hive
All the pages work except for /logs in HS2UI - need to backport [HIVE-14737] Problem accessing /logs in a Kerberized Hive Server 2 Web UI – ASF JIRA (apache.org)
Sample Curl command to access these pages programmatically:
curl –negotiate -u : http://hn0-kevx5t.securehadooprc.onmicrosoft.com:10502/jmx
The following table details the available UI pages and useful endpoints for metric scraping etc.
http://<host>:15002
|
Active sessions, open queries, and last 25 closed queries overview
|
http://<host>:15002/jmx
|
Hiveserver2 system metrics
|
http://<host>:15002/conf
|
Current Hiveserver2 configuration
|
http://<host>:15002/peers
|
Overview of Hiveserver2 Interactive instances in the cluster
|
http://<host>:15002/stacks
|
Show a stack trace of all JVM threads
|
http://<host>:15002/llap.html
|
Status of the LLAP daemons
|
Text
|
http://<host>:15002/conflog
|
Each LLAP daemon has a Monitor that listens on port 15002 by default. You can use the LLAP status command or the LLAP Daemons tab on the Hiveserver2 Interactive Web UI to quickly determine where the LLAP daemons are running.
Set hive.tez.exec.print.summary to true in order to report data and metadata cache hits and misses for each query you run.
LLAP Executor metrics and LLAP Cache metrics Dashboard:

Make sure your execution slots are available to run the query fragments. Also, check Evicted, Killed and Rejected task requests. If more than 90% of your execution slots are occupied, then system you may have to scale-out your LLAP cluster to be able to handle increased workload.
Run sample queries (especially long running) from your workload and find out how many resources they consume for a better understanding of the overall workload. Also, accommodate for any future additional workload.
Using beeline, you can set the following at session level and run your queries.
set hive.tez.exec.print.summary=true;
set hive.query.results.cache.enabled=false;
- Analyze query execution summary
Find out time consumed in different stages of query processing.

- Analyze LLAP Cache usage:
Usually, higher the DATA_HIT number better the performance as data can be directly read from the cache and no additional IO is required.

- Analyze LLAP Tasks execution pattern
With an active workload management plan, you will have to run your sample queries with actual user, group or app name based on your query pool mapping in your resource plan.
More time spent in SPECULATIVE_RUNNING and SPECULATIVE_QUEUED would mean that the query pool corresponding to the query needs more resource in the pool and it is using resources from the other query pools when possible. However, these speculative tasks will get evicted when other query pools need resources to serve its queries.

References:
https://docs.microsoft.com/en-us/azure/hdinsight/interactive-query/hive-llap-sizing-guide
https://docs.microsoft.com/en-us/azure/hdinsight/interactive-query/apache-interactive-query-get-started
https://docs.microsoft.com/en-us/azure/cloud-services/cloud-services-sizes-specs#dv2-series

by Contributed | Apr 27, 2021 | Technology
This article is contributed. See the original author and article here.
What do you do when you realize you are using too much paper? Rifling through filing cabinets, storage boxes and stacks of paper in search of necessary documents leads to productivity loss and environmental impact.
The Intrazone continues to spotlight Microsoft partners, the people and companies who deliver solutions and services to empower our customers to achieve more. In our 10th partner episode, we talk with Jason Burian (VP of product management | KnowledgeLake) and his customer, Tye Eyden (Collaboration business systems analyst | New Belgium Brewing).
In this episode, we focus on the needs of a growing company, New Belgium Brewing, faced with numerous challenges. They desperately wanted to move away from paper-based processes. With their portfolio of beers growing, and a second brewing facility coming online, they needed help from partner, KnowledgeLake, to optimize digitize invoices, improve employee time and efficiency while maintaining environmental stewardship, making world class beer, and having fun.
Like the Lorax, KnowledgeLake speaks for the trees. And we’re all listening.
Grab your favorite bevvy, and … on with the show.
https://html5-player.libsyn.com/embed/episode/id/18867890/height/90/theme/custom/thumbnail/yes/direction/backward/render-playlist/no/custom-color/247bc1/
Subscribe to The Intrazone podcast! Listen this partner episode on KnowledgeLake with New Belgium Brewing + show links and more below.
Left-to-right: Jason Burian (VP of product management | KnowledgeLake) and his customer, Tye Eyden (Collaboration business systems analyst | New Belgium Brewing). [The Intrazone guests]
Link to articles mentioned in the show:
Subscribe today!
Listen to the show! If you like what you hear, we’d love for you to Subscribe, Rate and Review it on iTunes or wherever you get your podcasts.
Be sure to visit our show page to hear all the episodes, access the show notes, and get bonus content. And stay connected to the SharePoint community blog where we’ll share more information per episode, guest insights, and take any questions from our listeners and SharePoint users (TheIntrazone@microsoft.com). We, too, welcome your ideas for future episodes topics and segments. Keep the discussion going in comments below; we’re hear to listen and grow.
Subscribe to The Intrazone podcast! Listen this partner episode on KnowledgeLake with New Belgium Brewing.
Thanks for listening!
The SharePoint team wants you to unleash your creativity and productivity. And we will do this, together, one partner at a time.
The Intrazone links
+ Listen to other Microsoft podcasts at aka.ms/microsoft/podcasts.
![Left to right [The Intrazone co-hosts]: Chris McNulty, director (SharePoint/Viva – Microsoft) and Mark Kashman, senior product manager (SharePoint – Microsoft).](https://www.drware.com/wp-content/uploads/2021/04/fb_image-89.jpeg "Chris-Mark_in-studio.jpg") Left to right [The Intrazone co-hosts]: Chris McNulty, director (SharePoint/Viva – Microsoft) and Mark Kashman, senior product manager (SharePoint – Microsoft).
Left to right [The Intrazone co-hosts]: Chris McNulty, director (SharePoint/Viva – Microsoft) and Mark Kashman, senior product manager (SharePoint – Microsoft).
 The Intrazone, a show about the Microsoft 365 intelligent intranet (aka.ms/TheIntrazone)

by Scott Muniz | Apr 27, 2021 | Security, Technology
This article is contributed. See the original author and article here.
Official websites use .gov
A .gov website belongs to an official government organization in the United States.

Secure .gov websites use HTTPS A
lock ( )
) or
https:// means you’ve safely connected to the .gov website. Share sensitive information only on official, secure websites.
by Scott Muniz | Apr 27, 2021 | Security, Technology
This article is contributed. See the original author and article here.
Google has released Chrome version 90.0.4430.93 for Windows, Mac, and Linux. This version addresses vulnerabilities that an attacker could exploit to take control of an affected system.
CISA encourages users and administrators to review the Chrome Release Note and apply the necessary updates.

by Contributed | Apr 27, 2021 | Business, Microsoft 365, Technology
This article is contributed. See the original author and article here.
Today, we’re pleased to announce that the Microsoft Office and OneNote apps are now available for Amazon Fire tablets in the Amazon Appstore. Combined with the Outlook and OneDrive apps already available for Amazon Fire tablets, these apps extend your Microsoft 365 benefits across even more devices. We’ve timed the release of these apps in…
The post Microsoft 365 apps now available for Amazon Fire tablets appeared first on Microsoft 365 Blog.
Brought to you by Dr. Ware, Microsoft Office 365 Silver Partner, Charleston SC.
by Contributed | Apr 27, 2021 | Technology
This article is contributed. See the original author and article here.
Today’s organizations are using multiple tools and environments for their day-to-day operation. As a result, many prefer a one central management system to operate their service across the stack. The integration of Azure Monitor Alerts with ITSM ticketing systems (e.g. ServiceNow) was created with this goal in mind.
Azure Monitor is a cloud-based offering that helps you to reliably monitor the performance and availability of your cloud services. Azure Monitor collects and analyzes telemetry from your cloud as well as on-premises environments. Azure Monitor alerts uses this data and gives proactively notifies you when a metric value or a log query result indicates a problem.
Why do we need integration between Azure Alerts and ITSM systems?
Integrating a monitoring and service management systems provides a single view of tickets/incidents in one central system regardless the underlying cloud technology. Thus, it enables a multi-cloud strategy of monitoring both cloud and on-premises services integrated with all the other monitored items in an organization.
When an organization has common processes and one unified KPI management system, they can operate across their stack view and improve per the operational and business needs.
How can we establish the integration between Azure Alerts and ITSM systems?
out of the various ways to integrate, in this article we will explore two integration options ITSM connector integration and logic app.
As a customer, you can select how you want to be notified about an alert using action group. Notification can go through email, SMS, Webhook or even an automated solution. You can also choose to use ITSM or a Logic app:
- ITSM Connector: ITSM connector lets you send alerts to an external ticketing system such as ServiceNow.
- Logic app: Logic apps let you write processing rules and use a built-in connector that will send the alerts to an external ticketing system such as ServiceNow.

What are the pros and cons for each option?
ITSM connector:
- Plug and Play: ITSM is a built-in solution within Azure Monitor, meaning that with a simple configuration you can send Azure alerts to the ticketing system.
- Bi-directional: The ITSM connector can also pull incidents and change requests from ServiceNow into an Azure Monitor Log Analytics workspace. This allows you to consume the data using Azure Monitor tools (for example using dashboard).
- Multi-Partners: The integration supports more than ServiceNow. It supports Microsoft System Center as well as BMC helix. The next generation of the integration is referred to as secure export.
Logic app:
- Flexible: Logic apps are more flexible. In the sense that you can define custom logic which builds a custom payload to send to ServiceNow when an alert fires.
- Complexity: The logic app rules can be very complex.
In conclusion, the main difference between the two is the robustness of the integration. ITSM is easy to use though albeit less flexible. Logic apps on the other hand are very flexible, but the configuration might be complex. As a customer, you need to define your priorities and evaluate which is the best solution for your organization.
by Contributed | Apr 27, 2021 | Technology
This article is contributed. See the original author and article here.
In Logic App, sometimes we need to merge two Json arrays into one based on reference ID.
The normal way is to iterate one array -> filter the items with same ID in another array -> insert the items.
But there’s another achievement to do it is using “Azure Monitor Logs” connector and pass arrays as dynamic content in the query which will be less time consumption and higher performance.
Background
In Azure Monitoring query, we can not only retrieve the data which stored in the database, but also pass dynamic content into it and convert it as data table.
https://docs.microsoft.com/en-us/azure/data-explorer/kusto/query/scalar-data-types/dynamic
Scenario
I have 2 Json arrays like following:
Array 1:
[
{
“@odata.type”: “#microsoft.graph.user”,
“id”: “e9b26715-b94e-xxxxxxxxxxxxxxxxx”,
“userPrincipalName”: “user2@xxx.onmicrosoft.com”
}
……
{
“@odata.type”: “#microsoft.graph.user”,
“id”: “8e98ee70-d769-xxxxxxxxxxxxxxxxx”,
“userPrincipalName”: “user3@xxx.onmicrosoft.com”
}
]
Array2:
[
{
“@odata.type”: “#microsoft.graph.user”,
“id”: “e9b26715-b94e-xxxxxxxxxxxxxxxxx”,
“displayName”: “user2”
},
……
{
“@odata.type”: “#microsoft.graph.user”,
“id”: “8e98ee70-d769-xxxxxxxxxxxxxxxxx”,
“displayName”: “user3”
}
]
In this scenario, these 2 arrays need to be merged into one array which has id, displayName and userPrincipalName field.
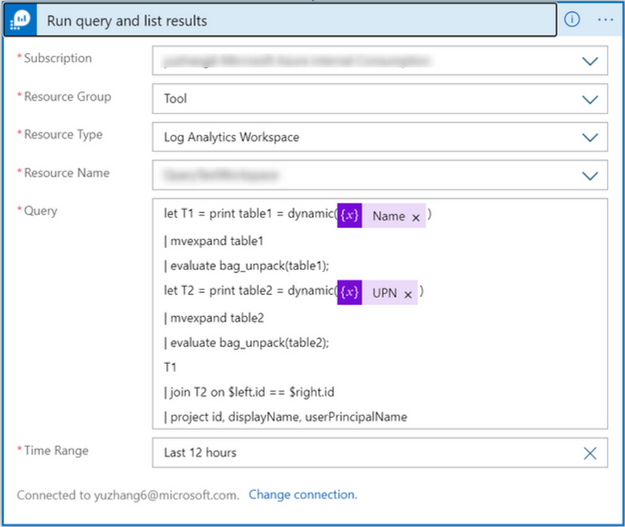
We only need to create a Azure Monitor Log – Run query and list result action like following and pass these 2 json arrays as dynamic content:
After run the LA, we can get the merged array.

Limitation
The values of type dynamic is limited to 1MB, so this workaround not support for handling large size data.

by Contributed | Apr 27, 2021 | Technology
This article is contributed. See the original author and article here.
Guest post by Microsoft Customer Engineer, Daniele De Angelis.
It’s a pleasure to be here again on the ITOpsTalk.com  .
.
Recently I had the opportunity to try the Microsoft Universal Print, the new cloud printing service on Azure.
Today I want to share with you a possible scenario where you can implement and manage this new great Azure cloud service.
If you read multiple time this article here the fast link to the specifics steps:
UP Requirements.
STEP 1 – Assign Universal Print License to users.
STEP 2 – Install the UP Connector.
STEP 3 – Register the Printers.ms
STEP 4 – Share the Printers.
STEP 5 – Add Printers on W10 Clients.
Conclusions
SCENARIO DESCRIPTION
We have an enterprise company called “ITOpsTalk Corp.” located in Rome that actually have few peoples working onsite (the CEO is one of this peoples “the Capitan never leave the boat”) and many others instead are working from home. The IT department want to give the possibility to the remote users to print documents in the HQ in Rome by registering the printers located on the corporate print server to the cloud. Also the financial consultant of the company, located in Milan, is working from home and she is responsible to send to the CEO the Financial documents to sign, but how she can locate the printer in the CEO Office?
 Italy Map with the location of the remote users.
TECHNICAL DETAILS
The ITOpsTalk corp actually do not have Universal print compatible printers, but have standard network printers, also the IT department is using a Printer Server on Windows Server 2016 to centrally manage the the printers. All the remote users and the financial consultant are using a Windows 10 build 1909 joined to Azure AD in the ITOpsTalk Tenant.
 ITOpsTalk Copr Network Diagram.
UP REQUIREMENTS
- Cloud Requirements:
- W10 Clients Requirements:
- Build version 1903 or later required.
- An Internet Connection.
- Device can be AAD Joined or Hybrid AD Joined or AAD Registered.
- User Requirements:
- Connector Requirement:
Windows 10 64-bit, version 1809 or later (Pro or Enterprise)
Windows Server 2016 64-bit or later (Windows Server 2019 64-bit or later is recommended)
NET Framework 4.7.2 or later.
- A continuous connection to the internet.
Access to the following endpoints: *.print.microsoft.com ; *.microsoftonline.com ; *.azure.com ; *.msftauth.net ; go.microsoft.com ; aka.ms
Reference: Installing the Universal Print connector | Microsoft Docs
STEP 1 – Assign Universal Print License to users.
- Universal Print by default is included with business and educational Microsoft 365 and Windows 10 subscriptions, but you need to know that can also be purchased as a standalone license.
Subscription Type
|
Universal Print
|
Microsoft 365 Enterprise F3, E3, E5, A3, A5
|
Included
|
Windows 10 Enterprise E3, E5, A3, A5
|
Included
|
Microsoft 365 Business Premium
|
Included
|
Universal Print
|
Standalone
|
- In typical scenario the IT department can decide to create a Group or Dynamic Group to assign UP license to desired users in the company. To assign the UP (Universal Print) licenses you can use the Azure Portal or the Admin Portal or even the PowerShell.
From Azure portal ==> Azure Active Directory ==> Licenses ==> Select the desired licenses ==> Assign the Dynamic Group
 Assign license to Dynamic Group.
 Universal Print enable license.
- Remember: you need to assign also the UP license also to the Printer Administrators.
STEP 2 – Install the UP Connector.
Before we start this section, we need to answer to this questions:
- Why we need the connector? Because the customer do not have UP compatible printers but standard network printers.
- Were I need to place the connector? In this scenario the better place is the “Printer Server” because have the network visibility of the printers.
- I have a Linux Server can I install it on it? We ♥ Linux but some things need to done by Windows , so the answer is no.
Let’s start with the deploy of the Universal Connector:
- Download the Universal Print connector from https://aka.ms/upconnector. (this is a direct download link)
- Install the connector on the “Printer Server“:
 Universal Print Connector EULA.
 Universal Print Connector Installed Successfully.
- After the installation, we need to register the UP connector on Azure, and to do so we need a Global Admin or a Printer Administrator:
- Start the connector.
 UP Connector Desktop Icon
- Login with a Printer Administrator Credential in the tenant of the ITOpsTalk Corp.
 UP Connector Login.
- Insert a name for the connector and Register it on the Azure Tenant.
 UP Connector name.
- Now if we go to the azure portal, and from the global search we type “Universal print” under the resource menu we can find the connectors menu and here we can see the connector just registered.
 UP Connector on Azure Portal.
STEP 3 – Register the Printers.
- After complete the connector registration, we need to register the printers on the cloud by selecting it from the connector interface:
NOTE: You need to keep in mind that the connector is able to register only the printers that are visible as a “local printers“.  UP Connector register printers.
- Here you can see that one printers is registered and other two are in-progress.
 UP Connector register printer progress.
- After successfully complete the printer registration you need to remember to “Sign Out” from the connector but why?
The user account used to login in the connector, do not represent a service account used by the connector service visible in the Windows services, but will only be used to register the printers from the connector interface to the Azure tenant and managing it.
 UP Connector Register printers completed.
STEP 4 – Share the Printers.
- After completing successfully the printer registration, from the Azure Portal we are able to see in the Universal Print service, the registered printers:
 Registered printers on the Azure portal.
- Now we have two way to share the printers:
- Select multiple Printers and use the command “Share” to share immediately the printers with the same exact name of each printer and the same “Access Control” (this means the same users or groups that you will select will have access to the printers)
 Share multiple printers at the same time from the Azure portal.
- Or you can click on a printer name and from the command bar use the “Share Printer“:
 Share one single printer from the Azure portal.
In this way you can specify a different “Share Name” and specify different members for each printer share.
 Share Printer with a custom name.
As you can see with this share name “ITOpsTalk CEO Printer” the financial consultant is able to identify really fast the CEO Printer, but also only the Finance Team is able to print using this printer.
STEP 5 – Add Printers on W10 Clients.
Conclusions
Remember, we love the Azure Portal to configure printers/shares or even the access control, but when we have a huge numbers of printers we love much more the PowerShell module dedicated to Universal print:
Install-Module UniversalPrintManagement
PowerShell Module – Universal Print | Microsoft Docs
In my honest opinion I think that the Universal Print represent something really powerful for the customers that want to simplify the printing infrastructure (especially if you have Universal Print enabled printers), also I think that we are only at the beginning of this journey our Product Group is working really hard to expand the functionality of this service, and to provide us feedback please look below in the Reference section.
I really hope with that this article, if you already have subscription that include the Universal Print license, you will start from tomorrow to try to deploy this great service in your environment, starting always from a pilot and then expand it to all your enterprise.
Enjoy the Universal Print and please don’t have fear to ask me questions!
Official Reference.

by Contributed | Apr 27, 2021 | Technology
This article is contributed. See the original author and article here.
In this installment of the weekly discussion revolving around the latest news and topics on Microsoft 365, hosts – Vesa Juvonen (Microsoft) | @vesajuvonen, Waldek Mastykarz (Microsoft) | @waldekm are joined by MVP, PnP Team member, and Architect at US-based Sympraxis Consulting Emily Mancini |@EEMancini. Topics discussed in this session include: Sharing is Caring engagement model, Aligning and addressing the client’s business needs with capabilities of owned technologies, i.e., Microsoft 365 for making changes with the business and not to the business! Conscious/unconscious usage of the Microsoft 365 Maturity Model for business ROI maximization. Ideas for increasing diversity in IT personnel, Imposter Syndrome, Tech vs Outcome and Teams or Yammer.
Please remember to keep on providing us feedback on how we can help on this journey. We always welcome feedback on making the community more inclusive and diverse.
Covering also 23 articles from Microsoft and the Community.
This episode was recorded on Monday, April 26, 2021.
These videos and podcasts are published each week and are intended to be roughly 45 – 60 minutes in length. Please do give us feedback on this video and podcast series and also do let us know if you have done something cool/useful so that we can cover that in the next weekly summary! The easiest way to let us know is to share your work on Twitter and add the hashtag #PnPWeekly. We are always on the lookout for refreshingly new content. “Sharing is caring!”
Here are all the links and people mentioned in this recording. Thanks, everyone for your contributions to the community!
Events:
Microsoft articles:
Community articles:
Additional resources:
If you’d like to hear from a specific community member in an upcoming recording and/or have specific questions for Microsoft 365 engineering or visitors – please let us know. We will do our best to address your requests or questions.
“Sharing is caring!”


Recent Comments