by Scott Muniz | Jul 7, 2020 | Uncategorized
This article is contributed. See the original author and article here.
In May (skip below to read the announcement) we announced our plans to provide additional profile customization options with the Microsoft Graph. Today we’re pleased to announce the availability of these customization capabilities.
The hundreds of millions of users of Microsoft 365 cloud services form part of the core of Microsoft Graph. The users’ data is carefully managed, protected, and with proper authorization, made available by Microsoft Graph services to drive productivity and creativity in businesses.
People are the heart and soul of intelligent insights in the Microsoft Graph, but more importantly of your company – but finding the right people at the right time isn’t always easy. Sometimes you’re looking for more than just a name and face, maybe it’s a skill, location, or something else.
Now by configuring your tenant settings through the Microsoft Graph you can enrich individual’s profile cards by adding the following attributes from Azure Active Directory:
- UserPrincipalName
- Fax
- StreetAddress
- PostalCode
- StateOrProvince
- Alias
In addition, you can also add any of the 15 custom attributes from Active Directory or Azure Active Directory (Azure AD) to users’ profile cards.
To learn more about this new profile customization option review the documentation at https://go.microsoft.com/fwlink/?linkid=2115944.
Announced in May 2020
People are the heart and soul of your company, but finding the right people at the right time isn’t always easy. Sometimes you’re looking for more than just a name and face, maybe it’s a skill, location, or something else.
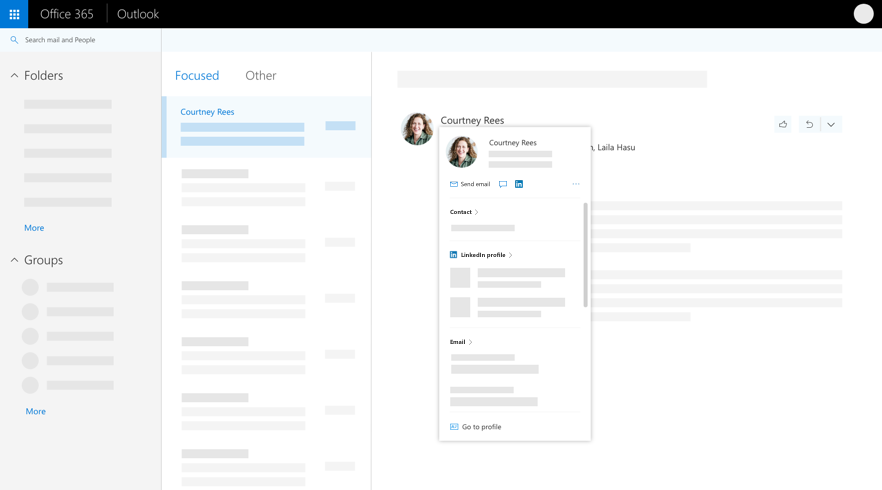
In Office 365 when you select someone’s name or picture in Outlook or other Office apps and services, you can find information related to them on their profile card. To see a profile card in Outlook mobile, tap a person’s picture or name. To see the profile card in other apps, hover or click the person’s photo or name. To see your own profile card, select your own profile picture or name.
The profile card is also sometimes referred to as a contact card or people card. Here’s an example of the card in Outlook on the web:

However, profile cards are limited in the amount of information they display. Perhaps you want to include custom properties related to your company or a person’s role to help people find the right person or expertise.
Today we’re pleased to announce we’ll be adding the ability to add custom information to a person’s profile card through the Microsoft Graph Beta. This allows an administrator to customize people’s profile cards by adding properties according to your business needs.
The new Beta experience will provide a simple way to supplement a person’s profile card via the Microsoft Graph.
For example, as illustrated below, you may want to add a custom property to the profile card, such as a person’s Cost Center or Employee Id.

Figure 1 Profile view where more contact info is displayed
In this example, you can see the standard profile card before it has been expanded.
Using new this new customization option, you’ll be able to easily display important information such as a person’s Cost Center or Employee Id as illustrated below in the expanded profile view.

Figure 2 Profile with all contact info displayed in addition to custom attributes
Wrapping Up
This new Beta experience will become available in Spring 2020 – keep an eye out for availability by bookmarking this article or by following @OfficeDev and @MicrosoftSearch on Twitter.
Roadmap Id 61502

by Scott Muniz | Jul 7, 2020 | Uncategorized
This article is contributed. See the original author and article here.
Remote work has become a necessity for many employees and companies. And of course, with this comes the issue of communication between those working from home, those working out in the field, and their managers and colleagues.
If you have been operating on a legacy intranet, it is time to evolve! Modern work deserves a modern intranet. Legacy intranets with outdated features and overwhelming information will only hinder your team. It’s time to respond to the rise in remote work and the desire for personalized experiences. Harness the power of the intelligent intranet to communicate effectively across the organization, engage employees, and connect with relevant information and knowledge.

To make upgrading and setting up your new intranet as easy as possible (easier than it already is) we have launched the intelligent intranet site, to transform employee communications and digital experiences with Microsoft 365. The 4-stage, self-paced approach designed to guide you from exploring the possibilities, aligning your company’s priorities, implementing your new intranet and finally, engaging with your team to ensure adoption.
We’ve put together videos, templates, demos, customer interviews, and more. Get started today! It’s all live right for you at aka.ms/Intelligent_Intranet
by Scott Muniz | Jul 7, 2020 | Uncategorized
This article is contributed. See the original author and article here.
Today, we have exciting news to share as part of the launch of joint efforts between multiple organizations in Microsoft and the MVP community. I thought it’d be interesting to take a look at how far we’ve come (and how much fun we’ve had).
A little over a year ago, we (Azure SQL) decided it was time for us to have a bigger presence in the video space. Having done some work with Channel 9 in the past, one Friday I walked into Channel 9 studios, caught up with the wonderful folks there, and we decided to re-launch Data Exposed.
Our initial goal was simple: get folks excited about Azure SQL. We started in a small recording studio, where we manage the switching of screens/video feeds and sometimes ran videos solo. The community, commonly referred to #sqlfamily, quickly began to participate and share, driving people to learn and, like our goal, get excited about Azure SQL. Since then, we’ve released videos (almost) every Thursday, we got upgraded to the big-time studios in Channel 9, and we started running with official hosts (Jeroen ter Heerdt and now myself). And with the global pandemic, we swiftly switched to recording remotely back in March, which allowed us to start recording with folks globally.
Over the past year, we’ve received over 132K views, and 30 members of the product group have recorded topics ranging from how to connect to Azure SQL Database, to understanding notebooks in Azure Data Studio, to deep dives on features in Azure SQL Database, Azure SQL Managed Instance, and SQL Server 2019. It’s been an amazing year, and I want to thank all of you for supporting our show with your views, likes, shares, and feedback (both positive and constructive). As we start a new fiscal year at Microsoft, we have even bigger plans, beginning with the MVPs.
Many of you reading this are probably familiar with the Microsoft MVP Program (MVP = Most Valuable Professionals). MVPs are technology experts who passionately share their knowledge with the community and support #sqlfamily all over the globe. What really sets them apart is that they are always willing to help others. If you want to learn more about the MVP Program, here’s a link: https://aka.ms/mvpprogram
Now, in this new fiscal year, we are introducing an additional day of Data Exposed, dedicated to MVPs. Every Tuesday, we will release a new Data Exposed MVP Edition episode. Since we record remotely, we can feature MVPs from around the world on a wide range of topics. Additionally, Rie Irish, the Data Platform MVP lead at Microsoft, will be highlighting various MVP blogs, to help in spreading more knowledge to #sqlfamily. We hope that not only will this help get you excited about Azure SQL and SQL Server, but also that it will help enable, unblock, and inspire you to take the next step with Azure SQL or SQL Server, whatever that may be.
Follow along on Channel 9 at aka.ms/dataexposed or via YouTube at aka.ms/dataexposedyt, and I’ll see you in the next episode of Data Exposed :nerd_face:
by Scott Muniz | Jul 7, 2020 | Uncategorized
This article is contributed. See the original author and article here.
By: Arnab Biswas | Program Manager – Microsoft Endpoint Manager – Intune
You can use Microsoft Endpoint Manager to deploy the most common app types supported by macOS such as .pkg, .dmg or .app. Natively, Mac MDM only supports installing signed .pkg-type applications. Therefore, for apps that are of non-pkg types, it requires admins to run commands on macOS either manually or as a script to create a signed app package (.intunemac file) that can be distributed using Intune. The rest of the document outlines the recommended app preparation steps. These steps have been tested on macOS 10.15.
1. Important notes before you begin
- For apps that require a kernel or system extension, the extension must be deployed as a macOS device configuration profile in Microsoft Endpoint Manager before the app is deployed. The app deployment will not complete successfully if the extension is included in the app package.
- For apps that require a property list file (plist file), the property list file must be deployed using a macOS device configuration profile in Microsoft Endpoint Manager before the app is deployed. The app deployment will not complete successfully if the property list files are included in the app package.
- The converted app must be re-signed for successful MDM-deployment. Unsigned applications are rejected by macOS. This also applies to DMGs containing PKG files.
- It is crucial that the PKG files are created using the commands below. PKG files that are packaged using different packaging commands may not deploy successfully.
- DMG files containing more than one APP file are not supported.
- You will need the Microsoft Intune App Wrapping Tool for macOS to complete the steps in the next section. Follow these instructions to set up the App Wrapping Tool correctly.
- This is not an exhaustive list of all applicable conditions.
2. App preparation steps
The steps below require that you initiate with an app of DMG or APP format that satisfy the conditions above.
- Mount the DMG file.
Note: Skip this step when starting with APP-format apps.
hdiutil attach appname.dmg
- Make a temporary folder and navigate to it.
mkdir ./TargetDirectory
mkdir ./TargetDirectory
cd ./TargetDirectory
- Build an intermediate PKG file.
Note: When using autocomplete, delete the final slash in the APP path. Pass the install-location as an argument to the pkgbuild command.
pkgbuild --install-location /Applications --component /Volumes/path_to_app/app_to_convert.app ./TargetDirectory/intermediate.pkg
- Create the distribution XML file for the intermediate PKG file.
Note: This is required to build a redistributable package.
productbuild --synthesize --package /TargetDirectory/intermediate.pkg /TargetDirectory/distribution.xml
- Build the final PKG file. This PKG file is not signed.
productbuild --distribution ./distribution.xml --package-path ./intermediate.pkg ./unsigned_final.pkg
- Sign the PKG file using a Mac Developer ID certificate.
productsign --sign “3rd Party Mac Developer Installer: Developer Name (XXXX)” ./unsigned_final.pkg ./signed_final.pkg
- Unmount the DMG file.
Note: Skip this step when starting with APP-format apps.
hdiutil detach /Volumes/appname
- Create the INTUNEMAC file from the signed PKG file.
./IntuneAppUtil -c signed_final.pkg -o /finalpath
- Add the INTUNEMAC file as a line-of-business application for macOS on Microsoft Endpoint Manager.
This sample script demonstrates how the above steps can convert a DMG file to INTUNEMAC.
Let us know by responding to this post if you have any questions or feedback! You can also ask questions by tagging #IntuneSuppTeam out on Twitter where our Support as a Feature team helps answer quick questions.
by Scott Muniz | Jul 7, 2020 | Uncategorized
This article is contributed. See the original author and article here.
The Max Degree of Parallelism, or MAXDOP, is one of the most known settings in the SQL Database Engine. There are guidelines of how to configure it that have intricate dependencies on the type of hardware resources you’re running on, and there are several occasions where someone might need to veer of those guidelines for more specialized workloads.
There are plenty of blogs on these topics, and the official documentation does a good job of explaining these (in my opinion). If you want to know more about the guidelines and ways to override for specific queries, refer to the Recommendations section in the Configure the max degree of parallelism Server Configuration Option documentation page.
But what does MAXDOP control? A common understanding is that it controls the number of CPUs that can be used by a query – previous revisions of the documentation used this abstraction. And while that is a correct abstraction, it’s not exactly accurate. What MAXDOP really controls are the number of tasks that can be used in each branch of a query plan.
For most use cases, talking about the number of CPUs used in a query, or the number of concurrent tasks scheduled won’t have a practical difference. But sometimes it’s relevant to know the full story, to go beyond the generalization, especially when troubleshooting those ginormous complex plans that involve dozens of operators – you know who you are :smiling_face_with_smiling_eyes:
Defining a few terms
So before we dive deeper into it, let’s make sure we’re all on the same page regarding a few important terms that will be used in this post, and you find in documentation. These my simplified definitions:
- A request is a logical representation of a query or batch an application sends to the Database Engine. Requests can be monitored through the sys.dm_exec_requests DMV, can be executed in parallel (multiple CPUs) or in a serial fashion (single CPU), have a state that reflects the state of underlying tasks, and accumulate waits when resources needed are not available like a page latch or row lock.
- A task is a single unit of work that needs to be carried out for the request to be completed. A serial request will only have one active task, whereas a parallel request will have multiple tasks executing concurrently. Tasks can be monitored through the sys.dm_os_tasks and sys.dm_os_waiting_tasks DMVs, also have a state (running, runnable, or suspended) that reflects up to the owner request state.
- A worker thread, a.k.a worker, a.k.a thread is the equivalent of a CPU thread (see Wikipedia). I’ll use these terms interchangeably. Tasks that need to be executed are assigned to a worker, which in turn is scheduled to run on the CPU. Workers can be monitored through the sys.dm_os_workers DMV.
- A scheduler is the logical equivalent of a CPU. Workers are scheduled to actively carry out the task assigned to them, and in SQL Server most scheduling is cooperative, meaning a worker won’t cling to the CPU, but instead yield its active time (called the quantum, in 4ms chunks) to another worker waiting to execute its own task. Schedulers can be monitored through the sys.dm_os_schedulers DMV.
- DOP (Degree of Parallelism) designates the actual number of schedulers assigned to a given request (more accurately, the set of tasks belonging to a request).
- The MAXDOP server or database configuration, as well as the MAXDOP query hint, determine the DOP ceiling, the maximum number of schedulers that can be used during a request lifetime. It doesn’t mean they’ll all be used. For example, in a very busy server, parallel queries may execute with a DOP that’s lower than the MAXDOP, if that number of schedulers is simply not available. Hence the term “available DOP”.
- A parallel query plan branch. If you think of a query plan as a tree, a branch is an area of the plan that groups one or more operators between Parallelism operators (a.k.a Exchange Iterators). You can see more about the Parallelism operator and other physical operators in the Showplan Logical and Physical Operators Reference.
Bringing it together
Let’s get on with the example. My SQL Server is configured with MAXDOP 8, CPU Affinity set for 24 CPUs across two NUMA nodes. CPUs 0 through 11 belong to NUMA node 0, CPUs 12 through 23 belong to NUMA node 1. I’ll be using the AdventureWorks2016_EXT database, and have enlarged the tables in the query 50 fold, to have the time to run all the DMV queries before the following query was done:
SELECT h.SalesOrderID, h.OrderDate, h.DueDate, h.ShipDate
FROM Sales.SalesOrderHeaderBulk AS h
INNER JOIN Sales.SalesOrderDetailBulk AS d ON h.SalesOrderID = d.SalesOrderID
WHERE (h.OrderDate >= '2014-3-28 00:00:00');
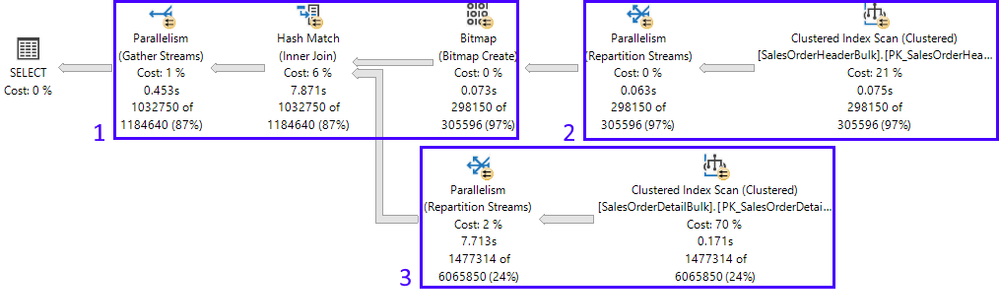
Here is the resulting actual execution plan, divided into its 3 branches:

In this example, looking at the plan properties, we can see more information about how many threads SQL Server will reserve to execute this plan, along with the worker’s placement on the NUMA nodes:

The Database Engine uses information about the plan shape (which allows for 2 concurrent branches in this example – more on this further ahead) and MAXDOP configuration (which is 8), to figure out how many threads to reserve. 2 x 8 = 16.
The threads can be reserved across all NUMA nodes, or be reserved in just one NUMA node, and this is entirely dependent on scheduler load at the moment the reservation is made at runtime. In this case, the reservation was split between both NUMA nodes. But a few minutes later, when I executed the query again, thread reservations were all on NUMA node 1, as seen below from the actual execution plan:

Back to the 1st execution: if there are 3 branches in the execution plan, why can only 2 branches execute concurrently? That’s because of the type of join in this case, and the Query Processor knows this. A hash join requires that its build input be available before starting to generate the join output. Therefore, branches 2 (build input) and 3 (probe input) can be executed concurrently (for more details on hash joins, refer to the documentation on Joins). Once the build input is complete, then branch 1 can start. Only at that point, can branches 3 and 1 be executed concurrently.
The live execution plan gives us a view of this with branches 3 and 1 in flight, and 2 completed:

Ok, so how about tasks? Didn’t I say MAXDOP limits how many tasks are spawned for each branch? Let’s query the sys.dm_os_tasks DMV and find out what’s happening:
SELECT parent_task_address, task_address,  task_state, scheduler_id, worker_address
FROM sys.dm_os_tasks
WHERE session_id = 100 -- my session ID
ORDER BY parent_task_address, scheduler_id;
With the following result:

Notice there are 17 active tasks: 16 child tasks corresponding to the reserved threads (8 for each concurrent branch), and the coordinating task. The latter can be recognized because the column parent_task_address is always NULL for the coordinating task.
Each of the 16 child tasks has a different worker assigned to it (worker_address column), but notice that all 16 workers are assigned to the same pool of 8 schedulers (5,8,10,11,12,18,20,22) – the MAXDOP limit. The fact they’re on the same schedulers is by-design: once the first set of 8 parallel tasks on a branch was scheduled, every additional task for any branch will use that same schedulers.
The coordinating task can be scheduled on any NUMA node, even on a node where no threads were reserved. In this case it was on scheduler 3, which is in NUMA node 0.
Summary
So, we’ve seen how a single request can spawn multiple tasks up to the limit set by reserved worker threads – 16 in this case. The threads reserved per branch are limited by MAXDOP – 8 in our example. Because each task must be assigned to a worker thread for execution, the number of tasks that can be running concurrently is therefore limited by MAXDOP. In other words, the MAXDOP limit is enforced at the task level, per branch, not at the query level.
If you want to know more, refer to the SQL Server task scheduling section in the Thread and Task Architecture Guide.
Pedro Lopes ( @SQLPedro ) – Principal Program Manager

Recent Comments