by Scott Muniz | Jul 24, 2020 | Uncategorized
This article is contributed. See the original author and article here.
This week, Caripros HR Analytics shared a great tip on using a date picker add-in with forms, MrExcel.com showed you how to use the TODAY function with charts to illustrate current data, and Creative Venus brought in some top-notch design skills to deliver a sleek, modern table, complete with space for including your own branding. If you find these helpful, be sure to check out their channels!
Learn more about the Microsoft Creators Program.
See more from Caripros HR Analytics
See more from MrExcel.com
See more from Creative Venus
by Scott Muniz | Jul 24, 2020 | Alerts, Microsoft, Technology, Uncategorized
This article is contributed. See the original author and article here.
As discussed in my two previous posts, Azure Sentinel provides a variety of methods for importing threat intelligence directly into the ThreatIntelligenceIndicator Logs table where it can be used to power Analytics, Workbooks, Hunting, and other experiences.
However, Azure Sentinel also allows you to leverage massive repositories of external intelligence data as enrichment sources to enhance the triage and investigation experience of security incidents. Using the built-in automation capabilities of Azure Sentinel you can take any incident created through Azure Sentinel analytics rules, and retrieve additional context about the entities from third party sources, and make this context readily available to your security operations personnel to aid triage and investigation.
Today, we are announcing the availability of the RiskIQ Intelligence Connector for Azure Sentinel which allows you to tap into petabytes of external threat intelligence from RiskIQ’s Internet Intelligence Graph. Incidents can be enriched automatically using Azure Sentinel Playbooks, saving time and resources for your security responders. This blog will walk you through the setup, configuration, and show you how the rich context from the new RiskIQ Intelligence Connector playbooks is surfaced in Azure Sentinel security incidents.
Installation
Each RiskIQ enrichment playbook leverages one or more RiskIQ Security Intelligence Service APIs to provide up to the minute threat and contextual information. To learn more about the service and request a trial key, see the API documentation.
The set of RiskIQ Intelligence Connector playbooks are located in the Azure Sentinel GitHub repository.
In this blog we’ll use the Enrich-SentinelIncident-RiskIQ-IP-Passive-DNS playbook as an example.
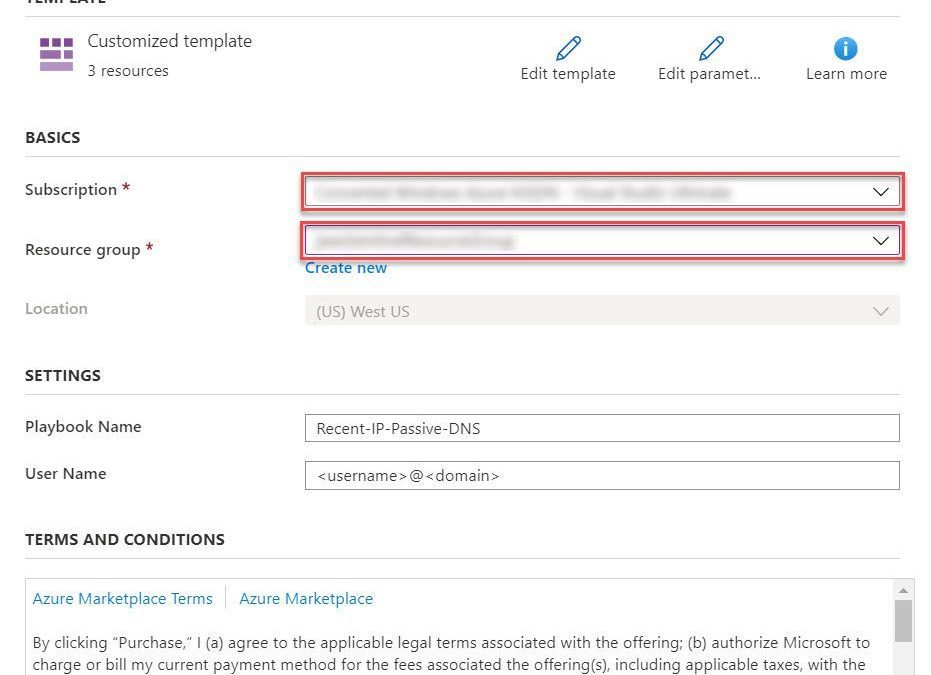
- Select the Deploy to Azure button on the playbook page in GitHub

- This will bring you to the Azure portal, Custom Deployment page. Input the Subscription and Resource Group values corresponding to your Azure Sentinel instance, and select the terms and conditions check box

- Select the Purchase button at the bottom of the page
- You will receive an Azure notification when the deployment has completed

Configuration
Once the playbook has been imported into your Azure Sentinel instance your will need to edit the playbook to configure the connections. Certain playbook actions require additional connection information to function, most commonly these are in the form of credentials for actions that require connecting to APIs. In this example, the playbook requires two connections, one for Azure Sentinel to read security alerts and the second for RiskIQ APIs to query for enrichment context for entities found in alerts.
- In the Azure portal, navigate to your Azure Sentinel workspace where you imported the playbook
- Select Playbooks from the Azure Sentinel navigation menu
- Select the Recent-IP-Passive-DNS playbook by selecting the playbook name
- Select Edit from the top menu of the playbook
- There are four steps in this playbook requiring you to configure connections

- Select a Connection from one of the steps requiring configuration and configure a new connection. For the connections to Azure Sentinel the user specified when establishing the connection must have sufficient permissions in the Azure Sentinel workspace to read the security alerts. For the RiskIQ connection, enter your RiskIQ API token and secret obtained from RiskIQ.
- Select Save from the top menu of the playbook to save the playbook
Use the RiskIQ playbook to enrich security incidents
Now that the Recent-IP-Passive-DNS playbook is installed and configured you can use it with the built-in Azure Sentinel automation framework in your analytics rules. Let’s take a look at how to associate this playbook with an analytic rule to enrich security incidents and give your security responders additional context for triage and investigation.
- Navigate to your Azure Sentinel Analytics page and select an existing analytics rule or template item you wish to add the playbook automation. Select Edit for an existing rule or Create rule for a new rule.
- The Recent-IP-Passive-DNS playbook works with analytics rules which map IP address entities so make sure you are working with such a rule. For simple testing of the playbook automation you can use rule logic as shown below to force an alert creation with a specific IP address.
AzureActivity
| take 1
| extend IPCustomEntity = "144.91.119.160"
- Navigate to the Automated response tab and place a check mark in the box for the Recent-IP-Passive-DNS playbook which will enable the playbook to run each time the analytic rule generates security alerts
- Select Save to finish and return to the Analytics page
The Recent-IP-Passive-DNS playbook queries the RiskIQ passive DNS database and retrieves any domains from the last 30 days associated with the IP address found in the security alert. It then adds this enrichment information to the resulting security incident so your security responders can easily access this additional context with triaging the incident. Let’s take a look at this experience for your security responders.
- Navigate to your Azure Sentinel Incidents page
- Locate the incident generated from the analytic rule configured to run the Recent-IP-Passive-DNS playbook automation and select Full details from the information pane
- Select the Comments tab to see the enrichment added by the Recent-IP-Passive-DNS playbook automation. You can also view the information in the RiskIQ portal by following the link provided at the bottom of the comment

Summary
In this post you learned how to obtain, configure, and associate the RiskIQ Intelligence Connector playbooks with analytics rules to enrich security incidents with additional context. Azure Sentinel, when combined with RiskIQ, has the potential to reshape how security teams operate, seamlessly integrating the most comprehensive external visibility with the advanced threat detection, AI, and orchestration found in Azure Sentinel.
by Scott Muniz | Jul 24, 2020 | Uncategorized
This article is contributed. See the original author and article here.
Windows 10, version 20H2 release will not bring updates to the Windows Hardware Compatibility Program and follow the same pattern as 19H2. Given below are more details with respect to all related WHCP activities.
Windows Hardware Compatibility program(WHCP) activities:
- WHCP requirements – No change. Windows 10, version 2004 requirements remain applicable for Windows 10, version 20H2 release.
- Hardware Lab kit – No change. Since WHCP requirements will persist in Windows 10, version 20H2, HLK will also remain the same. There will not be new HLK release in Windows 10, version 20H2. While both Windows 10, version 2004 and 20H2 OS can be used for Windows 10, version 2004 qualification, they will be recognized as meeting the Windows 10, version 2004 qualification.
- Errata – No change. All Windows 10, version 2004 errata will continue to be valid for Windows 10, version 20H2 release.
- HLK playlist – No change. HLK version 2004 playlist can be used for both Windows 10, version 2004 and 20H2 release.
- Driver signature – No change. Drivers meeting all the applicable Windows 10, version 2004 requirements, will be digitally signed with same signature attributes.
- Submission – No change. Both Windows 10, version 2004 and 20H2 OS can be used for WHCP submission.
- WHCP qualification – Windows 10, version 2004
- Required OS version – Either Windows 10, version 2004 or 20H2
- HLK version – HLK version 2004
by Scott Muniz | Jul 24, 2020 | Alerts, Microsoft, Technology, Uncategorized
This article is contributed. See the original author and article here.
Hi, all! Rod Trent here. I am a Cybersecurity CE/Consultant at Microsoft and work with Azure Sentinel literally every waking hour, so I see and hear a lot of unique and interesting things in relation to this fantastic product. I also blog for our Secure Infrastructure Blog and have quite a few Azure Sentinel articles posted there already.
Did you know that the Log Analytics agent requires an Internet connection no matter if it’s installed on an on-premises system or as an extension on a virtual machine stored in Azure? It may seem a bit quirky, but it’s true. Yes, even though an Azure VM has been spun up in the same cloud that the Log Analytics Workspace resides in, the agent still checks to see if there’s a valid Internet connection – well, actually it checks for a specific port (443) to be accessible, but the return error message is that an Internet connection is required.
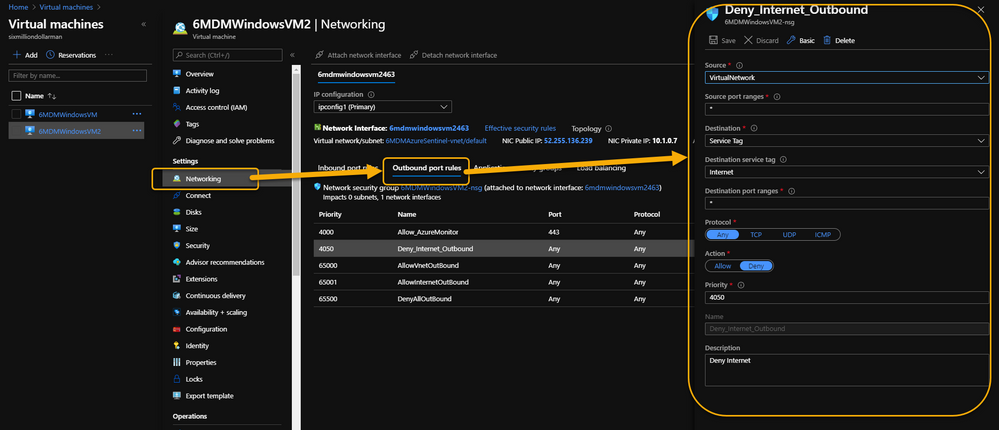
As a security precaution, some customers spin up VMs in Azure and disable all outbound Internet access. This is done through an Outbound rule (VM => Networking => Outbound port rules => Deny Internet) similar to what is shown in the following image:
 VM => Networking => Outbound port rules => Deny Internet
However, the same customer may also want to monitor potential threats against these VMs using Azure Sentinel. Azure Sentinel, of course, requires a Log Analytics workspace which requires the Log Analytics agent extension to be installed which, yeah…you guessed it…requires the outbound Internet connection already discussed.
Even more interesting is that the Log Analytics agent extension will deploy perfectly. And, unless it’s monitored obsessively, all seems just fine. Well, that is, until it’s realized that the newly installed agent isn’t sending its data to Azure Sentinel’s Log Analytics Workspace.
 Log Analytics Agent cannot connect due to a blocked port
If it’s required that the Azure VM remains Internet disconnected, the solution is to create a new Outbound rule for the VM to provide the necessary port to trick the agent into thinking it has the required Internet connection. The new Outbound rule also needs to have a higher priority than the blocker, otherwise the port will never be exposed.
The new Outbound rule should look like the following:
 Enable a new Outbound Rule specifically for AzureMonitor
The details:
Create a new Outbound rule with a higher priority than the Deny Internet rule with the following information:
- Source: VirtualNetwork
- Secure port ranges: *
- Destination: ServiceTag
- Destination service tag: AzureMonitor
- Destination port ranges: 443
- Protocol: Any
- Action: Allow
- Priority: (set it higher than the Deny Internet rule)
- Description: (I always recommend being very verbose when describing something you create – just in case you have a tendency to forget later on)
Summary
This technique ensures that the Virtual Machine doesn’t have Internet access according to policy, and that security can still be managed and monitored through Azure Sentinel. Disabling full Internet access for each Virtual Machine may seem a rare occurrence, but as I noted in my opening statement, I regularly work with scenarios that are sometimes uncommon. And, if I see it once, it’s most likely going to happen again. Sharing makes us all smarter.
A use case example where this makes perfect sense is for Windows Virtual Desktops (WVD). Disabling the Internet completely for a compromised WVD, ensures that the device is effectively quarantined from the other VMs in the WVD pool while still maintaining the ability to kick-off a malware scan through an Azure Sentinel Playbook because the Azure Monitor port is still open.
NOTE: In the future, you can Use Azure Private Link to securely connect networks to Azure Monitor.
For additional knowledge in relation to Azure Sentinel-specific role access components, see the following:
Granting Access to Specific Azure Sentinel Playbooks for Specific Analysts: https://secureinfra.blog/2020/06/19/granting-access-to-specific-azure-sentinel-playbooks-for-specific-analysts/
Controlling access to Azure Sentinel Data: Resource RBAC: https://techcommunity.microsoft.com/t5/azure-sentinel/controlling-access-to-azure-sentinel-data-resource-rbac/ba-p/1301463
Table Level RBAC In Azure Sentinel: https://techcommunity.microsoft.com/t5/azure-sentinel/table-level-rbac-in-azure-sentinel/ba-p/965043
Permissions in Azure Sentinel: https://docs.microsoft.com/en-us/azure/sentinel/roles
* Check out my other blog for more Azure Sentinel content: Rod Trent at the Secure Infrastructure Blog
* Follow me on Twitter: https://twitter.com/rodtrent
by Scott Muniz | Jul 24, 2020 | Uncategorized
This article is contributed. See the original author and article here.
At the end of August, Outlook for Android will roll out support for the new device password complexity functionality included within Android 10 and later.
With each operating system version release, Google includes new APIs in which apps can target for supporting new functionality offered in the operating system release. Until apps target those APIs, they are not able to take advantage of that functionality. When Google announced Android 10 and its latest API (API 29), they also announced deprecation of Device Admin. Prior to targeting Android 10, Outlook for Android used Device Admin to manage device password settings defined in an Exchange mobile device mailbox policy; for more information see, Managing Outlook for iOS and Android in Exchange Online.
With Outlook for Android targeting Android 10, when a user launches Outlook on Android 10 and later devices, Outlook queries the device’s (or the work profile’s) screen lock complexity. Android 10’s password complexity levels are defined as:
|
Password complexity level
|
Password requirements
|
|
None
|
No password requirements are configured
|
|
Low
|
Password can be a pattern or a PIN with either repeating (4444) or ordered (1234, 4321, 2468) sequences
|
|
Medium
|
Passwords that meet one of the following criteria:
– PIN with no repeating (4444) or ordered (1234, 4321, 2468) sequences with a minimum length of 4 characters
– Alphabetic passwords with a minimum length of 4 characters
– Alphanumeric passwords with a minimum length of 4 characters
|
|
High
|
Passwords that meet one of the following criteria:
– PIN with no repeating (4444) or ordered (1234, 4321, 2468) sequences with a minimum length of 8 characters
– Alphabetic passwords with a minimum length of 6 characters
– Alphanumeric passwords with a minimum length of 6 characters
|
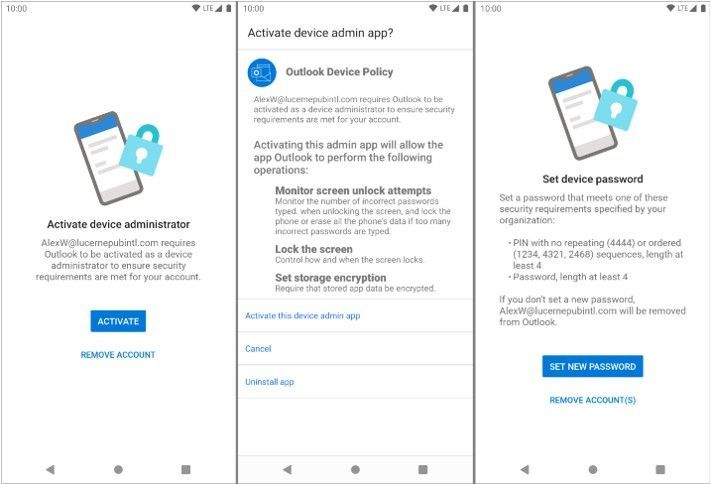
If Android determines that Outlook requires a stronger screen lock, then Outlook directs the user to the system screen lock settings, allowing the user to update the security settings to become compliant:

At no time is Outlook aware of the user’s password; the app is only aware of the password complexity level.
The specific password complexity criteria and conversion logic used for translating Exchange mobile mailbox device policy password settings to Android 10 password complexity levels is below, but is also documented in Mobile device mailbox policies in Exchange Online:
|
Mobile device mailbox policy setting
|
Android password complexity level
|
|
Password enabled = false
|
None
|
|
Allow simple password = true
Min password length < 4
|
Low
|
|
Allow simple password = true
Min password length < 6
|
Medium
|
|
Allow simple password = false
Alphanumeric password required = true
Min password length < 6
|
Medium
|
|
Allow simple password = true
Min password
|
High
|
|
Allow simple password = false
Alphanumeric password required = true
Min password length >= 6
|
High
|
The change associated with Android 10 will go into effect immediately once the version of Outlook for Android that targets Android 10 is updated at the end of August. For devices that are not upgraded to Android 10 (Android 9 and below), Device Admin will continue to be in use for managing the device’s password and there are no changes to Outlook’s use of Device Admin from a user experience perspective.
What do I need to do to prepare for this change?
There is nothing you need to prepare for this change. This may be a good time to review your current password policies for mobile devices and mobile apps. Our recommendation is to consult with your Microsoft account team on the right security solution for your organization. Depending on whether your devices are company owned or BYOD, the recommendation will vary. Our recommendation is that administrators do not rely on Exchange mobile device mailbox policies, but instead use a mobile management solution such as Microsoft Intune to set access requirement conditions appropriate for your organization. To learn more visit https://aka.ms/startoutlookmobile.
We also recommend that your users upgrade to the latest version of Android that is supported on your users’ phones and tablets.
Additional resources
Ross Smith IV

Recent Comments