by Scott Muniz | Jul 24, 2020 | Uncategorized
This article is contributed. See the original author and article here.
In the Windows world, a Windows Server Failover Cluster (WSFC) natively supports multiple subnets and handles multiple IP addresses via an OR dependency on the IP address. On Linux, there is no OR dependency, but there is a way to achieve a proper multi-subnet natively with Pacemaker, as shown by the following. You cannot do this by simply using the normal Pacemaker command line to modify a resource. You need to modify the cluster information base (CIB). The CIB is an XML file with the Pacemaker configuration.
That’s the comment from https://docs.microsoft.com/en-us/sql/linux/sql-server-linux-configure-multiple-subnet?view=sql-server-ver15
However, the steps of modifying CIB is not correct. MS will revise the steps soon.
Here is an example to create a SQL Server Linux Availability group in 4 nodes in 3 subnets in RHEL 7.6
If you are already familiar with the AG Group setup process, please just jump to step 16.
1.Register your subscription on for all servers (red1,red2,red3 and red4 in this case)
subscription-manager register
2.List all available subscription, pick the one with High Availabiilty , notedown the pool id
subscription-manager list –available –all
3.Register the subscription for all nodes (red1,red2,red3 and red4 in this case)
sudo subscription-manager attach –pool=xxxxx
4.Enable the repository(red1,red2,red3 and red4 in this case)
sudo subscription-manager repos –enable=rhel-ha-for-rhel-7-server-rpms
5.Install Pacemaker packages on all nodes. (red1,red2,red3 and red4 in this case)
sudo yum install pacemaker pcs fence-agents-all resource-agents
6.Install SQL Server resource agent (red1,red2,red3 and red4 in this case)
sudo yum install mssql-server-ha
7.Set the password for the default user that is created when installing Pacemaker and Corosync packages. All the password should be exactly same (red1,red2,red3 and red4 in this case)
sudo passwd hacluster
8.Run following commands to Enable and start pcsd service and Pacemaker in all nodes. (red1,red2 and red3 and red4 in this case)
sudo systemctl enable pcsd
sudo systemctl start pcsd
sudo systemctl enable pacemaker
9.Run following commands to Create Cluster in primary replica node (red1 in this case)
sudo pcs cluster auth red1 red2 red3 red4 -u hacluster -p YouPasswordUsedinStep7
sudo pcs cluster setup –name sqlcluster1 red1 red2 red3 red4
sudo pcs cluster start –all
sudo pcs cluster enable –all
10.Run following command to Enable cluster feature in all nodes(red1,red2 , red3 and red4 in this case)
sudo /opt/mssql/bin/mssql-conf set hadr.hadrenabled 1
sudo systemctl restart mssql-server
Create AG and Listener
1.Run following queries in red1 to create certificate
use master
go
CREATE MASTER KEY ENCRYPTION BY PASSWORD = ‘**<Master_Key_Password>**’;
go
CREATE CERTIFICATE dbm_certificate WITH SUBJECT = ‘dbm’;
go
BACKUP CERTIFICATE dbm_certificate TO FILE = ‘/var/opt/mssql/data/dbm_certificate.cer’
WITH PRIVATE KEY (
FILE = ‘/var/opt/mssql/data/dbm_certificate.pvk’,
ENCRYPTION BY PASSWORD = ‘**<Private_Key_Password>**’
);
2.Run following commands in red1 to copy the certificate to rest of the servers(red2,red3 and red4 in this case)
cd /var/opt/mssql/data
scp dbm_certificate.* root@red2:/var/opt/mssql/data/
scp dbm_certificate.* root@red3:/var/opt/mssql/data/
scp dbm_certificate.* root@red4:/var/opt/mssql/data/
3.Give permission to the mssql user to access the certificate files in rest of the servers(red2,red3 and red4 in this case)
cd /var/opt/mssql/data
chown mssql:mssql dbm_certificate.*
4.Run following T-SQL queries to create the certificate in rest of the nodes by restoring the certificate backup file (red2,red3 and red4 in this case)
use master
go
CREATE MASTER KEY ENCRYPTION BY PASSWORD = ‘**<Master_Key_Password>**’
go
CREATE CERTIFICATE dbm_certificate
FROM FILE = ‘/var/opt/mssql/data/dbm_certificate.cer’
WITH PRIVATE KEY (
FILE = ‘/var/opt/mssql/data/dbm_certificate.pvk’,
DECRYPTION BY PASSWORD = ‘**<Private_Key_Password>**’
)
5.Create endpoint in all servers (red1,red2,red3 and red4)
CREATE ENDPOINT [Hadr_endpoint]
AS TCP (LISTENER_PORT = 5022)
FOR DATABASE_MIRRORING (
ROLE = ALL,
AUTHENTICATION = CERTIFICATE dbm_certificate,
ENCRYPTION = REQUIRED ALGORITHM AES
);
ALTER ENDPOINT [Hadr_endpoint] STATE = STARTED;
6.Run following query in primary replica (red1) to create Availability group(Please note, it works for SQL 2019. If you are using SQL 2017, you need to change AVAILABILITY_MODE of one the replica to ASYNCHRONOUS_COMMIT)
CREATE AVAILABILITY GROUP [ag1]
WITH (DB_FAILOVER = ON, CLUSTER_TYPE = EXTERNAL)
FOR REPLICA ON
N’red1′
WITH (
ENDPOINT_URL = N’tcp://red1:5022′,
AVAILABILITY_MODE = SYNCHRONOUS_COMMIT,
FAILOVER_MODE = EXTERNAL,
SEEDING_MODE = AUTOMATIC) ,
N’red2′
WITH (
ENDPOINT_URL = N’tcp://red2:5022′,
AVAILABILITY_MODE = SYNCHRONOUS_COMMIT,
FAILOVER_MODE = EXTERNAL,
SEEDING_MODE = AUTOMATIC),
N’red3′
WITH (
ENDPOINT_URL = N’tcp://red3:5022′,
AVAILABILITY_MODE = SYNCHRONOUS_COMMIT,
FAILOVER_MODE = EXTERNAL,
SEEDING_MODE = AUTOMATIC),
N’red4′
WITH (
ENDPOINT_URL = N’tcp://red4:5022′,
AVAILABILITY_MODE = SYNCHRONOUS_COMMIT,
FAILOVER_MODE = EXTERNAL,
SEEDING_MODE = AUTOMATIC)
ALTER AVAILABILITY GROUP [ag1] GRANT CREATE ANY DATABASE;–grant create any database permission
- Join the AG group, run the following T-SQL queries in all the secondary servers (red2,red3 and red4 in this case)
ALTER AVAILABILITY GROUP [ag1] JOIN WITH (CLUSTER_TYPE = EXTERNAL);
ALTER AVAILABILITY GROUP [ag1] GRANT CREATE ANY DATABASE
8.Run following T-SQL Queries to create database and add it to AG group in primary replica (red1 in this case).
CREATE DATABASE [db1];
ALTER DATABASE [db1] SET RECOVERY FULL;
BACKUP DATABASE [db1] TO DISK = N’/var/opt/mssql/data/db1.bak’;
BACKUP log [db1] TO DISK = N’/var/opt/mssql/data/db1.trn’;
GO
ALTER AVAILABILITY GROUP [ag1] ADD DATABASE [db1];
9.Create SQL login pacemaker in all servers (red1,red2,red3 and red4 in this case).
CREATE LOGIN [pacemakerLogin] with PASSWORD= N’ComplexP@$$w0rd!’
GO
ALTER SERVER ROLE [sysadmin] ADD MEMBER [pacemakerLogin]
10.Run following bash command in red1
sudo pcs property set stonith-enabled=false
- In all SQL Server Linux servers , run following bash commands to save the credentials for the SQL Server login.(red1,red2,red3 and red4) (The password is as same as the one used in step 9)
echo ‘pacemakerLogin’ >> ~/pacemaker-passwd
echo ‘ComplexP@$$w0rd!’ >> ~/pacemaker-passwd
sudo mv ~/pacemaker-passwd /var/opt/mssql/secrets/passwd
sudo chown root:root /var/opt/mssql/secrets/passwd
sudo chmod 400 /var/opt/mssql/secrets/passwd # Only readable by root
12.Create availability group resource at cluster level, run following command on any one of the nodes (just in one server and run just one time).
sudo pcs resource create ag_cluster1 ocf:mssql:ag ag_name=ag1 meta failure-timeout=60s master notify=true
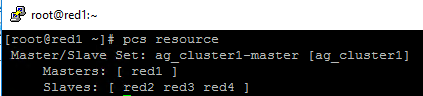
##check the status

13.Run following bash command in primary replica red1 to create one virtual IP resources. The resource name is ‘vip1’, and IP address is 192.168.2.111
sudo pcs resource create vip1 ocf:heartbeat:IPaddr2 ip=192.168.2.111

##check the status

- Create Availability group listener for Availability group ag1. Run following T-SQL query in primary replica (red1 in this case).
ALTER AVAILABILITY GROUP [ag1]
ADD LISTENER ‘aglistener’ (WITH IP
(
(‘192.168.2.111′,’255.255.255.0’),
(‘192.168.4.111′,’255.255.255.0’),
(‘192.168.5.111′,’255.255.255.0’)
),PORT = 1433);

- Run following bash commands to create constraints:
sudo pcs constraint colocation add vip1 ag_cluster1-master INFINITY with-rsc-role=Master
sudo pcs constraint order promote ag_cluster1-master then start vip1

16.Run following bash command to export the CIB.(you can run the command in any node)
sudo pcs cluster cib <filename>

17.You will find following similar entries
<primitive class=”ocf” id=”vip1″ provider=”heartbeat” type=”IPaddr2″>
<instance_attributes id=”vip1-instance_attributes”>
<nvpair id=”vip1-instance_attributes-ip” name=”ip” value=”192.168.2.111″/>
</instance_attributes>
<operations>
<op id=”vip1-monitor-interval-10s” interval=”10s” name=”monitor” timeout=”20s”/>
<op id=”vip1-start-interval-0s” interval=”0s” name=”start” timeout=”20s”/>
<op id=”vip1-stop-interval-0s” interval=”0s” name=”stop” timeout=”20s”/>
</operations>
</primitive>
18.Here is the modified version
<primitive class=”ocf” id=”vip1″ provider=”heartbeat” type=”IPaddr2″>
<instance_attributes id=”vip1-instance_attributes”>
<rule id=”Subnet1-IP” score=”INFINITY” boolean-op=”or”>
<expression id=”Subnet1-Node1″ attribute=”#uname” operation=”eq” value=”red1″/>
<expression id=”Subnet1-Node2″ attribute=”#uname” operation=”eq” value=”red2″/>
</rule>
<nvpair id=”vip1-instance_attributes-ip” name=”ip” value=”192.168.2.111″/>
</instance_attributes>
<instance_attributes id=”vip1-instance_attributes2″>
<rule id=”Subnet2-IP” score=”INFINITY”>
<expression id=”Subnet2-Node1″ attribute=”#uname” operation=”eq” value=”red3″/>
</rule>
<nvpair id=”vip1-instance_attributes-ip2″ name=”ip” value=”192.168.4.111″/>
</instance_attributes>
<instance_attributes id=”vip1-instance_attributes3″>
<rule id=”Subnet3-IP” score=”INFINITY”>
<expression id=”Subnet3-Node1″ attribute=”#uname” operation=”eq” value=”red4″/>
</rule>
<nvpair id=”vip1-instance_attributes-ip3″ name=”ip” value=”192.168.5.111″/>
</instance_attributes>
<operations>
<op id=”vip1-monitor-interval-10s” interval=”10s” name=”monitor” timeout=”20s”/>
<op id=”vip1-start-interval-0s” interval=”0s” name=”start” timeout=”20s”/>
<op id=”vip1-stop-interval-0s” interval=”0s” name=”stop” timeout=”20s”/>
</operations>
</primitive>
- Run following command to import the modified CIB and reconfigure Pacemaker.
sudo pcs cluster cib-push <filename>

Here are the takeaway points:
1).All nodes in same subnet should be in the same <Instance_attributes>

2).If there are more than one servers in the subnet, the keyword ‘boolean-op=”or”’ is a must

3).The IP address of Alwayson Listener is addressed in <nvpair> .

4).The id property must be unique

Optional, you can create three entries for the three IP addresses in the DNS server.

Here is an screenshot of using SQLCMD to connect the AGListener

by Scott Muniz | Jul 24, 2020 | Uncategorized
This article is contributed. See the original author and article here.
In the Windows world, a Windows Server Failover Cluster (WSFC) natively supports multiple subnets and handles multiple IP addresses via an OR dependency on the IP address. On Linux, there is no OR dependency, but there is a way to achieve a proper multi-subnet natively with Pacemaker, as shown by the following. You cannot do this by simply using the normal Pacemaker command line to modify a resource. You need to modify the cluster information base (CIB). The CIB is an XML file with the Pacemaker configuration.
That’s the comment from https://docs.microsoft.com/en-us/sql/linux/sql-server-linux-configure-multiple-subnet?view=sql-server-ver15
However, the steps of modifying CIB is not correct. MS will revise the steps soon.
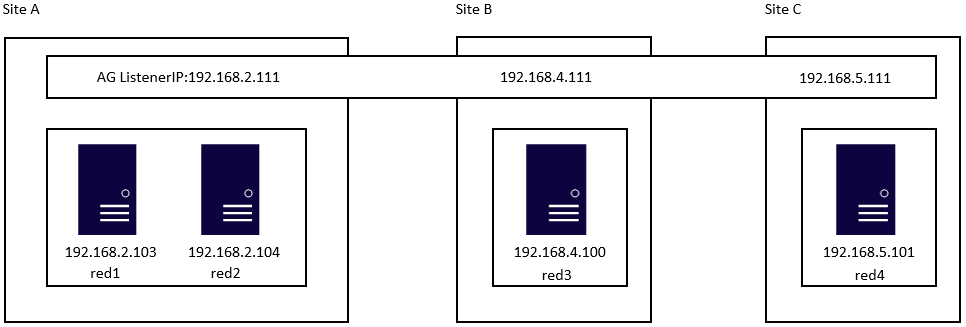
Here is an example to create a SQL Server Linux Availability group in 4 nodes in 3 subnets in RHEL 7.6

If you are already familiar with the AG Group setup process, please just jump to step 16.
1.Register your subscription on for all servers (red1,red2,red3 and red4 in this case)
subscription-manager register
2.List all available subscription, pick the one with High Availabiilty , notedown the pool id
subscription-manager list –available –all
3.Register the subscription for all nodes (red1,red2,red3 and red4 in this case)
sudo subscription-manager attach –pool=xxxxx
4.Enable the repository(red1,red2,red3 and red4 in this case)
sudo subscription-manager repos –enable=rhel-ha-for-rhel-7-server-rpms
5.Install Pacemaker packages on all nodes. (red1,red2,red3 and red4 in this case)
sudo yum install pacemaker pcs fence-agents-all resource-agents
6.Install SQL Server resource agent (red1,red2,red3 and red4 in this case)
sudo yum install mssql-server-ha
7.Set the password for the default user that is created when installing Pacemaker and Corosync packages. All the password should be exactly same (red1,red2,red3 and red4 in this case)
sudo passwd hacluster
8.Update /etc/hosts file in all servers, add IP and node name. All the servers should have the same entries.
192.168.2.103 red1
192.168.2.104 red2
192.168.4.100 red3
192.168.5.101 red4
9.Run following commands to Enable and start pcsd service and Pacemaker in all nodes. (red1,red2 and red3 and red4 in this case)
sudo systemctl enable pcsd
sudo systemctl start pcsd
sudo systemctl enable pacemaker
10.Run following commands to Create Cluster in primary replica node (red1 in this case)
sudo pcs cluster auth red1 red2 red3 red4 -u hacluster -p YouPasswordUsedinStep7
sudo pcs cluster setup –name sqlcluster1 red1 red2 red3 red4
sudo pcs cluster start –all
sudo pcs cluster enable –all
11.Run following command to Enable cluster feature in all nodes(red1,red2 , red3 and red4 in this case)
sudo /opt/mssql/bin/mssql-conf set hadr.hadrenabled 1
sudo systemctl restart mssql-server
Create AG and Listener
1.Run following queries in red1 to create certificate
use master
go
CREATE MASTER KEY ENCRYPTION BY PASSWORD = ‘**<Master_Key_Password>**’;
go
CREATE CERTIFICATE dbm_certificate WITH SUBJECT = ‘dbm’;
go
BACKUP CERTIFICATE dbm_certificate TO FILE = ‘/var/opt/mssql/data/dbm_certificate.cer’
WITH PRIVATE KEY (
FILE = ‘/var/opt/mssql/data/dbm_certificate.pvk’,
ENCRYPTION BY PASSWORD = ‘**<Private_Key_Password>**’
);
2.Run following commands in red1 to copy the certificate to rest of the servers(red2,red3 and red4 in this case)
cd /var/opt/mssql/data
scp dbm_certificate.* root@red2:/var/opt/mssql/data/
scp dbm_certificate.* root@red3:/var/opt/mssql/data/
scp dbm_certificate.* root@red4:/var/opt/mssql/data/
3.Give permission to the mssql user to access the certificate files in rest of the servers(red2,red3 and red4 in this case)
cd /var/opt/mssql/data
chown mssql:mssql dbm_certificate.*
4.Run following T-SQL queries to create the certificate in rest of the nodes by restoring the certificate backup file (red2,red3 and red4 in this case)
use master
go
CREATE MASTER KEY ENCRYPTION BY PASSWORD = ‘**<Master_Key_Password>**’
go
CREATE CERTIFICATE dbm_certificate
FROM FILE = ‘/var/opt/mssql/data/dbm_certificate.cer’
WITH PRIVATE KEY (
FILE = ‘/var/opt/mssql/data/dbm_certificate.pvk’,
DECRYPTION BY PASSWORD = ‘**<Private_Key_Password>**’
)
5.Create endpoint in all servers (red1,red2,red3 and red4)
CREATE ENDPOINT [Hadr_endpoint]
AS TCP (LISTENER_PORT = 5022)
FOR DATABASE_MIRRORING (
ROLE = ALL,
AUTHENTICATION = CERTIFICATE dbm_certificate,
ENCRYPTION = REQUIRED ALGORITHM AES
);
ALTER ENDPOINT [Hadr_endpoint] STATE = STARTED;
6.Run following query in primary replica (red1) to create Availability group(Please note, it works for SQL 2019. If you are using SQL 2017, you need to change AVAILABILITY_MODE of one the replica to ASYNCHRONOUS_COMMIT)
CREATE AVAILABILITY GROUP [ag1]
WITH (DB_FAILOVER = ON, CLUSTER_TYPE = EXTERNAL)
FOR REPLICA ON
N’red1′
WITH (
ENDPOINT_URL = N’tcp://red1:5022′,
AVAILABILITY_MODE = SYNCHRONOUS_COMMIT,
FAILOVER_MODE = EXTERNAL,
SEEDING_MODE = AUTOMATIC) ,
N’red2′
WITH (
ENDPOINT_URL = N’tcp://red2:5022′,
AVAILABILITY_MODE = SYNCHRONOUS_COMMIT,
FAILOVER_MODE = EXTERNAL,
SEEDING_MODE = AUTOMATIC),
N’red3′
WITH (
ENDPOINT_URL = N’tcp://red3:5022′,
AVAILABILITY_MODE = SYNCHRONOUS_COMMIT,
FAILOVER_MODE = EXTERNAL,
SEEDING_MODE = AUTOMATIC),
N’red4′
WITH (
ENDPOINT_URL = N’tcp://red4:5022′,
AVAILABILITY_MODE = SYNCHRONOUS_COMMIT,
FAILOVER_MODE = EXTERNAL,
SEEDING_MODE = AUTOMATIC)
ALTER AVAILABILITY GROUP [ag1] GRANT CREATE ANY DATABASE;–grant create any database permission
- Join the AG group, run the following T-SQL queries in all the secondary servers (red2,red3 and red4 in this case)
ALTER AVAILABILITY GROUP [ag1] JOIN WITH (CLUSTER_TYPE = EXTERNAL);
ALTER AVAILABILITY GROUP [ag1] GRANT CREATE ANY DATABASE
8.Run following T-SQL Queries to create database and add it to AG group in primary replica (red1 in this case).
CREATE DATABASE [db1];
ALTER DATABASE [db1] SET RECOVERY FULL;
BACKUP DATABASE [db1] TO DISK = N’/var/opt/mssql/data/db1.bak’;
BACKUP log [db1] TO DISK = N’/var/opt/mssql/data/db1.trn’;
GO
ALTER AVAILABILITY GROUP [ag1] ADD DATABASE [db1];
9.Create SQL login pacemaker in all servers (red1,red2,red3 and red4 in this case).
CREATE LOGIN [pacemakerLogin] with PASSWORD= N’ComplexP@$$w0rd!’
GO
ALTER SERVER ROLE [sysadmin] ADD MEMBER [pacemakerLogin]
10.Run following bash command in red1
sudo pcs property set stonith-enabled=false
- In all SQL Server Linux servers , run following bash commands to save the credentials for the SQL Server login.(red1,red2,red3 and red4) (The password is as same as the one used in step 9)
echo ‘pacemakerLogin’ >> ~/pacemaker-passwd
echo ‘ComplexP@$$w0rd!’ >> ~/pacemaker-passwd
sudo mv ~/pacemaker-passwd /var/opt/mssql/secrets/passwd
sudo chown root:root /var/opt/mssql/secrets/passwd
sudo chmod 400 /var/opt/mssql/secrets/passwd # Only readable by root
12.Create availability group resource at cluster level, run following command on any one of the nodes (just in one server and run just one time).
sudo pcs resource create ag_cluster1 ocf:mssql:ag ag_name=ag1 meta failure-timeout=60s master notify=true
##check the status
13.Run following bash command in primary replica red1 to create one virtual IP resources. The resource name is ‘vip1’, and IP address is 192.168.2.111
sudo pcs resource create vip1 ocf:heartbeat:IPaddr2 ip=192.168.2.111
##check the status
- Create Availability group listener for Availability group ag1. Run following T-SQL query in primary replica (red1 in this case).
ALTER AVAILABILITY GROUP [ag1]
ADD LISTENER ‘aglistener’ (WITH IP
(
(‘192.168.2.111′,’255.255.255.0’),
(‘192.168.4.111′,’255.255.255.0’),
(‘192.168.5.111′,’255.255.255.0’)
),PORT = 1433);
- Run following bash commands to create constraints:
sudo pcs constraint colocation add vip1 ag_cluster1-master INFINITY with-rsc-role=Master
sudo pcs constraint order promote ag_cluster1-master then start vip1
16.Run following bash command to export the CIB.(you can run the command in any node)
sudo pcs cluster cib <filename>
17.You will find following similar entries
<primitive class=”ocf” id=”vip1″ provider=”heartbeat” type=”IPaddr2″>
<instance_attributes id=”vip1-instance_attributes”>
<nvpair id=”vip1-instance_attributes-ip” name=”ip” value=”192.168.2.111″/>
</instance_attributes>
<operations>
<op id=”vip1-monitor-interval-10s” interval=”10s” name=”monitor” timeout=”20s”/>
<op id=”vip1-start-interval-0s” interval=”0s” name=”start” timeout=”20s”/>
<op id=”vip1-stop-interval-0s” interval=”0s” name=”stop” timeout=”20s”/>
</operations>
</primitive>
18.Here is the modified version
<primitive class=”ocf” id=”vip1″ provider=”heartbeat” type=”IPaddr2″>
<instance_attributes id=”vip1-instance_attributes”>
<rule id=”Subnet1-IP” score=”INFINITY” boolean-op=”or”>
<expression id=”Subnet1-Node1″ attribute=”#uname” operation=”eq” value=”red1″/>
<expression id=”Subnet1-Node2″ attribute=”#uname” operation=”eq” value=”red2″/>
</rule>
<nvpair id=”vip1-instance_attributes-ip” name=”ip” value=”192.168.2.111″/>
</instance_attributes>
<instance_attributes id=”vip1-instance_attributes2″>
<rule id=”Subnet2-IP” score=”INFINITY”>
<expression id=”Subnet2-Node1″ attribute=”#uname” operation=”eq” value=”red3″/>
</rule>
<nvpair id=”vip1-instance_attributes-ip2″ name=”ip” value=”192.168.4.111″/>
</instance_attributes>
<instance_attributes id=”vip1-instance_attributes3″>
<rule id=”Subnet3-IP” score=”INFINITY”>
<expression id=”Subnet3-Node1″ attribute=”#uname” operation=”eq” value=”red4″/>
</rule>
<nvpair id=”vip1-instance_attributes-ip3″ name=”ip” value=”192.168.5.111″/>
</instance_attributes>
<operations>
<op id=”vip1-monitor-interval-10s” interval=”10s” name=”monitor” timeout=”20s”/>
<op id=”vip1-start-interval-0s” interval=”0s” name=”start” timeout=”20s”/>
<op id=”vip1-stop-interval-0s” interval=”0s” name=”stop” timeout=”20s”/>
</operations>
</primitive>
- Run following command to import the modified CIB and reconfigure Pacemaker.
sudo pcs cluster cib-push <filename>
Here are the takeaway points:
1).All nodes in same subnet should be in the same <Instance_attributes>
2).If there are more than one servers in the subnet, the keyword ‘boolean-op=”or”’ is a must
3).The IP address of Alwayson Listener is addressed in <nvpair> .
4).The value of id property does not matter, you can specify any value as long as the value is unique.
Optional, you can create three entries for the three IP addresses in the DNS server.
Here is an screenshot of using SQLCMD to connect the AGListener

by Scott Muniz | Jul 24, 2020 | Uncategorized
This article is contributed. See the original author and article here.
A huge THANK YOU to everyone who has expressed interest and applied to be a Humans of IT Community Ambassador. We are truly so humbled by the overwhelming support and enthusiasm we’ve seen in this community by real-life Humans of IT who are passionate about doing good and spreading kindness in tech.
After careful evaluation of all applications, we’re thrilled to announce our inaugural batch of Humans of IT Community Ambassadors for FY21! Please join us in a round of (virtual) applause for these amazing individuals who will be advocating for Humans of IT around the world (literally!) and furthering our mission to make the tech industry a welcoming and inclusive place for all – no matter your background or experience in tech:
 FY21 Humans of IT Community Ambassadors
This year, we are also thrilled to be partnering with FIVE Historically Black Colleges and Universities (HBCUs) including Dillard University, Xavier University, Southern University – Baton Rouge, Southern University – New Orleans and Grambling State University to support budding technologists in these schools! Our Humans of IT Community Ambassadors will be actively involved in mentoring Humans of IT student ambassadors (soon to be announced!) from these schools, with full support from the universities’ Computer Science faculty and deans. They will also get the opportunity to do larger scale, 1:many mentoring sessions with future technologists in the Microsoft Learn Student Ambassador program to help them develop their career paths in tech and dive into tech for good projects.
If you live in or near a region where our Community Ambassadors are located, we strongly encourage you to reach out to them with ideas and initiatives on how to leverage #TechforGood. Together, we can achieve incredible things all around the world.
We can’t wait to see all the positive social impact we can create with YOU in FY21!
#HumansofIT
#TechforGood
by Scott Muniz | Jul 24, 2020 | Uncategorized
This article is contributed. See the original author and article here.
This week, there was several key announcements from Microsoft Inspire. A few include: the new Yammer being available worldwide, new Microsoft Teams capabilities and a new meeting/calling experience from them as well.
@Natalia Nemkovich is our member of the week, and has been a fantastic contributor especially in the Yammer community and recent Yammer AMA.
View the Weekly Roundup for July 20-24 in Sway and attached PDF document.
by Scott Muniz | Jul 24, 2020 | Uncategorized
This article is contributed. See the original author and article here.
In today’s post, I want to discuss how to move away from using legacy user profile technologies and leverage more cloud-friendly, time-tested solutions for Windows 10 roaming settings.
Over the past few months, IT pros around the world have been increasingly tasked with managing devices while end users are working remotely. Early priorities focused on securing corporate devices, securing application access, and ensuring the continuity of ongoing manageability. With these pillars now in place, we have seen many organizations shift greater focus towards user experience and productivity.
In addition, many organizations have realized that ensuring business continuity moving forward will require both user and device flexibility. Some users may continue to work remotely on a mix of portable/mobile devices and remote corporate workstations. Others may return to the office, including those returning on a part-time basis and working in a hybrid scenario where devices may be on-premises at times and remotely connected at others.
Securing access to corporate applications and data is paramount in ensuring that users remain productive throughout this transition. In addition to managing application and data access, ensuring the preservation and roaming of user state data, specifically application preferences and shell settings, is critically important as it is often very personalized and tailored to individual users. In some cases, some of these settings might also be mandated by policy.
Avoid roaming for full user profile data
There has never been a better opportunity to stop traditional Windows user profile management than now. Profile bloat is not something to be desired. IT pros need to avoid profile/settings traffic traveling over any connection, even VPN connections, as much of that data is not pertinent to the majority of the user’s work. Even then, important state data is not needed until an application tied to that data is used. When connectivity is limited and coupled with potential app growth, downloading and uploading full user profile data results in longer logons and logoffs, and the potential for wholesale profile corruption increases, generating more problems that are then further complicated for help desks to remediate without potential state data loss.
Microsoft has two technologies available for offering both more granular user and application state roaming of settings and preferences that can take advantage of the cloud for settings storage and roaming: Enterprise State Roaming and User Experience Virtualization (UE-V.) If you have an Azure AD Premium License or Enterprise Mobility + Security (EMS) license, you can already leverage Enterprise State Roaming. If you have Windows 10 Enterprise or Education, you already have UE-V available to you as well. Both Enterprise State Roaming and UE-V have been around for quite a while and have matured into feature complete solutions. Note that both solutions (designed to roam different types of shell and app settings) can leverage the cloud to roam settings storage.
Modern roaming settings for Windows
Many of our enterprise customers are leveraging Enterprise State Roaming with Azure AD Premium today to roam user state data. In this scenario, settings and data are roamed via your cloud tenant and in a much more granular and streamlined way. Data is processed on demand through specific triggers. You do not have to manage the storage or files as Azure AD and the cloud will take care of that for you. For more information, see Windows 10 roaming settings reference.
To ensure that users can synchronize settings using the cloud across Windows 10 devices in your organization, you will need to:
- Sign in to Azure AD admin center.
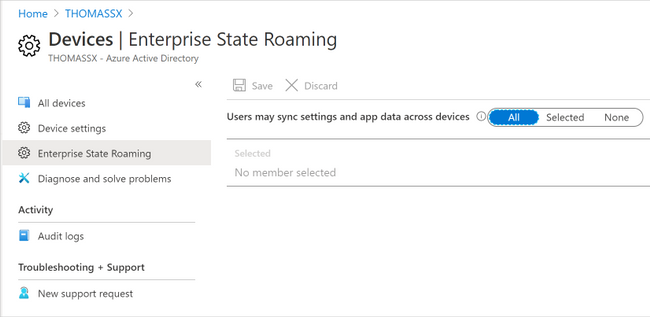
- Select Azure Active Directory > Devices > Enterprise State Roaming.
- Select Users may sync settings and app data across devices. For more information, see how to configure device settings.
 Enterprise State Roaming settings in Azure AD
For a Windows 10 device to use the Enterprise State Roaming service, the device must authenticate using an Azure AD identity. For devices that are joined to Azure AD, the primary sign-in identity for the user is their Azure AD identity, so no additional configuration is required. For devices that use on-premises Active Directory, you must first Configure hybrid Azure Active Directory joined devices.
Users can also enable synchronization of Windows 10 settings by selecting the Start button, then selecting Settings > Accounts > Sync your settings. When Sync settings is turned on, Windows syncs the settings you choose across all your Windows 10 devices that you have signed in to with your Azure AD account. If you need to enable specific policies for Enterprise State Roaming, you can do so using Group Policy (although you will find it likely that this might not be needed.) You can also control use via security groups and monitor device sync status per user in the portal.
 Sync settings options in Windows 10
You do not need to worry about server-side management of storage data, as that all happens automatically. Enterprise State Roaming data is hosted in one or more Azure regions that best align with the country/region value set in the Azure Active Directory instance. Enterprise State Roaming data is partitioned based on three major geographic regions: North America, EMEA (Europe, Middle East, and Africa), and APAC (Asia-Pacific.)
Roaming settings for Modern UWP apps
In addition to key Windows 10 browser and shell components, Enterprise State Roaming can facilitate roaming settings for modern Universal Windows Platform (UWP) applications as well including system, inbox, and Store apps. To view a more comprehensive listing of system and inbox apps, see Understand the different apps included in Windows 10.
Both Universal Windows applications and packaged desktop line-of-business (LoB) applications in MSIX can write settings data to a roaming folder and any data written to this folder will automatically be synced. Your experience may vary, as it is up to the individual developer to design an application to take advantage of this capability. Likewise, for desktop applications repackaged into MSIX packages, this data may not natively write to this folder, and a Package Support Framework (PSF) fixup may be required. For more information about how to develop a Universal Windows app that uses roaming, see the AppData Storage API and the AppData Roaming Developer Guidance.
Roaming settings for classic Win32 applications
Most LOB applications in the enterprise running on Windows are still running predominantly as traditional Win32 applications. Since there may be a lot of variance and non-standard approaches to user preference management, you can still use the UE-V Template Generator to capture those settings and designate for roam in an XML template those file and registry settings that will need to be stored as user state for that application.
UE-V can be enabled via PowerShell (the Enable-UEV cmdlet,) through Group Policy, and through Microsoft Endpoint Configuration Manager. You can also use any of the options to enable the inbox templates, which are, by default, located at C:ProgramDataMicrosoftUEVInboxTemplates) and register custom templates either using a custom path or leveraging the default (C:ProgramDataMicrosoftUEVTemplates.
In order to roam settings for custom applications, you first need to download the Windows 10 ADK and install the UE-V Template Generator. From there, run the template generator to capture the settings and preferences available for each application. For guidance around capturing settings and preferences and generating custom templates for your applications, see Working with custom UE-V templates and the UE-V template generator.
 User Experience Virtualization (UE-V) template generator
You can then leverage group policy or the register-uevtemplate cmdlet to register the custom template.
UE-V and roaming for additional legacy shell Items
In addition to roaming registered templates that might be customized for your LOB Win32 applications, UE-V can roam other legacy shell items that are still supported in Windows 10. For a list of items UE-V roams by default via its inbox templates, please see User Experience Virtualization (UE-V) for Windows 10 overview.
|
Note: Some of these items might not be directly applicable in mobile scenarios; however, items such as credential roaming, and legacy explorer preferences may be useful.
|
Roaming UE-V settings storage in the cloud
Traditionally, many enterprises over the years used UE-V to roam settings using an on-premises file share option. UE-V can also be configured to use an external sync source such as OneDrive. Additional enhancements over the past couple of years to OneDrive, such as Files On-Demand, means you can have your settings available during first-time launch of the application.
UE-V has a few sync methods, but for cloud scenarios, including OneDrive, you will want to select the “External” option. This configuration method specifies that if UE-V settings are written to a local folder on the user computer, then any external sync engine (such as OneDrive for Business, Work Folders, SharePoint, or Dropbox) can be used to apply these settings to the different computers that users access. If you were configuring this via policy, you can assign the %USERNAME% variable when assigning the local folder (i.e. C:Users%USERNAME%OneDriveSettings.)
 Configuring UE-V sync using Group Policy
Putting it all together
Combining Enterprise State Roaming with UE-V gives your organization the capability to provide more user flexibility and portability across multiple devices, and allows those settings to travel with your end users wherever they might be working. We recommend that you take advantage of these two solutions to roam settings if you have Windows 10 Enterprise and have also enabled OneDrive and Azure Active Directory. The chart below is a quick reference to help understand and manage the differences between roaming options.
|
Item
|
Solution
|
Settings Storage
|
|
Common Windows 10 Items
|
Enterprise State Roaming
|
Automatically roamed via Azure AD
|
|
Modern Shell Items
|
|
Windows 10 Inbox and UWP Apps
|
|
Packaged Apps via MSIX
|
|
Legacy Shell items
|
UE-V
|
Recommendation is to configure an external cloud sync host (OneDrive)
|
|
Win32 Apps
|

Recent Comments