by Contributed | Jul 8, 2021 | Technology
This article is contributed. See the original author and article here.
One of the many challenges of deploying AI on edge is that IoT devices have limited compute and memory resources. So, it becomes extremely important that your model is accurate and compact enough to deliver real-time inference at the edge. Juggling between the accuracy of the model and the size is always a challenge when creating a model; smaller, shallower networks suffer from poor accuracy and deeper networks are not suitable for edge. Additionally, achieving state-of-the-art accuracy requires collecting and annotating large sets of training data and deep domain expertise, which can be cost-prohibitive for many enterprises looking to bring their AI solutions to market faster. NVIDIA’s catalog of pre-trained models and Transfer Learning Toolkit (TLT) can help you accelerate your model development. TLT is a core component of the NVIDIA TAO, an AI-model-adaptation platform. TLT provides a simplified training workflow geared for the non-experts to quickly get started building AI using pre-trained models and guided Jupyter notebooks. TLT offers several performance optimizations that make the model compact for high throughput and efficiency, accelerating your Computer Vision and Conversational AI applications.
Training is compute-intensive, requiring access to powerful GPUs to speed up the time to solution. Microsoft Azure Cloud offers several GPU optimized Virtual machines (VM) with access to NVIDIA A100, V100 and T4 GPUs.
In this blog post, we will walk you through the entire journey of training an AI model starting with provisioning a VM on Azure to training with NVIDIA TLT on Azure cloud.
Pre-trained models and TLT
Transfer Learning is a training technique where you leverage the learned features from one model to another. Start with a pretrained model that has been trained on representative datasets and fine-tuned with weights and biases. These models can be easily retrained with custom data in a fraction of the time it takes to train from scratch.
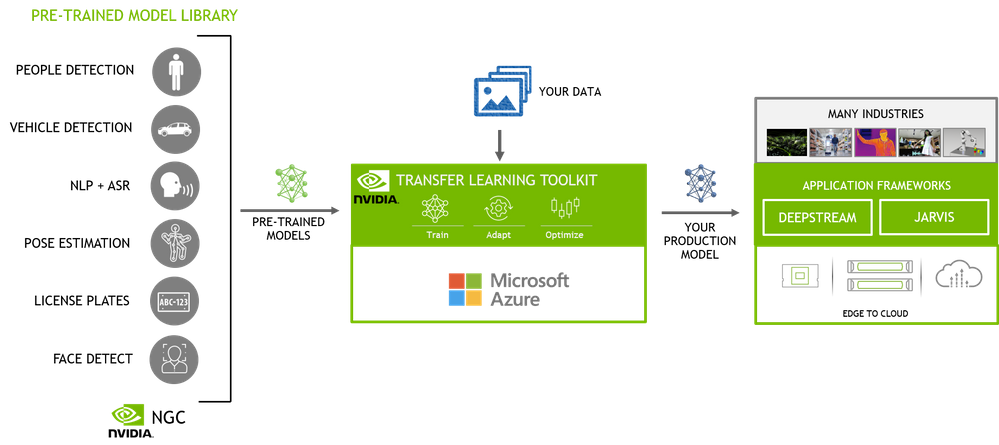
Figure 1 – End-to-end AI workflow
The NGC catalog, NVIDIA’s hub of GPU-optimized AI and HPC software contains a diverse collection of pre-trained models for computer vision and conversational AI use cases that span industries from manufacturing, to retail to healthcare and more. These models have been trained on images and large sets of text and speech data to provide you with a highly accurate model to start with. For example, People detection and segmentation and body pose estimation models can be used to extract occupancy insights in smart spaces such as retail, hospitals, factories, offices, etc. Vehicle and License plate detection and recognition models can be used for smart infrastructure. Automatic speech recognition (ASR) and Natural language processing (NLP) models can be used for smart speakers, video conferencing, automated chatbots and others. In addition to these highly specific use case models, you also have the flexibility to use the general purpose pre-trained models from popular open model architectures such as ResNet, EfficientNet, YOLO, UNET, and others. These can be used for general use cases in object detection, classification and segmentation.
Once you select your pre-trained model, you can fine-tune the model on your dataset using TLT. TLT is a low-code Jupyter notebook based workflow, allowing you to adapt an AI model in hours, rather than months. The guided Jupyter notebook and configurable spec files make it easy to get started.
Here are few key features of TLT to optimize inference performance:
- Model pruning removes nodes from neural networks while maintaining comparable accuracy, making the model compact and optimal for edge deployment without sacrificing accuracy.
- INT8 quantization enables the model to run inference at lower INT8 precision, which is significantly faster than running in floating point FP16 or FP32
Pruning and quantization can be achieved with a single command in the TLT workflow.
Setup an Azure VM
We start by first setting up an appropriate VM on Azure cloud. You can choose from the following VMs which are powered by NVIDIA GPUs – ND 100, NCv3 and NC T4_v3 series. For this blog, we will use the NCv3 series which comes with V100 GPUs. For the base image on the VM, we will use the NVIDIA provided GPU-optimized image from Azure marketplace. NVIDIA base image includes all the lower level dependencies which reduces the friction of installing drivers and other prerequisites. Here are the steps to setup Azure VM
Step 1 – Pull the GPU optimized image from Azure marketplace by clicking on the “Get it Now” button.

Figure 2 – GPU optimized image on Azure Marketplace
Select the v21.04.1 version under the Software plan to select the latest version. This will have the latest NVIDIA drivers and CUDA toolkit. Once you select the version, it will direct you to the Azure portal where you will create your VM.

Figure 3 – Image version selection window
Step 2 – Configure your VM
In the Azure portal, click “Create” to start configuring the VM.

Figure 4 – Azure Portal
This will pull the following page where you can select your subscription method, resource group, region and Hardware configuration. Provide a name for your VM. Once you are done you can click on the “Review + Create” button at the end to do a final review.
Note: The default disk space is 32GB. It is recommended to use >128GB disk for this experiment

Figure 5 – Create VM window
Make the final review of the offering that you are creating. Once done, hit the “Create” button to spin up your VM in Azure.
Note: Once you create, you will start incurring cost, so please review the pricing details.

Figure 6 – VM review
Step 3 – SSH in to your VM
Once your VM is created, SSH into your VM using the username and domain name or IP address of your VM.
ssh <username>@<IP address>
Training 2D Body Pose with TLT
In this step, we will walk through the steps of training a high performance 2D body pose model with TLT. This is a fully convolutional model and consists of a backbone network, an initial prediction stage which does a pixel-wise prediction of confidence maps (heatmap) and part-affinity fields (PAF) followed by multistage refinement (0 to N stages) on the initial predictions. This model is further optimized by pruning and quantization. This allows us to run this in real-time on edge platforms like NVIDIA Jetson.
In this blog, we will focus on how to run this model with TLT on Azure but if you would like to learn more about the model architecture and how to optimize the model, check out the two part blog on Training/Optimization 2D body pose with TLT – Part 1 and Part 2. Additional information about this model can be found in the NGC Model card.
Step 1 – Setup TLT
For TLT, we require a Python Virtual environment. Setup the Python Virtual Environment. Run the commands below to set up the Virtual environment.
sudo su - root
usermod -a -G docker azureuser
apt-get -y install python3-pip unzip
pip3 install virtualenvwrapper
export VIRTUALENVWRAPPER_PYTHON=/usr/bin/python3
source /usr/local/bin/virtualenvwrapper.sh
mkvirtualenv launcher -p /usr/bin/python3
Install Jupyterlab and TLT Python package. TLT uses a Python launcher to launch training runs. The launcher will automatically pull the correct docker image from NGC and run training on it. Alternatively, you can also manually pull the docker container and run it directly inside the docker. For this blog, we will run it from the launcher.
pip3 install jupyterlab
pip3 install nvidia-pyindex
pip3 install nvidia-tlt
Check if TLT is installed properly. Run the command below. This will dump a list of AI tasks that are supported by TLT.
tlt info --verbose

Configuration of the TLT Instance

dockers:
         nvcr.io/nvidia/tlt-streamanalytics:
               docker_tag: v3.0-py3
               tasks:
1. augment
2. classification
3. detectnet_v2
4. dssd
5. emotionnet
6. faster_rcnn
7. fpenet
8. gazenet
9. gesturenet
10. heartratenet
11. lprnet
12. mask_rcnn
13. retinanet
14. ssd
15. unet
16. yolo_v3
17. yolo_v4
18. tlt-converter

          nvcr.io/nvidia/tlt-pytorch:
          docker_tag: v3.0-py3

tasks:

1. speech_to_text
2. text_classification
3. question_answering
4. token_classification
5. intent_slot_classification
6. punctuation_and_capitalization
format_version: 1.0

tlt_version: 3.0

published_date: mm/dd/yyyy
Login to NGC and download Jupyter notebooks from NGC
docker login nvcr.io

cd /mnt/
sudo chown azureuser:azureuser /mnt/

wget --content-disposition https://api.ngc.nvidia.com/v2/resources/nvidia/tlt_cv_samples/versions/v1.1.0/zip -O tlt_cv_samples_v1.1.0.zip

unzip -u tlt_cv_samples_v1.1.0.zip  -d ./tlt_cv_samples_v1.1.0 && cd ./tlt_cv_samples_v1.1.0
Start your Jupyter notebook and open it in your browser.
jupyter notebook --ip 0.0.0.0 --port 8888 --allow-root
Step 2 – Open Jupyter notebook and spec file
In the browser, you will see all the CV models that are supported by TLT. For this experiment we will train a 2D body pose model. Click on the “bpnet” model in the Jupyter notebook. In this directory, you will also find Jupyter notebooks for popular networks like YOLOV3/V4, FasterRCNN, SSD, UNET and more. You can follow the same steps to train any other models.

Figure 7 – Model selection from Jupyter
Once you are inside, you will find a few config files and specs directory. Spec directory has all the ‘spec’ files to configure training and evaluation parameters. To learn more about all the parameters, refer to the 2D body pose documentation.

Figure 8 – Body Pose estimation training directory
Step 3 – Step thru the guided notebook
Open ‘bpnet.ipynb’ and step through the notebook. In the notebook, you will find learning objectives and all the steps to download the dataset and pre-trained model and run training and optimizing the model. For this exercise, we will use the open source COCO dataset but you are welcome to use your custom body pose dataset. Section 3.2 in the notebook talks about using a custom dataset.

Figure 9 – Jupyter notebook for training
In this blog, we demonstrated a body pose estimation use case with TLT but you can follow the steps to train any Computer Vision or conversational AI model with TLT. NVIDIA pre-trained models, Transfer Learning Toolkit and GPUs in the Azure cloud simplify the journey and reduce the barrier to starting with AI. The availability of GPUs in Microsoft Azure Cloud allows you to quickly start training without investing in your own hardware infrastructure, allowing you to scale the computing resources based on demand.
By leveraging the pre-trained models and TLT, you can easily and quickly adapt models for your use-cases and develop high-performance models that can be deployed at the edge for real-time inference.
Get started today with NVIDIA TAO TLT on Azure Cloud.
Resources:

by Contributed | Jul 8, 2021 | Technology
This article is contributed. See the original author and article here.
What do you get when you combine music, dancing and Excel? The answer could only be Kat Norton.
In a little over a year, the Office Apps and Services MVP has made a name for herself as Miss Excel on the world’s biggest social media platforms.
In short, 15-second videos, Kat tackles big Excel concepts, like how to create automated checklist hacks and interactive heat maps on the spreadsheet program, all the while dancing to a carefully curated soundtrack.
It’s perhaps this latter ingredient that is most integral to Kat’s rapid rise. Not only does the “Chief Excel Officer” pack as much information into each clip as possible, but she makes it engaging for the audience to digest. For the uninitiated, this video that teaches dynamic dropdown menu tips and tricks to the sound of Snoop Dog’s “Drop It Like It’s Hot” is a great place to start.
“As well as the content, a lot of people love my energy with it,” Kat says.
Kat’s rise in popularity has been sudden and impressive. The 28-year-old New Yorker started uploading videos in June of last year. By her fourth upload on TikTok, Kat was already notching video views of more than 100,000. By her fourth week, Kat’s account had attracted millions of viewers and more than 100,000 followers.
Soon after successfully branching out to Instagram and creating her own online courses, Kat had enough momentum to quit her corporate job and focus full-time on Miss Excel. Moreover, Kat also teaches Excel skills to businesses, as well as schools like the New York Institute of Technology, which commission her to speak.
“It’s almost like a science experiment to see how far it can go,” Kat says. “I always go to bed with a smile on my face – it’s amazing to be able to help people learn new things. It’s so rewarding.”
Another major milestone came in June of this year as Kat earned her first Microsoft MVP title.
Kat says she cannot wait to work further with MVPs and be a part of the community of experts. “It’s such an honor to work with MVPs, there are so many brilliant minds and I learn so much from being around the community. It’s a humbling experience to work with them,” Kat says.
The sky is the limit for Kat. The Excel expert says she looks forward to building more courses and expanding her content into other Microsoft programs like PowerPoint and Word. For the moment, however, Kat says she is more than happy to take things as they come.
“I couldn’t have predicted anything that’s happened so far, I’m constantly surprised by the opportunities that appear and emails that land in my inbox,” Kat says.
“If there are other MVPs out there that are thinking to do something similar with social media, jump in if it’s something you feel called to do. It’s a trial by fire but you learn a lot along the way.”
Kat invites any MVPs with questions about social media – or indeed Excel – to get in touch. For more on Kat, check out her TikTok and Instagram.


by Contributed | Jul 8, 2021 | Technology
This article is contributed. See the original author and article here.
Background

Catching your train on time can be challenging under the best of circumstances. Trains typically only stop for a few minutes, leaving little room for mistakes. For example, at Munich Main station around 240 express trains and 510 regional trains leave from 28 platforms per day. Some trains can also be quite long, up to 346 meters (1,135 ft) for express ICE trains. It is extremely important to quickly find the correct platform and the correct platform section, and it is convenient ato enter the train through the door closest to a reserved seat. This already challenging adventure becomes even more so, if a vision impairment forces a customer to rely exclusively on auditory or tactile feedback. When traveling autonomously, without assistance, it is common practice to walk along the outside of a train, continuously tapping it with a white cane, to discover opened and closed doors (image above). While this works in principle, this practice has limitations, both in terms of speed and reliability. We therefore partnered with the Deutsche Bahn Systel GmbH, to build the Digital Guide Dog, an AI-powered smartphone application that uses computer vision and auditory and haptic feedback to guide customers to the correct platform section and train car door. In this blog post, we are sharing some of the details and unique challenges that we experienced while the AI model behind this application. Before we jump into the details, let’s watch a brief video describing our customer story.
https://play.vidyard.com/Ervptr2VDm9mPr7VWyjaMn.html?
We also have a German version of this video: https://videos.microsoft.com/customer-stories/watch/FdKfxkZx7VRheMuFJKdThZ?
Approach

At its core, the application relies on an object detection model, which draws bounding boxes around every opened and closed door in the camera image. Using the coordinates of the corners of bounding boxes, the application can then guide customers into the correct direction (image above). Even though this is probably one of the most common and canonical applications of AI these days, there were a couple of unique challenges that made this project interesting. First, it is important to select an AI model that considers the context around a door, to decided whether it is looking at an opened or closed door, or something entirely different. Second, model errors can have detrimental, even fatal consequences, because of dangerous hazards that come with the territory of being inside a busy train station. Third, the model has to process video frames at a high frame, directly on the smart phone. In the following sections, we talk in more detail about how we tackled each of these challenges.
Considering the context of an object

It is important to select an AI model that considers the context around a door, to decide whether it is looking at an opened or closed door, or something entirely different. For example, in the image above, the model has to be able to recognize the closed door on the left, and an opened door on the right. The tricky part for the opened door is that it contains the same door flies that would represent a closed door (except that they would be touching each other). This gets even trickier for doors that only have one door fly that is pushed to one side. It would be a catastrophic failure, if the model recognized the door fly as a closed door. This situation would overwhelm many computer vision algorithms that treat object detection and classification as two separate problems. Many computer vision algorithms rely on approaches related to selective search (see this blog post, for example), in effect resizing and moving a window across an image, to then classify the objects contained in the window. We therefore chose to use the YOLO (You Only Look Once) v5, because it reformulates object detection and classification into a single challenge, taking the entire image input under consideration. We used a model that had been pretrained on the ImageNet dataset, and fine-tuned using Azure Machine Learning, including hyperparameter sweeps with HyperDrive.
Error Analysis
The second challenge was that we had to ensure that the model could be trusted in guiding customers to their doors. A train station contains many potential dangers, most of all the risk of falling onto the train tracks and being run over by a train. For this purpose, we had to take great care in preparing the model for various potential scenarios, exactly understanding its limitations, so that we can communicate those clearly to users. We carefully curated an annotated image dataset that would cover various types of train models and model years, diverse perspectives of doors, as well as diverse surroundings. In addition to training the model on objects we were interested in, we also trained the model to recognize objects that could be mistaken for doors (e.g., gaps between cars and windows). We then partnered with a team in Microsoft Research to perform error analysis (released open source in form of Jupyter notebook widgets). In essence, this approach involves assigning features to images, such as train model and year, and distance and angle to doors, to then train a decision tree that aims to predict model errors based on these features.
CoreML
One remaining challenge was to then convert the YOLO v5 model from PyTorch to CoreML, so that it would be able to process camera images in real-time on the smartphone. This was necessary to avoid costs related to transferring data between the phone and the cloud, reduce processing latency, and, most importantly, due to privacy concerns, ensuring that camera images are not intercepted or stored (see this repository for how to anonymize images when creating a dataset). Model conversion to CoreML can be accomplished using Core ML Tools. To achieve high enough image throughput, we ensured that all neural network operations are supported by the Neural Engine of the smart phone. This required us to explore various changes to the model architecture. We then used HyperDrive to combine a search over these changes with a search over common hyperparameters (e.g., learning rate, weight decay, momentum), to optimize model speed and accuracy.
Conclusion
In this blog post, we tried to share our learnings about unique challenges that we encountered when working on a project that initially appeared to be a canonical use case of computer vision model for object detection. In future work, we are planning to expand the scope of the application, to further improve the autonomy of passengers with impaired vision. Please let us know your thoughts in the comments below.
by Contributed | Jul 8, 2021 | Technology
This article is contributed. See the original author and article here.
When using Microsoft Graph Toolkit with Azure AD single-tenant Azure AD apps, you need to adjust MSAL Provider initiation for your app to work. Here is how.
Microsoft Graph Toolkit – the easiest way to connect to Microsoft 365
Microsoft Graph Toolkit (MGT) is a set of web components that abstract away the plumbing behind connecting to Microsoft Graph and allow you to focus on your application instead.
Microsoft Graph Toolkit is available as a generic set of web components distributed through the @microsoft/mgt npm package. If you’re building apps with React, you can use the @microsoft/mgt-react package which wraps MGT web component in React components making it easier to pass complex data and hook the components up to events.
Before you begin, connect to Azure AD
Microsoft Graph Toolkit allows you to connect your app to Microsoft 365 through Microsoft Graph. To do that, it needs to authenticate the user working with your web app against their tenant.
If you build applications using SharePoint Framework, you can reuse the existing authentication context. But if you build a standalone web app, you need to register an application in Azure Active Directory and use it with MGT’s MSAL Provider, like:
import { MsalProvider } from ‘@microsoft/mgt-msal-provider‘;
Providers.globalProvider = new MsalProvider({

  clientId: ‘ab9533b2-4e1e-4aaf-8412-8f02cfb9484c‘

});
In some cases though, this setup is not enough.
Single- vs. multi-tenant Azure AD apps
When you create an Azure AD app, you choose whether you want the application to be single- or multi-tenant. In other words, whether users from any directory should be allowed to use the app or only users from the same directory where the app is registered.
If your organization uses a single directory, registering your Azure AD app as single-tenant allows you to create an additional security measure preventing your app from unintended use.
The side-effect is though, that if you want to use a single-tenant Azure AD app with Microsoft Graph Toolkit, you need to instruct it where your Azure AD app is registered.
Use single-tenant Azure AD apps with Microsoft Graph Toolkit
If you try to use a single-tenant Azure AD with Microsoft Graph Toolkit using the default MSAL Provider setup with just the clientId, when you try to login to your app, you won’t be able to.

While you won’t see any error in the UI, if you open developer tools in your browser and take a look at requests, you will see a GET request to https://login.microsoftonline.com/common/reprocess followed by a 302 response with the error message in the query string:
http://localhost:3000/#error=invalid_request&error_description=AADSTS50194%3a+Application+%27ab9533b2-4e1e-4aaf-8412-8f02cfb9484c%27(My+M365+app)+is+not+configured+as+a+multi-tenant+application.+Usage+of+the+%2fcommon+endpoint+is+not+supported+for+such+applications+created+after+%2710%2f15%2f2018%27.+Use+a+tenant-specific+endpoint+or+configure+the+application+to+be+multi-tenant.%0d%0aTrace+ID%3a+79cfbca0-d484-461e-9d56-f3a4b4a30f00%0d%0aCorrelation+ID%3a+ffbed0df-da84-4076-a52b-9d3037c28ff9%0d%0aTimestamp%3a+2021-01-04+12%3a10%3a38Z&state=eyJpZCI6ImQyNGZjY2YxLTk2OTk…
For readability, here is the exact error message:
AADSTS50194: Application ‘ab9533b2-4e1e-4aaf-8412-8f02cfb9484c'(My M365 app) is not configured as a multi-tenant application. Usage of the /common endpoint is not supported for such applications created after ’10/15/2018’. Use a tenant-specific endpoint or configure the application to be multi-tenant
For you to be able to use a single-tenant Azure AD app with Microsoft Graph Toolkit, you need to extend the MsalProvider initialization with authority:
import { MsalProvider } from ‘@microsoft/mgt-msal-provider‘;
Providers.globalProvider = new MsalProvider({

  clientId: ‘ab9533b2-4e1e-4aaf-8412-8f02cfb9484c‘,

  authority: ‘https://login.microsoftonline.com/f7322380-f203-42ff-93e8-66e266f6d2e4‘

});
The GUID in the authority (f7322380-f203-42ff-93e8-66e266f6d2e4), is the ID of the Azure Active Directory where you have registered your application.
After this change, you will be able to use your app with Microsoft Graph Toolkit just as you’d expect.

When you use multi-tenant Azure AD apps with Microsoft Graph Toolkit, instantiating the MSAL Provider with just the clientId is sufficient. But when you use a single-tenant Azure AD app, you also need to specify the authority to instruct Azure AD where the app is registered.
by Contributed | Jul 8, 2021 | Technology
This article is contributed. See the original author and article here.
COVID-19 has a created an inflection point that is accelerating the use of AI in healthcare. More data was created in the last two years than in the previous 5,000 years of humanity. Alongside this trend, we see an acceleration of decision support applications that are based on extracting clinical insights and analytics from data. AI and Machine Learning play an important role in our ability to understand big data and learn from it.
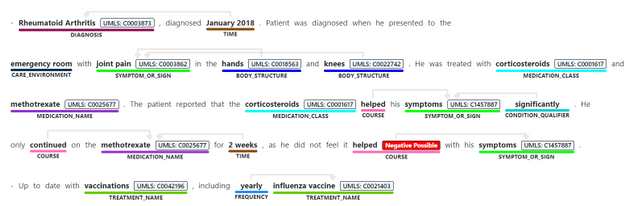
Today we are announcing Text Analytics for Health as generally available with Text Analytics in Azure Cognitive Services. The service allows developers to process and extract insights from unstructured biomedical text, including various types of clinical notes, medical publications, electronic health records, clinical trial protocols, and more, expediting the ability to learn from this data and leverage it for secondary use.
The service has been in preview since July 2020 supports enhanced information extraction capabilities, as follows:
- Identifying medical concepts in text, determining boundaries and classification into domain-specific entities. Concepts include Diagnosis, Symptoms, Examination, Medications, and more. Recent additions to the GA service include expanding the Genomics category to enable extracting mutation types and expression in addition to identifying genes and variants. The current version of the service we are releasing as generally available contains 31 different entity types, and we will be increasing this in the future.
- Associating medical entities with common ontology concepts from standard clinical coding systems, such as UMLS, SNOMED-CT, ICD9 and 10 etc.

- Identifying and extracting semantic relationships and dependencies between different entities to provide deeper understanding of the text, like Dosage of Medication or Variant or Gene. Recent additions made to the service toward its general availability include expanding the types of relationships, and the service now supports 35 different types.

- Assertion detection, to support better understanding of the context in which the entity appears in the text. The Assertions help you detect whether an entity appears in negated form, as possible, likely, unlikely (for example, “patients with possible NHL”)
- Whether the mention is conditional, or mentioned in a hypothetical way (for example, “if patient has rashes (hypothetical), prescribe Solumedrol (conditional)”, or whether something is mentioned in the context of someone else (for example, “patient’s mother had history of breast cancer” does not mean the patient has breast cancer).

The service can be used synchronously and asynchronously and is available in most Azure regions, currently in English. The service can be used via a hosted endpoint or by downloading a container, to meet your specific security and data governance requirements. Either way, the service does not store the data it processes and is covered under the Azure compliance .
During the last year, the service was available under a gated preview program. With today’s announcement on general availability, we are removing the gating off the service.
Get started today,
Review Text Analytics for health documentation
Learn more about Microsoft Cloud for Healthcare

Recent Comments