This article is contributed. See the original author and article here.
Manufacturing leaders today are under constant pressure: volatile demand, fragile supply networks, inventory risk, and zero tolerance for missed customer commitments. Plants must protect margins and maintain uptime while responding to disruption with incomplete or delayed information.
To lead in this environment, manufacturers need decision-making that surfaces risk earlier, absorb supply shocks faster, and replans quickly, so production stays aligned to demand and customer commitments.
Microsoft Dynamics 365 is your agentic enterprise resource planning (ERP) foundation
Dynamics 365 gives manufacturers a connected foundation where signals from demand, supply, capacity, and cost can drive action. As part of the Microsoft platform, it brings together data, analytics, automation, and collaboration across the business.
Imagine a manufacturing stack where every part of the business is connected, where data isn’t fragmented across systems but unified into a shared understanding of operations, and where insights don’t sit in dashboards but show up in context, in the flow of work. Where your teams can build AI agents and adapt processes in real time rather than reengineering them months later. Where every person operates with the full context of the business, demand, supply, capacity, and commitments, every decision drives aligned action across the company. This is what it means to close the gap between knowing and doing.
At Hannover Messe 2026, Microsoft is showcasing how agentic ERP with Copilot, agents and Dynamics 365 supports these operational decisions amid constant change, helping manufacturers replan faster, make better production tradeoffs, and meet or exceed customer service SLAs.
From sensing demand shifts to mitigating supplier delays, production constraints, and equipment downtime, these signals must translate into real-time fulfillment and order promise decisions. Agentic ERP can connect planning, sourcing, production, fulfillment and service commerce to execute these decisions across the manufacturing value chain.
Agentic demand planning can sense shifts earlier
Demand planning can help you forecast demand, applying a structured phase in/phase out with external signals to account for market dynamics. Copilot accelerates this data analysis, scenario modeling, and incorporates market intelligence. For structured planning, Demand Planning in Dynamics 365 Supply Chain Management provides an agentic collaborative demand planning solution, powered by best-in-class forecasting algorithms and models, an immersive user experience with AI, intelligent segmentation and signal analysis, and analytics.
“Now, we can see the item-level details and the solution populates Dynamics 365 with that information for master planning. That’s a big step forward because now we essentially have a planned budget and we can easily produce the next production cycle’s budget without manually exporting the data.”
A delayed component or supplier exception is not a paperwork problem. It is a production and operational risk. Today, Microsoft announced the Procurement Agent in Dynamics 365 Supply Chain Management is available in public preview. The Procurement Agent helps teams respond faster to supply disruption by decoding supplier communications and identifying which production orders, inventory positions, and customer commitments are at risk, while keeping humans in control. Beyond triaging supplier communications, the Procurement Agent performs impact analysis so teams can assess downstream effects and act before a supplier issue turns into an on time, in full (OTIF) failure.
“Across the team, Dynamics 365 will save us a total of 20 hours weekly. The big benefit in time savings is that the agent has read the email, found the order, found the lines affected, decoded what the vendor is trying to say, and recommended actions.”
// Modify player theme based on localStorage value.
let options = {“autoplay”:true,”hideControls”:null,”language”:”en-us”,”loop”:true,”partnerName”:”cloud-blogs”,”poster”:”https://cdn-dynmedia-1.microsoft.com/is/image/microsoftcorp/3669965-Procurement-Agent_tbmnl_en-us?wid=1280″,”title”:””,”sources”:[{“src”:”https://cdn-dynmedia-1.microsoft.com/is/content/microsoftcorp/3669965-Procurement-Agent-0x1080-6439k”,”type”:”video/mp4″,”quality”:”HQ”},{“src”:”https://cdn-dynmedia-1.microsoft.com/is/content/microsoftcorp/3669965-Procurement-Agent-0x720-3266k”,”type”:”video/mp4″,”quality”:”HD”},{“src”:”https://cdn-dynmedia-1.microsoft.com/is/content/microsoftcorp/3669965-Procurement-Agent-0x540-2160k”,”type”:”video/mp4″,”quality”:”SD”},{“src”:”https://cdn-dynmedia-1.microsoft.com/is/content/microsoftcorp/3669965-Procurement-Agent-0x360-958k”,”type”:”video/mp4″,”quality”:”LO”}]};
if (currentTheme) {
options.playButtonTheme = currentTheme;
}
For the shop floor, Copilot, connected to Dynamics 365 Supply Chain Management via Dynamics 365 MCP Server (Model Context Protocol), can provide AI-generated insights to schedules, inventory, and orders. Copilot can also surface quality-related alerts and can suggest targeted inspections to prevent recurring recalibration issues enabling supervisors to proactively mitigate resource constraints and shortages before they impact production schedules, triggering downstream inventory repositioning and order promise adjustments across fulfillment and customer commitments.
Dynamics 365 Supply Chain Management provides near real-time visibility to the production floor; with agentic experiences, supervisors can spend less time gathering data and more time on proactive exception management. This translates to higher Overall Equipment Effectiveness (OEE), fewer unplanned stops, and better on-time delivery to customers.
Equipment uptime and asset health are critical inputs to manufacturing performance. Unplanned downtime, delayed service, or poorly coordinated technician schedules can quickly cascade into constrained capacity and missed production targets. The Scheduling Operations Agent in Dynamics 365 Field Service can help maintain equipment availability for constrained production schedules by dynamically coordinating technician assignments based on geography, skills, certification requirements, capacity, travel time, and SLA commitments.
Today, Microsoft announced Researcher in Microsoft 365 Copilot is available in public preview within Dynamics 365 Field Service. With Microsoft 365 Copilot in Dynamics 365 Field Service, manufacturers can use Researcher to quickly view operational information across work orders, asset and service history, and parts availability. Researcher surfaces relevant context from Field Service data and Microsoft 365 signals to help teams understand situations as they arise.
// Modify player theme based on localStorage value.
let options = {“autoplay”:true,”hideControls”:null,”language”:”en-us”,”loop”:true,”partnerName”:”cloud-blogs”,”poster”:”https://cdn-dynmedia-1.microsoft.com/is/image/microsoftcorp/3669964-Field-Service_tbmnl_en-us?wid=1280″,”title”:””,”sources”:[{“src”:”https://cdn-dynmedia-1.microsoft.com/is/content/microsoftcorp/3669964-Field-Service-0x1080-6439k”,”type”:”video/mp4″,”quality”:”HQ”},{“src”:”https://cdn-dynmedia-1.microsoft.com/is/content/microsoftcorp/3669964-Field-Service-0x720-3266k”,”type”:”video/mp4″,”quality”:”HD”},{“src”:”https://cdn-dynmedia-1.microsoft.com/is/content/microsoftcorp/3669964-Field-Service-0x540-2160k”,”type”:”video/mp4″,”quality”:”SD”},{“src”:”https://cdn-dynmedia-1.microsoft.com/is/content/microsoftcorp/3669964-Field-Service-0x360-958k”,”type”:”video/mp4″,”quality”:”LO”}]};
if (currentTheme) {
options.playButtonTheme = currentTheme;
}
“The field technicians understand that AI can be a benefit for them. It’s really about trying to improve their overall experience as well as the customer’s”
Agentic warehouse management can fulfill demand faster
As finished goods hit the warehouse, intelligent inventory on-hand balancing in Dynamics 365 Supply Chain Management warehouse management updates slotting to align demand with pick zones. When inbound put-away happens, workers are directed to the best locations based on the intelligent inventory balancing, keeping the warehouse organized dynamically. On the outbound side, optimized pick routes shorten travel distance. The combined outcome is higher throughput with the same labor—faster fulfillment, lower picking cost.
With Dynamics 365, we trust the system. It’s easy to retrieve information and know it’s correct; people can just drive the forklift over. All the considerations we have for our picking, packing, and customer details, the system is doing it for us.
Agentic B2B Commerce aligns customer orders to production reality
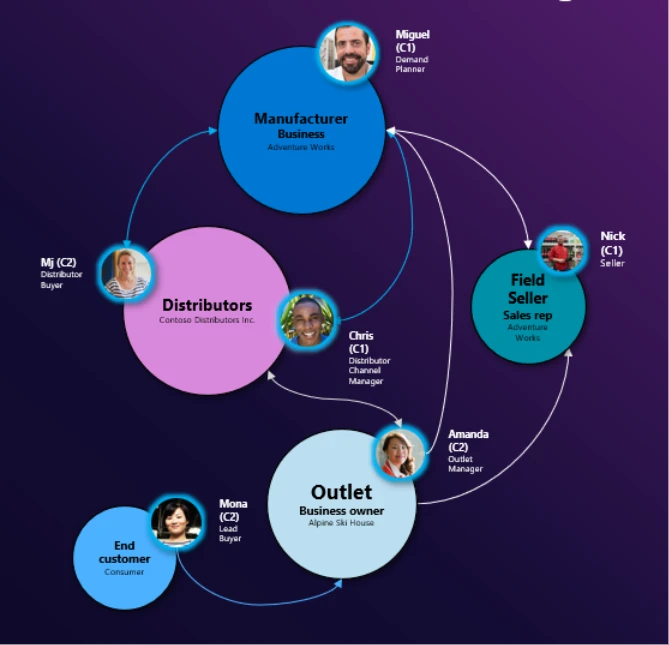
As manufacturers and industrial distributors modernize how they sell, serve, and scale, digital ordering is becoming a core capability of the ERP rather than a standalone channel. Dynamics 365 Commerce enables manufacturers to support complex buying and selling models including business-to-business (B2B), business-to-business-to-business (B2B2B), and multioutlet ordering across direct customers, distributors, and dealer networks.
Agentic B2B commerce can help automate routine ordering, replenishment, and quote-to-order processes while remaining tightly connected to pricing, inventory, warehousing, and production planning. This can allow manufacturers and distributors to accelerate order cycles, strengthen partner collaboration, and scale indirect growth with accuracy and control.
Partner agents to empower manufacturers and solve unmet needs
Frontier Manufacturing Firms can extend ERP embedded‑operational decisioning using Copilot and agents built with the Dynamics 365 ERP MCP Server. Microsoft’s partners are building agents to solve high friction manufacturing workflows, including engineering change impact analysis, product recalls, and configure-price‑quote‑ processes, enabling manufacturers to execute operational decisions across sourcing, production, and fulfillment within the systems they use to run their business.
“With the Experlogix CPQ MCP Server and Dynamics 365 ERP manufacturers can turn Copilot into a revenue agent that understands complex configurations, validates engineering rules and constraints, and generates accurate quotes instantly. This accelerates sales cycles, with many customers reducing time to quote by well over 90%.”
Louis-Philippe Perras, CTO, Experlogix
“Cegeka’s Quality Impact Recall Agent turns disruptive recall events into a controlled, orchestrated process for manufacturers reliant on end-to-end traceability. Running inside Dynamics 365 Supply Chain Management, companies handling batch- or serial-controlled products can identify affected materials across plants and distribution channels in minutes, trigger automated communication flows, and accelerate quality-investigation cycles. This approach supports manufacturers in maintaining continuity, reducing risk, and protecting both customers and brand reputation.”
Stijn Geeroms, VP Business Solutions, Cegeka
“The most expensive moment in manufacturing isn’t when something breaks. It’s when an engineering change gets approved without anyone understanding the impact. Manufacturers don’t need another disconnected AI tool to fix that. They need intelligence embedded where they already work. That’s why we built the Staedean ECM+ Impact Agent natively on Copilot inside Dynamics 365 – your rules, your data, your answer – without asking teams to leave the system they run their business in.”
Michiel Toppers, Chief Product Officer, Staedean
These agents extend ERP-embedded decision execution into engineering, quality, and configure-to-order workflows that directly impact production scheduling and customer commitments.
Become a Frontier Manufacturing Firm
The manufacturers that lead this next era will be the ones who can respond to demand shifts, supplier delays, and equipment constraints by coordinating planning, production, fulfillment, and customer commitments across the value chain in real time.
Microsoft is committed to helping manufacturers make that transition, combining a connected Dynamics 365 foundation with Copilot and agents embedded in everyday workflows plus a partner ecosystem that brings manufacturing expertise to the front line. Join us and become Frontier.
This article is contributed. See the original author and article here.
In contact centers, a voice conversation does not end when the call disconnects. That’s when critical work begins – logging outcomes, updating systems, triggering workflows, and ensuring compliance. Yet today, post-call actions are often delayed, inconsistent, or dependent on manual or external processes.
With caller hang-up event support in Dynamics 365 Contact Center and Copilot Studio, we are changing that.
This capability enables real-time, event-driven post-call automation by raising precise caller hang-up events to voice agents. Post-call actions happen immediately, reliably, and at scale.
Why this matters
Post-call actions today often require custom implementations and are not always easy to configure or consistently reliable.
Organizations frequently depend on external orchestration or complex workflows, which can leave gaps, especially when a caller disconnects unexpectedly in the middle of a flow.
For example, when a caller hangs up mid-flow, records can remain locked or reflect stale or incomplete data in downstream systems.
As a result, organizations face:
Missed or delayed post-call actions
Inconsistent or stale data updates
Gaps in reporting and operational workflows
This creates friction across automation and downstream operations.
What’s new
Voice agents can now listen to end-of-conversation events and take action based on how the call ended – directly within their Copilot Studio flow.
For example, you can trigger workflows specifically when:
The customer hangs up
The call is transferred to an external phone number
The call is escalated to customer service representatives in Dynamics 365 Contact Center
This capability is exposed through activity-based triggers in Copilot Studio, enabling makers to configure post-call logic within their voice agent flow in Copilot Studio.
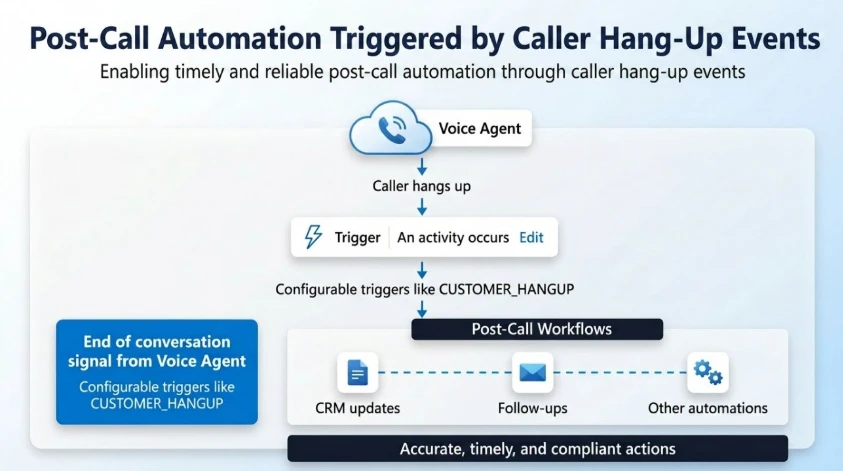
How it works
At the end of every conversation, the platform emits a structured event:
Activity type: End of conversation
Context: Conversation.EndReason (for example, CUSTOMER_HANGUP)
Makers can configure triggers such as:
When activity = End of conversation
AND EndReason = CUSTOMER_HANGUP
Execute post-call workflow
This creates a deterministic and reliable event model for post-call automation.
Key benefits
Immediate and reliable execution: Post-call workflows trigger as soon as the caller disconnects, eliminating delays and missed actions.
Foundation for governance and insights: Accurate call termination signals enable organizations to implement compliance, auditing, and data policies while building custom telemetry, reporting, and customer experience insights.
Real-world scenarios
Automated record updates and follow-ups: Update or unlock CRM records and trigger SMS, email, or callback workflows immediately after the customer disconnects, ensuring the latest state is captured and acted on without delay.
Drop-off detection and recovery: Identify when customers exit during critical flows (such as payment or authentication) and initiate appropriate recovery or risk handling actions.
Operational insights and optimization: Leverage precise end-of-conversation signals to improve data accuracy, escalation tracking, and overall customer experience.
This article is contributed. See the original author and article here.
Microsoft 365 Copilot can now bring your go-to apps directly into the conversation, which closes the gap between AI-powered insight and real, in-app action.
This article is contributed. See the original author and article here.
Make smarter, faster, and more confident quote decisions—right where you work.
Project quoting has always required a careful balance—aligning profitability with competitiveness, staffing strategies with delivery costs, and customer expectations with business outcomes.
But evaluating these trade-offs hasn’t always been easy. It often means jumping between tools, manually recalculating numbers, and relying on assumptions to guide critical decisions.
That’s where What-if Analysis (Preview) in Dynamics 365 Project Operations comes in.
This new capability brings real-time simulation directly into your quoting workflow—so you can explore options, compare outcomes, and make decisions with clarity before finalizing a quote.
What Is What-if Analysis?
What-if Analysis introduces a dedicated simulation workspace within a project quote, allowing you to model changes to quantities and pricing and instantly see their financial impact.
Instead of working through “what if” scenarios offline, you can now:
Explore multiple approaches within the quote
Compare their outcomes side by side
Apply the most effective scenario when you’re ready
All without modifying the actual quote until you choose to.
It’s a more intuitive, controlled way to move from estimation to decision-making.
Turn Everyday Questions into Clear Answers
Every project quote involves key decisions:
Should work shift to a lower-cost delivery center?
What happens if billing rates increase for specific roles?
Can you stay competitive while protecting margin?
With What-if Analysis, these are no longer hypothetical questions.
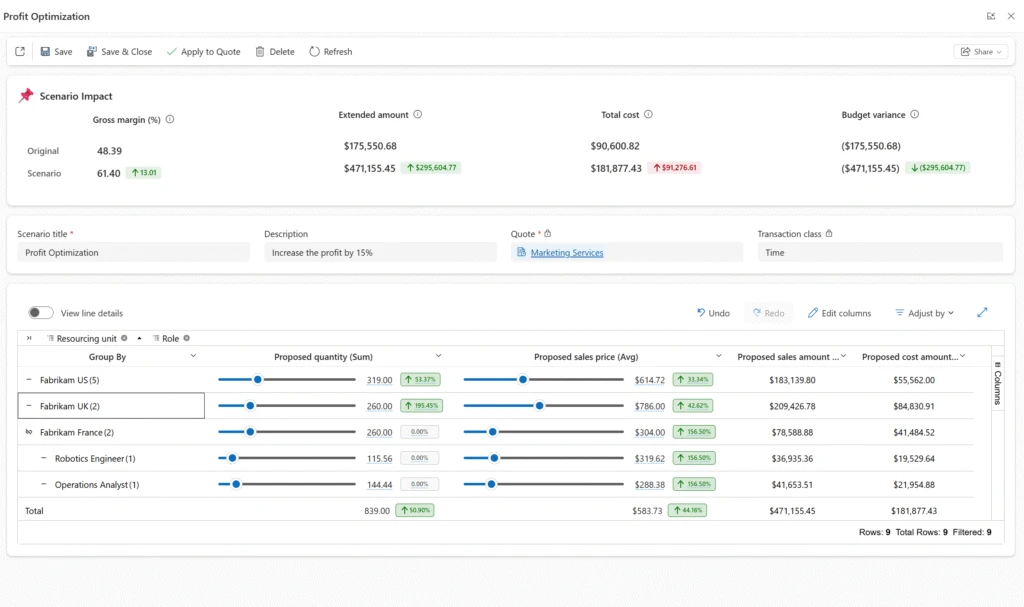
As you adjust quantities and pricing, the system instantly recalculates key financial metrics—including revenue, cost, gross margin, and budget variance—so you can clearly see the impact of every change.
This real-time feedback helps you move quickly from exploration to confident, data-backed decisions.
How It Works
Getting started is simple. From the What-if Analysis tab on a Draft quote, you can create a scenario based on the quote’s existing data. Each scenario is isolated, allowing you to experiment freely without affecting the live quote.
Within the simulation workspace, you can adjust quantities and pricing across dimensions such as resourcing unit, role, or any custom pricing dimension configured in your environment. Whether you’re making high-level adjustments or refining details at the quote line level, the experience is designed to be flexible and intuitive.
You can create multiple scenarios—each representing a different approach—and compare them side by side. Built-in comparison views highlight differences in financial outcomes, making trade-offs easier to evaluate.
When you’ve identified the best approach, applying the scenario updates the Draft quote in place—so you can move forward with confidence, without creating a new revision.
What This Means for You
What-if Analysis transforms how you approach project quoting—bringing clarity, speed, and confidence into every decision.
Make decisions with confidence: Instantly understand how pricing and staffing changes impact revenue, cost, and margin—before committing to a quote
Optimize for both competitiveness and profitability: Evaluate trade-offs in real time and choose the approach that best aligns with your goals
Reduce reliance on spreadsheets and manual iteration: Keep simulation and decision-making within Project Operations
Drive faster, more aligned conversations: Use data-backed scenarios to align stakeholders and move decisions forward
Instead of relying on assumptions, your team can now explore possibilities, evaluate outcomes, and finalize quotes with confidence—knowing the numbers support the decision.
Availability and Prerequisites
What-if Analysis is currently available as a preview feature in:
Project Operations Core (Lite deployment)
Project Operations integrated with ERP
To get started, enable the What-if Analysis feature flag in your environment. The What-if Analysis tab will then be available on qualifying Draft quotes.
A few things to keep in mind:
Scenarios can only be created on quotes in Draft status that contain estimates
Activated or closed quotes are not eligible
If the underlying quote changes, scenarios will need to be recreated
As with all preview features, we recommend evaluating this capability in a non-production environment.
The Bottom Line
Every project quote is a critical business decision. What-if Analysis gives you the tools to approach that decision with clarity—replacing guesswork with real-time insight and manual effort with seamless simulation.
The result is not just better quotes, but better decisions—ones that are competitive, financially sound, and aligned with your business goals.
Get Started
Enable What-if Analysis in your environment today and start turning “what if?” into “we know.”
Learn More
We are making constant enhancements to our features. To learn more about What-Analysis in Project Quotations, visit Quote What-if Analysis


Recent Comments