
by Contributed | Jun 1, 2021 | Technology
This article is contributed. See the original author and article here.

360° imagery is a great way to explore the benefits of Mixed Reality while limiting up-front investments in either equipment (e.g. HoloLens and advanced MR headsets) or specialized talent (e.g. 3D artists). There are so many different scenarios for using these images within your organization. These can include training and onboarding employees (e.g. facility tours), celebrating and sharing capabilities of new facilities, and many explorations around documenting current state and monitoring progress of physical spaces. Basically, any time you have a physical space that you need to document or communicate about to others, 360° imagery can be a great tool.
For me, that also extends outside work to backcountry ski adventures where I can show friends, family, and co-workers what it is like to experience remote backcountry destinations that can be a bit challenging to get to. Check out this video below for a quick view of what’s possible or go check out how it was made using the SharePoint spaces 360° tour web part.
SharePoint spaces offers significant flexibility for handling 360° images and videos. Most tools available to capture 360° images and videos will work with Spaces. However, there are several considerations you may not be familiar with from working with 2D images. There are also ways that you can optimize quality and performance both today and into the future as mixed reality devices expand in availability and quality. Here are a few key questions to keep in mind along with suggestions for tools that work well with Spaces today:
- What is the target device? Virtual Reality or Browser, Mobile or Desktop
- Is it better to capture 360° images or video?
- What is the right mix of content?
- What devices can capture 360° images?
- What formats does SharePoint spaces support?
Target Device
Interacting with your spaces has never been easier, SharePoint spaces supports viewing either in a web browser or using mixed reality headsets. The same content can be used for both, but if your primary use case is the browser, it does not make sense to use stereoscopic content. To create the best experience when viewing you may have to reduce resolution or file size to optimize for mobile or standalone VR headsets.
Images or Video
For the sake of simplicity, we recommend starting with 360° images and exploring video only when there is a strong need to capture a dynamic and changing space. Capturing and displaying high quality 360° video is notably more challenging than 360° images. If you pursue videos, make sure you add captions or a transcript and follow the best practices for video format, resolution, etc.
Combining 360° and 2D Images and Videos
In many cases, the best experience can be created by combining video and images, SharePoint spaces supports both 360° and 2D images and videos in the same space. You will find that 360° images are great for understanding spatial context (e.g where things are within a room) but 2D images or videos are useful to highlight specific areas within the image using a high resolution and artfully composed view of a few areas you want to highlight. Users will understand the context from the 360° image while appreciating the detail, artistry, and focused storytelling that are characteristic of high quality 2D images and videos. Spaces makes it easy to combine the two, just add your 2D images as annotations using the 360° tour web part.
Capture Devices
There are many options available for capturing 360° images ranging from smartphone apps (e.g. Google Camera Photo Spheres) to simple consumer handheld 360° cameras (e.g. Ricoh Theta, Insta 360 One X) to more complicated commercial high resolution and stereoscopic cameras (e.g. Insta360 Pro 2). These devices will generally produce outputs that are usable immediately in SharePoint spaces, but often the experience can be improved by optimizing to balance quality and file size as described below. If you are going to be capturing a lot of 360° images, a dedicated camera is recommended because it will be a much faster workflow.
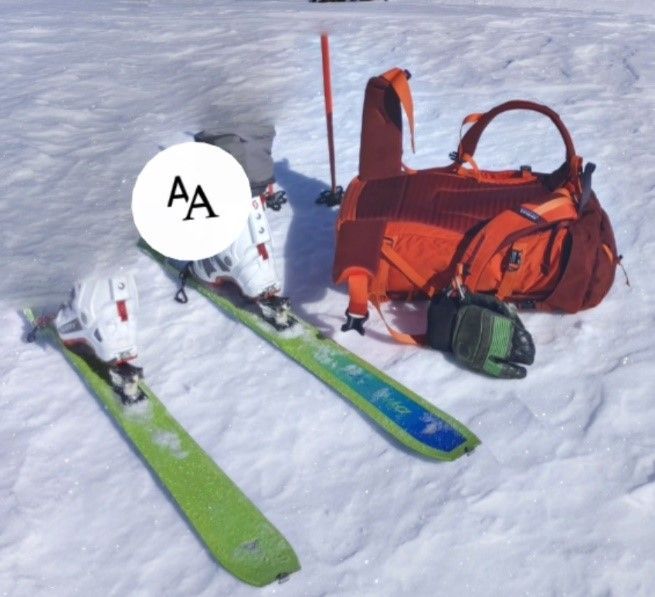
Smartphone apps can produce high resolution and high-quality images, but they require you to take multiple images that are assembled into a 360° image by the app. This means the process of capturing images will be slower than a dedicated multi-lens 360° camera (consumer handheld or commercial). Unless the scene is completely static during the capture, they can also produce image artifacts such as ghosting as seen in this image:
Recommended Image Settings
Format
While SharePoint spaces supports many options for image format (JPG, TIFF, PNG, etc.), we recommend storing images as equirectangular progressive JPEG images with quality setting set to 80% or equivalent in various software tools. Most 360° cameras automatically output equirectangular JPEG images. These can be batch optimized to reduce file size and set the quality setting using various tools like Adobe Photoshop or RIOT image optimizer after the images are captured.
Resolution
It is best to capture images with the highest resolution possible. Equirectangular images have a 4:2 aspect ratio (twice as many pixels wide as tall). We recommend using 8K resolution (8192 X 4096) to achieve maximum quality 360° image output in SharePoint spaces while balancing file size, download time, etc. However, lower resolutions are often acceptable – especially if your goal is communication, documentation, or collaboration instead of a showcase visual experience.
Two examples are shown below – the first is an 8K image (captured with an Android smart phone) while the second is 5.3K resolution (captured with a consumer handheld Ricoh Theta V). Although the 5.3K resolution is acceptable quality for many applications, the 8K resolution captures notably more detail.
If using a camera that can capture above 8K resolution it would be a best practice to keep images at the highest resolution and use image editing tools like Adobe Photoshop or RIOT to save versions optimized for SharePoint spaces. That will allow you to update your SharePoint space as higher resolution mixed reality headsets become available and those extra pixels can be put to good use.
 8K Image in SharePoint spaces
 5.3K image in SharePoint spaces
Conclusion
Following these guidelines should make sure your 360° imagery maintains high quality while balancing performance and load time. Have some ideas for what we should do next with 360° imagery in SharePoint spaces? Let us know what you are looking for or share your 360° imagery scenario in the comments.
by Contributed | Jun 1, 2021 | Technology
This article is contributed. See the original author and article here.
If you work in project management, you have probably heard of and used Microsoft Project. You may also be familiar with Dynamics 365 Project Operations, the successor to Dynamics 365 Project Service Automation. In this Microsoft Mechanics video, we are going to show you how to use these applications to manage work from simple task management and planning to more complex initiatives like service-oriented projects that drive your business.
As organizations across industries continue to grapple with accelerated digital transformation, remote work, and increasingly diverse teams and work styles, they need to transform how they manage work. Today, almost all work is project work, and everyone works on projects. A project can take a couple of people a few hours, or it can embrace an entire portfolio of initiatives that involves hundreds of employees from across the organization and lasts years. A transformation like this demands new approaches and a new generation of tools that span the entire organization and meet people where they are working – from their homes to the warehouse to the retail store.
Understanding Microsoft Project and Dynamics 365 Project Operations at the functional and technical level
Microsoft Project and Dynamics 365 Project Operations provide end-to-end work management for teams of all sizes and projects of differing complexity. They include core capabilities for project planning & scheduling, collaboration, resource management, reporting, customization, and extensibility, and Project Operations also includes powerful capabilities for deal management, contracting, project finances & accounting, and time & expense management.
Built on the Microsoft cloud, and leveraging 35 years of development on the Microsoft Project scheduling engine, these solutions deliver connected experiences across the organization while providing the flexibility and extensibility needed to innovate with confidence.
In this video we are going to give you an introduction to a new generation of connected project experiences on the Microsoft platform; experiences designed to empower the people in your organization to meet the rising tide of complexity and drive your business forward. We will show you how Microsoft Project, and Dynamics 365 Project Operations are designed to help you organize and view projects, schedules, and tasks—or dive more deeply into all the details. We will also help you identify which solution can best meet your needs. And we will point you to additional information and show you how to get started today with Microsoft Project, and Dynamics 365 Project Operations.
Request a Project Operations trial at aka.ms/ProjectOperationsTrial
Get a Project trial at aka.ms/TryProjectNow

by Scott Muniz | Jun 1, 2021 | Security
This article was originally posted by the FTC. See the original article here.
If you used MoneyGram to send money to a scammer between January 1, 2013 and December 31, 2017, you may be eligible to file a claim for a refund. The company handling claims — Gilardi & Co. LLC — is distributing $125 million from MoneyGram’s 2018 settlements with the FTC and Department of Justice (DOJ). In those cases, the FTC and DOJ charged that MoneyGram failed to meet agreements to crack down on consumer fraud involving money transfers.
You’re eligible to file a claim if:
- you sent a MoneyGram transfer to a scammer from the United States between January 1, 2013 and December 31, 2017, and
- you used your name on the money transfer.
The deadline to file a claim online or by mail
is August 31, 2021.
You don’t have to be a US citizen or in the US to file a claim. If you already returned a prefilled form to Gilardi & Co. LLC, you don’t need to file another claim. You can file online, or print the claim form and mail it in with copies of MoneyGram receipts, “send” forms, and transaction history reports.
The claim form requires you to give your Social Security number (SSN). That’s because the federal Treasury Offset Program must find out whether you owe money to the US government before you can get a payment. It needs your SSN to do that.
You don’t have to pay fees to file your claim. You don’t need a lawyer to file a claim. Don’t pay anyone who contacts you and says they’ll help you file a claim or get your money back. When you file a claim, you have to give a MoneyGram money transfer control number (MTCN), an eight-digit number assigned to a MoneyGram transfer. It’s listed on MoneyGram receipts and completed “send” forms.
For more information about eligibility, the claims process, and other topics, go to ftc.gov/moneygram and moneygramremission.com.
Brought to you by Dr. Ware, Microsoft Office 365 Silver Partner, Charleston SC.
by Contributed | Jun 1, 2021 | Technology
This article is contributed. See the original author and article here.
Synapse Serverless SQL Pool is a serverless query engine platform that allows you to run SQL queries on files or folders placed in Azure storage without duplicating or physically storing the data.
There are broadly three ways to access ADLS using synapse serverless.
- Azure Active Directory
- Managed Identity
- SAS Token
The user would need to be assigned to one of the RBAC role : Azure storage blob data ownercontributorreader role. However, there might be scenario that you would or could not provide access to the ADLS account or container and provide access to granular level directories and folder levels and not complete storage container or blob.
Scenario
You have a data lake that contains employee and social feed data. You have data residing in an employee folder that is used by HR team members and twitter for live social feeds that is usually used by marketing folks. If you use SAS token or RBAC, you cannot control to the folder level.
How do you allow users to perform data exploration using synapse serverless with fine grain control on underlying storage.

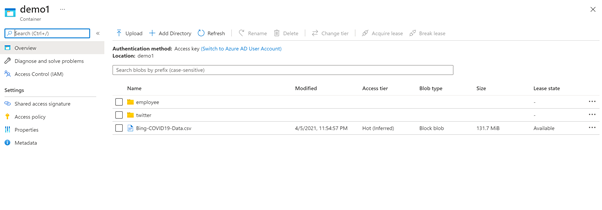
Fig1. A storage account with container demo contains two folder employee and twitter.
Solution
To solve this challenge, you can use directory scoped SAS token along with database scope credentials in synapse serverless.
Directory scoped SAS provides constrained access to a single directory when using ADLS Gen2. This can be used to provide access to a directory and the files it contains. Previously a SAS could be used to provide access to a filesystem or a file but not a directory. This added flexibility allows more granular and easier access privilege assignment.
Directory scoped shared access signatures (SAS) generally available | Azure updates | Microsoft Azure
|
Storage Account
|
Container
|
Folder
|
File
|
AAD
|
YES (RBAC on Account)
|
YES (RBAC on Container)
|
YES (via POSIX ACLs)
|
YES (via POSIX ACLs)
|
Managed Identity (same as AAD)
|
YES (RBAC on Account)
|
YES (RBAC on Container)
|
YES (via POSIX ACLs)
|
YES (via POSIX ACLs)
|
SAS Token
|
YES (Scope – Account)
|
YES(Scope – Container)
|
YES (Scope – Directory and Files)
|
YES (Scope – Files)
|
For
How to create Directory based SAS token
You can do via SDK or portal. To create a SAS token via portal.
a. Navigate to the folder that you would like to provide access and right click on the folder and select generate SAS token.

Fig 2 : Directory scope selection for employee folder
b. Select permissions Read, list and execute to read and load all the files in the folder. Provide the expiration date and click generate SAS token and URL. Copy blob SAS token.
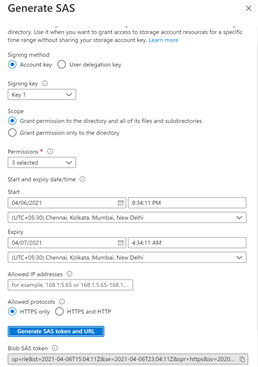
Fig 3 : Generate SAS token.
The step b. can be similar to create storage SAS token . Earlier, it used to apply to storage account, now you can reduce the surface area to directory and files as well.
Use Serverless with directory SAS token
Once the storage account access has been configured using SAS token, the next to access the data using synapse serverless engine.
On Azure synapse Studio, go to develop and SQL Script.
a. Create a master key, if it is not there.
— create master key that will protect the credentials:
CREATE MASTER KEY ENCRYPTION BY PASSWORD = <enter very strong password here>
b. Create a database scope credential using the sas token. You would like to access HR data. So use the blog storage sas token generated for Employee directory.
CREATE DATABASE SCOPED CREDENTIAL mysastokenemployee
WITH IDENTITY = ‘SHARED ACCESS SIGNATURE‘,
SECRET = ‘<blob sas token>‘
c. Create external data source till the container path demo1 and use credential mysastokenemployee
CREATE EXTERNAL DATA SOURCE myemployee
WITH ( LOCATION = ‘https:// <storageaccountname>.dfs.core.windows.net/<filesystemname>‘,
CREDENTIAL = mysastokenemployee
)
d. Once the data is created, lets read the data using OPENROWSET BULK in serverless
SELECT * FROM OPENROWSET(
BULK ‘/employee/*.csv’,
DATA_SOURCE = ‘myemployee’,
FORMAT =’CSV’,
parser_version = ‘2.0’,
HEADER_ROW = TRUE
) AS Data
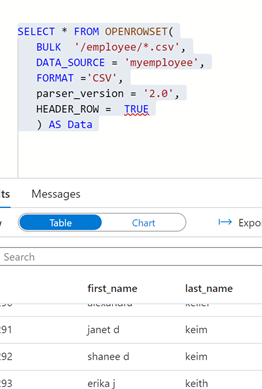
Fig 4 : Openrowset bulk output
e. Now to confirm whether the scope of the SAS token is only restricted to employee folder, lets use the same data source and database credential to access file in twitter folder.
SELECT * FROM OPENROWSET(
BULK ‘/twitter/StarterKitTerms.csv’,
DATA_SOURCE = ‘myemployee’,
FORMAT =’CSV’,
parser_version = ‘2.0’,
HEADER_ROW = TRUE
) AS Data
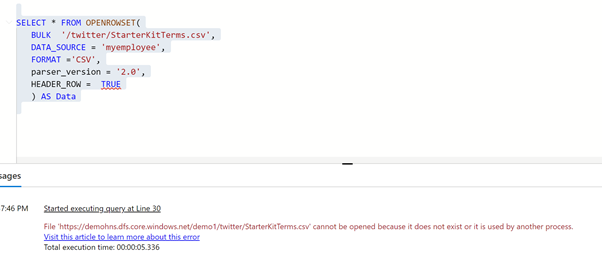
Fig 5: Bulk openrowset access failure
f. You will encounter an error because the scope of the SAS token was restricted to employee folder.
Now, to access twitter folder for the marketing representative, create a database scoped credential using a sas token for twitter folder. Repeat the steps “How to create Directory based SAS token” for twitter folder.
CREATE DATABASE SCOPED CREDENTIAL mysastokentwitter
WITH IDENTITY = ‘SHARED ACCESS SIGNATURE‘,
SECRET = ‘<blob sas token>‘
g. Create an external data source using the scope credential created for twitter directory.
CREATE EXTERNAL DATA SOURCE mytwitter
WITH ( LOCATION = ‘https://<storageaccountname>.dfs.core.windows.net/<filesystemname>/‘,
CREDENTIAL = mysastokentwitter
)
h. Once the data source is created , you can query the twitter data using newly created data source.
SELECT * FROM OPENROWSET(
BULK ‘/twitter/StarterKitTerms.csv’,
DATA_SOURCE = ‘mytwitter’,
FORMAT =’CSV’,
parser_version = ‘2.0’,
HEADER_ROW = TRUE
) AS Data
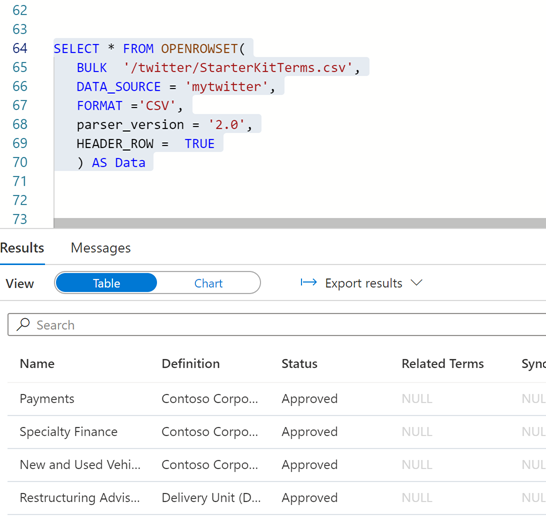
Fig 6 : Twitter data accessed using the directory sas token
Summary
- In a central data lake environment or any file store , directory sas token is a great way of reducing the access surface area without providing access at storage root or account level.
- Separation of duties and roles can be easily achieved as data access is controlled at storage level and synapse serverless
- Create sas token with read, list and execute to minimize the impact of accidental deletion etc. sharing the sas token should be done in a secured manner.
- Expire sas token, regenerate new token and recreate the scope credentials frequently.
- Serverless is great way of data exploration without spinning any additional SQL resources. You would be charged based on data processed by each query.
- Managing too many sas tokens will be challenge. So, use a hybrid approach of breaking the large data lake to smaller pools or mesh and grant RBAC access control and blend with SAS token for regulated users is best way of scaling the serverless capability.


 8K Image in SharePoint spaces
 5.3K image in SharePoint spaces


Recent Comments