
by Scott Muniz | Mar 9, 2021 | Security
This article was originally posted by the FTC. See the original article here.
Did you get a bill for a Small Business Administration (SBA) loan, but you didn’t apply for one? It’s likely that an identity thief applied for the loan using your personal or business information. The SBA has new guidance about reporting the fraud, and the FTC has tips to help you clear up any credit problems it may cause.
The SBA’s Office of Disaster Assistance has been issuing the loans under its COVID-19 Economic Injury Disaster Loan (EIDL) program. They’re designed to give financial help to small businesses and non-profit organizations. Criminals have taken advantage of the program by using stolen information to get loans in someone else’s name, or in the name of that person’s company. And now, the bills are landing in the mailboxes of people and businesses that never applied.
If you or your business is billed for an SBA EIDL loan you don’t owe:
- Report the problem right away to the SBA’s Office of Disaster Assistance and follow their guidance on what to do.
- While the SBA processes your identity theft report, you may still get monthly invoices. Keep these invoices until the SBA has finished reviewing your identity theft report.
If you run into other problems caused by the misuse of your personal information:
- Visit IdentityTheft.gov/steps, which will guide you through placing a free, one-year fraud alert on your credit, checking your free credit reports for other accounts you did not open, closing fraudulent accounts opened in your name, and adding a free extended fraud alert or credit freeze to your credit report.
- Report on IdentityTheft.gov all instances of fraudulent accounts that you find, including the SBA loan. You will get an Identity Theft Report that you can use to clear fraudulent information from your credit reports. Your personal credit may be affected by the identity theft. Keep a close eye on what’s in your credit report by checking it regularly. Visit annualcreditreport.com to get a free credit report every year from each of the three national credit agencies.
Brought to you by Dr. Ware, Microsoft Office 365 Silver Partner, Charleston SC.
by Contributed | Mar 9, 2021 | Dynamics 365, Microsoft 365, Technology
This article is contributed. See the original author and article here.
One of the most important aspects of fraud prevention is to know where you stand in the fight against fraud. An effective fraud scorecard makes you aware of current trends, helps identify any evolving problem areas, and empowers you to make decisions as an organization. Striking the right balance is important. Too much detail can drop adoption or cause you to miss unforeseen issues due to information paralysis. Too few details won’t deliver actionable insights, rendering the scorecard ineffective.
One way to strike that balance is to design a layered scorecard that is crisp, insightful, and appealing to all audiences.
Define the goal of the scorecard
Before you get started, you should know the answers to these questions:
- What is the scorecard supposed to say and to whom?
- Is it meant for consumption by senior management?
- Should it cater to analysts and fraud managers?
- Should it provide the ability to do deep analysis and define rules?
When any new patterns are found during investigations, it’s tempting to add additional views to the existing scorecard. Over time, such additions will bloat the scorecard and deplete its overall effectiveness. Defining a goal in advance and sticking to it will help to ensure that the value of the fraud scorecard remains intact.
After the goal is defined, the layers for a fraud scorecard can be carved out. Typically, three layers work best to offer insights that cater to different levels of consumers.
First layer: Exec summary
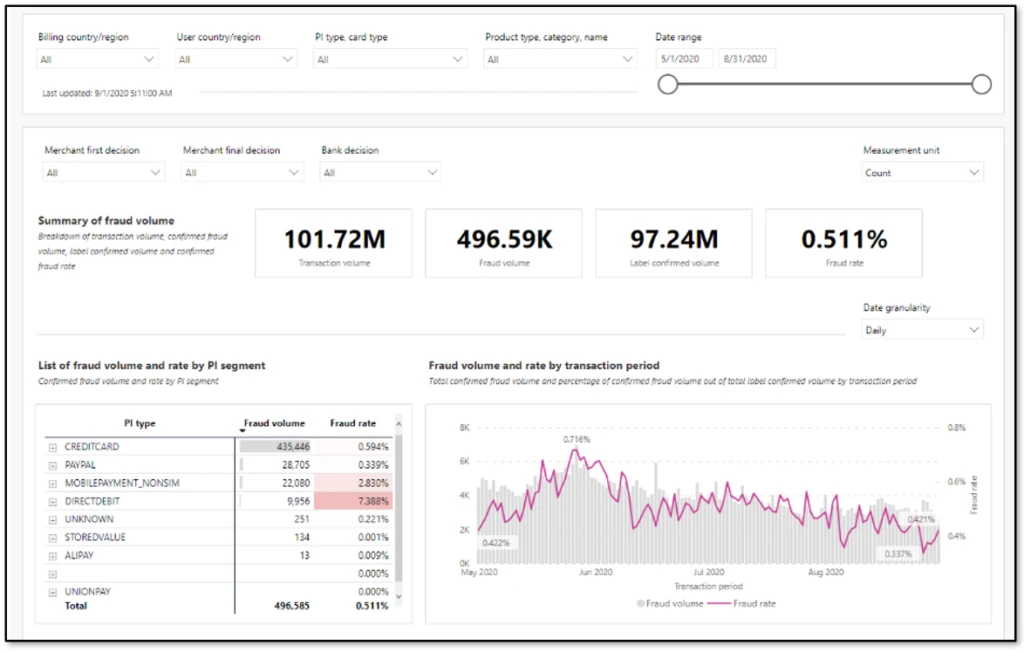
The purpose of this layer is to show the business impact as a snapshot. A view that can be taken as-is into executive review slides. Include only a few uber-level metrics. Profit efficiency, which measures overall impact from fraud, non-fraud, and optimization, should be the main metric in this view. Customer impact metrics, such as escalations or false positives and a split of fraud detected by automated system versus human reviews, can also be included. Representing these metrics as snapshots for a specific time, month, or week, and color coding them to measure against target or change from a previous time period will emphasize the goal of this view.
Second layer: Contributors
This layer should show what the current trends are and what is contributing to any changes in uber-level metrics. This will be the key monitor for fraud managers and the starting point for analysts. A trended view of key metrics, such as fraud rate, split by chargeback and other sources, rejection rate, top rules that were executed, challenge rate, and refund rate can be included here. Representing these as trend charts, with the ability to look back a few months, will make these most insightful.
Third layer: Drivers
This layer offers deep dive views on causation. Analysts can rely on this view to quickly identify drivers for any changing trends and react to evolving fraud patterns. Score distribution and respective fraud rates, segmentation slices such as geo-product-payment type can be included. If there are certain thresholds implemented to deter abuse, such as a maximum of five orders per month per user, then views can be added here to track users who are hovering just below the threshold.
Things to avoid in a fraud scorecard
It is important to not use a fraud scorecard as an investigative tool. A scorecard is meant to provide an aggregate view of where things stand, like the dashboard of a car. Investigations will require specific data at transaction level. Having the ability to slice data in multiple forms and link across transactions is quintessential for investigations. Trying to build one tool for both purposes can easily lead to large amounts of data, which slows down performance and dilutes value. Except for certain cases where you are using specialized Power BI and data exploratory tools, it’s always best to keep a fraud scorecard separate from investigative tools.
Next steps
If you’re already using Dynamics 365 Fraud Protection, use the account protection and purchase protection scorecards to gain business insights. Additionally, as described in our earlier post Do you monitor the pulse of your fraud protection operations?, you can also export transactional data into your existing workflows to augment your business-specific reports.
If you aren’t already using Dynamics 365 Fraud Protection, sign up for a live demo or a free trial to check out this and other capabilities that can help your business develop effective fraud protection strategies.
The post Best practices for building an effective fraud scorecard appeared first on Microsoft Dynamics 365 Blog.
Brought to you by Dr. Ware, Microsoft Office 365 Silver Partner, Charleston SC.
by Contributed | Mar 9, 2021 | Technology
This article is contributed. See the original author and article here.
You might have the cutting edge AI features but it is hard to know how useful it will be before letting your users beta test your prototype. You can build fast, deploy and deliver your app and iterate without writing any code, using AI Builder and Power Platform.
This article explains what Power Platform is, as well as go through a step by step process to create an application that detects objects from photos using Power Apps and AI Builder. Check out the video below to see the app we will build to detect different Mixed Reality Headsets such as HoloLens version 1 and 2 Augmented Reality and Virtual Reality headsets and their hand controllers.

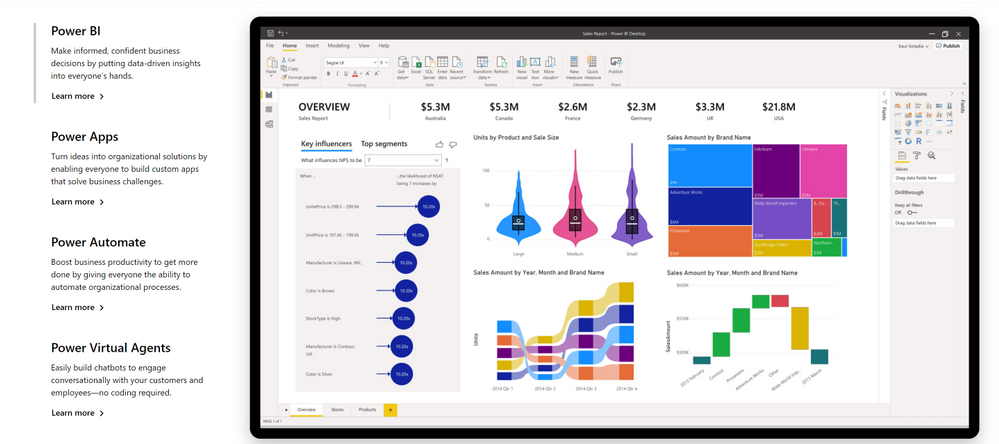
What is Power Platform?
Power Platform is a set of tools, API‘s and SDK‘s that helps you analyze your data and build automations, applications and virtual agents with or without having to write any code.
What are Power Apps?
Power Apps, allows you to create applications with a drag and drop UI and easy integration of your data and 3rd party APIs through connectors.
A connector is a proxy or a wrapper around an API that allows the underlying service to talk to Microsoft Power Automate, Microsoft Power Apps, and Azure Logic Apps. It provides a way for users to connect their accounts and leverage a set of pre-built actions and triggers to build their apps and workflows. For example, you can use the Twitter connector to get tweet data and visualize it in a dashboard or use the Twilio connector to send your users text messages without having to be an expert in Twitter or Twilio APIs or having to write a line of code.
What is AI Builder?
AI Builder is one of the additional features of Power Apps. With AI Builder, you can add intelligence to your apps even if you have no coding or data science skills.

What are some of the use cases for AI Builder?
Is AI Builder the right choice?
Can I use Power Apps and AI Builder for production?
Yes you can. As any tool that does things magically, AI Builder in Power Apps comes with a cost. That does not mean you can’t try your ideas out for free.
What will my production app cost?
If you want to go to production with Power Apps, it is a good idea to consider the costs. Thankfully there is an app for that. AI Builder Calculator lets you input what AI tools you will need and how many users will be accessing your app’s AI features and gives you the price it will cost you.

What are preview features?

What is Object Detection?
AI Builder Object detection is an AI model that you can train to detect objects in pictures. AI models usually require that you provide samples of data to train before you are able to perform predictions. Prebuilt models are pre-trained by using a set of samples that are provided by Microsoft, so they are instantly ready to be used in predictions.

Object detection can detect up to 500 different objects in a single model and support JPG, PNG, BMP image format or photos through the Power Apps control.
How to try out Object Detection capabilities?
You can try out and see how object detection works before having to create and accounts or apps yourself on the Azure Computer Vision page.

What can you do with Object Detection?
Object counting and inventory management
Wildlife animal recognition
How to detect objects from images?
- To start creating your AI model for your app, sign in to Power Apps and click on AI Builder on the left hand menu. Select Object Detection from the “Refine Model for your business needs” option.


- Name the objects that you are going to detect.

- Upload images that contain the object you will detect. To start with you can upload 15 images for each object.

- Make sure each object has approximately the same amount of images tagged. If you have more examples of one object, the training data will be likely to detect that object when it is not.
- Tag your objects by selecting a square that your object is in and choosing the name of the object.

- Once you are done, choose Done Tagging and Train. Training process will take some time.
- If you choose to not use an image or clear any tags, you can do that at any time by going back to your model under the AI Builder on the left hand side menu and choose your model and choose edit.

- AI Builder will give you a Performance score over 100 and a way to quickly test your model before publishing. You can edit your models and retrain to improve your performance. Next section will give you some best practices to improve your performance.

How to Improve Your Custom Model Performance?
by Contributed | Mar 9, 2021 | Technology
This article is contributed. See the original author and article here.
We are pleased to announce the new alert custom details and an improved version of entity mapping. Two new features which are part of a series of new alert enrichment capabilities in Azure Sentinel. Let’s go through them in the following:
Custom Details:
Overview
When a security alert is triggered in the environment, the information described in the alert is crucial for the security analyst to perform their investigation. Hence, it is important that the alert contains essential information and therefore the ability to include custom details in the alert will improve the efficiency of investigation. Custom details allows users to add custom information to the alert created within scheduled alert rules.
How do I configure it?
When creating or editing an analytics rule, you will find Alert enhancement – Custom details section under Set rule logic tab.

Start configuring the custom details by providing a name that will appear as the field name in alerts and its value from the drop-down list. You can add multiple key-value pairs (up to 20) by clicking on “Add new”.

Where to view the custom details
The custom details will be stored as a part of ‘ExtendedProperties‘ field in Json format. In the event where multiple alerts were triggered, each has its own custom details.

Below is the sample query to parse custom details where each field name will be unpacked as a column. The name of the column will be the field name with the prefix “custom_”.
SecurityAlert
| extend customDetails = parse_json(tostring(parse_json(ExtendedProperties).["Custom Details"]))
| evaluate bag_unpack (customDetails, "custom_")
Limitations
We wouldn’t want the alert to be overloaded, so we will limit the number of key-value pairs to 20 in a single analytics rule and the details are limited to 2 KB collectively. Additional details will be dropped when exceeding the limit.
Entity Mapping:
Overview
Entity mapping configuration is essential in building scheduled query analytics rules. It allows Azure Sentinel to recognize the entities and form the core of analysis which help you to investigate incidents effectively and efficiently.
In the past, you could only map five entity types in Analytic rules – users (accounts), hosts, IP addresses, URLs and file hashes. It has been our goal to enhance the entity mapping feature with more entity types and identifier options for a greater flexibility in identifying an entity.
The new entity mapping offers the following enhancements and functionalities:
- Supports additional entity types and identifiers (see the full list of supported Entity types and Identifiers).
- Supports multiple entities of the same kind on a single event.
- Supports strong and weak identifiers.
- Validates the configuration of mappings during rule creation.
- Unlike the previous version, the new entity mappings do not add codes to your query.
How do I configure it?
1. When creating or editing an analytics rule, you will find Alert enhancement – Entity mapping section under Set rule logic tab.

2. Select the entity type from the entity type drop-down list to start mapping (you may map up to a maximum of five entities at a time by clicking + Add new entity).

3. Choose the identifier for each entity from the identifier drop-down list. Some identifiers are required, others are optional. Then, select the correspond data field from the Value drop-down list. The Value list is populated by the data fields (columns) defined in the rule query.

4. The number of definable identifiers for a given entity ranges from one to three, depending on the entity type. For example, IP entity has only one identifier, File entity can define up to two identifiers, while Host entity allows up to three.

Note that adding more identifiers to an entity allows Azure Sentinel to discover more attributes of a particular entity. Hence, the discovered entity will have a richer information about the entity. This helps to increase the efficiency during incident investigation.
5. You can map more than one entity of the same type. For example, you can map two IP entities, one from a source IP address field and another one from a destination IP address field.
6. Unlike the previous version, the new entity mappings do not add any code to the rule’s query.

What about my previously defined entity mappings?
1. Your previously defined entity mappings will still be working as usual.
2. If you configured the new entity mapping on an existing analytics rule with previously defined entity mappings, the rule will disregard the old mapping without removing the mappings defined in the query code.
3. When you update a rule with the intention to add more entity mappings, you need to re-define all the entities via the new mapping.
For example, I have an existing rule with two entities defined (Account and Host) through the old mapping. If I wish to add another entity mapping (Registry Key), I need to define all the three entity types (Account, Host and Registry Key) with the new entity mapping feature.
4. Lastly, if you still need to use the old version of entity mapping (as long as the new version is still in preview), you can access it using the URL with feature flag (https://ms.portal.azure.com/?feature.EntityMapping=false). More information can be found here.
Get started today!
We encourage you to start using this feature as it will help to improve your efficiency by shorten the investigation time.
Try it out, and let us know what you think!
You can also contribute new connectors, workbooks, analytics and more in Azure Sentinel. Get started now by joining the Azure Sentinel Threat Hunters GitHub community.
Special thanks to @romarsia and @Innocent Wafula for the review.
by Contributed | Mar 9, 2021 | Technology
This article is contributed. See the original author and article here.
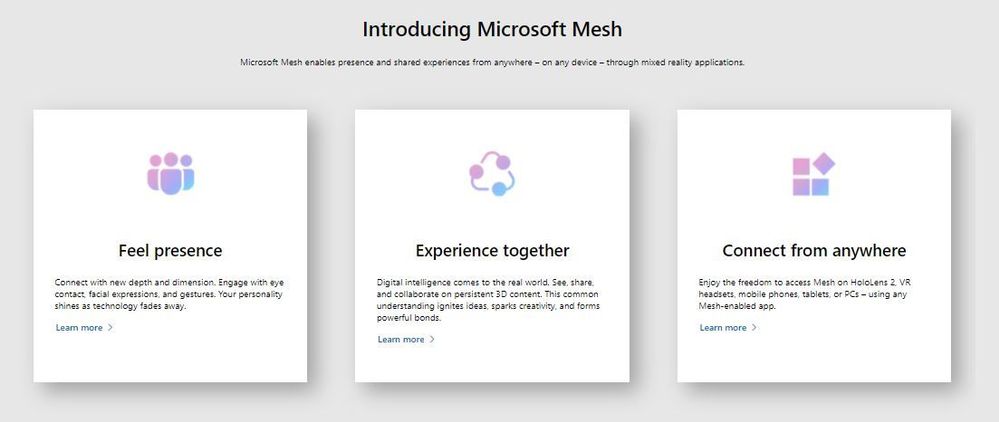
Microsoft Mesh, a new platform built on Microsoft Azure, enabling developers to build immersive, multiuser, cross-platform mixed reality apps. Microsoft Mesh enables its users to connect with presence, share across space, and collaborate in an immersive way as if they were in person regardless of physical location. Customers can leverage Mesh to enhance virtual meetings, conduct virtual design sessions, assist remotely better, learn together virtually, host virtual social gatherings and meet-ups.
Mesh-enabled apps: On top of the development platform, Microsoft Mesh also delivers some app experiences that bring the platform alive. The HoloLens 2 Mesh app and AltspaceVR with new enterprise capabilities are instantiations of the collaborative experience Mesh can light up for immersive headsets. These are just the first amongst many other experiences on their way, built by Microsoft and our partners.
Mesh developer platform is comprehensive, and the tools and capabilities are designed to help developers get started quickly and deliver engaging multiuser mixed reality experiences. As we learn from early adopters and preview customers, we’ll continue to evolve the SDK to support more engines and frameworks. If you have a compelling app scenario and would like to onboard to the preview, please join the MR developer program. This allows you to build your MR app with the help of some of the pioneers in the MR space and contribute to the Mesh platform along the way.
Resources on Microsoft Mesh
Video: Microsoft Mesh – Mechanics Session
Video: Microsoft Mesh – Ignite Session
Blog: Microsoft Mesh Innovation Story
Microsoft Mesh – A Technical Overview Blog Post https://aka.ms/MRMicrosoftMesh
Introduction to Microsoft Mesh – Ignite Session https://aka.ms/intro-mesh
If you want to be notified when the SDK is available, join the mixed reality developer program – invite people to join https://aka.ms/introducing-mesh at very bottom of the website.
If you want to install a preview of a Mesh-enabled app on your HoloLens 2: https://aka.ms/mr-mesh-app-preview


You can use pre-trained models to: