This article is contributed. See the original author and article here.
2020 has been a year of ups and downs for all of us, lots of changes and lots of adjusting. I wanted to look back at the year and look at the highlights from the community pulling together and the awesome new features/products that have been launched.
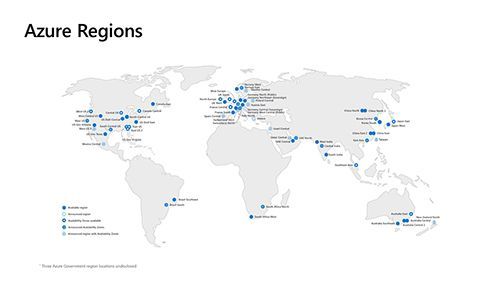
Azure Regions
Azure Regions
We’ve seen a whole host of new Azure regions announced this year, some are expanding on existing regions while others are brand new regions:
Taiwan
Austria
Spain
Brazil
Arizona
Poland
Italy
Greece
Azure Security Centre
Azure Security Centre
Azure Security Centre has seen some great new features and developments this year. For me, the two highlights have been Asset Inventory and Multi Cloud Support. Asset Inventory is in preview, but it provides you with an overview of the security posture of the resources you have connected to Security Center.
Multi Cloud support means those who have an environment spanning across a multi cloud environment can integrate Amazon Web Services (AWS) Security Hub and Google Cloud Platform (GCP) Security Command into Security Centre.
Azure VMware Solution went Generally Available
Azure VMware Solution
The Azure VMware Solution (AVS) offering went Generally Available (GA) in September 2020. AVS offers a great solution for companies who are looking to move their workloads from Azure but want to stay with VMware as well. This offers the best of both worlds, utilizing the familiar VMware platform while making use of the scale and reliability of Azure.
Azure Stack HCI
Azure Stack HCI
Azure Stack HCI, as a hyper-converged infrastructure (HCI) solution was announced expanding the Azure Stack Portfolio at Inspire 2020.
Azure Stack HCI is a hyper-converged cluster solution that runs virtualized Windows and Linux workloads in a hybrid on-premises environment. Potential user cases for this are datacenter modernization, branch office scenarios and Virtual Desktop infrastructure or even running Kubernetes clusters.
The Azure Stack HCI operating system (OS) is a specialized OS with streamlined composition and newer components than Windows Server 2019, meaning it includes a minimal local user interface and is designed for remote management.
Azure Arc
Azure Arc
Lots of companies are now facing a multi cloud environment, either by design or by accident through shadow IT and managing all those resources to make sure they compliant with company policies can be a bit of a challenge, or even a nightmare. What Azure Arc enables you to do it is manage your virtual machines, Kubernetes clusters and database that don’t live on Azure as if they are running in Azure. Giving you that one management plane to ensure you can have all your resources compliant to company policies.
Private Azure Marketplace
This is an announcement that happened at Microsoft Ignite that I missed until this month. Private Azure Marketplace is in preview and it allows administrators to govern which third party solutions can be used, that comply and match your enterprise’s policies. I know a lot of customers that will be interested in this as the Azure Marketplace has always been something that they have struggled to control from a cost and compliance point of view.
Community
This year has seen nearly all conferences, community events and meetings into virtual ones. And I definitely miss meeting up with everyone, collecting stickers and all the pizza you get a meetups, however what this year has offered is the change to “travel” to user groups and interact with the community in locations I might never be able to get to in person. This year I have had the pleasure of speaking at over 35 different events ranging from Microsoft Ignite to the local Azure User Groups here in the UK.
I’ve loved how the community has pulled together and managed to still have the meetups and conferences to share knowledge and fun.
The Glasgow Azure User Group organized sticker packs for some of the community around the world:
Loving seeing all the sticker packs arriving! Thank you to everyone for their support in making this an awesome community! :grinning_face: https://t.co/8Ikq4mYoCz
The Festive Tech Calendar launched for a second year, seeing people from the Azure, O365, PowerApps and more communities come together to share content and help each other out, while wearing some festive jumpers!
Each week we will publish a challenge co-created by Azure Advocates with some amazing Student Ambassadors around the world. Discover popular festive recipes and learn how Microsoft Azure empowers you to do more with Azure Serverless services! :fork_and_knife_with_plate: :smiling_face_with_heart_eyes:.
Explore our serverless Resources and learn how you can contribute solutions here.
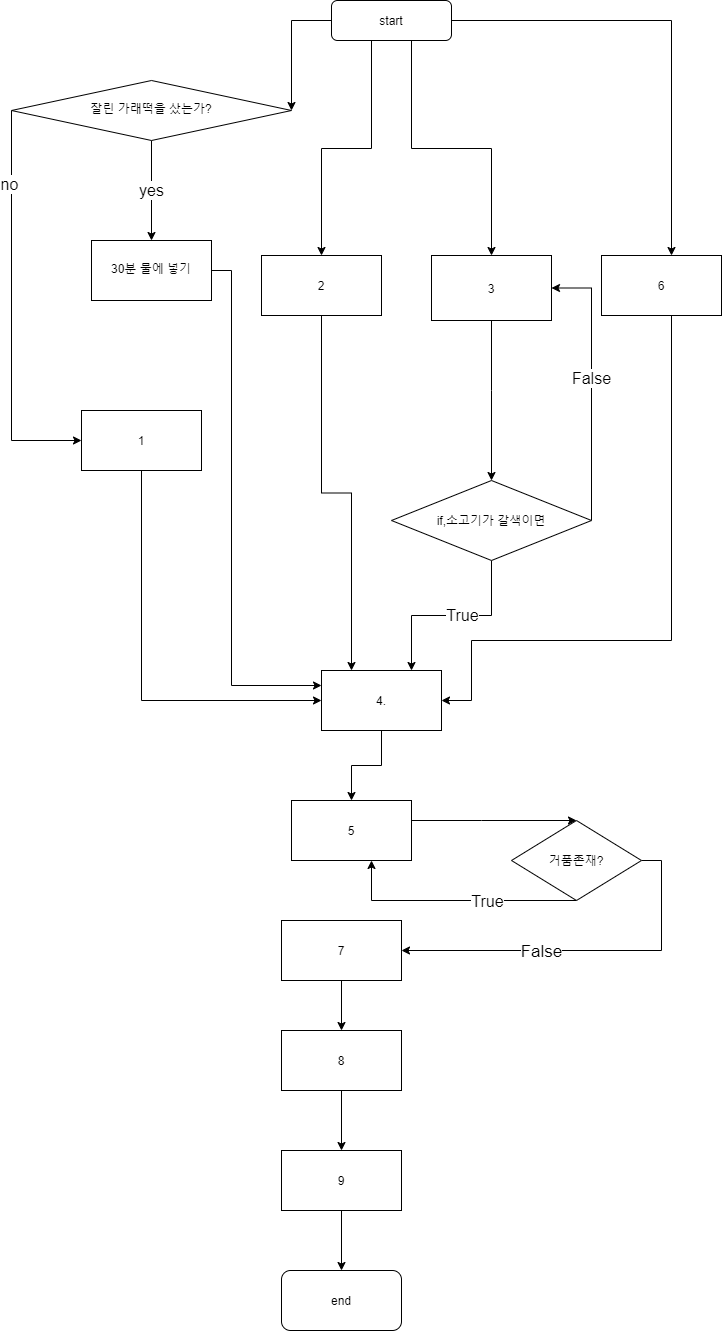
In Korea, when New Year begins, everyone eats tteok-guk (rice cake soup). There are various shapes of tteok, but especially for greeting New Year, garae-tteok is the most popular to make the soup.
As garae-tteok has a long and cylindrical shape, people wish to live long, by eating tteok-guk. When cooking tteok-guk, the garae-tteok is sliced into small pieces, which look like coins. This coin-like shape is believed to bring wealth.
I took an interview video with MLSAs how they have implemented. They actually did awesome jobs! Although we took the video in Korean, we provide subtitles in both English and Korean. So, turn on the subtitles and you won’t regret it.
Ingredients (for 4 People)
Cooking tteok-guk is fairly straightforward. Here is the list of ingredients for four people.
Garae-tteok: 400g
Diced beef: 100g
Water: 10 cups
Eggs: 2
Spring onion: 1
Minced garlic: 1 tablespoon
Soy sauce: 2 tablespoon
Sesame oil: 1 tablespoon
Olive oil: 1 tablespoon
Salt and pepper
Recipe
The simplest way to cook tteok-guk is the following:
Slice garae-tteok into small pieces – no thicker than 5 mm.
You can buy sliced garae-tteok.
But in this case, put the sliced garae-tteok into a bowl of water for about 30 mins.
Slice spring onion.
At high heat, stir-fry the diced beef with sesame oil and olive oil until the beef surface goes brown.
Put the water into the wok and boil for about 30 mins with medium heat.
While boiling, remove bubbles from the water from time to time.
Get the eggs beaten.
After the 30 mins, put the minced garlic and soy sauce into the boiled soup. Add some salt, if necessary.
Add the beaten egg and sliced spring onion.
Serve the soup with pepper drizzled on top.
You Jin depicted the recipe in the flow-chart format (some letters are in Korean).
Recipe Steps Implementation
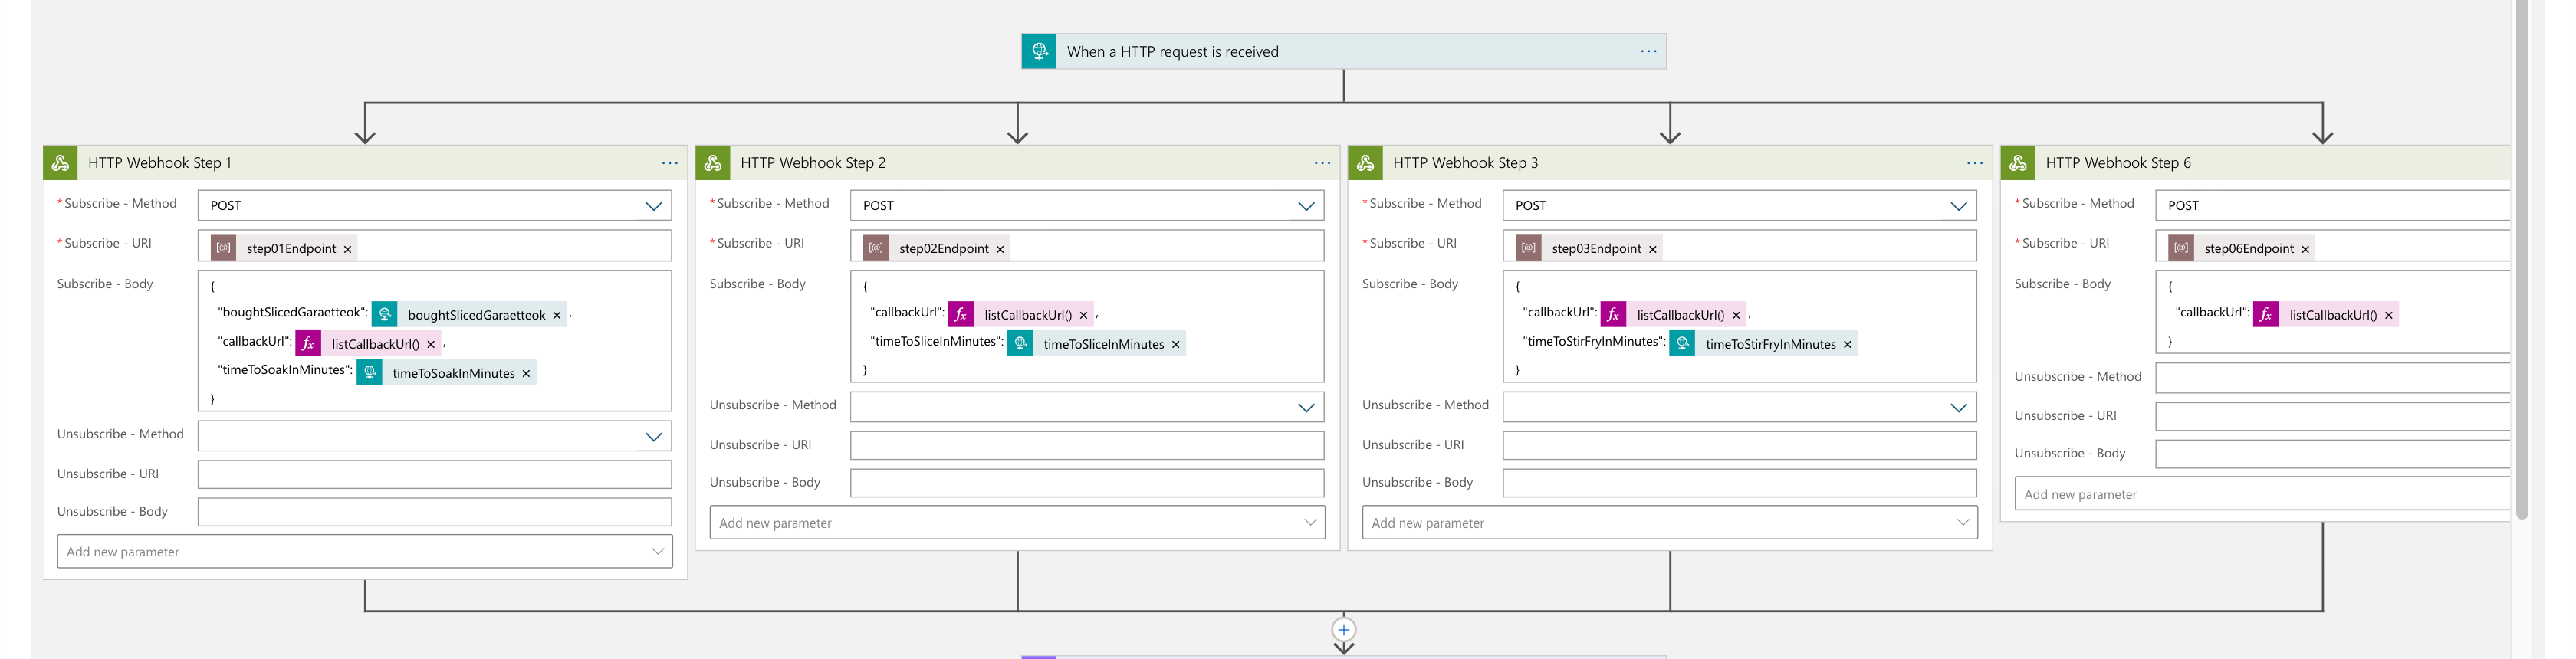
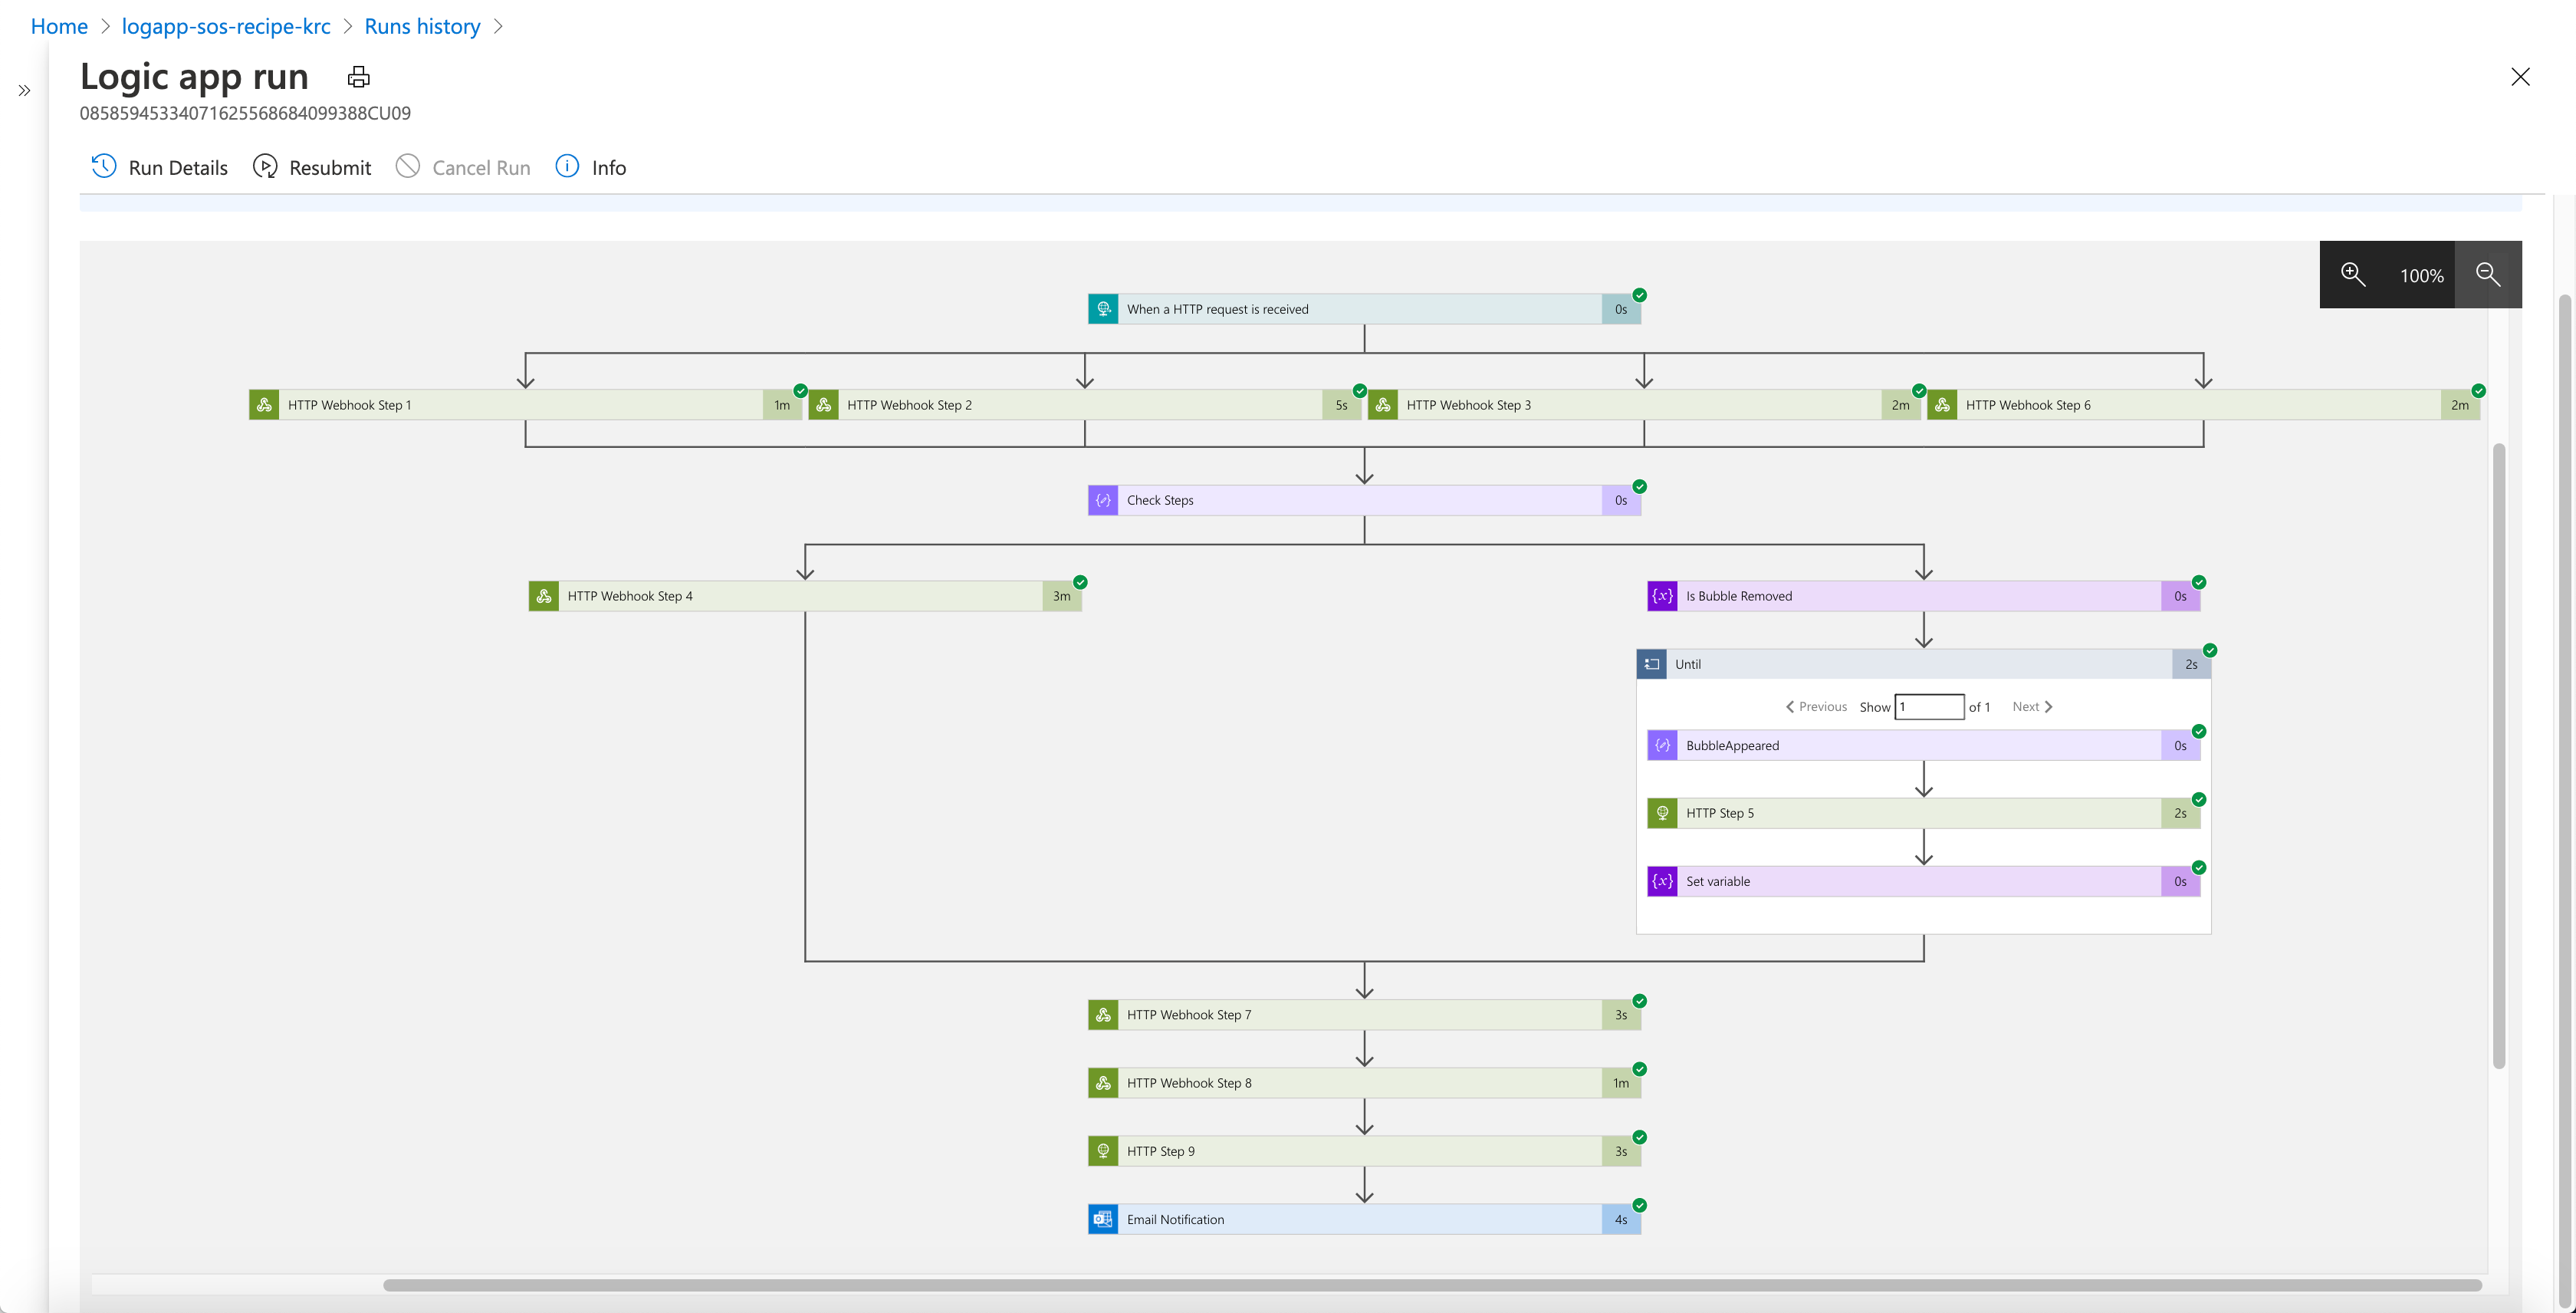
As each step takes time to complete, the prep time is simulated by a timer. Azure Durable Function offers the Timer feature, which perfectly fits this case.
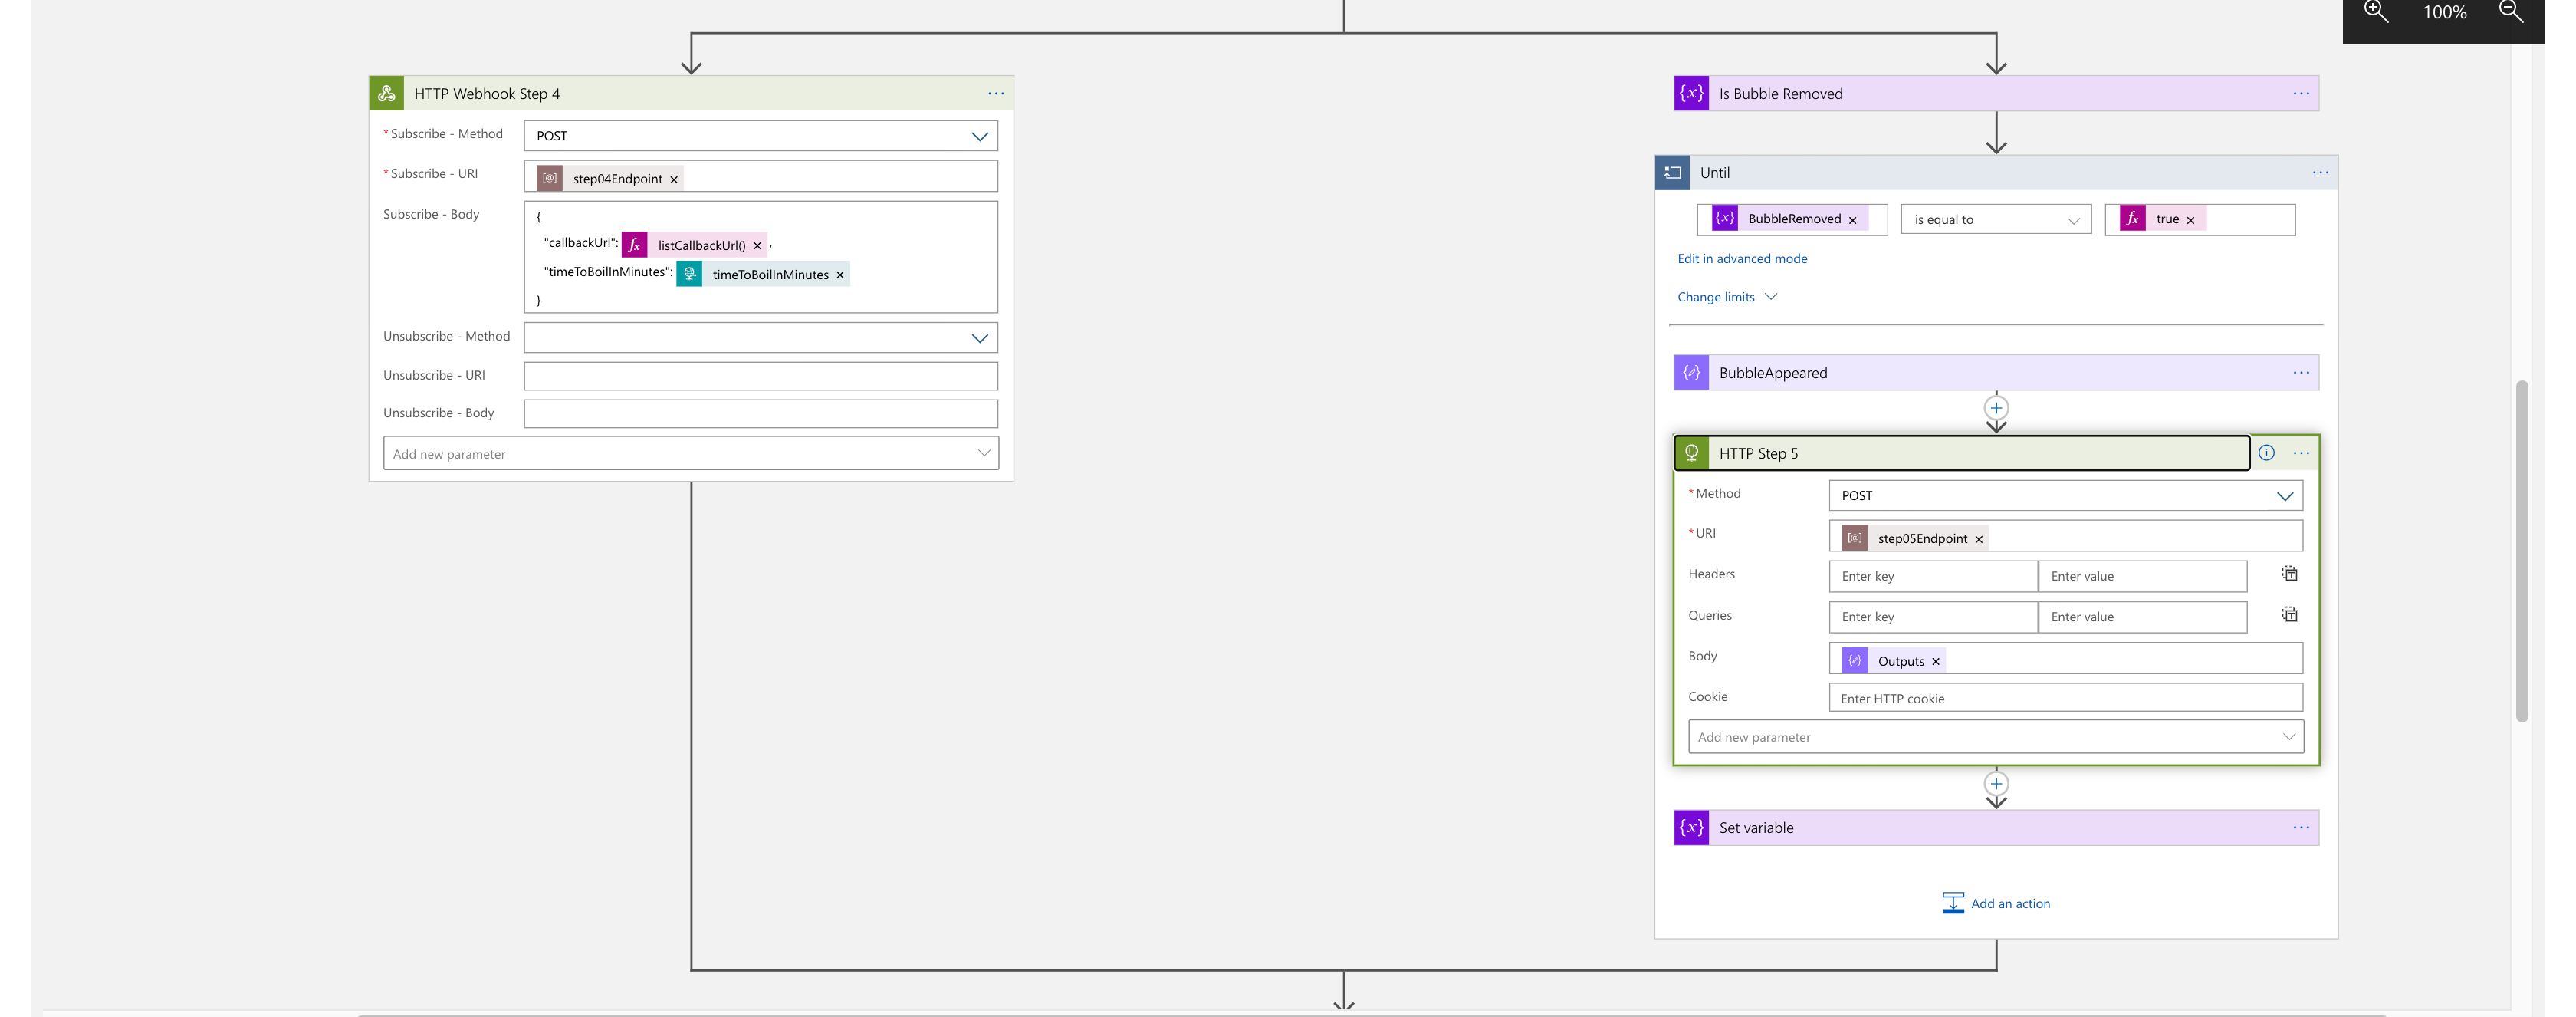
After the aggregation, Run the Step 4 (Boiling). While boiling, bubbles randomly occur, which should be removed (Step 5).
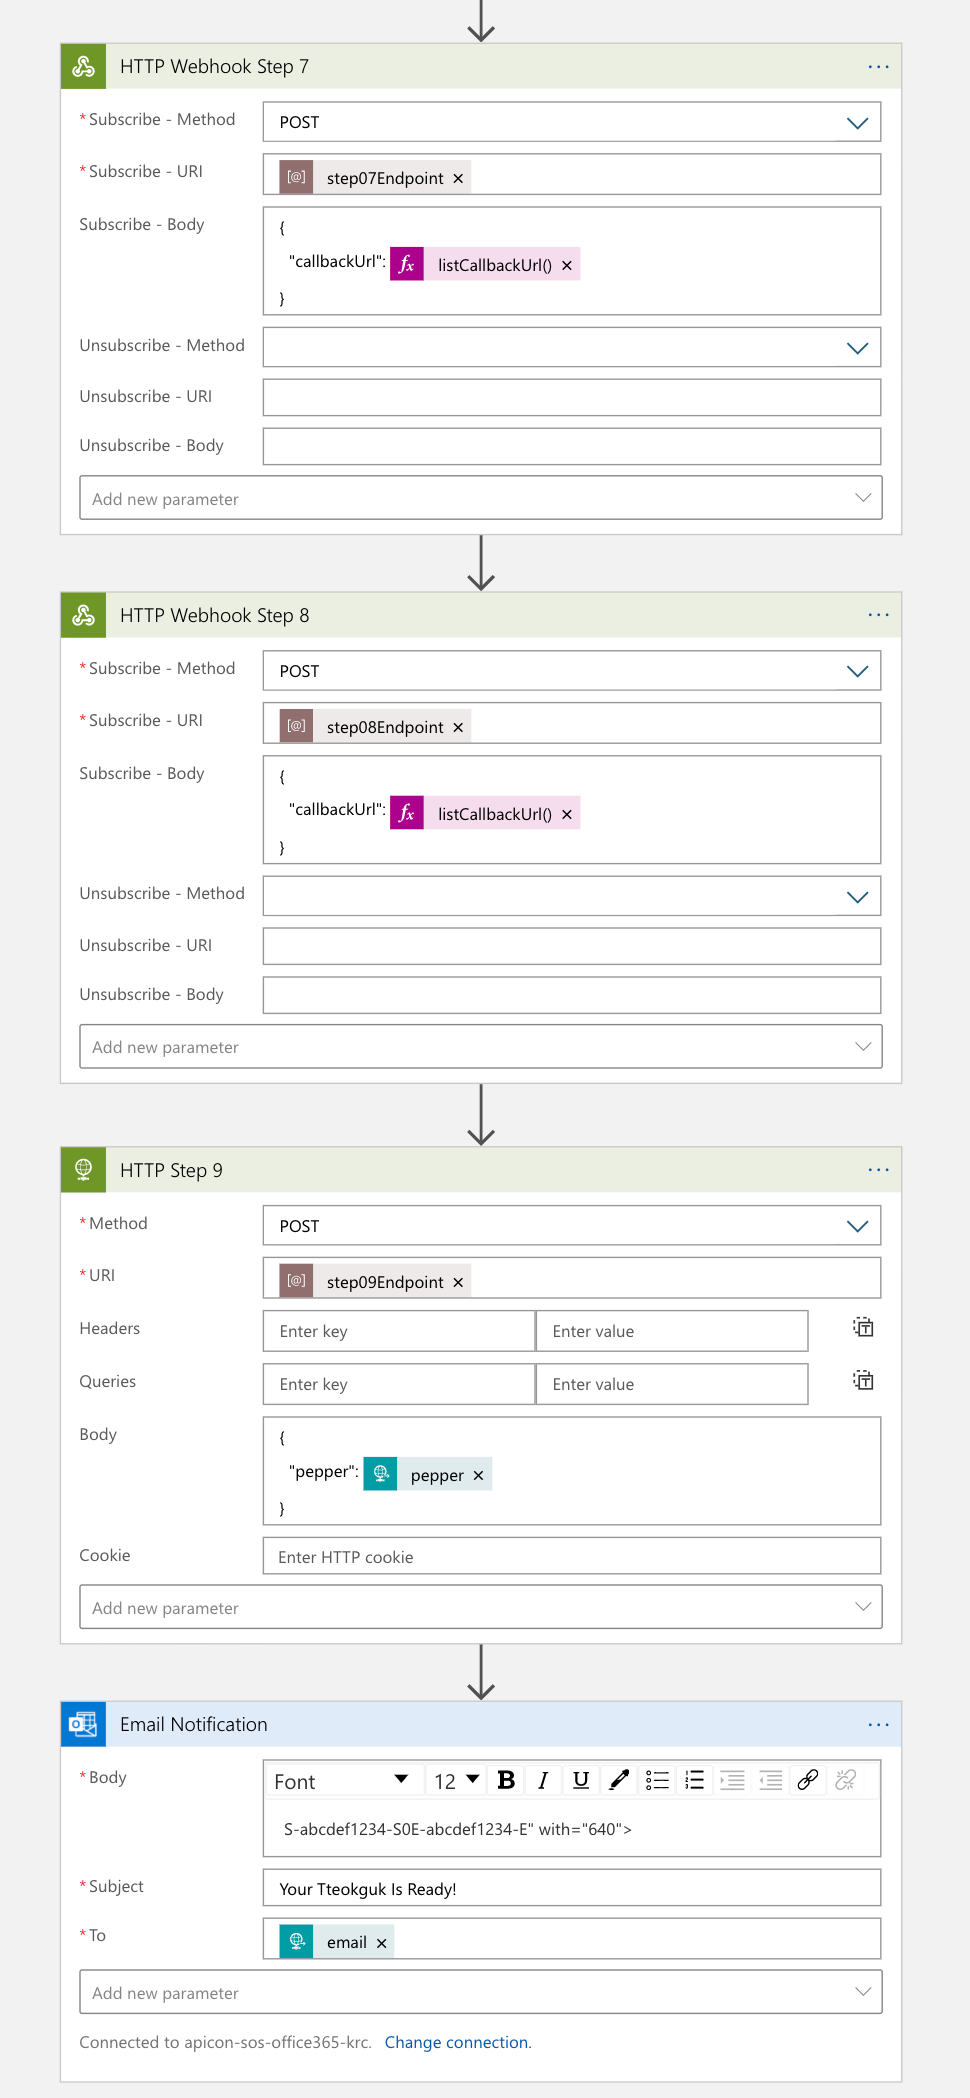
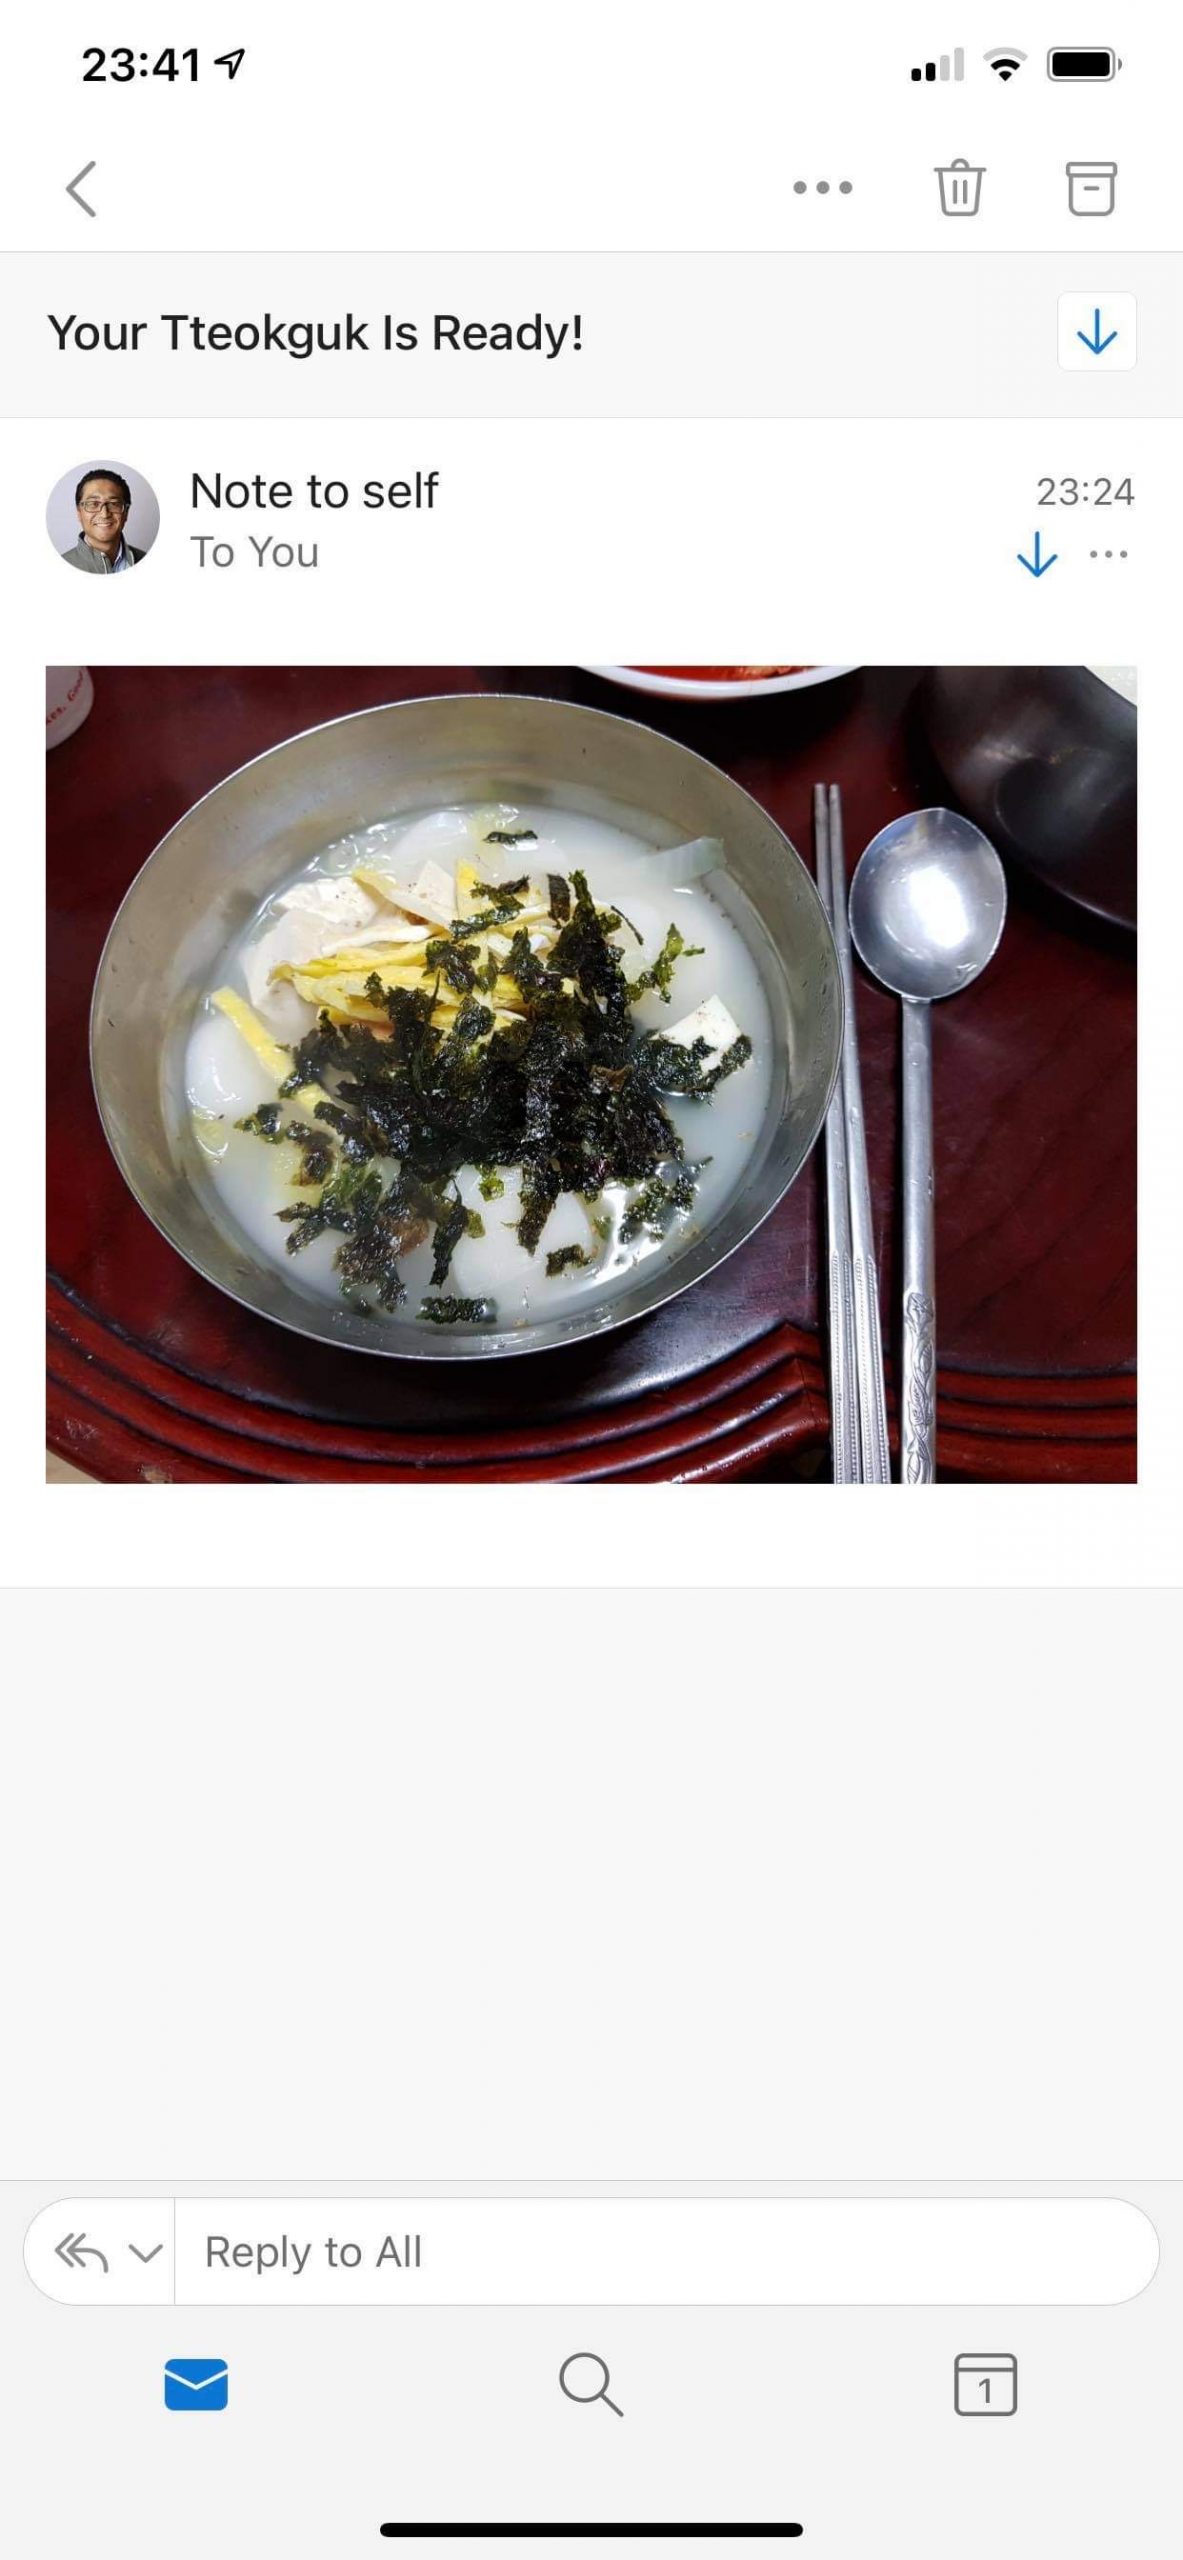
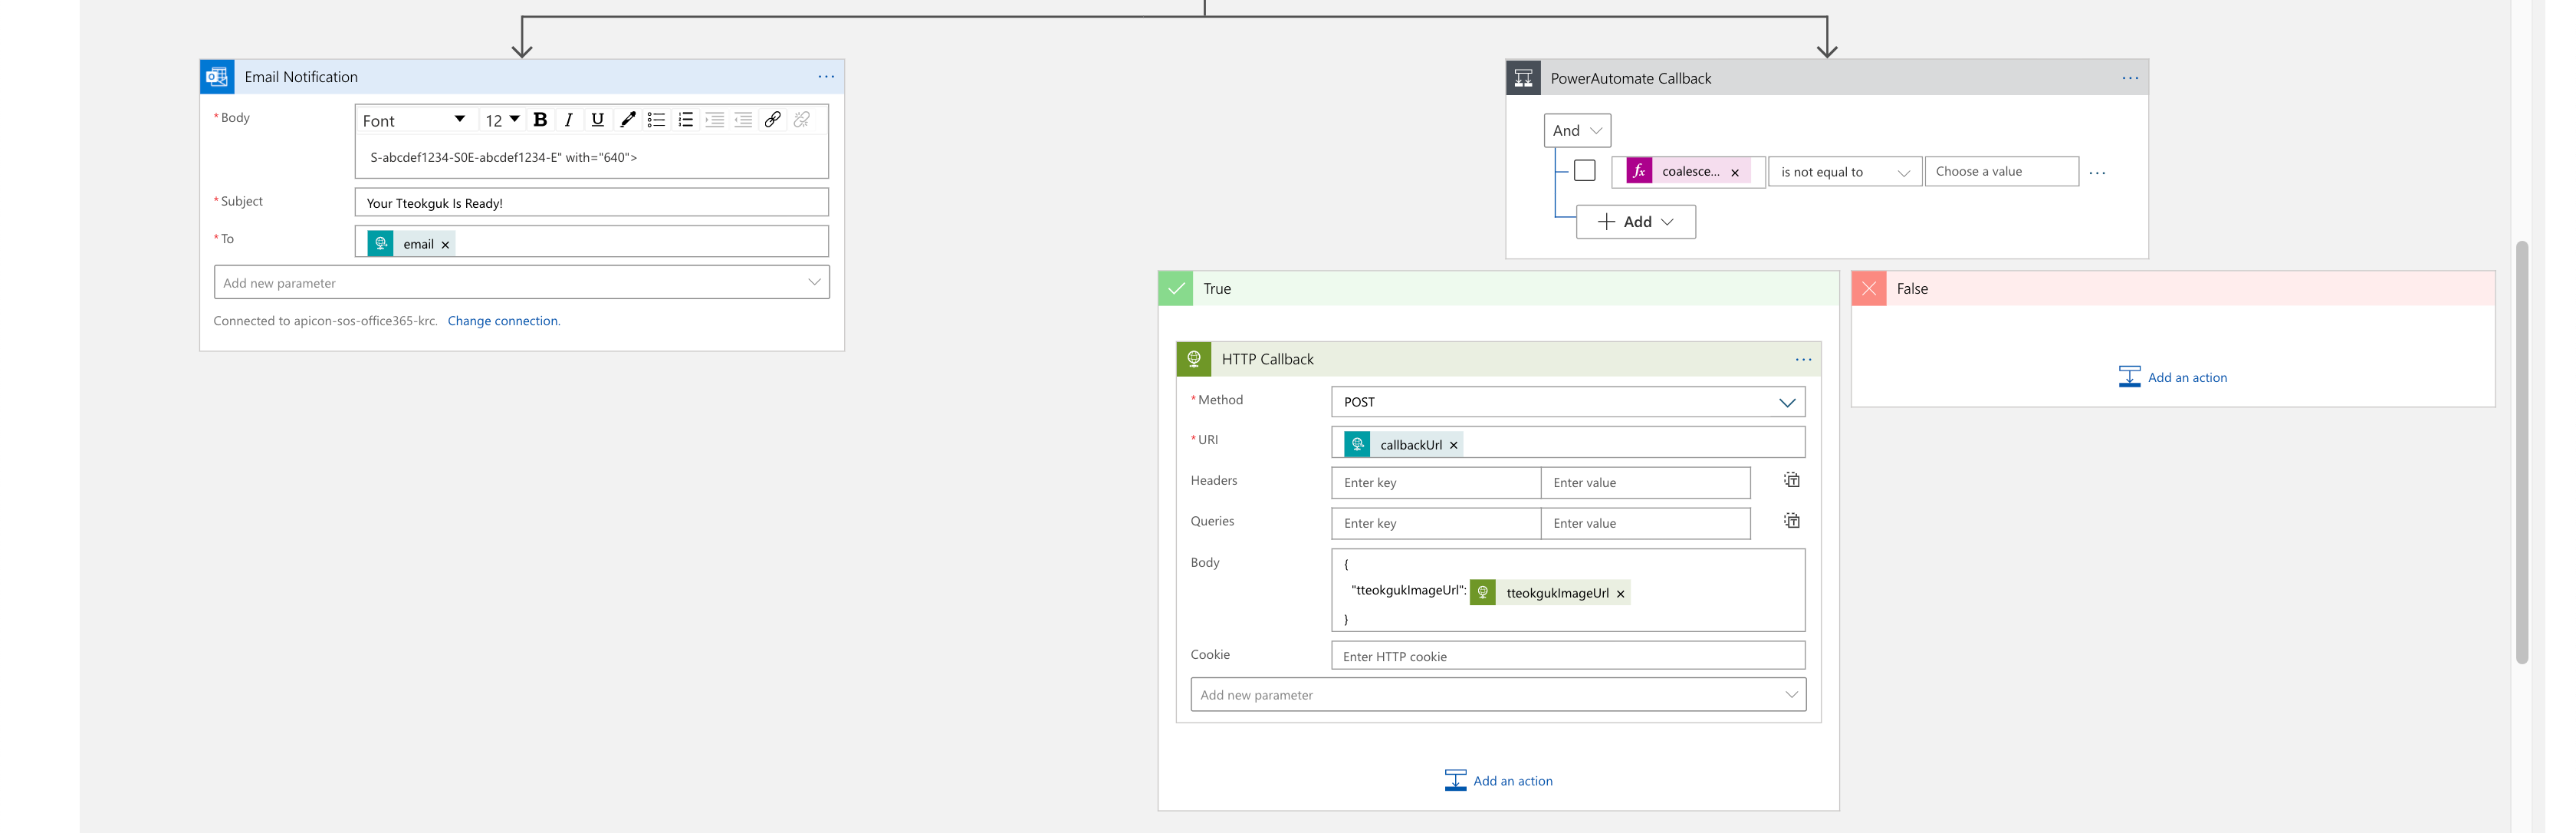
Then, add garlic and sauce (Step 7), Add beaten eggs and spring onion (Step 8), and finally serve the soup by adding salt and pepper (Step 9). Step 9 returns a random tteok-guk image from Azure Blob Storage, and the image is sent to the designated email.
At this stage, we have to consider the two-minute limitation of Logic Apps during this execution. Therefore, instead of using the HTTP action, we used the HTTP webhook action to overcome this restriction. The following screenshot shows the end-to-end execution result.
As you can see the last action, the tteok-guk image is sent to the given email like this:
Recipe Automatic Build and Deployment
Both Durable Function apps and Logic App orchestration are all automatically built and deployed to Azure via GitHub Actions. You can find more details at the following links. As we used Bicep to build ARM template, you might like to know more about it. This link would be helpful, if you like.
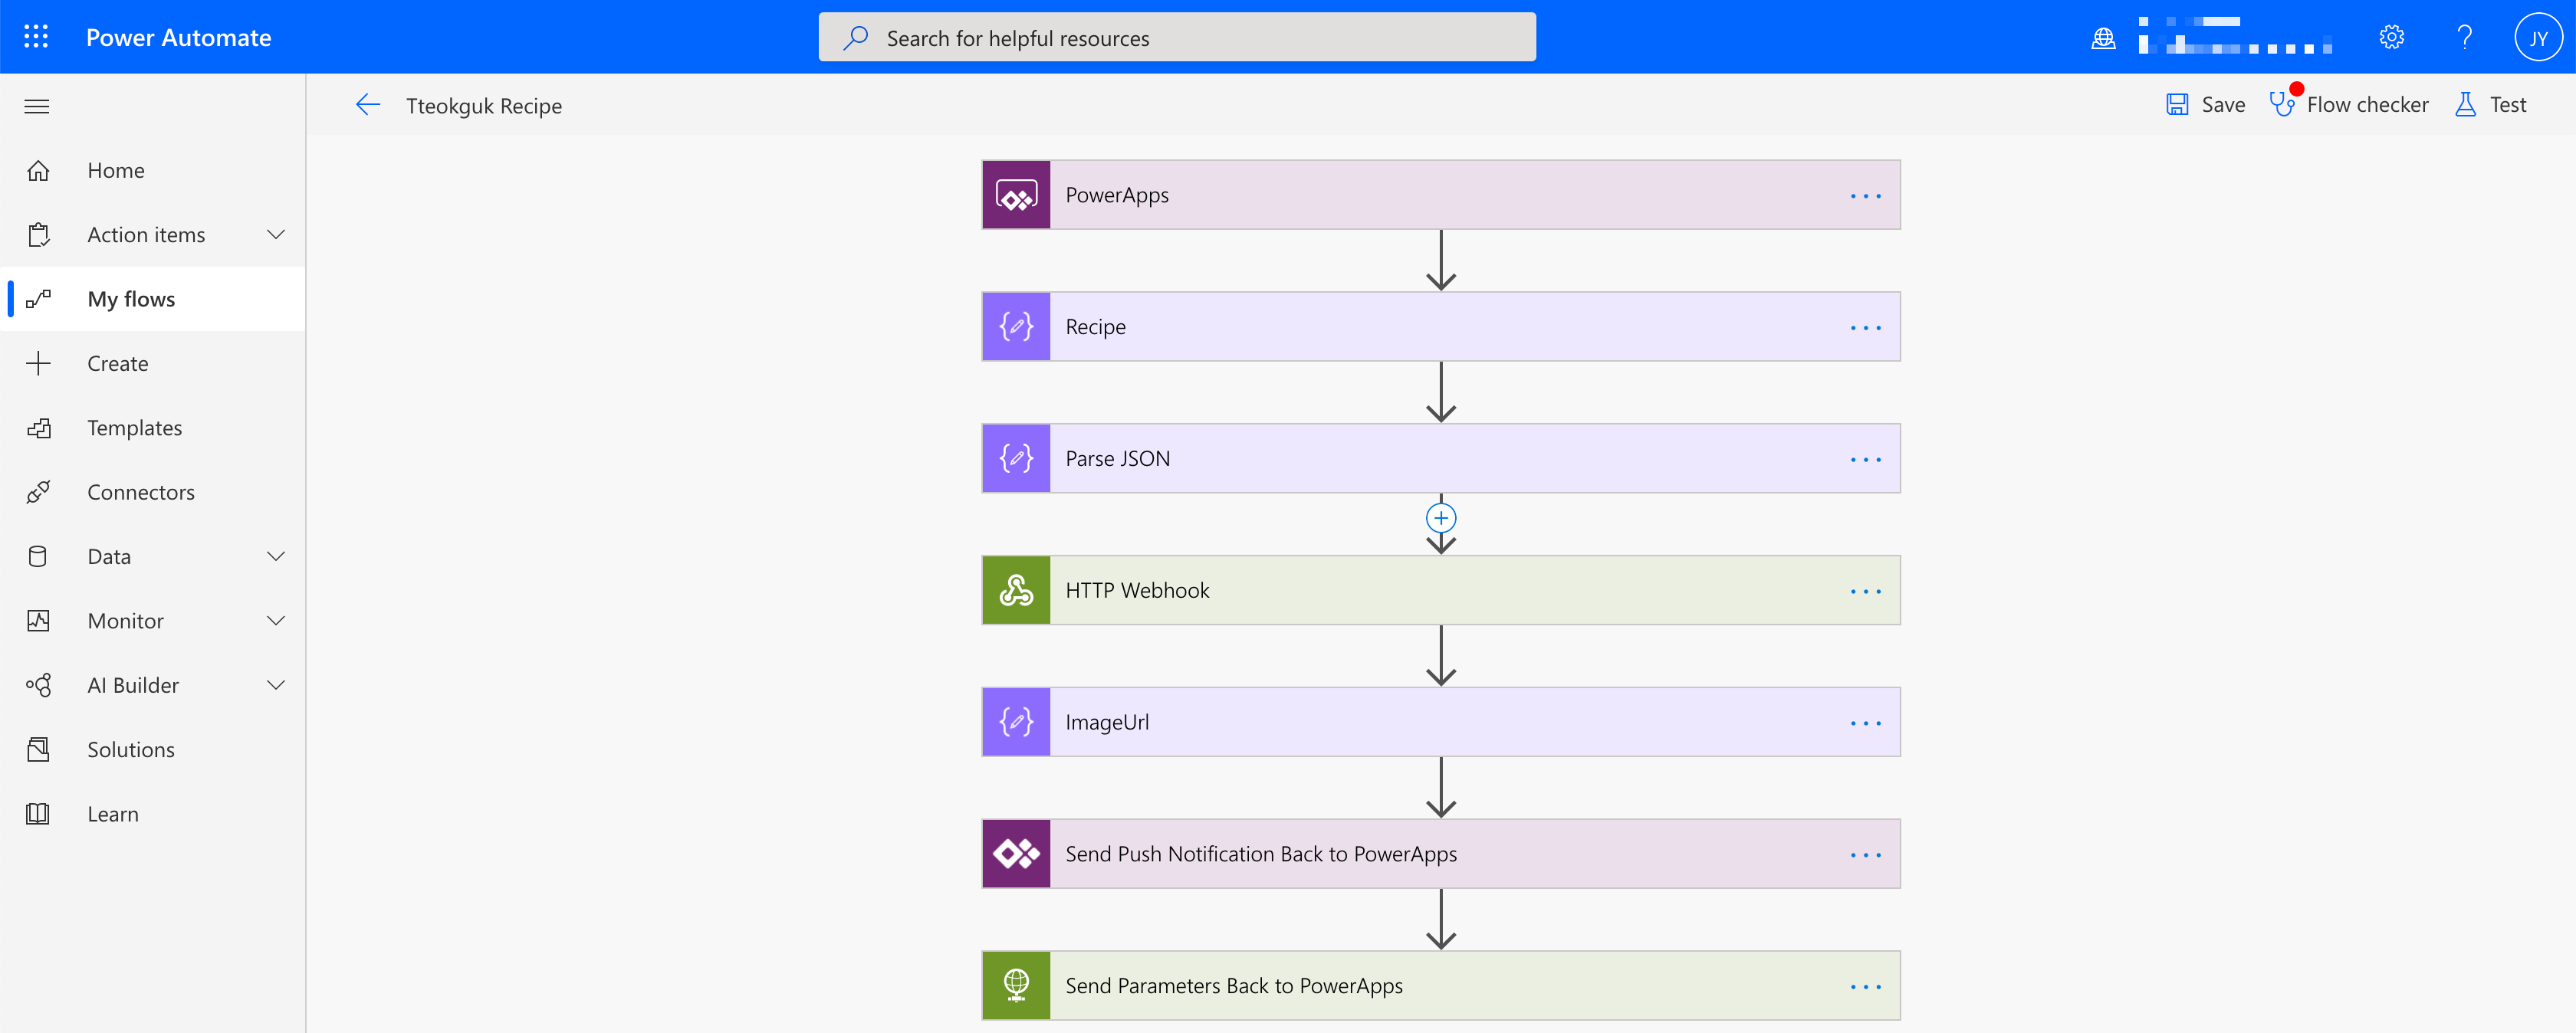
The first plan was to migrate the Logic App to Power Automate flow. However, we eventually decided to separate Power Automate side from Logic App side. Within the Power Automate workflow, we call the Logic App workflow using the webhook action. As Power Apps calls this Power Automate workflow, it sends the result back to the Power App through the push notification.
In order to use the push notification feature on Power Automate, we should slightly update the Logic App. The final action on the Logic App is not only sending an email but also calling back to the Power Automate with the image URL.
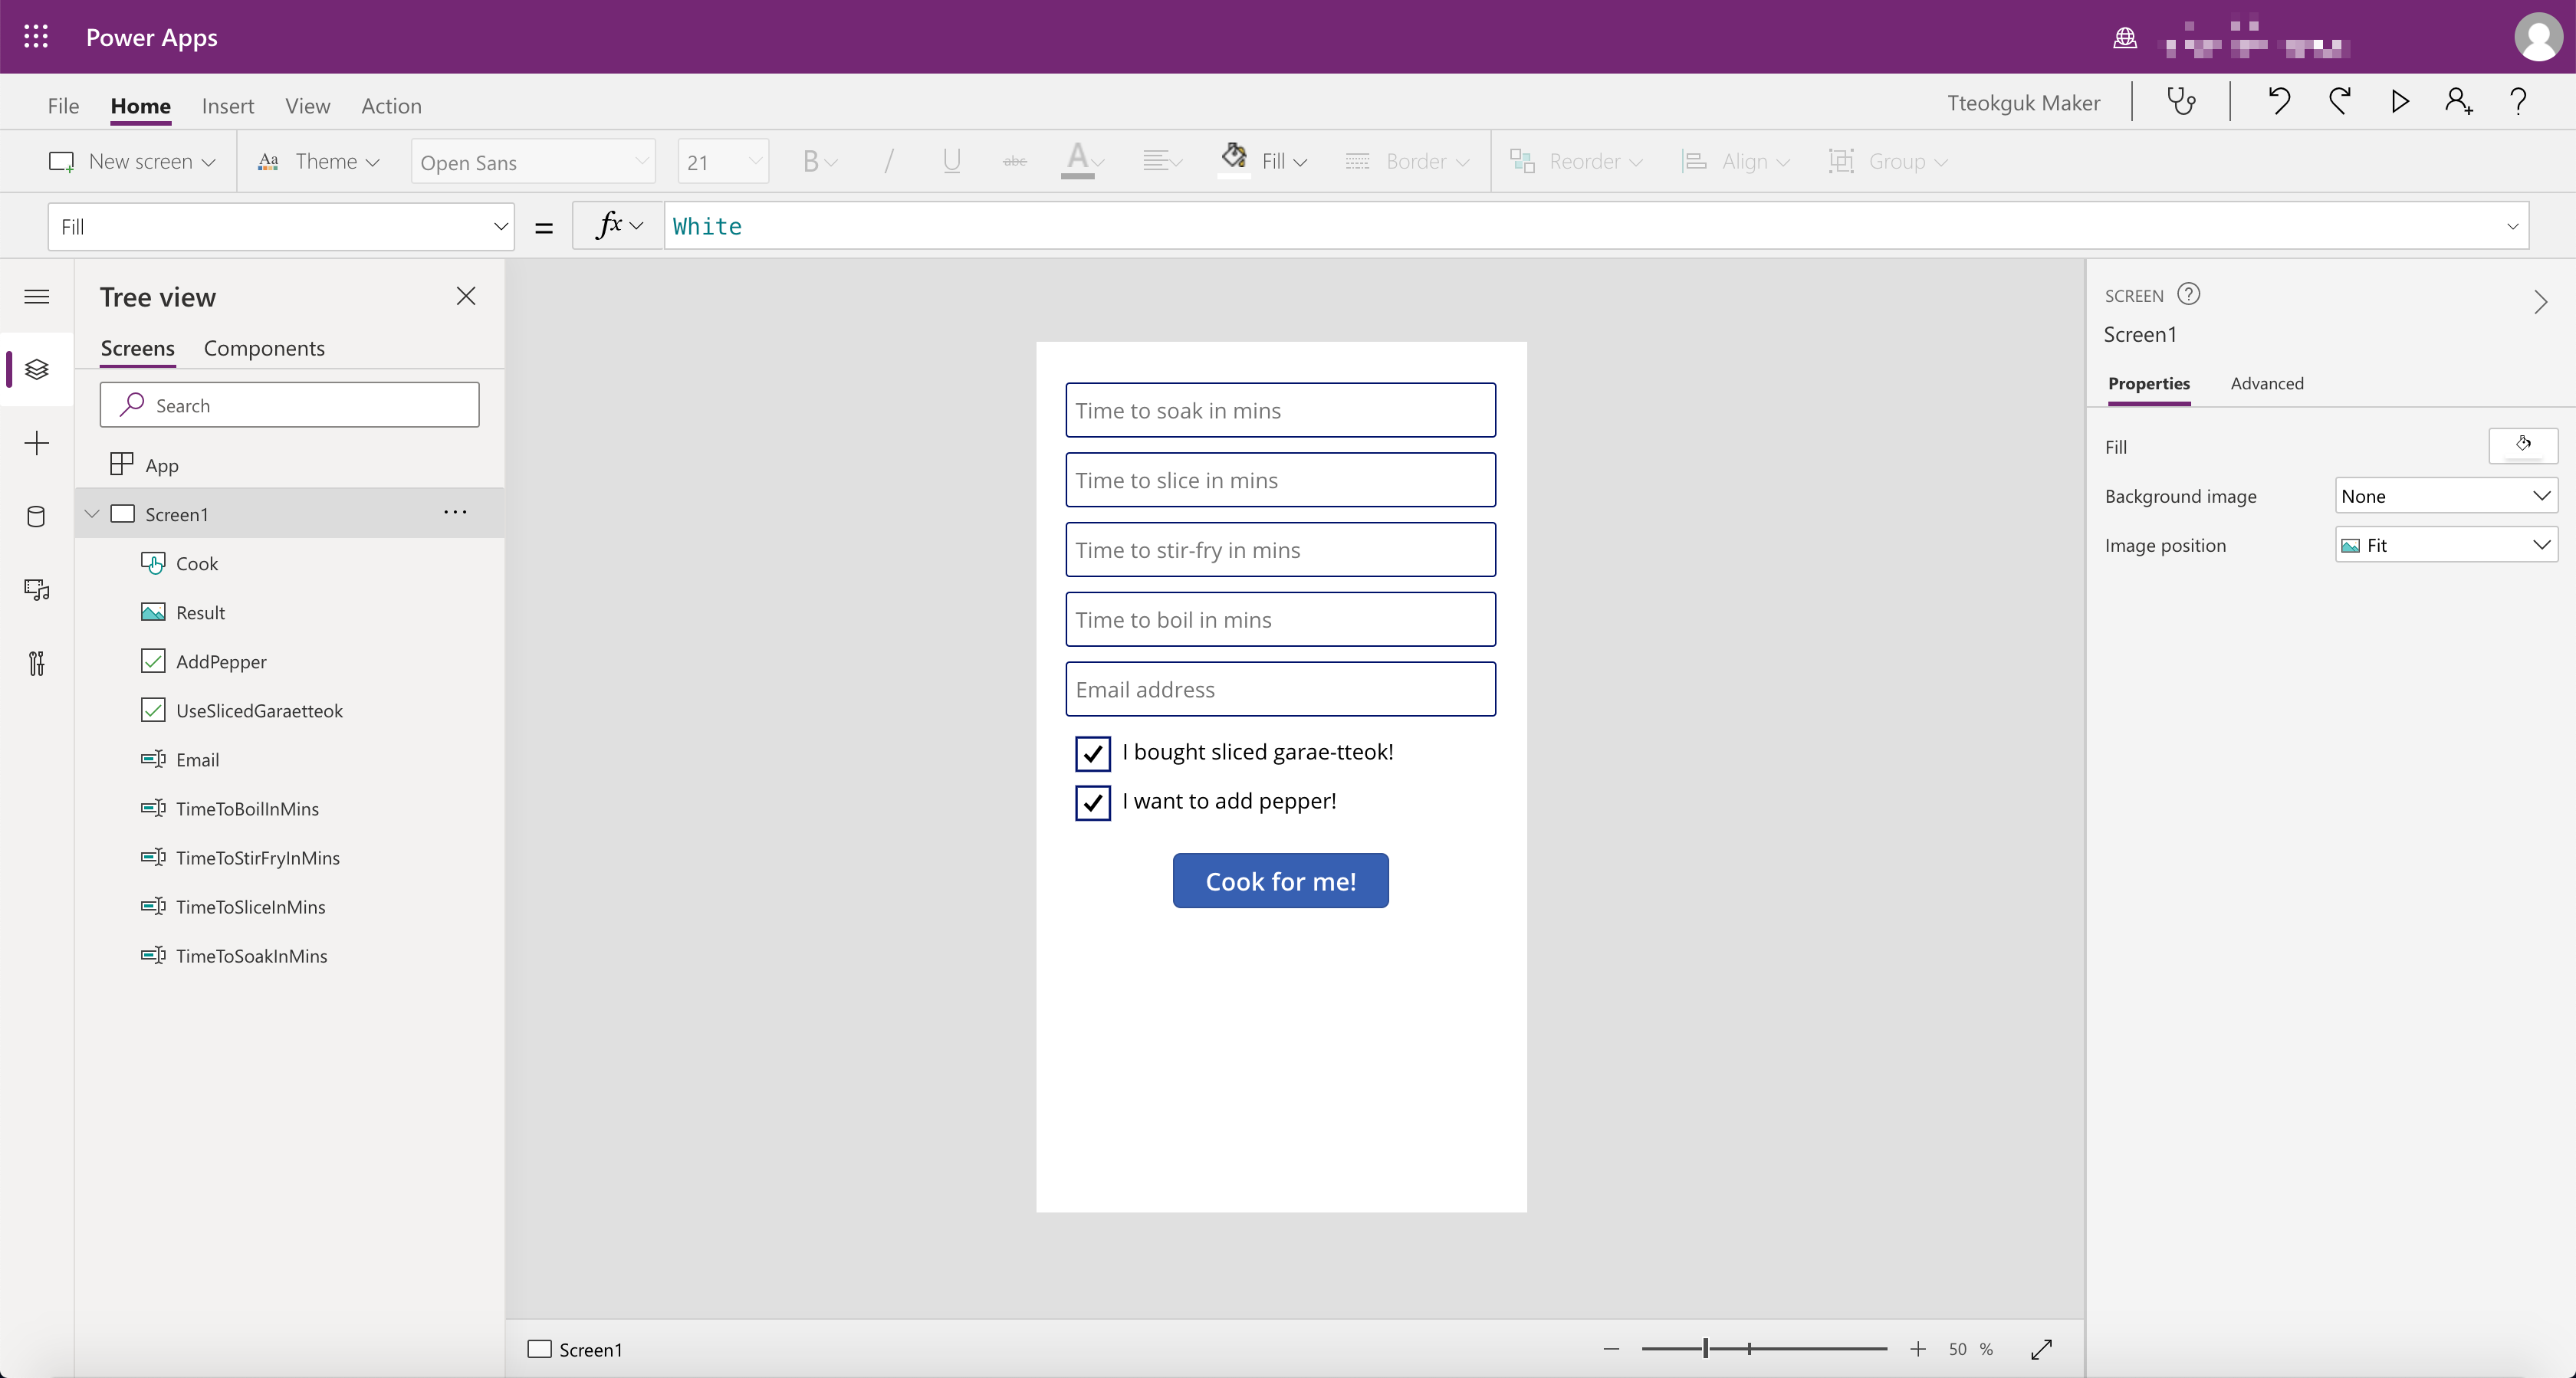
Power Apps Build
To call Power Automate workflow with parameters, we used Power Apps. The following screenshot shows which controls we used in the Power Apps canvas.
Once completed, publish the Power Apps and run it on our mobile phone. And here’s the result.
So far, we have built an end-to-end solution to cook tteok-guk, using Azure serverless services including Power Platform. The entire source code can be fount at this repository:
As this repository also contains the sample Power Apps and Power Automate workflow, download the zip files and import them to your Power Platform and run them. It will be super easy! If you like to challenge the other recipes, check out this page, #SeasonsOfServerless!
This article was originally published on Dev Kimchi.
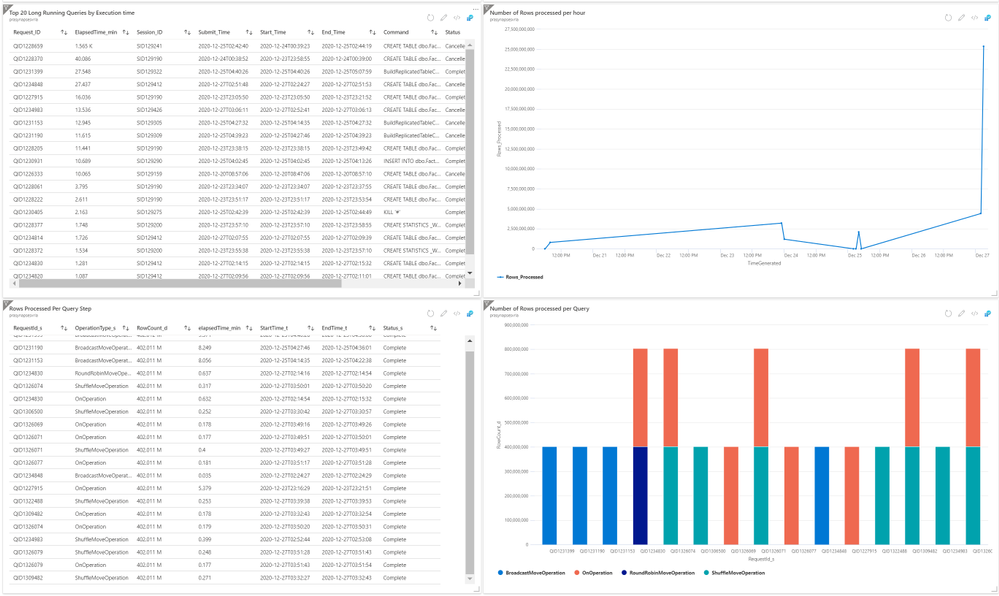
As a first step, please download the log analytics queries in this GitHub repo that we will be using to set up the following custom dashboards. We are going to create the following charts in this article:
Top 20 Long Running Queries by Execution time in a given interval
Number of Rows processed per hour
Most Rows Processed Per Query step
Number of Rows processed per Query
Navigate to the Log Analytics workspace you configured to receive Synapse diagnostic data as shown below.
Close out the ‘queries’ popup and paste in the text from ‘Top20LongrunningQueries.txt’ file in the GitHub link provided above (image below for your reference). Replace the database name with your database name.
You can save the query for future use with a name that corresponds to the query goal. For example, ‘LongRunningQueriesbyexecutiontime’
Press ctrl-A to select all the contents in the query window, including the commented out portions. Press Run to execute the Query. Once you get the results, select ‘Pin to dashboard’ then in the popup choose the dashboard we are working on and click ‘pin’
Navigate to your dashboard and find the chart that you just pinned. Click the pencil icon to rename the chart to fit the purpose.
In the popup at the top of the window click ‘save’ – you will want to do this each time you make a change or all the changes you made will be discarded.
Navigate back to the log analytics workspace and paste in the text from the file ‘Top20Stepsthatmovedmostnumberofrows.txt’ that you downloaded. Save the query, select all the contents in query window and run. Once you get the results, pin it to the dashboard.
Without leaving the query window, click the ‘Chart’ button. The output will switch to a chart view. Set the 3 parameters as shown in the screenshot below – note that you will need to set ‘OperationType_s’ first to be able to set the first parameter to RequestID_s. Pin this chart to the dashboard as well.
Navigate back to the dashboard and rename both the charts and save the dashboard.
Repeat the process for query, RowsProcessedPerHour.txt as well and pin the chart to the dashboard.
Now for all the above 4 charts, click the context menu option (ellipsis button to the top right corner) and select configure tile settings. Make sure to uncheck the “Override the dashboard time settings at the tile level” option. This will let you automatically refresh the chart for the interval selected on the dashboard. It is important to configure this setting to interpret the results which will be discussed in the 3rd part in this series.
Diederik Krols lives in Antwerp, Belgium. He is a principal consultant at U2U Consult where he leads, designs and develops C# and XAML apps for the enterprise and the store. He’s a Windows Development MVP since 2014. Diederik runs the XamlBrewer blog on WordPress and the XamlBrewer repositories on GitHub. Follow him on Twitter @diederikkrols.
Robert Smit is a EMEA Cloud Solution Architect at Insight.de and is a current Microsoft MVP Cloud and Datacenter as of 2009. Robert has over 20 years experience in IT with experience in the educational, health-care and finance industries. Robert’s past IT experience in the trenches of IT gives him the knowledge and insight that allows him to communicate effectively with IT professionals. Follow him on Twitter at @clusterMVP
Marc Lelijveld is a Data Platform MVP, Power BI enthusiast, and public speaker who is passionate about anything which transforms data into action. Currently employed as a Data & AI consultant in The Netherlands, Marc is often sharing his thoughts, experience, and best-practices about Microsoft Data Platform with others. For more on Marc, check out his blog.
Chris Hoard is a Microsoft Certified Trainer Regional Lead (MCT RL), Educator (MCEd) and Teams MVP. With over 10 years of cloud computing experience, he is currently building an education practice for Vuzion (Tier 2 UK CSP). His focus areas are Microsoft Teams, Microsoft 365 and entry-level Azure. Follow Chris on Twitter at @Microsoft365Pro and check out his blog here.
Asma Khalid is an Entrepreneur, ISV, Product Manager, Full Stack .Net Expert, Community Speaker, Contributor, and Aspiring YouTuber. Asma counts more than 7 years of hands-on experience in Leading, Developing & Managing IT related projects and products as an IT industry professional. Asma is the first woman from Pakistan to receive the MVP award three times, and the first to receive C-sharp corner online developer community MVP award four times. See her blog here.
This article is contributed. See the original author and article here.
Hi IT Pros,
Today we discuss about preparing our MD for Endpoint on Organization’s MacOS Systems and make them ready for “Big Sur”, the greatest and latest version of Mac operating system which is released by Apple on the 12th of November, 2020. Big Sur enhance MDM (Mobile Device Management) protocol as key for automated device enrollment, content caching and managing apps. Big Sur’s code running process has been moved from kernel extensions (KEXTs) to system extensions for security reason.
Microsoft Endpoint Manager now supports the following new device configurations on MacOS Big Sur :
Non-OS software updates deferral
“Enable direct download” setting for associated domains · 4096-bit SCEP certificate keys
Prevent users from disabling automatic VPN
Excluded Domains for per-app VPN connections
For Microsoft Defender for Endpoint (WD ATP), Microsoft released an update to Microsoft Defender for Endpoint MacOS that will leverage new system extensions instead of kernel extensions with the following details:
An update to the Microsoft Defender ATP for Mac agent is required on all eligible macOS devices prior to moving these devices to macOS 11.
The update is applicable to devices running macOS version 10.15.4 or later.
To ensure that the Microsoft Defender ATP for Mac update is delivered and applied seamlessly from an end-user experience perspective, a new remote configuration must be deployed to all eligible macOS devices before Microsoft publishes the new agent version.
If the configuration is not deployed prior to the Microsoft Defender ATP for Mac agent update, end-users will be presented with a series of system dialogs asking to grant the agent all necessary permissions associated with the new system extensions.
Even though Microsoft Defender ATP for Mac new implementation based on system extensions is only applicable to devices running macOS version 10.15.4 or later, deploying configuration proactively across the entire macOS fleet will have two benefits:
ensure that even down-level devices are ready for macOS 11 Big Sur upgrade
ensure that Microsoft Defender ATP for Mac continues protecting all macOS devices regardless OS version they were running prior to the Big Sur upgrade.
New configuration profiles for macOS Catalina and newer versions of macOS
You could deploy the Configuration Profile Policies by JAMF or Microsoft Endpoint Manager as your deployment tool. There are Configuration Profiles and Preference Control Policy that need to be deployed:
System Extension configuration profile
Privacy Preferences Policy Control, granting Full Disk Access to the Microsoft Defender ATP Endpoint Security Extension
Network Extension configuration profile
Option 1: JAMF Deployment
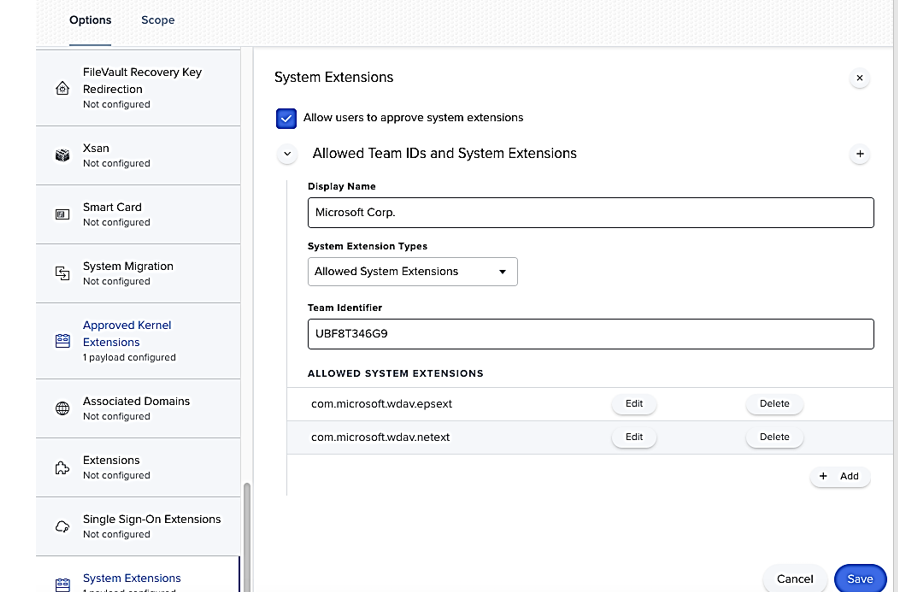
System Extension configuration profile
In Computers > Configuration Profiles select Options > System Extensions.
Select Allowed System Extensions from the System Extension Types drop-down list.
Use UBF8T346G9 for Team Id.
Add the following bundle identifiers to the Allowed System Extensions list:
com.microsoft.wdav.epsext
com.microsoft.wdav.netext
Privacy Preferences Policy Control
Add the following JAMF payload to grant Full Disk Access to the Microsoft Defender ATP Endpoint Security Extension. This policy is a pre-requisite for running the extension on your device.
Use com.microsoft.wdav.epsext as the Identifier and Bundle ID as Bundle type.
Set Code Requirement to identifier “com.microsoft.wdav.epsext” and anchor apple generic and certificate 1[field.1.2.840.113635.100.6.2.6] /* exists */ and certificate leaf[field.1.2.840.113635.100.6.1.13] /* exists */ and certificate leaf[subject.OU] = UBF8T346G9
Set App or service to SystemPolicyAllFiles and access to Allow.
Network Extension Policy
As part of the Endpoint Detection and Response capabilities, Microsoft Defender ATP for Mac inspects socket traffic and reports this information to the Microsoft Defender Security Center portal. The following policy allows the network extension to perform this functionality.
Note
JAMF doesn’t have built-in support for content filtering policies, which are a pre-requisite for enabling the network extensions that Microsoft Defender ATP for Mac installs on the device. Furthermore, JAMF sometimes changes the content of the policies being deployed. As such, the following steps provide a workaround that involve signing the configuration profile.
Save the following content to your device as com.microsoft.network-extension.mobileconfig using a text editor:XML
<string>identifier “com.microsoft.wdav.netext” and anchor apple generic and certificate 1[field.1.2.840.113635.100.6.2.6] /* exists */ and certificate leaf[field.1.2.840.113635.100.6.1.13] /* exists */ and certificate leaf[subject.OU] = UBF8T346G9</string>
</dict>
</array>
</dict>
</plist>
Verify that the above file was copied correctly by running the plutil utility in the Terminal:
From the JAMF portal, navigate to Configuration Profiles and click the Upload button. Select com.microsoft.network-extension.signed.mobileconfig when prompted for the file.
Option 2: Endpoint Manager Deployment
System Extensions Policy
To approve the system extensions:
In Intune, open Manage > Device configuration. Select Manage > Profiles > Create Profile.
Choose a name for the profile. Change Platform=macOS to Profile type=Extensions. Select Create.
In the Basics tab, give a name to this new profile.
In the Configuration settings tab, add the following entries in the Allowed system extensions section:
Bundle identifier
Team identifier
com.microsoft.wdav.epsext
UBF8T346G9
com.microsoft.wdav.netext
UBF8T346G9
In the Assignments tab, assign this profile to All Users & All devices.
Review and create this configuration profile.
Create and deploy the Endpoint Manager Custom Configuration Profile for MacOS Network Extension, Full Disk Access Policies
The following configuration profile enables the network extension and grants Full Disk Access to the Endpoint Security system extension.
Save the following content to a file named sysext.xml:
<string>identifier "com.microsoft.wdav.netext" and anchor apple generic and certificate 1[field.1.2.840.113635.100.6.2.6] /* exists */ and certificate leaf[field.1.2.840.113635.100.6.1.13] /* exists */ and certificate leaf[subject.OU] = UBF8T346G9</string>
<string>identifier “com.microsoft.wdav.epsext” and anchor apple generic and certificate 1[field.1.2.840.113635.100.6.2.6] /* exists */ and certificate leaf[field.1.2.840.113635.100.6.1.13] /* exists */ and certificate leaf[subject.OU] = UBF8T346G9</string>
<key>IdentifierType</key>
<string>bundleID</string>
<key>StaticCode</key>
<integer>0</integer>
<key>Allowed</key>
<integer>1</integer>
</dict>
</array>
</dict>
</dict>
</array>
</dict>
</plist>
Verify that the above file was copied correctly. From the Terminal, run the following command and verify that it outputs OK:
Bash
$ plutil -lint sysext.xml
sysext.xml: OK
To deploy this custom configuration profile: > In Intune, open Manage > Device configuration. Select Manage > Profiles > Create profile.
Choose a name for the profile. Change Platform=macOS and Profile type=Custom. Select Configure.
> Open the configuration profile and upload sysext.xml. This file was created in the preceding step.
Select OK.
> In the Assignments tab, assign this profile to All Users & All devices.
> Review and create this configuration profile.
After this point, your environment is ready for MacOS devices to be upgraded to Big Sur, the MacOS newest version. MD for Endpoint on MacOS Devices will continue functioning normally after a successful OS upgrade.


Recent Comments