
by Contributed | Apr 1, 2021 | Technology
This article is contributed. See the original author and article here.
The Problem
Have you ever heard this from a client or colleague?
“I have a list of data on this one site that I need to move to another site.”
Just a simple list of data that they want moved from Site A to Site B. For such a simple request, the solution has, historically, always been anything but simple.
Until now! Thanks to PnP PowerShell, we can handle this request in 5 lines of PowerShell!
The Setup
Aside from the obvious set of SharePoint sites and a list, the only real prerequisite is to make sure you have PnP PowerShell installed.
This blog is running the newer PnP.PowerShell module, which I highly recommend you jump over to.
You can use the link from the introduction for the full instructions, or you can open up PowerShell and…
Install-Module -Name PnP.PowerShell
The Solution
In a previous blog post, we walked through the process of creating custom view formats to create a pretty nifty dashboard full of cards about members of the Fellowship of the Ring.
For the sake of this example, let’s pretend I made a mistake (which never happens IRL), and I put that list on the wrong site.
The solution is pretty straightforward. We’re basically going to create a PnP site template, add our list data to it, and then apply that template to our target site.
Step 1 – Connect to the Source Site
The first thing we’ll do is connect to the source site.
Connect-PnPOnline -Url https://constoso.sharepoint.com/sites/star-wars -Interactive
Step 2 – Create the Template
We actaully have two lists we need to copy. Fellowship Members is the list we care about but, since it contains a lookup column, we need to grab the Middle Earth Locales lookup list as well.
Get-PnPSiteTemplate -Out Lists.xml -ListsToExtract “Middle Earth Locales”, “Fellowship Members” -Handlers Lists
Step 3 – Get the List Data
We’ll use the Add-PnPDataRowToSiteTemplate cmdlet to populate our list instances with actual list item. Because we have two lists, we need to run the cmdlet twice. (So, technically, I guess we’re doing 6 lines of PowerShell. Shh!)
Add-PnPDataRowsToSiteTemplate -Path Lists.xml -List “Middle Earth Locales”
Add-PnPDataRowsToSiteTemplate -Path Lists.xml -List “Fellowship Members”
Step 4 – Connect to Target Site
Now we connect to the target site…
Connect-PnPOnline -Url https://constoso.sharepoint.com/sites/lotr -Interactive
Step 5 – Apply the Template
…and we apply our template using the Invoke-PnPSiteTemplate cmdlet.
Invoke-PnPSiteTemplate -Path Lists.xml
Game Over
Now you’ve got your list(s), complete with data, copied over to another site. All that’s left to do is get rid of the old one, if necessary.

by Contributed | Apr 1, 2021 | Technology
This article is contributed. See the original author and article here.
We are back to announce the release of Update Rollup 3(UR3) for System Center Operations Management 2019! UR3 comes fully loaded with extended auditing capabilities, performance improvements, Linux monitoring enhancements and web console improvements. Let’s dig into each of these aspects below.
Extended auditing capabilities
Operations Manager 2019 UR3 includes updates to the change tracking feature for management packs that was well received by our customers in UR2.For SCOM customers with large scale environments it is critical to be able to quickly identify root causes for issues caused due to changes done by any user in SCOM .The change tracking feature provides auditing capabilities for management packs that allows customers to track WHAT changes are done by WHOM and WHEN? This feature has been further rounded off to now support tracing of agents (windows or Linux agents) and the ability to track monitor health reset related actions. There are 2 new reports created in SCOM that show these changes.
- The Agent tracking report gives details on the actions such as install/uninstall/repair/upgrade carried out on Windows or Linux agents. A sample report can be seen below:

- Monitor Health Reset Tracking Report: Change tracking for monitor health reset is the next addition made in UR3. You can see health reset actions on the monitors as a consolidated view under Reports via the Monitor Health Reset Tracking report.

Users can export both the new reports as an Excel, PDF, Notepad and edit the exported content if needed. The reports can also be filtered by date/time, username, and monitor name.
Other enhancements to the change tracking feature include the ability to customize when and how the change tracking data from the Operations Manager DB is synced to the Data Warehouse, this helps in ensuring the DB performance is optimized and data is being stored for the appropriate periods of time based on legal requirements and Data Warehouse sizing . Customers can override the default values for synchronization of change tracking data in Data Warehouse and also customize the parameters of the groom change tracking data workflow through the Data Warehouse Job Status Information Grooming rule based on their specific needs.
Performance Improvements in SCOM
Operations Manager 2019 UR3 also comprises many performance improvements which has been one of the key focus areas for SCOM. Load time of the windows computer view in the operations console and load time of views when any changes are made to a user’s role privileges have been vastly improved by optimizing the relevant SQL queries.
In the past lack of grooming of maintenance mode staging table in Data Warehouse was leading to the increase in utilization of the database that was found to cause decrease in performance of the operations manager’s console. With the Operations Manager 2019 UR3, an index has been added to the maintenance mode staging table that facilitates the efficient grooming of this table leading to performance improvements of the operations console.
Linux Monitoring enhancements
We also continue to invest in enhancing the cross-platform monitoring capabilities of SCOM to cater to the rapidly increasing diverse environments of customers. Cross-platform related enhancements include support for RHEL 6 via the RHEL6 management pack and TLS 1.2 support for Solaris 10 SPARC in UR3. Reliability and performance improvements have correspondingly been added to the Linux agent, for example in earlier releases changes to log-level settings of OMI processes required an agent restart, in UR3 log-level settings can now be changed without the need for restarting the agent .In addition filters have been introduced in the Linux management pack to help users customize the discovery and monitoring scope of the entities of interest.
Last but not the least additional view options in web console widgets have been added and you can now sort the results columns in the Alert widget and State widget, along with being able to group the columns.
Additionally, fixes for critical defects continue to be a part of UR3. Find more details at the following link:
KB Article- Update Rollup 3 (UR3) for System Center 2019 Operations Manager. For the details of features that are released in Update Rollup 3, see the following Microsoft Docs article: What’s New in System Center Operations Manager 2019 Update Rollup 3. We sincerely hope you enjoy the SCOM 2019 Update Roll up 3. Upgrade Now!
by Contributed | Apr 1, 2021 | Technology
This article is contributed. See the original author and article here.
One of the huge advantages of using Microsoft Defender for Identity to help protect your on-premises identities from advanced attacks, is that new detections, features and improvements are being added all the time. After some recent updates, we thought that we’d take some time to properly introduce one of these new detections and give it the attention it deserves!
The alert in today’s update covers a notorious attack method that was requested by many of our customers and security partners. It addresses an attack technique that we’ve seen become more and more popular – AS-REP Roasting.
What is AS-REP Roasting?
In short, AS-REP Roasting is an attack against Kerberos that targets users that do not require Kerberos pre-authentication.
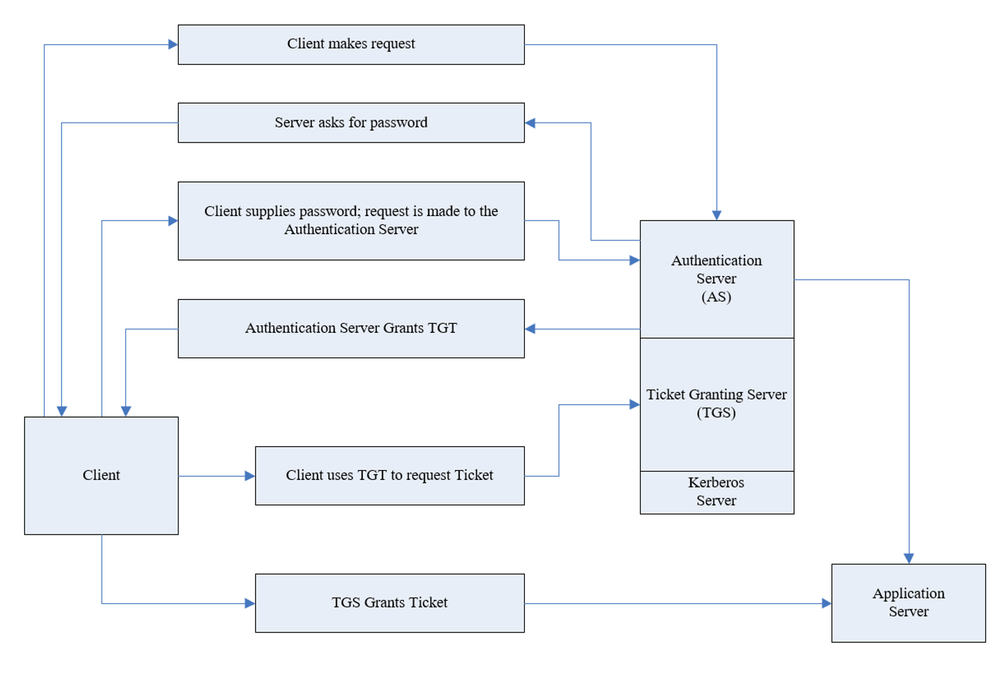
To understand what AS-REP Roasting is, we need to start with simple explanation about what Kerberos is and how it works.
Kerberos is authentication protocol that works based on tickets and this is its basic flow:

As part of the authentication request sent (AS-REQ), the user will provide their password that encrypts the timestamp. The domain controller will attempt to decrypt it and validate that the right password was used. If the request is granted, the user will be issued with a ticket-granting ticket (TGT) that will be used for future authentication. However, there is an attribute in Active Directory that facilitates disabling pre-authentication for users in the organization. Although this attribute is required by default in Active directory, this can be changed freely.
The typical attack vector in this scenario is to enumerate users that have the attribute turned off and then ask for TGT for these users. The TGT allows a potential attack to crack the password offline.

Covering all of the bases…
Microsoft Defender for Identity can help protect against these kinds of threats in different ways. Let’s dive in to each of these approaches:
Prevention
Defender for Identity allows you to pre-emptively protect against this kind of method using our Security Assessments. If you are not familiar with our security assessments, check out our docs pages for a summary of how you can help prevent threats before they happen.
In short, Defender for Identity offers proactive identity security posture assessments to detect misconfigurations or legacy settings that may not have been reviewed in a long time. Suggested improvement actions are then given to bolster your identity posture across your on-premises Active Directory. One of these assessments is “Unsecure account attributes”. This assessment continuously monitors your environment to identify accounts with attribute values that expose a security risk – including Kerberos pre-authentication. Click here to learn more about this assessment

Detections
Aside from the preventative nature of the assessments that have been covered above, we offer two detections to help identify this type of attack – 1) the reconnaissance phase and 2) the actual ticket granting ask for future brute force usage.
The reconnaissance portion often involves the attacker preforming enumeration techniques to find users that have the pre-authentication attribute turned off. If the reconnaissance was performed with LDAP it will result in triggering Active Directory attributes reconnaissance (LDAP) alert. This alert triggers when certain attributes are enumerated.

The new detection we are announcing today, Suspected AS-REP Roasting attack helps identify AS-REQ messages without encrypted timestamps and AS-REP messages with TGT data.

This comprehensive protection against AS-REP roasting style attacks will be available in Defender for Identity starting from version 2.141. Try it out for yourselves, and as always, we’d love to hear your feedback on this new feature.
by Contributed | Apr 1, 2021 | Technology
This article is contributed. See the original author and article here.
As you know, the Azure CLI already AI-build in with the az find command, and you might have seen the great feature like AI-powered PowerShell module called Az Predictor Module (Azure PowerShell Predictions), which does what the name says, predict PowerShell commands. Now with az next, the team also brought a similar feature to the Azure CLI. The team’s goal with az next is to guide users through their scenarios or sequence of jobs-to-be-done in tool, so that they could remain focused and avoid unnecessary external documentation searches.
Az next adopts our latest design guidelines and should help making the Azure CLI more approachable for all users, including beginners.
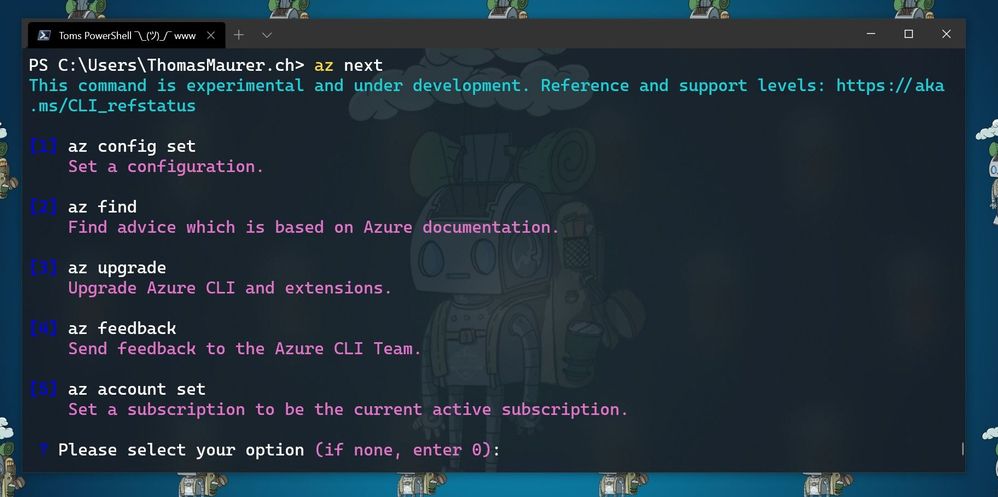
There are two scenarios in which are currently supported. The first one is a simple walkthrough for the next commands as soon as you execute az next. After that, the Azure CLI will return set of command options, which are highly likely to come after your last command. This is super helpful if you are running a sequence of commands, the Azure CLI will provide you with predictive recommendations.
Here for example, the commands after I ran az login and logged in into my Azure environment, followed by az next.
az next after az login
The second one is the end-to-end scenario walkthrough with the aim to help you achieve a specific scenario in mind. In these case the options show up in form of a summary instead of an explicit command, and the tool will guide you through individual command completion.
 az next after creating a resource group
Getting started with az next
To get started with az next, you can simply start using the preview by downloading the latest Azure CLI. You can log issues or feature requests in our GitHub repo: GitHub – Azure/azure-cli: Azure Command-Line Interface
Configure az next
The first time you run az next, you will be prompted to install the Azure CLI extension.
 Install Az next
If your Azure CLI doesn’t automatically ask to install the extension. you can run the following command:
az extension add -n next
Now you can configure az next, to switch between the different modes and experiences.
Set a non-interactive experience:
az config set next.execute_in_prompt = False
Set the options to be more elaborated with parameters
az config set next.show_arugments = True
For additional customization
az next –-help
Learn more
To learn more, check out the full announcement blog for the az next command here on Tech Community.
If you want to learn more about the Az Predictor Module and PowerShell Predictive IntelliSense, check out my blog posts:
by Contributed | Mar 31, 2021 | Technology
This article is contributed. See the original author and article here.
We have released a new early technical preview of the JDBC Driver for SQL Server which contains a few additions and changes.
Precompiled binaries are available on GitHub and also on Maven Central.
Below is a summary of the new additions and changes.
Added
- Added Open Connection Retry feature #1535
- Added server recognition for Azure Synapse serverless SQL pool, and Azure SQL Edge #1543
Fixed
- Fixed potential integer overflow in TDSWriter.writeString() #1531
Getting the latest release
The latest bits are available on our GitHub repository, and Maven Central.
Add the JDBC preview driver to your Maven project by adding the following code to your POM file to include it as a dependency in your project (choose .jre8, .jre11, or .jre15 for your required Java version).
<dependency>
  <groupId>com.microsoft.sqlserver</groupId>
  <artifactId>mssql-jdbc</artifactId>
  <version>9.3.0.jre11</version>
</dependency>
Help us improve the JDBC Driver by taking our survey, filing issues on GitHub or contributing to the project.
Please also check out our
tutorials to get started with developing apps in your programming language of choice and SQL Server.
David Engel


Recent Comments