by Contributed | Apr 26, 2021 | Technology
This article is contributed. See the original author and article here.
Millions of developers use GitHub daily to build, ship, and maintain their software – but software development isn’t performed in silos and require open communication and collaboration across teams. Microsoft Teams is one of the key tools that developers use for their collaboration needs, so it was important that the integration of our platforms provide a seamless, connected experience. Context switching is a drain on productivity and stifles the flow of work, which is why the GitHub integration in Teams is so important – as it gives you and your team full line of sight into your GitHub projects without having to leave Teams. Now, when you collaborate with your team, you can stay engaged in your channels and ideate, triage issues, and work together to move your projects forward.
GitHub has made tremendous updates refreshing the integration – with public preview last September and recently with general availability of the app last month. Many in the developer community have been looking forward to the updates in the new GitHub app, which they’ve experienced on other collaboration platforms, and so we’re excited to share some of new features and the existing capabilities you can experience today.
New support for personal app and scheduling reminders
Since the public preview launch of the GitHub app last September, we’ve made some great updates on a couple key areas. First, we’ve added support for the personal app experience and secondly, we’ve added capabilities to support scheduling reminders for pending pull requests.
Personal app experience
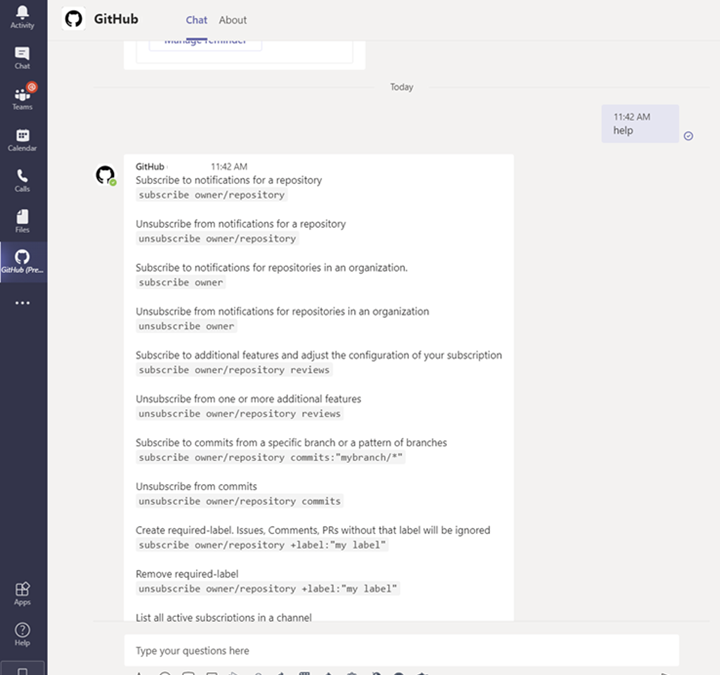
As part of personal app experience, you can now subscribe to your repositories and receive notifications for:
- issues
- pull requests
- commits
All the commands available in your channel are now available on your personal app experience with the GitHub app.
 Image showing subscription experience within the personal app view
Schedule reminders
You can now schedule reminders for pending pull requests. With this feature you can now get periodic reminders of pending pull requests as part of your channel or personal chat. Scheduled reminders ensure your teammates are unblocking your workflows by providing reviews on your pull request. This will have an impact on business metrics like time-to-release for features or bug fixes.
 Image showing user setting up scheduled reminders within the GitHub Teams app
From your Teams channel, you can run the following command to configure a reminder for pending pull requests on your Organization or Repository:
@github schedule organization/repository
This will create reminder for weekdays at 9.30 AM. However, if you want to configure the reminder for a different day or time, you can achieve that by passing day and time with the below command:
@github schedule organization/repository <Day format> <Time format>
Learn more about channel reminders.
You can also configure personal reminders in your personal chats, as well, using the below command:
@github schedule organization
Stay notified on updates that matter to you through subscriptions
Subscriptions allow you to customize the notifications you receive from the GitHub app for pull request and issues. You can use filters to create subscriptions that are helpful for your projects, without the noise of non-relevant updates – and you can create these in channels or in the personal app.
Subscribing and Unsubscribing
You can subscribe to get notifications for pull requests and issues for an Organization or Repository’s activity.
@github subscribe <organization>/<repository>
 Image showing user subscribing to a specific organization and repository via GitHub app
To unsubscribe to notifications from a repository, use:
@github unsubscribe <organization>/<repository>
Customize notifications
You can customize your notifications by subscribing to activity that is relevant to your Teams channel and unsubscribing from activity that is less helpful to your project.
@github subscribe owner/repo
Learn more about subscription notifications on the GitHub app.
Use threading to synchronize comments between Teams and GitHub
Notifications for any pull request and issue are grouped under a parent card as replies. The parent card always shows the latest status of the pull request/issue along with other meta-data like description, assignees, reviewers, labels, and checks. Threading gives context and helps improve collaboration in the channel.
 Image showing pull request card staying updated with latest comments and information
Make your conversations actionable
Stay in the flow of work by making the conversations you have with your teammates on GitHub actionable. You can use the app to create an issue, close or reopen an issue, or leave comments on issues and pull requests.
With the GitHub app, you can perform the following:
- Create issue
- Close an issue
- Reopen and issue
- Comment on issue
- Comment on pull request
You can perform these actions directly from the notification card in the channel by clicking on the buttons available in the parent card.
 Image of a GitHub pull request notification on a card and the user from Teams commenting
More to come!
We’re excited for you to use these new and existing features as you continue to build world-class software and services – and we’re equally excited to see the growth and evolution of the app in the future. If you haven’t already installed the GitHub app for Teams, you can easily do so today to get started.
Happy coding!
by Contributed | Apr 26, 2021 | Technology
This article is contributed. See the original author and article here.
By John Mighell, Sr. Product Marketing Manager, Viva Learning Marketing Lead
Since we announced Microsoft Viva in February, we’ve heard consistently from customers, industry analysts, and our own internal users how important learning is to them. Everyday we hear examples of creative learning – not just as an important aspect of personal and professional growth – but also as an avenue for social engagement, helping people feel more connected in a largely virtual work environment. These scenarios are top of mind as we get closer to launching Viva Learning – a central hub for learning in Microsoft 365 where people can discover, share, recommend, and learn from best-in-class content libraries to help teams and individuals make learning a natural part of their day.
At Microsoft Ignite in March, we shared a new set of product features and admin capabilities, derived from our private preview customer feedback and internal use scenarios. With this feedback we’re continuing to build Viva Learning to seamlessly integrate learning into the tools you already use everyday – you can share learning via chat, pin learning content in existing Teams channels, recommend learning, see all your available learning sources in a personalized view, search across available sources, and so much more.
As we strive to build a product that facilitates an organization’s learning culture by bringing learning into the flow of work, we’re thrilled to announce today we’re ready to take the next step in that journey.
Viva Learning enters public preview today
There are a few items to keep in mind as we kick off public preview:
Eligibility
Viva Learning public preview is open to all organizations with paid subscription access to Microsoft Teams, with the exception of Education or Government customers. We’ll have additional information to share when Viva Learning is available to those audiences in the future.
Approval from your IT admin
Public preview onboarding requests should either come from your IT admin directly or have the support of your IT admin. In the Teams Admin Center, your IT admin will have the ability to configure who within your organization has access to the Viva Learning app in preview – this can range from the entire organization to just a small subset of users.
Onboarding timelines
We expect a high volume of public preview requests and will manage requests as they come in through a rolling onboarding process. Expect it to take a few weeks from request submission to tenant activation.
Product features in preview
As with any product in preview or beta stages, please be aware that we are still hard at work building the final version. The preview product will not initially include all the features that will be available at product general availability. We will roll out additional features to our preview customers continually as we lead up to general availability later this year.
Submitting feedback
As you start to use Viva Learning we want to hear your feedback! Please use the “Help” button in Teams (bottom of the left nav rail) and select either “Suggest a feature” or “Report a problem”

How to sign up for Viva Learning public preview
Once you’ve read through the 5 items above, you’re ready to get started. The public preview request process is simple and should only take you a few minutes:
1. Gather required information
To activate the Viva Learning preview for your Microsoft 365 tenant we need the tenant ID your organization uses to login to Teams (has AAD users associated), and the type of SKU your organization is currently licensed with. You will need that information to accurately fill out the form linked below.
2. Submit your request
Complete our onboarding request form with the required information. Completing this form should take about 5 minutes.
3. Next steps
After submitting your request, please stay tuned for a confirmation email within 24 business hours. Later, you will receive a notification email once your tenant is activated which will include setup and usage documentation. We will keep you posted using the vivalp@microsoft.com alias. Please add this alias to your Safe Senders list in Outlook (Home → Junk → Junk E-mail Options → Safe Senders). Please do not send emails directly to this alias.
Looking ahead
We will have additional important updates, features, and news on Viva Learning in the coming weeks and months. Don’t forget to visit aka.ms/VivaLearning and click “sign up for updates” to receive the latest customer and partner updates as they become available.
by Contributed | Apr 26, 2021 | Technology
This article is contributed. See the original author and article here.
Many ISVs today are developing on the AKS platform and looking to take advantage of the flexibility that the Kubernetes platform provides to run multiple workloads in a shared cluster environment. There are many benefits to this approach including cost, management, and performance.
However, many customers have concerns around how to run their workloads in a shared Kubernetes environment while ensuring that they maintain a secure and performant runtime environment for their tenants. In this video we’ll cover some of the considerations you’ll need to take into consideration for your AKS solution as well as some of the Kubernetes primitives that will help you achieve a successful multi-tenant deployment.
For more information on the topics covered in this video please refer to the following docs:
AKS
Kubernetes
Please let us know in the comments what you think, and if you have any questions!
by Contributed | Apr 26, 2021 | Technology
This article is contributed. See the original author and article here.
Welcome to the April update of Java Azure Tools! This blog series provide updates for all the Azure tooling support we are providing for Java users, covering Maven/Gradle plugins for Azure, Azure Toolkit for IntelliJ/Eclipse and Azure Extensions for VS Code. Follow us and you will get more exciting updates in the future blogs.
If you use Azure with Java apps deployed either on VM, on App Service, on AKS or on-premise, you probably store application data on Azure as well using data services like the Azure Database for MySQL. The Azure Toolkit for IntelliJ 3.50.0 release brings this brand new experience in IntelliJ on connecting your Java app with Azure Database for MySQL. We will also show you how to deploy the app seamlessly to Azure Web Apps with the database connection.
In brief, the Azure Toolkit for IntelliJ can manage your Azure database credentials and supply them to your app automatically through:
- If running the app locally: Environment variables through a before launch task named “Connect Azure Resource”.
- If running the app on Azure Web Apps: App Setting deployed along with the artifact.
Check out the showcase GIF below and detail steps will be explained in later sections.
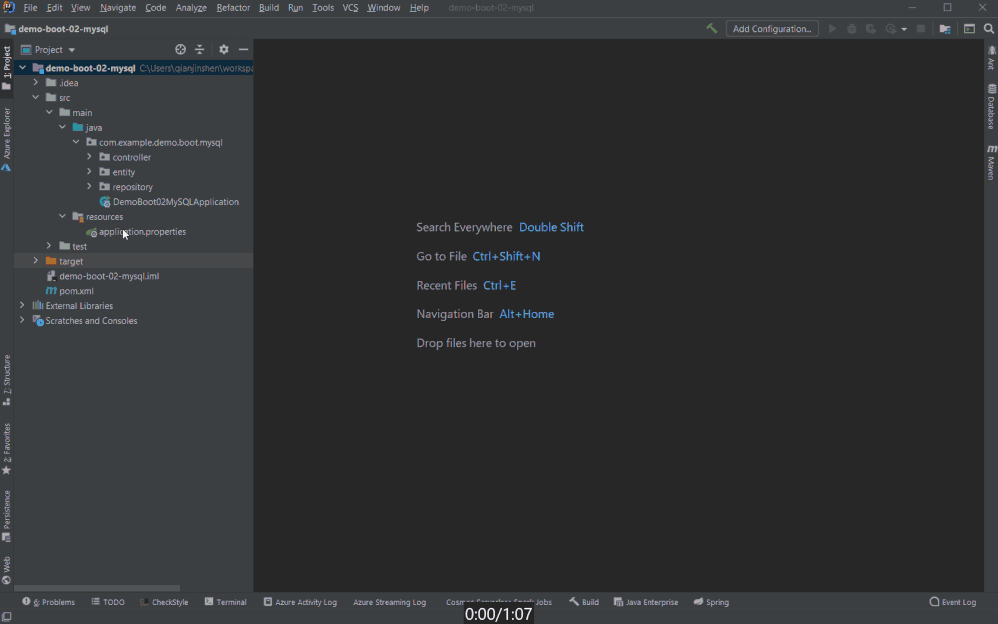
Create an Azure Database for MySQL
let’s start from creating an Azure Database for MySQL server instance. You can either follow the steps here right from your Azure Toolkit for IntelliJ plugin or with any other tools like Azure Portal.
- Right-click on the Azure Database for MySQL node in the Azure Explore, select Create and then select More settings to open the wizard shown in image below.
- (Optional) Customize the resource group name and server name.
- Choose a location you prefer, here we use West US.
- Specify admin username and password.
- Select the two checkboxes in the Connection security section. This step will automatically add corresponding IP whitelist rules to the firewalls protecting your MySQL server.
- Click OK.

The background operation can take a few minutes to complete. After that you can refresh the Azure Database for MySQL node in the Azure Explore, right-click on the server you just created and select Show Properties for some key information listed. If you are using IntelliJ IDEA Ultimate version, select Open by Database Tools will connect the MySQL server to the database tools embedded.

Connect with your local project
Here we use a sample Spring Boot project called PetClinic. You can also try this with your own project consuming MySQL.
- Clone the project to your dev machine and import with IntelliJ IDEA.
git clone https://github.com/spring-projects/spring-petclinic.git
- Enable MySQL profile by adding
spring.profiles.active=mysql in the application.properties.
- Connect to the MySQL server using MySQL Workbench or MySQL CLI for example:
mysql -u <admin name>@<mysql server name> -h <mysql server name>.mysql.database.azure.com -P 3306 -p --ssl
- Run the commend in resources/db/mysql/user.sql on the MySQL server to create the petclinic database and user.
- In Azure Explorer, right-click on the MySQL server you created and select Connect to Project to open the wizard below. Select the petclinic database, specify password and select Until restart for to save the password for this IDE session. Then you can click Test Connection below to verify connection from your IDE. Then click OK.

- Open application-mysql.properties, comment out the original spring.datasource.url/username/password. Type those properties again and accept the autocomplete suggestion with Connect to Azure Datasource.

# database init, supports mysql too
database=mysql
#spring.datasource.url=${MYSQL_URL:jdbc:mysql://localhost/petclinic}
#spring.datasource.username=${MYSQL_USER:petclinic}
#spring.datasource.password=${MYSQL_PASS:petclinic}
spring.datasource.url=${AZURE_MYSQL_URL}
spring.datasource.username=${AZURE_MYSQL_USERNAME}
spring.datasource.password=${AZURE_MYSQL_PASSWORD}
# SQL is written to be idempotent so this is safe
spring.datasource.initialization-mode=always
- Run the application by right-clicking on the PetClinicApplication main class and choosing Run ‘PetClinicApplication’. This will launch the app locally with the MySQL server on Azure connected.
Deploy the app seamlessly to Azure Web Apps
Once you have finished all the steps above, there is no extra steps to make the database connect also works on Azure Web Apps. Just follow the ordinary steps to deploy the app on Azure: Right-click on the project and select Azure->Deploy to Azure Web Apps. You can also see the before launch task “Connect Azure Resource” added here, which will upload your database credentials as App Settings to Azure. Therefore, after click Run and wait for the deployment to complete you will see the app working on Azure without any further configuration.

Try our tools
Please don’t hesitate to give it a try! Your feedback and suggestions are very important to us and will help shape our product in future.
by Contributed | Apr 26, 2021 | Technology
This article is contributed. See the original author and article here.
It is very important to keep updating your Exchange Servers to a supported Cumulative Update (CU). Simply put, your on-premises environments should always be ready to take an emergency security update (this applies to Exchange, Windows, and other Microsoft products you use on-premises). One thing we learned during the March 2021 release of Exchange Server security updates is that many of our customers were not ready to install security updates because they were not on supported cumulative update versions. With the threat landscape rapidly evolving, the importance of keeping your environment current should not be underestimated.
Please keep your Exchange Servers up to date. We want to continue helping you keep your environment secure, and this means your Exchange servers need to be up to date. This is a continuous process.
Once your Exchange servers are running a supported CU, ensure that the latest available Security Update (SU) is also installed. This will help address any vulnerabilities found since the release of the supported CU. To find recently released Exchange Server SUs, go to the Security Update Guide (filter on Exchange Server under Product Family). Exchange Server security updates are cumulative (an update released in April will also contain security fixes released in March, for example). We also announce all major updates on our blog.
We have prepared a set of questions and answers that cover what we hear most often about Exchange updates. If you are running into a different set of challenges keeping your environment up to date, please let us know in comments below!
Q&A
I updated my Exchange Servers a few months ago! How come they are ‘not supported’ today?
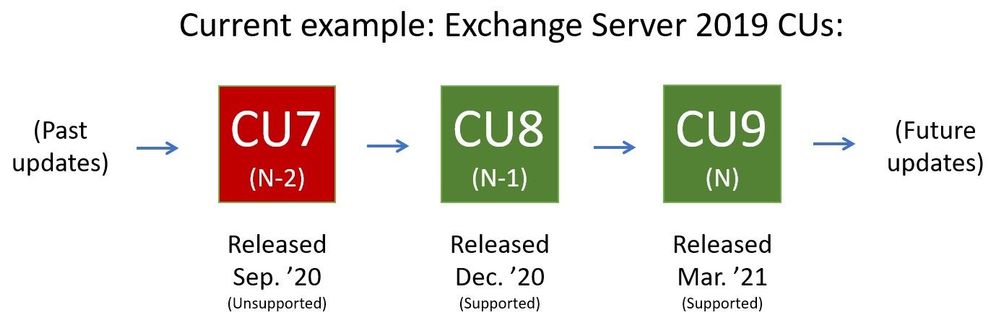
For versions of Exchange that are within mainstream support (see product lifecycle), Microsoft supports (releases relevant security fixes for) the two latest CUs. Sometimes the latest two CUs are referred to as “N and N-1”. As a current example, if the latest released CU is CU9 (‘N’), and the server version is Exchange Server 2019, then Microsoft at this time supports two Exchange Server 2019 CUs, N and N-1 (CU9 and CU8). When CU10 is released, the “supported CU window” will slide toward the newly released CU10 (and what used to be the N-1 supported CU, CU8, will become unsupported).
Why does Microsoft release updates so often?
It is good that updates are released when issues are found. Microsoft (and other software vendors) release updates only when they are needed. CUs typically contain resolutions to feature problems that were reported to us by our customers (and can contain security updates from previous SUs) and are released quarterly. SUs are released only when actual security issues are found and fixed, and are typically released on a ‘patch Tuesday’. Let’s take an example of how a typical release flow for two CUs and two SUs we might release would look like:
- On a particular month (let’s say March), we might release CU4; CU4 is cumulative and will include fixes and updates from before.
- A month later we release CU4 SU1, a security update for CU4.
- In May we then release CU4 SU2, an additional security update for CU4. CU4 SU2 will include updates released in CU4 SU1 also.
- In June we release CU5, which will contain all updates released up to that point.

My Exchange Servers are working as expected, so why update them?
While we appreciate the ‘don’t fix what is not broken’ thinking, the reality is that keeping Exchange Server current allows you to ensure that it will keep working without major interruptions to functionality. Investing some time into Exchange Server maintenance (on your planned schedule) will give you a long-term benefit of well running system, with code as protected from vulnerabilities as you can get it.
Updating Exchange Server seems complicated; what exactly do I do?
Think of updating Exchange server in several stages:
- Take inventory: use the Exchange Server Health Checker script on GitHub to see if you are behind on your on-premises Exchange Server updates.
- Install updates: visit https://aka.ms/ExchangeUpdateWizard and choose your currently running CU and your target CU. Then click the “Tell me the steps” button, to get a list of steps to follow.
- Troubleshoot (if needed): follow the ExchangeUpdateWizard instructions and best practices for installation of updates carefully, including when to use an elevated command prompt. If you encounter errors during or after installation, see Repair failed installations of Exchange Cumulative and Security updates.
Why did Microsoft suddenly start releasing Exchange Server security updates?
Releasing security updates for Exchange Server is not new. Microsoft has been releasing Exchange Server updates on ‘patch Tuesday’ for years (when issues are found). Keeping up with these updates is a best practice.
How can I update Exchange Server when (insert 3rd party application name here) does not support either of the latest supported Exchange Server CUs?
Work with your 3rd party vendor to bring their software current in a timely manner. Consider that your Exchange environment contains a lot of valuable company directory and messaging information. Your priority should be to keep your environment as secure as possible.
How can we stay current when we are a 24×7 business and have no time to take our servers down for maintenance?
Many customers require Exchange Server to work 24×7. In fact, our update process is designed for these high-demand businesses. You should use Database Availability Groups (DAGs) and put servers that you are updating in Maintenance mode to enable a graceful and non-disruptive update process for your users. See Performing maintenance on DAG members for more information.
If we are in Hybrid mode and don’t actively use our on-premises Exchange Server, do we still need to stay current?
Even if you are only using Exchange Server on-premises to manage Exchange-related objects, you need to keep the server current. Note that the Hybrid Configuration Wizard (HCW) does not need to be re-run after updates are installed.
I looked at recent security update releases and the Common Vulnerabilities and Exposures (CVE) severity was not very high; so why update?
Microsoft recommends that you apply all available security updates because it can be difficult to understand how even lower severity vulnerabilities disclosed in one month might interact with vulnerabilities disclosed and fixed a month later. An attack may trigger only specific low-impact functionality on a remote target machine and nothing else, causing the scoring for the CVE to be quite low one month. For example, in the following month an important issue with that functionality could be discovered, but it might be only triggered locally and require significant user interaction. That on its own might also not be scored highly. But if your software is behind in updates, these two issues could combine into an attack chain, thereby scoring at critical levels.
We find it difficult to update because Active Directory (AD) schema extensions and Exchange installations require different teams to take action.
In cases where different teams need to perform separate actions to prepare for installation of Exchange Cumulative Updates (as those might require AD schema extension) – we recommend you request schema changes when we release new CUs that require them. Even if you do not need to update to the very latest CU (because last two CUs are supported for Exchange versions that are still within support lifetime) – the fact that Active Directory schema will be up to date means that if you do find that you need to install the latest CU, AD schema will already be updated. We release CUs quarterly and not all of them will require AD schema updates. You can track this here for Exchange 2016 and here for Exchange 2019.
The Exchange Team

Recent Comments