This article is contributed. See the original author and article here.
Welcome to the April update of Java Azure Tools! This blog series provide updates for all the Azure tooling support we are providing for Java users, covering Maven/Gradle plugins for Azure, Azure Toolkit for IntelliJ/Eclipse and Azure Extensions for VS Code. Follow us and you will get more exciting updates in the future blogs.
If you use Azure with Java apps deployed either on VM, on App Service, on AKS or on-premise, you probably store application data on Azure as well using data services like the Azure Database for MySQL. The Azure Toolkit for IntelliJ 3.50.0 release brings this brand new experience in IntelliJ on connecting your Java app with Azure Database for MySQL. We will also show you how to deploy the app seamlessly to Azure Web Apps with the database connection.
In brief, the Azure Toolkit for IntelliJ can manage your Azure database credentials and supply them to your app automatically through:
- If running the app locally: Environment variables through a before launch task named “Connect Azure Resource”.
- If running the app on Azure Web Apps: App Setting deployed along with the artifact.
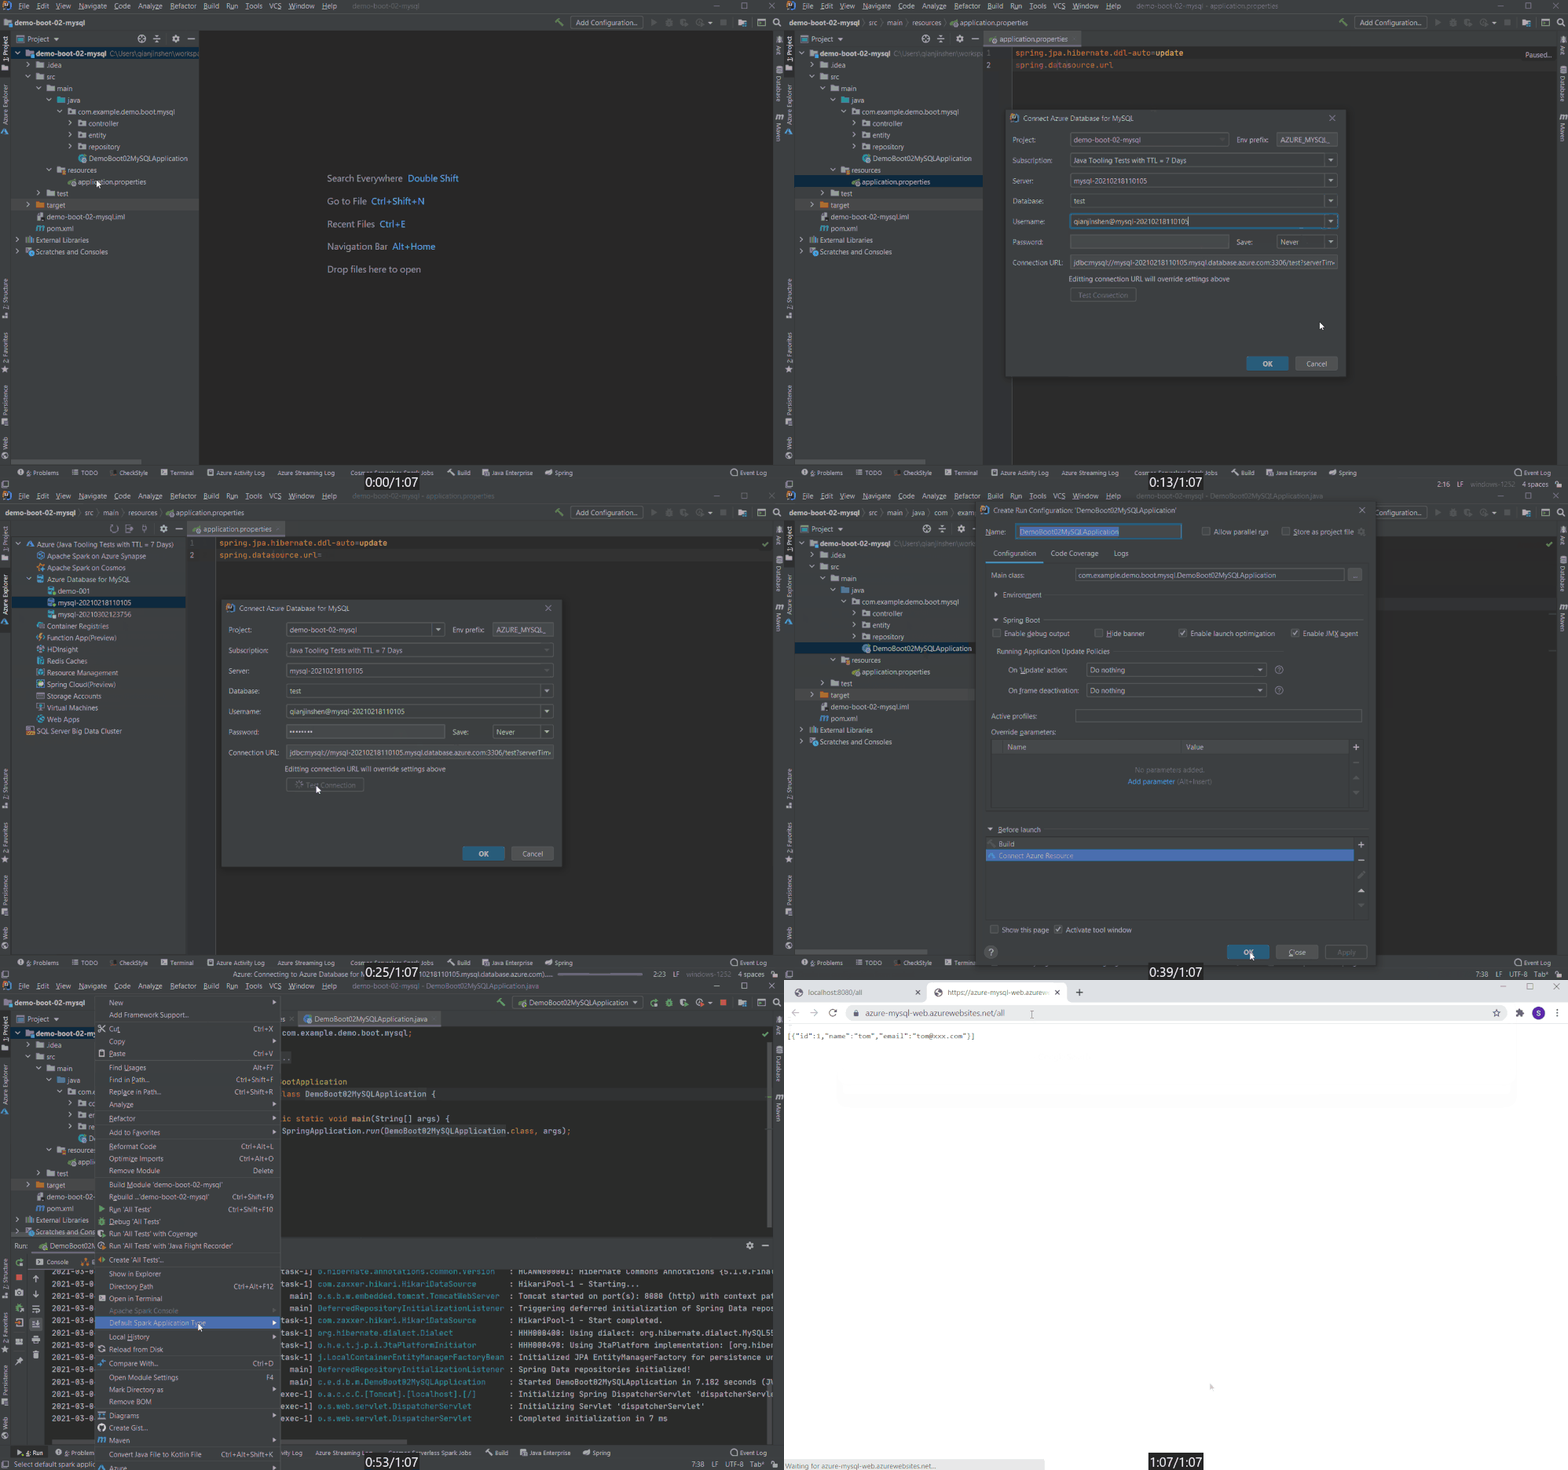
Check out the showcase GIF below and detail steps will be explained in later sections.
Create an Azure Database for MySQL
let’s start from creating an Azure Database for MySQL server instance. You can either follow the steps here right from your Azure Toolkit for IntelliJ plugin or with any other tools like Azure Portal.
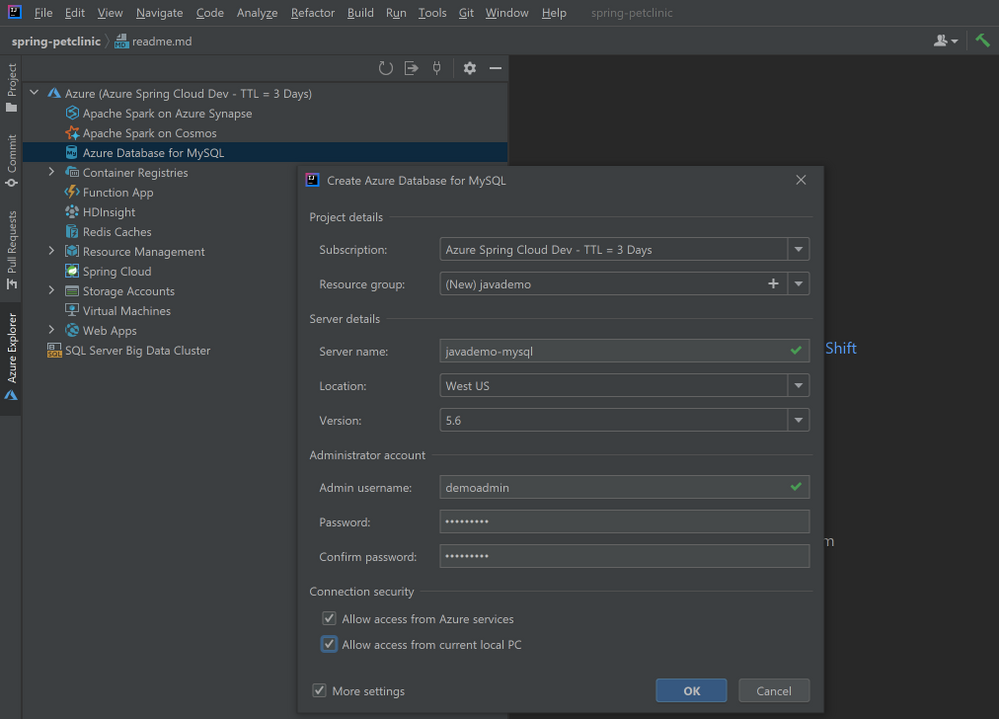
- Right-click on the Azure Database for MySQL node in the Azure Explore, select Create and then select More settings to open the wizard shown in image below.
- (Optional) Customize the resource group name and server name.
- Choose a location you prefer, here we use West US.
- Specify admin username and password.
- Select the two checkboxes in the Connection security section. This step will automatically add corresponding IP whitelist rules to the firewalls protecting your MySQL server.
- Click OK.
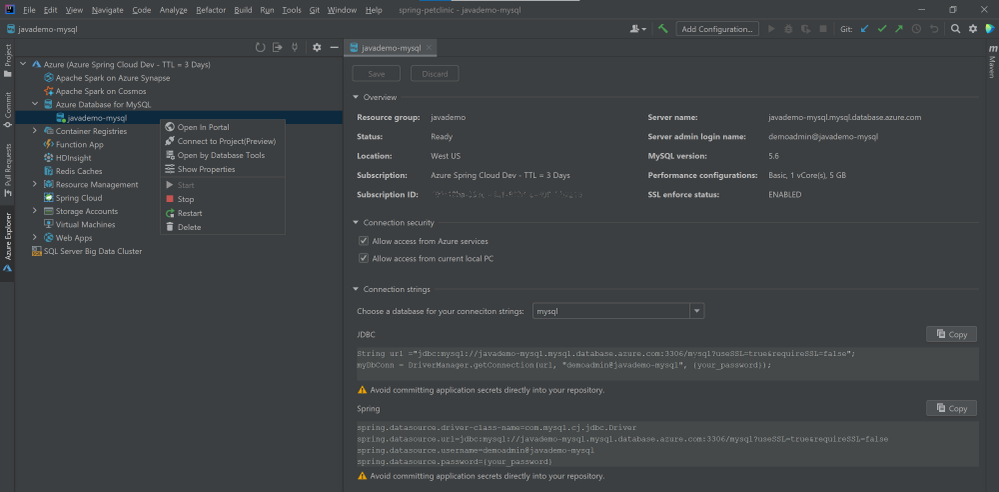
The background operation can take a few minutes to complete. After that you can refresh the Azure Database for MySQL node in the Azure Explore, right-click on the server you just created and select Show Properties for some key information listed. If you are using IntelliJ IDEA Ultimate version, select Open by Database Tools will connect the MySQL server to the database tools embedded.
Connect with your local project
Here we use a sample Spring Boot project called PetClinic. You can also try this with your own project consuming MySQL.
- Clone the project to your dev machine and import with IntelliJ IDEA.
git clone https://github.com/spring-projects/spring-petclinic.git - Enable MySQL profile by adding
spring.profiles.active=mysqlin the application.properties. - Connect to the MySQL server using MySQL Workbench or MySQL CLI for example:
mysql -u <admin name>@<mysql server name> -h <mysql server name>.mysql.database.azure.com -P 3306 -p --ssl - Run the commend in resources/db/mysql/user.sql on the MySQL server to create the petclinic database and user.
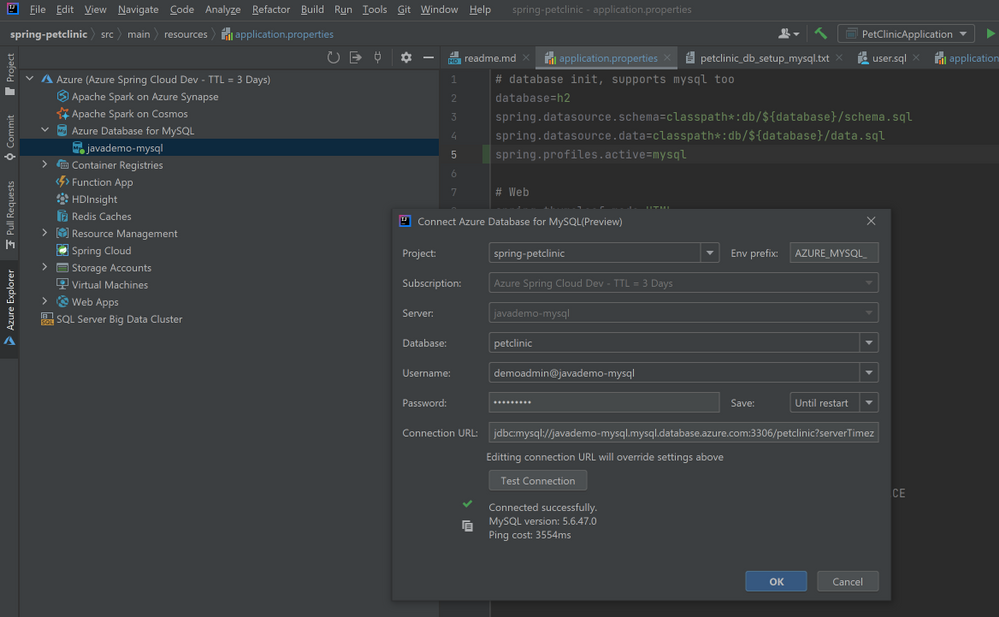
- In Azure Explorer, right-click on the MySQL server you created and select Connect to Project to open the wizard below. Select the petclinic database, specify password and select Until restart for to save the password for this IDE session. Then you can click Test Connection below to verify connection from your IDE. Then click OK.
- Open application-mysql.properties, comment out the original spring.datasource.url/username/password. Type those properties again and accept the autocomplete suggestion with Connect to Azure Datasource.
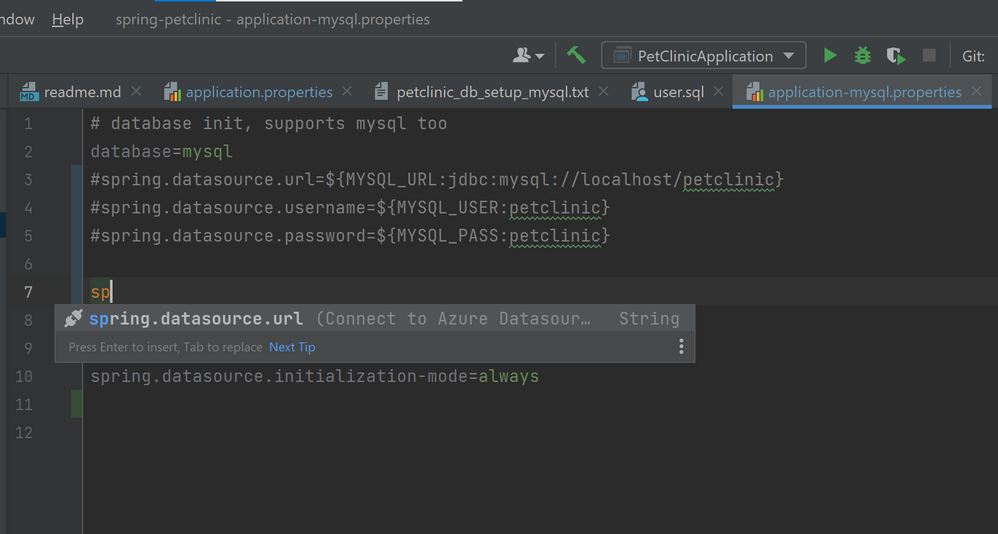
# database init, supports mysql too database=mysql #spring.datasource.url=${MYSQL_URL:jdbc:mysql://localhost/petclinic} #spring.datasource.username=${MYSQL_USER:petclinic} #spring.datasource.password=${MYSQL_PASS:petclinic} spring.datasource.url=${AZURE_MYSQL_URL} spring.datasource.username=${AZURE_MYSQL_USERNAME} spring.datasource.password=${AZURE_MYSQL_PASSWORD} # SQL is written to be idempotent so this is safe spring.datasource.initialization-mode=always - Run the application by right-clicking on the PetClinicApplication main class and choosing Run ‘PetClinicApplication’. This will launch the app locally with the MySQL server on Azure connected.
Deploy the app seamlessly to Azure Web Apps
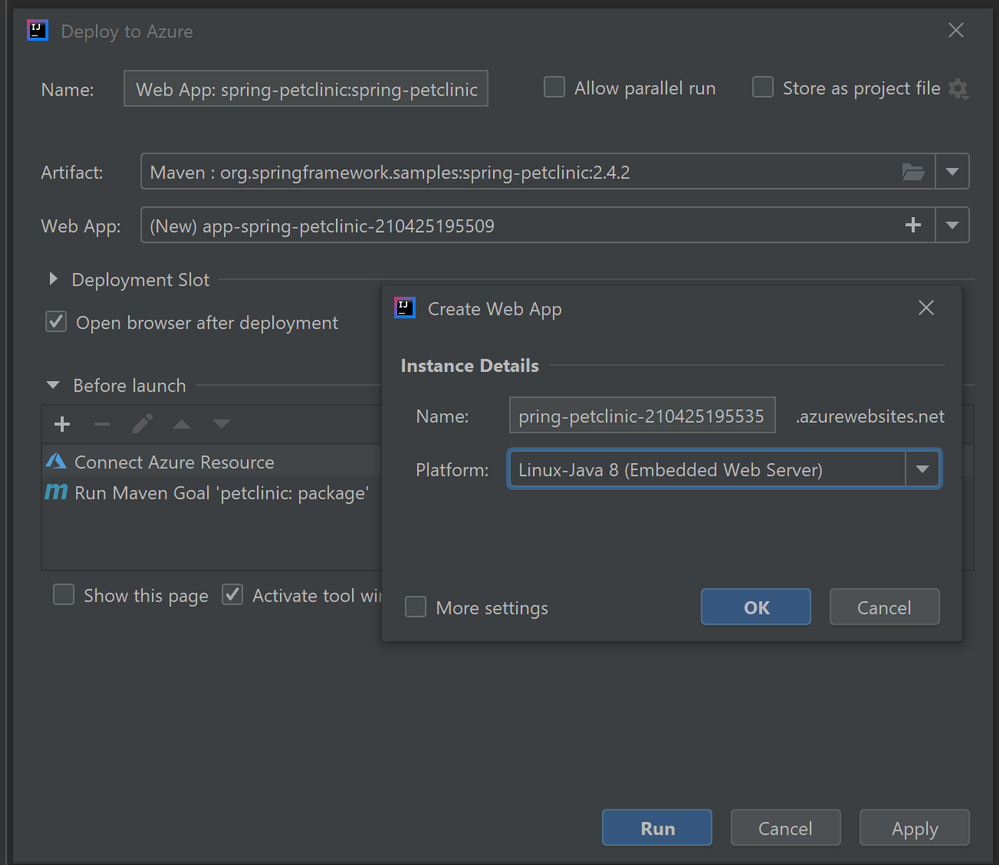
Once you have finished all the steps above, there is no extra steps to make the database connect also works on Azure Web Apps. Just follow the ordinary steps to deploy the app on Azure: Right-click on the project and select Azure->Deploy to Azure Web Apps. You can also see the before launch task “Connect Azure Resource” added here, which will upload your database credentials as App Settings to Azure. Therefore, after click Run and wait for the deployment to complete you will see the app working on Azure without any further configuration.
Try our tools
Please don’t hesitate to give it a try! Your feedback and suggestions are very important to us and will help shape our product in future.
- Learn more about Java on Azure
- Get started with Azure Web Apps using Maven/IntelliJ/VS Code
- Get started with Azure Functions using Maven/Gradle/IntelliJ/VS Code
- Get started with Azure Spring Cloud using IntelliJ/VS Code
Brought to you by Dr. Ware, Microsoft Office 365 Silver Partner, Charleston SC.


Recent Comments