
by Contributed | May 5, 2021 | Technology
This article is contributed. See the original author and article here.
By Marc Nahum Sr Program Manager | Microsoft Endpoint Manager – Intune
Any enterprise or education institution that owns iOS/iPadOS devices can take advantage of automatic enrollment to Intune, as well as the extra features and controls that Apple’s Automated Device Enrollment (ADE) – previously known as Device Enrollment Program (DEP) – provides.
When ADE was first introduced, only Apple resellers or telecom carriers were able to add devices to Apple Business Manager or Apple School Manager. However, since the release of iOS 11, Apple supports the ability to manually add iOS and iPadOS devices yourself with the Apple Configurator 2.5 (AC2) tool. This means that, regardless of where the device was purchased, you can benefit from using ABM or ASM.
This article will help IT pros and mobile device administrators understand the steps required to manually add iOS and iPadOS devices to Apple Business Manager or Apple School Manager, as well as enrolling them into the Intune service.
Note: Manually adding devices (new or old) is not supported for macOS. For these devices, the reseller must carry this out for you, no matter when they have been purchased.
Warning: The devices will be fully wiped during the process. This happens because Apple treats a device being in ABM as proof of ownership.
Before proceeding, there are some configurations, constraints, and restrictions to understand, after which the process is straightforward.
Prerequisites:
- A Mac device (desktop or laptop), running at least macOS Catalina (macOS 10.15.6 or later). This is mandatory as AC2 only runs on macOS.
- AC2 installed on the Mac from the App Store (Apple ID required). A version can be downloaded from the Apple developer site, but it requires an Apple developer membership account. This can be useful if you want to distribute the pkg with Intune on the Mac who will have to use it.
- Physical access to the iOS/iPadOS device, which must be connected to the Mac device running AC2. It must not have Apple’s “Find My” turned on (Activation Lock off).
- An ABM or ASM account with the role of “Device Enrollment Manager” assigned.
- A network profile in AC2 (steps detailed below) to allow the iOS or iPadOS device to connect to the Internet during the process.
- ABM or ASM configured with Microsoft Endpoint Manager as an MDM Server (Settings > Device Management Settings > Add MDM Server).
Preparing Apple Configurator:
There are a lot of options in AC2, so we will cover only the steps necessary to import the devices to ABM or ASM and assign them to the Microsoft Endpoint Manager MDM server. You can find full documentation from Apple here.
1. Creating a Wi-Fi profile
During the onboarding process, the device will need to connect to the internet. Therefore, it’s mandatory to have a Wi-Fi profile, which will allow it to automatically connect. The profile can be as complex as is required, but must not prompt the user for any action, or require a certificate to authenticate.
- In Apple Configurator go to the File menu and choose New Profile.
- Complete the Name of the profile in the mandatory General section.
- Complete the Wi-Fi section with your parameters.
- Once created, save it by clicking on the name on the top of the window. You can then close it and it will be used later.
Screenshot of a Wi-Fi profile and configured settings in Apple Configurator 2
2. Generate MDM Server URL for Microsoft Endpoint Manager
Note: This step is not mandatory, but it will create a trusted configuration and avoid any doubts that the URL is the proper one.
- Open Microsoft Endpoint Manager admin center.
- Select Devices, then navigate to Enroll devices > Apple enrollment > Apple Configurator.
- Select Profiles > Create.
- Complete all required fields with your desired configuration, then click Create.
- Select the profile you just created, then click Overview > Export Profile.
- Copy the Profile URL from the Setup Assistant Enrollment section on the right-hand side. This will be used later.
 Screenshot of the Apple Configurator – Default Enrollment Profile in the Microsoft Endpoint Manager admin center
Connect the device to Apple Configurator
Important: The device will be fully wiped during this process.
If this is the first time you are connecting the device to the Mac, a pop up will appear asking for the Mac to be trusted, select Trust. Now the device is ready to be prepared.
- In Apple Configurator, select Prepare from the toolbar or by doing a secondary click on the picture of the device.
 Screenshot of Apple Configurator 2 with an arrow pointing to the “Prepare” option
- The below settings must be selected:
- Manual Configuration.
- Add to Apple School Manager or Apple Business Manager.
- Allow devices to pair with other computers.
Do not select:
- Activate and complete enrollment.
- Enable Shared iPad.
 Apple Configurator 2 – Prepare Devices” menu
- If this is the first time the operation is run on this Mac, you will have to create a “New Server” with the following details:
Name: “Microsoft Endpoint Management”
URL: The one created in the step “Generate MDM Server URL for MEM
Example URL: https://appleconfigurator2.manage.microsoft.com/MDMServiceConfig?id=<Intune_tenant_ID>&AADTenantId=<AAD_tenant_ID>
 Apple Configurator 2 – “Define an MDM Server” menu
Note: If you decided to skip the step of creating the dedicated URL from the Intune portal, you can simply use “https://endpoint.microsoft.com” and acknowledge the warning “Unable to verify the enrollment URL” as per below:
 Apple Configurator 2 – “Define an MDM Server” menu with the warning text: “Unable to verify the enrollment URL”
- Add trust anchor certificate for MDM server.
- Select the one with the Microsoft or Azure name on the list (this should be appleconfigurator2.manage.microsoft.com or portal.azure.com or endpoint.microsoft.com)
- Attach the device to your organization.
- Next, authenticate to ABM/ASM with an account with the “Device Enrollment Manager” role assigned.
 Apple Configurator 2 – Sign in to Apple School Manager or Apple Business Manager menu
If you did not set up the organization name, you will need to do that next. That Organization name will be displayed on the device.
The iOS setup assistant steps selected on the next screen are not important as they will be defined in Intune later.
Next, select the Network Profile previously created and, when prompted, enter your local password to initiate the process.
At this point, the device will be erased. When the device has restarted, steps in AC2 are complete.
Log on your Apple management console
You now need to assign it to Intune in the ABM/ASM console. By default, it’s assigned to an MDM server configuration named “Apple Configurator 2”:
 Screenshot of an Apple iPhone 6 device in the ABM/ASM console Screenshot of an Apple iPhone 6 device in the ABM/ASM console |
 Screenshot of the ABM/ASM console with associated Apple devices Screenshot of the ABM/ASM console with associated Apple devices |
You can reassign 1 device by selecting that device and choosing:
Edit Device Management > Assign to server and select the proper Intune one. |
You can reassign multiple devices by doing the same with filters and choose “Edit Device Management” > “Apple Configurator 2” |
Microsoft Endpoint Manager admin center
Once the device is assigned it will need to be synchronized. This occurs automatically every 12 hours or you can manually trigger the synchronization in Microsoft Endpoint Manager admin center:
- Navigate to Devices > Enroll devices > Apple Enrollment> Enrollment program tokens and select your token name.
- Navigate to Devices and click Sync.
Note: You can manually synchronize the devices from ABM/ASM to Intune at a maximum frequency of every 15 minutes.
At this point you should have successfully added your ADE device to Intune.
Let us know if you have any questions by replying to this post or reaching out to @IntuneSuppTeam on Twitter.
![[Guest Blog] Stretch Goals will change your life](https://www.drware.com/wp-content/uploads/2021/05/fb_image-313.png)
by Contributed | May 5, 2021 | Technology
This article is contributed. See the original author and article here.
This blog is written by Jerry Weinstock, Microsoft Business Applications MVP. He shares how he set and pursued stretch goals to become a Business Applications MVP and author a white paper for Microsoft.
When you hear the term “Stretch Goals” it is usually in the context of performance metrics for sales people on quota or commission. I am going to tell you two stories where I have used stretch goals to take my career to the so-called next level by getting me out of my comfort zone and accomplishing bucket list items. Stretch goals are also for technology people!
When we think about goals they are generally conservative, somewhat routine and tend to be achievable and perhaps expected to be accomplished. Do not confuse it with “doing your job” and getting a positive review along with the standard merit increase. New Year’s Resolutions are not stretch goals!
A stretch goal is an objective that you set for yourself that is extremely difficult to achieve. It is over and above your normal activities or the results that others expect you to achieve. While there are many ways to define a stretch goal, in my life I have defined it by two criteria; it will take me well out of my comfort zone, requiring me to “stretch” well past my current level of activities and skill level; and it will be something when achieved, is “braggable” either in a personal or business setting. It could also be a bucket list accomplishment but not everything that might fall into a bucket list checklist is a stretch goal.
So now that we have a baseline for stretch goals, let me tell you about two stretch goals that took me well out of my comfort zone, provided some things I could brag about, and catapulted my career to another level.
Microsoft CRM Team Blog – My path to becoming a MVP
Back in the early days – circa 2007-2009, the Microsoft CRM Team Blog (that was its’ name then) was just about the only place online that you could find new product information being posted. We did not have Facebook or Twitter the way it’s used today, nor Linkedin. Additionally, very few people were blogging on their own website. It was the one place you went to almost every day to get the latest CRM news.
I had been voraciously consuming the blog posts as soon as they came out, applying the new found knowledge to projects for my clients. I had noticed a pattern that some of the posts were being made by non-Microsoft people and labeled as “guest posts”. After a while of seeing these posts, I began to think that I had equally good information to share as these guest bloggers. I just had never done anything like that before and I had no clue how to break into the process. All I knew was that all the guest bloggers were MVPs. While I had no direct exposure to these people I knew from seeing them at events and their entourage that they seemed a step ahead of all the other consultants.
So while I had given no thought to becoming an MVP, I also had no clue where to begin the process. I got it in my head that if I tried, I could write equally valuable blog content. I started working on several candidate posts that went through dozens of iterations. Finally, when I had something that I thought might work, I tracked down Jim Glaas who, at the time, ran the MVP program and managed the team blog. After pinging him with emails, I finally connected with him and we started the process. The first post I submitted was turned down because it was based on what the product team assessed as unsupported methods. I was devastated and almost retreated. The second submission I came up with was accepted and on September 9, 2009 the first post appeared – A Plethora of Phone Attributes.

After successfully getting one post accepted and basking in the glory for a few minutes (my family wasn’t impressed), I set out to see if I could continue to stretch and repeat the accomplishment. I had several more published, one of them is as follows:

Concurrent with the posting of the Marketing list post, I received an email from Jim asking why I wasn’t a CRM MVP. He advised that if I spent a lot of time in the CRM forum, it would greatly boost my chances. I took him up on it without knowing much about the MVP program, but I felt confident that if I pushed myself, I could demonstrate I was equally qualified.
I received the MVP Application form in January 2010. I then set out to diligently become more active on the community forums. Every morning, as soon as I got to the office, I went to the forums and tried to answer the questions that had been posted the night before. In many cases I actually had to create the submitters’ scenario in CRM to come up with the answer. This went on for months, sometimes my real work didn’t get started for 2+ hours after the day began.
I applied to the MVP program with the formal application in April and was notified that I had been turned down and to re-apply. I decided to ramp it up even more and delivered another guest post and stretched myself to answer even more complex questions on the forums.

On October 1, 2010 I received the email letting me know that I had been recognized for my community activities and entered the MVP program. It is coming up on 11 years now and I consider it the single biggest professional stretch goal I have accomplished. It has had more impact on my business and personal life than any other career event. Put your mind to it and stretch yourself, you can do it also if you want it.
Microsoft White Paper – Power Automate Flow
Just like I had been observing the guest posts by MVPs circa 2008, I had been consuming Microsoft White Papers. I always marveled over the value of the content along with the prestige that seemed to come to people that were skilled enough to put them together. I had jumped on Microsoft Flow when it was first introduced and felt it was the most powerful tool that the product team had given to functional consultants in the life of the product. After blogging, speaking, and answering forum questions for the first two years I believed I had defined myself as the go to person in the community for Flow and Dynamics 365.
I decided to set my next stretch goal – to firmly establish myself at the pinnacle of Flow and Dynamics 365. After a long and brand new process that took me through selling the idea to Microsoft and then actually delivering on what I told them I could do, in August of 2009 the Flow white paper was released. Did I stretch myself? You bet, the paper went through four iterations with Microsoft and I invested three times the amount of hours that I had originally estimated but I was ecstatic when it was released. It certainly falls into the braggable category. Would I do it again? I could but probably wouldn’t and perhaps that is the third criteria of a stretch goal – something you achieve but only need to do once.

So that kind of sums it up – get out of the routine, think big, take yourself to the next level, accomplish something that no one around you has, look to the leaders that you know, set a stretch goal for yourself and when you achieve it – tell the world. You will have a smiling grin on your face.
by Contributed | May 5, 2021 | Technology
This article is contributed. See the original author and article here.
Last year we released the Reply-all Storm Protection feature to help protect your organization from unwanted reply-all storms. This feature uses global settings applicable to all Microsoft 365 customers for reply-all storm detection and for how long the feature will block subsequent reply-alls once a storm has been detected. Today we’re pleased to announce you’ll now have the ability to make these settings specific to your Microsoft 365 organization; email admins will have the flexibility to enable/disable the feature, and set customized detection thresholds and block duration time. This not only makes it more flexible to tailor for your organization, but it also allows more Microsoft 365 customers to take advantage of the Reply-all Storm Protection feature since the minimum number of reply-all recipients for detection can now be as low as 1000 when previously it was hard-coded at 5000.
The current Reply-all Storm Protection settings for Microsoft 365 are as follows:
Setting
|
Default
|
Enabled/disabled
|
Enabled
|
Minimum number of recipients
|
5000
|
Minimum number of reply-alls
|
10
|
Detection time sliding window
|
60 minutes
|
Block duration (once detected)
|
4 hours
|
Based on our telemetry and customer feedback we’re also taking this opportunity to update a few of the default settings. Once this change has rolled out, the default settings for each Microsoft 365 organization will be the following:
Setting
|
Default
|
Enabled/disabled
|
Enabled
|
Minimum number of recipients
|
2500 (previously 5000)
|
Minimum number of reply-alls
|
10
|
Detection time sliding window
|
60 minutes
|
Block duration (once detected)
|
6 hours (previously 4 hours)
|
The customizations possible for each setting will be as follows:
Setting
|
Customizable options
|
Enabled/disabled
|
Enabled or Disabled
|
Minimum number of recipients
|
1000 to 5000
|
Minimum number of reply-alls
|
5 to 20
|
Detection time sliding window
|
60 minutes (not customizable)
|
Block duration (once detected)
|
1 to 12 hours
|
Admins will be able to use the Set-TransportConfig Remote PowerShell cmdlet to update the settings for their organization:
Setting
|
Cmdlet
|
Enabled/disabled
|
Set-TransportConfig -ReplyAllStormProtectionEnabled [$True:$False]
|
Number of recipients threshold
|
Set-TransportConfig -ReplyAllStormDetectionMinimumRecipients [1000 – 5000]
|
Number of reply-alls threshold
|
Set-TransportConfig -ReplyAllStormDetectionMinimumReplies [5 – 20]
|
Block duration
|
Set-TransportConfig -ReplyAllStormBlockDuration [1 – 12]
|
These updates are rolling out now and should be fully available to all Microsoft 365 customers by mid-June. While this should come as a welcome update for customers wanting to better take advantage of the Reply-all Storm Protection feature, we are not done yet! In future updates we plan to provide an insight, report, and optional notifications for the feature as well. And if there’s enough customer feedback for it, we’ll consider also exposing the ability to customize these settings in the Exchange Admin Center. Let us know what you think!
The Exchange Transport Team
by Contributed | May 5, 2021 | Technology
This article is contributed. See the original author and article here.
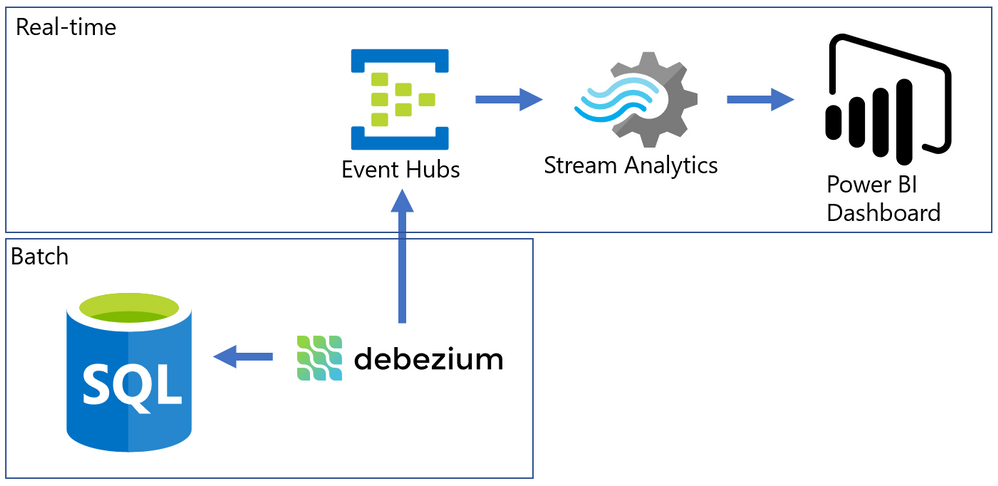
Almost every modern data warehouse project touches the topic of real-time data analytics. In many cases, the source systems use a traditional database, just like SQL Server, and they do not support event-based interfaces.
Common solutions for this problem often require a lot of coding, but I will present an alternative that can integrate the data form SQL Server Change Data Capture to a Power BI Streaming dataset with a good help of an Open-Source tool named Debezium.
The Problem
SQL Server is a batch-oriented service, just like any DBMS. This means that one program must query it in order to get the result – so to have real time analytics we would have to change this batch behavior to a streaming /event/push behavior.
On the other side, we have Azure Event Hubs, Stream Analytics and Streaming datasets on Power BI. They work pretty well together if the data source is a stream producing events (something we can have with a custom code application or some Open Source solution like Kafka).
The challenge here was to find something to make the bridge between SQL Server and Event Hubs.
After some time looking for solutions, I found this Docs page (Integrate Apache Kafka Connect on Azure Event Hubs with Debezium for Change Data Capture – Azure Event Hubs | Microsoft Docs) with an approach to bring CDC data from Postgres to Event Hubs.
The solution presented on Docs was more complex than I needed, so I simplified it by using a container deployment and by removing unnecessary dependencies, then I wrote this post where I hope I can present it is a simpler way.
The solution looks like this: On one side, we have SQL Server with CDC enabled in a few tables, on the other we have Azure ready to process events that came to Event Hub. To make the bridge, we have Debezium that will create one event per row found on the CDC tables.
Have you ever used Docker?
For my development environment, I decided to go for Docker Desktop. The new WSL2 backend makes it easy to run Linux containers (such as those needed by Debezium). It works well on Windows 10 and on recent builds of Windows Server (Semi-Annual Channel). If you still never tried WSL2, I highly recommend it. (See: Install Docker Desktop on Windows | Docker Documentation)
After a few steps, I have installed the WSL2 feature, chose the Ubuntu 20.04 distro (there other distros available on Windows Store) and finished the setup of Docker Desktop on my Windows 10 Surface Laptop :smiling_face_with_smiling_eyes:.
Spoiler (Highlight to read)
Docker Desktop works well for your development enviorement. For production, if your company don’t have a container orchestration environment, you can try
Azure Kubernetes Service (AKS) | Microsoft Azure.
Docker Desktop works well for your development enviorement. For production, if your company don’t have a container orchestration environment, you can try Azure Kubernetes Service (AKS) | Microsoft Azure.
How to install a Debezium container?
Debezium has a Docker Image available on hub.docker.com, named “debeziumserver”.
Debezium Server is a lightweight version that do NOT have Kafka installed. The image has already the connector you need for SQL Server and can output the events directly to Event Hubs.
To install and configure the container, I ran only this single line on PowerShell.
docker run -d -it --name SampleDebezium -v $PWD/conf:/debezium/conf -v $PWD/data:/debezium/data debezium/server
This will download the docker image “debezium/server” and start a container named “SampleDebezium”
We are mounting 2 folders from the host machine to the container:
/conf – Holds the configuration file.
/data – Will store the status of Debezium. This avoids missing or duplicate data once the container is recreated or restarted.
On my lab, I used the configuration file bellow (place it on the /conf folder named as application.properties). (Don’t worry about the keys here, I changed them already)
You will have to change the SQL Server and Event Hubs connections to match to match your enviorement.
Sample application.properties file:
debezium.sink.type=eventhubs
debezium.sink.eventhubs.connectionstring=Endpoint=sb://er-testforthisblogpost.servicebus.windows.net/;SharedAccessKeyName=TestPolicy;SharedAccessKey=O*&HBi8gbBO7NHn7N&In7ih/KgONHN=
debezium.sink.eventhubs.hubname=hubtestcdc
debezium.sink.eventhubs.maxbatchsize=1048576

debezium.source.connector.class=io.debezium.connector.sqlserver.SqlServerConnector
debezium.source.offset.storage.file.filename=data/offsets.dat
debezium.source.offset.flush.interval.ms=0
debezium.source.database.hostname=sqlserverhostname.westeurope.cloudapp.azure.com
debezium.source.database.port=1433
debezium.source.database.user=UserDemoCDC
debezium.source.database.password=demo@123
debezium.source.database.dbname=TestCDC
debezium.source.database.server.name=SQL2019
debezium.source.table.include.list=dbo.SampleCDC

debezium.source.snapshot.mode=schema_only
debezium.source.max.queue.size=8192
debezium.source.max.batch.size=2048
debezium.source.snapshot.fetch.size=2000
debezium.source.query.fetch.size=1000

debezium.source.poll.interval.ms=1000

debezium.source.database.history=io.debezium.relational.history.FileDatabaseHistory
debezium.source.database.history.file.filename=data/FileDatabaseHistory.dat
Setting up the Change Data Capture
My SQL Server is hosted on Azure (but this is not a requirement) and to create a lab enviorement, I created a single table and enabled CDC on it by using this script:
-- Create sample database
CREATE DATABASE TestCDC
GO
USE TestCDC
GO


-- Enable the database for CDC
EXEC sys.sp_cdc_enable_db
GO

-- Create a sample table
CREATE TABLE SampleCDC (
ID int identity (1,1) PRIMARY KEY ,
SampleName nvarchar(255)
)

-- Role with privileges to read CDC data
CREATE ROLE CDC_Reader

-- =========
-- Enable a Table
-- =========
EXEC sys.sp_cdc_enable_table
@source_schema = N'dbo',
@source_name   = N'SampleCDC',
@role_name     = N'CDC_Reader',     -- The user must be part of this role to access the CDC data
--@filegroup_name = N'MyDB_CT',     -- A filegroup can be specified to store the CDC data
@supports_net_changes = 0           -- Debezium do not use net changes, so it is not relevant

-- List the tables with CDC enabled
EXEC sys.sp_cdc_help_change_data_capture
GO

-- Insert some sample data
INSERT INTO dbo.SampleCDC VALUES ('Insert you value here')

-- The table is empty
select * from SampleCDC

-- But it recorded CDC data
select * from [cdc].[dbo_SampleCDC_CT]


/*
-- Disable CDC on the table
--EXEC sys.sp_cdc_disable_table
--@source_schema = N'dbo',
--@source_name   = N'SampleCDC',
--@capture_instance = N'dbo_SampleCDC'
*/
Debezium will query the latest changed rows on CDC based on its configuration file and create the events on Event Hub.
Event Hub and Stream Analytics
I created a Event Hub Namespace with a single Event Hub to hold this experiment. There is no special requirement for the event hub. The size will depend only on the volume of events your application will send to it.
Once it is done, we have to create a Shared Access Policy. The connection string is what you need to add to the Debezium application.properties file.

To consume the events and create the Power BI streaming dataset, I used Azure Stream Analytics.
Once the Stream Analytics job is created, we have to configure 3 things: Inputs, Outputs and Query.
Inputs
Here is where you say what the stream analytics will listen to. Just create a Inputs for your Event Hub with the default options. Debezium will generate uncompressed JSON files encoded on UTF-8.

Outputs
Here is where we will configure the Power BI streaming dataset. But you first need to know on which Power BI Workspace it will stay.
On the left menu, click on Outputs and then Add -> Power BI.
The options “Dataset name” and “Table name” are what will be visible to Power BI.

The a test, the “Authentication mode” as “User Token” is a good one, but for production, better use “Managed Identity”
Query
Stream used a query language very similar to T-SQL to handle the data that comes in a stream input.
Check this link to find more about it Stream Analytics Query Language Reference – Stream Analytics Query | Microsoft Docs
On the example, I’m just counting row many rows (events) were generated on the last 10 minutes FROM an input INTO an output. The names on the query must match the ones you defined on prior steps.

Here it is in the text version:
SELECT
    count(*) over( LIMIT DURATION (minute, 10)) as RowsLast10Minutes
INTO
    [TestCDC]
FROM
    [InputCDC]
Make it Run
If everything is correctly configured, we will be able to start our Stream Analytics and our Container.
Stream Analytics:

Docker Desktop:

Power BI
Once the Stream Analytics is started, we will go to the Power BI workspace and create a tile based on the streaming dataset.
If you don’t have a Power BI Dashboard on your workspace, just create a new one.

On the Dashboard, add a Tile.

Click on Real-time data and Next.

The dataset with the name you chose on Stream Analytics should be visible here.

Select the Card visual and the column RowsLast10Minutes, click Next, and Apply.

It should be something like this if there is no data being inserted on the table.

Now it comes the fun time. If everything is configured correctly, we just have to insert data on our sample table and see it flowing to the dashboard!
.gif")
Known problems
It seems when a big transaction happens (like an update on 200k rows), Debezium stops pointing that the message size was bigger than the maximum size defined from Event Hubs. Maybe there is a way to break it on smaller messages, maybe it is how it works by design. If the base (CDC) table are OLTP oriented (small, single row operations), the solutions seem to run fine.
References
Enable and Disable Change Data Capture (SQL Server)
Debezium Server Architecture
Docker image with example
SQL Server connector
Azure Event hubs connection

by Contributed | May 5, 2021 | Technology
This article is contributed. See the original author and article here.
Accessibility is about making our products accessible and inclusive to everyone, including the 1 billion+ people with disabilities around the world. It is a core Excel and Microsoft priority, and an area where we continuously strive to improve. For more information about Microsoft’s commitment to accessibility, visit microsoft.com/accessibility.
Excel’s approach
Making Excel more accessible is a journey, and we will always have room for improvement as we strive to make spreadsheets work for everyone. We have three overarching objectives to guide us:
- Work seamlessly with assistive technology. Our partners around the globe and within Microsoft create amazing technology to support people with disabilities. A few examples of assistive technology include screen readers, dictation software, magnifiers, and physical devices. Our priority is to collaborate with these partners so that everyone can use Excel in the way that works best for them, with tools that are already familiar.
- Build inclusive and delightful experiences inspired by people with disabilities. Beyond “just working,” Excel should be efficient and delightful to use. We are always looking for opportunities to simplify your workflow, summarize your content, or suggest information. By learning from and being inspired by the experiences of people with disabilities, we can make Excel better for all.
- Support authors to create accessible content. Making Excel as an application accessible is only half the battle; the other half is making sure workbooks created in Excel are accessible. For that, we rely heavily on you, the author…but that doesn’t mean we can’t help! We look for opportunities to automatically create accessible content on your behalf, support you while you create accessible content, let you know when something is inaccessible, and help you fix accessibility issues before sharing your workbook with others.
Feature Spotlight: Accessibility ribbon
As a part of our goal to help you create accessible content, there is a new contextual ribbon called “Accessibility” coming to Excel. The Accessibility ribbon will be available when you open the Check Accessibility pane on the Review tab. On the Accessibility ribbon you will find a collection of the most common tools you need to make your workbook accessible. The ribbon is available today to those in the Office Insiders program.
Contextual Accessibility ribbon in Excel shows when the Check Accessibility pane is open.
To learn more about the Accessibility ribbon, view our announcement on the Office Insiders blog. If you are interested in learning more about how to create accessible workbooks, check out our support article Make your Excel documents accessible to people with disabilities.
Next steps
Please let us know what you think! Your feedback and suggestions shape our approach to accessibility and inclusive design. To get in touch, contact the Disability Answer Desk or use Help > Feedback. We look forward to hearing from you!
This is the first in a series of blogs about our accessibility work in Excel. We hope you will join us over the next several months as we discuss exciting new improvements to Excel through an inclusive lens.
Subscribe to our Excel Blog and join our Excel Community to stay connected with us and other Excel fans around the world.

Recent Comments