by Contributed | May 11, 2021 | Technology
This article is contributed. See the original author and article here.
During 2016, Microsoft introduced a new product that allowed organizations to implement a sensitivity label taxonomy and empower information workers to leverage these and apply them to documents or emails as part of daily work. This product is known as “Azure Information Protection (AIP)” and uses a client application for the Windows platform which deployed an add-in within Office apps including introducing a new “Sensitivity” button that can be used by information workers to flag documents and emails according to their sensitivity.
Since then, Microsoft’s information protection platform has evolved, implemented across all common platforms (MacOS, iOS, Android, Web) and the Azure Information Protection Client with rich capabilities across Microsoft 365 and is now under the wide umbrella of Microsoft Information Protection offering.
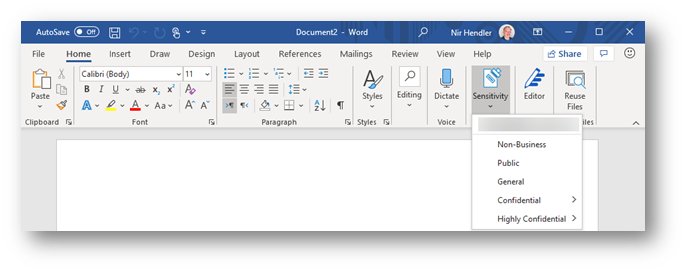
The main change as part of the transition to Microsoft Information Protection is that sensitivity labels are available across all common platforms and do not require an add-in or additional implementation, they are just part of the service offering. If you are using Microsoft 365 apps for Enterprise (formerly known as Office 365 Professional Plus) and you deployed sensitivity labels within your organization, no additional deployment stage is required. The same “Sensitivity” button is now exposed within the application ribbon. This integration is applicable consistently to all supported platforms. Moving forward, this integrated capability is to be known as “Built-in sensitivity labeling.”
Fig. 1: Built-in labeling within Microsoft 365 apps for Enterprise
Benefits to moving from client-based labeling to built-in labeling.
Using built-in labeling is seamless and does not require any management overhead in addition to cloud-based policy configuration. As part of your existing Microsoft 365 apps deployment, the bits are already available for every information worker without the need for installing additional components. The important aspects to consider are:
- No need to test, deploy and update another application or add-in within your endpoints. You leverage the deployment stage as part of ongoing or existing Microsoft 365 app project.
- Microsoft 365 apps will work with improved performance since no add-in needs to be loaded and all labeling functionality runs inside the application itself.
- Updates are being pushed as part of Microsoft 365 apps releases.
- Seamless experience across all Microsoft 365 platforms.
This is in line with other initiatives at Microsoft to provide built-in functionality that reduces or eliminates the need to deploy and maintain add-ins and plugins for other security and compliance-related functionality, which can potentially reduce an IT department’s challenges while providing a better user experience with more performance and stability to end users across workloads.
So, what is the Azure Information Protection Client, and should I continue to use it (or consider deploying it)?
Azure Information Protection Client (or Unified Labeling Client) is an application package for the Windows platform that include 4 components:
- Azure Information Protection add-in for Microsoft 365 apps
- Classify and protect (Ability to apply and consume labels outside Microsoft 365 apps) via a File Explorer extension
- Azure Information Protection viewer (to consume Non-Microsoft protected documents)
- Azure Information Protection PowerShell cmdlets to apply and consume labels.
Using built-in labeling replaces the first item in the list which is the Azure Information Protection add-in. Other components (described in number two, three, and four) can still be deployed without any dependency on the add-in portion of Azure Information Protection.
If you are using the Azure Information Protection add-in today and wish to use built-in sensitivity labeling instead to gain the benefits described above, then you can disable the add-in, uninstall the complete client, or control the behavior with a group policy. You have the choice to select the best approach which fits your business use cases and needs.
If you are NOT using the Azure Information Protection add-in today and looking to implement sensitivity labels across your organization, we recommend starting directly with built-in sensitivity labeling and deploy Azure Information Protection Client components (items described in number two, three, and four) if desired, but without enabling the AIP plugin for Office apps.
 Fig. 2: Built-in labeling within Microsoft 365 apps highlight the sensitive information identifies within a Word document.
Where is built-in labeling available today?
Built-in labeling is already available and in use as part of your deployment of sensitivity labels in MacOS, iOS, Android, and web apps. If you deployed your sensitivity labels policies then these are already enabled and deployed (Web apps integration need to be enabled separately as documented). The main requirement here is to ensure that you are using the right Microsoft 365 apps for Windows that support this capability.
Built-in labeling in Microsoft 365 apps for Windows is available in all updated releases with versions newer than 1910+. (How to check your version of Microsoft 365 apps). If you are using an up to date version, no matter if you use Current Channel or Semi-Annual Channel, the capability is there and operational.
We do recommend ensuring your organization Microsoft 365 apps update channel is set to Current Channel or Monthly-Enterprise channel. These channels get the latest and greatest features in a shorter time frame. If your organization is using the Semi-Annual channel, then updates are deferred for a later period. Read more about Microsoft 365 Apps update channels here.
Deployment method
Once you have ensured you are using a version of Microsoft 365 apps that is released after 1910 in your organization, all you need to do is to implement your labeling taxonomy in the Microsoft 365 Compliance portal and publish your labels. You can use the official documentation to understand more on the backend configurations that need to be done.
If you do want to use Azure Information Protection client capabilities side by side with built-in labeling (referring to PowerShell module, Classify & Protect app and, AIP Viewer), you can download and deploy the Azure Information Protection unified labeling client (available to be downloaded from this link). Then configure a Group Policy to ensure that built-in labeling will always override and disable the Azure Information Protection add-in component. Read more about how to configure the group policy here. With this deployment approach you can enjoy both from the benefits of using built-in labeling and additional components.
Feature parity
Azure Information Protection Client and built-in labeling for Microsoft 365 apps do not have feature parity today. As we move forward, built-in labeling will add more capabilities which are currently available in the Azure Information Protection client. It is important to understand that the key features available, which include:
Feature marked as :star: are exclusive to built-in labeling with Microsoft 365 apps.
Read more about the feature comparison between Azure Information Protection Client and built-in labeling for Microsoft 365 apps here.
In addition, see complete roadmap and timelines for additional features within built-in labeling for Microsoft 365 apps here.
Additional considerations
In perpetual versions of Microsoft 365 apps (Office 2013, 2016, 2019) built-in labeling is not included, so if you are using one of these versions you will need to use the Azure Information Protection client and add-in for Office instead.
Do note that using built-in labeling does require sensitivity labels to be configured and published in the M365 Compliance portal (or Office 365 Security and Compliance portal). If your sensitivity labels are deployed as part of the Classic platform in Azure, please ensure you are migrating to unified sensitivity labels as documented here.
Additional resources:
by Contributed | May 11, 2021 | Technology
This article is contributed. See the original author and article here.
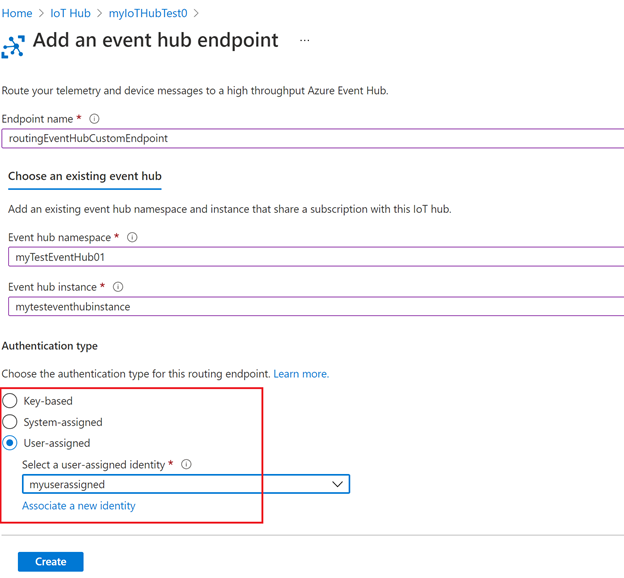
Azure support for user-assigned managed identity is now generally available! With today’s release, you can now use the user-assigned managed identity to connect your hubs to resources that support Azure Active Directory (Azure AD) authentication.
There are two different types of managed identities: system-assigned and user-assigned managed identity. In IoT Hub, managed identities can be used for egress connectivity from IoT Hub to Azure blob storage, event hub and service bus resources for message routing, file upload, and bulk device import/export. IoT Hub has the existing support for the system-assigned managed identity, and now we are adding support for user-assigned managed identity as well.
- User-assigned managed identity. It is created as a standalone resource and can be shared across Azure resources and instances. For example, if there are multiple IoT Hubs that require the same access permissions to a storage account, you can create a single user-assigned managed identity, use the RBAC role assignment to control the identity’s access and add this identity to multiple IoT Hubs. In this way, you no longer need to manage multiple identities for different IoT Hubs. In addition, user-assigned managed identity has its own independent life cycle. If one of your IoT Hubs is recycled, the identity remains unchanged and permissions stay consistent.
- System-assigned managed identity. Unlike user-assigned managed identity, system-assigned managed identity is tied to your IoT Hub instance. Therefore, the system-assigned managed identity cannot be shared across different hubs, and it has a shared lifecycle with the associated hub instance. System-assigned can be used when your hub requires an independent identity.
Both system-assigned and user-assigned managed identity come with the common benefits of using the managed identities:
- You don’t need to manage secret keys.
- You can use managed identities to authenticate to any resource that supports Azure Active Directory (Azure AD) authentication.
- Managed identities can be used without additional charge.
With the support for both system-assigned and user-assigned managed identity in IoT Hub, you’re able to select different types based on your scenarios and requirements.
Getting started
To get started, create a user-assigned managed identity as a standalone resource and add the identity to your IoT Hub. Instructions and samples are published on our documentation page IoT Hub support for managed identities.
by Contributed | May 11, 2021 | Technology
This article is contributed. See the original author and article here.
In 2020, Artificial Intelligence (AI) Specialist was named the top emerging job, and according to Forbes, we are likely to witness an even more accelerated adoption of AI over the next year. Microsoft and Udacity have collaborated in the past to bring in-demand Azure skilling opportunities. Today, we are excited to announce the new AI Fundamentals free course on Udacity.
What to expect from AI Fundamentals
AI Fundamentals offers learners a basic foundational understanding of machine learning (ML) and AI concepts. This course also prepares learners to implement ML and AI workloads using Azure. There is no prerequisite for the course as AI Fundamentals is intended for learners with both technical and non-technical backgrounds.
Upon completing the AI Fundamentals free course, learners will have a foundational understanding of the following:
- AI workloads and considerations
- Fundamental principles of ML on Azure
- Computer vision workloads on Azure
- Natural Language Processing (NLP) workloads on Azure
While Udacity enables students to learn at their own pace, the AI Fundamentals course can be completed in as little as one month at 20 hours a week.
You completed the AI Fundamentals course, now what?
After completing this course with Udacity, learners will be prepared to take the AI-900 exam and become certified in Microsoft Azure AI Fundamentals. Whether a learner is looking for new roles or wanting to upskill in their current role, being adept in Microsoft Azure and having a certification to prove it is a competitive advantage. In fact, according to the Value of IT Certification Survey by Pearson Vue, almost thirty-five percent of technical professionals said getting certified led to salary or wage increases, and twenty-six percent reported job promotions.
While the AI Fundamentals course and the AI-900 certification exam will teach and test learners on their foundational understanding of AI on Azure, learners who are interested in furthering their learning can enroll in the Machine Learning Engineer for Microsoft Azure Nanodegree program with Udacity.
Enroll in the AI Fundamentals free course on Udacity today!
by Contributed | May 11, 2021 | Technology
This article is contributed. See the original author and article here.
Windows Holographic, version 21H1 is now available! In this article, we showcase some of the release highlights, but if you’re interested in more details on the full list of features, you can read our official release notes.
Features continually evolve in Windows 10 Holographic based on your feedback. We packed this new update with features for both end-users and IT admins with the goal of making the day-to-day usage of your HoloLens 2 more intuitive and customizable.
To get the 21H1 build now, go to Settings > Update & Security > Windows Update Select > Check for updates. IT Admins can use Windows Update for Business (WUfB) and MDM policy to update their fleet of HoloLens. Note that you must upgrade to Windows Holographic, version 20H2 February Update ( before you can upgrade to Windows Holographic, version 21H1. Another important note is that with the introduction of Windows Holographic version 21H1, we are discontinuing monthly servicing updates (for bug and security fixes) for Windows Holographic version 1903. We will now offer servicing updates for the following releases:
- Windows Holographic, version 21H1 (Build 20346.1002+)
- Windows Holographic, version 20H2 (Build 19041.1128+)
- Windows Holographic, version 2004 (Build 19041.1103+)
Release highlights
The new, Chromium-based Microsoft Edge is now available and will be the default browser for HoloLens users, offering better compatibility for customers and less fragmentation for web developers. The addition of WebXR and 360 Viewer make it possible to explore immersive web experiences. You can also use the new Edge to install web apps alongside Microsoft Store apps. For example, you can install the Microsoft Office web app from https://www.office.com to view and edit files hosted on SharePoint or OneDrive.

The Settings app has been updated to provide more granular control and customizability through additional settings. You can now search for specific settings and explore new options for Sound, Power & sleep, Network & Internet, Apps, Accounts, Ease of Access, and more. Some examples include selecting an alternative color profile for your HoloLens 2 display with the display color calibration tool, resetting default apps using the default app picker, and enabling Battery Saver Mode and Airplane Mode for your HoloLens 2.

We are also adding a new interaction for the holographic keyboard by introducing ‘Swipe to type’, similar to your mobile device. You can pass your fingertip through the plane of the keyboard, create the shape of the word, and then withdraw your finger from the plane.
The new Power menu allows you to Sign out, Shut down and Restart your device from the Start menu by tapping the user profile icon. There will also be an indicator when there is a system update available.


For our customers that share a HoloLens 2 across several users, multiple user accounts will now be visible on the sign-in screen, quashing the need to constantly retype usernames and passwords to change users. Before this build, you would just see one user or the generic ‘Other User’.

For IT admins, we continue to deliver features that enable seamless control and management of your devices. To highlight a few, Visitor Auto-logon for Kiosk mode will now be on by default for visitors but can be managed or turned off. Additionally, we improved error handling to help end-users get unblocked in case of a Kiosk mode failure. Instead of displaying an empty menu on startup if no Azure AD (Azure Active Directory) membership is found, a global kiosk configuration will be displayed (if available).
The Delivery Optimization Preview aims to reduce network bandwidth consumption for downloads from multiple HoloLens devices. Read Delivery Optimization for Windows 10 updates for more information on this feature.
Upgrade Today
As mentioned above, you can check out the full release notes on the HoloLens 2 release notes page. Update your HoloLens 2 devices so today to take advantage of the most recent features. If you are an IT administrator, we also created an IT Admin – Update Checklist to help you track and implement the features of this update.
Use the Feedback Hub app on your HoloLens to submit your feedback and report any issues. We love getting your feedback and take it all into consideration, so please keep it coming!
![Back in the Office with Microsoft Teams [M365 Meetup for Government]](https://www.drware.com/wp-content/uploads/2021/05/fb_image-90.jpeg)
by Contributed | May 11, 2021 | Technology
This article is contributed. See the original author and article here.
Back in the Office with Microsoft Teams – Professional woman is depicted in an office using teams.
As many organizations start to return to in-person office environments, how can we best leverage Microsoft Teams not only as a virtual work environment, but to enable and support more traditional office space scenarios? Discuss and explore real world adoption techniques and customer pain points – with solutions – to help keep your team on track. Live Q&A with expert deployment and workforce adoption experts.
Session Registration Link – Sign Up Here!
Presenter:
Doug Deitterick, Microsoft Federal
https://www.linkedin.com/in/dougdeitterick/
Live Q&A Panel with:
Jennifer Mason – Vice President Workforce Transformation and Learning, Planet Technologies
https://www.linkedin.com/in/jennifer-mason-5aa84b4/
Adam Ochs – Cloud Architect, Planet Technologies
https://www.linkedin.com/in/aochs/
Julie White – Evolve 365 Learning Strategist Manager, Planet Technologies
https://www.linkedin.com/in/julie-white-868a4a13/

Recent Comments