
by Contributed | Mar 11, 2021 | Technology
This article is contributed. See the original author and article here.
Get to know the Lifestyle category teams innovating for impact with deep convolutional neural networks, Artificial Intelligence, Microsoft Edge Extensions, and more.
The 2021 Imagine Cup is all about innovating to help solve pressing global issues, and this year’s competition is focused on solutions in four social good categories: Earth, Education, Healthcare, and Lifestyle. All tech ideas submitted to the competition were developed under one category that best aligned with a team’s passion and motivation to make a difference. In this feature, we’ll look at innovations in our Lifestyle competition category.
Lifestyle overview
The Lifestyle category focuses on projects that shape how we game, play, and live. Tech that creates opportunities for recreation, building community, and shaping our passions, hobbies, and work is important for all of us as a digital world becomes interwoven into our daily lives. Students have created solutions within this category encompassing a virtual game to combat social isolation, an app to increase the spatial awareness of cyclists, and a sign-language caption generator.
Why it matters
The tools, games, and resources that bring positivity, fun, social connection, and creative interactions with others around the world is more important than ever. At the forefront of Lifestyle innovation is creating technology that holds purpose and meaning in our lives giving us information, creative outlets, connection, and relaxation. Students in this category aim to have that impact through their Imagine Cup ideas.
Meet our Lifestyle category World Finalists:
Team Assurance, United States
Project: Assurance – Re(Imagine) Safety
Team Assurance created a proactive and affordable system to prevent mass shootings. It works by scanning the aggregate input from security camera feeds for firearms and alerts all parties it needs to alert as soon as a firearm is detected. The system is fully extensible and is able to run on low-cost hardware.
|
|
Team DataMasker, China
Project: WellMask
WellMask is an Artificial Intelligence social mask based on semantic extraction & symbol communication. The team hopes to solve the problems of inefficient communication and high social threshold caused by masks, so that masks are no longer synonymous with isolation.
|
 |
Team Detectd, India
Project: Detectd- A sophisticated Artificial Intelligence based online Deepfake Detection platform
Detectd is a sophisticated Artificial Intelligence online Deepfake detection platform. It aims to fight misinformation warfare, the biggest cyber threat of 21st century. The aim is to counter the bad actors from weaponizing AI & misinformation.
|
 |
Team En#Plane, Korea
Project: HSG : Hate Speech Guard for Children
HSG is a Microsoft Edge extension program for children that filters hate speech in text and videos on websites. The goal is to positively aid child development and reduce parental concerns.
|
 |
Team Funtime, France
Project: Funtime
Funtime is a social game, with the goal to help people socializing virtually. The game is a video call with pose challenges that players try to mimic. AI is used to analyze the human poses and return a player score.
|
 |
Team INTELLIVOLT, Kenya
Project: Power Monitoring System
Intellivolt monitors over voltage, under voltage and power outages. Alerts from Azure applications in the form of SMS and emails are sent to relevant authorities in real time.
|
 |
Team Mimibot, Singapore
Project: Mimibot
Mimibot is a chatbot that interacts with children aged 7-12. Its database is connected to a web portal that allows parents and teachers to gain insight to their children’s emotions and words or topics using data visualization.
|
 |
Team Roball Go, China
Project: Intelligent Visual Inspection Spherical Robot with Active Drive and Recovery
Roball Go is an intelligent vision spherical inspection robot with active attitude drive and recovery. It can travel in a variety of harsh environments so as to be used in consumer-grade entertainment projects, security inspections, environmental inspections, and national defense and military applications.
|
 |
SafeTandem, Singapore
Project: SafeTandem
The team created an Android application with an optional hardware add-on to increase the spatial awareness of cyclists and the people around then. The solution aims to benefit everyone, including the deaf and hard-of-hearing community.
|
 |
Team Threeotech, Thailand
Project: JustSigns
JustSigns is a web application for content creators to create sign language captions to improve media accessibility for hard-of-hearing viewers.
|
 |
Team Virtuoso Music, United States
Project: Virtuoso-Hyper-realistic AI Musician Using a Novel Multi-resolution Approach with deep convolutional neural networks
Virtuoso is a program capable of playing a midi (sheet music) as if it was played by a real musician, achieved by utilizing a novel multi-resolution approach using deep convolutional neural networks.
|
 |
Team Zephyr Air, United States
Project: Zephyr Air
Zephyr Air is a low-cost smart air purifier that automatically turns on when the particulate matter sensor inside detects highly concentrated levels of P.M. 2.5 and P.M.10.
|
 |
We’re so inspired by these students’ passion to make a difference and are excited to see them pitch their projects at the World Finals this month. Four winning teams will be selected from each of the competition categories, taking home USD10,000 and Azure credits. These teams will also move forward to the World Championship for the chance to win USD75,000 and mentorship with Microsoft CEO, Satya Nadella. Two runner-up teams in each category will take home USD2,500 plus Azure credits.
Follow the action
Follow these teams’ journey on Instagram and Twitter as they head to the World Finals to compete.
by Contributed | Mar 11, 2021 | Technology
This article is contributed. See the original author and article here.
One question we often get in support is, “How do I find all my Planner plans?” The answer to this is not too tricky—the tricky bit is ‘all plans; rather than ‘all my plans’—as, due to security and privacy controls, you can only ever see plans that are in a group where you are a member (and being an owner does not automatically mean you are a plan member as far as Planner is concerned). But with that constraint how can I get a list of all my plans other than looking at the Planner hub? PowerShell and the Microsoft Graph API are one way.
An animation showing some plans, the PowerShell code and then the output list of groups and plans
I’ve posted previously about using the Graph with Planner, and to avoid repeating some of the basics I won’t cover the creation of App Registrations in Azure Active Directory in depth. You can find those details in this blog from Lee Ford. His blog is not about Planner specifically, but has very good steps on the App Registration using a more recent UI than I did in my earlier posts. I’ll note in the PowerShell code walkthrough below the specific permissions needed.
I also use the latest MSAL authentication, using the MSAL.PS module to make things easier. You’ll need to have the most up-to-date version of PowerShell and preferably PowerShellGet to make it easier to install modules. I usually work in the ISE, too. On to the code!
First, I have a function that helps to handle failed web calls—unless you get a “200” http response, it will be handled as an exception—so you need to use Try/Catch rather than just read the status of the response. I found this useful function on Chris Wahl’s blog.
# Script to iterate Groups and get all Plans

function not200 {
$global:result = $_.Exception.Response.GetResponseStream()
$global:reader = New-Object System.IO.StreamReader($global:result)
$global:responseBody = $global:reader.ReadToEnd();
$message = $global:responseBody | ConvertFrom-Json
Write-Host -BackgroundColor:Black -ForegroundColor:Red "Status: A system exception was caught."
Write-Host -BackgroundColor:Black -ForegroundColor:Red $message.error.message
}
This will be called in the catch to give the specific error (usually it will be a “403″ for Groups that you read, but since you’re not a member you can’t see the groups). You could use this information to either find a member or add yourself to check for plans.
Next is the authentication using MSAL. First, you need to install the module either manually or using the Install-Module if you have PowerShellGet.
# MSAL.PS added to the function to support the MSAL libraries
# Available from https://github.com/AzureAD/MSAL.PS or https://www.powershellgallery.com/packages/MSAL.PS
# Or Install-Module MSAL.PS -AcceptLicense
Import-Module MSAL.PS

# Interactive login
# Client ID is created in Azure AD under App Registration - requires Group.Read.All and the default User.Read
# Redirect Url is Mobile and Desktop applications - https://login.microsoftonline.com/common/oauth2/nativeclient
# Change TenantId to your own tenant
For the call, you need to have your TenantId as well as a ClientId that you have configured via Azure AD as per the reference I shared above. This assumes you are making an interactive login—so it will prompt you—but if necessary you could configure with any of the supported MSAL authentication flows. Just a reminder, Planner always requires an app + user authentication.
$graphToken = Get-MsalToken -ClientId "<replace with your client id>" -TenantId "<replace with your tenant id>" `
-Interactive -Scope 'https://graph.microsoft.com/Group.Read.All', 'https://graph.microsoft.com/User.Read' `
-LoginHint <use your fully qualified domain name as login hint>
Once you have the token, the next section is where the work happens, as it makes a call to get all groups and then iterates over the groups to get the plans in each group—assuming you have access. As you can potentially have a lot of groups, the response can be paged, so the “while” loop handles this seamlessly to get all groups in one PowerShell object. There are very useful Graph examples in this blog from Rezwanur Rahman. I used the “top 10” filter to give me a nextlink—even though I don’t have that many groups—and to check the “while“ functionality. This also shows how the parameters are passed in, which are not really the body of the call but work as url query strings. I also use the parameter to pull just two fields.
#
# Get Groups
#

$headers = @{}
$headers.Add('Authorization','Bearer ' + $graphToken.AccessToken)
$headers.Add('Content-Type', "application/json")

$parameters = @{'$select'='id,displayname'
'$top'='10'}

$uri = "https://graph.microsoft.com/v1.0/groups"

# Fetch all groups

$groupsRequest = Invoke-RestMethod -Uri $uri -Method GET -Headers $headers -Body $parameters

$groups = @()
$groups+=$groupsRequest.value

while($groupsRequest.'@odata.nextLink' -ne $null){
    $groupsRequest = Invoke-RestMethod -Uri $groupsRequest.'@odata.nextLink' -Method GET -Headers $headers
    $groups+=$groupsRequest.value
    }
Now that I have all my groups, I’ll next look at each for any plans.
# Iterate through the Groups and find the plans owned by each group

ForEach($value in $groups)
{
    Write-host " "
    Write-host "Group ID           = " $value.id
    Write-host "Group Display Name = " $value.displayname

    $parameters = @{'$select'='id,title'}

    $uri = "https://graph.microsoft.com/v1.0/groups/" + $value.id + "/planner/plans"
    try
    # This code will read all groups - but if you are not a member it may fail to read plans
    {

        $plans = Invoke-WebRequest -Uri $uri -Method Get -Headers $headers -Body $parameters -UseBasicParsing
            if($plans.StatusCode -eq '200')
            {
                $plansContent = $plans.Content | ConvertFrom-Json
                $plansContentValues = $plansContent.value
                ForEach($value in $plansContentValues)
                {
                    Write-host "     Plan ID    = "$value.id
                    Write-host "     Plan title = "$value.title
                }
            }
            else
            {
                Write-host "Likely permissions issue with " $value.displayname "site/plan"
            }

     }catch
        {
            not200
            Write-host "     No access to group - "$value.description " with the /planner/plans call"
            Write-host "     Check in AAD or Graph"
        } # avoids the 403 displaying - may hide other failures

}
Again, I am using parameters to get the fields I want. I also found that on some machines I didn’t need the -UseBasicParsing flag—that depends on exact versions and is now the default. The output of this script will show the group ID and display name, and then indented underneath the plan ID and title for each plan.
 Part of the output showing groups and plans and a failure
I hope you find this useful.
by Contributed | Mar 11, 2021 | Technology
This article is contributed. See the original author and article here.
As you mature in your cloud journey you may start to be intrigued by the Azure REST API. I feel like sometimes our answer to almost anything is “we could do that through the REST API.” This is a true statement but when we are talking to Infrastructure Engineers a REST API solution might be intimidating. What I want to do in this blog is to use Logic App to make an Azure REST API call with the goal of taking away some of the stigma that you need to be a programmer to utilize API calls!
Azure REST API
Before we jump into Logic App look at our documentation on the Azure REST API:
Azure REST API reference documentation | Microsoft Docs
As you can see this library of APIs is extensive and powerful. That’s why you can do almost anything through the Azure REST API. For this blog I’m going to utilize the Virtual Network API for listing your Virtual Networks:
Virtual Networks – List All (Azure Virtual Networks) | Microsoft Docs
Most everyone has at least one Virtual Network in there subscription so this is a good one to start with.
Virtual Network – List All
We need to understand the API before we can call it. The first thing I always look at is the sample call:
GET https://management.azure.com/subscriptions/{subscriptionId}/providers/Microsoft.Network/virtualNetworks?api-version=2020-07-01
Couple thing to note from this:
- This is a “GET” operation
- The values we need to provide will be in the {} block. So for this particular API we need to just provide the Subcription ID we want to query
The other section that I always look at too is the “Sample” section which will have a sample response. So for this one we should expect the response to look like this:
{
  "value": [
    {
      "id": "/subscriptions/subid/resourceGroups/rg1/providers/Microsoft.Network/virtualNetworks/vnet1",
      "name": "vnet1",
      "type": "Microsoft.Network/virtualNetworks",
      "location": "westus",
      "properties": {
        "addressSpace": {
          "addressPrefixes": [
            "10.0.0.0/8"
          ]
        },
        "dhcpOptions": {
          "dnsServers": []
        },
        "subnets": [
          {
            "id": "/subscriptions/subid/resourceGroups/rg1/providers/Microsoft.Network/virtualNetworks/vnet1/subnets/test-1",
            "name": "test-1",
            "properties": {
              "addressPrefix": "10.0.0.0/24",
              "provisioningState": "Succeeded"
            }
          }
        ],
        "virtualNetworkPeerings": [],
        "provisioningState": "Succeeded"
      }
    },
    {VNET2},
    {VNET3},
    {…}
  ]
}
Logic App
So how do we take advantage of Logic App to call this API? Well let’s start with a blank logic app. Here is some info if you’ve never created one:
Quickstart – Create your first Logic Apps workflow – Azure portal – Azure Logic Apps | Microsoft Docs
When you create a Logic App it always brings you to the designer page. You always need a trigger in your logic app and for testing I like to use the “When a HTTP Request is Received” (I can always change it later to something like a schedule).
This will take you into the designer with the trigger already added. We are going to utilize the managed identity for the Logic App to do the REST API call. This is not enabled by default, so we need to enable it and give it some rights before we go further. Go ahead and save the Logic App in the designer. Then go to “Identity” under the “Settings” for your Logic App.

Turn the status to “On” and click on “Save”

Once it finishes saving click on the “Azure role assignments”:

Click on “Add role assignment” and fill in the following:
- Scope: Subscription
- Subscription: Whatever subscription you plan to query

Click on Save. At this point the Managed Identity has the permissions needed to query the REST API so we can move back to the Logic App Designer.
In the designer, go ahead and click on the “New Step” below the trigger.
Search for “http” and select the “HTTP” action

Then we can choose the basic HTTP Action

Let’s go ahead and add the authentication before we fill anything out. Click on “Add new parameter” and check the box next to “Authentication”. You’ll need to click somewhere outside of the drop down to add it in so click for instance the “URI” field.

Now we can fill out the required fields to call the REST API
***Replace {subscriptionId} with the subscription id you want to query***
- Authentication type: Managed identity

Go ahead and save your Logic App and then click on Run.

You should see the HTTP call succeed and in the “Body” section you should see your VNets.

Congrats! You have authenticated to an Azure Rest API, made a request, and successfully gotten results.
Using the Results
I don’t want to leave you with just the results in the body of the HTTP action. Let’s actually do something with the results in Logic Apps. I would typically do some parsing of the JSON but to keep this simple being the focus here is the REST API and not Logic App we will keep the parsing of the JSON to a minimum.
Go back into the Logic App Designer and click on “New Step” below the HTTP action.
Search for “parse json” and then under the “Actions” section choose “Parse JSON”

Click in the “Content” section and then from the “Dynamic content” choose “Body”

Click on the option to “Use sample payload to generate schema”

In the box that pops up you can paste in the below:
***TIP: You can get the sample payload from the previous run we did. You can just grab the body from the “Output”***
{
  "value": [
    {
      "id": "/subscriptions/subid/resourceGroups/rg1/providers/Microsoft.Network/virtualNetworks/vnet1",
      "name": "vnet1",
      "type": "Microsoft.Network/virtualNetworks",
      "location": "westus",
      "properties": {
        "addressSpace": {
          "addressPrefixes": [
            "10.0.0.0/8"
          ]
        },
        "dhcpOptions": {
          "dnsServers": []
        },
        "subnets": [
          {
            "id": "/subscriptions/subid/resourceGroups/rg1/providers/Microsoft.Network/virtualNetworks/vnet1/subnets/test-1",
            "name": "test-1",
            "properties": {
              "addressPrefix": "10.0.0.0/24",
              "provisioningState": "Succeeded"
            }
          }
        ],
        "virtualNetworkPeerings": [],
        "provisioningState": "Succeeded"
      }
    }
  ]
}
Click “Done” and it’ll generate the schema for you.
Click on “New Step” below the “Parse JSON”
Search for “create html table” and then under the “Actions” section choose “Create HTML table”

Click in the “From” field and in “Dynamic content” search for “value”. Choose the “value” field from “Parse JSON”

We now have an HTML table lets send an email with it attached.
Click on “+ New Step” below this activity, search for “send an email (v2)”, and choose the Office 365 Outlook action named “Send an email (V2)”

Rename the Action to “Email HTML Report” and fill out the following:
- Body: Whatever you wish for the Body of the email
- Subject: Whatever you wish for the Subject of the email
- To: Fill out the emails you wish to receive the report
- Click on “Add new parameter” and choose “Attachment”
- Attachment Content: from the “Dynamic content” choose “Output” under “Create HTML table”
- Attachment Name: Something like “VNets.html”

That’s it for the Logic App. You should now click on “Save” and once the Logic App is saved click on “Run”. Look for an email with the HTML attachment.

Summary
In this blob we showed how to use Logic App to query the Azure Rest API, take the output and make a HTML report, then email that report as an attachment. The focus was on calling the REST API and not the report (there is more formatting that I’d do with that report but didn’t want to focus on that). So hopefully you see from this example that you don’t need to be a programmer to call Azure REST APIs. Logic App can take care of the authentication and we can focus on just formatting the request correctly! As an Azure Administrator this can open the doors for a lot of automation that you always wanted but never thought was possible.
by Contributed | Mar 11, 2021 | Technology
This article is contributed. See the original author and article here.
There was some new Windows Server goodness announced at Microsoft Ignite by Bernardo Caldas, VP of Program Management from the Azure Edge and Platform team. In the Featured Session “Latest Azure Innovation for Windows Server and SQL Server” – he revealed some great nuggets of information about Windows Server 2022, Azure Stack HCI and new functionality that got some buzz called “Hotpatching”. I am willing to bet you didn’t catch something that’s worth talking about. It’s a new edition of Windows Server called Azure Edition. To be fair – its full name is: Windows Server 2019 Datacenter: Azure Edition.
That’s right – a special version of Windows Server 2019. This is a separate product that has a unique build number and codebase. It will be serviced in parallel to Windows Server 2019 Datacenter Core and will have the exact same feature set but will have one main addition – it supports hotpatching. Hotpatching is a new Windows Update technology that will provide significant update advantages due to its ability to apply patches in memory and not require a reboot of the server. Check out this quick demo video of Windows Server 2019 hotpatching in action:
For more complete details on Hotpatching, you can see the initial documentation about it on our docs site (Hotpatch for Windows Server Azure Edition (preview) | Microsoft Docs).
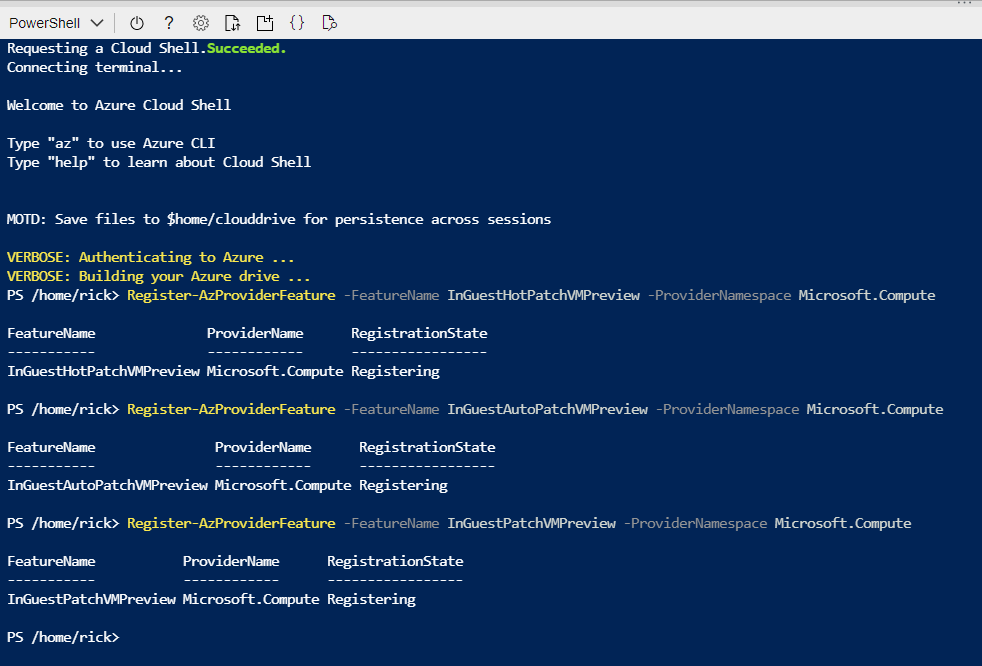
You want to get you hands dirty now? Start your testing early and try out Windows Server 2019 Datacenter: Azure Edition with your Microsoft Azure subscription. All you need to do is enroll your subscription into the Azure Update Manager preview. The easiest way to do this is to sign into the Azure Portal and open an Azure Cloud Shell instance from the top right corner. You will want to execute the following three powershell commands to enroll in the preview:
Register-AzProviderFeature -FeatureName InGuestHotPatchVMPreview -ProviderNamespace Microsoft.Compute
Register-AzProviderFeature -FeatureName InGuestAutoPatchVMPreview -ProviderNamespace Microsoft.Compute
Register-AzProviderFeature -FeatureName InGuestPatchVMPreview -ProviderNamespace Microsoft.Compute
Your output should look like this from a CloudShell prompt
The registration can take up to 15 minutes – you can check on it’s status with the Get-AzProviderFeature command:
Get-AzProviderFeature -FeatureName InGuestHotPatchVMPreview -ProviderNamespace Microsoft.Compute
Get-AzProviderFeature -FeatureName InGuestAutoPatchVMPreview -ProviderNamespclearace Microsoft.Compute
Get-AzProviderFeature -FeatureName InGuestPatchVMPreview -ProviderNamespace Microsoft.Compute
Once the status comes back as Registered, you can either wait some more or choose to propagate this down to the Compute Resource Provider faster with:
Register-AzResourceProvider -ProviderNamespace Microsoft.Compute
You should expect to have the following as a successful registration

Now that your subscription is enabled, you will want to deploy a new Virtual Machine from the Windows Server Operating Systems Preview image by searching for one in the Azure Marketplace OR by using this shortcut https://aka.ms/WindowsServerAzureEdition and clicking on the “GET IT NOW” button.

You can select the Windows Server 2019 Datacenter: Azure Edition from the drop down and click on Continue to start the deployment process in the Azure portal. I recommend you click on the CREATE button to have full visibility into the configuration options for this deploy.

Your VM will have a couple of additional configuration options in the Manage section, most notably “Enable Hotpatch (preview)” and “Patch Orchestration Options” with a single choice of “Azure-Orchestrated”. These will be enabled by default for your deployment.

Once deployment is complete you can see the details of hotpatching by going to the virtual Machine overview page and selecting Guest and Host Updates from the left hand side menu under the Operations section. From there – click on Go to Hotpatch (Preview)

You’ll notice there has been no evaluation of machines before. You can force an assessment by clicking on the Assess Now button.

Hotpatching works with cumulative updates on a monthly basis. Microsoft will issue baseline updates every three months in preview and hotpatch updates on the two months in-between each baseline. An example of this schedule is:

Your newly deployed Windows Server 2019 Datacenter: Azure Edition machine comes pre-installed with the latest updates and based on when you try this out – will require hotpatch updates to be current.

From this assessment you can choose Install Updates Now and fill in the details of what updates you wish to install and if you will allow a reboot. Click on the Install button to instruct the Azure Agent to proceed with the install.

Now you now have your first Windows Server 2019 Datacenter: Azure Edition machine setup for hotpatching. A reminder that you should not be using this machine in production as it is currently in preview for testing purposes. Windows Server Azure Edition will be serviced in parallel to Windows Server 2019 and will continue with future releases of Windows Server. Don’t forget – the only major difference between Windows Server 2019 Datacenter editions is the support for Hotpatching in Microsoft Azure.
Stay tuned for more updates on future releases of Windows Server as we get closer to general availability.
by Contributed | Mar 11, 2021 | Technology
This article is contributed. See the original author and article here.
There was some new Windows Server goodness announced at Microsoft Ignite by Bernardo Caldas, VP of Program Management from the Azure Edge and Platform team. In the Featured Session “Latest Azure Innovation for Windows Server and SQL Server” – he revealed some great nuggets of information about Windows Server 2022, Azure Stack HCI and new functionality that got some buzz called “Hotpatching”. I am willing to bet you didn’t catch something that’s worth talking about. It’s a new edition of Windows Server called Azure Edition. To be fair – its full name is: Windows Server 2019 Datacenter: Azure Edition.
That’s right – a special version of Windows Server 2019. This is a separate product that has a unique build number and codebase. It will be serviced in parallel to Windows Server 2019 Datacenter Core and will have the exact same feature set but will have one main addition – it supports hotpatching. Hotpatching is a new Windows Update technology that will provide significant update advantages due to its ability to apply patches in memory and not require a reboot of the server. Check out this quick demo video of Windows Server 2019 hotpatching in action:
For more complete details on Hotpatching, you can see the initial documentation about it on our docs site (Hotpatch for Windows Server Azure Edition (preview) | Microsoft Docs).
You want to get you hands dirty now? Start your testing early and try out Windows Server 2019 Datacenter: Azure Edition with your Microsoft Azure subscription. All you need to do is enroll your subscription into the Azure Update Manager preview. The easiest way to do this is to sign into the Azure Portal and open an Azure Cloud Shell instance from the top right corner. You will want to execute the following three powershell commands to enroll in the preview:
Register-AzProviderFeature -FeatureName InGuestHotPatchVMPreview -ProviderNamespace Microsoft.Compute
Register-AzProviderFeature -FeatureName InGuestAutoPatchVMPreview -ProviderNamespace Microsoft.Compute
Register-AzProviderFeature -FeatureName InGuestPatchVMPreview -ProviderNamespace Microsoft.Compute
Your output should look like this from a CloudShell prompt
The registration can take up to 15 minutes – you can check on it’s status with the Get-AzProviderFeature command:
Get-AzProviderFeature -FeatureName InGuestHotPatchVMPreview -ProviderNamespace Microsoft.Compute
Get-AzProviderFeature -FeatureName InGuestAutoPatchVMPreview -ProviderNamespclearace Microsoft.Compute
Get-AzProviderFeature -FeatureName InGuestPatchVMPreview -ProviderNamespace Microsoft.Compute
Once the status comes back as Registered, you can either wait some more or choose to propagate this down to the Compute Resource Provider faster with:
Register-AzResourceProvider -ProviderNamespace Microsoft.Compute
You should expect to have the following as a successful registration
Now that your subscription is enabled, you will want to deploy a new Virtual Machine from the Windows Server Operating Systems Preview image by searching for one in the Azure Marketplace OR by using this shortcut https://aka.ms/WindowsServerAzureEdition and clicking on the “GET IT NOW” button.
You can select the Windows Server 2019 Datacenter: Azure Edition from the drop down and click on Continue to start the deployment process in the Azure portal. I recommend you click on the CREATE button to have full visibility into the configuration options for this deploy.
Your VM will have a couple of additional configuration options in the Manage section, most notably “Enable Hotpatch (preview)” and “Patch Orchestration Options” with a single choice of “Azure-Orchestrated”. These will be enabled by default for your deployment.
Once deployment is complete you can see the details of hotpatching by going to the virtual Machine overview page and selecting Guest and Host Updates from the left hand side menu under the Operations section. From there – click on Go to Hotpatch (Preview)
You’ll notice there has been no evaluation of machines before. You can force an assessment by clicking on the Assess Now button.
Hotpatching works with cumulative updates on a monthly basis. Microsoft will issue baseline updates every three months in preview and hotpatch updates on the two months in-between each baseline. An example of this schedule is:
Your newly deployed Windows Server 2019 Datacenter: Azure Edition machine comes pre-installed with the latest updates and based on when you try this out – will require hotpatch updates to be current.
From this assessment you can choose Install Updates Now and fill in the details of what updates you wish to install and if you will allow a reboot. Click on the Install button to instruct the Azure Agent to proceed with the install.
Now you now have your first Windows Server 2019 Datacenter: Azure Edition machine setup for hotpatching. A reminder that you should not be using this machine in production as it is currently in preview for testing purposes. Windows Server Azure Edition will be serviced in parallel to Windows Server 2019 and will continue with future releases of Windows Server. Don’t forget – the only major difference between Windows Server 2019 Datacenter editions is the support for Hotpatching in Microsoft Azure.
Stay tuned for more updates on future releases of Windows Server as we get closer to general availability.

Recent Comments