by Contributed | Mar 15, 2021 | Technology
This article is contributed. See the original author and article here.
As mobile usage becomes more prevalent in your organizations, so does the need to protect against data leaks. App protection policies (APP, also known as MAM) help protect work or school account data through data protection, access requirements, and conditional launch settings. For more information, see App protection policies overview.
Conditional launch settings validate aspects of the app and device prior to allowing the user to access work or school account data, or if necessary, remove the work or school account data. Based on your feedback, we’ve updated an existing conditional launch setting, and are introducing four new management settings.
Jailbroken/rooted devices
Status: Jailbroken/rooted devices conditional launch setting was updated in February 2021 and works with both iOS and Android Microsoft apps.
To improve the overall security of devices accessing work or school account data using apps with App Protection Policies, the Jailbroken/rooted devices conditional launch setting can no longer be deleted and defaults to block access. Organizations now only have two options for jailbroken or rooted devices:
- Block access – When the Intune SDK has detected the device is jailbroken or rooted, the app blocks access to work or school data.
- Wipe data – When the Intune SDK has detected the device is jailbroken or rooted, the app will perform a selective wipe of the users’ work or school account and data.
For organizations that had previously removed the Jailbroken/rooted devices conditional launch setting, this is now enforced in the Intune SDK automatically. If users had been using a jailbroken or rooted device prior to this change, those devices would be blocked.
Disabled account
Status: The Disabled account conditional launch setting was released in Q4 2020 and works with both iOS and Android Microsoft apps.
When a user account is disabled in Azure Active Directory (Azure AD), customers have an expectation that work or school account data being managed by an APP is removed. Prior to this conditional launch setting, customers had to rely on the Offline grace period timer to remove the data after the token expired.
The Disabled account conditional launch setting works by having the Intune SDK check the state of the user account in Azure Active Directory when the app cannot acquire a new token for the user. If the account is disabled, then the Intune SDK will perform the following based on the policy configuration:
- Block access – When Intune has confirmed the user has been disabled in Azure Active Directory, the app blocks access to work or school data.
- Wipe data – When Intune has confirmed the user has been disabled in Azure Active Directory, the app will perform a selective wipe of the users’ work or school account and data.
If Disabled account is not configured, then no action is taken. The user continues to access the data in an offline manner until the Offline grace period wipe timer has expired with data access being wiped after 90 days (assuming default settings).
Important: The Disabled account setting does not detect account deletions. If an account is deleted, the user continues to access data in an offline manner until the Offline Grace Period wipe timer has expired.
The time taken between disabling an Azure Active Directory user account and the Intune SDK wiping the data varies. There are several components that impact the time to initiate the data wipe:
[Max time to wipe] = [Azure AD connect sync time] + [APP access token lifetime] + [APP check-in time]
- Azure AD Connect sync defaults to 30 minutes. See Azure AD Connect sync: Scheduler for more information.
- Azure AD access token for the APP service is hard coded to 120 minutes.
- Intune APP check-in time is hard coded to 30 minutes. For more information, see Understand App Protection Policy delivery timing.
The selective wipe will be executed the next time that the app is active after the max time to wipe has passed.
Max OS version
Status: The Max OS version conditional launch is supported with the March 2021 (Company Portal version 5.0.5084.0) release for Android Microsoft apps and the Intune SDK will be available for consumption by iOS Microsoft apps in April 2021.
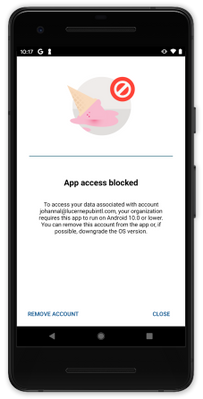
The Max OS version conditional launch setting operates like the Min OS version setting. When the app launches, the operating system version is checked. The primary use case for the Max OS version conditional launch setting is to ensure that users don’t use unsupported operating system versions to access work or school account data. An unsupported version could be beta versions of next generation operating systems, or versions that you have not tested.
If the operating system version is greater than the value specified in the Max OS version, then the Intune SDK will perform the following based on the policy configuration:
- Warn – The user sees a dismissible notification if the operating system version on the device doesn’t meet the requirement.
- Block access – The user is blocked from accessing work or school account data if the operating system version on the device doesn’t meet the requirement.
- Wipe data – The app performs a selective wipe of the users’ work or school account and data if the operating system version doesn’t meet the requirement.
Figure 1: Access is blocked due to OS version
Require device lock
Status: The Require device lock Android conditional launch setting was released in January 2021 and works with Android Microsoft apps.
The Require device lock conditional launch setting determines if the Android device has a device PIN, password, or pattern set. It cannot distinguish between the lock options or complexity, for that, device enrollment is required. If the device lock is not enabled on the device, then the Intune SDK will perform the following based on the policy configuration:
- Warn – The user sees a dismissible notification if the device lock is not enabled.
- Block access – The user is blocked from accessing work or school account data if the device lock is not enabled.
- Wipe data – The app performs a selective wipe of the users’ work or school account and data if the device lock is not enabled.
 Figure 2: Access is blocked until device lock is enabled
With this conditional launch setting, there is parity both mobile operating system platforms whereby app protection policies can enforce a device PIN (on iOS, device lock is required when encryption is required) on devices that are not enrolled.
SafetyNet Hardware Backed Attestation
Status: The SafetyNet hardware backed attestation conditional launch setting for Android will be supported in Q2 2021.
App protection policies provide the capability for admins to require end-user devices to pass Google’s SafetyNet Attestation for Android devices. Administrators can validate the integrity of the device (which blocks rooted devices, emulators, virtual devices, and tampered devices), as well as require that unmodified devices that have been certified by Google. Within APP, this is configured by setting SafetyNet device attestation to either Check basic integrity or Check basic integrity & certified devices.
Hardware backed attestation enhances the existing SafetyNet attestation service check by leveraging a new evaluation type called Hardware Backed, providing a more robust root detection in response to newer types of rooting tools and methods, such as Magisk, that cannot always be reliably detected by a software only solution. Within APP, hardware attestation will be enabled by setting Required SafetyNet evaluation type to Hardware-backed key once SafetyNet device attestation is configured.
As its name implies, hardware backed attestation leverages a hardware-based component which shipped with devices installed with Android 8.1 and later. Devices that were upgraded from an older version of Android to Android 8.1 are unlikely to have the hardware-based components necessary for hardware backed attestation. While this setting should be widely supported starting with devices that shipped with Android 8.1, Microsoft strongly recommends testing devices individually before enabling this policy setting broadly.
Important: Devices that do not support this evaluation type will be blocked or wiped based on the SafetyNet device attestation action. Organizations wishing to use this functionality will need to ensure users have supported devices. For more information on Google’s recommended devices, see Android Enterprise Recommended requirements.
If the device fails the attestation query, then the Intune SDK will perform the following based on the policy configuration:
- Warn – The user sees a dismissible notification if the device does not meet Google’s SafetyNet Attestation scan based on the value configured.
- Block access – The user is blocked from accessing work or school account data if the device does not meet Google’s SafetyNet Attestation scan based on the value configured.
- Wipe data – The app performs a selective wipe of the users’ work or school account and data.
 Figure 3: Access is blocked with a rooted device
We hope you find these enhancements to our Conditional launch capabilities useful. The Data Protection Framework has been updated for the settings that have been released and changes will be introduced as the new settings are released in the future.
Ross Smith IV
Principal Program Manager
Customer Experience Engineering
by Contributed | Mar 15, 2021 | Technology
This article is contributed. See the original author and article here.
Microsoft has always had a strong commitment to provide full transparency for every operation performed during incidents. When customers open support request, Microsoft support engineers may eventually proceed to investigate the databases and those operations must be surfaced to our customers.
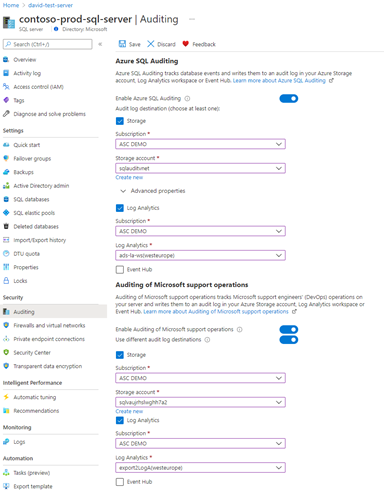
We are delighted to announce the general availability of the capability to audit operations performed by Microsoft support engineers when they need to access customer’s SQL assets during a support request. The use of this capability, along with the regular auditing, enables more transparency into customers’ workforce and is sometimes required for compliance with regulatory standards.
How to enable Azure SQL Auditing of Microsoft support operations?
This functionality can be enabled on every Azure SQL Server by turning the feature to ON and configuring the desired destinations or programmatically (API, Azure CLI and PowerShell cmdlet). Customers can also enable Azure SQL Auditing of Microsoft support operations on every Azure SQL Managed Instance by configuring their Audit log and specifying OPERATOR_AUDIT = ON. We are now allowing customers to use a single audit configuration for their SQL audit logs and the Auditing of Microsoft support operations.
How to investigate SQL audit logs of Microsoft support operations?
When Azure SQL Auditing of Microsoft support operations is configured to a storage account destination, customers can access the audit logs in the same way for Azure SQL Auditing or Azure SQL Auditing of Microsoft support operations.
When Azure SQL Auditing of Microsoft support operations is configured to a Log Analytics Workspace or an Event Hub destination, the audit logs will be audited under a new category called “DevOpsOperationsAudit“.
For more details on Auditing of Microsoft support operations for Azure SQL Server and Azure SQL Managed Instance, see Auditing for Azure SQL Database and Auditing for Azure SQL Managed Instance documentation.
by Contributed | Mar 15, 2021 | Technology
This article is contributed. See the original author and article here.
You might think of Azure Sentinel in the context of connecting the logs of third party devices (such as physical firewalls), to add the full picture of your environment for your Security, Information Event and Management processes. Azure Sentinel can also include other Microsoft solutions as data sources, such as Azure Active Directory, Microsoft Cloud App Security and Microsoft 365. Let’s take a look at the built-in threat hunting queries available for Microsoft 365.
NB: Previously known as Office 365, some remnants of this original name still exist, like the data connector name.
Ingesting Microsoft 365 data
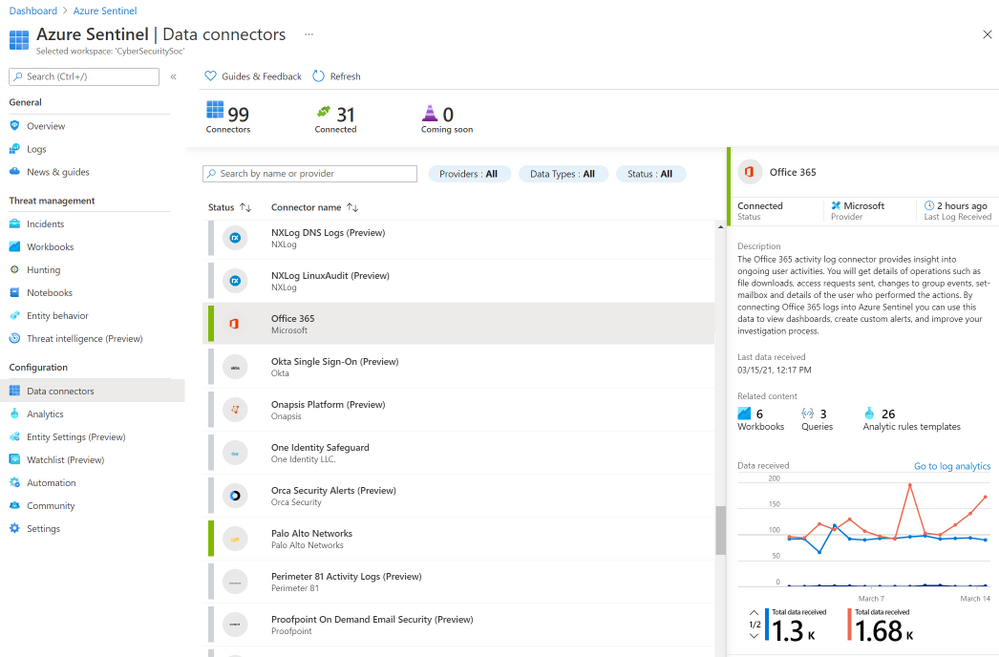
First, you’ll need to add the Office 365 data connector to Azure Sentinel. A pre-requisite for this is that unified audit logging must be enabled on your Office 365 deployment. You can use the Microsoft 365 Security and Compliance Center to check the status of unified audit logging. Then you can enable the Office 365 log connector in Azure Sentinel, in the Data Connectors blade.
The Office 365 data connector in Azure Sentinel
At the time of writing, this data connector supports the ingestion of data from Exchange Online, SharePoint Online, OneDrive for Business and Microsoft Teams. For a full and current list of supported audit log data, visit the OfficeActivity Logs Reference.
Built-in threat hunting queries for Microsoft 365
There are currently 27 queries available in Azure Sentinel that Microsoft provides for the OfficeActivity logs. Queries with a * can include other data sources, like SignInLogs or even AWS Cloud Trail:
- Multiple password reset by user*
- Permutations on logon attempts by UserPrincipalNames indicating potential brute force*
- Rare domains seen in Cloud Logs*
- Tracking Privileged Account Rare Activity*
- Exploit and Pentest Framework User Agent*
- New Admin account activity seen which was not historically
- SharePointFileOperation via previously unseen IPs
- SharePointFileOperation via devices with previously unseen user agents
- Non-owner mailbox login activity
- Powershell or non-browser mailbox login activity
- SharePointFileOperation via clientIP with previously unseen user agents
- Multiple users email forwarded to same destination
- Preview – TI (threat intelligence) map File entity to OfficeActivity Event*
- Multiple Teams deleted by a single user
- Summarize files uploaded in a Teams chat
- Bots added to multiple teams
- User made owner of multiple teams
- External user from a new organisation added
- User added to Team and immediately uploads file
- Exes with double file extension and access summary
- Mail redirect via ExO transport rule
- New Windows Reserved Filenames staged on Office file services
- Office Mail Fowarding – Hunting Version
- Files uploaded to teams and access summary
- External user added and removed in a short timeframe
- Previously unseen bot or application added to Teams
- Anomalous access to other user’s mailboxes
These queries give you common scenarios you might want to search the logs for, and the Kusto Query Language (KGQL) to run these queries at the click of a button. After filtering or searching the list of queries across all of the data sources, you can even click Run displayed queries to execute multiple searches at once.
 Azure Sentinel run displayed queries
Check out the public Hunting query repository on GitHub too, for more queries shared by the community.
Scenario: Mail forwarding
The magic comes from deciding which queries are relevant to your organization and relevant to the potential security threat you’re proactively investigating. You can always build your own with KQL (or start with a built-in one and clone it to modify it), but the built-in queries offers some insights “out of the box” to get you started.
Let’s choose the Office Mail Forwarding – Hunting version query.
This query highlights cases where user mail is being forwarded and shows if it is being forwarded to external domains as well. It might be normal in your organization for mail to be forwarded, so monitoring and alerting on this every time it happens may generate noise you then start to ignore, because you know it’s normal. But if you’d been alerted of some abnormal employee behaviour, running this query can easily give you some more details.
 Mail forward hunting query and result
The results show that meganb set up a mailbox rule to automatically forward emails to someone at an external email domain, and the time, client IP address and email server involved.
While that query ran once at a point in time, looking at historical data, we could use it to run a livestream session, notifying us via the Azure portal notifications when new events occur, or elevating that livestream session to an alert. For more details, visit Use livestream to hunt.
Other steps in the threat hunt
The scenario has highlighted a particular activity by a user, MeganB, so let’s dig a little deeper. Now I’m going to use the User and Behaviour Analytics to look at activity related to Megan’s account. This isn’t a straight query – again, Megan may have done a lot of valid work that we would need to try and filter out. Instead, UEBA analyzes the data sources and builds baseline behavioural profiles, using a variety of techniques and machine learning to identify anomalous activity. The results are presented as timeline and as a set of insights.
 Behavior Analytics
I also have the option to click the Investigate button, and use the investigation graph to explore related data. Visit Tutorial: Investigate incidents with Azure Sentinel.
Want to learn more?
Check out the the following free learning paths on Microsoft Learn, which are also resources for the SC-200 Microsoft Security Operations Analyst exam (currently in beta):
SC-200 part 4: Create queries for Azure Sentinel using Kusto Query Language (KQL)
SC-200 part 5: Configure your Azure Sentinel environment
SC-200 part 7: Create detections and perform investigations using Azure Sentinel
SC-200 part 8: Perform threat hunting in Azure Sentinel
Summary
To help improve the threat response in your organization, a powerful tool like Azure Sentinel, plus the right data sources, is just the start. You don’t need to be faced with a blank canvas, having to decide which queries to build. Azure Sentinel’s built-in threat hunting queries for Microsoft 365 are a great way to start investigating potentially malicious user behaviour.
by Contributed | Mar 15, 2021 | Technology
This article is contributed. See the original author and article here.
Introduction
PnP Core SDK is a library designed to help you work with Microsoft 365 services in your .NET projects, this currently focuses on SharePoint and Teams as part of the V1.0 GA release. The PnP Core SDK is the successor to the PnP-Sites-Core project – the library that underpins well known tools such as the PnP Provisioning Engine and PnP PowerShell, and is designed to use the latest development techniques and standards such as:
- .Net 5 and .Net Standard 2.0 support – this has cross-platform support allowing you to build solutions for a wider range of platforms, greater performance, and a larger range of APIs.
- Unified object model – obscures the underlying API used to retrieve the data, so from a developer point of view, the SDK handles determining the best API to use e.g., Graph, SharePoint, REST or CSOM meaning you can focus on writing your busines logic rather than dealing with working with the various APIs to access the features you need to consume. This yields a significantly faster response and huge performance benefits over the older CSOM method accessing SharePoint.
- Batching support at the API level to reduce the calls to the service with retry logic to handle cases such as service throttling.
Improved Quality
The PnP Core SDK has a strong focus on quality, to help reduce bugs and issues, provide developers with better support working with the SDK, concentrating, and building on the following points:
- Unit testing – with a project goal to maintain over 80% of the SDK covered by unit tests, we also as part use a new mocking framework that allows us to perform rapid tests without the dependency of the underlying services.
- Improved documentation – we have built a portal that contains all the API documentation, how to use the SDK and perform common operations with sample code to help developers use the SDK in their business logic.
- Samples – a range of samples initially focusing on, Console App, Web App, Azure Functions, Blazor, WPF and even an example on a Raspberry Pi – each demonstrating a working example using the SDK interacting with Microsoft 365 services.
- Contributor guidance – we have included support documentation for contributors to explain, how to get setup, how to extend the models that work with SharePoint and the Graph, writing unit tests and supporting documentation.
This is a starting point, and we are actively working on better ways of supporting developers with the use of the SDK and testing to ensure that SDK maintains a high standard of quality – of course, we welcome any feedback, issues, suggestions from the community, all are welcome.
Getting started building an app
We are next going to show you, the simplest method of creating a console app that interacts with Microsoft 365, provides you with a login window, and creates a page in SharePoint using the awesome support for working with Modern Pages in the PnP Core SDK.
But before we start writing the application, we are going to need to setup a few things in Azure and SharePoint:
SharePoint Site
For the purposes of this example, we will use a Microsoft 365 Group connected team, please sure that you set one up for the application to connect to.
Azure AD App
The application uses Azure AD app to authenticate into the services required, for this you we recommend creating your own Azure AD app, and there are tools that can assist with this either the Microsoft 365 CLI, PnP PowerShell are great at making it easy to setup your own Azure AD Apps – additionally, we also have documentation to help set up the app. Make sure you take a note of the Azure AD app – Application Id, you will need this later.
If you want to test the app first, we recommend setup of a “dev” tenant to test the application in a non-production environment – check out this article to understand on how to get a free developer tenant from Microsoft.
Building the Application
So, let’s get going with using the SDK, so for this next section, we will show you how to get going in Visual Studio (btw, Visual Studio Code supported as well), to get the packages and connect to the Microsoft 365 Services using a C# Console Application.
Note: If you do not have visual studio, and you are using this for academic, open-source, or personal usage, you can download Visual Studio Community edition to get going, this blog is using Visual Studio 2019, version V16.9.
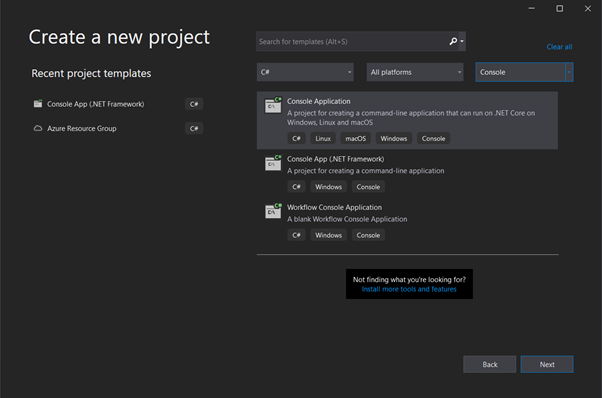
In Visual Studio, create a new C# Console Application (.NET core),
Create a new visual studio project
(Note: I have filtered the list using the dropdowns to find the project type quickly)
Select Next, and Enter Project Name, Location and Solution Name as your discretion,
Under additional information, please select .NET 5.0 as the Target Framework
 Visual studio – select .NET version
Visual Studio will create a hello world project for you, as a starting place.
Next we, want to get the NuGet package for the PnP Core SDK, NuGet is a package manager tool that by Microsoft is an essential tool in modern development that allows you to download, create, share, useful libraries and packages to use in your .NET projects – this is where the PnP Core SDK packages are published to.
Continuing in Visual Studio, right click on the solution and find the “Manage NuGet Packages for Solution” option.
 Option to manage NuGet packages in the solution right-click menu
When the package manager opens, Click to Browse for Packages and Enter “PnP Core SDK” in the search bar, to show the two packages described earlier.
 Find the PnP Core SDK NuGet packages
About the versions and libraries
When searching for the NuGet packages you will see two options, these options are:
- PnP.Core – this includes the core library that interacts with the Microsoft 365 workloads such as SharePoint and Microsoft Graph.
- PnP.Core.Auth – includes the authentication library providing multiple methods in which to securely connect to Microsoft 365 using Azure Active Directory – this includes PnP.Core as a dependency. In most cases, you will only need to use this one to get started.
You will need an additional NuGet Package called “Microsoft.Extensions.Hosting” – this allows us to manage the services in the lifetime of running the app. For further information, please refer the documentation around the generic host library.
With regards to the way versioning is done for the SDK, there are major releases which currently is v1.0.0 and nightly releases e.g., v1.0.1-nightly which are the prerelease versions allowing you to use the very latest build this would include any fixes and new features.
 PnP Core SDK release versions
Let’s start writing some code
Once you have added the NuGet packages, open the program.cs file, this is the entry point that the application runs calling on the Main method, we need to add code to this to configure the connection to Microsoft 365 services and perform the page operations.
Change the program.cs file using the following code:
using System;

// Add the relevant using statements for PnP Core
using Microsoft.Extensions.DependencyInjection;
using Microsoft.Extensions.Hosting;
using PnP.Core.Model.SharePoint;
using PnP.Core.Services;
using System.Threading.Tasks;
using PnP.Core.Auth;

// Ensure you have added the NuGet packages
//  - PnP.Core.Auth
//  - Microsoft.Extensions.Hosting

namespace GettingStartedConsoleApp
{
    class Program
    {
        // Update main method for asynchronous
        static async Task Main(string[] args)
        {
            // Setup the host
            // This app uses interactive login

            var host = Host.CreateDefaultBuilder()

            .ConfigureServices((hostingContext, services) =>
            {
                //    Add the PnP Core SDK library services
                services.AddPnPCore(options => {

                    options.DefaultAuthenticationProvider = new InteractiveAuthenticationProvider(
                            "f8023692-08de-48ea-8bef-d987f10e08d2", // Client Id
                            "contoso..onmicrosoft.com", // Tenant Id
                            new Uri("http://localhost"));  // Redirect Id
                });
            })

            // Let the builder know we're running in a console
            .UseConsoleLifetime()
            // Add services to the container
            .Build();

            // Start console host
            await host.StartAsync();

            // Connect to SharePoint
            using (var scope = host.Services.CreateScope())
            {
                // Obtain a PnP Context factory
                var pnpContextFactory = scope.ServiceProvider.GetRequiredService<IPnPContextFactory>();
                // Use the PnP Context factory to get a PnPContext for the given configuration
                using (var context = await pnpContextFactory.CreateAsync(new Uri("https://contoso.sharepoint.com/sites/pnpcoresdktestgroup")))
                {
                    var web = await context.Web.GetAsync();
                    Console.WriteLine($"Title: {web.Title}");

                    // Create the page
                    var page = await context.Web.NewPageAsync();

                    // Configure the page header
                    // Check out for more detail https://pnp.github.io/pnpcore/using-the-sdk/pages-header.html
                    page.SetDefaultPageHeader();
                    page.PageHeader.LayoutType = PageHeaderLayoutType.CutInShape;
                    page.PageHeader.ShowTopicHeader = true;
                    page.PageHeader.TopicHeader = "Welcome";
                    page.PageHeader.TextAlignment = PageHeaderTitleAlignment.Center;

                    // adding sections to the page
                    page.AddSection(CanvasSectionTemplate.OneColumn, 1);

                    // Adding text control to the first section, first column
                    // Check out for more detail https://pnp.github.io/pnpcore/using-the-sdk/pages-webparts.html#working-with-text-parts
                    page.AddControl(page.NewTextPart("<p style="text-align:center">" +
                                                        "<span class="fontSizeSuper">" +
                                                            "<span class="fontColorRed">" +
                                                                "<strong>PnP Core SDK Rocks!</strong>" +
                                                            "</span>" +
                                                        "</span>" +
                                                     "</p>"), page.Sections[0].Columns[0]);

                    // Save the page
                    await page.SaveAsync("Awesomeness.aspx");

                    // Publish the page
                    await page.PublishAsync();
                }
            }

            // Cleanup console host
            host.Dispose();
        }
    }
}
In the above sample, we look through the sections of the code:
Async – the PnP Core SDK is designed to work asynchronously, so we need to update the main method to include the “async” keyword and “Task” return type to allow the code inside to run.
 // Update main method for asynchronous
 static async Task Main(string[] args)
Configure Host – This block creates and configures the host to run the application, this adds references to the PnP Core SDK, configures the default authentication method, as the simplest method of connecting to Microsoft 365 services, there are other ways to implement this, such as using an appsettings.json file or inline code, if you want more information about this – the PnP Core SDK documentation site contains the additional instructions.
// Setup the host
// This app uses interactive login

var host = Host.CreateDefaultBuilder()

.ConfigureServices((hostingContext, services) =>
{
  //    Add the PnP Core SDK library services
 services.AddPnPCore(options => {

    options.DefaultAuthenticationProvider = new InteractiveAuthenticationProvider(
        "f8023692-08de-48ea-8bef-d987f10e08d2", // Client Id
        "contoso..onmicrosoft.com", // Tenant Id
        new Uri("http://localhost"));  // Redirect Id
    });
 })

 // Let the builder know we're running in a console
 .UseConsoleLifetime()
 // Add services to the container
 .Build();

 // Start console host
 await host.StartAsync();
Note, the client ID shown above is the same as the ID as the Azure AD app, you set up earlier.
Setup Context – This block will create a context to connect to SharePoint supplying the URL to the site this will use the default authentication provider specified earlier – on running the app, this will open a window or tab to allow you to interactively log into your tenant. When authenticated, you are returned a context to perform further options using the connection.
// Connect to SharePoint
using (var scope = host.Services.CreateScope())
{
   // Obtain a PnP Context factory
   var pnpContextFactory = scope.ServiceProvider.GetRequiredService<IPnPContextFactory>();

  // Use the PnP Context factory to get a PnPContext for the given configuration
  using (var context = await pnpContextFactory.CreateAsync(new Uri("https://contoso.sharepoint.com/sites/pnpcoresdktestgroup")))
  {
Make a page – Now that you have connected and you have a context object, you can set to write code that interacts with the service.
// Create the page
var page = await context.Web.NewPageAsync();

// Configure the page header
// Check out for more detail https://pnp.github.io/pnpcore/using-the-sdk/pages-header.html
page.SetDefaultPageHeader();
page.PageHeader.LayoutType = PageHeaderLayoutType.CutInShape;
page.PageHeader.ShowTopicHeader = true;
page.PageHeader.TopicHeader = "Welcome";
page.PageHeader.TextAlignment = PageHeaderTitleAlignment.Center;

// adding sections to the page
page.AddSection(CanvasSectionTemplate.OneColumn, 1);

// Adding text control to the first section, first column
// Check out for more detail https://pnp.github.io/pnpcore/using-the-sdk/pages-webparts.html#working-with-text-parts
page.AddControl(page.NewTextPart("<p style="text-align:center">" +
                                   "<span class="fontSizeSuper">" +
                                      "<span class="fontColorRed">" +
                                         "<strong>PnP Core SDK Rocks!</strong>" +
                                      "</span>" +
                                   "</span>" +
                                "</p>"), page.Sections[0].Columns[0]);

// Save the page
await page.SaveAsync("Awesomeness.aspx");

// Publish the page
await page.PublishAsync();
The code fragment is a simple example of using the Modern Pages support, by doing the following:
- Creating a modern page
- Setting the header of the page
- Adds a one column section to the page
- Adds a text web part to the page with some simple formatting, to the new section in the first column.
- Saving the page
- Publishing the page
If you want to dive deeper into how to use the SDK when working with Modern Pages, there is documentation on the site that covers adding web parts, configuring the header, publishing and promoting pages and multi-lingual support.
Once written, Hit F5, log in and see the result:
 Resulting page creation by the console app
What’s Next
So, you have written the app, what’s next, if you want a further examples and a video walkthrough, checkout the short video by Paolo Pialorsi (one of the major authors of the SDK) on PiaSys Tech Bites, “Welcome PnP Core SDK” with a fantastic demo (no spoilers here) – https://www.youtube.com/watch?v=ozqN5-Yh5cM
Check out these great resources to help you build your solutions:
There is still plenty to do in the SDK, if you want to contribute to this open source repository, you are most welcome to, we have tagged areas in the issues list for areas we are looking for help with, please reach out either on social media, via GitHub to connect and support you getting started.
Enjoy!
by Contributed | Mar 15, 2021 | Technology
This article is contributed. See the original author and article here.
Call Summary:
This month’s community call features presentations on Excel JS API v1.13 updates, PowerPoint ribbon updates, UX changes for Outlook add-ins on the web and Discussion on building for the Microsoft 365 ecosystem. Discussion focused on ways Microsoft can help developers to be more successful building on the M365 ecosystem. 9 enabling components of a M365 Customer Success Developer Journey were presented. This month’s Community spotlight recognizes MVP Maarten van Stam. Thank you! Q&A in chat throughout call. The call was hosted by David Chesnut (Microsoft). Microsoft Presenters include: Raymond Lu, Lillian Liu, Hitesh Manwar, Nikhil Verma, Ying Hao. Recorded on March 10, 2021.
Topic Summaries:
Excel JS API v1.13 updates – Excel APIs are in Preview today, targeting GA release in July. The APIs are presently available in Script lab, include Dependent, Workbook, Range/Table, Event, Pivot Layout and Table style. Quick demos today on Range/Table APIs. Feedback on preview APIs requested.
PowerPoint ribbon updates – available in Office Online week of March 15th, Desktop and Mac in May+. New features shown – Allowing native controls, Setting tab location (to any location you want), and Setting focus for a tab. All functions accomplished in manifest with new elements.
UX changes for Outlook add-ins on the web – whenever an Admin installs an add-in, the user will now see a one-time nudge informing them that a new item has been installed and prompts the user to customize the settings as necessary. UX changes release to OWA commercial users April 2021.
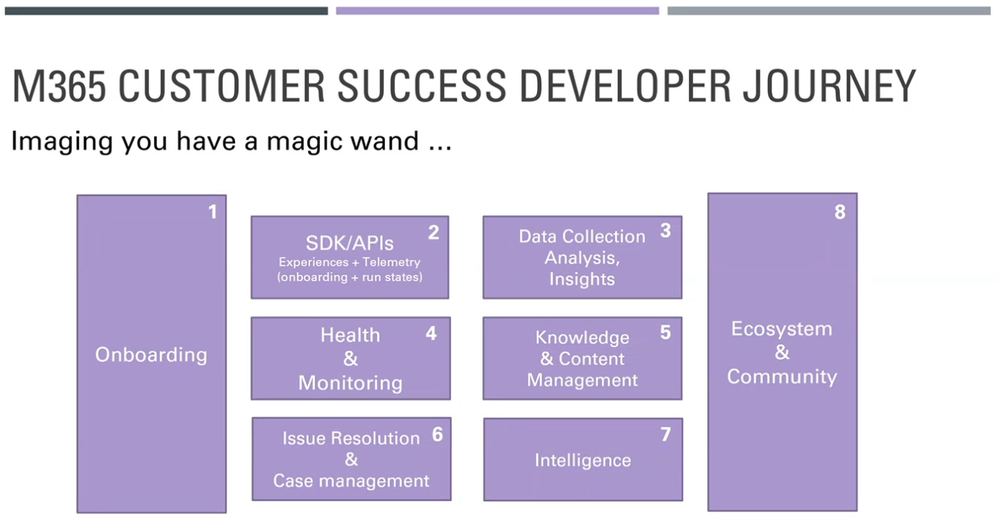
Discussion on building for the Microsoft 365 ecosystem – focused on how Microsoft can help developers to be more successful with M365 ecosystem. 9 enabling components of a M365 Customer Success Developer Journey shown. Join the ongoing discussion at M365 Customer Success Platform Panel
Resources:
Actions:
General Resources: (referenced in every call, blog post only):
Stay connected – (all groups) (Blog and YouTube posts)

Recent Comments