This article is contributed. See the original author and article here.
Azure Policy lets you assess resources against certain criteria at different levels in your environment – from the top level management groups containing multiple subscriptions down to resource groups. So what happens if the policies at one level are different from the policies at another level in your environment hierarchy? Sonia explores some scenarios!
How Azure Policy assignments work
When you apply an Azure Policy at a certain level (known as assigning it to a scope), that assignment will be inherited by all the child resources under that scope. If I add a policy at the subscription level for example, all of the resources groups under that subscription will also be impacted by that policy. However, existing resources will not be modified by a Deny policy – they will be marked as non-compliant.
Azure Policy is an “explicit deny” system. This means that if any policy assignment in the hierarchy would deny a resource configuration, then it will be denied. To manage exceptions (say you want one resource group to be allowed resources of a larger size that aren’t allowed anywhere else in the subscription), you can exclude the resource group from the policy that is denying those resource sizes (known as SKUs), and you can assign a different allowed sizes policy to that resource group.
Scenarios with the Allowed virtual machine SKUs policy
My test environment started with the following:
Subscription level: No policy assignments
Resource group level: Allowed virtual machine SKUs set to standard_dc2s, standard_dc2s_v2, standard_dc4s, standard_dc4s_v2, standard_dc8_v2
VM in the resource group: Size Standard_DS1_v2
How can there be a VM in that resource group with a size that’s not listed in the allowed VM SKUs policy?
The policy is set to Deny, so that tells me that the policy was assigned to the resource group AFTER the VM had been created. Azure Policy is showing that there are some non-compliant resources in this resource group. Assigning a deny policy won’t modify existing resources, but it will show them as non-compliant. It will prevent existing resources from being resized to a SKU that’s not listed, and it will prevent new resources from being created with a SKU that’s not explicitly allowed.
So, what happens if I go and add an Azure Policy at the subscription level to allow the Standard_DS1_v2 SKU being used by that VM?
Once assigned and assessed, my VM is showing as compliant with the subscription-level policy but still non-compliant with the resource group level policy assignment.
Policy compliance and non-compliance at different assignment scopes
What happens if I now add a completely new resource group?
The new resource group will inherit the subscription level policy, which allows Standard_DS1_v2.
But if I then go and add an allow SKU policy at the resource group level, list Standard_D4s_v3 and try to create a new VM in that resource group with the D4s_v3 SKU – the creation of the VM will fail as it does not meet the more restrictive subscription-level policy.
Adding exclusions
If I really want to enable a resource group to allow a SKU that’s not listed in the subscription level policy assignment, I can add the resource group to the exclusions at that subscription level. Then I can set a more permissive list of SKUs when I assign the policy at the resource group level. This will allow the creation of new resources that match the SKUS listed at the resource group level.
Exclude a resource group from an Azure Policy assignment
If I have existing resources in a resource group that I want keep at that size, but I don’t want any new resources to be created (or existing resources to be resized) to that SKU, I can exempt single resources from a policy assignment, at any level. This will prevent the resource from being evaluated against that policy. Exclusions are also useful if the resource is in a temporary state of non-compliance, or the policy condition is mitigated by some other method (for example, another vendor’s security product).
Scenario with the Allowed locations
My test environment is configured with:
Subscription level: Allowed location Australia East
Resource group level: Allowed location East US 2
If I try to add a VM to the resource group and set its location to East US 2, the creation will fail due to that location not being listed in the subscription level’s policy assignment. Again, I’d need to add this resource group to the exclusion at the subscription level.
VM creation warning on location not meeting Azure Policy assignment
Triggering an Azure Policy compliance scan
Did you know that right in the Azure Portal you can trigger a compliance scan, using Cloud Shell (the first icon)?
Azure portal – CloudShell
There’s a PowerShell command for this, but it can take a little while to run on larger environments. So we don’t have to wait for it to finish before we get our CloudShell prompt back, we can run it as a job:
$job = Start-AzPolicyComplianceScan -AsJob
And to check the progress, we run $job
AZPolicyComplianceScan job status
Custom non-compliance messages
One of my favorite Azure Policy enhancements is the ability to add a custom message to be displayed when a resource change or creation is denied due to non-compliance against a policy assignment. You can use this to give more clarity to exactly which policy assignment is saying no (such as “Allowed SKUs in SVM-RG-09 are D series only”) or to direct people to who to contact for more information or an exemption (such as “Email SKUPolicyOwner@yourcompany.com for more info”)
Do you have any other scenarios?
These are just two little examples – do you have any other suggestions for scenarios where you may have a conflict with your Azure Policy assignments? Let us know if there’s anything you’d like to model through or discuss.
This article is contributed. See the original author and article here.
Join the Microsoft Advertising team to learn about exciting new features coming soon to the developer roadmap. We’ll explore features that are currently available as well as several that we’ll be piloting and releasing soon.
This webcast will provide you with a clear understanding of upcoming features and the value they can bring to your Microsoft Advertising campaigns. Along with a view of the features coming soon and those recently updated, we’ll also provide an estimated timeline as to when features will become available, so you’ll have the building blocks needed to develop the solution that works best for you.
You can register here for the webcast on March 30, 2021 at 11:00 a.m. U.S. Pacific Time.
In this webcast we will cover:
Multi-Factor Authentication Requirements
Dynamic Search Ads Mix Mode
Autobidding
Global Expansion
Retail Updates
Responsive Search Ads
Conversion Import
Dynamic Remarketing for new verticals
Google Import API
Scripts Updates
If you can’t make the live webcast, register to watch it on demand when it’s most convenient for you. The on-demand version is usually available 24 hours after the live event.
This article is contributed. See the original author and article here.
On January 28, 2021 Microsoft released its first Environmental Sustainability Report “A Year of Action” documenting progress the company made since announcing its 2020 commitments to become a carbon negative, water positive, zero waste company that protects more land than it uses by 2030. See a summary of the overall report in Part One of this blog series and learn more about the carbon negative commitment in Part Two. This third and final post will close out with a deeper look at the water positive, zero waste and ecosystems commitments, including the mysterious Planetary Computer.
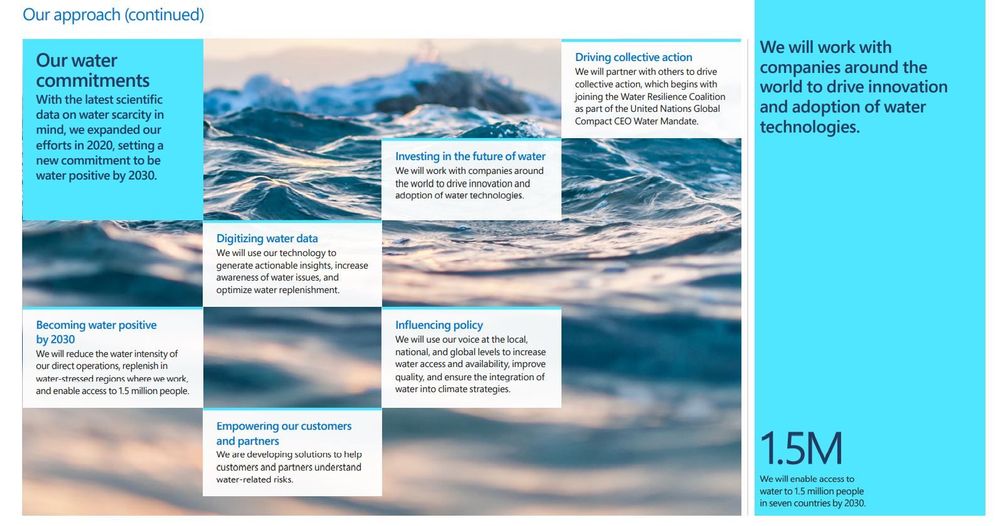
Water Positive
Microsoft’s water positive commitments at a glance
A company is water positive when it puts more water back into the environment than it consumes. Microsoft will accomplish this through a combination of reduction and replenishment (physically putting water back into the environment, like recharging groundwater aquifers).
Why is a tech company like Microsoft focused on water? The UN predicts that by 2030, the world may face a 40% shortfall in available freshwater. Climate change, pollution, industrialized animal agriculture and increased demand could reduce water availability in major cities more than 66% by 2050, and as we all know from Standing Rock, “Mni Wiconi” (water is life). But it’s not just freshwater: the oceans are in trouble too. The World Economic Forum estimates that there will be more plastic waste in the oceans than fish (by weight) by 2050 unless we take drastic action to stem the tide of pollution. Microsoft spent much of its 2020 attempting to standardize and digitize water data (where it exists at all), an unglamorous but extremely important baseline for improving the situation. And true to form, Microsoft examined the unique role that technological solutions like Artificial Intelligence (AI) can provide for better water management.
While not as flashy or headline grabbing as carbon reduction, water commitments are no less important. There are few things that all people, and most of life on Earth require, but access to water is one of them. This issue is deeply intertwined with human rights, especially Indigenous rights. Environmental racism means that black, brown and poor people around the world will often face the worst and most immediate effects of the climate crisis: at the top of that list is lack of access to reliable, clean drinking water. Becoming water positive, while working with a growing number of partner organizations including the United Nations Water Resilience Coalition, means making progress on all these front and addressing systemic inequity while improving the underlying environment we all depend on.
“Microsoft is taking responsibility for our own water use and developing technology to help others do the same.” – President Brad Smith
Zero Waste
Each year, humanity creates 11 billion tons of waste including plastics, e-waste and harmful chemicals that pollute our land, clog our waterways, deplete scarce natural resources and contaminate the air we breathe. Inefficiencies associated with a wasteful society also create a lot of unnecessary carbon emissions.
Zero waste is a set of principles focused on waste prevention that encourages the redesign of resource life cycles to reduce or eliminate waste generation. The goal is for no trash to be sent to landfills, incinerators or the ocean. In practice, for most individuals and companies, 100% waste diversion or elimination is simply not achievable, so the goal is 90% diversion from landfill to achieve TRUE Zero Waste certification. Microsoft has committed to becoming a zero waste company by 2030 and will eliminate single use plastics from its packaging by 2025.
The company spent much of 2020 working to accelerate the development of a circular economy, a system in which economic activity is decoupled from the consumption of scarce resources, waste is designed out and there is an emphasis on repair, disassembly and reuse. Waste data has many of the same challenges as water data: where it exists at all, it is often fragmented, unstructured, and hard to use. Here too the company made strides in the standardization and digitization of waste data (a necessary precursor for leveraging the power of AI).
On a personal note, I was surprised and delighted to see page 54 of the report: it referenced my Plastic Free Oceans Hackathon project! A small army of Microsoft volunteers created a scalable way to automate the recognition of plastic pollution in rivers using AI, which resulted in a multi-year partnership with The Ocean Cleanup. This is one of my proudest accomplishments at Microsoft and a clear example of the role technology (and technology companies) can play in creating solutions for the world’s most pressing environmental challenges.
“Waste is almost purely synonymous with opportunity.” – Microsoft Chief Environmental Officer Lucas Joppa
Ecosystems
Microsoft’s ecosystems goals at a glance
And last but certainly not least, ecosystems. This is perhaps the least obvious of the company’s four sustainability commitments: what does a tech company have to do with protecting ecosystems and biodiversity? A lot as it turns out!
We often know more about the rate of decline than we know about the overall health and wellness of a single species or the many species that comprise an ecosystem. Technologies like Artificial Intelligence and Machine Learning can help accelerate the collection and synthesis of large data sets, letting conservation researchers spend less time digging through data, and more time planning conservation with actionable insights. But why does protecting ecosystems and biodiversity matter?
Nature, and the benefits that it provides, are the foundation of our society, cultures and the global economy. We depend on healthy and intact ecosystems for clean air, water, food, medicine, energy and resources. Simply put, there is no human civilization if we continue to destroy the complex web of life that supports us. For its part, Microsoft has committed to protecting more land than it uses by 2025 (which is 11k acres or 44,515 square meters), putting resources and technology in the hands of scientists and nonprofits working on conservation, and curiously, developing a Planetary Computer.
The Planetary Computer
Of all the things packed into the Year of Action report, none piqued my curiosity like the Planetary Computer. What is it? The report calls it “a platform that provides access to the world’s critical environmental datasets.” Think of it less as some kind of enormous supercomputer and more like open-source access to very large datasets and powerful computing resources for the environmental science community (you know, the people writing all the reports telling us how bad things are). According to Microsoft Chief Environmental Officer Lucas Joppa, the end goal is an answer to the most complex environmental science question of all “how do we manage Earth΄s natural resources to ensure a climate-stable future?”
Microsoft is a technology company, so it makes sense that technology solutions are the most meaningful contribution it can make to combatting the climate crisis, the degradation of Earth’s ecosystems and frightening loss of biodiversity we are currently experiencing. The goal is to better monitor, model and manage the world’s ecosystems.But don’t take it from me, this is the brainchild of Lucas Joppa who sits at the intersection of computer and environmental science.
“This won’t be built as a crystal ball. Instead, it will be a global portfolio of applications connecting trillions of data points to computing power and machine learning capable of converting that all into contextualized information.”
Conclusion
If we step back, zoom out and look at the moment in history we are in, it is precarious. Too many carbon emissions in our atmosphere are warming the planet and changing the climate in unpredictable and destabilizing ways; freshwater sources and oceans around the world have been degraded and filled with pollution; consumption of scarce resources continues to accelerate while waste piles up and contaminates the environment; and the living things that prop up our entire way of life, from soil microbes to whales, are going extinct faster than we can identify them.
Humans have fundamentally transformed the entire planet in just 250 years with the explosion of growth and technology ushered in by the first Industrial Revolution. But that progress has come at a cost, and we are now paying the price. Unless we drastically change the ways we power our civilizations, grow and transport our food and design and consume our products, we face a climate catastrophe. But it’s not too late to make meaningful change, and while not a cure all, technology has an important role to play.
Committing to become a carbon negative, water positive, zero waste company by 2030 is remarkable. There aren’t many organizations doing this, and none the size of Microsoft. But if these goals seem overly ambitious, consider that every organization on the planet will need to do the same thing, and sooner rather than later. As large as Microsoft is, it is barely a drop in the ocean when it comes to climate change. Its strategy – its moonshot – is that the rest of the world will want to do the same when they see it can be done, and along the way, the company will develop solutions it will sell to those organizations to become the world’s leading environmental technology solutions provider.
At the heart of these commitments is something more: a desire to do something, anything, to avert a climate catastrophe and a willingness to bring the full resources of a trillion-dollar tech company to bear to make it happen faster. These commitments, and the progress made to date, are a proportional and appropriate response to what the best available science is telling us needs to happen. Let’s hope it spurs companies and governments around the world to respond in kind, because ultimately, that is what’s required to make a meaningful difference.
See a summary of the overall report in Part One of this blog series and learn more about the carbon negative commitment in Part Two.
This article is contributed. See the original author and article here.
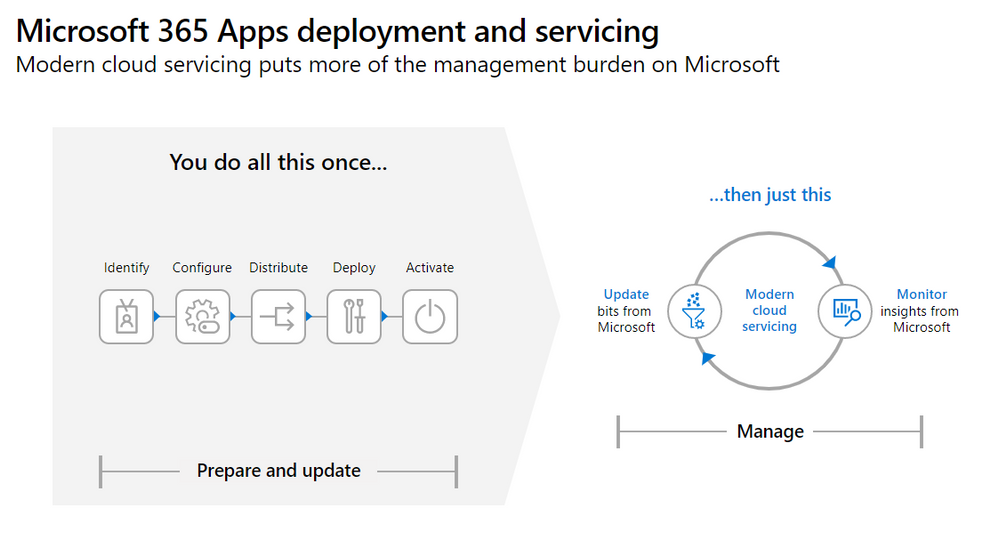
This webinar provides an overview of the Microsoft 365 Apps upgrade and the new management strategy, as well as servicing channel best practices and Microsoft Information Protection.
This webinar was presented on February 24, 2021, and the recording can be found here.
Attached to this post are:
The FAQ document that summarizes the questions and answers that came up over the course of both Webinars.
A PDF copy of the presentation.
Thanks to those of you who participated during the two sessions and if you haven’t already, don’t forget to check out our resources available on the Tech Community.
Thanks!
@Robin_Baldwinon behalf of the MIP and Compliance CXE team
This article is contributed. See the original author and article here.
This isthethird blog in our series onusing BitLocker withMicrosoft Endpoint Manager – Microsoft Intune.In thelastpost, we describedhow to effectively troubleshoot common scenarios using theMicrosoftencryption report in theMicrosoft Endpoint Manager admin center.Now we’lllookatcommon issues,the logs and data you need to collect,and thesteps you can take totroubleshoot BitLocker encryption on the client side.
BitLockerencryption process
Thefollowing steps describethe flow of eventsthatshould result in a successful encryption of a Windows 10 devicethat has not been previously encrypted with BitLocker:
An administrator configures a BitLocker policy configured through Endpoint security > Disk encryption with the desired settings and targets a user group or device group.
The policy is saved to a tenant in the Intune service.
A Windows 10 Mobile Device Management (MDM) client syncs with the Intune service and processes the BitLocker policy settings.
The BitLocker MDM policy Refresh scheduled task runs on the device that replicates the BitLocker policy settings to full volume encryption (FVE) registry key.
BitLocker encryption is initiated on the drives.
The encryption report identifies common troubleshooting scenarios that are documented in the BitLocker configuration service provider (CSP) status node.However,some status scenarios might not be reportedand you will need access to the device to investigate further.
If you determine that there is no actionable information in the encryption report to understand why BitLocker was not enabled, the next step is to access an affected device and gather the required data to complete the investigation.
If a device is accessible, you can initiate a sync with the Intune service manually from your Windows device by selecting Settings > Accounts> Access work or school > Connect <tenant> Azure AD > Info before collecting the data.
Event logs
Mobile device management (MDM) agent event log
The MDM event log is useful to determine if there’s been an issue processing the policy sent from Intune. The OMA DM agent will connect to the Intune service and attempt to process the policies targeted at the user or device. Success and failures processing Intune policies will be found in this log.
Once the sync is complete, collect or review the following information:
Location: Right-click on Start Menu > Event Viewer > Applications and Service Logs > Microsoft > Windows > Microsoft-Windows-DeviceManagement-Enterprise-Diagnostics-Provider > Admin
File system location: C:WindowsSystem32winevtLogsMicrosoft-Windows-DeviceManagement-Enterprise-Diagnostics-Provider%4Admin.evtx
To filter this log, right–click the event log and select Filter Current Log> Critical/Error/Warning. Then search through the filtered logs for BitLocker (press F3 and enter the text).
Errors in BitLocker settings will follow the format of the BitLocker CSP, so you will see entries like this:
Note You can also enable debug logging for this event log using the Event Viewer for troubleshooting.
BitLocker-API management event log
This is the main event log for BitLocker. If the policy has been processed by the MDM agent and there are no errors in the DeviceManagement-Enterprise-Diagnostics-Provider admin event log, this is the next log to investigate.
LOG> BitLocker-API management
Location: Right-click on Start Menu > Event Viewer > Applications and Service Logs > Microsoft > Windows > BitLocker-API
File system location: C:WindowsSystem32winevtLogsMicrosoft-Windows-BitLocker%4BitLocker Management.evtx
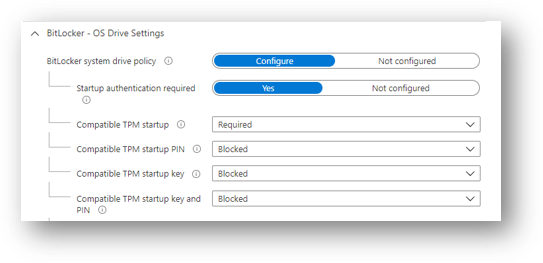
Usually, errorsare logged here if there are hardware or software prerequisites missing that the policy requires such as Trusted Platform Module (TPM)or Windows Recovery Environment (WinRE). As you can see in the following example, conflicting policy settings that cannot be implemented during silent encryption and manifest as group policy conflicts are also logged:
Failed to enable Silent Encryption.
Error: BitLocker Encryption cannot be applied to this drive because of conflicting Group Policy settings. When write access to drives not protected by BitLocker is denied, the use of a USB startup key cannot be required. Please have your system administrator resolve these policy conflicts before attempting to enable BitLocker.
Resolution: Configuring the compatible TPM startupPIN to Blockedwill resolve conflicting Group Policy settingswhen using silent encryption.
Configuring the TPM startup PIN and startup key to Allowed and other startup key and PIN setting to Blocked for user interaction and will result in a conflicting Group Policy error in BitLocker-AP event log.
Also, if you configure TPM startup PIN or startup key to require user interaction, it will cause silent encryption to fail. You must set the PIN and TPM startup key to Blocked if silent encryption is required.
Configuringany of thecompatible TPMsettingstoRequiredwill cause silent encryption to fail.
Microsoft Endpoint Manager – BitLocker | OS Drive Settings
TPM not available
Another common errorin the BitLocker-APIlogisthatthe TPMis notavailable.ThefollowingexampleshowsthatTPM is a requirement for silent encryption:
Failed to enable Silent Encryption. TPM is not available
Error: A compatible Trusted Platform Module (TPM) Security Device cannot be found on this computer.
Resolution:Ensure there is a TPM available on the device and if it is present check the status viaTPM.mscorthe PowerShell cmdlet get-tpm.
Un-Allowed DMA capable bus
If the BitLocker-API log displays the status: Un-Allowed DMA capable bus/device(s) detected, it means that Windows has detected an attached Direct memory access (DMA)-capable device that might expose a DMA threat.
Resolution: To remediate this issue,first verify that the device has no external DMA ports with the original equipment manufacturer (OEM). Then follow thesestepsto add the device to the allowed list.Note:Only add a DMA device to the allowed list if it is an internal DMA interface/bus.
System event log
Ifyou’re havinghardware–related issues—such as problems with the TPM—errors will appear in the system event log for TPMfrom theTPMProvisioningServiceor TPM-WMI source.
LOG > System event
Location: Right-click on Start Menu > Event Viewer > Windows Logs > System
File system location: C:WindowsSystem32winevtLogsSystem.evtx
Filtering properties for the System event log
Resolution: Filter on these event sources to help identify any hardware-related issues that the device may be experiencing with the TPM and check with the OEM manufacturer whether there are any firmware updates available.
Task scheduler operational event log
The task scheduler operational event log is useful for troubleshooting scenarios where the policy has been received from Intune, but BitLocker encryption has not successfully initiated. BitLocker MDM policy refresh is a scheduled task that should run successfully when the MDM agent syncs with the Intune service.
The log is worth investigating when:
The BitLocker policy appears in the DeviceManagement-Enterprise-Diagnostics-Provider admin event log, in MDM diagnostics, and the registry.
There are no errors (i.e., the policy has been picked up successfully from Intune).
Nothing is logged in the BitLocker-API event log to show that encryption was even attempted.
LOG > Task scheduler operational event
Location:Event Viewer > Applications and Service Logs > Microsoft > Windows > TaskScheduler
File system location:C:WindowsSystem32winevtLogsMicrosoft-Windows-TaskScheduler%4Operational.evtx
Important You must manually enable this event log before logging anything because the log will identifyany problems running the BitLocker MDM policy Refresh scheduled task.
To enable this log, Right-click on StartMenu > EventViewer>Applications and Services> Microsoft > Windows > TaskScheduler >Operational.
Screenshot of the TaskScheduler – Operational Logs
Then enter task scheduler in the Windows search box, select Task Scheduler > Microsoft > Windows > BitLocker. Right-click on BitLocker MDM policy Refresh and choose Run.
When the run is complete, inspect the Last Run Result column for any error codes and examine the task schedule event log for errors.
Example screenshot of BitLocker tasks in Task Scheduler
In the example above, 0x0 has run successfully. The error 0x41303 this means the task has never previously run.
Note Check out thisarticle for more information about Task Scheduler error messages.
Checking BitLocker settings
MDM Diagnostics Report
You can create a report of MDM logs to diagnose enrollment or device management issues in Windows 10 devices managed by Intune. The MDM Diagnostic Report containsuseful information about an Intune enrolled device and the policies deployed to it.
Theoperating system (OS)build andeditionin encryption failures: It’s important to investigate the OS build and edition because some CSPs were introducedon specific versions of Windows and will only work on a certain edition. For example, the bulk of BitLocker CSP settings were introduced in Windows 10, version 1703 but these settings weren’t supported on Windows 10 Pro until Windows 10, version 1809.
Additionally,there aresettingssuch asAllowStandardUserEncryption(addedinversion1809),ConfigureRecoveryPasswordRotation(added in version1909),RotateRecoveryPasswords(added in version1909),and Status(added in version1903).
Checking if your Windows version and edition supports the settings configured in your policy is the first step in understanding why they are not applying correctly.
Investigating with the EntDMID: This is a unique device ID for Intune enrollment. You can use the EntDMID to search through the All Devices view in the Microsoft Endpoint Manager admin center to identify a specific device. It is also a crucial piece of information for Microsoft support to enable further troubleshooting on the service side if a support case is required.
You can also use the MDMDiagnosticReport to identify whether a policy has beensuccessfully sent to the device with the settings the administrator configured.By using the BitLocker CSP as a reference, you can decipher which settings have been picked up when syncing with the Intune service.Thisarticlediscusses this topicin more detail.You can use the report to determine if the policy is targeting the device and identify what settings have been configured using the BitLocker CSP documentation.
MSINFO32
MSINFO32 is an information tool that contains device data you can use to determine if a device satisfies BitLocker prerequisites. The required prerequisites will depend on BitLocker policy settings and the required outcome. For example, silent encryption for TPM 2.0 requires a TPM and Unified Extensible Firmware Interface (UEFI).
Location: In the Search box, enter msinfo32, right-click System Information in the search results and select Run as administrator.
File system location: C:WindowsSystem32Msinfo32.exe.
However, if this item doesn’t meet the prerequisites, it doesn’t necessarily mean that you can’t encrypt the device using an Intune policy.
If you have configured the BitLocker policy to encrypt silently and the device is using TPM 2.0, it is important to verify that BIOS mode is UEFI. If the TPM is 1.2, then having the BIOS mode in UEFI is not a requirement.
Secure boot, DMA protection, and PCR7 configuration are not required for silent encryption but might be highlighted in Device Encryption Support. This is to ensure support for automatic encryption.
BitLocker policies that are configured to not require a TPM and have user interaction rather than encrypt silently will also not have prerequisites to check in MSINFO32.
TPM.MSC file
TPM.mscisaMicrosoftManagementConsole(MMC)Snap–infile. You can useTPM.msctodetermine whether your device has a TPM,to identity theversion,and whether it is ready for use.
Location: In the Search box enter, tpm.msc, right-click and select Run as administrator.
File system location: MMC Snap-in C:WindowsSystem32mmc.exe.
As we discussed in previous blogs, having a TPM is not a prerequisite for BitLocker but is highly recommended due to the increased security it provides.
Having a TPM is required forsilent and automatic encryption.Ifyou’retrying to encrypt silentlywithIntune andthere areTPM errorsin the BitLocker-API and system event logs,TPM.mscwill helpyouunderstand the problem.
The followingexample showsa healthyTPM 2.0 status. Notethe specification version 2.0 in the bottom rightandthatthe status is ready for use.
Example screenshot of a healthy TPM 2.0 status in the Trusted Platform Module console
This example shows an unhealthy status when the TPM is disabled in the BIOS:
Example screenshot of an unhealthy TPM 2.0 status in the Trusted Platform Module console
Configuring a policy to require a TPM and expecting BitLocker to encrypt when the TPM is missing or unhealthy is one of the most common issues.
Get-Tpm cmdlet
A cmdlet is a lightweight command in the Windows PowerShell environment. In addition to running TPM.msc, you can verify the TPM using the Get-Tpm cmdlet. You will need to run this cmdlet with administrator rights.
Location: In the Search box enter cmd, right-click and select Run as administrator > PowerShell > get-tpm.
Example screenshot of a present and active TPM in a PowerShell window
In the example above, you can see that the TPM is present and active in the PowerShell window. The values equal True. If the values were set to False, it would indicate a problem with the TPM. BitLocker will not be able to use the TPM until it is present, ready, enabled, activated, and owned.
Manage-bde command-line tool
Manage-bde is a BitLocker encryption command line tool included in Windows. It’s designed to help with administration after BitLocker is enabled.
Location:In theSearchbox, entercmd,right–click andselectRun as administrator>entermanage–bde–status.
Example screenshot of the manage-bde.exe command in a Command Prompt window
You can use manage-bde to discover the following information about a device:
Is it encrypted? If reporting in the Microsoft Endpoint Manager admin center indicates a device is not encrypted, this command line tool can identify the encryption status.
Which encryption method has been used? You can compare information from the tool to the encryption method in the policy to make sure they match. For example, if the Intune policy is configured to XTS-AES 256-bit and the device is encrypted using XTS-AES 128-bit, this will result in errors in Microsoft Endpoint Manager admin center policy reporting.
What specific protectors are being used? There are several combination of protectors. Knowing which protector is used on a device will help you understand if the policy has been applied correctly.
In the following example, the device is not encrypted:
Example screenshot of a device not encrypted with BitLocker
BitLocker registry locations
This is the first place in the registry to look when you want to decipher the policy settings picked up by Intune.
Location: Right clickonStart>RUN>enterregeditto open the Registry Editor.
The MDM agent registry key will help you identify the Globally Unique Identifier (GUID) in the PolicyManager that contains the actual BitLocker policy settings.
BitLocker registry location in the Registry Editor
The GUID is highlighted in the above example. You can include the GUID (it will be different for each tenant) in the following registry subkey to troubleshoot BitLocker policy settings:
Screenshot of the Registry Editor displaying the BitLocker policy settings configured by the MDM agent
This report shows the BitLocker policy settings that have been picked up by the MDM agent (OMADM client). These are the same settings that you will see in the MDM Diagnostic report, so this is an alternative way of identifying settings that the client has picked up.
Example of EncryptionMethodByDriveType registry key:
The settings in the policy provider registrykey will be duplicated into the mainBitLocker registry key.You can compare the settings to ensure theymatch what appears in thepolicysettings in theuser interface (UI),MDM log, MDM diagnostics and the policy registry key.
REAgentC.exe is a command line executabletool thatyou can use toconfigure the Windows Recovery Environment (Windows RE). WinRE is a prerequisite for enabling BitLocker in certain scenariossuch assilent or automatic encryption.
Location:Right-click onStart>Run>entercmd>right–clickcmdand selectRun as administrator>reagnetc /info.
File system location:C:WindowsSystem32ReAgentC.exe.
Tip
If you seeerrormessages in the BitLocker-APIaboutWinRenot being enabled, run the following command on the device to determine the WinRE status:
Output of the ReAgentC.exe command in Command Prompt
Ifthe WinRE status isdisabled,it is possible to enable it manuallyusingthe following command lineasanadministrator:
Example screenshot to enable ReAgentC.exe in Command Prompt
Conclusion
WhenBitLocker fails toenable ona Windows10deviceusingan Intune policy,in most cases,the hardware or software prerequisitesare not in place.Examining the BitLocker-API log will helpyouidentify which prerequisite is not satisfied.Themostcommonissuesare:
TPM is not present
WinRE is not enabled
UEFI BIOS is not enabled for TPM 2.0 devices
Policy misconfigurationcanalsocause encryption failures. Notall Windows devicescan encryptsilentlyso think abouttheusersanddevicesthatyou’retargeting.
ConfiguringastartupkeyorPINfor apolicy intended for silent encryptionwill notworkbecause ofthe user interaction requiredwhen enabling BitLocker. Keepthis in mind when configuring the BitLocker policy in Intune.
It is useful to be able to verify whether the policy settings have been picked up by the device to determine whether the targeting has been successful.
It is possible toidentify the policysettingsusing MDM diagnostics, registry keys and thedevice management enterprise event logto verify if the settings have been successfully applied.TheBitLocker CSPdocumentationcan help youdecipher these settings to understand whether they match what has been configured in the policy.
Thereare multiple places to configure BitLocker settings in theMicrosoft Endpoint Manager admin center–Securitybaselines, Endpointsecurity,andConfiguration profiles.It’s not a good idea to have conflicting policies.The preferred and recommended approach is to useEndpointsecurity>Diskencryption.
Reference
Here’s an overview of the logs,diagnosticchecks, and command-line tools discussed in this post:
BitLocker-API and system event log: Investigate this log if the policy has been processed successfully and Windows is now attempting to implement the settings.
Task scheduler operational event log: Check this log if the policy has been processed in DeviceManagement-Enterprise but nothing has happened in BitLocker-API.
Collect diagnostics remote action: Use Intune to collect logs remotely without interrupting the user.
BitLocker settings checks
MDM Diagnostics report: Use this report to verify if BitLocker settings have been applied and what they are configuring.
Registry keys: Use to verify if the policy received from MDM provider has applied to Windows correctly.
Command line/Powershell tools
Get-Tpm cmdlet: Check the TPM status of the device.
Tpm.msc: Check the TPM status of the device.
REAgentc.exe: Check WinRE status of the device.
MSINFO32.exe: Check the hardware prerequisites for BitLocker.
Manage-bde.exe: Check the BitLocker encryption status of the device.
More info and feedback
For further resources on this subject, please see the links below.


Recent Comments