by Contributed | Mar 29, 2021 | Technology
This article is contributed. See the original author and article here.
Let’s start with some basics…
Cost optimization is one of the most common requirements for cloud workloads. How to implement a cost optimization framework will depend on the type of service, scenario, purchase model, and a few other aspects of Your environment. It’s worth noting that, when it comes to frameworks, Microsoft has been developing its own framework for Azure. The Azure Well-Architected Framework (WAF) is a set of guiding tenets that can be used to improve the quality of a workload. The framework consists of five pillars of architecture excellence:
- Cost Optimization
- Operational Excellence
- Performance Efficiency
- Reliability
- Security
Following the best practices and the specific business priorities that are relevant to you and your cloud journey, you can effectively and consistently optimize your workload costs against Azure. You can find more information about Microsoft Azure Well-Architected Framework by going to:
Now, after You have grown a little more with the WAF, it’s time to start the journey. Diving deeper down the cost optimization pillar we can identify several areas:
- Right resources, the right size
- Aim for scalable costs |Pay for consumption
- Keep within the cost constraints
- Monitor and optimize
These four areas are your anchor for the further steps. The thing to keep in mind is that, as any other framework, the WAF only provides broad recommendations. To implement it, You will need concrete details pertinent to a particular solution, workload, and even the service level. With this in mind, let’s go one level deeper and focus on the cost optimization aspect for Azure SQL Managed Instance.
The next level starts here…
Right resources, right size…and the right location
The first and one of the most important steps in cost optimization is to choose the right resources that are aligned with Your business goals and can deliver the required performance of the planned workload. An inappropriate or misconfigured service can adversely impact the cost.
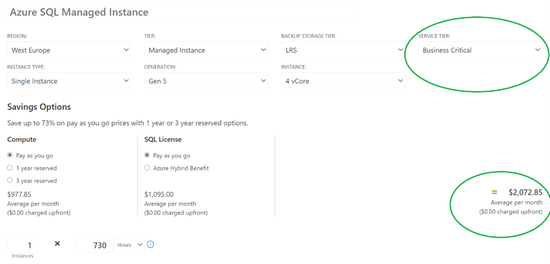
With SQL Managed Instance You can choose between General Purpose (GP) and Business Critical (BC) tiers. Obviously, there is a price difference between these two tiers because each tier was designed differently.
The General Purpose service tier is based on the separation of computing and storage, while the Business Critical service tier model is based on a cluster of database engine processes. The choice between these architectural models affects the availability, reliability, performance, and cost. In the GP tier, Azure Blob Storage transparently replicates database files and guarantees no data loss. Business Critical, on the other hand, relies on the fact that there is always a quorum of available database engine nodes which ensure minimal performance impact on your workload even during maintenance activities. Of course, there are other differences between the two tiers which affect their bottom line pricing, e.g. storage latency between 5 and 10 m in GP and 1-2 ms SSD storage in BC.
The SKU Recommendations feature which is available in Data Migration Assistant tool allows you to identify the minimum recommended Azure SQL Managed Instance SKU based on performance counters collected from the computer(s) hosting your databases. Make sure to check how easily identify the right Azure SQL Database SKU for your on-premises database (Data Migration Assistant)
If You need more details about the SQL MI tiers please visit:
Below you can find a sample comparison between the same SQL MI configuration running in GP and BC tiers.
Figure 1 General Purpose Sample Pricing vs Business Critical Sample Pricing
Once you identify the appropriate service tier, there are few more things to consider which can allow reducing cost:
- Check service prices in different Azure datacenter locations. Azure has regions located all over the world. Prices between regions for the same service can be different. Below You can find a sample comparison of SQL MI cost deployed in different regions in Europe with the following configuration : General Purpose, 4 vCores, Pay-as-you-go:

Figure 2 Sample SQL MI cost per Azure region in Europe comparison
Region
|
Monthly cost (~ 730h)
|
Difference to West Europe [in percent]
|
West Europe
|
$780.82
|
N/A
|
North Europe
|
$745.27
|
~ – 4 %
|
France Central
|
$847.49
|
~+ 9 %
|
France South
|
$1,014.17
|
~+ 30 %
|
Germany North (public)
|
$927.50
|
~ + 19 %
|
Germany West Central (public)
|
$780.82
|
0%
|
- Deploy the database/instances in the same region as your application to prevent data transfer costs. Deploying SQL MI in one region and other services, like App Service, in another region, can generate additional cross-region data transfer costs. Although in most cases this cost will not be significant, it’s worth following the pattern of keeping the related services in the same region.

Figure 3 Sample bandwidth cost for 1 TB
- Building a multi-region service when the service levels don’t require high-availability or geo-redundancy will increase the cost without a reasonable business justification. There are many options to increase the availability of your solution. One of them is multi-region deployment. In the case of SQL MI You can achieve this by using Auto-failover groups – SQL Managed Instance. Auto-failover groups are superior to having a secondary instance deployed in another region as a fully paid instance, which doubles the cost of the solution.

Figure 4 Failover groups – secondary replica is fully paid
As an alternative approach, if you still need geo-region deployment with reduced costs you can consider using Auto-failover groups – SQL Managed Instance with secondary instance configuration lower than primary one – in this case make sure performance of secondary instance is enough to follow the primary instance synchronization needs and scale it up if needed.
- If your Business Continuity strategy requires geo-region deployment but there are no strict requirements for auto-failover and some RTO,RPO values can be relaxed consider using backup with geo-replicated storage as well as the geo-restore option, you can also automate the process with a simple script to Restore geo-backup for Azure SQL Managed Instance – Azure SQL Managed Instance. Geo-restore is the most basic disaster-recovery solution available in SQL Database and SQL Managed Instance. It relies on automatically created geo-replicated backups with a recovery point objective (RPO) up to 1 hour and an estimated recovery time of up to 12 hours. Depends on a need this can be a good option to keep Business Continuity policies in place at lower cost.
Note! Remember to choose the service tier based on a thorough analysis rather than a superficial comparison of service prices. Always make a clear analysis of your HA/DR (RTO, RPO), performance, and feature requirements to set up your service accordingly. Please visit the following pages to get more information about SQL MI tiers:
Aim for scalable costs | Pay for consumption
The workload cost should scale with the demand. A key benefit of the cloud is the ability to scale dynamically. You can save costs through automatic/on-demand scaling. Although SQL Managed Instance doesn’t have a built-in autoscaling option, like other services it follows a common cloud pattern in which You can access APIs to turn on/off, scale-up/down, or even drop and re-deploy workloads. Such an approach allows You to manage the overall costs depending on the changing business needs. Although scaling up/down or drop/re-deployment of the service aren’t instantaneous, they can be some of the easiest ways to control SQL Managed Instance cost over longer periods of time. Make sure You check the following links for details and examples of automation (including progress tracking):


Figure 6 Sample SQL MI Cost Pay-as-you-go vs Reservations
Make sure You check more details how to Save compute costs with reserved capacity – Azure SQL Database & SQL Managed Instance
Keep within the cost constraints
Every design choice has cost implications. Thus, no matter if You are just planning the deployment or the deployment was already done, there are some points to verify and focus on in order to fit within the budget constraints. In the case of SQL Managed Instance, licensing can be one of the most important areas to consider:
Cost structure has a huge impact on the ongoing costs. Although we are talking about cloud services we have to follow specific licensing rules. In the case of SQL MI there are few rules of thumb that help you manage cost-effectively:
- Compute is provisioned in virtual cores (vCores). A vCore represents a logical CPU and its main cost factor when choosing Your Managed Instance configuration as you pay for computing (number of cores) and license needed to cover deployed cores – BY DEFAULT LICENSE COST IS TRANSPARENT FOR YOU AS A CUSTOMER AND IS INCLUDED IN THE SERVICE PRICE
- In some cases, You can already have SQL Server licenses in Your organization which can be used to run SQL MI and reduce its cost. SQL Managed Instance is eligible for Azure Hybrid Use Benefit (AHUB), which is a licensing benefit that works by letting you use your on-premises SQL Server licenses with Software Assurance on Azure based on the following pattern:
On-premises license
|
Azure usage
|
SQL Server Enterprise Edition core customers with Software Assurance
|
1 core on-premises = 4 cores in General Purpose SKU
1 core on-premises = 1 core in Business Critical SKU
|
SQL Server Standard Edition core customers with Software Assurance
|
1 core on-premises = 1 core in General Purpose SKU
4 core on-premises = 1 core in Business Critical SKU
|
It’s important to remember if you decide to use AHUB you need to cover whole SQL MI configuration (it isn’t possible to cover only part of vCores used in SQL MI with AHUB and using rest in license-included model). The same rule applies if you plan to scale up your instance – you must have eligible number of SQL license with SA to cover whole instance after scaling up. To find more information about Azure Hybrid Use Benefit, visit Azure Hybrid Benefit – Azure SQL Database & SQL Managed Instance
Azure Hybrid Use Benefit for SQL MI can be enabled during or after instance deployment and it’s possible to do it using Azure Portal, PowerShell, CLI, or REST API. Below You can find the sample snapshot from Azure Portal for running SQL MI which shows how to activate AHUB and the potential savings – in this case, 39.6% (value can vary between Azure offering, Azure regions).


Figure 7 SQL MI Cost comparison in Pay-as-you-go vs Azure Hybrid Use Benefit
Note! One of best practices to reduce cost is instances consolidation with right sizing to ensure the least amount of vCores is required.
- An additional cost-saving option is directly related to the scenario in which SQL MI is used. If your workload is not a production one. Consider using Dev/Test licensing model which is available for SQL Database Managed Instance as part of the dev/test offer. It is a highly cost-effective way to run your development and testing workloads and can easily help save up to 55% off the list price. To make it clear Dev/Test licensing model means you pay only for compute, license cost is reduced to zero. There are three offers that allow reducing SQL MI cost used for development and testing:
- Individual one: Monthly Azure credits for Visual Studio subscribers
Azure credits are included in your Visual Studio subscription and depend on the Visual Subscription level. When you run out of the credit that’s allotted for the month, you won’t be able to continue using it until it resets the next month.

Figure 8 Azure Credits in Visual Subscriptions
This is offer doesn’t require any separate payment, it’s just using the funds already in your Enterprise Agreement. It requires creating a subscription that is marked as Dev/Test or changing the existing one. More details can be found here: Enabling and Creating EA Dev/Test Subscriptions through the EA Portal | Enterprise Azure Portal | Channel 9 (msdn.com).Please remember that only active Visual Studio subscribers with standard subscriptions can use the Azure resources running within an Enterprise Dev/Test subscription. End users can also access the application to provide feedback or perform acceptance tests.
This offer works similar to Enterprise Dev/Test. The difference is that it doesn’t require You to have an Enterprise Agreement in place. This scenario also requires users to have an active Visual Studio subscription to be able to use the Azure resources running within a Dev/Test subscription.
Just to show how the dev/test pricing looks like, below You will find a comparison between the same SQL MI configuration running in standard and dev/test model.


Figure 9 Commercial to Dev/Test cost comparision
- Last but not least is taking the advantage of the appropriate subscription offer types. Azure usage rates and billing periods can differ between Enterprise, Web Direct, and Cloud Solution Provider (CSP). It’s worth evaluating this option to make sure your pricing is relevant to your business needs.
Monitor and optimize
Resource monitoring can be a great opportunity to optimize costs. Treat it as a process, rather than a point-in-time activity. Conduct regular reviews and forecast the capacity needs so that you can provision resources dynamically and scale with demand – for more information please back to section Right resources, right size…and right location and Aim for scalable costs | Pay for consumption
There are few steps which can help you optimize the overall cost:
- collect and visualize key performance metrics to determine the right resource level usage (vCore, memory, IOPS, etc.). Verify if your database requires a specific number of cores, memory, IOPS and use it to determine the right service tier (General Purpose or Business Critical). Follow the best practice in monitoring SQL MI by using solutions like SQL Insights. Make sure to explore monitoring options available for Azure SQL Managed Instance
- use built-in features like Query Store or index usage statistics to optimize SQL workload which can allow you to optimize the sizing of your SQL MI and help to reduce the ongoing costs: Performance tuning guidance for applications and databases – Azure SQL Database & Azure SQL Managed Instance | Microsoft Docs
- consider using compression (row, page), column store indexes where possible to keep storage footprint small and reduce storage size needs.
- define and enforce data retention, archival requirements, or data offloading (e.g. to a storage account) strategy, as not all data typically needs to be available for online processing)
- reduce the billing charges for excess usage of the backup storage space beyond the free backup storage space provided. You can control the backup consumption using these general approaches:
- Choosing the backup storage type that is right for you
- Optimize database backup retention period
- Maximize your free backup storage space
- Optimize your apps and workloads
- Alternative considerations
Dive into details about backup cost optimization by @Danimir Ljepava
Fine tuning backup storage costs on SQL Managed Instance
Backup storage consumption on Managed Instance explained
What’s next?
Once you go through the most common cost optimization hints described in this post, remember to treat them as a process. Implement, revisit, and follow them regularly. Also stay tuned as more articles about Azure Well-Architected Framework (WAF) for SQL Managed Instance workload is coming.
Disclaimer
Please note that options presented in this article are subject to change. This article reflects the state of cost optimization options available for Azure SQL Managed Instance in March, 2021 but is not limited to them and can changed over time
Closing remarks
If you find this article useful, please like it on this page and share through social media.
To share this article, you can use the Share button below, or this short link: https://aka.ms/sqlmi-waf-cost-optimization
by Contributed | Mar 29, 2021 | Technology
This article is contributed. See the original author and article here.
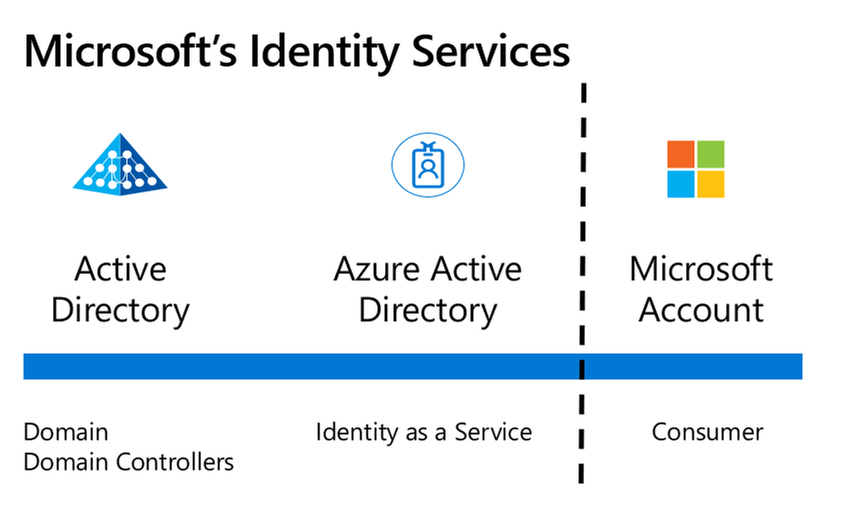
Microsoft provides three main Identity services – Active Directory, Azure Active Directory and Microsoft Accounts. In this article, we’ll explore the differences between Azure Active Directory and Microsoft Accounts.
Interested in the difference between Active Directory and Azure Active Directory? Check out this article I wrote for A Cloud Guru.
Microsoft’s three main Identity platforms
What is a Microsoft Account?
A Microsoft Account is the modern name given to the Identity system that provides authentication and authorization to Microsoft’s consumer services. It’s had other former names, like Microsoft Passport or a Microsoft Live Account and is sometimes referred to as a personal account. A Microsoft Account can be used to sign in to Outlook.com, Office subscriptions, Skype, OneDrive, XBox Live, Bing, the Microsoft Store, Windows and MSN:
 Consumer services that use a Microsoft Account
Here are some common scenarios:
A Microsoft Account can be created with a new email address and mailbox at Outlook.com. You can even choose Hotmail.com as a valid domain name for this service.
A Microsoft Account can be created when you sign into a new Windows 10 computer for the first time.
A Microsoft Account can be used to sign into Microsoft 365 home plans such as Microsoft 365 Personal, for access to Office applications, including the consumer version of OneDrive.
With a Microsoft Account, Microsoft controls and manages all of the configuration and settings of the Identity platform. It’s designed to scale to a broad base of consumer users across the globe, all in the one system. So, you will have a conflict if you try and create a Microsoft Account with a username that has already been taken.
You don’t need to create a new email account or use the outlook.com or hotmail.com domains for your new Microsoft Account. In fact, you can even use a Gmail address to register for a Microsoft Account:
 gmail.com address used for a Microsoft Account
You used to be able to create a Microsoft Account using the same email address as your work or school account, but Microsoft have now blocked this to stop confusion between the two different identity services. There is no organizational-level management of user accounts for creating and viewing users, resetting passwords etc.
What is a work or school account with Azure Active Directory?
A work or school account is created by an organization using a business service that has Azure Active Directory as the authentication and authorization platform. This includes business plans for Microsoft 365 including Outlook Web Access and OneDrive for Business, Microsoft Intune and Windows 10 devices that are connected to your organization’s Azure Active Directory domain, as well as Microsoft Azure resources.
With Azure Active Directory, Microsoft provides the identity platform as a service but you can modify some of the configuration and settings, such as adding your own custom domain name (to get @yourorg.com) or requiring multi-factor authentication. Your Azure Active Directory instance is available via the Azure Portal and other management tools like PowerShell, the Azure CLI and the REST API. And you can also monitor and investigate advanced security events with integration into tools like Azure Sentinel.
 User management with Azure Active Directory in the Azure portal
The sign-in experience
Previously, the Microsoft sign-in interface would get you to choose personal account or a work or school account before entering your details. Now the sign-in screen detects the account type for you, presenting you with an agnostic sign-in window:
 A sign-in window for a Microsoft service
If you visit Outlook.com and sign in with your work account that has an Exchange Online mailbox via Microsoft 365, you’ll automatically be redirected to the outlook.office365.com mailbox.
And if you try to sign into a business service that needs a work or school account (like portal.office.com), you’ll receive an error:
 You can’t sign in here with a personal account. Use your work or school account instead.
Interoperability
Lets look at some difference scenarios that might involve these two services together.
Synchronization
There is no synchronization of user account information between Microsoft Accounts and Azure Active Directory, like you can achieve with Active Directory and Azure Active Directory. This is due to the separation of that consumer versus business identity platform.
Guest accounts
Even though you can’t synchronize Microsoft accounts into your Azure AD (or vice versa), you can invite someone as a guest user into Azure with their Microsoft Account email address. They’ll appear in your directory with Microsoft Account listed at the source and you won’t be able to perform any user administration on their account such as renaming them or resetting their password. This is useful though for inviting external people to collaborate and is the method behind the scenes if someone’s Microsoft Account is invited to be a guest in Microsoft 365 services like Teams.
Azure AD B2C
In addition, Microsoft provides a service called Azure Active Directory B2C which DOES support using Microsoft Accounts as an authentication source for access to your applications, as well as other consumer identity directories like Facebook, Twitter, Google, Amazon and OIDC compliant business and government identity providers. For more information, visit What is Azure Active Directory B2C?
 Azure Active Directory B2C allows consumer and OIDC identities to be authentication sources for Azure.
Azure service errors
I’ve recently become aware of errors like this example, accessing Azure Key Vault with Visual Studio, that may indicate a conflict between a Microsoft Account and an Azure Active Directory account: “Azure Key Vault is configured for use by Azure Active Directory users only. Please do not use the /consumers endpoint to serve this request.” It is possible to create a new Azure tenancy and have a Microsoft Account as the login.
In fact, that’s a common process when you set up Azure for the first time:
From Azure, create a Free or Pay as you Go account using your Outlook.com email address (such as personal0321@outlook.com).
This creates an Azure subscription with a new Azure Active Directory and your account as the first user. Note it takes your email address to form the new directory’s default domain name (personal0321outlook.onmicrosoft.com) and you can add a custom domain name next.
 First Azure User created from a Microsoft Account
Note the Source is listed as Microsoft Account.
 Microsoft Account signed in to access Azure
In this case, it’s recommended that you create a new user in Azure Active Directory and grant them the Owner role to the subscription, and use that identity to authenticate with. In this example, I’ve also made them a Global Administrator for Azure Active Directory. For more information visit Add or change Azure subscription administrators.
 The new user has Azure Active Directory as the Source
 Creating a new Azure user as a global administrator
Learn more:
Secure access to your applications by using Azure identity services – Microsoft Learn
What’s new in Azure Active Directory?
What is the Azure Active Directory architecture?
Microsoft Accounts in the Enterprise
by Contributed | Mar 29, 2021 | Technology
This article is contributed. See the original author and article here.
AzureRM PowerShell modules would be retired on 29 February 2024, Az PowerShell modules now have all the capabilities of AzureRM PowerShell modules.
This blog shows AZ module setup and common commands to manage your Azure Service Fabric.
Table of Contents
- Az module setup:
- Check if you have AzureRM module
- Install AZ module and remove AzureRM module
- Common commands
- Login to your Azure account
- Get service fabric cluster status
- Add nodes to a cluster
- Add nodeType to cluster
- Update cluster durability
- Update the cluster reliability
Notes:
- The following cmdlets of {Get-Az*} only support ARM deployed resources:
- Get-AzServiceFabricApplication
- Get-AzServiceFabricService
- Get-AzServiceFabricApplicationTypeVersion
- Get-AzServiceFabricApplicationType
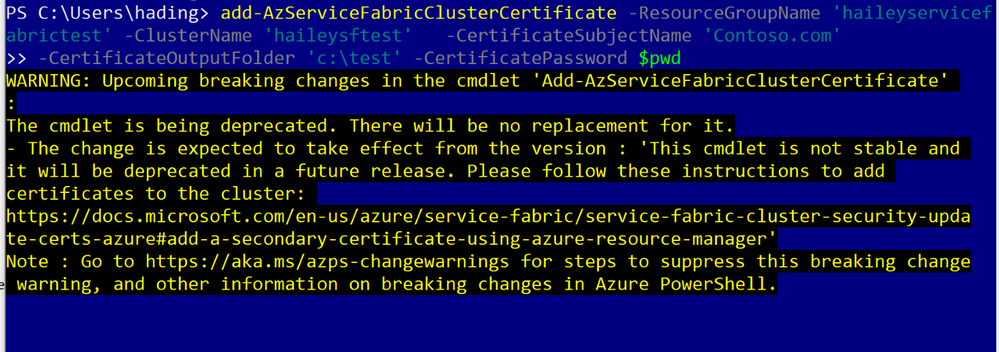
- Add cluster certificate is not supported, suggest to use ARM instead.
Az module setup:
This section will cover how to setup the AZ module in your environment.
You can skip this part, If you have already setup a local environment for with the AZ module.
Step 1: check if you have AzureRM module.
If you do have the AzureRM installed, you will need to remove AzureRM module first.
Document Link
Run code:
if ($PSVersionTable.PSEdition -eq 'Desktop' -and (Get-Module -Name AzureRM -ListAvailable)) {

    Write-Warning -Message ('Az module not installed. Having both the AzureRM and ' +

      'Az modules installed at the same time is not supported.')

} else {

    Install-Module -Name Az -AllowClobber -Scope CurrentUser

}

Step2: install AZ module and remove AzureRM module
Uninstall AzureRM module: https://docs.microsoft.com/en-us/powershell/azure/uninstall-az-ps?view=azps-5.6.0#option-2-uninstall-the-azurerm-powershell-module-from-powershellget
First run code:
Install-Module -Name Az -AllowClobber -Scope CurrentUser

Then run code as an admin:
Uninstall-AzureRm

Common commands
- Login to your Azure account
To login, you will need to run the following command:
Connect-AzAccount

After sign in, you will be able to see the subscriptions you can work with:

(Optional) If you want to change a subscription to work with, run the following codes:
Run code:
$context = Get-AzSubscription -SubscriptionId ...
Set-AzContext $context
Use the Get-AzServiceFabricCluster command to get the information for a specific SF cluster.
Run code:
Get-AzServiceFabricCluster -ResourceGroupName 'haileyservicefabrictest' -ClusterName 'haileysftest'

You can run the following code to add nodes to your specific cluster.
Add-AzureRmServiceFabricNode -ResourceGroupName 'haileyservicefabrictest' -ClusterName 'haileysftest' -NodeType 'Type456' -Number 2
Run codes:
Add-AzServiceFabricNodeType -ResourceGroupName $resourceGroupName -ClusterName $clusterName -NodeType $nodeType -Capacity $capacity -VmUserName $vmUsername -VmPassword $pwd

Using the following command to update the durability tier or VmSku of a node type in the cluster.
Update-AzServiceFabricDurability -ResourceGroupName 'haileyservicefabrictest' -Name 'haileysftest' -DurabilityLevel Silver -NodeType 'mynodetype’

Use the following command to update the reliability tier of the primary node type in a cluster.
Update-AzServiceFabricReliability -ResourceGroupName 'haileyservicefabrictest' -Name 'haileysftest' -ReliabilityLevel Silver
by Contributed | Mar 29, 2021 | Technology
This article is contributed. See the original author and article here.
Microsoft 365 Business Voice makes it easy for small and medium organizations to turn Microsoft Teams into a powerful and flexible telephone system. If you already have phone numbers that you would like transfer to Business Voice, you can bring them with you by porting them from your previous service provider to Microsoft.
Porting your existing phone numbers to Microsoft 365 Business Voice can be a simple and straightforward process. To minimize potential issues, it is important to avoid common mistakes when submitting your porting requests.
This document provides a summary of how our porting process works and includes additional guidance and resources to assist you in completing your porting requests most efficiently.
Let’s quickly look at the porting process on a high level:
- In a nutshell, the gaining carrier (the phone service provider that you want to port your numbers to, i.e., Microsoft) raises a port request on your behalf (the end customer) and sends it to the losing carrier (the phone service provider that currently owns the phone numbers that you are trying to port).
- The losing carrier will process the port request and respond with either an approval or a rejection. Microsoft has no say in this decision and cannot influence the behavior of the losing carrier, as it is based on completion and accuracy of the port request data.
- When placing a port request, you will be asked to choose a target porting date and time. Choosing a target date does not mean that the port will happen on that date – the port will only occur on the target date IF the losing carrier provides approval to allow your numbers to be ported away from their system on the date that you have asked for.
- Microsoft takes your request and submits it to the losing carrier and then relays their response back to you.
Below are a few best practices that would make your number porting process as smooth as possible:
Creating a Number Porting Request
If you are in a supported region for the automated number porting process through Teams Admin Center, we strongly recommend you to use this method. You’ll benefit from an automated process and a structured wizard with additional guidance.
The following rules are important to be aware of when creating porting requests:
- Request to schedule the execution of your ports during business hours in your time zone.
- Avoid requesting to schedule the execution of number ports on Friday afternoon because it will limit our staff’s ability to connect with the losing carrier (if necessary). This may result in the numbers being out of service over the weekend.
- Submit one order per each account number from the losing carrier. Phone numbers from different account numbers in a single port order will fail.
- Careful planning is necessary to properly schedule the port order. Submitting multiple orders for the same carrier and account number may fail as the losing carrier may only accept one at a time.
- Toll-free phone numbers must be submitted on separate port orders.
- All phone numbers in a port order must be from the same carrier.
Validate Information you provide in a porting request.
The success of your port request depends on the accuracy of the information that you provide to Microsoft when you create it. Please validate the information accuracy with the existing provider before submitting the port request. You can do this by obtaining a Customer Service Record (U.S.), Equipment Record (Canada), or pre-order validation bill from the current carrier.
Do not cancel existing services until porting is complete.
Number porting occurs based on account information and if you cancel your subscription, it will not succeed.
Porting different number types
Phone numbers in Business Voice can have two types: user phone numbers that can be assigned to users and service numbers that can be assigned to services such as Call Queues.
In this model, the Service Desk can than schedule the inventory change right after the number port has been completed.
In addition to the above guidance, Microsoft is taking the following steps to improve the number porting experience:
- We’re investing in additional step-by-step guidance documentation to assist customers and partners in submitting port requests. This blog post is the first step in this direction and we will be providing more details as new resources become available.
- The porting process is being streamlined, with new automation being added this month to accelerate response times.
- We continue to add more staff to our number porting team to improve the experience with number porting management.
For more details and additional tips and tricks on number porting, please refer to the Number Porting – Best Practices Webinar and additional resources below:
- What is a port order. For an overview of what number porting is and answers frequently asked questions about number porting.
- Transferring phone numbers common questions. It includes regional support information, numbers that can and cannot be transferred, and the data required to complete the process.
- Use the Teams Admin Center to submit a port order:
- How to check the status of your port orders: In Teams Admin Center, use the left and go to > Voice > Port orders. Then click Order history. Each port order status is listed in the Status column.
- Manage phone numbers for your organization and obtain LOA templates: Manage phone numbers for your organization
by Contributed | Mar 29, 2021 | Technology
This article is contributed. See the original author and article here.
Scenario:
In the browser, if you send a request to your Azure API management service, sometimes you might get the CORS error, detailed error message like:
Access to XMLHttpRequest at ‘https://xxxxx.azure-api.net/123/test’ from origin ‘https:// xxxxx.developer.azure-api.net’ has been blocked by CORS policy: No ‘Access-Control-Allow-Origin’ header is present on the requested resource.

This blog is intended to wrap-up the background knowledge and provide a troubleshooting guide for the CORS error in Azure API Management service.
Background Information:
What is CORS?
https://developer.mozilla.org/en-US/docs/Web/HTTP/CORS
Cross-Origin Resource Sharing (CORS) is an HTTP-header based mechanism that allows a server to indicate any other origins (domain, scheme, or port) than its own from which a browser should permit loading of resources.
An example in my case, when I try to test one of my API in my APIM developer portal. My developer portal ‘https://coolhailey.azure-api.net’ uses XMLHttpRequest to make a request for my APIM service ‘https://coolhailey.developer.azure-api.net’, two different domains.
How does CORS work?
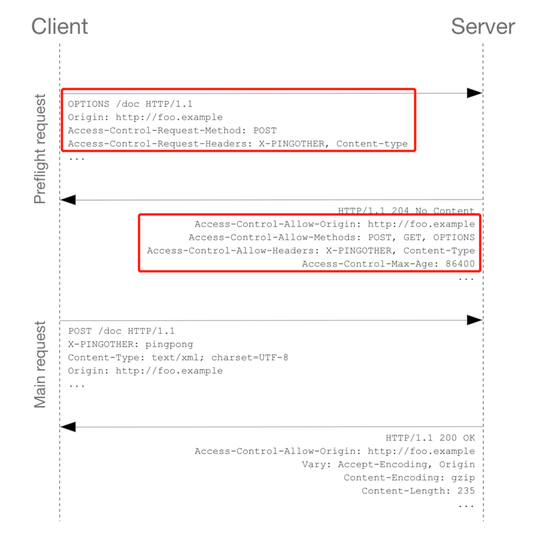
CORS relies on a mechanism by which browsers make a “preflight” request to the server hosting the cross-origin resource, in order to check that the server will permit the actual request. In that preflight, the browser sends headers that indicate the HTTP method and headers that will be used in the actual request. https://developer.mozilla.org/en-US/docs/Web/HTTP/CORS#preflighted_requests
Preflight: “preflighted” requests the browser first sends an HTTP request using the OPTIONS method to the resource on the other origin, in order to determine if the actual request is safe to send. Cross-site requests are preflighted like this since they may have implications to user data.
An example of valid CORS workflow:
Step 1: There will be an Options request first.
In the request header, the ‘Access-Control-Request-Headers’ and ‘Access-Control-Request-Method’ has been added.
Please pay attention to the response header: Access-Control-Allow-Origin. You might need to make sure the request origin URL has been added here. In my case, I am sending a request from my developer portal, so ‘https://coolhailey.developer.azure-api.net‘ needs to be added to the Access-Control-Allow-Origin field.
Then go to the real request, step 2.

Step 2: The real request starts.

Troubleshooting:
To troubleshoot the CORS issue with the APIM service, usually we need to prepare ourselves with the following aspects.
Checking if you have the CORS policy added to the inbound policy
You will need to navigate to the inbound policy and check if you have this <cors> element added.
Some example as the snapshot below:

here is a document for the CORS policy in APIM service
Understanding how CORS policy work in different scopes
If you have been using APIM policy before, you will notice that CORS policy can be added into the global level(All APIs) or the specific API level(An operation), which means that there are policies in APIs and there are also policies in specific operations. How does these policies work in different scopes?
The answer is that specific APIs and operations inherited the policies from their parent APIs, by using the <base/> element. By default, the <base/> element is added to all the sub APIs and operations. However by manually removing the <base/> from specific APIs and operations, the policies from the parent APIs won’t be inherited.
A default policy for an API and operation:

Calculating Effective Policies
We can use the tool ‘Calculate effective policy’, to get the current effective policies for a specific API/operation.
Navigate to the inbound policy for the specific API or operation, you will find the ‘Calculate effective policy’ button on the bottom right. Snapshot below:

Clicking on the botton, and choose the product you want to check, then you will find all the effective policies for the current API/Operation.

Common Scenarios:
Scenario 1: no <cors> policy enabled
If you want to apply the cors policy into the global level, you can add the <cors> policy at the ‘All APIs’ level.
In the allowed origins section, please make sure the origin URL which will call your APIM service, has been added.
<cors allow-credentials="true">
<allowed-origins>
<origin>the origin url</origin>
</allowed-origins>
<allowed-methods preflight-result-max-age="300">
<method>*</method>
</allowed-methods>
<allowed-headers>
<header>*</header>
</allowed-headers>
<expose-headers>
<header>*</header>
</expose-headers>
</cors>

In some cases, you may only want to apply <cors> policy to the API or Operation level. In this case, you will need to navigate to the API or Operation, add the <cors> policy into the inbound policy there.
Scenario 2: missing the <base> element into the inbound policyat different scopes
If you have enabled the <cors> policy at the global level, you would suppose all the child APIs or operations can work with cross region requests properly. However, things are not as expected if you’ve missed the <base> element for one of the child level policy.
For example, I have <cors> at the global level enabled, but for the ‘Get Test call’ Operation, the cors is not working.


In this case, your need to check the inbound policy for this specific Operation ‘Get Test call’ , and see if you have the <base> element here. If no, you will need to add it back into the inbound policy.

At the same time, you will need to check the inbound policy at the API level, which you can click the ‘All operations’, and make sure the <base> element is added at this different scope.

In my case, I find that I am missing the <base> element in the ‘Test API’ level, so my solution would be adding the <base> element here.
Scenario 3: <cors> policy after other policies
In the inbound policy, if you have other policies before the <cors> policy, you might also get the CORS error.
For example, in my scenario, navigate to the effective policy for the operation, there is a <rate-limit> policy right before the <cors> policy. The CORS setting won’t work as expected, since the rate-limit policy will be executed first. Even though I have <cors>, but it cannot work effectively.

In this case, I need to change the order of the inbound policy and make sure the <cors> is at the very beginning of my inbound policy, so that it will be executed first.
Scenario 4: product level CORS setting
Your product level policy setting can also affect your <cors> policy.
Please be noted that: when CORS policy applied at the product level, it only works when subscription keys are passed in query strings.
For one of my API, when I navigate to the calculate effective policies, and if I choose different Products, the inbound policies are completely different.
- When I choose Contoso product, I see <cors> setting working fine.

- However, when I choose a different product ‘Starter’, I have <rate-limit> and <quota> setting at the product level. These rate limit policies will be executed before the <cors> policy, which will result in the CORS error when I reach to the rate limit. This is actually a fake CORS error message, since the real problem comes with the rate limit.

- To avoid this kind of fake CORS error, you can navigate to the Starter product, and go to the Policies blade, then change the order of the inbound policies.
In my case, I just moved the <base/> element to the beganing of the inbound policy.


Recent Comments