by Contributed | Mar 30, 2021 | Technology
This article is contributed. See the original author and article here.
We are excited to announce the support of managing Azure Stack HCI clusters in VMM 2019 UR3. Azure Stack HCI is the newly launched subscription-based fabric OS that’s delivered as an Azure service. More details on the announcement here.
SCVMM 2019 UR3 introduces support to manage Azure Stack HCI, 20H2
Let’s look at a scenario on how a SCVMM customer can get started with Azure Stack HCI. Contoso is an enterprise in retail space that uses SCVMM to manage their on-premises datacenter infrastructure. Currently they are managing Windows Server 2019 hosts and a small fraction of VMware ESXi hosts using VMM 2019. The enterprise just started with the project to modernize their datacenter. Contoso decided to leverage the benefits of HCI (Hyper Converged Infrastructure) architecture and simplify their management of compute, storage, and networking in a single system. Contoso opted for Azure Stack HCI because of the rich hybrid capabilities and also Contoso IT admins are well versed with Hyper-V tools, concepts, and skills.
Create and manage Azure Stack HCI cluster using VMM:
The following scenarios are supported in VMM 2019 UR3 to manage Azure Stack HCI, version 20H2.
- Addition, creation, and management of Azure Stack HCI clusters. See detailed steps to create and manage HCI clusters.
- Ability to provision & deploy VMs on the Azure Stack HCI clusters and perform VM lifecycle operations. VMs can be provisioned using VHD files, templates or from an existing VM. Learn more.
- Set up networking (including VLAN-based networks) on Azure Stack HCI clusters.
- Deployment and management of SDN network controller on Azure Stack HCI clusters.
- Management of storage pool settings, creation of virtual disks, creation of cluster shared volumes (CSVs) and application of QOS settings.
- The PowerShell cmdlets used to manage Windows Server clusters can be used to manage Azure Stack HCI clusters as well.
Register Azure Stack HCI clusters:
After creating an Azure Stack HCI cluster, it must be registered with Azure within 30 days of installation per Azure Online Service terms. Follow the stated steps to register the Azure Stack HCI cluster with Azure.
View the registration status of Azure Stack HCI clusters:
In VMM console, you can view the registration status & last connected date of Azure Stack HCI clusters. Navigate to fabric tab and right click the Azure Stack HCI cluster and select properties.
 View Registration status and last connected date of Azure Stack HCI cluster
Migrate workloads to Azure Stack HCI:
Contoso wanted to migrate some of the workloads from their Windows Server 2019 fabric to Azure Stack HCI cluster. Unfortunately, Live migration between Windows Server and Azure Stack HCI is not supported. Network migration functionality can be used in VMM to migrate workloads from Windows Server 2019 to Azure Stack HCI. Network migration from Azure Stack HCI to Windows Server is not supported.
- Live migration should be temporarily disabled at the destination Azure Stack HCI host.
- VMs and Services > All Hosts, select the source Windows Server 2019 host from which you want to migrate.
- Select the VM that you want to migrate. The VM should be in turned off state.
- Click Migrate Virtual Machine to start the Migrate Virtual Machine Wizard.
- In Select Host, review select the destination Azure Stack HCI host.
- Click Next to initiate network migration. VMM will perform import and export behind the scenes here.
- To verify that the virtual machine was migrated, check the VMs list on the destination host. Turn on the VM and re-enable live migration on the Azure Stack HCI host.
Migrate VMware workloads to Azure Stack HCI:
- Click VMs and Services > Home > Create > Create Virtual Machines > Convert Virtual Machine.
- In Convert Virtual Machine Wizard > Select Source click Browse and Select Virtual Machine Source select the VMware VMs you want to convert.
- In Specify Virtual Machine Identity modify the machine name and description as required.
- In Virtual Machine Configuration specify the number of processor and memory settings.
- In Select Host select the Azure Stack HCI host for placement. In Select Path configure the storage location on the host for the VM files. The default VM paths are listed.
- In Select Networks select the logical network, virtual network, and the VLAN as applicable. The list matches whatever is configured on the physical adapters of the host.
- In Add Properties configure settings. In Summary review the settings and select Start the virtual machine after deploying it if required. Then click Create to start the conversion. Verify the VM was converted in VMs and Services > Home > Show > VMs.
Additional resources:
Download and install Update Rollup 3 for System Center Virtual Machine Manager 2019.
Check out the all-new Azure Stack HCI solutions catalog. Read more about Azure Stack HCI and get started with data center modernization.
by Contributed | Mar 30, 2021 | Technology
This article is contributed. See the original author and article here.
Azure Purview is unified data governance solution to maximize the business value of data. Using Azure Purview, you can create an up-to date Data Map using automated metadata discovery including technical metadata and classifications. The metadata can then be further enriched with AI-powered classifiers, associated with business glossary terms and specify experts and data owners. This process, essentially, makes data more trustworthy and valuable to data consumers across the organization.
In order to help you streamline this process even further, we recently launched the capability for Azure Purview to bulk edit data assets at scale. In just a few clicks, you can now prepare a list of the data assets to be edited and then modify classifications, terms, experts as well as owners for the selected list with a single action.
How does it work?
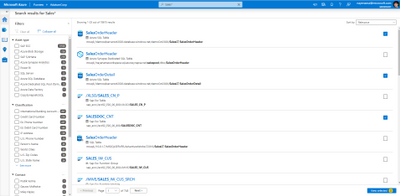
Step 1: Prepare a list of data assets to be bulk-edited.
You can prepare the list either by searching on the assets and selecting them in search result page or doing to the asset details view and selecting the same.
Figure 1: Screenshot showing selection of assets in search result page

Figure 2: Screenshot showing selection of asset in asset detail page.
Step 2: Once the list is ready click on “View selected” to review the list and remove any data asset which is accidentally added to the list.

Figure 3: Screenshot showing “View selected” blade.
Step 3: Click on “Bulk edit” to add/replace/remove classifications, glossary terms, experts or owners to the list with a single action.

Figure 4: Screenshot showing all the annotations and contacts which will be applied to the list.
Get started today:
- Learn more on how to bulk edit assets here

by Contributed | Mar 30, 2021 | Technology
This article is contributed. See the original author and article here.
We are thrilled to announce that the Immersive Reader is rolling out to four additional Microsoft apps and services, including PowerPoint for the web, OneDrive, SharePoint and MakeCode. This set up updates that bring this powerful literacy tool to even more places!
PowerPoint gets more inclusive
One of the top requests we’ve heard from students, parents and educators has been to add the Immersive Reader to PowerPoint. It has also been a top UserVoice request for the PowerPoint team. We are excited to announce that Immersive Reader in PowerPoint for the web is rolling out globally to Office Insiders, and will continue rolling out in April. You’ll be able to access the Immersive Reader in two areas of PowerPoint for the web.
- Select any text on a PowerPoint slide and choose “Open in Immersive Reader” (see the demo below).
- The other area was inspired directly by Molly Paris. Molly and her mother visited the Microsoft campus last year and Molly told us how helpful it would be for her to be able to access the Immersive Reader in the Notes area of PowerPoint. We’re happy to announce to Molly and everyone else that Immersive Reader access is now on the Notes section of every slide as well. Just select the Notes text, right click and choose “Open in Immersive Reader.
SharePoint adding Immersive Reader for Pages
Another area we’ve heard customer feedback from is making SharePoint pages more accessible with the Immersive Reader. Last fall, we did an internal hackathon to prototype this, and today we are excited to announce that Immersive Reader for SharePoint Pages will be rolling out in April. An example of this integration is below.

OneDrive adding the Immersive Reader for documents
OneDrive is a great place to store and access documents and other content. To enable better access to content, we’re adding the Immersive Reader directly into the OneDrive menus to launch it on Word documents and text files. This will roll out in April and May of 2021.

MakeCode and Immersive Reader make STEM and Computer Science more accessible
MakeCode Arcade tutorial instructions are now available to all by clicking on the Immersive Reader icon at the top of any tutorial, as well as where there are instructions for a MakeCode project. See the demo below for the details.v

We hope you enjoy these inclusive and accessible updates where we’ve added the Immersive Reader to Microsoft products!
Mike Tholfsen
Principal Product Manager, Microsoft Education
@mtholfsen
by Contributed | Mar 30, 2021 | Technology
This article is contributed. See the original author and article here.
Azure Sphere is a Microsoft platform enabling customers to build secured IoT products. For Azure Sphere-based products, Microsoft provides ongoing OS updates, enables device manufacturers to update their own app code, and provides certificate management. Being a platform, Azure Sphere is not directly used by end users, but by companies who build devices – often called “OEMs” (Original Equipment Manufacturers), or by enterprises who deploy those devices. Therefore, the “interface” for the Azure Sphere product is not an end user interface, but is docs, SDKs, software samples and hardware reference designs that enable our OEMs to build products.
In this blog post, we’re going to describe an end-to-end device built with Azure Sphere, showing how software, hardware, and physical design come together to create a real working device, which we then distributed to some end users. Our example device isn’t intended for sale, or even to be a formal reference design. It was intended as a demo device showcasing some of the key features of Azure Sphere through that device’s capabilities. We also deployed this device internally at Microsoft, which gave us insights into how end users experienced and interacted with Azure Sphere devices.
As part of the Azure Sphere team, we have a small team known as Devices & Demos, which includes software, electronics, and design expertise. This team maintains assets such as the design of the MT3620 Reference Development Board and other hardware reference designs. In addition, by designing, implementing, manufacturing, and deploying small runs of real devices, we enable the Azure Sphere team to experience and validate our OEM customers’ perspective as users of Azure Sphere.
For this particular demo, we wanted to build something:
- Enclosed and self-contained
- Battery powered
- Connected to a cloud IoT dashboard – built with Azure IoT Central
- Using a small, custom PCB (printed circuit board)
- With real-time requirements
- Engaging and fun!
-
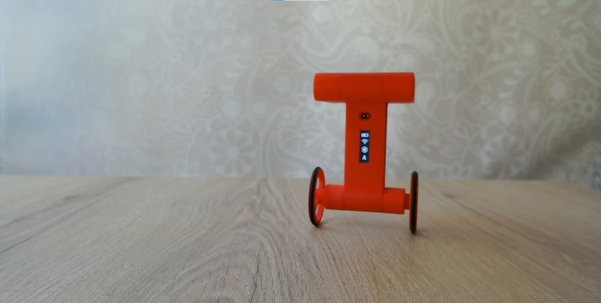
We settled on a balancing two-wheeled robot. Balancing robots (and inverted pendulums) are canonical examples of hard real-time control – if the control loop is stopped from executing, or misses timing constraints, they fall over – hard.
Of course, if we’re going to build a cool demo, it wouldn’t be complete without lasers. So we added some range-finding lasers that enable the robot to avoid obstacles.
Robot design and behavior
Here’s a picture of the robot in action:
We included a small LCD screen to show the robot’s status. There are 4 icons, the top one being battery level, then WiFi connectivity status, then IoT Central connectivity status, and finally an indicator of the firmware version (version A or version B) that it is running that is used when demonstrating how the robot handles over-the-air software updates without falling over.
Inside, the robot looks like this:

As you can see, the 3 AA batteries are in the top compartment. The PCB forms the “spine” and includes an inertial measurement unit (IMU) for balancing, and the laser range-finders. The motors are housed at the bottom in line with the wheels. The whole thing is encased – we used 3D printing to quickly build some custom cases. To simplify the electronic design, we used the Avnet Azure Sphere MT3620 module.
The software architecture is illustrated in the diagram below. We made use of Azure RTOS on one of the MT3620’s M4F cores to perform the hard real-time loop of controlling the motors, using data from the IMU to stay upright, and data from the laser range-finders to detect and back away from obstacles. The “high level” A7 core app communicates with Azure IoT Central and with the real-time core to provide secured internet connectivity.

Connecting to the cloud
It wouldn’t be an IoT demo without showing how to view and control the data from the Internet. In Azure IoT Central, we implemented a dashboard showing the status of the robot:

This shows:
- The battery level of the robot over time
- The current heading of the robot in both degrees and as a compass direction
- The total number of obstacles that the robot has avoided using the laser rangefinder to detect and back away from an object
We also implemented a control feature in IoT Central:

This illustrates how IoT Central can set a “desired property” in the robot’s device twin, for the desired heading – the robot then turns on the spot to face in that direction.
Deferring updates while balancing
Being securely connected to the Internet requires a device to be regularly updated to stay on top of newly discovered security issues – this is one of the Seven Properties of Highly Secured Devices. However, to take a software update requires a device to be unresponsive while it installs – which is not a good idea if you’re balancing on two wheels. To address this, Azure Sphere supports deferral of device updates. For this robot, we use that feature and defer updates until the robot is safely lying down.
Video and source
All of the above features are illustrated in this video:
We have also made all the source files and docs for this robot available in the Azure Sphere Gallery github repository. This includes the software, electronics design, physical case design, plus assembly and end-user instructions. The Azure Sphere Gallery github repository includes unmaintained content that is not part of our official, maintained Azure Sphere platform. others might find useful as an example of a complete device implemented, manufactured and deployed on top of Azure Sphere.
Conclusion
Thank you for reading this blog post! I hope it has inspired you to think about what you could create with Azure Sphere. If you haven’t already, why not grab an Azure Sphere dev board and see how quick it is to build a secured IoT device, or have a look at the github repository to see how we did it ourselves.
by Contributed | Mar 30, 2021 | Technology
This article is contributed. See the original author and article here.
In this episode with Gaston Cruz, he’ll show you the options to process Azure Analysis Services models (Semantic Layer) connecting to an Azure SQL DB as a data source (using SSDT), and then create an architecture using a Service Principal account to process the model (DB, Tables, Partitions) in an automatic way deploying an Azure Logic Apps, and then calling from Azure Data Factory to trigger the process. Finally, he’ll conclude by showing you the advantages of using a live connection from Power BI to connect to AAS models.
Watch on Data Exposed
Resources:

Recent Comments