by Contributed | Apr 12, 2021 | Technology
This article is contributed. See the original author and article here.
Several customers have approached me on how to configure Splunk antivirus exclusions for processes, folders, and files within Microsoft Defender for Endpoint on RedHat Enterprise Linux. This quick reference article has been created to address this common question.
Note: This blog is in support of Microsoft Defender for Endpoint on Red Hat Enterprise Linux 7.9.
Disclaimer: This may not work on all versions of Linux. Linux is a third-party entity with its own potential licensing restrictions. This content is provided to assist our customers to better navigate integration with a 3rd party component or operating system, and as such, no guarantees are implied. Process and folder exclusions could potentially be harmful because such exclusions increase your organizational exposure to security risks.
- First let’s check if any file or folder exclusions are already configured on your RedHat Enterprise Linux clients by running the following command
mdatp exclusion list
- In the following example, we see that we do not have any exclusions configured for the device
[azureuser@redhat /]$ mdatp exclusion list
=====================================
No exclusions
=====================================
[azureuser@redhat /]$
- To review Microsoft Defender for Endpoint on Linux exclusions information, visit our public documentation.
- Splunk exclusions list is noted in their respective documentation.
- Here is a simplified list of the recommended exclusion from the link above:
version:
|
Directories to exclude:
|
Processes to exclude:
|
Splunk Enterprise (*nix)
|
/opt/splunk ($SPLUNK_HOME) and all sub-directories
/opt/splunk/var/lib/splunk ($SPLUNK_DB) and all sub-directories
|
· bloom
· btool
· btprobe
· bzip2
· cherryd
· classify
· exporttool
· locktest
· locktool
· node
· python*
· splunk
· splunkd
· splunkmon
· tsidxprobe
· tsidxprobe_plo
· walklex
|
Splunk universal forwarder (*nix)
|
/opt/splunkforwarder ($SPLUNK_HOME) and all subdirectories
|
· Same as Splunk Enterprise (*nix)
|
- To add an exclusion manually for a process running on RHEL 7.9, you need to run the following command:
mdatp exclusion process add –name [nameofprocess]
- Since we have 17 processes to exclude, we will have to run the command 17 times, one for each process.
sudo mdatp exclusion process add –name bloom
sudo mdatp exclusion process add –name btool
sudo mdatp exclusion process add –name btprobe
sudo mdatp exclusion process add –name bzip2
sudo mdatp exclusion process add –name cherryd
sudo mdatp exclusion process add –name classify
sudo mdatp exclusion process add –name exporttool
sudo mdatp exclusion process add –name locktest
sudo mdatp exclusion process add –name locktool
sudo mdatp exclusion process add –name node
sudo mdatp exclusion process add –name python*
sudo mdatp exclusion process add –name splunk
sudo mdatp exclusion process add –name splunkd
sudo mdatp exclusion process add –name splunkmon
sudo mdatp exclusion process add –name tsidxprobe
sudo mdatp exclusion process add –name tsidxprobe_plo
sudo mdatp exclusion process add –name walklex
[azureuser@redhat /]$ sudo mdatp exclusion process add –name bloom
Process exclusion added successfully
- Once we run through the 17 processes, we can check the exclusions list again.
[azureuser@redhat /]$ mdatp exclusion list
=====================================
Excluded process
Process name: bloom
—
Excluded process
Process name: btool
—
Excluded process
Process name: btprobe
—
Excluded process
Process name: bzip2
—
Excluded process
Process name: cherryd
—
Excluded process
Process name: classify
—
Excluded process
Process name: exporttool
—
Excluded process
Process name: locktest
—
Excluded process
Process name: locktool
—
Excluded process
Process name: node
—
Excluded process
Process name: python*
—
Excluded process
Process name: splunk
—
Excluded process
Process name: splunkd
—
Excluded process
Process name: splunkmon
—
Excluded process
Process name: tsidxprobe
—
Excluded process
Process name: tsidxprobe_plo
—
Excluded process
Process name: walklex
=====================================
[azureuser@redhat /]$
Note: Now that we have all 17 processes excluded. We can move on to the folder exclusions.
- To add folder exclusions manually for RedHat Enterprise Linux 7.9, you need to run the following commands:
sudo mdatp exclusion folder add –path “/opt/splunk/”
Note: This will exclude all paths and all sub directories under /opt/splunk.
[azureuser@redhat /]$ sudo mdatp exclusion folder add –path “/opt/splunk/”
Folder exclusion configured successfully
- We can check the folder exclusions list again and verify the folders are excluded.
[azureuser@redhat /]$ mdatp exclusion list
=====================================
[azureuser@redhat /]$ mdatp exclusion list
=====================================
Excluded folder
Path: “/opt/splunk/”
—
- Now that we have added the folder exclusions for the application and verified it with mdatp exclusion list we are good to go.
Hopefully this article provides you with added clarity around the common task of adding Splunk exclusions on Linux clients protected by Microsoft Defender for Endpoint on Linux.
Disclaimer
The sample scripts are not supported under any Microsoft standard support program or service. The sample scripts are provided AS IS without warranty of any kind. Microsoft further disclaims all implied warranties including, without limitation, any implied warranties of merchantability or of fitness for a particular purpose. The entire risk arising out of the use or performance of the sample scripts and documentation remains with you. In no event shall Microsoft, its authors, or anyone else involved in the creation, production, or delivery of the scripts be liable for any damages whatsoever (including, without limitation, damages for loss of business profits, business interruption, loss of business information, or other pecuniary loss) arising out of the use of or inability to use the sample scripts or documentation, even if Microsoft has been advised of the possibility of such damages.
by Contributed | Apr 12, 2021 | Technology
This article is contributed. See the original author and article here.
In the last blog we discussed how to deploy AKS fully integrated with AAD. Also we discussed deploying add-on for Azure Pod Identity and Azure CSI driver. In the article we will discuss how to create an application that using Pod Identity to access Azure Resources.
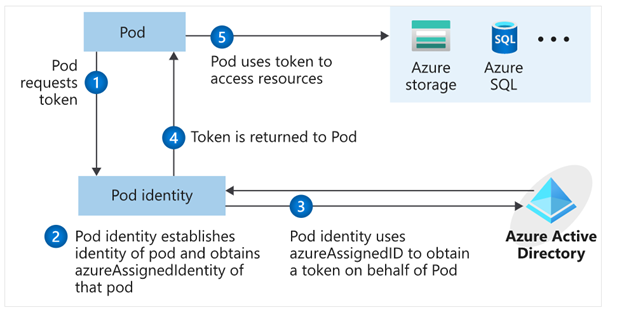
What is Pod Identity?
Pod Identity is a feature allows applications deployed to communicate with AAD, request a token then use the token to access Azure resources. The simplified workflow for pod managed identity is shown in the following diagram:
You can review Microsoft docs about pod identity best practice here
How to Create an application using Pod Identity?
In order to use pod identity in our code we will need AKS cluster to be configured with Azure AAD and Pod Identity deployed as we discussed in our pervious post.
Depending on the application, we will need to use an authentication MSI library to request a token from AAD. You can review example here
In our pervious post we show after deploying Pod Identity addon, terraform script deployed a managed Identity to namespace “demo” and updated the Key Vault access policy to include this managed identity.
In our demo today, we will show how to build application access Azure Key Vault to retrieve secrets using Pod Identity. Sample code exists here. The repo contains sample codes using C#, Java and Python.
Before staring we need to double check out environment to make sure all necessary deployment are deployed
- AAD Azure Identity Pods under Kube-System namespace:
kubectl get pods -n kube-system| grep aad”
- Azure Identity resource under target namespace
kubectl get azureIdentity -n demo
- Azure Identity Binding resource under target namespace
kubectl get azureIdentity -n demo
Once we confirm the resources then we are ready to start coding.
Java Demo
Source Code Review
The Java demo is a sample java spring boot RestAPI application. Here are few points about the code
Helm Chart Review
The helm chart will be the same chart for all demos (java/C#/Python) we will override the values.yaml during the pipeline run to fit every demo needs. The chart will deploy the following:

- Applications pods deployment: we can control how many replica from values.yaml
- Service deployment:
- Ingress deployment: map incoming request to app services
The main area we point here will be the metadata label aadpodbinding. The pod deployment file MUST have this label. In our environment we deployed the AzureIdentity and AzureIdentityBinding with same name like environment namespace hence we passing the namespace as value for aadpodbinding

Pipeline Review
The pipeline “azure-pipelines-java-kv.yml” has 3 stages as shows in the following figure

- Java Build: using Maven will package the app and publish it with chart
- Docker Build: using docker will build an image and publish it to ACR
- Helm Deployment: using helm will connect to AKS then install helm chart under namespace “demo”. Please notice how we passing new chart values as argument

Once it runs, we should see the following:

Check our work:


Finally Use Postman and query the Java app.

C# Demo
Source Code Review
Demo is identical to Java code. Rest API service that shows secret from KV. The API class is under controller folder and it expect KV URL to pass as environment variable exactly like Java example.

The pipeline for “azure-pipelines-csharp-kv.yml” is follow same structure of 3 stages
- CSharp Build: using dotnet will package the app and publish it with chart
- Docker Build: using docker will build an image and publish it to ACR
- Helm Deployment: using helm will connect to AKS then install helm chart under namespace “demo”. Please notice how we are passing new chart values as arguments
Python Demo
Source Code Review
Python code is a FlaskRest API example.

The pipeline for “azure-pipelines-python-kv.yml” is follow same structure of 2 stages.
- Docker Build: using docker will build an image and publish it to ACR
- Helm Deployment: using helm will connect to AKS then install helm chart under namespace “demo”. Please notice how we are passing new chart values as arguments.
Check our work:
Once we get pipelines deployed for all application, we can review the deployed resources.


Use Postman to call apps using ingress host.
Java Demo

Python Demo

C# Demo

Summary
We discussed in detail how to setup and configure your application to use Pod Identity. It is great feature to utilize Azure Managed Identity to access Azure resources. In our next blog will discuss Azure secret store provider for csi driver
by Contributed | Apr 12, 2021 | Technology
This article is contributed. See the original author and article here.
Getting an approval on your work items is an essential part of almost every workflow. The approval can be a written acknowledgement from your manager, a formal authorization from a diverse group of stakeholders, or an official signature from a customer. Regardless of the type of approval needed, it can be hard to track and manage the requests when many systems and people are involved, leading to unnecessary delays.
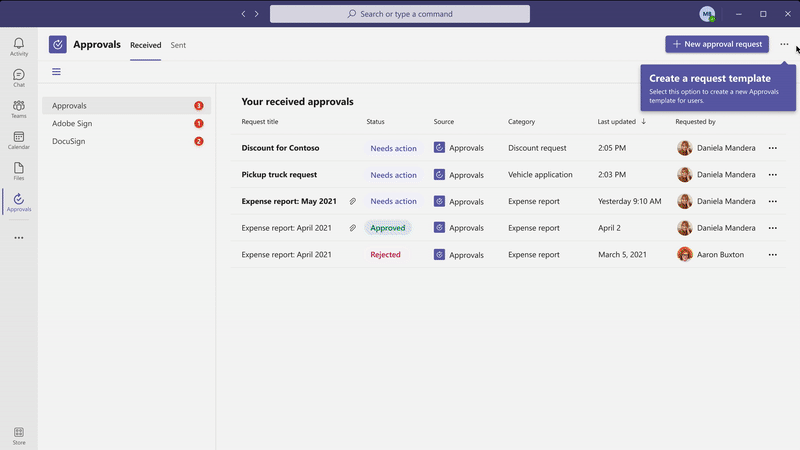
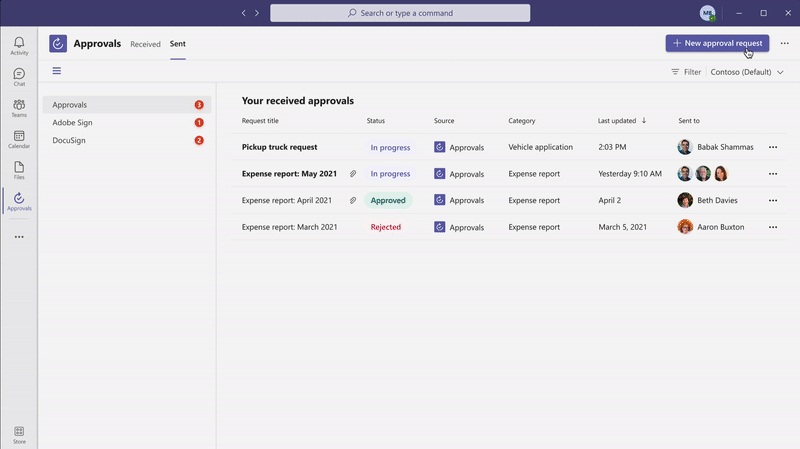
Approvals in Microsoft Teams enables everyone, from frontline workers to corporate headquarters employees, to easily create, manage, and share approvals directly from Teams.
We’ve been listening to your feedback and have added new capabilities to streamline your approval request and get faster results.
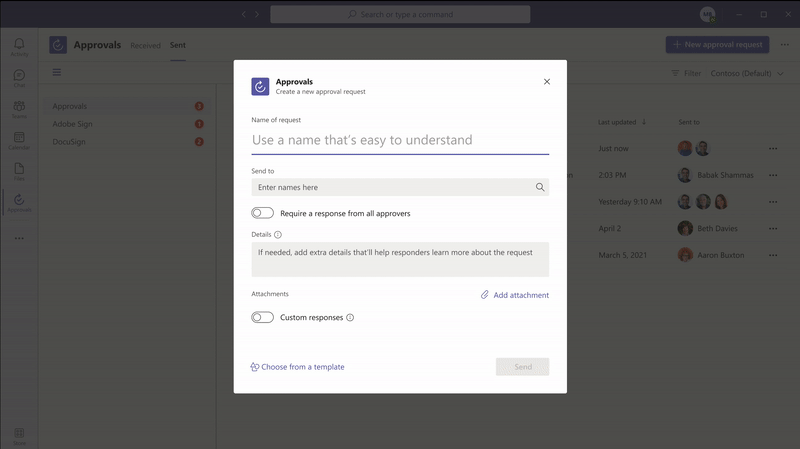
Create an approval request with an electronic signature
There may be times when you need a more formal attestation, requiring the approvers’ signatures. Now, key partners like Adobe Sign, DocuSign and other 3rd party providers allow you to create an electronic signature approval natively within the Approval app. With this new feature, approvers can add their signature without leaving Teams, enabling an efficient and faster approval process. Once the approval process is completed, the information is stored in Teams, and you can easily access the approval record and view the eSignatures.
To request the approver’s eSignature, choose eSign as your request type. Then choose your electronic signature provider, choose a file that needs to be signed, and add any additional details needed. Once submitted, internal signers are sent a notification via Teams and an email asking for their signature. If the signer is external to the organization, they will be notified with an email, in which they can easily review the details and sign. Approvals will keep track of the entire audit trail right in context of Teams, so you are able to track who already signed the approval and when. This feature will start rolling out at the end of April.
Create an approval template
To streamline workflows, new out of the box templates provide a repeatable structure for common approvals like filling out expense reports or requesting overtime. Admins and team owners can use these as is, customize or create new templates for their organization and teams.
Teams admins and teams owners can create approval templates by clicking on template management in the overflow menu and following the instructions. Enter the name of your template, select the approvers, add in the necessary form fields and the workflow settings. When done, hit publish.
Once you create your first organizational template, it will create a new admin team. From there, you can add additional admins that can manage the organizational templates, right from the Approvals App.
This feature will be rolling out in April.
Create an approval request with templates
Leverage the templates your admin/team owner enabled for you, making it easier to create an approval request. Use the structured form to input all the necessary information and eliminate back and forth on missing data for a faster approval.
New attachment capabilities
Approval hub enables you to attach files directly from OneDrive and SharePoint, as well as attach a generic link for content that is hosted outside of Microsoft 365. This will ensure your approval is connected to the latest version of the file, reflecting any changes. . This feature will be rolling out in April. This feature is available now.

Markdown support
We are also adding full Markdown support in both adaptive cards and the detail’s view, so you can ensure all your approvals are formatted correctly for all your approval processes. This feature is available now.
Approve or reject an approval request inline
Approvals role based adaptive cards enables you to quickly respond to an approval request right there from within the chat or channel without having to view the details. If you do not have permission to respond to the request, you will not see the “Approve” or “Reject” buttons on the card. This feature is available now.

Resources
Getting your request approved just got easier with the new features coming to approvals in Microsoft Teams. Learn more and get the most out of approvals in Microsoft Teams using these resources:
by Contributed | Apr 12, 2021 | Technology
This article is contributed. See the original author and article here.
Getting an approval on your work items is an essential part of almost every workflow. The approval can be a written acknowledgement from your manager, a formal authorization from a diverse group of stakeholders, or an official signature from a customer. Regardless of the type of approval needed, it can be hard to track and manage the requests when many systems and people are involved and often leads to unnecessary delays.
Approvals in Microsoft Teams enables everyone, from frontline workers to corporate headquarters employees, to easily create, manage, and share approvals directly from Teams.
We’ve been listening to your feedback and have added new capabilities to streamline your approval request and get faster results.
Create an approval request with an electronic signature
There may be times when you need a more formal attestation and require the approvers’ signatures. Now, key partners like Adobe Sign, DocuSign and other 3rd party providers allow you to create an electronic signature approval natively within the Approval app. With this new feature, approvers can add their signature without leaving Teams, enabling an efficient and faster approval process. Once the approval process is completed, the information is stored in Teams, and you can easily access the approval record and view the eSignatures.
To request the approver’s eSignature, choose eSign as your request type. Then choose your electronic signature provider, select the file that needs to be signed, and include additional details needed. Once submitted, internal signers are sent a notification via Teams and an email asking for their signature. If the signer is external to the organization, they will be notified with an email, in which they can easily review the details and sign. Approvals will keep track of the entire audit trail right in context of Teams, so you are able to track who already signed the approval and when it was signed. This feature will start rolling out at the end of April.
Create an approval template
To streamline workflows, new out of the box templates provide a repeatable structure for common approvals like filling out expense reports or requesting overtime. Admins and team owners can use these as is, customize, or create new templates for their organization and teams.
Teams admins and teams owners can also create approval templates by clicking on template management in the overflow menu and following the instructions. Enter the name of your template, select the approvers, add in the necessary form fields and the workflow settings. When done, hit publish.
Once you create your first organizational template, it will create a new admin team. From there, you can add additional admins that can manage the organizational templates, right from the Approvals App.
This feature will be rolling out in April.
Create an approval request with templates
Leverage the templates your admin or team owner enabled for you and make it easier to create an approval request. Use the structured form to input all the necessary information and eliminate back and forth on missing data for a faster approval.
New attachment capabilities
Approval hub enables you to attach files directly from OneDrive and SharePoint, as well as attach a generic link for content that is hosted outside of Microsoft 365. This will ensure your approval is connected to the latest version of the file, reflecting any changes. This feature is available now.
Markdown support
We are also adding full Markdown support in both adaptive cards and the detail’s view, so you can ensure all your approvals are formatted correctly for all your approval processes. This feature is available now.
Approve or reject an approval request inline
Approvals role based adaptive cards enable you to quickly respond to an approval request right from within the chat or channel without having to view the details. If you do not have permission to respond to the request, you will not see the “Approve” or “Reject” buttons on the card. This feature is available now.
Resources
Getting your request approved just got easier with the new features coming to approvals in Microsoft Teams. Learn more and get the most out of approvals in Microsoft Teams using these resources:
by Contributed | Apr 12, 2021 | Technology
This article is contributed. See the original author and article here.
Customers rely on Microsoft Data Loss Prevention(DLP) to enforce policies that identify and prevent risky or inappropriate sharing, transfer or use of sensitive information across cloud, on-premise and endpoints. Alerts, which can be configured as a part of the DLP policy authoring experience are an effective tool for customers to get notified whenever a DLP policy is violated.
Microsoft announces the General Availability of the Microsoft Data Loss Prevention Alerts Dashboard. This latest addition in the Microsoft’s data loss prevention solution provides customers with the ability to holistically investigate DLP policy violations across :
- Exchange
- SharePoint Online
- OneDrive
- Teams
- Devices
- Cloud apps
- On-premises file shares
Advance alert configuration options are available in the existing DLP policy configuration flow. These provide eligible DLP customers with the ability to tailor how they organize DLP policy alerts along with exhaustive information that they need to investigate and address DLP policy violations quickly. Historical workflow information for alerts is available in the Management log.
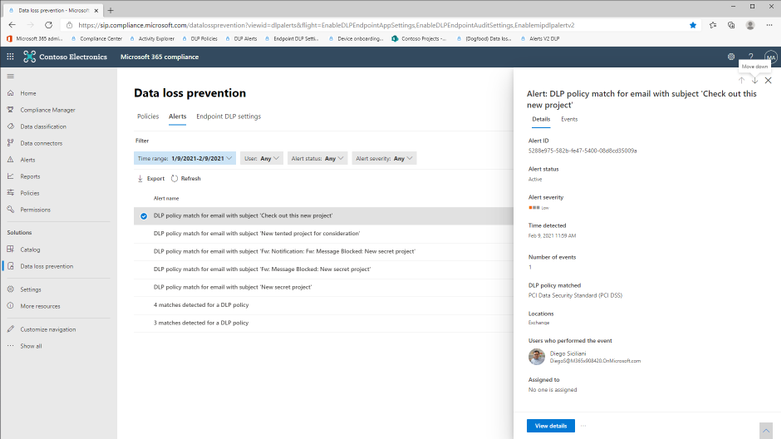
The alerts dashboard provides a list view of all DLP alerts and clicking on an alert will display the relevant details.
Figure 1 : Data Loss Prevention Alerts Dashboard
Clicking on ‘View Details’ will display the alert page with exhaustive information associated with the DLP policy violation, ability to change alert status (Active, Investigating, Dismissed or Resolved), include additional comments and define workflow actions such as assigning alerts to individuals for follow up.

Figure 2 : Alert details with manage alert options
Clicking on the ‘Events’ tab will display the actual user activity along with details including :
- Source view (requires E5 or related subscriptions) : This will allow customers to view the email or the file involved in the DLP policy alert. Source view in the DLP Alerts Dashboard will be available for content(email/files) belonging to the following workloads :
- Exchange (Email body only)
- SharePoint Online
- One Drive
This feature is available only for licenses in the following subscriptions :
– Microsoft 365 (E5)
– Office 365 (E5)
– Advanced Compliance (E5) add-on
– Microsoft 365 E5/A5 Info Protection & Governance
– Microsoft 365 E5/A5 Compliance
- Matched sensitive terms and context : This will allow customers to view the sensitive terms in the content due to which the DLP policy was violated. You will also be able to view up to 300 characters surrounding the detected sensitive term. This information will be available for detections for the following workloads :
- Exchange (both email body and attachments)
- SharePoint Online
- OneDrive
- Teams
For both features : Source View and Matched sensitive terms and context, the role group “Content Explorer Content Viewer” should be assigned. This role group has the role “data classification content viewer” pre-assigned.

Figure 3 : Exhaustive metadata for each user event

Figure 4 : View the content of the email(body) or file

Figure 5 : View matched sensitive terms and surrounding characters
Get Started
Microsoft’s DLP solution is part of a broader set of Information Protection and Governance solutions that are part of the Microsoft 365 Compliance Suite. You can sign up for a trial of Microsoft 365 E5 or navigate to the Microsoft 365 compliance center to get started today.
Additional resources:
- For more information on DLP Alerts Management, please this
- For more information on Data Loss Prevention, please see this
Thank you,
The Microsoft Information Protection Team


Recent Comments