by Contributed | Apr 15, 2021 | Technology
This article is contributed. See the original author and article here.
Sure, being a student comes with homework, exams, and other harsh realities. But while you’re in school, you also have a rare and beautiful gift: student discounts.
As the Audience Evangelism Manager on the Azure for Students team at Microsoft, Ryan Mendenhall knows all of the benefits that you have as Microsoft Learn Student Ambassadors and what’s available for free to the students who come to your events.
Recently, Ryan shared a talk that highlights some of these benefits and demonstrates how they can be used together for a workshop. Here’s a look at what’s out there and how to save on developer tools as a student.
GitHub
You may already be using GitHub to store code, but there’s so much more to it—especially for students. If you haven’t already verified yourself as a student on GitHub yet, get started at GitHub Education.
Then check out the Student Developer Pack, which offers free access to more than 100 useful tools for managing domains, infrastructure, and mobile clients.
The pack helps you get your development career going by gathering a ton of great resources in one place. Did you know that you can get a 12-month subscription of Canva’s Pro tier design service? Or that you can register a free domain through Name.com? You’ll also find tools that help you stay on task (PomoDone), engage your audience with interactive forms and quizzes (Typeform), and start building real-time games (Unity).
Microsoft Azure for Students
Whether you get it through GitHub or some other way, a free Azure for Students account helps you learn, grow, and build on the cloud. And it’s not just a few services, either. It’s the entire Azure platform, ready to support whatever you’re inspired to build.
Start exploring services with $100 in Azure credit and free software such as SQL Server 2019, Machine Learning Server, and Visual Studio. Plus, there’s a library of Quickstart templates to help you get up and running. These shortcuts help you condense the monotonous steps of a deployment and get straight to designing and building.
Microsoft Learn
And, of course, you have access to Microsoft Learn for Students. Explore hours of modules, courses, and paths to see where your imagination can take you. Practice the skills that will help you stand out. Build proofs of concept to show off your knowledge of new technologies. Earn certifications, connect with other students who share your interests, and feed your curiosity.
Get started
Verify your student status through GitHub Education
Explore the GitHub Student Developer Pack
Create a free Azure for Students account
Explore Microsoft Learn for Students
by Contributed | Apr 15, 2021 | Technology
This article is contributed. See the original author and article here.
If you make a mistake when configuring operating system firewall rules that block you from accessing the VM, or a service is stopping an IaaS VM from booting, or some other configuration problem such as a newly installed application is stopping you from accessing a Windows Server IaaS VM using RDP or remote PowerShell, you always have the option of interacting with the Special Administration Console (SAC), also known as Emergency Management Services (EMS) if you set it up beforehand.
Enabling EMS can provide you with another “get out of jail” card if something goes wrong with one of your Windows Server IaaS VMs.
Note: Serial Console access is also available for Linux VMs, and you can find out more about it in the following Docs article:
There are several steps that you need to take to enable Serial Console access to Windows Server IaaS VMs. The first is to configure the Windows Server VM operating system to support EMS, something that it isn’t configured for by default. You can do this by opening up an administrative command prompt (not PowerShell) on the VM once it is deployed and running the command:
Bcdedit /ems {current} on
You’ll then need to restart the VM.
When configuring Serial Console for a VM, you also need to ensure that you have an account configured as a member of the local Administrators group on the VM that uses password authentication. This is the account you’ll use to interact with the VM through EMS once you have authenticated.
The next step requires that you configure the VM to support boot diagnostics. It’s important to note that you’ll need to use a custom boot diagnostics account and that you can’t use managed boot diagnostics storage accounts at the time of writing. You can do this from CloudShell by running the command (substituting in the appropriate values for VM name, resource group and storage account that will store boot diagnostics data):
az vm boot-diagnostics enable --name MyVirtualMachine --resource-group MyResourceGroup --storage https://mystor.blob.core.windows.net/
Or by enabling it through the VM’s properties in the Azure portal in the Boot Diagnostics area of the Support + Troubleshooting section.
Once you’ve enabled boot diagnostics, the final step is to enable Serial Console at the subscription level. You can do this in CloudShell by running the following commands:
subscriptionId=$(az account show --output=json | jq -r .id)

az resource invoke-action --action enableConsole --ids "/subscriptions/$subscriptionId/providers/Microsoft.SerialConsole/consoleServices/default" --api-version="2018-05-01"
Once you’ve taken these steps you can access the Serial Console for the VM from the Serial Console area of the Support + Troubleshooting section.
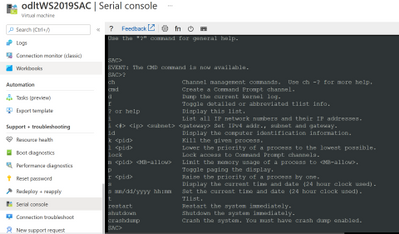
Once you’ve made the connection to SAC, enter the following to create a channel that has the CMD instance
Cmd
You’ll then need to type the following to switch to the cmd channel
Ch -si 1
Press Enter and you’ll be presented with an authentication prompt. Authenticate with the account that has local credentials. Generally you’ll just press Enter when prompted for Domain and if you have to delete characters when authenticating, press <CTRL><H>
To start a PowerShell session from the command prompt, type PowerShell.exe

You can use PowerShell within a Serial Console to perform the following tasks:
- Edit the registry
- Enable RDP
- Manage services
- Configure service logon accounts
- Configure service startup types
- Configure service dependencies
- Perform network diagnostics
- Manage Windows Firewall settings
- Manage users and groups
- Manage the Windows Event Log
- View or remove installed applications
- Add and remove Windows roles and features
- Restart windows
- Configure network interfaces including setting IP addresses (remember that an Azure IaaS VM should always be configured from within the VM to use DHCP and any adapter address configuration should be performed external to the VM against the network adapter within the Azure console)
For more information on what you can do using cmd.exe and PowerShell within a Serial Console session, consult the following article:
Although you’ll probably not need it, you should enable EMS on all of your Windows Server IaaS VMs as a way of giving yourself a method of troubleshooting a VM you can’t connect to using RDP or Azure PowerShell.

by Contributed | Apr 15, 2021 | Technology
This article is contributed. See the original author and article here.
We use AI (Artificial Intelligence) integrated applications daily, from search engines optimized to find the most relevant content, to recommendation engines for streaming or shopping. During AI’s early years rising to popularity, improving applications with AI was only possible for companies with big budgets dedicated to research and experts, preventing companies that cannot effort an AI team to compete. Today AI is readily available for any product, without having to invest in research and development. There are open-source libraries that can help you train Machine Learning models like TensorFlow. With a fraction of the effort and the cost, pre-trained AI services are available to easily integrate into your applications, with APIs and UI based tools to train custom models for your specific use case. In Integrating AI series, I aim to help you decide if and how to integrate AI into your applications, get you started with Azure’s ready to use AI solutions, Cognitive Services and answer your most frequent questions when getting started.
Let’s start with these fundamental questions:
- What are the problems you can solve with AI?
- What do you need to know before starting to build your solution?
- How do you measure the success of your new AI features?
What are the problems you can solve with AI?
AI is a groundbreaking technology but not a magical solution for everything. It is important to know if you are adding value or solving an actual user problem. There are complex products like Wikipedia and Reddit that have a lot of information but use crowdsourcing and simple search to cater to unique needs without the help of AI. To make an informed decision, you need to start with your users’ needs. What are the problems they face? Is there a process that you can automize like filling expense forms that can be automated with Form Recognizer service? Send voice messages to your customers with updates using Speech Services? Do they make complex choices while using your product that could be customized to your users with the use of Personalizer? Do you need to improve the usability of your application with voice interactions and Language Understanding? It is important to solve a real need for your users instead of assuming the solution that will be useful. User research is the best way to figure out the issues and a lot can be surfaced by user analytics. You can use Metrics Advisor AI service to detect anomalies and figure out future AI solutions as well.
Once you have a clear definition of the problem and define how to measure success, it is time to explore practical solutions. You can read about the Azure customer stories and learn from their methods and design process. For example, read about BBC’s customer story before you read about the technical story of using Azure’s Speech, Azure Bot Service and Language Understanding Services together to solve the customer needs they identified.
Most AI solutions can fall into two categories. The first major use case for AI is automating the mindless repetitive jobs. If the users of an expense report or a hiring application need to type in information from a form or a receipt to your system, it is easily automated by OCR (Optical Character Recognition). Similar automations are possible for close captioning, translation, classifying images and automizing alert messages.
The second category of AI solutions can be categorized as complex human decisions based on data. You could give your friends recommendations on what to watch next easily, knowing what they like, what they don’t like. For example, a streaming service with thousands of movies to choose from, cannot surface relevant content with simple filtering of the genres or release dates. It would take forever to choose what to watch by browsing unless you know the exact name of the movie. For a decision like recommendation among thousands or millions of results, AI might be better at recommending to your best friend, maybe even better than you over time. Understanding the language and intent of people is another example. A human can understand and classify a review as positive or negative easily. For machines to detect the same emotions, you must do more than detect certain words to get sentiment.
What do you need to know before starting to build your solution?
Some problems are easier to solve than others with AI. Experimenting with different tools to confirming your solutions is important. All the Cognitive services are easy to try out and here is how to do that:

- Once you create an Azure resource, you can see the code samples, API call examples and try out the Rest API end points directly on the Cognitive Services API Reference pages.
-
 API descriptions
 Code Samples
 Request
Will your users love your solution?
Scaling an application and polishing the user experience takes most of the development time. It is better to try out features fast and adjust before making the investment in perfecting the wrong experience. You might assume an application flow that users are going to interact, but users can surprise you in their own creative ways of using your tools. Prototype your applications quickly and get user feedback early on.
Power platform is one of the tools that allows you to create mobile apps that integrates important AI capabilities without writing any code. With power platform, you can easily deploy and share your prototypes, without leaving the platform’s UI. After the free trial period, both training and using your AI models will cost but not as much as the development time of an actual app with AI and having to make major changes after the release. Check out some of the capabilities and use cases of AI Builder on Power Platform and how to train a custom vision model and creating a mobile app on Power Platform in this article.
There are other fast and easy options to add AI to your applications, without a big development investment, especially if you are adding the capabilities to an existing application. You can use a logic app to design an application on Azure platform to find twitter mentions of your brand and analyze the sentiment of the tweets. You can visualize the data on Power BI or your choice of visualization platform or tools.
Once you integrate your AI solution, you can make the new AI features to a limited group of users and compare the effectiveness of your solution with your non-AI features.
 AI Show Live every Friday on LearnTV
- Let us know the problems you are trying to solve and your specific use cases on the comments below.
Thanks!
by Contributed | Apr 14, 2021 | Technology
This article is contributed. See the original author and article here.
API connections resources work as the bridges for Logic App to communicate with other services. While most of them are used to connect to cloud resources, a few of them leverage On-premises Data Gateways to connect local data sources to Azure. However, we may find that it is not easy to check which On-premises Data Gateway (OPDG) is used by which API connection resource.
Objective:
Find out which On-premises Data Gateways are used by which API connection resources.
Workaround:
The most known way to check OPDG used by a connector is by inspecting the Logic App designer.
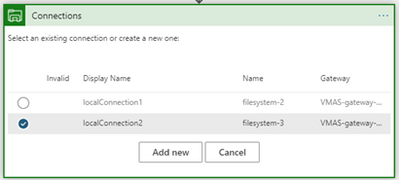
- When creating API connections with OPDG, we can find the OPDG used from the connection list in the Logic App designer.
However, this method seems unhandy as we need to go every Logic App’s designer mode and may cause unwanted change. My preferred way is to check the sourced OPDG from the JSON definition of an API connection resource.
- From a Logic App, open the API connection blade, and choose the API connection which is using the OPDG.

- From the API connection resource main page, click on “JSON View” on the far right.

- In the JSON definition of the API connection, you will find the OPDG’s name, resource ID in the “properties” > “parameterValues” > “gateway”.

One more step:
As we have found out that OPDG information can be extracted from the JSON definition of an API connection resource. We can use a PowerShell script to find out all API connections which is using an OPDG.
Prerequisites:
Run the script:
- After downloading the script into your machine, put in the name of your Azure subscription for the subscriptionName variable.

- Then run the script and log into your Azure account in the pop-up window.

- A CSV file named “output.csv” will be created in the same folder where the script resides.

- The CSV file will contain all API connection resources along with the OPDGs they are using.

Columns:
connectionName: name of the API connection resource
connectionId: resource ID of the API connection
gatewayName: name of the On-premises Data Gateway resource
gatewatyId: resource ID of the On-premises Data Gateway
Notes:
- Alternative to run the script locally, you may choose to run this through Azure cloud shell. However, please remember the first command “Connect-AzAccount” as it will no longer be required.
Raw script:
# If you encountered "script is not signed error", please use below comand in the PowerShell first.
# Set-ExecutionPolicy -Scope Process -ExecutionPolicy Bypass

# Login to your Azure Account:
Connect-AzAccount

# Put in your own subscription name:
$subsctionName = ''

Set-AzContext -SubscriptionName $subsctionName

# Get all API connection resources
$connectionList = Get-AzResource -ResourceType 'Microsoft.Web/connections'


# Loop through connection list
Write-Host '---------------------------------------'
Write-Host '  Start loop connections - Processing'
Write-Host '---------------------------------------'
$result = @()
foreach ($connection in $connectionList){
    $currentConnectionObj = Get-AzResource -ResourceId $connection.ResourceId
    $connectionName = $currentConnectionObj.Name
    $connectionId = $connection.ResourceId
    Write-Host 'Processing connection:' $connectionName
    # Extract gateway information
    $opdgName = $currentConnectionObj.Properties.parameterValues.gateway.name
    $opdgId = $currentConnectionObj.Properties.parameterValues.gateway.id
    if (!($opdgId -eq $null)){
        Write-Host '------------------------------------------------'
        Write-Host 'OPDG found:'
        Write-Host 'Connection' $connectionName 'is using gateway' $opdgName
        Write-Host '------------------------------------------------'

        $new = [PSCustomObject]@{
            connectionName = $connectionName
            connectionId = $connectionId
            gatewayName = $opdgName
            gatewayId = $opdgId
        }

        $result += $new
    }
}

# Write collected information to output.csv file
$result | Export-Csv -Path .output.csv -NoTypeInformation
by Contributed | Apr 14, 2021 | Technology
This article is contributed. See the original author and article here.
Note: Please take extreme caution before making any changes in Production. Make sure you test the changes in a test environment first.
Recently due to a spate of updates to various endpoints in SharePoint, Azure, and the AAD auth login endpoints, we are seeing projects compiled with version of .NET before 4.6 cause TLS errors which don’t always show as TLS errors in the PHA.
The error messages The underlying connection was closed” or “System.Net.Sockets.SocketException: An existing connection was forcibly closed by the remote host” you are seeing is mainly due to deprecation of TLS1 1.0 & 1.1. Please see:
Preparing for TLS 1.2 in Office 365 and Office 365 GCC – Microsoft 365 Compliance | Microsoft Docs
Enable TLS 1.2 on servers – Configuration Manager | Microsoft Docs
TLS 1.0 and 1.1 deprecation – Microsoft Tech Community
The updates were communicated in the Office 365 message center.
- MC218794 – July 17, 2020 | TLS 1.0 and 1.1 retirement date in Office 365 to be October 15, 2020
- MC240160 – Feb 16, 2021 | Reminder: Disabling TLS 1.0 and TLS 1.1 in Microsoft 365
If the PHA app web is hosted on a remote physical server, then.
3 ways you can resolve the error:
1] You can either update applications web.config file and update httpRuntime to 4.7 example:
<httpRuntime targetFramework=”4.7″/>
Or
2] You can add the following registry key settings on your remote app web server(s):
[HKEY_LOCAL_MACHINESOFTWAREMicrosoft.NETFrameworkv4.0.30319]
“SystemDefaultTlsVersions” = dword:00000001
“SchUseStrongCrypto” = dword:00000001
Note: You may need to restart your server(s)
Or
3] Add this one line of code above each instantiation of the ClientContext in your code:
System.Net.ServicePointManager.SecurityProtocol = System.Net.SecurityProtocolType.Tls12;
Note: Extensive code updates will be needed.
If the App web is hosted on Azure, then.
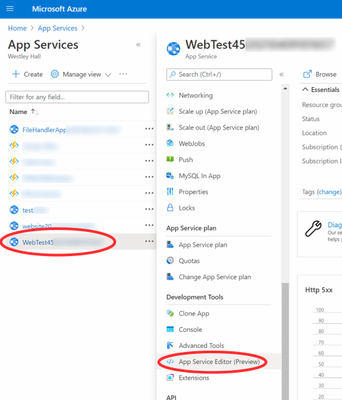
Log into the Azure portal (portal.azure.com) with an account with admin rights on the web app in question.
Once you open the App Services and select the web app hosting the PHA site, click on the App Service Editor (Preview).
This will open the editor, then select the web.config file and change the circled targetFramework attribute to 4.7 preferably (any setting higher than 4.6 will work too). Note the status in the upper right will say ‘DIRTY’ for a bit, then it should auto-save and change back to ‘SAVED’-

At this point you should be set, refresh the page with the PHA and all should be good.
if the application is a Azure WebJob, then.
You will have to re-target/re-compile the app to 4.6+ (recommend 4.7) and re-upload it to fix it.
You can’t use the config file for the exe to re-target the same way we can for a web application.

Recent Comments