by Contributed | Apr 16, 2021 | Technology
This article is contributed. See the original author and article here.
Recently I worked on a scenario where we had to set up client cert authentication for WCF service hosted as an App service in Azure: We followed the below steps to achieve the same and was able to parse the client certificate in service end using custom certificate validator:
Here I have highlighted in detail the steps of how to create and publish a WCF Service with Client Certificate enabled in Azure Web App.
Create an Azure Web App:
===========================
- Navigate to the Azure Portal and login with your Azure account and click on App services.
- Click on Add Web Apps and enter the details for Name, Subscription, Resource Group, OS and click Create.
- The Web App with name WCFCLIENTCERTSAMPLE is created at my end.
Deploying the WCF service to the Web App:
======================================
We will be able to publish the created WCF Service or any other type of application directly into the created Web APP.
- Open Visual studio and create a new project by selecting WCF service application as the project type and name it as CertForAppServiceInAzure.
- Let the Default generated code be in the operation contract and Service class for the sample. Modify it according to requirement. I modified it to print the certificate subject passed later:
IService1.cs:
[ServiceContract]
    public interface IService1
    {
        [OperationContract]
        string GetData(int value);
    }
Service1.cs:
public class Service1 : IService1
    {
        public static string str { get; set; }
        public string GetData(int value)
        {
           return string.Format(str+ value);
       } }
- We need to make the following changes in the Service’s web config inside system.servicemodel section to enable client cert authentication:
- In the binding at my end I have used basicHttpsBinding and enabled the security mode as Transport with clientCredentialType as Certificate.
<system.serviceModel>
<bindings>
<basicHttpsBinding>
<binding name="CertBind">
<security mode="Transport">
<transport clientCredentialType="Certificate"/>
</security>
</binding>
</basicHttpsBinding>
</bindings>
<services>
<service name="CertForAppServiceInAzure.Service1">
<endpoint address="" binding="basicHttpsBinding" bindingConfiguration="CertBind" contract="CertForAppServiceInAzure.IService1"/>
</service>
</services>
<behaviors>
<serviceBehaviors>
<behavior>
<serviceMetadata httpGetEnabled="true" httpsGetEnabled="true"/>
<serviceDebug includeExceptionDetailInFaults="false"/>
<serviceCredentials>
<clientCertificate>
<authentication certificateValidationMode="Custom" customCertificateValidatorType="CertForAppServiceInAzure.MyX509CertificateValidator, CertForAppServiceInAzure"/>
</clientCertificate>
</serviceCredentials>
</behavior>
</serviceBehaviors>
</behaviors>
<protocolMapping>
<add binding="basicHttpsBinding" scheme="https"/>
</protocolMapping>
<serviceHostingEnvironment aspNetCompatibilityEnabled="true" multipleSiteBindingsEnabled="true"/>
</system.serviceModel>
Note: I have defined the client certificate validator in the service end as a custom validator so that I can verify if the client certificate is fetched in service end and parse the client certificate details. You can ignore step 5 if you are not using custom validator.
- To add the custom validator class, Create a Class file named MyX509CertificateValidator.cs in the service end with the below code to read the client certificate sent by the client and print the subject details (You can add your own condition check).
using System;
using System.IdentityModel.Selectors;
using System.Security.Cryptography.X509Certificates;

namespace CertForAppServiceInAzure
{
 public class MyX509CertificateValidator : X509CertificateValidator
    {
        public override void Validate(X509Certificate2 certificate)
        {
            // Check that there is a certificate.
            if (certificate == null)
            {
                throw new ArgumentNullException("certificate");
            }
            Service1.str = certificate.Subject;
            }
    }
}
- Right Click on your Project and select Publish, Select the Publish Location as Azure App Service.
- Select the Subscription, Resource Group and App service name from the dropdown which you have created on Azure and select Finish to publish the WCF service directly to the created Azure Web App.
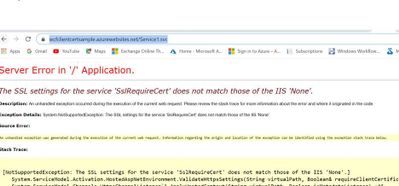
- Browse the Service Over the Azure App service public URL https://wcfclientcertsample.azurewebsites.net/Service1.svc
- We get the below error:
Enable Client certificate for the same App published in Azure:
=============================================
- Run the below command to enable the Client certificate for the Azure Web App:
az webapp update –set clientCertEnabled=true –name WCFCLIENTCERTSAMPLE –resource-group MyResGroup
Note: Give your App service name and Resource Group name

- To fix the Server Error we add the below section in the Web.config system.WebServer Section and re-publish the same:
<system.webServer>

    <modules runAllManagedModulesForAllRequests="true"/>

    <security>

      <access sslFlags="Ssl,SslRequireCert,SslNegotiateCert" />

    </security>

    <directoryBrowse enabled="true"/>

  </system.webServer>
- Browse the application again over the same https://wcfclientcertsample.azurewebsites.net/Service1.svc we get the pop up to select the client certificate we select the client cert and we are able to access the service:


- Now Consume the same service in the client application by creating a test console application project and adding the service Reference by the url https://wcfclientcertsample.azurewebsites.net/Service1.svc
- Pass the client certificate details in the web.config and map it with the binding, In my scenario the client app is running on my Windows server. Make Sure the Client certificate is installed on the client machine and present in mmc under Current User.
<system.serviceModel>

      <bindings>

        <basicHttpBinding>

          <binding name="BasicHttpsBinding_IService1">

            <security mode="Transport">

              <transport clientCredentialType="Certificate" />

            </security>

          </binding>

        </basicHttpBinding>

      </bindings>

      <client>

        <endpoint address="https://wcfclientcertsample.azurewebsites.net/Service1.svc"

          binding="basicHttpBinding" bindingConfiguration="BasicHttpsBinding_IService1" behaviorConfiguration="endpointCredentialBehavior"

          contract="ServiceReference1.IService1" name="BasicHttpsBinding_IService1" />

      </client>

      <behaviors>

        <endpointBehaviors>

          <behavior name="endpointCredentialBehavior">

            <clientCredentials>

              <clientCertificate findValue="9c8a3857851e653ff22f0161914a1accf8ac5e76"

                                 storeLocation="CurrentUser"

                                 storeName="My"

                                 x509FindType="FindByThumbprint" />

            </clientCredentials>

          </behavior>

        </endpointBehaviors>

      </behaviors>

    </system.serviceModel>
- As in the Service end I have used a custom client certificate validator and for testing purpose I am printing the subject name of the client certificate passed via the custom validator in the service end. Now when we run the client we see the below Console Output.

by Contributed | Apr 16, 2021 | Technology
This article is contributed. See the original author and article here.
Recently I worked on a scenario where we had to disable the proxy output for /jsdebug or /js endpoint for security concerns: We were able to achieve the same using following steps:
When we consume a Wcf service or Webservice using Java script client or ASP.NET Ajax page via a servicehost factory defined as WebScriptServiceHostFactory, We expose the client side javascript proxy information via the endpoint /WcfService.svc/jsdebug or /WcfService.svc/js which we use in the client end to invoke the Wcf service.
Here we have highlighted the steps for creating Wcf Service and exposing the client side javascript proxy information using Factory type as WebScriptServiceHostFactory so the same can be consumed via javascript or an ASP.NET Ajax page:
Also, How to disable the proxy output exposed via /jsdebug or /js due to security constrains or hide the proxy information when required.
Step 1: Creating the wcf service and exposing the javascript client end proxy information over the /jsdebug endpoint.
- Open Visual Studio and create the WCF Service Library named WCFService1.
- Now we will create the Operation Contract in the interface as below:
namespace WcfService1

{

    [ServiceContract]

    public interface IService1

    {

[OperationContract]

        string GetData(int value);


        // TODO: Add your service operations here

    }

}
- Create the Service Class with the following code:
namespace WcfService1

{

    public class Service1 : IService1

    {

        public string GetData(int value)

        {

            return string.Format("You entered: {0}", value);

        }

    }

}
- In your Web.config file add the below section:
<system.serviceModel>

    <services>

      <service name="WcfService1.Service1" behaviorConfiguration="beh">

        <endpoint address="" binding="basicHttpBinding"  name="soap" contract="WcfService1.IService1"/>

      </service>

    </services>

<serviceBehaviors>

<behavior name="beh">

<serviceMetadata httpGetEnabled="true" httpsGetEnabled="true"/>

</behavior>

</serviceBehaviors>

</system.serviceModel>
The rest is configured automatically.
- Now we will create another ASP.NET project and add it to the solution which will be the client application.
Now add a text file in the application and save it as “Ajaxservice.svc”. Add the WCFService1 project reference in the asp.net Web Application. Copy the following code to the file “Ajaxservice.svc” :
<%@ServiceHost language="C#" debug="false"
Service="WcfService1.Service1"
Factory="System.ServiceModel.Activation.WebScriptServiceHostFactory"%>
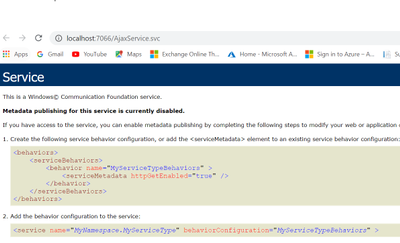
Build the Project. Right click on the Ajaxservice.svc file and browse it in the browser.
- Now we will modify the url to add jsdebug http://localhost:10253/Ajaxserv.svc/jsdebug to get the javascript proxy information and we see the below output:

Step 2: To disable the output for the /jsdebug or /js endpoint so that the proxy information is not exposed and other security reasons please follow the below approach in your client application consuming the service:
- We need to use the approach of filtering it out using message inspector.
- We need to create a behavior which iterates through ServiceHostBase.ChannelDispatchers to find it’s index and then remove it. We need to do it in IServiceBehavior.ApplyDispatchBehavior.
We need to use endpointDispatcher.ChannelDispatcher.Host to get the instance of ServiceHostBase, then access ChannelDispatchers to get the collection of ChannelDispatcher instances. We can use ChannelDispatcher.Listener.Uri to get the listen address to see if the instance is the right one.
- We add a class file to the ASP.net Web Application and add the below code as a part of the message inspector to block the output for .jsdebug and .js
public class DisableJSDebugServiceBehavior : IServiceBehavior, IEndpointBehavior

    {

        #region IServiceBehavior

        public void AddBindingParameters(ServiceDescription serviceDescription, ServiceHostBase serviceHostBase, Collection<ServiceEndpoint> endpoints, BindingParameterCollection bindingParameters) { }


        public void ApplyDispatchBehavior(ServiceDescription serviceDescription, ServiceHostBase serviceHostBase)

        {

            foreach (var endpoint in serviceHostBase.Description.Endpoints)

            {

                endpoint.EndpointBehaviors.Add(this);

            }

        }


        public void Validate(ServiceDescription serviceDescription, ServiceHostBase serviceHostBase) { }

        #endregion // IServiceBehavior

        #region IEndpointBehavior

        public void AddBindingParameters(ServiceEndpoint endpoint, BindingParameterCollection bindingParameters) { }

        public void ApplyClientBehavior(ServiceEndpoint endpoint, ClientRuntime clientRuntime) { }

        public void ApplyDispatchBehavior(ServiceEndpoint endpoint, EndpointDispatcher endpointDispatcher)

        {

            ServiceHostBase host = endpointDispatcher.ChannelDispatcher.Host;

            for(int i=0; i< host.ChannelDispatchers.Count; i++)

            {

                if(host.ChannelDispatchers[i].Listener.Uri.ToString().IndexOf("jsdebug", StringComparison.OrdinalIgnoreCase) >= 0)

                {

                    host.ChannelDispatchers.RemoveAt(i);

                }


            }


            for (int i = 0; i < host.ChannelDispatchers.Count; i++)

            {

                if (host.ChannelDispatchers[i].Listener.Uri.ToString().IndexOf("js", StringComparison.OrdinalIgnoreCase) >= 0)

                {

                    host.ChannelDispatchers.RemoveAt(i);

                }


            }

        }

        public void Validate(ServiceEndpoint endpoint) { }

        #endregion // IEndpointBehavior

    }


    public class DisableJSDebugServiceBehaviorElement : BehaviorExtensionElement

    {

        public override Type BehaviorType => typeof(DisableJSDebugServiceBehavior);


        protected override object CreateBehavior()

        {

            return new DisableJSDebugServiceBehavior();

        }

    }

by Contributed | Apr 16, 2021 | Technology
This article is contributed. See the original author and article here.
Microsoft Defender for Identity is focused on protecting on-premises identities and allowing security analysts to pinpoint vulnerabilities before an attack can occur. A key feature that allows analysts to achieve this is by viewing the evidence relates to lateral movement paths in Defender for Identity. This information is provided through a visual guide that break downs the possible ways an advisory can move throughout an organization by compromising credentials.
A lateral movement occurs when an attacker begins to use non-sensitive accounts to gain access to sensitive entities – think a domain admin or a server containing sensitive information. If an attacker is successful in compromising sensitive entities, they can traverse the environment and eventually gain domain dominance.
To learn more about the different techniques attackers use to move laterally and how you can remediate these vulnerabilities, watch the video below.
https://www.microsoft.com/en-us/videoplayer/embed/RWAOfW
The lateral movement paths view can be found in each individual’s user page, available in the Microsoft 365 security center. You can also query information relating to lateral movement paths using Microsoft 365 Defender’s advanced hunting function. More information on advanced hunting can be found on this docs page.
by Contributed | Apr 16, 2021 | Technology
This article is contributed. See the original author and article here.
As mobile usage becomes more prevalent, so does the need to protect your work or school data on those devices. In March 2020, we introduced the App Protection Policy Data Protection Framework to help organizations determine which Intune app protection policy settings they should deploy to protect work or school account data within the apps.
In June 2020, we expanded the framework by including recommendations for enrolled Android Enterprise devices by introducing the Android Enterprise Security Configuration Framework to manage device compliance and device restriction settings.
Today, I am happy to announce that we’re expanding the framework to also include recommendations for enrolled iOS/iPadOS devices. iOS/iPadOS supports several enrollment scenarios, two of which are covered as part of this framework:
When configuring device compliance and configuration policies, the number of various settings and options enable organizations to tailor protection to their specific needs. Due to this flexibility, it may not be obvious which permutation of policy settings is required to implement a complete scenario. To help organizations prioritize client endpoint hardening, Microsoft has introduced a new taxonomy for security configurations in Windows 10, and Intune is leveraging a similar taxonomy for its iOS/iPadOS security configuration framework.
The iOS/iPadOS security configuration framework is organized into several distinct configuration scenarios, providing guidance for personally owned and supervised devices.
For personally owned devices:
- Basic security (Level 1) – Microsoft recommends this configuration as the minimum security configuration for personal devices where users access work or school data. This is done by enforcing password policies, device lock characteristics, and disabling certain device functions (e.g., untrusted certificates).
- Enhanced security (Level 2) – Microsoft recommends this configuration for devices where users access sensitive or confidential information. This configuration enacts data sharing controls. This configuration is applicable to most mobile users accessing work or school data on a device.
- High security (Level 3) – Microsoft recommends this configuration for devices used by specific users or groups who are uniquely high risk (users who handle highly sensitive data where unauthorized disclosure causes considerable material loss to the organization). This configuration enacts stronger password policies, disables certain device functions, and enforces additional data transfer restrictions.
For supervised devices:
- Basic security (Level 1) – Microsoft recommends this configuration as the minimum security configuration for supervised devices where users access work or school data. This is done by enforcing password policies, device lock characteristics, and disabling certain device functions (e.g., untrusted certificates).
- Enhanced security (Level 2) – Microsoft recommends this configuration for devices where users access sensitive or confidential information. This configuration enacts data sharing controls and blocks access to USB devices. This configuration is applicable to most mobile users accessing work or school data on a device.
- High security (Level 3) – Microsoft recommends this configuration for devices used by specific users or groups who are uniquely high risk (users who handle highly sensitive data where unauthorized disclosure causes considerable material loss to the organization). This configuration enacts stronger password policies, disables certain device functions, enforces additional data transfer restrictions, and requires apps to be installed through Apple’s volume purchase program.
To see the specific recommendations for each configuration level, reviewiOS/iPadOS Security Configuration Framework.
As with any framework, settings within a corresponding level may need to be adjusted based on the needs of the organization as security must evaluate the threat environment, risk appetite, and impact to usability.
We hope this framework helps you when evaluating what iOS/iPadOS settings to deploy in your environment. As always, if you have questions, please let us know.
Ross Smith IV
Principal Program Manager
Customer Experience Engineering
by Contributed | Apr 16, 2021 | Technology
This article is contributed. See the original author and article here.
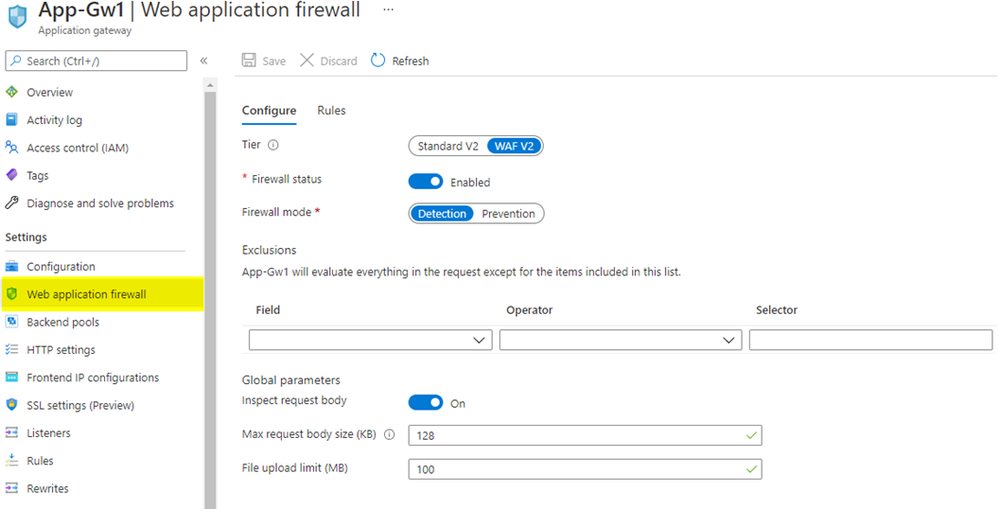
What is Web Application Firewall (WAF) config?
WAF config is the built-in method to configure WAF on Azure Application Gateway, and it is local to each individual Azure Application Gateway resource. When you create an Azure Application Gateway with either the WAF or the WAF_v2 SKU, you will see a new item on the menu blade called “Web application firewall” that displays WAF configuration options.
The biggest drawback of using WAF config is that not all WAF settings are displayed in the portal UI. For example, you cannot configure or manage custom rules in the portal: you must use PowerShell or Azure CLI for that. Additionally, WAF config is a setting within an Azure Application Gateway resource. For this reason, each WAF config must be managed individually, and its configuration applies globally for everything within that specific Azure Application Gateway resource. WAF config does not exist on Azure Front Door.
Image: WAF config on Azure Application Gateway
What is WAF policy?
WAF policy is a standalone resource type. It is not a built-in configuration within the Azure Application Gateway resource. A WAF policy is managed independently, and it can be attached to either Azure Application Gateway or Azure Front Door resources. When checking the “Web application firewall” option on the menu blade for Azure Application Gateway or Azure Front Door, you will notice that it simply displays a link to the attached WAF policy, rather than the full WAF configuration settings.
A benefit of using WAF policy for Azure Application Gateway or Azure Front Door is that all generally available WAF settings exist in the portal UI, such as exclusions, custom rules, managed rules and more. You can configure and visualize the WAF policy settings in the portal, in addition to PowerShell and Azure CLI. Another useful benefit of WAF policy when it comes to Azure Application Gateway is that it offers more granularity in scope. You can associate a WAF policy at a global level by assigning it to an Azure Application Gateway resource, at a website level by assigning it to an HTTP listener, or even at a URI level by assigning it to a specific route path. For example, you could use a global WAF policy to apply the baseline security controls that meet your organization’s security policy and attach it to all your Azure Application Gateways. From there, based on individual application needs, you can apply a different WAF policy that contains more (or less) strict security controls at a website level or at a URI level.
Would you like more information on different WAF policy association levels for Azure Application Gateway? Refer to our Azure Web Application Firewall (WAF) policy overview documentation.
Image: WAF policy on Azure Application Gateway

Image: WAF policy on Azure Front Door

What types of rules are available in Azure WAF?
1. Azure-managed rule sets
The Azure-managed rulesets for Azure WAF on Azure Application Gateway and Azure Front Door are based on OWASP ModSecurity Core Rule Set (CRS). This set of rules protect your web applications against most top 10 OWASP web application security threats, such as SQL injection and cross-site scripting.
When using Azure WAF with Azure Application Gateway, you will see the managed rule sets represented as OWASP_3.2 (Preview), OWASP_3.1, OWASP_3.0, and OWASP_2.2.9. Here, the Azure WAF uses the anomaly scoring mode, which means all rules in these rule sets are evaluated for each request, and the request is only blocked when the anomaly scoring threshold is reached.
When using Azure WAF with Azure Front Door, you will see the managed rule sets represented as Microsoft_DefaultRuleSet_1.1 and DefaultRuleSet_1.0. The Microsoft_DefaultRuleSet_1.1 rule set includes Microsoft-authored rules in addition to the rules based on OWASP ModSecurity CRS. In this case, Azure WAF uses the traditional mode, which means that as soon as there is a rule match the WAF stops processing all other subsequent rules.
More information on Azure-managed rule sets for Azure WAF on Azure Application Gateway
More information on Azure-managed rule sets for Azure WAF on Azure Front Door
2. Bot protection rule sets
Bot protection rule sets provide safety against bots doing scraping, scanning, and looking for vulnerabilities in your web application. These rule sets are powered by our own Microsoft Threat Intelligence feed, which is used by multiple Azure services, including Azure Firewall and Azure Security Center.
When using Azure WAF with Azure Application Gateway, you will see the bot protection rule set represented as Microsoft_BotManagerRuleSet_0.1. This rule set can detect known bad bots based on IP reputation.
When using Azure WAF with Azure Front Door, you will see the bot protection rule set represented as Microsoft_BotManagerRuleSet_1.0. This rule set can detect bad bots, good bots, and unknown bots based on IP reputation, user-agent headers, and other indicators that compose signatures managed by Microsoft.
More information on Bot protection rule set for Azure WAF on Azure Application Gateway
More information on Bot protection rule sets for Azure WAF on Azure Front Door
3. Custom rules
Azure WAF provides the ability to create custom rules. This allows you to either fine-tune your WAF policy or create rules with specific logic to address your unique application requirements. The rule conditions can be based on many variables, such as IPs, geolocation, request URIs, post arguments, and more. Custom rules can trigger based on a simple match for Azure WAF on Azure Application Gateway and Azure Front Door, or additionally, they can trigger based on rate-limiting thresholds for Azure WAF on Azure Front Door.
If you’d like to see some WAF custom rule examples, check out our blog post on Azure WAF Custom Rule Samples and Use Cases
More information on Custom rules for Azure WAF on Azure Application Gateway
More information on Custom rules for Azure WAF on Azure Front Door
What are the feature distinctions between WAF config and WAF policy?
As you can see based on the information we have shared this far, there are a few important differences between the capabilities of WAF depending on the associated resource type. You can consult these tables to get a quick comparison and make an informed decision when deploying Azure WAF.
In the table below, we’re sharing the feature availability on WAF config for Azure Application Gateway WAF and WAF_v2 SKUs.
WAF Config Features
|
WAF SKU
|
WAF_v2 SKU
|
OWASP_3.2 (Preview)
|
Unavailable
|
Unavailable
|
OWASP_3.1
|
Unavailable
|
Available
|
OWASP_3.0
|
Available
|
Available
|
OWASP_2.2.9
|
Available
|
Available
|
Microsoft_BotManagerRuleSet_0.1
|
Unavailable
|
Unavailable
|
Geo-Location Rules
|
Unavailable
|
Available
|
Per-Site Policy
|
Unavailable
|
Available
|
Per-Uri Policy
|
Unavailable
|
Available
|
In the table below, we are detailing the feature availability on WAF policy for Azure Application Gateway WAF_v2 and Azure Front Door. Note that WAF policy cannot be used with Azure Application Gateway WAF SKU.
WAF Policy Features
|
Azure Application Gateway (WAF_v2 SKU)
|
Azure Front Door
|
OWASP-Based Rule Set
|
Available
|
Available
|
Microsoft-Authored Rule Set
|
Unavailable
|
Available
|
Bot Protection Rule Set
|
Available
|
Available
|
Custom Rules with Geo-Location support
|
Available
|
Available
|
Custom Rules with Rate-Limiting support
|
Unavailable
|
Available
|
Per-Website WAF Policy
|
Available
|
Available
|
Per-URI WAF Policy
|
Available
|
Unavailable
|
Are there other key differences worth mentioning?
Here are a few more things to consider:
- Rule actions for custom rules: In a WAF policy for Azure Front Door, rule actions can be set to Allow, Deny, Log or Redirect. In a WAF policy for Azure Application Gateway, rule actions can be set to Allow, Block or Log. Redirect is not an available rule action for the latter.
- Rule actions for managed rules: In a WAF policy for Azure Front Door, rule actions can be set to Allow, Deny, Log or Redirect. In a WAF policy for Azure Application Gateway, rules can be either enabled or disabled. It is not possible to change the rule action.
- Types of custom rules: In a WAF policy for Azure Front Door, you can create custom rules based on Match type or Rate Limit type. Rate-limiting custom rules allow you to respond to abnormally high traffic from any given source IP, based on a customized quantity of web requests within a time frame. In a WAF policy for Azure Application Gateway, you can configure Match type custom rules, and rate-limiting type is not available.
- Exclusion lists: In a WAF policy for Azure Front Door, you can create exclusion lists at a rule level, at a rule group level, and at a rule set level. You can apply exclusions for matches on request header name, request cookie name, query string args name and request body post args name, and the exclusions can be applied to specific rules, rule groups or rule sets. In a WAF policy for Azure Application Gateway, the exclusions are a global setting. This means the exclusions will apply to all active rules within the scope of your WAF policy. You can apply exclusions for matches on request header name, request cookie name and request args name. You could alternatively apply a dedicated WAF policy at different association levels in your Azure Application Gateway, using per-site WAF policy or per-URI WAF policy.
In this article, we provided a snapshot of the current Azure WAF feature set. We’d love to hear more from you. Feel free to leave comments below or let us know more about new features you need in our Microsoft Azure Feedback forum.

Recent Comments