by Contributed | Apr 19, 2021 | Technology
This article is contributed. See the original author and article here.
Today I wanted to share with you some exciting new capabilities that are now available to help Microsoft Defender for Office 365 and Microsoft 365 Defender customers investigate emails.
Investigating email threats is now easier than ever!
We know that you, the security teams, spend a lot of time diving deep into alerts, hunting threats, identifying malicious indicators, and taking remediation actions. You go through multiple workflows to take the right measures to protect your organization. These workflows involving email borne threats typically have a few steps in common – all involving analyzing an email in question and any related emails – to answer questions like: Why did the system call an email malicious? Why did an email get blocked (or delivered)? How many users (and which ones) received these emails? What actions have already been taken on these emails? And a lot more.
Answering these questions often takes time and effort. And we consistently hear how much you crave ever-increasing efficiency in the tools you use, so the effort and time involved in responding to alerts and threats is reduced.
That’s why we’re excited to introduce the new Email Entity page in Microsoft Defender for Office 365. A simple, yet rich experience that offers a single pane of glass view to answer all the questions above, greatly amplifying the efficiency with which you can investigate and respond to threats.
Introducing the new Email Entity page
The new email entity page brings a comprehensive experience that provides an exhaustive view of details critical to investigation. The email entity page gives a 360-degree view of an email in one page, and helps security analysts save time and effort, leading to more effective threat protection.
Curious why an email was delivered despite being marked as malicious? Or what the latest location of the email is? What are the rich set of details for a URL or file that was detonated? Was it sent to a priority account? The email entity page brings you the answer to these questions, and the details you need to investigate and analyze an email – overrides, exchange transport rules, latest delivery location, detonation details, tags and a lot more.
The email page has information and capabilities for analysts to dig deeper into intricate email details, and headers, look at email preview or email download. The email page also builds on our promise to integrate Defender for Office 365 tightly with other Microsoft 365 Defender experiences like hunting, alerts, investigations and more.
What’s exciting about the Email Entity page?
We are sure the single page view is appealing, but that is not it. We bring a lot more details and capabilities to the new email entity page.
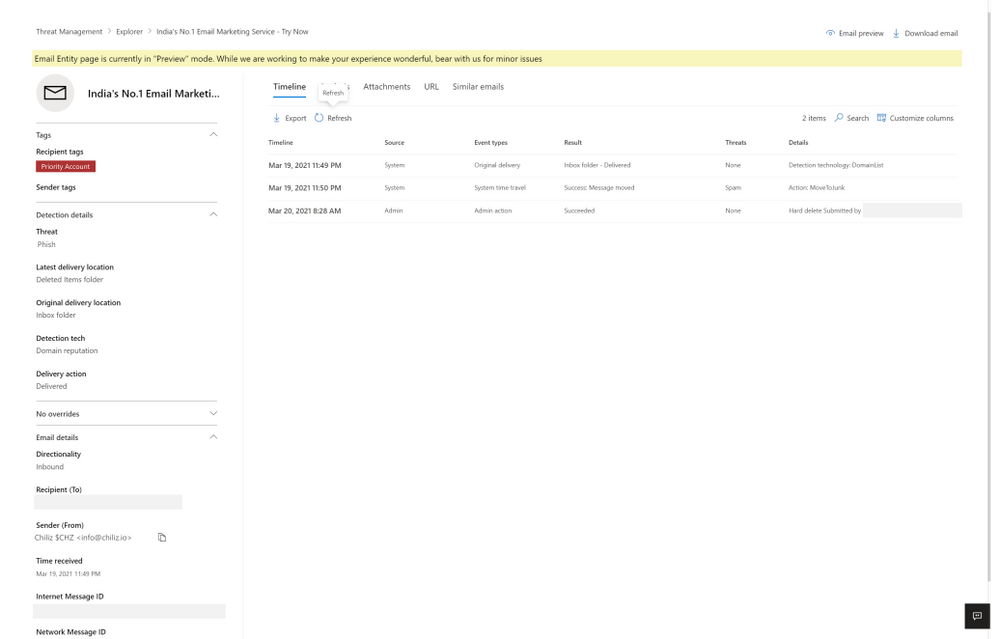
Each tab presents you with information about the email. The timeline tab has a series of events which took place on email by system, admin or user.
Figure 1: The timeline tab has a series of events which took place on email by system, admin or user.
The analysis tab shows pre and post-delivery fields about email, in addition to the headers presented in the same tab, helpful for a side-by-side analysis.

Figure 2: The analysis tab shows pre and post-delivery fields about email, in addition to the email headers
The attachment and URL tabs present detailed information about attachments and URLs present in the email, along with detonation details in case a detonation occurs (shown in the section later on detonation details).
Lastly, the similar emails tab shows emails found similar to the email. Similar emails are found using the body fingerprint i.e. the cluster ID.

Figure 3: The similar emails tab shows emails found similar to the email, using cluster ID
The email entity page not only has enriched details, but also new capabilities to help the security operations team investigate successfully, like email preview and detonation details.
Email preview for cloud mailboxes
We now provide full previews of emails found in cloud mailboxes. No need to download a copy of a malicious message to understand what your users saw – you can now do this with the click of a button from the safety of the admin center.

Figure 4: Email preview provides full previews of emails found in cloud mailboxes
Exposing details for detonated URLs and attachments
With the email entity page, we have greatly enhanced the level of details we present about the observations we make in the detonation chamber for entities which get detonated. When a URL or file present in an email is found malicious during detonation, we will present the information to help you understand the full scope of related threats. Detonation details reveal information like the full detonation chain, a detonation summary, a screenshot and observed behavior details. This information can help security teams understand why we reached a malicious verdict for a URL or file following a detonation.
For file detonation cases (you can filter by detection technology in Threat Explorer), the Attachments tab shows a list of attachments and their respective threats. Clicking on the malicious attachment opens the detonation details flyout for the detonated attachments. For URL detonations, the URL tab shows a list of URLs and the corresponding threats. Clicking on the malicious URL will open the detonation details flyout for detonated URLs.

Figure 5: Detonation details shows additional details discovered during detonation of links and files
How can I get started with this new experience?
If you have Microsoft Defender for Office 365 or Microsoft 365 Defender, you can take advantage of this new experience today. When hunting for email-based threats, natively integrated into Explorer, you may now choose to navigate to the new email entity page. You can do the same with alerts experience, across both the security and protection portals at security.microsoft.com and protection.office.com respectively.
Learn more about the email entity page on Microsoft Docs, and check out a video overview of these capabilities here.
Do you have questions or feedback about Microsoft Defender for Office 365? Engage with the community and Microsoft experts in the Defender for Office 365 forum.
by Contributed | Apr 19, 2021 | Technology
This article is contributed. See the original author and article here.
Pssst! You may notice the Round Up looks different – we’re rolling out a new, concise way to show you what’s been going on in the Tech Community week by week.
Instead of scrolling through every blog posted here, you can scroll through and see every blog on our blog page here.
Top news this week:
- Streamline requests with new approval features in Microsoft Teams
- Endpoint Discovery – Navigating your way through unmanaged devices
- The latest in Group Policy settings parity in Mobile Device Management
- Announcing the iOS/iPadOS Security Configuration Framework
- Friday Five: Azure Key Vault, Teams Tips, More!
- Surface commercial apps for the new Surface Laptop 4
- Microsoft Tech Community Language Translation – Service Update
- LearnTogether: Build Apps with Microsoft Graph
- Making MsQuic Blazing Fast
Important Events:
by Contributed | Apr 19, 2021 | Technology
This article is contributed. See the original author and article here.
Public read access to Azure containers and blob storage is an easier and convenient way to share data, however it also possesses security risk. For better and enhanced security, public access to entire storage account can be disallow regardless of the public access setting for an individual container present within the storage container. By disallowing public access to storage prevents a user from enabling public access for a container in respective storage account.
Remediating secure access to storage account across subscriptions and storage account can be tedious as we grow. Below solution can help you to disallow public access to storage account at scale. We can extract list of all storage account from azure subscriptions and use the same csv as input to below solution to disallow storage account containers at scale across all your subscriptions.
Pre-Requisite:
– Az Modules must be installed
– Service Principal created as part of Step 1, must be having contributor level access to subscriptions
Steps to follow:
Step 1: Create a service principal
Post creation of service principal, please retrieve below values.
- Tenant Id
- Client Secret
- Client Id
Step 2: Create a PowerShell function which will be used in generating authorization token
function Get-apiHeader{
[CmdletBinding()]
Param
(
 [Parameter(Mandatory=$true)]
 [System.String]
 [ValidateNotNullOrEmpty()]
 $TENANTID,
 [Parameter(Mandatory=$true)]
 [System.String]
 [ValidateNotNullOrEmpty()]
 $ClientId,
 [Parameter(Mandatory=$true)]
 [System.String]
 [ValidateNotNullOrEmpty()]
 $PasswordClient,
 [Parameter(Mandatory=$true)]
 [System.String]
 [ValidateNotNullOrEmpty()]
 $resource
)
$tokenresult=Invoke-RestMethod -Uri https://login.microsoftonline.com/$TENANTID/oauth2/token?api-version=1.0 -Method Post -Body @{"grant_type" = "client_credentials"; "resource" = "https://$resource/"; "client_id" = "$ClientId"; "client_secret" = "$PasswordClient" }
$token=$tokenresult.access_token
$Header=@{
  'Authorization'="Bearer $token"
  'Host'="$resource"
  'Content-Type'='application/json'
  }
return $Header
}
Step 3: Invoke API to retrieve authorization token using function created in above step
Note: Replace $TenantId, $ClientId and $ClientSecret with value captured in step 1
$AzureApiheaders = Get-apiHeader -TENANTID $TenantId -ClientId $ClientId -PasswordClient $ClientSecret -resource "management.azure.com"
Step 4: Extracting list of storage accounts across accessible subscriptions
$subscriptionList =  Get-AzSubscription
$subscriptionIdList = $subscriptionList.Id
foreach($subscriptionId in $subscriptionIdList)
{
$resourceURL = "https://management.azure.com/subscriptions/$($subscriptionId)/providers/Microsoft.Storage/storageAccounts?api-version=2021-01-01"
$resourcedetails=(Invoke-RestMethod  -Uri $resourceURL -Headers $AzureApiheaders -Method GET)
$TableData = $resourcedetails.value.ID
}
Step 5: Enable secure access to storage account
foreach($Data in $TableData)
{
  #Select Current Subscription and get All Storage Accounts
  $resourceid=$Data
  $resourceURL="https://management.azure.com$($resourceid)?api-version=2021-02-01"
  $resourcedetails=(Invoke-RestMethod  -Uri $resourceURL -Headers $AzureApiheaders -Method GET)
  $resourcelocation=$resourcedetails.location
  $permissions=$resourcedetails.properties.allowBlobPublicAccess
  if($permissions -eq $false)
  {
   Write-Output "Public access to Storage Account: $($resourcedetails.name) is already disabled"
  }
  Else
  {
   Write-Output "Changing ACL for Storage Account: $($resourcedetails.name)"
   $body = @"
   {
    "location":"$($resourcelocation)",
    "properties": {
         "allowBlobPublicAccess":  "false"
                  }
   }"@
   Invoke-RestMethod -Uri $resourceURL -Method Put -Headers $AzureApiheaders -Body $body
  }
}
Overall Script:
function Get-apiHeader{
[CmdletBinding()]
Param
(
 [Parameter(Mandatory=$true)]
 [System.String]
 [ValidateNotNullOrEmpty()]
 $TENANTID,
 [Parameter(Mandatory=$true)]
 [System.String]
 [ValidateNotNullOrEmpty()]
 $ClientId,
 [Parameter(Mandatory=$true)]
 [System.String]
 [ValidateNotNullOrEmpty()]
 $PasswordClient,
 [Parameter(Mandatory=$true)]
 [System.String]
 [ValidateNotNullOrEmpty()]
 $resource
)
$tokenresult=Invoke-RestMethod -Uri https://login.microsoftonline.com/$TENANTID/oauth2/token?api-version=1.0 -Method Post -Body @{"grant_type" = "client_credentials"; "resource" = "https://$resource/"; "client_id" = "$ClientId"; "client_secret" = "$PasswordClient" }
$token=$tokenresult.access_token
$Header=@{
  'Authorization'="Bearer $token"
  'Host'="$resource"
  'Content-Type'='application/json'
  }
return $Header
}

$AzureApiheaders = Get-apiHeader -TENANTID $TenantId -ClientId $ClientId -PasswordClient $ClientSecret -resource "management.azure.com"

$subscriptionList =  Get-AzSubscription
$subscriptionIdList = $subscriptionList.Id

foreach($subscriptionId in $subscriptionIdList)
{
$resourceURL = "https://management.azure.com/subscriptions/$($subscriptionId)/providers/Microsoft.Storage/storageAccounts?api-version=2021-01-01"
$resourcedetails=(Invoke-RestMethod  -Uri $resourceURL -Headers $AzureApiheaders -Method GET)
$TableData = $resourcedetails.value.ID
foreach($Data in $TableData)
{
  #Select Current Subscription and get All Storage Accounts
  $resourceid=$Data
  $resourceURL="https://management.azure.com$($resourceid)?api-version=2021-02-01"
  $resourcedetails=(Invoke-RestMethod  -Uri $resourceURL -Headers $AzureApiheaders -Method GET)
  $resourcelocation=$resourcedetails.location
  $permissions=$resourcedetails.properties.allowBlobPublicAccess
  if($permissions -eq $false)
  {
   Write-Output "Public access to Storage Account: $($resourcedetails.name) is already disabled"
  }
  Else
  {
   Write-Output "Changing ACL for Storage Account: $($resourcedetails.name)"
   $body = @"
   {
    "location":"$($resourcelocation)",
    "properties": {
         "allowBlobPublicAccess":  "false"
                  }
   }"@
   Invoke-RestMethod -Uri $resourceURL -Method Put -Headers $AzureApiheaders -Body $body
  }
}
}
References:
https://docs.microsoft.com/en-us/azure/storage/blobs/anonymous-read-access-configure?tabs=powershell
by Contributed | Apr 19, 2021 | Technology
This article is contributed. See the original author and article here.
Whether it’s to repeat common tasks or to automatically respond to a trigger, IT Pros look to automation to help streamline their work and improve their response times. In Azure, runbooks stored in Azure Automation accounts need to use credentials of an identity that they will run their actions as, if they are acting on a Azure resource. Azure Resource Manager checks that identity against to ensure it has permission to the resource before the actions are executed. Lets look at the new managed identities for Azure Automation (preview) and how they’re better than the previous Run As accounts.
Run As accounts
Previously, we’ve used an Azure Automation “Run As” account for this execution identity. When you create an Azure Automation Run As account, it creates:
- An Azure AD application with a self-signed certificate
- A service principal account in Azure Active Directory for that application
- And assigns the Contributor role to that service principal account in your subscription.
- It also creates an Automation certificate asset to hold the certificate’s private key, and an Automation connection asset which holds the application ID, tenant ID, subscription ID and certificate thumbprint.
That’s a bit of complexity there, all to provide a secure identity. Also, that self-signed certificate will expire one year after creation and will need to be renewed.
System-assigned Managed Identity
Now in preview, Azure Automation supports using a system-assigned managed identity instead. This managed identity works with any Azure service that supports AD authentication and can be used in Hybrid jobs on Azure and non-Azure VMs with the Hybrid Runbook Worker. It removes the need for renewing certificates and you dont need to specify the Run As connection object in your runbook code.
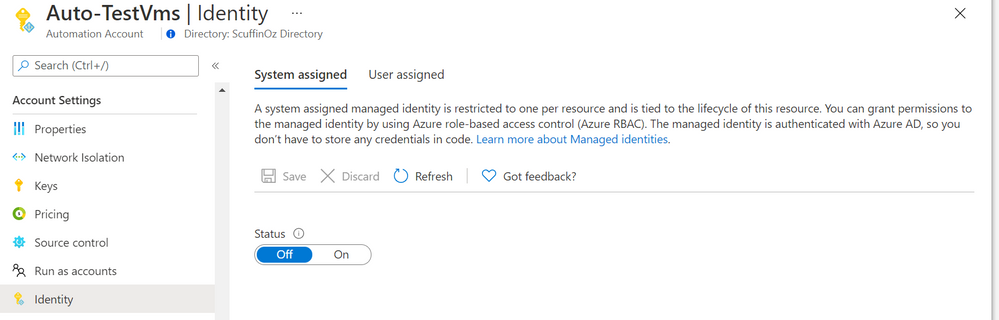
Enabling managed identity in an Azure Automation account
In an existing automation account, in the Account Settings section you’ll find the Identity blade and the option to turn on a system assigned identity.
Adding a system-assigned managed identity to your Azure Automation account – Identity blade inside the Azure Portal
Once created, it will show the managed identity’s Object ID and you can add role assignments at the subscription or resource group level, or to key vault, storage or SQL
 Azure Automation account enabled with a system-assigned managed identity
Now that your managed identity has been created and has a role that allows it to access your target resources, you can update your runbooks to use the Connect-AzAccount PowerShell cmdlet to call the managed identity:
Connect-AzAccount -Identity
View more sample runbooks here using managed identity.
Feedback
As always, we love your feedback but especially for features in preview as we seek to improve them. What do you think? Is this a better way of providing your automation runbooks with an identity? Would you change over your existing Azure Automation accounts? Let us know in the comments!
Learn more:
Azure Automation account authentication overview
Manage an Azure Automation Run As account
Manage runbooks in Azure Automation
Enable a managed identity for your Azure Automation account (preview)
What are managed identities for Azure resources?
by Contributed | Apr 18, 2021 | Technology
This article is contributed. See the original author and article here.
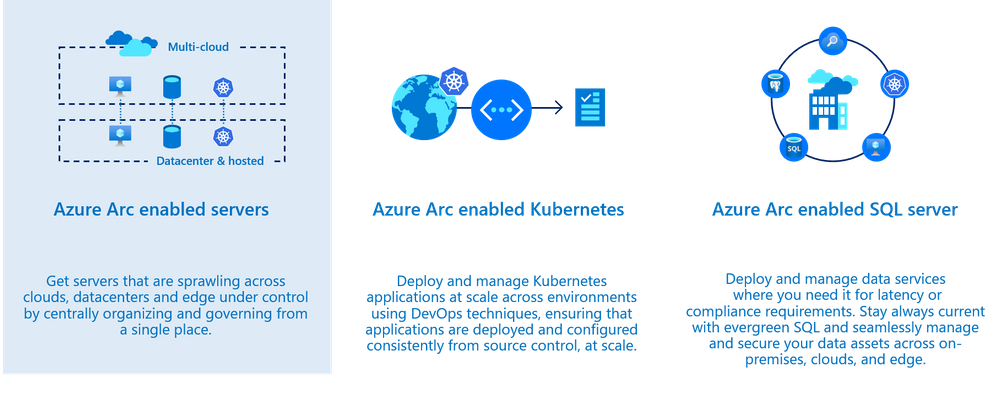
Azure Security Center monitors the security posture of your Azure resources. Today, organizations are extending their hybrid footprint and using additional public clouds. Security Center allows you to protect non-Azure resources located on-premises or on other cloud providers, from virtual machines, Kubernetes services and SQL resources.
To do so, those resources need to be connected to Azure by leveraging Azure Arc service – meaning that you can now manage and operate all your existing IT resources consistently and at-scale, wherever they reside, from Azure. You can also run Azure services anywhere, on-premises or in other public clouds, and take advantage of cloud benefits everywhere, such as scalability, fast deployment, and always up-to-date cloud innovation. Moreover, Azure Arc allows you to manage these resources like any other first citizen resource in Azure and benefit from additional capabilities, such as: non-Azure virtual machines connected to Azure Arc can benefit from capabilities such as patch management, RBAC roles, extension platform, tags and more.
Using Security Center and Azure Arc, you can also secure the 3 core scenarios which are offered today. In this blog post we will focus on the first one which is Azure Arc enabled servers.
Onboarding non-Azure machines into Azure Arc provide you the ability to:
- Deploy virtual machine extension (such as Log Analytics agent, vulnerability assessment scanner, custom script extension and more)
- Enable guest configuration policies (Azure Policy)
- Use Security Center to improve the security posture such as misconfigured settings, missing system updates and more.
- Use Azure Defender for server capabilities such security alerts, vulnerability assessment, adaptive application controls, network hardening and more.
Prepare
Onboard machines as Azure Arc connected machines by installing the Hybrid Connected Machine agent on the target machine(s); this can be done by using a script or manually. Once a machine is onboarded, you will see it as Azure resource.
Before you onboard machines, please make sure to review these tasks:
- Make sure to review the supported operating system version as found here: Overview of the Connected Machine agent – Azure Arc | Microsoft Docs. If you still want to onboard a non-Azure machine but the target machine runs an OS version which is not supported by the agent yet, you can still onboard it by installing the Log Analytics agent directly on a machine.
- Ensure the target machines can communicate over the internet with the required URLs for the agent through a firewall or proxy server – proxy settings are set on the OS level.
All URLs used for communication are outbound and secured over TCP port 443 and can be found here.
Onboard
There are multiple ways to deploy the agent on a target machine as provided here: Connect hybrid machines to Azure from the Azure portal – Azure Arc | Microsoft Docs.
During the onboarding, you will be asked to onboard the resource to a subscription and a resource group you selected a subscription where Azure Defender for Servers plan is enabled.
To do so, navigate to Security Center Pricing and Settings page, and in the Servers row, click ON as shown the example below:

Once the machine is successfully onboarded, you will be able to see it listed on the Azure Arc blade.
In the Azure portal, search for Azure Arc service, then select Servers to see all the onboarded servers and their status, as shown in the example below:

Selecting one of the onboarded machines, opens the resource blade. Here you can see the connectivity status, OS details and additional metadata.
Since it’s an ARM resource, you can assign tags, manage permissions using Azure RBAC and use additional capabilities such as policies, change tracking and inventory, patch management and security.

Secure
Projecting resources using Arc is a necessary step to ensure your machines are protected by Security Center. Like an Azure VM, you will need to deploy the Log Analytics agent on the target machine. To do so, you can use dedicated recommendations on Security Center recommendation list to deploy the Log Analytics agent; one for Azure Arc machines based on Linux and for Windows.
These recommendations offer you the Quick Fix approach to remediate it with a single click to trigger an installation of the Log Analytics agent.

The agent is being deployed using the VM extension platform which is one of the advantages of using Arc. Once the Log analytics agent is installed and connected to a workspace used by Security Center, your machine will be ready to use and benefit of the variety of features which are available as part of the Azure Defender for Servers plan.
On Security Center’s asset inventory, you can filter Arc resources by using the filters located on the upper section, for example: select “servers – azure arc”. Unlike Azure VMs, Arc connected machines are presented in purple as you can see below.
For each resource you can see the agent monitoring alongside with the current security recommendations:

You can distinguish between the different resource by the icon:

The security alert below was triggered by Azure Defender from a virtual machine onboarded to Azure Arc and located on other cloud vendor:

Deploying our integrated vulnerability assessment solution on non-Azure machine is included with the Azure Defender for servers plan and provide you a visibility for all vulnerabilities found on the target resource including the remediation steps:

Hope you enjoyed learning on how Security Center and Azure Arc can protect your non-Azure resources located anywhere 
Reviewers:
@Yuri Diogenes, Principal Program Manager, ASC CxE
Future Kortor, Program Manager, ASC CxE

Recent Comments