by Contributed | Apr 26, 2021 | Technology
This article is contributed. See the original author and article here.
Welcome to the April update of Java Azure Tools! This blog series provide updates for all the Azure tooling support we are providing for Java users, covering Maven/Gradle plugins for Azure, Azure Toolkit for IntelliJ/Eclipse and Azure Extensions for VS Code. Follow us and you will get more exciting updates in the future blogs.
If you use Azure with Java apps deployed either on VM, on App Service, on AKS or on-premise, you probably store application data on Azure as well using data services like the Azure Database for MySQL. The Azure Toolkit for IntelliJ 3.50.0 release brings this brand new experience in IntelliJ on connecting your Java app with Azure Database for MySQL. We will also show you how to deploy the app seamlessly to Azure Web Apps with the database connection.
In brief, the Azure Toolkit for IntelliJ can manage your Azure database credentials and supply them to your app automatically through:
- If running the app locally: Environment variables through a before launch task named “Connect Azure Resource”.
- If running the app on Azure Web Apps: App Setting deployed along with the artifact.
Check out the showcase GIF below and detail steps will be explained in later sections.
Create an Azure Database for MySQL
let’s start from creating an Azure Database for MySQL server instance. You can either follow the steps here right from your Azure Toolkit for IntelliJ plugin or with any other tools like Azure Portal.
- Right-click on the Azure Database for MySQL node in the Azure Explore, select Create and then select More settings to open the wizard shown in image below.
- (Optional) Customize the resource group name and server name.
- Choose a location you prefer, here we use West US.
- Specify admin username and password.
- Select the two checkboxes in the Connection security section. This step will automatically add corresponding IP whitelist rules to the firewalls protecting your MySQL server.
- Click OK.

The background operation can take a few minutes to complete. After that you can refresh the Azure Database for MySQL node in the Azure Explore, right-click on the server you just created and select Show Properties for some key information listed. If you are using IntelliJ IDEA Ultimate version, select Open by Database Tools will connect the MySQL server to the database tools embedded.

Connect with your local project
Here we use a sample Spring Boot project called PetClinic. You can also try this with your own project consuming MySQL.
- Clone the project to your dev machine and import with IntelliJ IDEA.
git clone https://github.com/spring-projects/spring-petclinic.git
- Enable MySQL profile by adding
spring.profiles.active=mysql in the application.properties.
- Connect to the MySQL server using MySQL Workbench or MySQL CLI for example:
mysql -u <admin name>@<mysql server name> -h <mysql server name>.mysql.database.azure.com -P 3306 -p --ssl
- Run the commend in resources/db/mysql/user.sql on the MySQL server to create the petclinic database and user.
- In Azure Explorer, right-click on the MySQL server you created and select Connect to Project to open the wizard below. Select the petclinic database, specify password and select Until restart for to save the password for this IDE session. Then you can click Test Connection below to verify connection from your IDE. Then click OK.

- Open application-mysql.properties, comment out the original spring.datasource.url/username/password. Type those properties again and accept the autocomplete suggestion with Connect to Azure Datasource.

# database init, supports mysql too
database=mysql
#spring.datasource.url=${MYSQL_URL:jdbc:mysql://localhost/petclinic}
#spring.datasource.username=${MYSQL_USER:petclinic}
#spring.datasource.password=${MYSQL_PASS:petclinic}
spring.datasource.url=${AZURE_MYSQL_URL}
spring.datasource.username=${AZURE_MYSQL_USERNAME}
spring.datasource.password=${AZURE_MYSQL_PASSWORD}
# SQL is written to be idempotent so this is safe
spring.datasource.initialization-mode=always
- Run the application by right-clicking on the PetClinicApplication main class and choosing Run ‘PetClinicApplication’. This will launch the app locally with the MySQL server on Azure connected.
Deploy the app seamlessly to Azure Web Apps
Once you have finished all the steps above, there is no extra steps to make the database connect also works on Azure Web Apps. Just follow the ordinary steps to deploy the app on Azure: Right-click on the project and select Azure->Deploy to Azure Web Apps. You can also see the before launch task “Connect Azure Resource” added here, which will upload your database credentials as App Settings to Azure. Therefore, after click Run and wait for the deployment to complete you will see the app working on Azure without any further configuration.

Try our tools
Please don’t hesitate to give it a try! Your feedback and suggestions are very important to us and will help shape our product in future.
by Contributed | Apr 26, 2021 | Technology
This article is contributed. See the original author and article here.
It is very important to keep updating your Exchange Servers to a supported Cumulative Update (CU). Simply put, your on-premises environments should always be ready to take an emergency security update (this applies to Exchange, Windows, and other Microsoft products you use on-premises). One thing we learned during the March 2021 release of Exchange Server security updates is that many of our customers were not ready to install security updates because they were not on supported cumulative update versions. With the threat landscape rapidly evolving, the importance of keeping your environment current should not be underestimated.
Please keep your Exchange Servers up to date. We want to continue helping you keep your environment secure, and this means your Exchange servers need to be up to date. This is a continuous process.
Once your Exchange servers are running a supported CU, ensure that the latest available Security Update (SU) is also installed. This will help address any vulnerabilities found since the release of the supported CU. To find recently released Exchange Server SUs, go to the Security Update Guide (filter on Exchange Server under Product Family). Exchange Server security updates are cumulative (an update released in April will also contain security fixes released in March, for example). We also announce all major updates on our blog.
We have prepared a set of questions and answers that cover what we hear most often about Exchange updates. If you are running into a different set of challenges keeping your environment up to date, please let us know in comments below!
Q&A
I updated my Exchange Servers a few months ago! How come they are ‘not supported’ today?
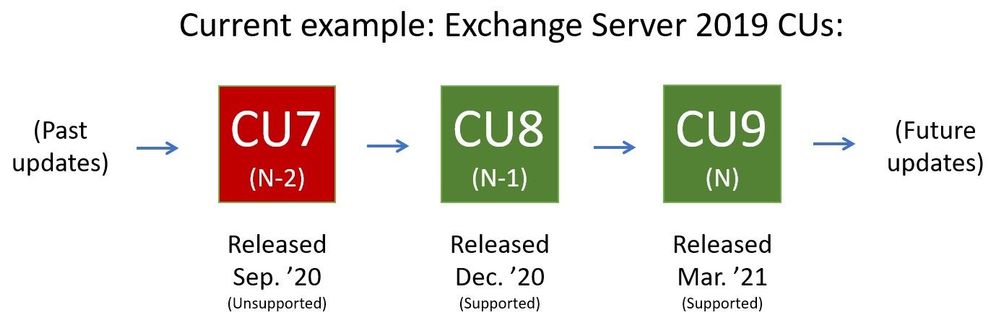
For versions of Exchange that are within mainstream support (see product lifecycle), Microsoft supports (releases relevant security fixes for) the two latest CUs. Sometimes the latest two CUs are referred to as “N and N-1”. As a current example, if the latest released CU is CU9 (‘N’), and the server version is Exchange Server 2019, then Microsoft at this time supports two Exchange Server 2019 CUs, N and N-1 (CU9 and CU8). When CU10 is released, the “supported CU window” will slide toward the newly released CU10 (and what used to be the N-1 supported CU, CU8, will become unsupported).
Why does Microsoft release updates so often?
It is good that updates are released when issues are found. Microsoft (and other software vendors) release updates only when they are needed. CUs typically contain resolutions to feature problems that were reported to us by our customers (and can contain security updates from previous SUs) and are released quarterly. SUs are released only when actual security issues are found and fixed, and are typically released on a ‘patch Tuesday’. Let’s take an example of how a typical release flow for two CUs and two SUs we might release would look like:
- On a particular month (let’s say March), we might release CU4; CU4 is cumulative and will include fixes and updates from before.
- A month later we release CU4 SU1, a security update for CU4.
- In May we then release CU4 SU2, an additional security update for CU4. CU4 SU2 will include updates released in CU4 SU1 also.
- In June we release CU5, which will contain all updates released up to that point.

My Exchange Servers are working as expected, so why update them?
While we appreciate the ‘don’t fix what is not broken’ thinking, the reality is that keeping Exchange Server current allows you to ensure that it will keep working without major interruptions to functionality. Investing some time into Exchange Server maintenance (on your planned schedule) will give you a long-term benefit of well running system, with code as protected from vulnerabilities as you can get it.
Updating Exchange Server seems complicated; what exactly do I do?
Think of updating Exchange server in several stages:
- Take inventory: use the Exchange Server Health Checker script on GitHub to see if you are behind on your on-premises Exchange Server updates.
- Install updates: visit https://aka.ms/ExchangeUpdateWizard and choose your currently running CU and your target CU. Then click the “Tell me the steps” button, to get a list of steps to follow.
- Troubleshoot (if needed): follow the ExchangeUpdateWizard instructions and best practices for installation of updates carefully, including when to use an elevated command prompt. If you encounter errors during or after installation, see Repair failed installations of Exchange Cumulative and Security updates.
Why did Microsoft suddenly start releasing Exchange Server security updates?
Releasing security updates for Exchange Server is not new. Microsoft has been releasing Exchange Server updates on ‘patch Tuesday’ for years (when issues are found). Keeping up with these updates is a best practice.
How can I update Exchange Server when (insert 3rd party application name here) does not support either of the latest supported Exchange Server CUs?
Work with your 3rd party vendor to bring their software current in a timely manner. Consider that your Exchange environment contains a lot of valuable company directory and messaging information. Your priority should be to keep your environment as secure as possible.
How can we stay current when we are a 24×7 business and have no time to take our servers down for maintenance?
Many customers require Exchange Server to work 24×7. In fact, our update process is designed for these high-demand businesses. You should use Database Availability Groups (DAGs) and put servers that you are updating in Maintenance mode to enable a graceful and non-disruptive update process for your users. See Performing maintenance on DAG members for more information.
If we are in Hybrid mode and don’t actively use our on-premises Exchange Server, do we still need to stay current?
Even if you are only using Exchange Server on-premises to manage Exchange-related objects, you need to keep the server current. Note that the Hybrid Configuration Wizard (HCW) does not need to be re-run after updates are installed.
I looked at recent security update releases and the Common Vulnerabilities and Exposures (CVE) severity was not very high; so why update?
Microsoft recommends that you apply all available security updates because it can be difficult to understand how even lower severity vulnerabilities disclosed in one month might interact with vulnerabilities disclosed and fixed a month later. An attack may trigger only specific low-impact functionality on a remote target machine and nothing else, causing the scoring for the CVE to be quite low one month. For example, in the following month an important issue with that functionality could be discovered, but it might be only triggered locally and require significant user interaction. That on its own might also not be scored highly. But if your software is behind in updates, these two issues could combine into an attack chain, thereby scoring at critical levels.
We find it difficult to update because Active Directory (AD) schema extensions and Exchange installations require different teams to take action.
In cases where different teams need to perform separate actions to prepare for installation of Exchange Cumulative Updates (as those might require AD schema extension) – we recommend you request schema changes when we release new CUs that require them. Even if you do not need to update to the very latest CU (because last two CUs are supported for Exchange versions that are still within support lifetime) – the fact that Active Directory schema will be up to date means that if you do find that you need to install the latest CU, AD schema will already be updated. We release CUs quarterly and not all of them will require AD schema updates. You can track this here for Exchange 2016 and here for Exchange 2019.
The Exchange Team
by Contributed | Apr 26, 2021 | Technology
This article is contributed. See the original author and article here.
PowerShell Gallery contains lots of modules that you can add to a Windows Server deployment to make it easier to manage. In this article, I’ll cover a few of the ones I’ve found most useful over the years when it comes to managing Windows Server.
Before you can install any of these modules, you need to install the NuGet package provider with:
Install-PackageProvider -Name NuGet -Force
The next step is to install the PowerShellGet for module installation using:
Install-Module -Name PowerShellGet -Force
Or, if you have it already installed, ensure that it is up to date with:
Update-Module -Name PowerShellGet
You can learn more about PowerShellGet at: https://docs.microsoft.com/en-us/powershell/module/powershellget/?view=powershell-7.1?WT.mc_id=modinfra-24781-orthomas
Now that you’ve got the necessary bits in place, here are the five modules I recommend:
1: PSWindowsUpdate.
Use this module to manage Windows Updates from PowerShell (functionality that I’m endlessly surprised isn’t there in the base operating system). Especially useful if you’re working with Server Core machines and you don’t want to use sconfig.cmd to install software updates.
Install using:
Install-Module -Name PSWindowsUpdate
Notable cmdlets include:
- Add-WUServiceManager
- Enable-WURemoting
- Get-WindowsUpdate
- Get-WUApiVersion
- Get-WUHistory
- Get-WUInstallerStatus
- Get-WUJob
- Get-WULastResults
- Get-WURebootStatus
- Get-WUServiceManager
- Get-WUSettings
- Invoke-WUJob
- Remove-WindowsUpdate
- Remove-WUServiceManager
- Set-WUSettings
- Update-WUModule
- Set-PSWUSettings
- Reset-WUComponents
- Get-WUOfflineMSU
You can learn more about this module at: https://www.powershellgallery.com/packages/PSWindowsUpdate/2.2.0.2
2: Package Management
Use this module to install software packages using PowerShell in a manner reminiscent of apt-get or Chocolatey.
Install using:
Install-Module -Name PackageManagement
Notable cmdlets include:
Find-Package
Get-Package
Get-PackageProvider
Get-PackageSource
Install-Package
Import-PackageProvider
Find-PackageProvider
Install-PackageProvider
Register-PackageSource
Set-PackageSource
Unregister-PackageSource
Uninstall-Package
Save-Package
You can learn more about this module at:
https://docs.microsoft.com/en-us/powershell/module/packagemanagement/?view=powershell-7.1?WT.mc_id=modinfra-24781-orthomas
3. PSLogging
Use this module to manage log files for PowerShell scripts.
Install using:
Install-Module -Name PSLogging
Notable cmdlets/functions:
- Start-Log
- Write-LogInfo
- Write-LogWarning
- Write-LogError
- Stop-Log
- Send-Log
You can learn more about this module at: https://www.powershellgallery.com/packages/PSLogging/2.5.2
4. Invoke-CommandAs
This module allows you to invoke commands as a specific user or as system on either the local or remote computers through ScheduleTask.
Install using:
Install-Module -Name Invoke-CommandAs
Notable cmdlets/functions
You can learn more about this module at:
https://www.powershellgallery.com/packages/Invoke-CommandAs/3.1.6
5.0 IISAdministration
This module allows you to manage Internet Information Server using PowerShell.
Install using:
Install-Module -Name IISAdministration
Notable cmdlets/functions
- Get-IISAppPool
- Start-IISCommitDelay
- Stop-IISCommitDelay
- Get-IISSite
- Remove-IISSite
- New-IISSite
- Stop-IISSite
- Start-IISSite
- Get-IISConfigSection
- Get-IISConfigCollection
- Get-IISConfigCollectionElement
- New-IISConfigCollectionElement
- Remove-IISConfigCollectionElement
- Remove-IISConfigElement
- Clear-IISConfigCollection
- Get-IISConfigElement
- Get-IISConfigAttributeValue
- Remove-IISConfigAttribute
- Set-IISConfigAttributeValue
- Get-IISServerManager
- Reset-IISServerManager
- Get-IISCentralCertProvider
- Set-IISCentralCertProvider
- Set-IISCentralCertProviderCredential
- Clear-IISCentralCertProvider
- Disable-IISCentralCertProvider
- Enable-IISCentralCertProvider
- Enable-IISSharedConfig
- Disable-IISSharedConfig
- Export-IISConfiguration
- Get-IISSharedConfig
- Get-IISSiteBinding
- Remove-IISSiteBinding
- New-IISSiteBinding
You can learn more about this module at: https://www.powershellgallery.com/packages/IISAdministration/1.1.0.0
by Contributed | Apr 26, 2021 | Technology
This article is contributed. See the original author and article here.
Transfer your group chat emails to Teams with Power Automate
I recently covered this idea on my blog but it is a Cloud Flow that I make use of often so I thought I would share it with you all. My organisation is well in to their Teams adoption journey and whilst a large proportion of users use Teams for their first port of call for a group chat, it still often surprises me when a conversation is struck up via Outlook Email and very quickly we get lost between reply to alls and reply to sender. Could Power Automate help you move that conversation group or one to one to Teams with a mouse click before the conversation gets out of control?
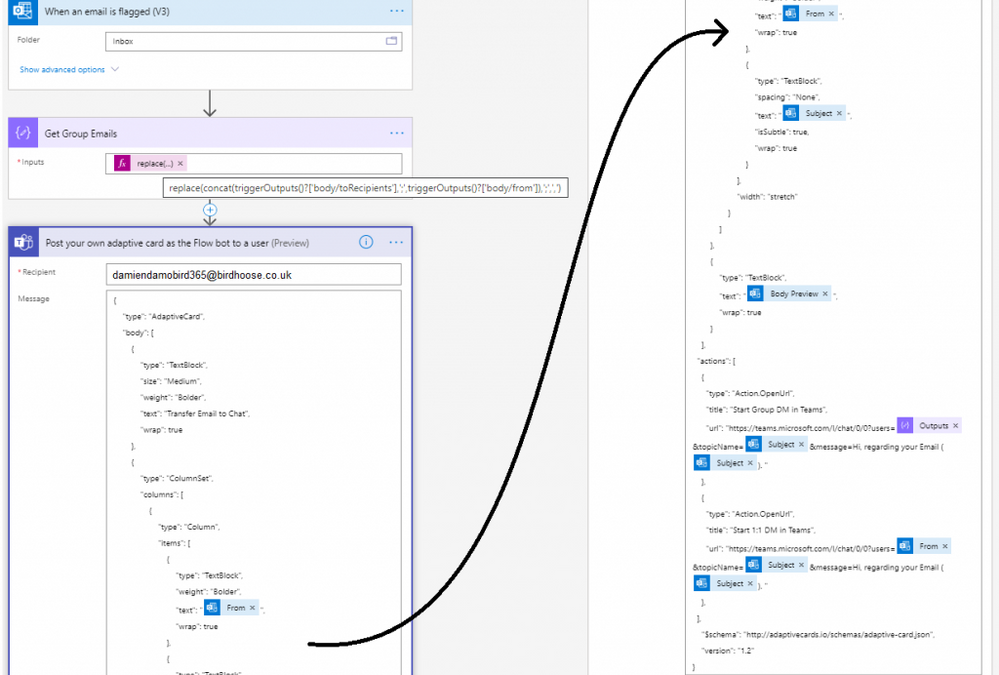
The simplest way for me, to transfer the conversation from Outlook and trigger a flow, was to use “When an email is flagged” trigger. Therefore I can simply flag an email in Outlook and take the conversation onto Teams.
With the variables provided by the email trigger, I compose (by default) the to and from fields in order to get all mail recipients (albeit you may want to include the CC’d emails to) and simply replace the semi colon with a comma, this is needed for the final and only other step.
Using the “Post your own adaptive card as the Flow bot to a user” step, I am able to send an adaptive card notification in Teams to myself and provide a summary of the email I am transferring, from, subject and body preview and in my case the option to start a one to one chat with the sender or a group chat if there are more than one recipients of the email. This is done using the Deep Link feature of Teams.
I have supplied a copy/paste option at the end of my post that will allow you to replicate this in your personal PowerAutomate / Teams environment in a matter of seconds.
**NOTE** make sure you update the TO field in the post adaptive card action as it’s currently set to youremail[at]yourdomain[dot]com.
So, what does the Cloud Flow look like?

The cloud flow only has 2 actions
The flow simply consists of a compose action in order to structure the list of emails from the email trigger, above I don’t include the cc’d emails. You’ve therefore a couple options for the get group email compose action, do you want to include cc’d or not in the Group Chat Deep Link? The below sample snippet expression includes the ccRecipients, but feel free to adjust as necessary.
replace(tolower(concat(triggerOutputs()?[‘body/toRecipients’], ‘;’, triggerOutputs()?[‘body/from’], ‘;’, triggerOutputs()?[‘body/ccRecipients’])), ‘;’, ‘,’)
The second and final step is an adaptive card built via adaptive cards designer. It’s a steep learning curve but Designer site gives you plenty of sample cards to experiment with and it is here that you need to include the deep links to your new Teams conversations which will automatically launch a teams conversation with these users.
The User Experience
My colleague Alex, sends me an email with a list of colleagues in the to field. Before the conversation gets out of control, I simply flag the email and instigate a move to Teams Group Chat.

Within a matter of seconds, basically as fast as your Flow is triggered, a Flow Bot message is received to my Teams application with the subject and summary email body including a link to both a one to one and group chat.

Clicking on that Group DM in Teams button results in an opening conversation line and conversation subject (in draft), all courtesy of the deep link. Now it’s time to get the conversation going.

Want to try the solution quickly?
Did you know that you can copy and paste Cloud Flow actions between environments really easily? Simply by creating a new Cloud Flow with the “When an email is flagged” trigger you can then copy the provided code below and paste it into your ClipBoard by clicking Next Step, selecting My ClipBoard and pasting with Ctrl + V. The only field you need to change is the Adaptive Card Recipient which by default is set to youremail[at]yourdomain[dot]com. Just make sure you set this to your own email address to receive the Adaptive Card.

{"id":"f616b2c7-1645-4360-aff5-1710-a2bfb6a1","brandColor":"#8C3900","connectionReferences":{"shared_office365":{"connection":{"id":"/providers/Microsoft.PowerApps/apis/shared_office365/connections/shared-office365-2c7a215d-616e-4cc2-9dab-9d05f14c21a5"}},"shared_teams_1":{"connection":{"id":"/providers/Microsoft.PowerApps/apis/shared_teams/connections/shared-teams-c32e6b36-e3dd-4ca6-806d-5969ba7e6dee"}}},"connectorDisplayName":"Control","icon":"data:image/svg+xml;base64,PHN2ZyB3aWR0aD0iMzIiIGhlaWdodD0iMzIiIHZlcnNpb249IjEuMSIgdmlld0JveD0iMCAwIDMyIDMyIiB4bWxucz0iaHR0cDovL3d3dy53My5vcmcvMjAwMC9zdmciPg0KIDxwYXRoIGQ9Im0wIDBoMzJ2MzJoLTMyeiIgZmlsbD0iIzhDMzkwMCIvPg0KIDxwYXRoIGQ9Im04IDEwaDE2djEyaC0xNnptMTUgMTF2LTEwaC0xNHYxMHptLTItOHY2aC0xMHYtNnptLTEgNXYtNGgtOHY0eiIgZmlsbD0iI2ZmZiIvPg0KPC9zdmc+DQo=","isTrigger":false,"operationName":"DamoBird365_Transfer_Email_To_Teams","operationDefinition":{"type":"Scope","actions":{"Get_All_To_and_From_Emails":{"type":"Compose","inputs":"@replace(tolower(concat(triggerOutputs()?['body/toRecipients'], ';', triggerOutputs()?['body/from'])), ';', ',')","runAfter":{}},"Post_your_own_adaptive_card_as_the_Flow_bot_to_a_user":{"type":"OpenApiConnection","inputs":{"host":{"connectionName":"shared_teams_1","operationId":"PostUserAdaptiveCard","apiId":"/providers/Microsoft.PowerApps/apis/shared_teams"},"parameters":{"PostAdaptiveCardRequest/recipient/to":"youremail[at]yourdomain[dot]com;","PostAdaptiveCardRequest/messageBody":"{n "type": "AdaptiveCard",n "body": [n {n "type": "TextBlock",n "size": "Medium",n "weight": "Bolder",n "text": "Transfer Email to Chat",n "wrap": truen },n {n "type": "ColumnSet",n "columns": [n {n "type": "Column",n "items": [n {n "type": "TextBlock",n "weight": "Bolder",n "text": "@{triggerOutputs()?['body/from']}",n "wrap": truen },n {n "type": "TextBlock",n "spacing": "None",n "text": "@{triggerOutputs()?['body/subject']}",n "isSubtle": true,n "wrap": truen }n ],n "width": "stretch"n }n ]n },n {n "type": "TextBlock",n "text": "@{triggerOutputs()?['body/bodyPreview']}",n "wrap": truen }n ],n "actions": [n {n "type": "Action.OpenUrl",n "title": "Start Group DM in Teams",n "url": "https://teams.microsoft.com/l/chat/0/0?users=@{outputs('Get_All_To_and_From_Emails')}&topicName=@{triggerOutputs()?['body/subject']}&message=Hi, regarding your Email (@{triggerOutputs()?['body/subject']}). "n },n {n "type": "Action.OpenUrl",n "title": "Start 1:1 DM in Teams",n "url": "https://teams.microsoft.com/l/chat/0/0?users=@{triggerOutputs()?['body/from']}&topicName=@{triggerOutputs()?['body/subject']}&message=Hi, regarding your Email (@{triggerOutputs()?['body/subject']}). "n },n ],n "$schema": "http://adaptivecards.io/schemas/adaptive-card.json",n "version": "1.2"n}","PostAdaptiveCardRequest/messageTitle":"Transfer Email To Teams"},"authentication":"@parameters('$authentication')"},"runAfter":{"Get_All_To_and_From_Emails":["Succeeded"]}}},"runAfter":{},"description":"***Please make sure you update the TO: in the Adaptive Card***"}}
Summary
Get that internal conversation moved from traditional Email into modern Teams. Not all conversation is better suited to Teams, I accept, but it’s often far more productive to have the order of conversation in front of you, expecially if you have had a couple days off. If a colleague has taken the initiative to shift a conversation into Teams, it will save the group a lot of effort having to sift through that email string and potentially allows you to work in real time seeing if someone is available/online, rather than wait for that next email to come in or maybe a couple of people reply to that email at the same time with a different opinion  I’ve enjoyed working with you email, but Teams messaging is my preferred internal conversation route these days if I can’t start a call of course.
What trigger would suit you best?
Would you include To/From or CC’d members too in your Group Email?
Have you used Teams Deep Links before?
Check out my blog for more ideas or if you have an idea of your own but don’t know where to start, give me a shout via the various platforms – DamoBird365
by Contributed | Apr 26, 2021 | Technology
This article is contributed. See the original author and article here.
Hello, dear readers! My name is Hélder Pinto and I am sharing here some tips about how to leverage NSG Flow Logs and Traffic Analytics to improve your Azure network security hygiene and, at the end, simplify your NSG rules and, more importantly, uncover security vulnerabilities.
Introduction
Traffic Analytics is an Azure-native service that allows you to get insights about the Azure Virtual Network flows originated by or targeted to your applications. For example, identifying network activity hot spots, security threats or network usage patterns is made very easy by navigating over the several ready-made Traffic Analytics dashboards. This service depends on the Flow Logs generated by the network activity evaluated by Network Security Group (NSG) rules. Whenever a network flow tries to go from A to B in your network, it generates a log for the NSG rule that allows/denies the flow. Traffic Analytics is not enabled by default and you must turn it on for each NSG. You can read more details about Traffic Analytics here.
Traffic Analytics dashboards are built on top of the logs that are collected at least every hour into a Log Analytics workspace. If you drill down some of its charts, you’ll notice that everything depends on the AzureNetworkAnalytics_CL custom log table. Of course, these flow logs can be used for other purposes besides feeding Traffic Analytics dashboards. In this article, I’ll demonstrate how to leverage Traffic Analytics logs to improve your Azure network security hygiene and, at the end, simplify your NSG rules and, more importantly, uncover security vulnerabilities.
The problem
When managing NSGs, inbound/outbound rules are added/updated as new services are onboarded into the Virtual Network. Sometimes, rules are changed temporarily to debug a failing flow. Meanwhile, services and network interfaces are decommissioned, temporary rules are not needed anymore, but too frequently NSG rules are not updated after those changes. As time goes by, it is not uncommon to find NSG rules for which we don’t know the justification at all or, in many cases, containing IP address-based sources/destinations that are not easy to identify. As a result, motivated by the fear of breaking something, we let those rules hanging around.
This negligence in network security hygiene sometimes originates vulnerabilities that have a dire impact in your Azure assets. Some examples:
- An outbound allow rule for Azure SQL that is not needed anymore and that can be exploited for data exfiltration.
- A deny rule that is never hit because someone inserted a permissive allow rule with higher priority.
- An RDP allow rule for a specific source/destination that is never hit because, again, someone added a higher priority rule that suppresses its effect.
Even if some unneeded NSG rule is innoxious, it is a general best practice to keep your Azure resources as optimized and clean as possible – the cleaner your environment, the more manageable it is.
NSG Optimization Workbook
Based on Azure Resource Graph and on the AzureNetworkAnalytics_CL Log Analytics table generated by Traffic Analytics, I built an Azure Monitor workbook that helps you spot NSG rules that haven’t been used for a given period, i.e., good candidates for cleanup or maybe a symptom that something is wrong with your NSG setup.
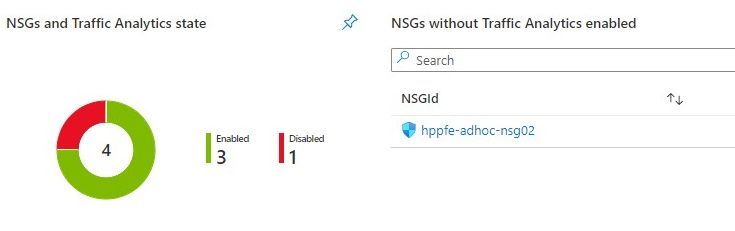
The workbook starts by showing you:
- which NSGs do not have Traffic Analytics enabled – this means no visibility over their flows.
- which NSGs have been inactive, i.e., not generating any flow logs – maybe these NSGs were associated to subnets or network interfaces that were decommissioned.
Workbook tiles with a summary of Traffic Analytics state in all NSGs
 Workbook tile listing NSGs that have not been generating flow logs (inactive)
If you scroll down a bit more, you’ll also get details about NSG rules that have been inactive for the period specified as parameter. These rules are not generating NSG Flow Logs and this may be a symptom of some misconfiguration or, at least, of some lack of security hygiene.
 Workbook tile with a list of NSG rules that have not been used by network traffic
If you select a rule from the list, you get statistics about other rules in the same NSG that are generating flows, which may give you a hint for the reason why that rule has not generated any log lately.
 Workbook tile with the statistics for all the NSG rules that have generating traffic for the NSG where the inactive rule sits in
Deploying the Workbook
The NSG Optimization workbook can be found at the address below:
https://github.com/helderpinto/azure-wellarchitected-toolkit/blob/main/security/workbooks/nsg-optimization.json
For instructions on how to setup a workbook, check the Azure Monitor documentation. Once in Azure Monitor Workbooks, you must create a new Workbook and, in edit mode, click on the Advanced Editor button (see picture below) and replace the gallery template code by the one you find in the GitHub URL above. After applying the workbook code, you should see the dashboard described in this article. The workbook looks quite simple but the logic behind is somewhat complex and, depending on the volume of your NSG Flow Logs and on the NSG activity time range you chose, it may take a while to fully load each table. Don’t forget to save your workbook!
 Screenshot of the Workbooks user interface for creating a new workbook from existing code
 Screenshot of the Workbooks user interface for applying and saving a new workbook from existing code
Conclusion
As we saw in this article, keeping a good network security hygiene may save you from troubles. Some of these potential issues come out of unneeded or obsolete network security rules defined in your NSGs. The NSG Optimization Workbook here described will help you uncover NSGs or NSG rules that have not been used over a specific time range, based on Traffic Analytics logs. An NSG rule that has not generated flow logs is probably a symptom of some misconfiguration. So, go turn on Traffic Analytics, deploy the NSG Optimization Workbook and give a start to your NSG spring cleanup! :smiling_face_with_smiling_eyes:

Recent Comments