by Contributed | May 11, 2021 | Technology
This article is contributed. See the original author and article here.
Azure provides a few built-in roles to allow or deny actions for Azure Lab Services. These built-in roles include owner, contributor, lab creator, and reader. If the built-in roles don’t fit your needs, you can also create and deploy a custom role. That is what we will do in this blog post.
In this scenario we need to create a Lab Liaison role. A lab Liaison is a technical helper that will be able to reset student VMs for multiple labs and nothing else. We build off of the information in the previous post, Use Custom Role to Tailor Teachers’ Lab Management Permissions.
Defining the Lab Liaison Role
First, things first. Let’s define our custom role. We’ll look at the overall role definition, and then discuss each section.
{
    "properties": {
        "roleName": "Lab Liaison",
        "description": "Lab Liaison can reset student VMs when necessary.",
        "assignableScopes": [
            "/subscriptions/11111111-1111-1111-1111-11111111"
        ],
        "permissions": [
            {
                "actions": [
                    "Microsoft.LabServices/labAccounts/read",
                    "Microsoft.LabServices/labAccounts/labs/environmentSettings/delete",
                    "Microsoft.LabServices/labAccounts/labs/write",
                    "Microsoft.LabServices/labAccounts/GetPricingAndAvailability/action",
                    "Microsoft.LabServices/labAccounts/GetRestrictionsAndUsage/action"
                ],
                "notActions": [],
                "dataActions": [],
                "notDataActions": []
            }
        ]
    }
}
Roles contain a name, description, assignable scopes, and a list of allowed or not allowed actions. Assignable scopes determine at what level a role can be assigned. This may be a management group (preview), entire subscriptions (as shown above) or a specific resource groups.
Our custom role lists five specific actions. Let’s go over why we need each action.
Action
|
Purpose
|
“Microsoft.LabServices/labAccounts/read”
|
Allows the Lab Liaison to see the labs under each lab account.
|
“Microsoft.LabServices/labAccounts/labs/environmentSettings/delete”
|
Allows the Lab Liaison to reset a VM for any VM in a lab.
|
“Microsoft.LabServices/labAccounts/labs/write”,
“Microsoft.LabServices/labAccounts/GetPricingAndAvailability/action”,
“Microsoft.LabServices/labAccounts/GetRestrictionsAndUsage/action”
|
These three actions are the minimum required set of actions for https://labs.azure.com to successfully load for a user.
|
You’ll notice that we only list specific allowed actions. The advantage to this approach is that we can assign this role once to a user at the subscription or resource group level and that will affect resources contained within the subscription or resource group. The Lab Liaison will have access see the VMs, reset the VMs in the Labs Portal and nothing else. Lab Liaison will not be able to inadvertently set a schedule or change lab settings that affect the cost or running a lab.
If you are creating a role that is less restrictive, consider using wildcard permissions in conjunction with the notAction section to exclude only specific permissions.
Deploying Custom Role
There are a few ways to create or add a custom role in Azure including using the Azure Portal, Azure CLI or PowerShell. We are going to use PowerShell today.
First, we to create a new custom role object.
$role = New-Object `
 -TypeName 'Microsoft.Azure.Commands.Resources.Models.Authorization.PSRoleDefinition'
$role.Id = $null
$role.Name = "Lab Liaison Role"
$role.Description = "Can view labs in Azure Lab portal and reset student VMs."
$role.IsCustom = $true
$role.Actions = @()
$role.AssignableScopes = @()
Next, let’s set the assignable scope to the current subscription. (Run Connect-AzAccount first, if not done already.) You can add more than one assignable scope if there are several management groups, subscriptions and/or resource groups that should have this role available.
$currentSubscriptionId = Get-AzContext `
 | Select-Object -expand Subscription `
 | Select-Object -expand Id
$role.AssignableScopes.Add("/subscriptions/$currentSubscriptionId")
Next, let’s add the specific actions we need for the Lab Liaison Role.
$roleAssignmentsToAdd = @(
"Microsoft.LabServices/*/read",
"Microsoft.LabServices/labAccounts/labs/environmentSettings/environments/delete",
"Microsoft.LabServices/labAccounts/labs/write",
"Microsoft.LabServices/labaccounts/getRestrictionsAndUsage/action",
"Microsoft.LabServices/labaccounts/getPricingAndAvailability/action"
)

$roleAssignmentsToAdd |
ForEach-Object {
    $role.Actions.Add($_)
}
Lastly, let’s add the newly created custom role to Azure.
New-AzRoleDefinition -Role $role
Go to Import-LabLiaisonRole.ps1 to see this script in its entirety. The full script also contains the ability to assign the role to several subscriptions at once, ability to update an existing role, and extra error checking.
Assigning a Custom Role
Yeah! Our custom role is now available for use. Now let’s assign the role to someone. Roles can be assigned to users, groups, and service principals.
For our example, we will assign a specific user, liaison@contoso.com, access at the resource group level. The user will be able to reset VMs under any lab under any lab account in that resource group. Role assignments require the
- Active Directory object id. This is the id of the user, group, or service principal
- Scope the assignment affects. For example if assignment is made at the resource group level, it will affect all resources in that group, including any lab accounts and labs in that resource group.
- Name of role definition. In our case, that’s ‘Lab Liaison’
We are going to assign the role to a user, so let’s find the id for the user first.
#Get AD object id for user.  Try both user principal name and email
$email = 'liaison@contoso.com'
$userAdObject = $null
$userAdObject = Get-AzADUser `
-UserPrincipalName $email.ToString().Trim() `
-ErrorAction SilentlyContinue
if (-not $userAdObject){
$userAdObject = Get-AzADUser `
   -Mail $email.ToString().Trim() `
   -ErrorAction SilentlyContinue
}
if (-not $userAdObject){
 	Write-Error "Couldn't find user '$email' in Azure AD."
}
Next, we need to get the id of the resource group, so we can set the scope of the role assignment.
$resourceGroupeId = Get-AzResourceGroup `
 -ResourceGroupName '{resource-group-name}' `
 | Select-Object -ExpandProperty ResourceId
Now we are all set to make the role assignment. Creating a role assignment with the same object id, definition name and scope will throw an error, so we’ll only create the role assignment if it doesn’t exist already.
$RoleDefinitionName = "Lab Services Liaison"
if (-not (Get-AzRoleAssignment `
 -ObjectId $userAdObject.Id `
 -RoleDefinitionName $RoleDefinitionName `
 -Scope $resourceGroupId `
 -ErrorAction SilentlyContinue)) {

New-AzRoleAssignment `
    -ObjectId $userAdObject.Id `
    -RoleDefinitionName $RoleDefinitionName
    -Scope $resourceGroupId
}
Role assignments can be made with the subscription, resource group, lab account and even specific lab as the scope. Just pass in the resource id for that resource to the scope argument. Consider using the Az.LabServices PowerShell module (preview) to make the task of getting resource id for lab accounts and labs easier.
Conclusion
You are all set! We’ve defined, imported, and assigned our Lab Liaison custom role. If you want to create a role with more permission, refer back to the Use Custom Role to Tailor Teachers’ Lab Management Permissions – Microsoft Tech Community blog post. It has a nice list of Lab Services permissions and their purpose.
We hope that you find this post helpful!
~Az Labs team
by Contributed | May 11, 2021 | Technology
This article is contributed. See the original author and article here.
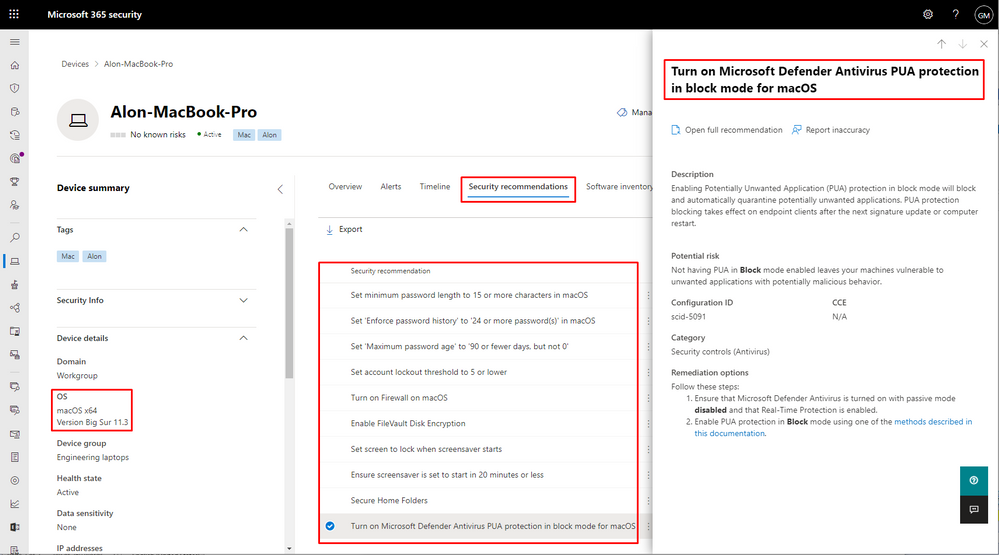
Effectively identifying, assessing, and remediating device misconfigurations that deviate from security best practices is pivotal in running a healthy security program, hardening your surface area, and reducing organizational risk. Microsoft’s Threat and Vulnerability Management capabilities already does this for Windows 10 and Windows Server devices today. However, when it comes to misconfiguration detection and remediation, covering additional operating systems is just as important.
Today, we’re excited to announce that we’re expanding our secure configuration assessment capabilities to cover macOS and Linux, in addition to existing support for Windows 10 and Windows Server devices. With this expansion, organizations can now discover, prioritize, and remediate over 30 known unsecure configurations in macOS and Linux to improve their organization’s security posture. We’ll be continuously expanding on the initial set of supported configuration assessments to provide more visibility into your security posture.
The secure configuration assessment feature in threat & vulnerability management is a key component of Microsoft Secure Score for Devices. When generally available, the newly introduced configuration assessments for macOS and Linux will also be surfaced in the all-up Microsoft Secure Score.
Want to know how many macOS devices have FileVault turned off, or how many Linux devices have real-time protection disabled? Go to Vulnerability management > Security recommendations in the Microsoft 365 security portal (security.microsoft.com). You can also open the device page for any of your macOS or Linux devices and select the ‘Security recommendations’ tab.
This new capability requires client version 101.23.64 and later.
Microsoft Defender for Endpoint team

by Contributed | May 11, 2021 | Technology
This article is contributed. See the original author and article here.
Azure Security Center uses assessments to determine, if a resource is flagged as healthy or unhealthy, or if a recommendation is not applicable to it. Azure Resource Graph and Azure Security Center’s REST APIs are two great starting points for automations around these assessments, however, without knowing when an assessment has been evaluated for the first time, or when a particular resource’s health state has recently changed, it is hard to determine how current the actual assessment result is. Well, I’m beyond excited to announce that the Azure Security Center product group got you covered as of now!
We recently added two new time indicator fields to both, Azure Resource Graph, and the microsoft.security/assessments REST API provider.
to help you be even more successful in creating automations around Cloud Security Posture Management (CSPM). The statusChangeDate field will indicate when a resource’s status has recently changed, for example from healthy to unhealthy, whereas the firstEvaluationDate field explains when a resource has been evaluated for the first time.
Time indicators fields in a REST response
Although it seems like only little information to be added to an assessment result, these two new fields enable a variety of new automations that will help you keep track of improving your organization’s security posture. For example, you can use that data in a custom workbook to show the average time it needs for your resource owners to remediate a particular security control or recommendation. Or think of an automation that sends you a regular list with the latest resources that have been created with open recommendations. Another idea would be an automation that helps you “penalize” your resource owners by sending a notification that tells them they have had open recommendations on their resources for a particular number of days so they are supposed to focus on closing the gaps.
With this article, I want to give you some help to start with using time indicators in your new automations.
Time indicators in Azure Resource Graph
As you might know, Azure Security Center leverages Azure Resource Graph (ARG) to publish information about unhealthy resources in the securityResources ARG table. The following KQL (Kusto Query Language) query
will show all assessments and their corresponding policy initiatives that have recently changed their assessment status to unhealthy:
securityresources
| where type =~ "microsoft.security/assessments"
| extend assessmentStatusCode = tostring(properties.status.code)
| where assessmentStatusCode =~ "unhealthy"
| extend firstEvaluationDate = todatetime(properties.status.firstEvaluationDate)
| extend statusChangeDate = todatetime(properties.status.statusChangeDate)
| where statusChangeDate > firstEvaluationDate
Time indicators within that context are stored in the properties.status.firstEvaluationDate and properties.status.statusChangeDate fields. The query above has also been published to our Azure Security Center Github repository where you can always find the latest version.
Time indicators in REST APIs
Besides using ARG, the microsoft.security/assessments API provider can be used to query the same information. The team is currently working on providing a new API version, however, in the meantime, you can already use the new fields with all existing API versions (2020-01-01 and 2019-01-01-preview) by adding an additional parameter to the GET request. The request will then look like this:
GET https://management.azure.com/subscriptions/{{subscriptionId}}/providers/Microsoft.Security/assessments?api-version=2020-01-01&$expand=statusEvaluationDates
where expand=statusEvaluationDates is the new parameter to be added. As a result, the two new fields are shown within the properties.status section of the reply, as shown in the picture below.
 Postman result when requesting information from the microsoft.security/assessments API provider
As always when it comes to automation, it’s all about fantasy and the imagination of what might be possible with new features. To give you a head start, I’ve already created a Logic App that will send a weekly report to list resources that have recently changed to unhealthy.
The Logic App runs on a recurrence trigger and leverages the following KQL query within the context of a REST API POST command to pull all resource IDs that have become unhealthy within the last 7 days.
securityresources
| where type =~ 'microsoft.security/assessments'
| extend assessmentStatusCode = tostring(properties.status.code)
| where assessmentStatusCode =~ 'unhealthy'
| extend statusChangeDate = todatetime(properties.status.statusChangeDate)
| extend resourceId = tostring(properties.resourceDetails.Id)
| extend displayName = tostring(properties.displayName)
| where statusChangeDate > todatetime(now(-7d))
| distinct resourceId, displayName
After that, doing some internal magic, the playbook will leverage two other KQL queries to determine if the unhealthy resource in question is a resource or resource container (such as a subscription), and will then compose a new html email body and send it to the address(es) that you determine when deploying the automation to your environment. The automation has been published to the Azure Security Center Github repository and can directly be deployed from there, using the provided ARM template.
Why using KQL in a Logic App?
Using a single http post request against the Azure Resource Graph REST API provider lets you retrieve a list of resources and pre-filter the output instead of pulling information for every resource using a separate REST GET call. Leveraging the KQL query means that with a single API request you will get all the information pre-filtered in a very quick way, preventing throttling issues and enhancing automation speed.
Now it’s your turn: go ahead, deploy the automation, play around with time indicators and let us know if the new fields are helpful for you and if you have other ideas of using these fields in other automation scenarios.
Happy testing and best regards,
Tom
by Contributed | May 11, 2021 | Technology
This article is contributed. See the original author and article here.
Our training and certification portfolio continues to evolve, and we invite you to discover the power of Microsoft technology to open new career possibilities. Here are the new learning paths and modules that we released last month on Microsoft Learn. Look for ways to build and deepen your skills, and then validate them by earning a Microsoft Certification. This month, we have a new learning path (with 12 modules) for Microsoft Power Platform solution architects. Check out our other new Microsoft Power Platform and Power Automate modules, plus a new Industry Solutions module. In addition, we’ve got new Dynamics 365 Fraud Protection, Project Operations, and Human Resources modules. Work through these and other modules at your own pace. Use free, online training on Microsoft Learn, to explore new skills to use on the job or to take your career in a new direction. If you need help figuring out which training to take, check out the Dynamics 365 learning paths page and the Microsoft Power Platform learning paths page, where you’ll find useful collections, learning paths to get you started, and popular modules. We’ve also added product-specific landing pages, listed at the end of this post.
We’re removing older, retired courses from the Dynamics Learning Portal on October 15, 2021, as a result of the significant reduction in the number of downloads of these e-learning courses. If you want to keep any of these courses for your own use, be sure to download them before that date.
The following learning paths and modules were released in April 2021.
Microsoft Power Platform
Power Automate
Industry Solutions
Project Operations
Fraud Protection
Human Resources
Product landing pages

Recent Comments