by Contributed | May 11, 2021 | Technology
This article is contributed. See the original author and article here.
Improved network performance over the Internet is essential for edge devices connecting to the cloud. Last mile performance impacts user perceived latencies and is an area of focus for our online services like M365, SharePoint, and Bing. Although the next generation transport QUIC is on the horizon, TCP is the dominant transport protocol today. Improvements made to TCP’s performance directly improve response times and download/upload speeds.
The Internet last mile and wide area networks (WAN) are characterized by high latency and a long tail of networks which suffer from packet loss and reordering. Higher latency, packet loss, jitter, and reordering, all impact TCP’s performance. Over the past few years, we have invested heavily in improving TCP WAN performance and engaged with the IETF standards community to help advance the state of the art. In this blog we will walk through our journey and show how we made big strides in improving performance between Windows Server 2016 and the upcoming Windows Server 2022.
Introduction
There are two important building blocks of TCP which govern its performance over the Internet: Congestion Control and Loss Recovery. The goal of congestion control is to determine the amount of data that can be safely injected into the network to maintain good performance and minimize congestion. Slow Start is the initial stage of congestion control where TCP ramps up its speed quickly until a congestion signal (packet loss, ECN, etc.) occurs. The steady state Congestion Avoidance stage follows Slow Start where different TCP congestion control algorithms use different approaches to adjust the amount of data in-flight.
Loss Recovery is the process to detect and recover from packet loss during transmission. TCP can infer that a segment is lost by looking at the ACK feedback from the receiver, and retransmit any segments inferred lost. When loss recovery fails, TCP uses retransmission timeout (RTO, usually 300ms in WAN scenarios) as the last resort to retransmit the lost segments. When the RTO timer fires, TCP returns to Slow Start from the first unacknowledged segment. This long wait period and the subsequent congestion response significantly impacts performance, so optimizing Loss Recovery algorithms enhances throughput and reduces latency.
Improving Slow Start: HyStart++
We determined that the traditional slow start algorithm is overshooting the optimum rate and likely to hit an RTO during slow start due to massive packet loss. We explored the use of an algorithm called HyStart to mitigate this problem. HyStart triggers an exit from Slow Start when the connection latency is observed to increase. However, we found that sometimes false positives cause a premature exit from slow start, limiting performance. We developed a variant of HyStart to mitigate premature Slow Start exit in networks with delay jitter: when HyStart is triggered, rather than going to the Congestion Avoidance stage we use LSS (Limited Slow Start), an increase algorithm that is less aggressive than Slow Start but more aggressive than e have published our ongoing work on the HyStart algorithm as an IETF draft adopted by the TCPM working group: HyStart++: Modified Slow Start for TCP (ietf.org).
Loss recovery performance: Proportional Rate Reduction
HyStart helps prevent the overshoot problem so that we enter loss recovery in Slow Start with fewer packet losses. However, if we retransmit in large bursts. Proportional Rate Reduction (PRR) is a loss recovery algorithm which accurately adjusts the number of bytes in flight throughout the entire loss recovery period such that at the end of recovery it will be as close as possible to the congestion window. We enabled PRR by default in Windows 10 May 2019 Update (19H1).
Re-implementing TCP RACK: Time-based loss recovery
After implementing PRR and HyStart, we still noticed that we tend to consistently hit an RTO during loss recovery if many packets are lost in one congestion window. After looking at the traces, we figured out that it’s lost retransmits that cause TCP to time out. The RACK implementation shipped in Server 2016 is unable to recover lost retransmits. A fully RFC-compliant RACK implementation (which can recover lost retransmits) requires per-segment state tracking but in Server 2016, per-segment state is not stored.
In Server 2016, we built a simple circular-array based data structure to track the send time of blocks of data in one congestion window. The RACK implementation we had with this data structure has many limitations, including being unable to recover lost retransmits. During the development of Windows 10 May 2020 Update, we built per-segment state tracking for TCP and in Server 2022, we shipped a new RACK implementation which can recover lost retransmits.
(Note that Tail Loss Probe (TLP) which is part of RACK/TLP RFC and helps recover faster from tail losses is also implemented and enabled by default since Windows Server 2016.)
Improving resilience to network reordering
Last year, Dropbox and Samsung reported to us that Windows TCP had poor upload performance in their networks due to network reordering. We bumped up the priority of reordering resilience in the Windows version currently under development, we have completed our RACK implementation which is now fully compliant with the RFC. Dropbox and Samsung confirmed that they no longer observed upload performance problems with this new implementation. You can find how we collaborated with the Dropbox engineers here. In our automated WAN performance tests, we also found that the throughput in reordering test cases improved more than 10x.
Benchmarks
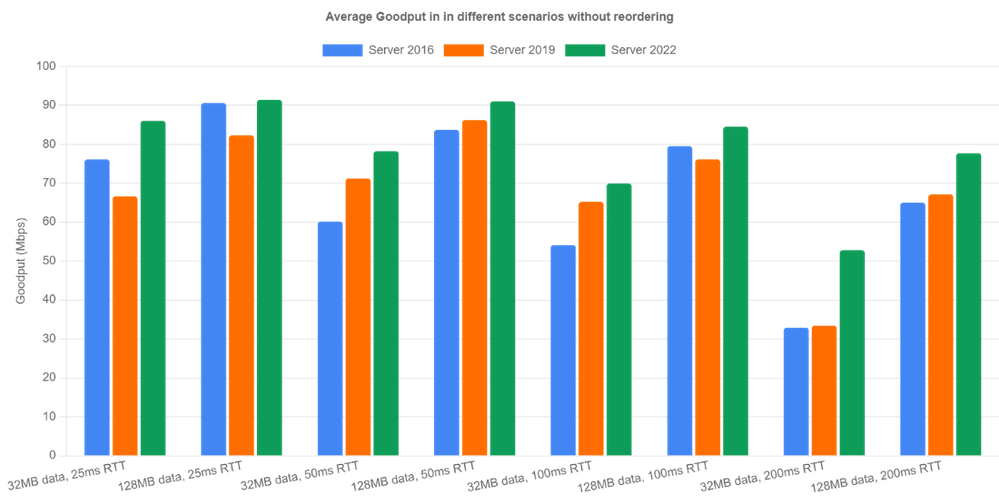
To measure the performance improvements, we set up a WAN environment by creating two NICs on a machine and connecting the two NICs with an emulated link where bandwidth, round trip time, random loss, reordering and jitter can be emulated. We did performance benchmarks on this testbed for Server 2016, Server 2019 and Server 2022 using an A/B testing framework we previously built where you can easily automate testing and data analysis. We used the current Windows build 21359 for Server 2022 in the benchmarks since we plan to backport all TCP perf improvement changes to Server 2022 soon.
Let’s look at non-reordering scenarios first. We emulated 100Mbps bandwidth and tested the three OS versions under four different round trip times (25ms, 50ms, 100ms, 200ms) and two different flow sizes (32MB, 128MB). The bottleneck buffer size was set to 1 BDP. The results are averaged over 10 iterations.
Server 2022 is the clear winner in all categories because RACK significantly reduces RTOs occurring during loss recovery. Goodput is improved by up to 60% (200ms case). Server 2019 did well in relatively high latency cases (>= 50ms). However, for 25ms RTT, Server 2016 outperformed Server 2019. After digging into the traces, we noticed that the Server 2016 receive window tuning algorithm is more conservative than the one in Server 2019 and it happened to throttle the sender, indirectly preventing the overshoot problem.
Now let’s look at reordering scenarios. Here’s how we emulate network reordering: we set a probability of reordering per packet. Once a packet is chosen to be reordered, it’s delayed by a specified amount of time instead of the configured RTT. We tested 1% reordering rate and 5ms reordering delay. Server 2016 and Server 2019 achieved extremely low goodput due to lack of reordering resilience. In Server 2022, the new RACK implementation avoided most unnecessary loss recoveries and achieved reasonable performance. We can see goodput is up over 40x in the 128MB with 200ms RTT case. In the other cases, we are seeing at least 5x goodput improvement.

Next Steps
We have come a long way in improving Windows TCP performance on the Internet. However, there are still several issues that we will need to solve in future releases.
- We are unable to measure specific performance improvements from PRR in the A/B tests. This needs more investigation.
- We have found issues with HyStart++ in networks with jitter. So we are working on making the algorithm more resilient to jitter.
- The reassembly queue limit (the max number of discontiguous data blocks allowed in receive queue), turns out to be another factor that affects our WAN performance. After this limit is reached, the receiver discards any subsequent out of order data segments until in-order data fills the gaps. When these segments are discarded, the receiver can only send back SACKs not carrying new information and make the sender stall.
— Windows TCP Dev Team (Matt Olson, Praveen Balasubramanian, Yi Huang)
by Contributed | May 11, 2021 | Technology
This article is contributed. See the original author and article here.
Today we’re announcing the general availability (GA) of Azure Service Fabric managed clusters. Azure Service Fabric managed clusters remove the complexity associated with owning and operating Service Fabric clusters by simplifying deployment and management operations.
Azure customers use Service Fabric to manage both stateless and stateful microservices at scale. While our customers love the reliability, scalability, and richness of Service Fabric’s features, they have asked us to simplify the cluster deployment experience. Our customers have also requested simpler Service Fabric certificate management and scaling operations to facilitate deployments, testing, and scaling of their Service Fabric environment.
Service Fabric managed clusters provide a simplified ARM resource model for easier deployments. This resource model eliminates the need to define individual resources such as Virtual Machines (VMs), storage, or Virtual Networks that make up the cluster. Service Fabric managed clusters also eliminate the need for cluster certificate management by providing certificates that are fully managed by Azure. This ensures that customers don’t run into incidents caused by expired cluster certificates. With Service Fabric managed clusters, operations like removing a node type that previously required multiple steps, can now be completed in a single step. In addition, Service Fabric managed clusters provide full support for Service Fabric’s features. All these improvements together allow our customers to focus on their applications instead of infrastructure management.
“We recently started using Service Fabric and given our scale, we were concerned about the operational overhead of setting up our environments. We onboarded to Service Fabric managed clusters and were pleasantly surprised by the ease of deployment. It was a lot easier to read the simplified ARM template, add extensions, and deploy the cluster.” – Azure Usage Billing
“We operate multiple Service Fabric clusters. Rotating cluster certificates was a time-consuming yearly activity that took time away from application development. We were really excited to learn about the fully managed certificates enabled via Service Fabric managed clusters. Our operations team is elated that we no longer worry about an expired certificate bringing our environment down!” – Azure WAN
“Removing node types from a Service Fabric cluster required lots of steps, and time, which made it difficult to plan for our scaling needs. Service Fabric managed clusters make it really easy to add and remove node types with a single operation enabling us to scale on demand!” – Azure SQL Telemetry
Get started with Azure Service Fabric managed clusters
You can use Quickstart templates to get started with Service Fabric managed clusters or see the Azure Service Fabric managed clusters documentation to learn more. Additionally, you can learn more about all the new features in the release notes and submit feedback on the Service Fabric GitHub repository.
by Contributed | May 11, 2021 | Technology
This article is contributed. See the original author and article here.
As we prepare to ship version 1.0 of Windows Package Manager, we wanted to provide guidance on how to manage Windows Package Manager using Group Policy.
We first announced the existence of Windows Package Manager at Microsoft Build in 2020. Designed to save you time and frustration, Windows Package Manager is a set of software tools that help automate the process of getting packages (applications) on Windows devices. Users can specify which apps they want installed and the Windows Package Manager does the work of finding the latest version (or the exact version specified) of that application and installing it on the user’s Windows 10 device.
Announcing Group Policy for Windows Package Manager
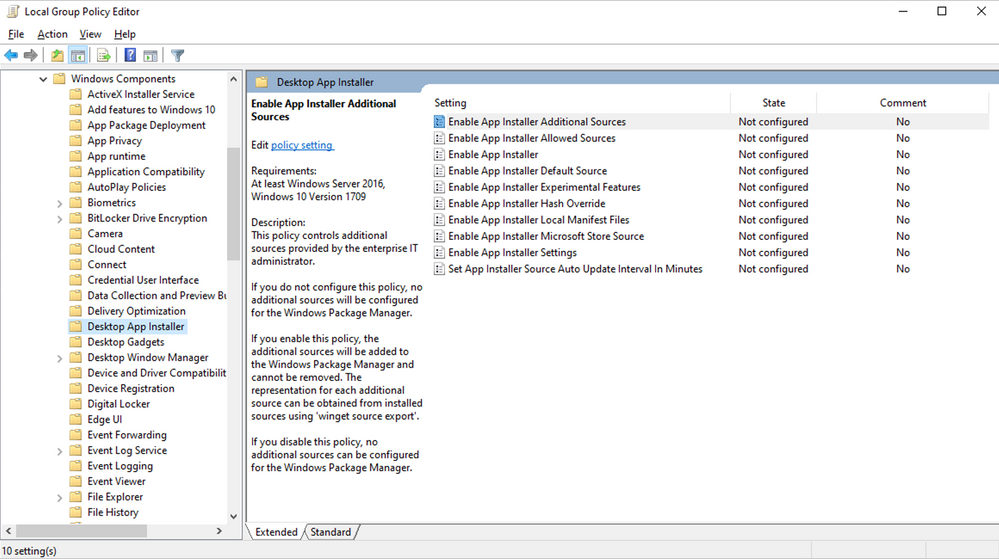
When we released the Windows Package Manager v0.3.1102 preview, we provided an initial set of “Desktop App Installer Policies” Group Policy Administrative Template files (ADMX/ADML)—making it easy for you review and configure Group Policy Objects targeting your domain-joined devices. To download these ADMX files today, visit the Microsoft Download Center.
Not only to these new policies empower you to enable Windows Package Manager, they enable you to control certain commands and arguments, and configure the sources to which your devices connect.
The new Desktop App Installer policies are accessible via the Local Group Policy Editor in Windows 10 as shown here:
Group Policy settings
Any policies that have been enabled or configured will be shown when a user executes winget –info. The goal is to assist users in troubleshooting unexpected behaviors they may encounter in the Windows Package Manager because of any policies that are enabled or configured. For example, a user may attempt to modify a setting controlled by policy and not be able to understand why the device does not appear to honor their setting.
Before we proceed further, let’s clarify two basic terms used with respect to Windows Package Manager:
- A package represents an app, application, or program.
- A manifest is a file (or set of data) containing meta-data providing descriptive elements for a package as well as the location of the installer, and the installers SHA256 hash. The Windows Package Manager obtains manifests from sources such as the default source available for the community repository. Additional sources may be a REST API-based service provided by an enterprise or other party. It is also possible to use a manifest from a path available locally on the machine.
Enable App Installer
This policy controls whether Windows Package Manager can be used by users. Users will still be able to execute the winget command. The default help will be displayed, and users will still be able to execute winget -? to display the help as well. Any other command will result in the user being informed the operation is disabled by Group Policy.
If you enable or do not configure this setting, users will be able to use the Windows Package Manager.
If you disable this setting, users will not be able to use the Windows Package Manager.
Enable App Installer settings
This policy controls whether users can change their settings. The settings are stored inside of a .json file on the user’s system. It may be possible for users to gain access to the file using elevated credentials. This will not override any policy settings that have been configured by this policy.
If you enable or do not configure this setting, users will be able to change settings for Windows Package Manager.
If you disable this setting, users will not be able to change settings for Windows Package Manager.
Enable App Installer Hash Override
This policy controls whether Windows Package Manager can be configured to enable the ability to override SHA256 security validation in settings. Windows Package Manager compares the installer after it has downloaded with the hash provided in the manifest.
If you enable or do not configure this setting, users will be able to enable the ability to override SHA256 security validation in Windows Package Manager settings.
If you disable this setting, users will not be able to enable the ability to override SHA256 security validation in Windows Package Manager settings.
Enable App Installer Experimental Features
This policy controls whether users can enable experimental features in Windows Package Manager. Experimental features are used during Windows Package Manager development cycle to provide previews for new behaviors. Some of these experimental features may be implemented prior to the Group Policy settings designed to control their behavior.
If you enable or do not configure this setting, users will be able to enable experimental features for Windows Package Manager.
If you disable this setting, users will not be able to enable experimental features for Windows Package Manager.
Enable App Installer Local Manifest Files
This policy controls whether users can install packages with local manifest files. If a user has a manifest available via their local file system rather than a Windows Package Manager source, they may install packages using winget install -m <path to manifest>.
If you enable or do not configure this setting, users will be able to install packages with local manifests using Windows Package Manager.
If you disable this setting, users will not be able to install packages with local manifests using Windows Package Manager.
Set App Installer Source Auto Update Interval in Minutes
This policy controls the auto-update interval for package-based sources. The default source for Windows Package Manager is configured such that an index of the packages is cached on the local machine. The index is downloaded when a user invokes a command, and the interval has passed (the index is not updated in the background). This setting has no impact on REST-based sources.
If you disable or do not configure this setting, the default interval or the value specified in settings will be used by Windows Package Manager.
If you enable this setting, the number of minutes specified will be used by Windows Package Manager.
Enable App Installer Default Source
This policy controls the default source included with Windows Package Manager. The default source for Windows Package Manager is an open-source repository of packages located at https://github.com/microsoft/winget-pkgs.
If you enable or do not configure this setting, the default source for Windows Package Manager will be available and can be removed.
If you disable this setting, the default source for Windows Package Manager will not be available.
Enable App Installer Microsoft Store Source
This policy controls the Microsoft Store as a source included with Windows Package Manager.
If you enable or do not configure this setting, the Microsoft Store source for Windows Package manager will be available and can be removed.
If you disable this setting, the Microsoft Store source for Windows Package Manager will not be available.
Enable App Installer Additional Sources
This policy controls additional sources configured for Windows Package Manager.
If you do not configure this setting, no additional sources will be configured for Windows Package Manager.
If you enable this setting, additional sources will be added to Windows Package Manager and cannot be removed. The representation for each additional source can be obtained from installed sources using winget source export.
If you disable this setting, no additional sources can be configured by the user for Windows Package Manager.
Enable Windows Package Manager Allowed Sources
This policy controls additional sources approved for users to configure using Windows Package Manager.
If you do not configure this setting, users will be able to add or remove additional sources other than those configured by policy.
If you enable this setting, only the sources specified can be added or removed from Windows Package Manager. The representation for each allowed source can be obtained from installed sources using winget source export.
If you disable this setting, no additional sources can be configured by the user for Windows Package Manager.
When will Windows Package Manager be available?
Version 1.0 of Windows Package Manager will soon ship as an automatic update via the Microsoft Store for all devices running Windows 10, version 1809 and later and we look forward to hearing your feedback. For more information on Windows Package Manager, please see the following resources:
Continue the conversation. Find best practices. Visit the Windows Tech Community.
Stay informed. For the latest updates on new releases, tools, and resources, stay tuned to this blog and follow us @MSWindowsITPro on Twitter.
by Contributed | May 11, 2021 | Technology
This article is contributed. See the original author and article here.
During 2016, Microsoft introduced a new product that allowed organizations to implement a sensitivity label taxonomy and empower information workers to leverage these and apply them to documents or emails as part of daily work. This product is known as “Azure Information Protection (AIP)” and uses a client application for the Windows platform which deployed an add-in within Office apps including introducing a new “Sensitivity” button that can be used by information workers to flag documents and emails according to their sensitivity.
Since then, Microsoft’s information protection platform has evolved, implemented across all common platforms (MacOS, iOS, Android, Web) and the Azure Information Protection Client with rich capabilities across Microsoft 365 and is now under the wide umbrella of Microsoft Information Protection offering.
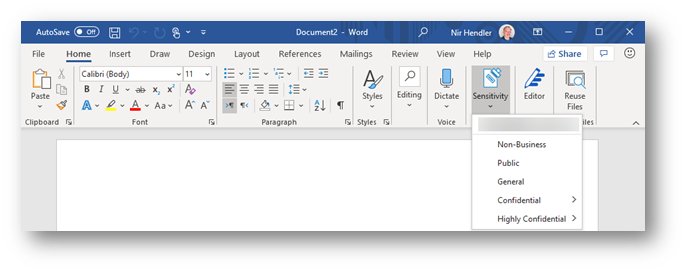
The main change as part of the transition to Microsoft Information Protection is that sensitivity labels are available across all common platforms and do not require an add-in or additional implementation, they are just part of the service offering. If you are using Microsoft 365 apps for Enterprise (formerly known as Office 365 Professional Plus) and you deployed sensitivity labels within your organization, no additional deployment stage is required. The same “Sensitivity” button is now exposed within the application ribbon. This integration is applicable consistently to all supported platforms. Moving forward, this integrated capability is to be known as “Built-in sensitivity labeling.”
Fig. 1: Built-in labeling within Microsoft 365 apps for Enterprise
Benefits to moving from client-based labeling to built-in labeling.
Using built-in labeling is seamless and does not require any management overhead in addition to cloud-based policy configuration. As part of your existing Microsoft 365 apps deployment, the bits are already available for every information worker without the need for installing additional components. The important aspects to consider are:
- No need to test, deploy and update another application or add-in within your endpoints. You leverage the deployment stage as part of ongoing or existing Microsoft 365 app project.
- Microsoft 365 apps will work with improved performance since no add-in needs to be loaded and all labeling functionality runs inside the application itself.
- Updates are being pushed as part of Microsoft 365 apps releases.
- Seamless experience across all Microsoft 365 platforms.
This is in line with other initiatives at Microsoft to provide built-in functionality that reduces or eliminates the need to deploy and maintain add-ins and plugins for other security and compliance-related functionality, which can potentially reduce an IT department’s challenges while providing a better user experience with more performance and stability to end users across workloads.
So, what is the Azure Information Protection Client, and should I continue to use it (or consider deploying it)?
Azure Information Protection Client (or Unified Labeling Client) is an application package for the Windows platform that include 4 components:
- Azure Information Protection add-in for Microsoft 365 apps
- Classify and protect (Ability to apply and consume labels outside Microsoft 365 apps) via a File Explorer extension
- Azure Information Protection viewer (to consume Non-Microsoft protected documents)
- Azure Information Protection PowerShell cmdlets to apply and consume labels.
Using built-in labeling replaces the first item in the list which is the Azure Information Protection add-in. Other components (described in number two, three, and four) can still be deployed without any dependency on the add-in portion of Azure Information Protection.
If you are using the Azure Information Protection add-in today and wish to use built-in sensitivity labeling instead to gain the benefits described above, then you can disable the add-in, uninstall the complete client, or control the behavior with a group policy. You have the choice to select the best approach which fits your business use cases and needs.
If you are NOT using the Azure Information Protection add-in today and looking to implement sensitivity labels across your organization, we recommend starting directly with built-in sensitivity labeling and deploy Azure Information Protection Client components (items described in number two, three, and four) if desired, but without enabling the AIP plugin for Office apps.
 Fig. 2: Built-in labeling within Microsoft 365 apps highlight the sensitive information identifies within a Word document.
Where is built-in labeling available today?
Built-in labeling is already available and in use as part of your deployment of sensitivity labels in MacOS, iOS, Android, and web apps. If you deployed your sensitivity labels policies then these are already enabled and deployed (Web apps integration need to be enabled separately as documented). The main requirement here is to ensure that you are using the right Microsoft 365 apps for Windows that support this capability.
Built-in labeling in Microsoft 365 apps for Windows is available in all updated releases with versions newer than 1910+. (How to check your version of Microsoft 365 apps). If you are using an up to date version, no matter if you use Current Channel or Semi-Annual Channel, the capability is there and operational.
We do recommend ensuring your organization Microsoft 365 apps update channel is set to Current Channel or Monthly-Enterprise channel. These channels get the latest and greatest features in a shorter time frame. If your organization is using the Semi-Annual channel, then updates are deferred for a later period. Read more about Microsoft 365 Apps update channels here.
Deployment method
Once you have ensured you are using a version of Microsoft 365 apps that is released after 1910 in your organization, all you need to do is to implement your labeling taxonomy in the Microsoft 365 Compliance portal and publish your labels. You can use the official documentation to understand more on the backend configurations that need to be done.
If you do want to use Azure Information Protection client capabilities side by side with built-in labeling (referring to PowerShell module, Classify & Protect app and, AIP Viewer), you can download and deploy the Azure Information Protection unified labeling client (available to be downloaded from this link). Then configure a Group Policy to ensure that built-in labeling will always override and disable the Azure Information Protection add-in component. Read more about how to configure the group policy here. With this deployment approach you can enjoy both from the benefits of using built-in labeling and additional components.
Feature parity
Azure Information Protection Client and built-in labeling for Microsoft 365 apps do not have feature parity today. As we move forward, built-in labeling will add more capabilities which are currently available in the Azure Information Protection client. It is important to understand that the key features available, which include:
Feature marked as :star: are exclusive to built-in labeling with Microsoft 365 apps.
Read more about the feature comparison between Azure Information Protection Client and built-in labeling for Microsoft 365 apps here.
In addition, see complete roadmap and timelines for additional features within built-in labeling for Microsoft 365 apps here.
Additional considerations
In perpetual versions of Microsoft 365 apps (Office 2013, 2016, 2019) built-in labeling is not included, so if you are using one of these versions you will need to use the Azure Information Protection client and add-in for Office instead.
Do note that using built-in labeling does require sensitivity labels to be configured and published in the M365 Compliance portal (or Office 365 Security and Compliance portal). If your sensitivity labels are deployed as part of the Classic platform in Azure, please ensure you are migrating to unified sensitivity labels as documented here.
Additional resources:
by Contributed | May 11, 2021 | Technology
This article is contributed. See the original author and article here.
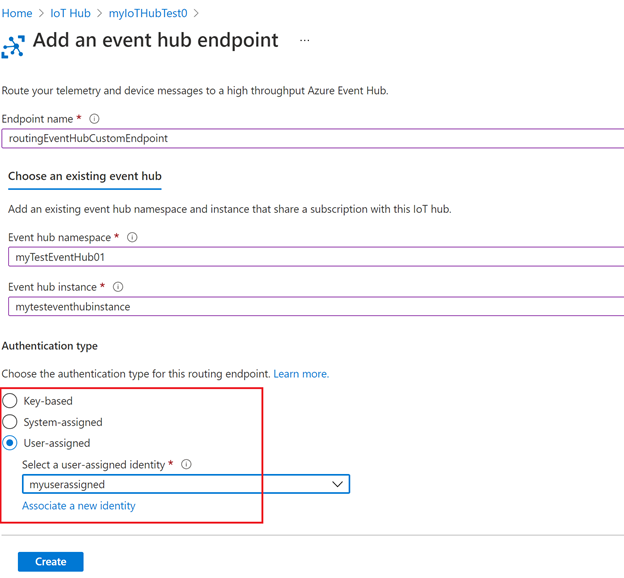
Azure support for user-assigned managed identity is now generally available! With today’s release, you can now use the user-assigned managed identity to connect your hubs to resources that support Azure Active Directory (Azure AD) authentication.
There are two different types of managed identities: system-assigned and user-assigned managed identity. In IoT Hub, managed identities can be used for egress connectivity from IoT Hub to Azure blob storage, event hub and service bus resources for message routing, file upload, and bulk device import/export. IoT Hub has the existing support for the system-assigned managed identity, and now we are adding support for user-assigned managed identity as well.
- User-assigned managed identity. It is created as a standalone resource and can be shared across Azure resources and instances. For example, if there are multiple IoT Hubs that require the same access permissions to a storage account, you can create a single user-assigned managed identity, use the RBAC role assignment to control the identity’s access and add this identity to multiple IoT Hubs. In this way, you no longer need to manage multiple identities for different IoT Hubs. In addition, user-assigned managed identity has its own independent life cycle. If one of your IoT Hubs is recycled, the identity remains unchanged and permissions stay consistent.
- System-assigned managed identity. Unlike user-assigned managed identity, system-assigned managed identity is tied to your IoT Hub instance. Therefore, the system-assigned managed identity cannot be shared across different hubs, and it has a shared lifecycle with the associated hub instance. System-assigned can be used when your hub requires an independent identity.
Both system-assigned and user-assigned managed identity come with the common benefits of using the managed identities:
- You don’t need to manage secret keys.
- You can use managed identities to authenticate to any resource that supports Azure Active Directory (Azure AD) authentication.
- Managed identities can be used without additional charge.
With the support for both system-assigned and user-assigned managed identity in IoT Hub, you’re able to select different types based on your scenarios and requirements.
Getting started
To get started, create a user-assigned managed identity as a standalone resource and add the identity to your IoT Hub. Instructions and samples are published on our documentation page IoT Hub support for managed identities.

Recent Comments