This article is contributed. See the original author and article here.
Have you discovered that the existing Power Automate actions for Excel are limited to Excel Tables? Are you looking to take your cloud flow interactions with Excel to the next level? Maybe it’s time to start looking at Excel Scripts which are currently accessible to Power Automate as a Preview Feature.
What are Excel Scripts? Using either the built in recording tool or TypeScript programming language you can create a script to update cells, rows or ranges of data or indeed insert formulas into cells. You can even use Excel to perform some of the features missing to Power Automate like sorting an array.
I have prepared a two part video series demo’ing how you can use Power Automate and Excel Scripts to both send data to a plain excel file and populate cells, rows and ranges but also in return, again using Excel Scripts, how you can create a table in an Excel file and return the available data either as a results array for your next action in your Cloud Flow OR by using the list all rows action based on the newly created table.
First Video on Populating Excel from Cloud Flows is available here:
The below Cloud Flow is relatively straight forward for this first part demo. We have an array of Rows for our Excel Worksheet and this demonstrates one of many ways to pass data to Excel via the Script Action. The real benefit of creating a bespoke function in Excel Scripts is that the Script Action is dynamic. It will return the fields you have defined in the action window and ensure the datatype provided is correct, i.e. string or number.
In the sample Typescript Excel Script built below, you can try this for yourself. The script will populate unique cells, columns and rows with data based on the 4 variable types defined, examplevar1-4 as strings, numbers, multivariables and arrays.
function main(workbook: ExcelScript.Workbook,

  examplevar1: string,
  examplevar2: number,
  examplevar3: multivariable, //Header of Table
  examplevar4: arrayvar[] //Multiple rows in Table

) {

  let selectedSheet = workbook.getActiveWorksheet();

  // Set cells A1,B2,C3,D4 on selectedSheet
  selectedSheet.getRange("A1").setValue(examplevar1);
  selectedSheet.getRange("B2").setValue(examplevar2);
  selectedSheet.getRange("C3").setValue(examplevar1 + ' ' + examplevar2);
  selectedSheet.getRange("D4").setValue(examplevar2 + 1111);

  //An example function to reverse the strings
  function reverseString(str: string) {
    return str.split("").reverse().join("");
  }

  //Create Vertical Header Row with Multi Variables
  const formattedColumn = [
    [reverseString(examplevar3.multivar3var1)],
    [reverseString(examplevar3.multivar3var2)],
    [reverseString(examplevar3.multivar3var3)],
    [reverseString(examplevar3.multivar3var4)],
    [reverseString(examplevar3.multivar3var5)],
    [reverseString(examplevar3.multivar3var6)]];

  selectedSheet.getRange("F1:F6").setValues(formattedColumn);

  //Create Horizontal Header Row with Multi Variables
  const formattedHeader = [[examplevar3.multivar3var1, examplevar3.multivar3var2, examplevar3.multivar3var3, examplevar3.multivar3var4, examplevar3.multivar3var5, examplevar3.multivar3var6]];

  selectedSheet.getRange("A8:F8").setValues(formattedHeader);

  //Populate rows below Header Row with Array Variable
  const starterrow = 9; //starting row for "table" data

  for (let i = 0; i < examplevar4.length; i++) {
    const currentObject = examplevar4[i];

    const formattedrow = [[currentObject.arr4var1, currentObject.arr4var2, currentObject.arr4var3, currentObject.arr4var4, currentObject.arr4var5, currentObject.arr4var6,]];

    const rowRange = `A${starterrow + i}:F${starterrow + i}`;
    selectedSheet.getRange(rowRange).setValues(formattedrow);
  }

  //Return a response to the Cloud Flow
  return "DamoBird365 Loaded " + examplevar4.length + " Records Loaded into Excel and Demo Completed OK"
}

//Defining Interfaces for MultiVar and Array

interface multivariable {
  multivar3var1: string,
  multivar3var2: string,
  multivar3var3: string,
  multivar3var4: string,
  multivar3var5: string,
  multivar3var6: string
}

interface arrayvar {
  arr4var1: number,
  arr4var2: string,
  arr4var3: string,
  arr4var4: string,
  arr4var5: string,
  arr4var6: string
}
Second video on retrieving data back from Excel files without a table. Identify the active cells, define and create a table via the script and return the data to your cloud flow as either a result to the script action or via the traditional list rows actions.
The Cloud flow on this occasion does not require any data input as its purpose is to return data back to the flow. Whilst the data could be fully repurposed in Excel, as a Power Automate enthusiast, I have used a select action to reformat the Array and rename the keys. Both the Select Action and the List Rows Action demonstrate the two methods for retrieving data from Excel where no table was present previously.
Again, in the sample Typescript Excel Script built below, you can quickly test out the functionality of creating a table and returning data to your cloud flow. The code is commented to help you understand how the solution is built. Please note I am not a coder but with the available resources online, I was quickly able to understand how to put this together. The recording tool is also useful for getting an understanding of some of the functions available.
function main(workbook: ExcelScript.Workbook) {

  // Get the first worksheet
  const selectedSheet = workbook.getFirstWorksheet();

  //get active range of WorkSheet
  let range = workbook.getActiveWorksheet().getUsedRange();

  // Get last used row of WorkSheet
  let lastrow = range.getRowCount();

  // Find first reference of ID in selectedSheet i.e. header row
  let IDCell = selectedSheet.getRange("A1").find("ID", { completeMatch: true, matchCase: true, searchDirection: ExcelScript.SearchDirection.forward });

  // Get the current active cell in the workbook.
  //and format current cell without Sheet1! reference
  let activeCell = IDCell.getAddress().replace("Sheet1!", "");

  //get table range
  const TableRange = `${activeCell}:F${lastrow}`;

  // Create a table using the data range.
  let newTable = workbook.addTable(selectedSheet.getRange(TableRange), true);
  newTable.setName("NewTableInExcel");

  // Get the first (and only) table in the worksheet.
  let table = selectedSheet.getTables()[0];

  // Get the data from the table.
  let tableValues = table.getRange().getValues();

  //Return a response to the Cloud Flow
  return tableValues

}
Where do you find Excel Scripts Functionality? It’s an Excel Online feature. Load up Excel and click on the Automate Tab. Here you can view all scripts, record some actions and edit new or existing scripts that have been built.
Wondering where they live? Jump onto OneDrive and take a look at Documents/Office Scripts where you can export/import and share.
Want to see a proof of concept ? Take a look at my Invoicing Demo here where I show you how you could autocompete an excel invoice template using scripts. I recently covered this in a live demo with the Monthly (12th May) Microsoft Office Scripts Dev Team and included a bonus feature, converting the excel files to PDF using the same flow without premium actions. Look out for this video on here soon.
Please let me know if you found this useful and what you might use Excel Scripts for next.
This article is contributed. See the original author and article here.
Hi, Jonas here!
Or as we say in the north of Germany: “Moin Moin!” I am a Senior Customer Engineer based in Germany and over the years I created several configuration items I use as part of a Microsoft Endpoint Configuration Manager (MECM / ConfigMgr) baseline to detect configuration changes in the environment.
In this blog post I will describe each config item and how you can benefit from them to detect changes before significant issues arise.
TL;DR
If you are just looking for the download link for the ConfigMgr baseline and items, here you go: LINK
If you are familiar with configuration items and baselines you might want to skip the next section and start with “Why use a baseline for site systems?”.
ConfigMgr configuration items and baselines are around for a while and most customers use them to detect and or remediate issues on ConfigMgr clients.
If you are not familiar with the concept of a configuration item and baseline, let me give you a brief introduction.
A configuration item will test a certain state, either by checking the existence of a file, folder, registry entry or registry value for example (not a complete list of options).
A configuration item can also contain a custom script to test more complex states which extends the functionality of the default tests.
In addition each item can contain a remediation step to revert a state back to a desired state. Setting a registry value to 1 in case a test detected a 0 for example.
It can also contain a detection method to only run the test if a certain condition has met. Like a condition for the existence of a specific service for example.
Each configuration item needs to be part of a baseline which can be deployed to a collection and then evaluated on ConfigMgr clients.
The test results / compliance state will be sent back to the ConfigMgr site and the results can either be seen in the console or via different reports.
If you want to know more you will find the documentation here: LINK
Why use a baseline for site systems?
There are good reasons to use a baseline for all the changes you do to your ConfigMgr site systems:
Each configuration item could be seen as a documentation entry
Newly added servers will be tested and any missing changes will be visible via the baseline
Any configuration drifts can be detected before they result in bigger issues
Some default settings might get reset after a ConfigMgr upgrade and a configuration item can help to detect such changes
Rule of thumb:
Whenever you configure something outside the ConfigMgr console create a configuration item for the reasons above.
How to import
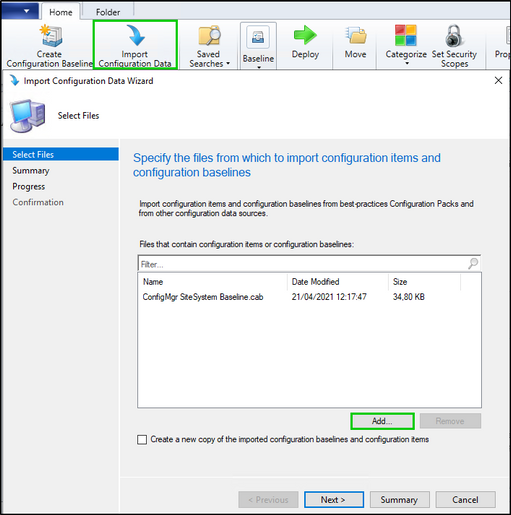
Either download the baseline and the items from the GitHub repository or clone the repository or use the ConfigMgr Community hub to import the items. Imported from the Community hub the baseline and items can be used directly. When downloaded from Github first unpack the files and use the ConfigMgr console to import the cab file.
Open the ConfigMgr console and navigate to: “Assets and Compliance”, “Compliance Settings” and ”Configuration Baselines”.
Click on “Import Configuration Data” and add the cab file. Accept the publisher message and follow the wizard to import the baseline and items.
Prerequisites to use the baseline and items
There are three prerequisites to use the described configuration items.
First:
Compliance settings needs to be enabled via a client setting by setting “Enable compliance evaluation on clients” to “Yes“
Second:
PowerShell scripts should be able to run without signing except you want to sign each script of each item yourself. In that case you can leave the setting in its default state: “All Signed” otherwise it needs to be set to “Bypass”.
Third:
Whenever you add one of the configuration items described below to a configuration baseline make sure to set the “Purpose” to the value “Optional”.
That setting ensures the correct reporting of the detection part of each item.
(See section Detection of each item for more details)
List of configuration items
In this section I describe a list of items I often use.
Each item has a detection script and will only run tests on systems where a test makes sense or where a certain test is possible at all. Each item has a “Detection” section with more details about the detection logic.
The detection logic means you can simply deploy a baseline with all items to all ConfigMgr servers and the detection makes sure each test runs only on the right systems.
Adjust each item as needed for your environment and as described in the “Customizations” sections of each item description.
Item1: CI-Validate-HINV-MaxMIFSize
This item is one of the simpler ones and makes use of the default test for registry values to test the “Max MIF Size” for hardware inventory (HINV) files. If the HINV file exceeds 5MB the file cannot be imported by default. If the setting has been changed to support bigger file sizes use the item to make sure it stays that way.
Item1: Detection:
The item will only run its test if the registry path exists.
Item1: Remediation:
The item can also remediate the setting if desired.
Item1: Customizations:
Change the “Compliance Rule” to the value you use in your environment.
Item2: CI-Validate-SINV-MaxFileSize
This item does the same as: “CI-Validate-HINV-MaxMIFSize” but for Software Inventory files. Detection, remediation and customizations are also identical but specific to Software Inventory.
Item3: CI-Validate-SINV-ExceedSizeLimit
This item will compare each file size of files in folder: “inboxesauthsinv.boxbad” with the maximum allowed file size set here: “HKLM:SOFTWAREMicrosoftSMSCOMPONENTSSMS_SOFTWARE_INVENTORY_PROCESSOR” – “Max File Size”.
In case the item detects any large files there are three options to reduce the file size:
Try to reduce the number of folders to be scanned by Software Inventory
Exclude specific folders via the Skpswi.dat file. More details can be found here: LINK
Or increase the max file size value (should be the last option)
Item3: Detection:
The item will only run its test if the registry path exists.
Item3: Remediation:
The item can also remediate the setting if desired.
Item3: Customizations:
No customizations required.
Item4: CI-Validate-HINV-ExceedSizeLimit
This item does the same as: “CI-Validate-HINV-ExceedSizeLimit” but for Hardware Inventory files. Detection, remediation and customizations are also identical but specific to Hardware Inventory.
In most cases some WMI classes on some machines hold more data than normal which can lead to larger files. Terminal servers with multiple loggon on users for example might report more user specific data.
In that case try to exclude some WMI classes for specific systems to limit the amount of Hardware Inventory data.
To exclude a certain Hardware Inventory classe from specific systems you would need to disable the class in the “Default Client Setting”. Then enable the one class via a custom setting for all systems except the ones you don’t need the class from.
(Item10 might help to stay compliant with what you have defined in your environment)
Item5: CI-Validate-DP-Pxe-Settings
This item can be used to validate the registry settings to manipulate TFTP window and block size.
The item will only run on Pxe enabled Distribution Points.
Item5 Remediation:
The item can also remediate the settings if desired.
Item5 Customizations:
Change the “Compliance Rule” to the values you use in your environment.
Item6: CI-Validate-LegacyCardinality
This item will validate the setting to use legacy cardinality for ConfigMgr console queries by testing the value of “UseLegacyCardinality” located at: “HKLMSOFTWAREMicrosoftSMSProviders”
This item will test for IIS logfiles older than seven days and can be used to also delete them by using the remediation part of the item.
The embedded script will test
Item8 Detection:
The item will only run on servers with an installed IIS webserver.
Item8 Remediation:
The remediation script can delete files older than seven days.
Item8 Customizations:
Change the discoveryand remediation script via the “Edit Script” button and change the value of variable $logFileMaxAgeInDays to the desired value.
Item9: CI-Validate-WSUS-AppPoolConfig
This item will run several tests against the WSUS website and is intended to make sure each WSUS server follows the best practices.
The WSUS best practices documentation can be found HERE
Item9 Detection:
The item will only run on servers with an installed WSUS server role.
Item9 Remediation:
The item does not contain any remediation parts.
Item9 Customizations:
Not every test might be needed in your environment. The WSUS-Content… tests for example are only needed when WSUS is configured to use a shared database and shared content storage. Simply delete the tests/settings you might not need and adjust the compliance rules or each test to your needs.
This item is the most complicated one and can be used to validate the activated hardware inventory (HINV) classes of the default client setting or any custom setting.
The idea is to detect any removed or added classes to the HINV part of a client setting. Like the added “Battery” class as shown in the screenshot below for example.
Keep in mind that any ConfigMgr upgrade might also change/extend the HINV part of the default client setting.
Item10 How it works
The config item will run a script to compare a known HINV class state with the current HINV class state of a given client setting. If it detects any differences it will report each added or removed item as a critical change.
If you want to test multiple client settings you would need to copy the configuration item and change the settings as described in the following section.
Item10 Configuration item setup
The following steps are necessary to adjust the configuration item and script to your environment.
Step 1
Copy the script out of the configuration item or from the Github repository and save it on a CAS or Primary Site server.
In most cases it will be necessary to change the script to be able to compare the settings of the given environment. It is therefore designed to run as part of a configuration item or as a standalone script.
Step 2
Run the script with administrative rights and without any parameters to compare a known list of active HINV classes of the “Default Client Setting”.
Note: Do not run the script in the PowerShell ISE you might get strange results when changing some parameters.
It should either return the word “Compliant” or a list like this:
The script should contain the default classes of a ConfigMgr 2010 installation.
So, “Compliant” would mean you have not changed anything and the default classes are selected.
A list like the one shown above would mean you are either not on ConfigMgr 2010 or you changed the settings in the past or my initial known class list of the script is simply not complete.
Step 3
If the output of the script is the word “Compliant” you could use the script and therefore the configuration item without any changes to detect future changes of HINV classes.
But if you get a list back, the script needs to be changed to compare what has been set in your environment.
You do that by running the script with the parameter -OutPutMode ‘CreateScript’.
That will copy the script to the same location as the original script but will change the known HINV class list to the state of your environment.
Note: I could have used an external configuration file to read the data for comparison, but I didn’t want to rely on external data. That’s why everything is part of the script and the reason for the “CreateScript” option.
Step 4
Run the new script without any parameters to test it. It should output the word “Compliant” since it now contains the current state.
Step 5
Copy the contents of the new script and replace the existing script of the configuration item as shown in the screenshot below.
Click on “Settings”, “Edit Script…” and “Clear” to clear the existing script.
“Open…” the new script and add it to the configuration item.
Step 6
If you would like to compare HINV classes of custom client settings run the script with the parameters -ClientSettingsName ‘Name of custom client setting’ and the parameter -OutPutMode ‘CreateScript’.
The script will then generate a new script containing all the classes of your custom client setting. It will also change the default value of the parameter:
-ClientSettingsName to the name of the custom client setting to be able to run without the need to provide extra parameter values.
Item10 Detection:
The item will only run on site servers.
Item10 Remediation:
The item does not contain any remediation parts.
Item10 Other parameters:
As mentioned before the script can also be used as a standalone script for documentation purposes for example.
The following actions are possible via the -OutputMode parameter:
“CompareData”
CompareData is the default value and will output the difference between the known classes and the current active classes of a given client setting.
“ShowData”
ShowData will open two GridViews. One for all available inventory classes and one with the active classes for the selected client setting.
“ExportAsCSV”
Will create two csv files in the same directory as the script.
One for all available inventory classes and one with the active classes for the selected client setting.
“CreateScript”
Creates a new script with the current HINV Class state for a given client setting.
Run “Get-Help .Compare-ClientSettingHINVClasses.ps1 -Detailed” to get more help with the available options.
Item11: CI-Validate-WSUS-Subscription
This item works the same way as the one before (CI-Validate-DefaultClientSetting-HINV-Classes) but is intended to compare a known list of activated WSUS update categories and products as shown in the screenshot below.
The item will detect any changes and can therefore help you either activate a newly synched product or revert any unwanted changes.
Item11 Detection:
The item will only run site servers.
Item11 Remediation:
The item does not contain any remediation parts.
Item11 Customizations:
The script has a limited set of update categories and products and will therefore output a long list of differences when you run it on a primary or CAS without any parameters.
But the script has also the option to use the -OutPutMode ‘CreateScript’ parameter to create a new script with the settings of your environment.
Use the same method to import the new script (containing your settings) into the configuration item as described in Step 5 of “CI-Validate-DefaultClientSetting-HINV-Classes”
Run “Get-Help .Compare-WSUSSubscriptions.ps1 -Detailed” to get more help.
Monitoring
Like any other deployment each baseline deployment can be viewed via “Monitoring” and “Deployments”.
For any uncompliant systems the exact values can be viewed via the “More Details” button on the right side of the screen.
Corresponding reports can be found in the report folder called: “Compliance and Settings Management”.
Another option to view compliance is the compliance report on a local system via the ConfigMgr client applet.
Conclusion
Whenever changing anything outside of the ConfigMgr console create a configuration item to document and monitor each setting.
I hope the article was worth reading and I hope the items will help you get a better understanding of the changes which might happen to your ConfigMgr environment before any real issues arise.
Have fun detecting any changes in your ConfigMgr environment and let me know what you think.
Jonas Ohmsen
Microsoft Germany
Disclaimer:
This posting is provided “AS IS” with no warranties, and confers no rights
This article is contributed. See the original author and article here.
Microsoft has published a learning path for fusion dev teams. In addition to that, they also published an e-book for it. We can see how an organisation can build up a fusion team and deliver services through this fusion development approach.
Gartner claims that 84% of organisations have at least one fusion team. According to the article, Gartner defines the fusion team as a “cross-functional team that uses data and technology to achieve business outcomes”. Because of this nature, the fusion team’s leader often comes from the business side rather than the IT side and makes decisions from the perspective outside of IT. In other words, the fusion team pursues the business achievement from the broader organisational aspects, although they use technologies. What can the fusion team deliver a service or product for their customers, then?
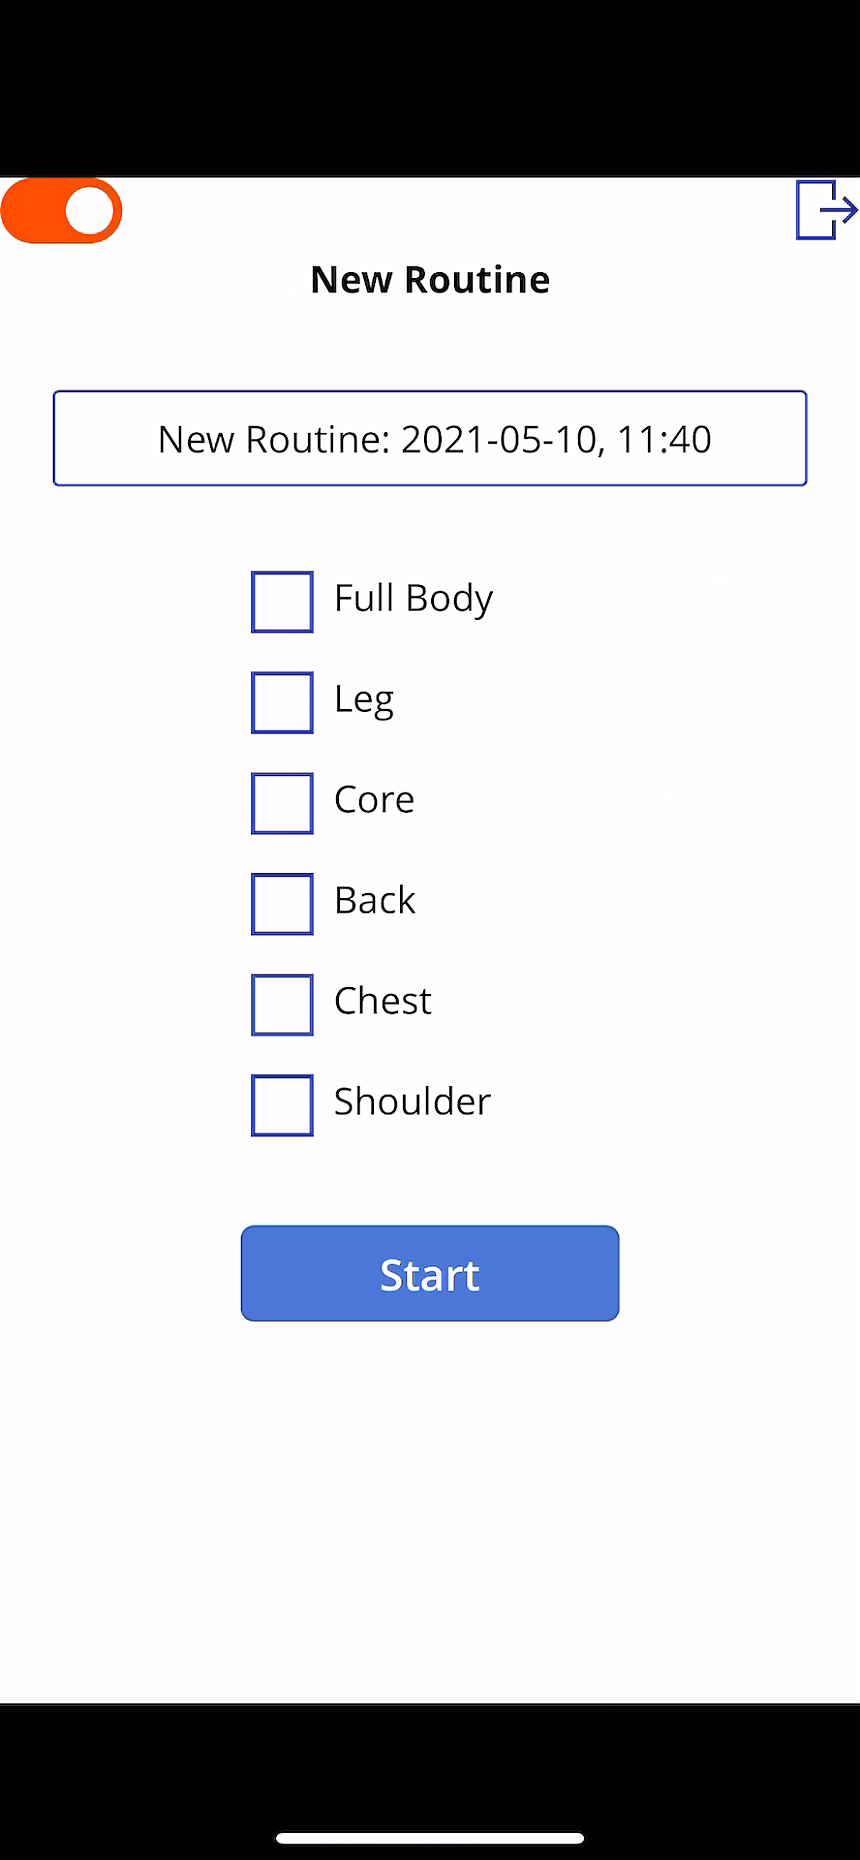
Lamna Healthcare Company is a fictitious company that provides health and fitness services for their members. They are about to build a mobile app using Power Apps. Throughout this post, I’m going to observe how they cope with it within the fusion team.
You can find the sample code used in this post at this GitHub repository.
Scenario
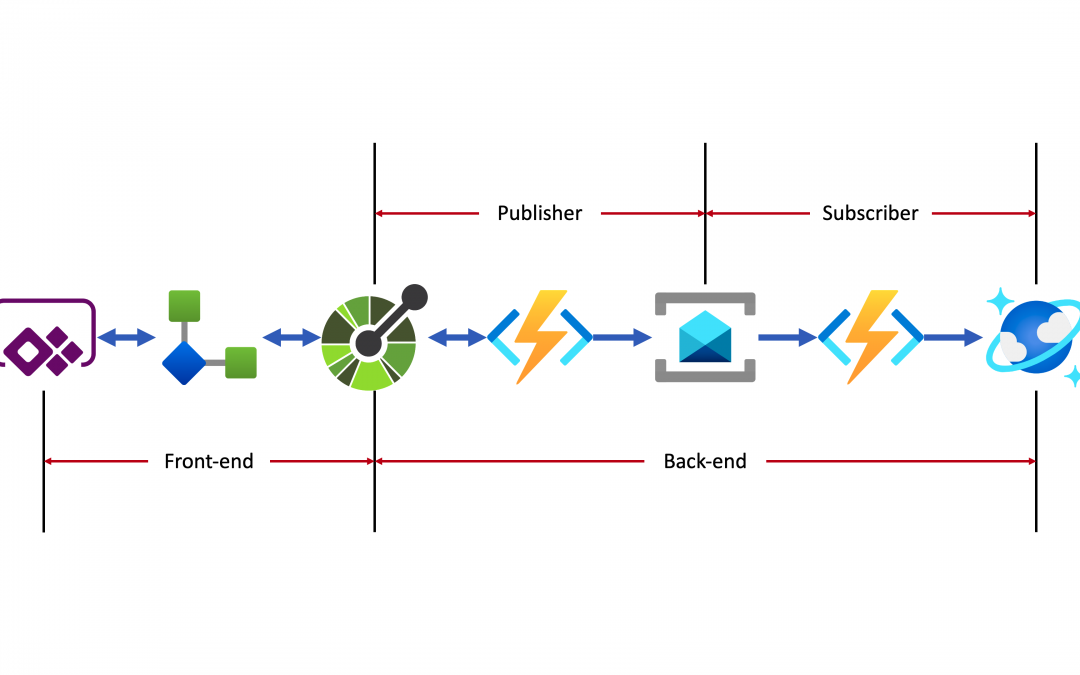
Lamna Healthcare Company runs a fitness centre in Korea. Ji Min is a team leader for personal trainers. The centre has built a system that the trainers put the workout logs for their members through a system. For their customer experiences, they at the same time also write the records to their members’ journal by hand. Ji Min wonders whether it’s efficient for both trainers and members because it seems they write the same log twice. Fortunately, she’s willing to build a Power Apps app for those workout logs. When a trainer or member logs the workout details through the app, the centre stores the data to their data storage (Azure Cosmos DB) through their backend (Azure Functions and Azure Service Bus).
As the backend API has already been up and running, all she needs to do is to use the API within Power Apps via a custom connector. The end-to-end application architecture looks like:
A custom connector is generated by the OpenAPI document.
Through the custom connector, the Power Apps app sends the workout data to the backend system.
The backend system implements the Pub/Sub pattern that handles data asynchronously.
At the publisher’s end, data from the Power Apps app keeps accumulated. Then it is aggregated when a workout routine ends and sent to Azure Service Bus.
At the subscriber’s end, another Azure Functions takes the message from Azure Service Bus and finally stores it to Azure Cosmos DB.
Improving Backend API
As Ji Min is a part of the fusion team representing the personal trainers’ team, she contributes many ideas to the team to achieve more business outcomes. Su Bin is a pro dev in the same fusion team who is responsible for the backend APIs. Ji Min asked Su Bin to make the API discoverable so that Ji Min can do something on her side. Therefore, Su Bin added the OpenAPI extension to the Azure Functions app by installing the NuGet package.
By adding minimal efforts, Su Bin added a few OpenAPI-related decorators to the function endpoints. The following code snippets are just an example API for creating a routine when a workout begins. As it’s over-simplified codes for brevity, you can check out the full codes at this link.
    // Decorators for OpenAPI

    [OpenApiOperation(operationId: “CreateRoutine”, tags: new[] { “publisher”, “routine” }, Summary = “Create a new routine”, Description = “This creates a new routine”, Visibility = OpenApiVisibilityType.Important)]

    [OpenApiSecurity(“function_key”, SecuritySchemeType.ApiKey, Name = “x-functions-key”, In = OpenApiSecurityLocationType.Header, Description = “API key to execute this endpoint”)]

    [OpenApiRequestBody(contentType: ContentTypes.ApplicationJson, bodyType: typeof(RoutineRequestMessage), Required = true, Example = typeof(RoutineRequestMessageExample), Description = “The request message payload for a routine”)]

    [OpenApiResponseWithBody(statusCode: HttpStatusCode.OK, contentType: ContentTypes.ApplicationJson, bodyType: typeof(RoutineResponseMessage), Example = typeof(RoutineResponseMessageExample), Summary = “200 response”, Description = “This returns the response of ‘OK'”)]

    [OpenApiResponseWithBody(statusCode: HttpStatusCode.InternalServerError, contentType: ContentTypes.ApplicationJson, bodyType: typeof(ErrorResponseMessage), Example = typeof(ErrorResponseMessageExample), Summary = “500 response”, Description = “This returns the response of ‘Internal Server Error'”)]

    // Decorators for OpenAPI

    [FunctionName(nameof(RoutineHttpTrigger.CreateRoutineAsync))]

    public async Task CreateRoutineAsync(

        [HttpTrigger(AuthorizationLevel.Function, HttpVerbs.Post, Route = “routines”)] HttpRequest req,

        ExecutionContext context,

        ILogger log)

    {

        …

    }
After the decorators being added, deploy the function app, and you will see the Swagger UI screen like:
As the OpenAPI extension supports both V2 (Swagger) and V3, you’ll see either V2 or V3 doc depending on your configurations when you visit https://<function_app_name>.azurewebsites.net/api/swagger.json. The screenshot above renders the V3 doc.
Create Custom Connector
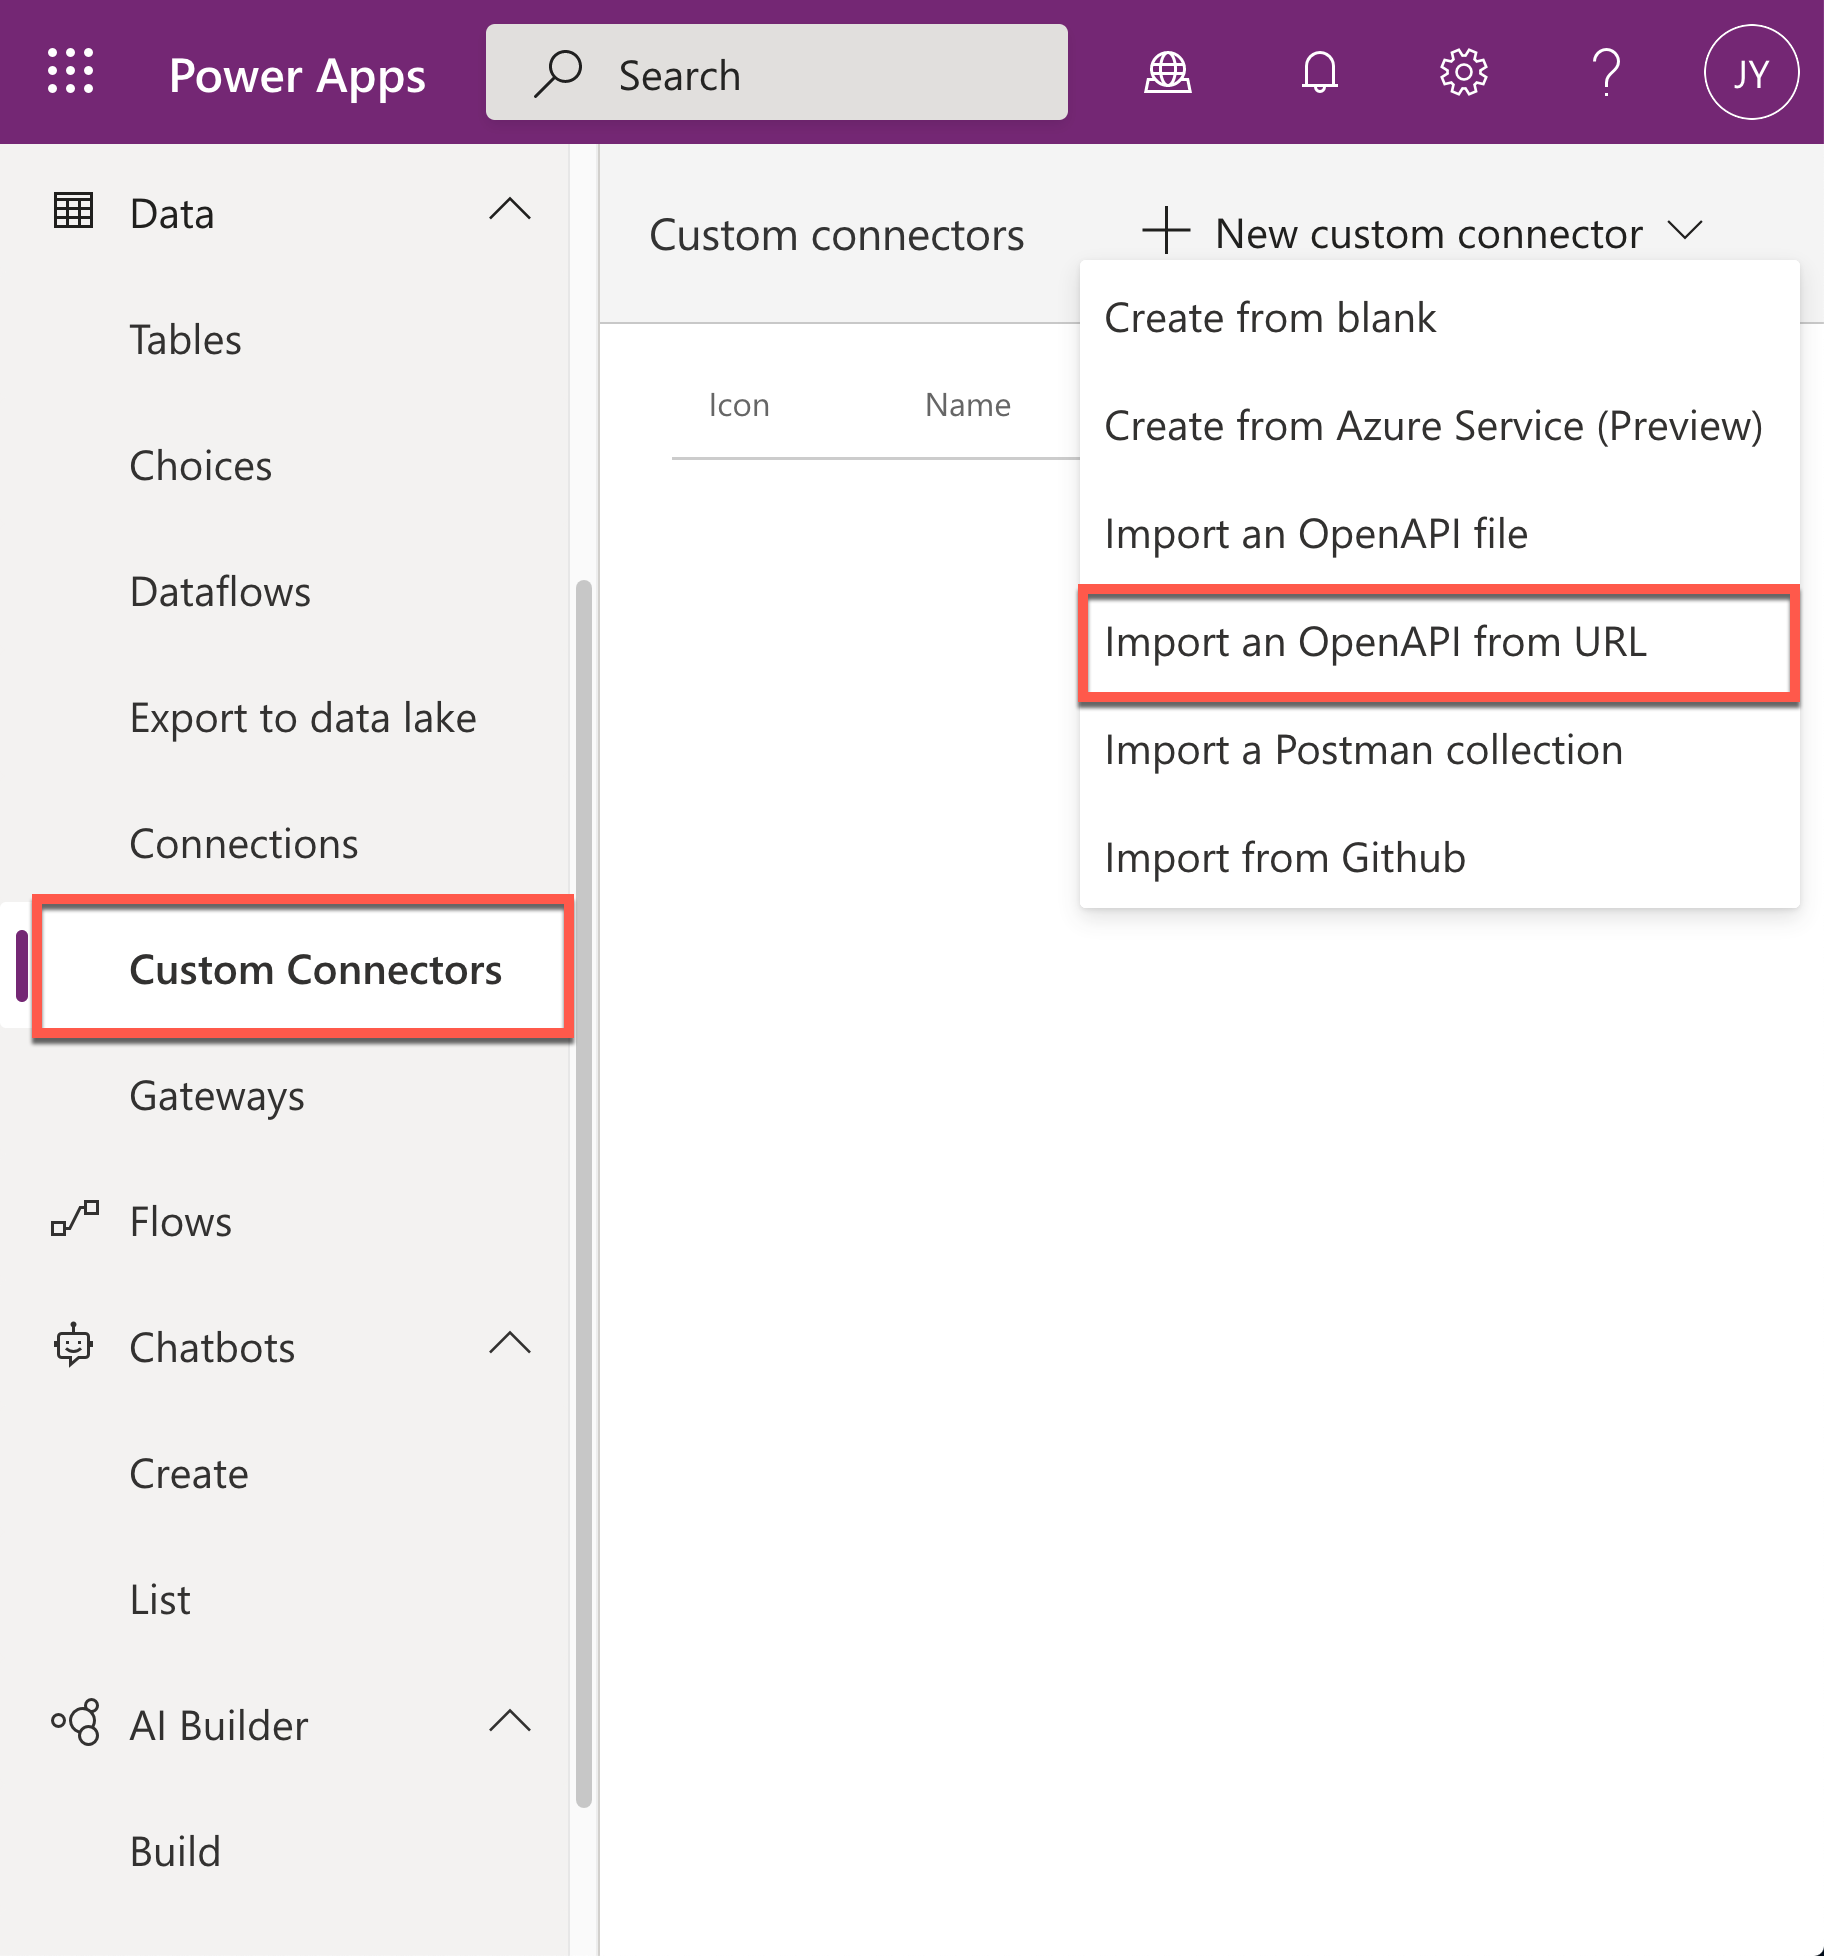
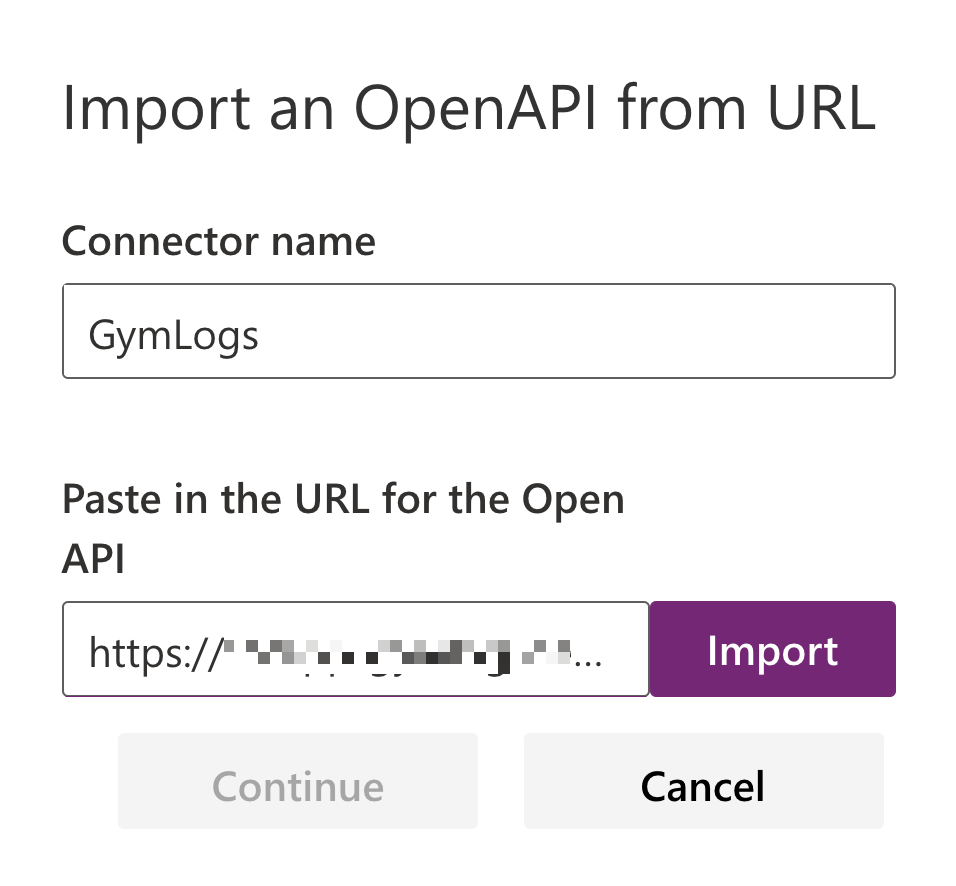
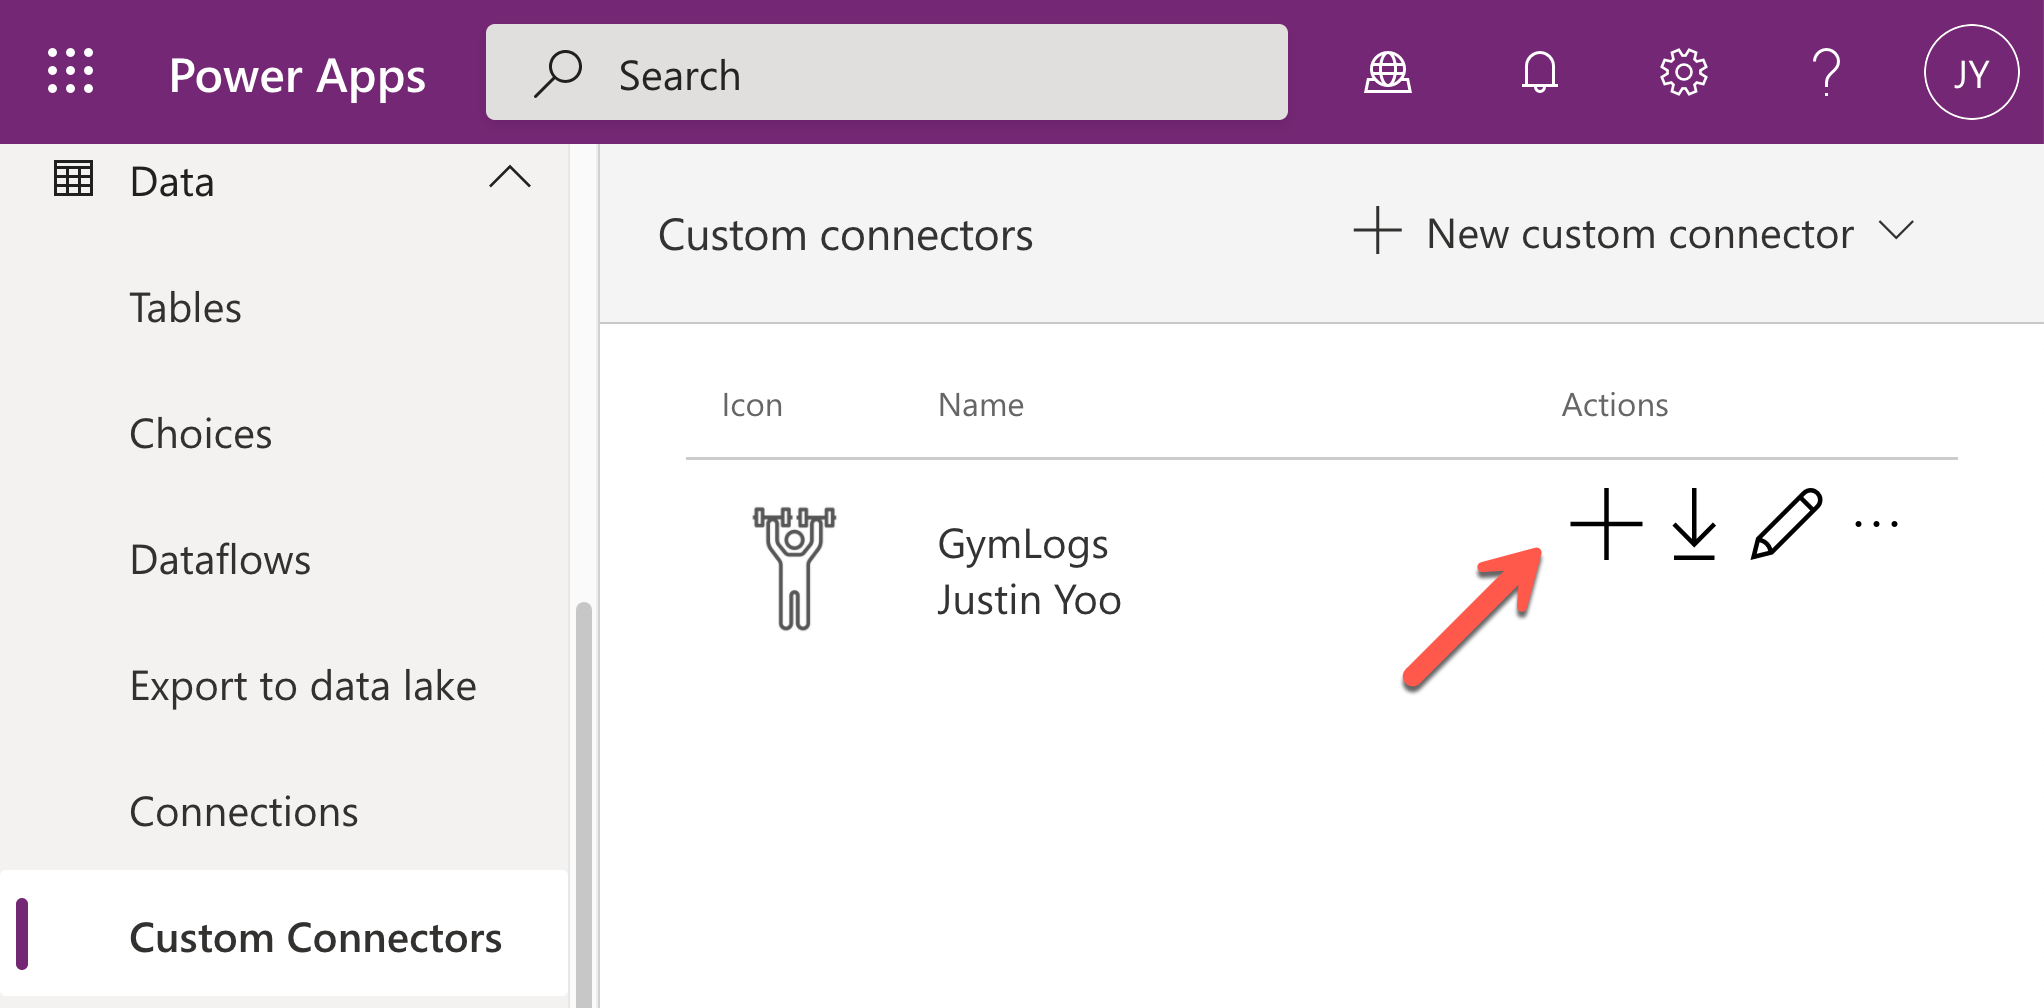
The serverless API has now got better discoverability. Now it’s time to create a custom connector for Power Apps to access the API. As Power Apps is a low-code app maker platform, Ji Min, as a citizen dev, can easily make the custom connector. Click the Custom Connector menu at the left-hand side, click the :heavy_plus_sign: New custom connector button and select the Import an OpenAPI from URL menu.
Put the OpenAPI document URL to the field of Paste in the URL for the OpenAPI. Currently, the custom connector only supports the OpenAPI spec v2. Therefore, use the URL, https://<function_app_name>.azurewebsites.net/api/openapi/v2.json for import.
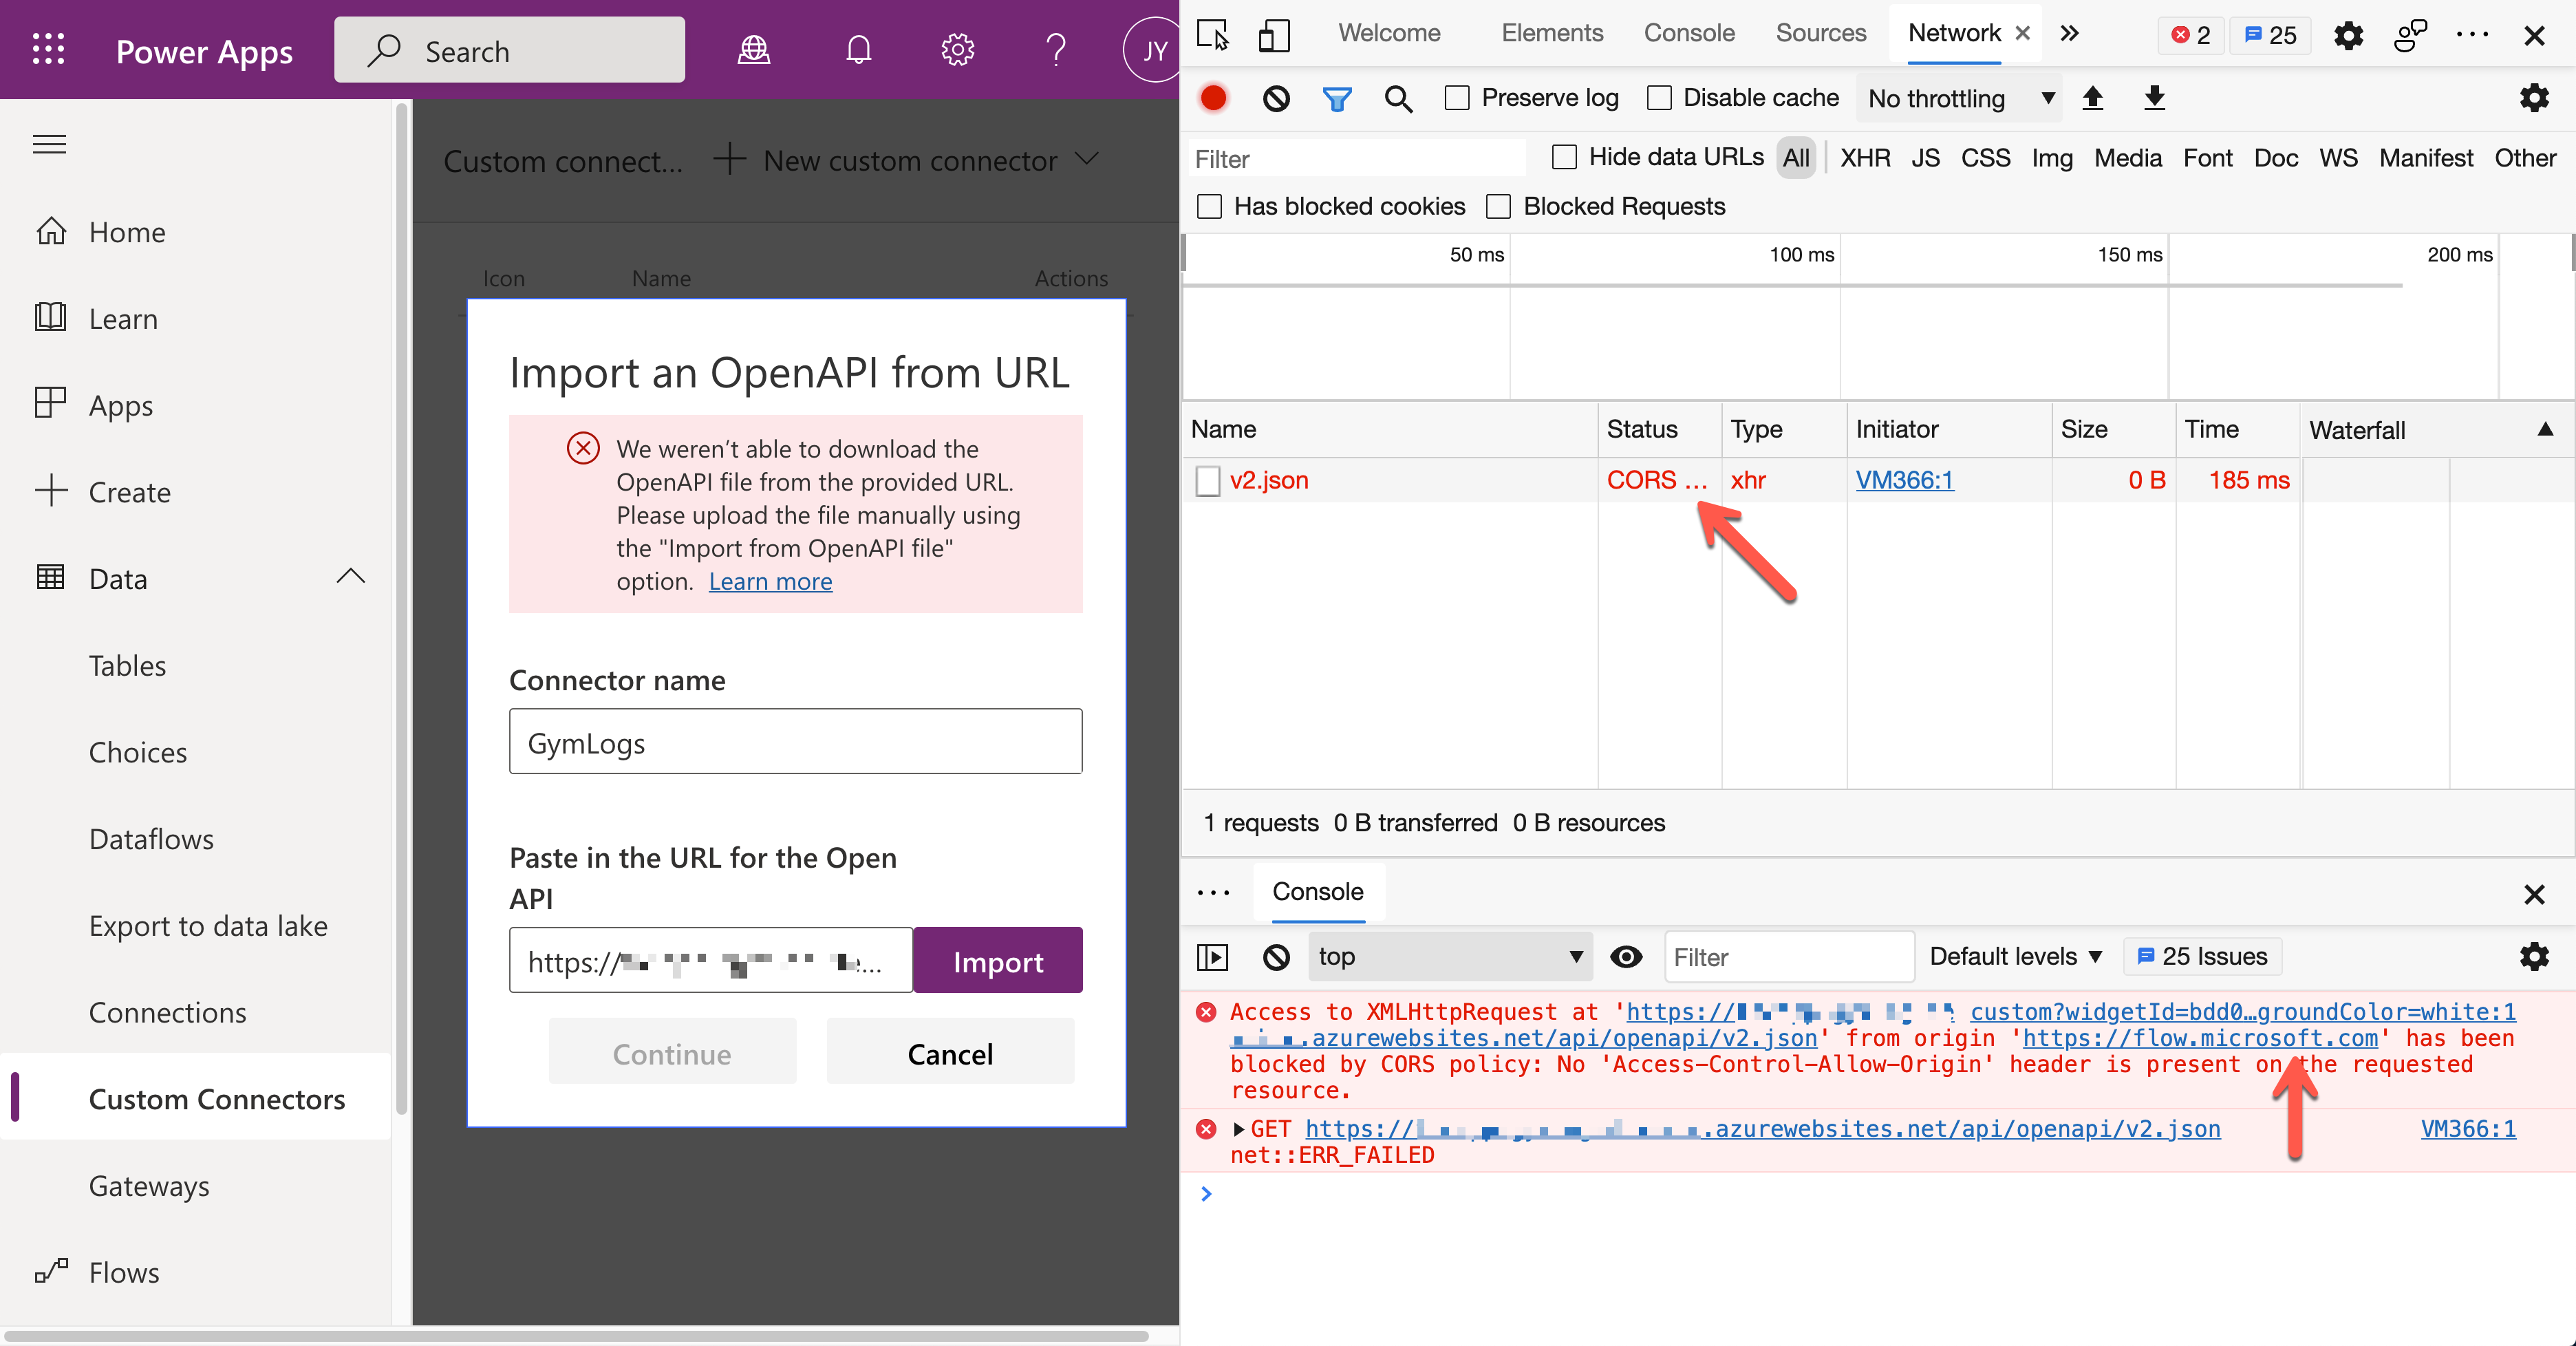
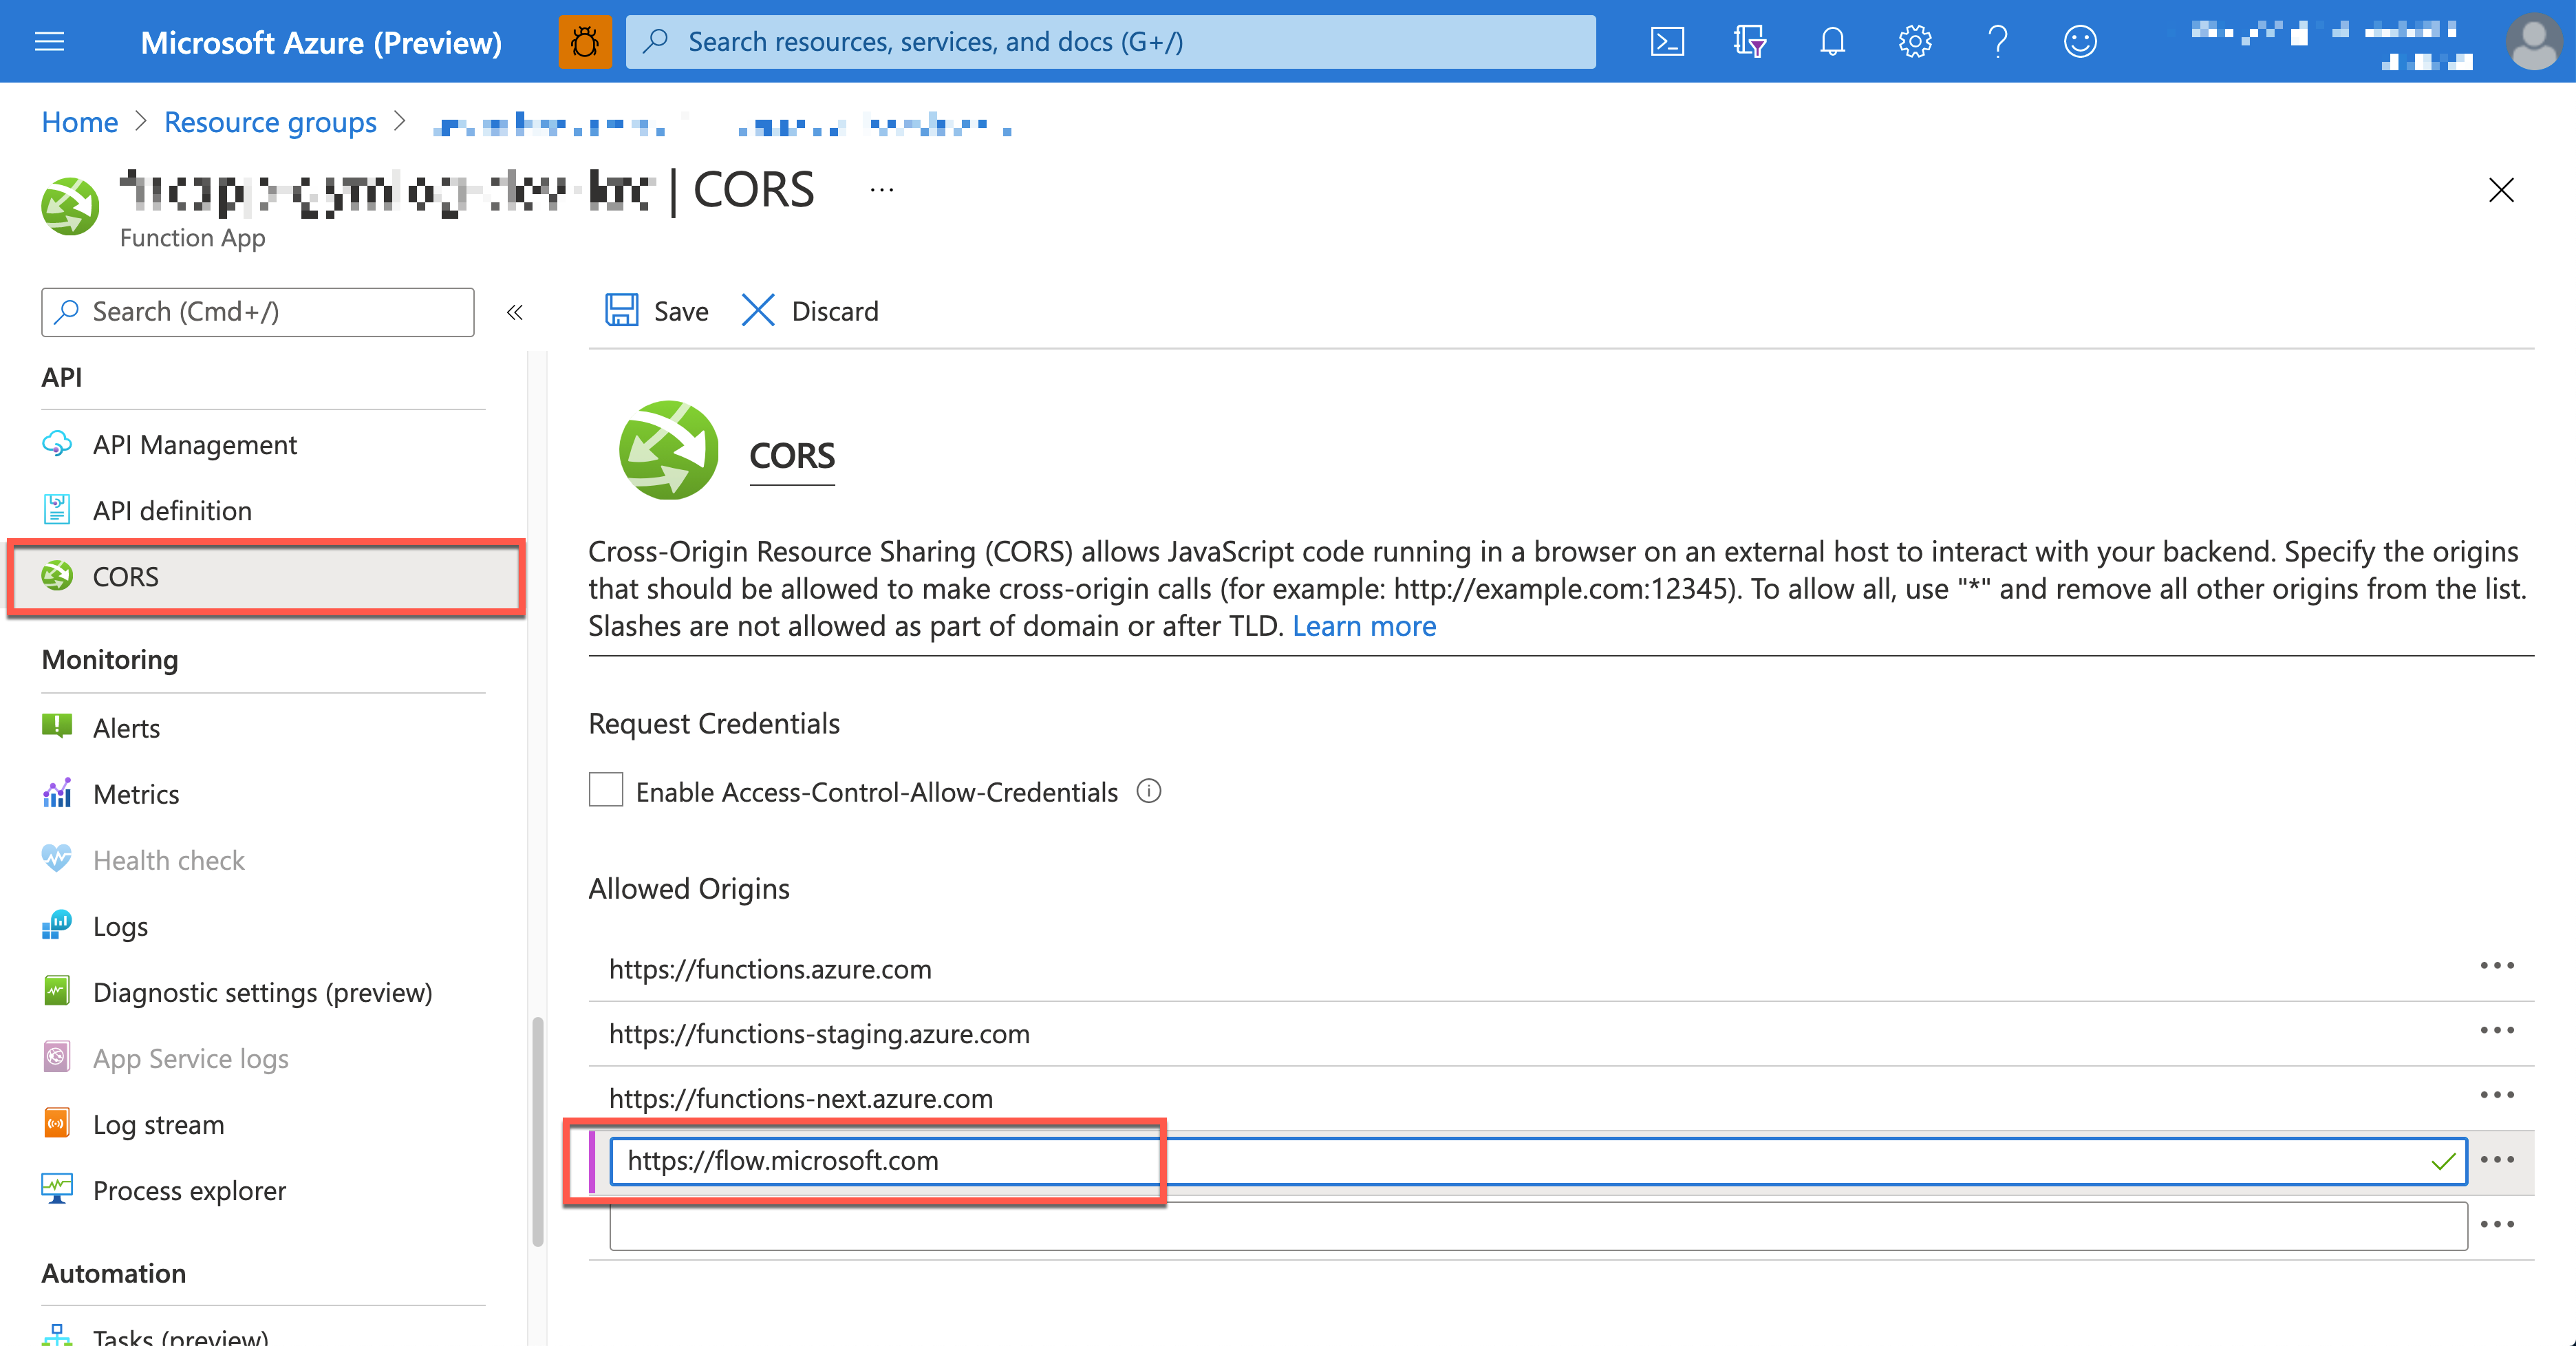
Sometimes, you’ll have the following error during the import. It’s because the CORS setting is missing between the Power Apps Studio and Azure Functions app instance.
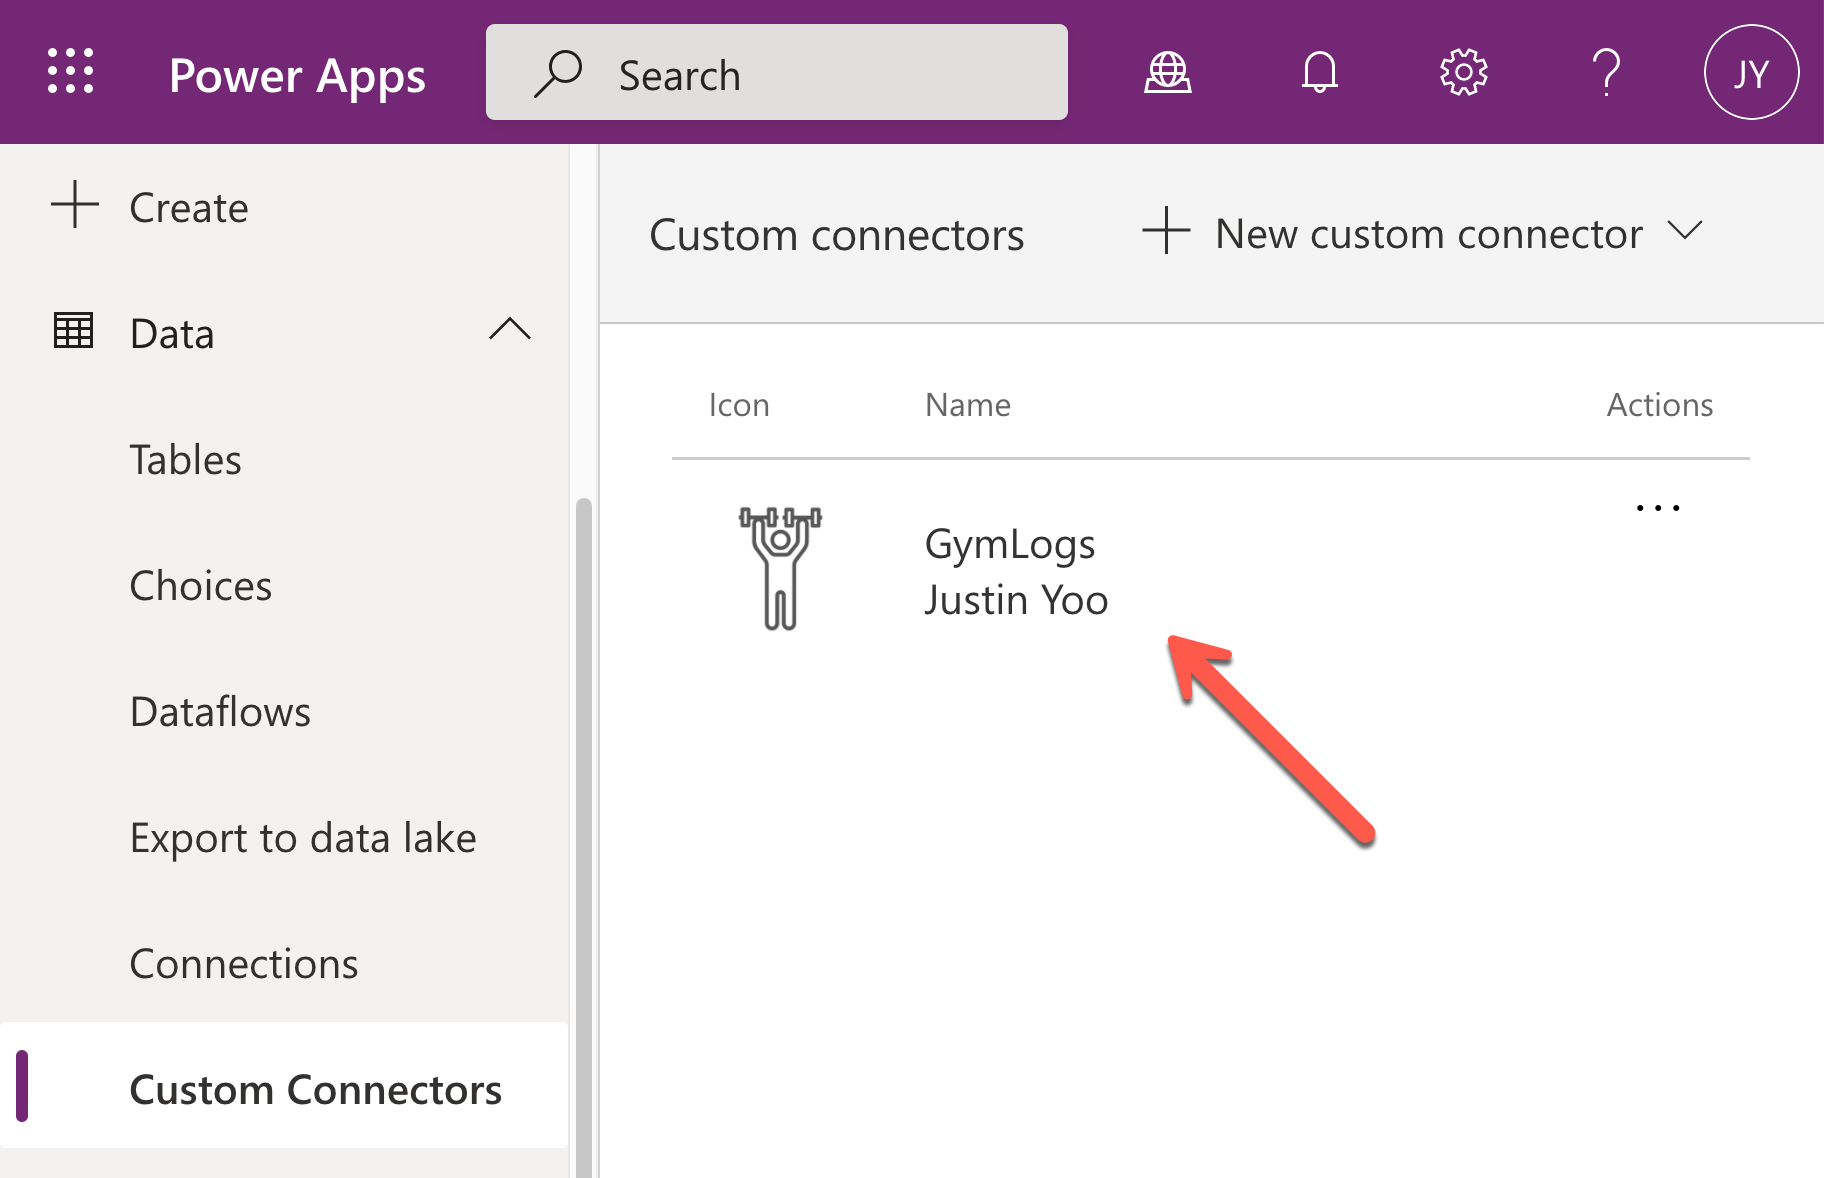
After the CORS configuration, go back to Power Apps Studio and create the custom connector again. It’s now OK without an error. As the rest of creating the custom connector process is the same as this process, I won’t repeat it here. Finally, you’ve got the custom connector for the Gym Logs.
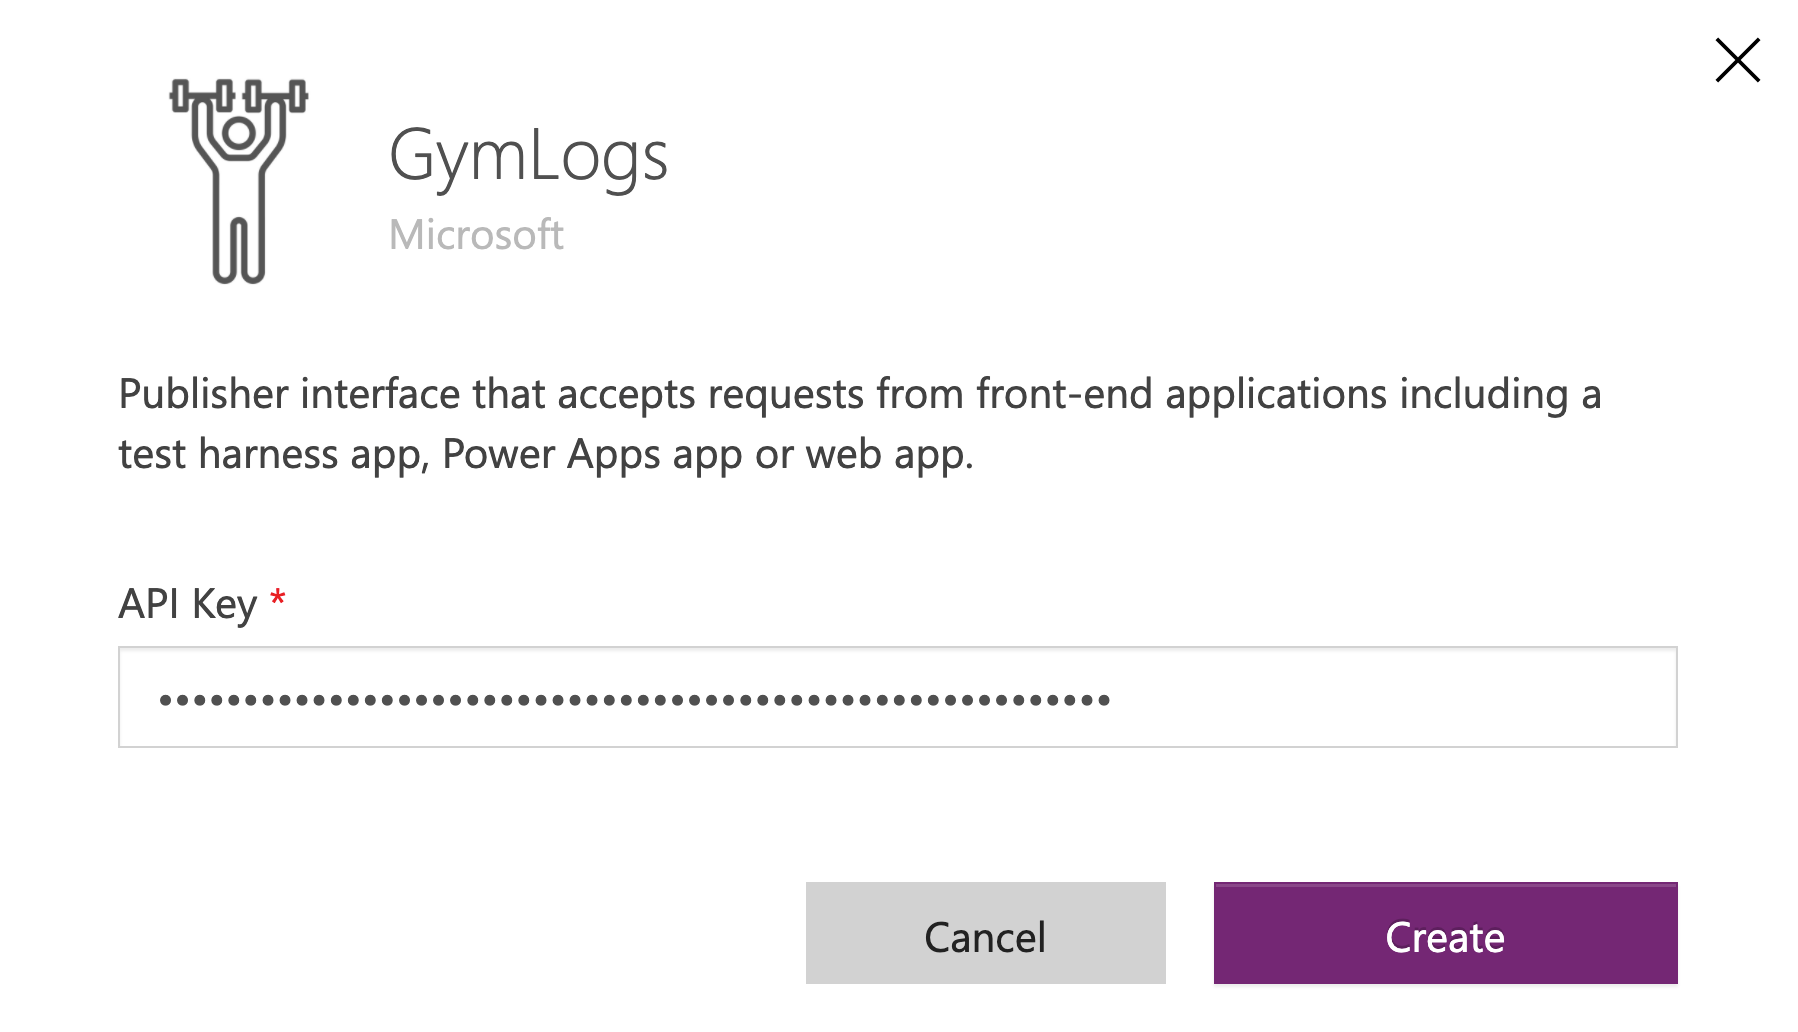
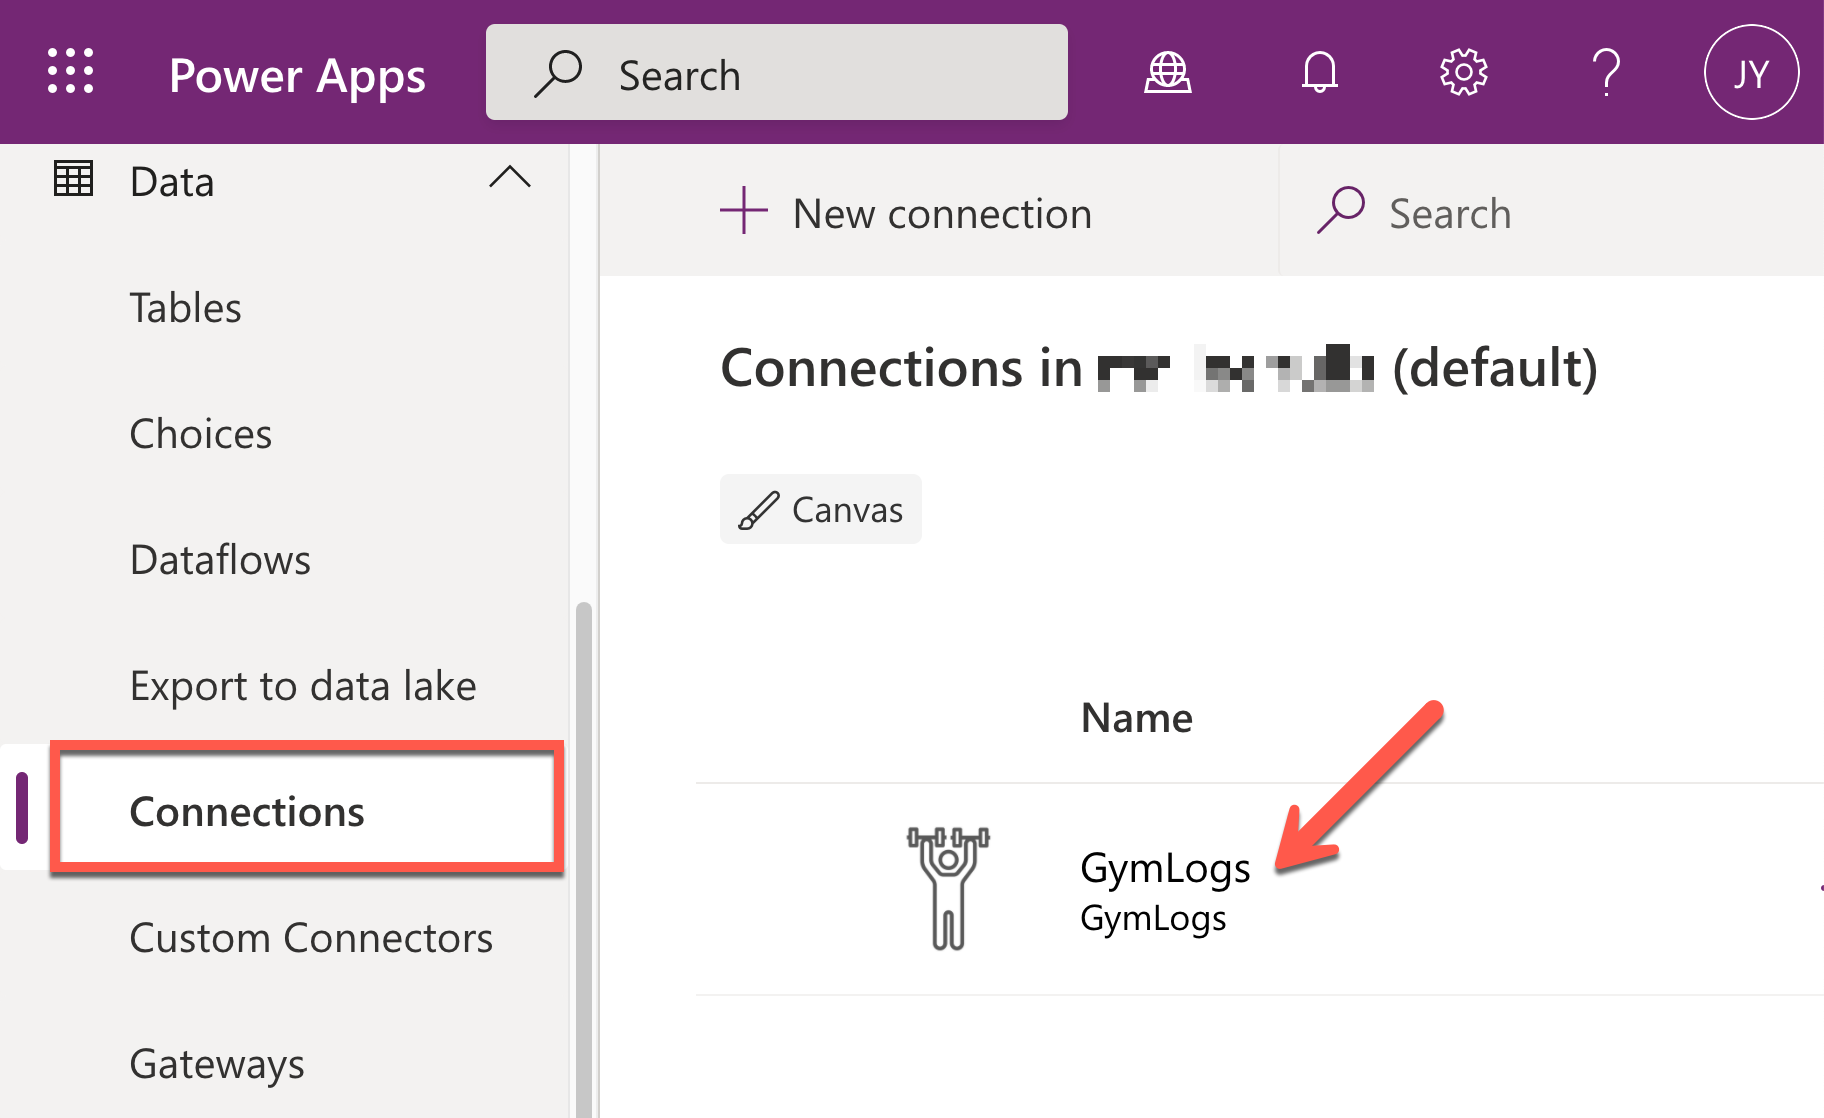
Connecting Custom Connector via Authentication
In order for Ji Min to use the custom connector within her Power Apps app, a new connection must be created beforehand by providing authentication details. As API keys protect Azure Functions API endpoints, give the key for the authentication. Click the :heavy_plus_sign: button.
Enter the API key to the field and click the Create button.
Now, you’ve got the connection and can use the custom connector within the Power Apps app.
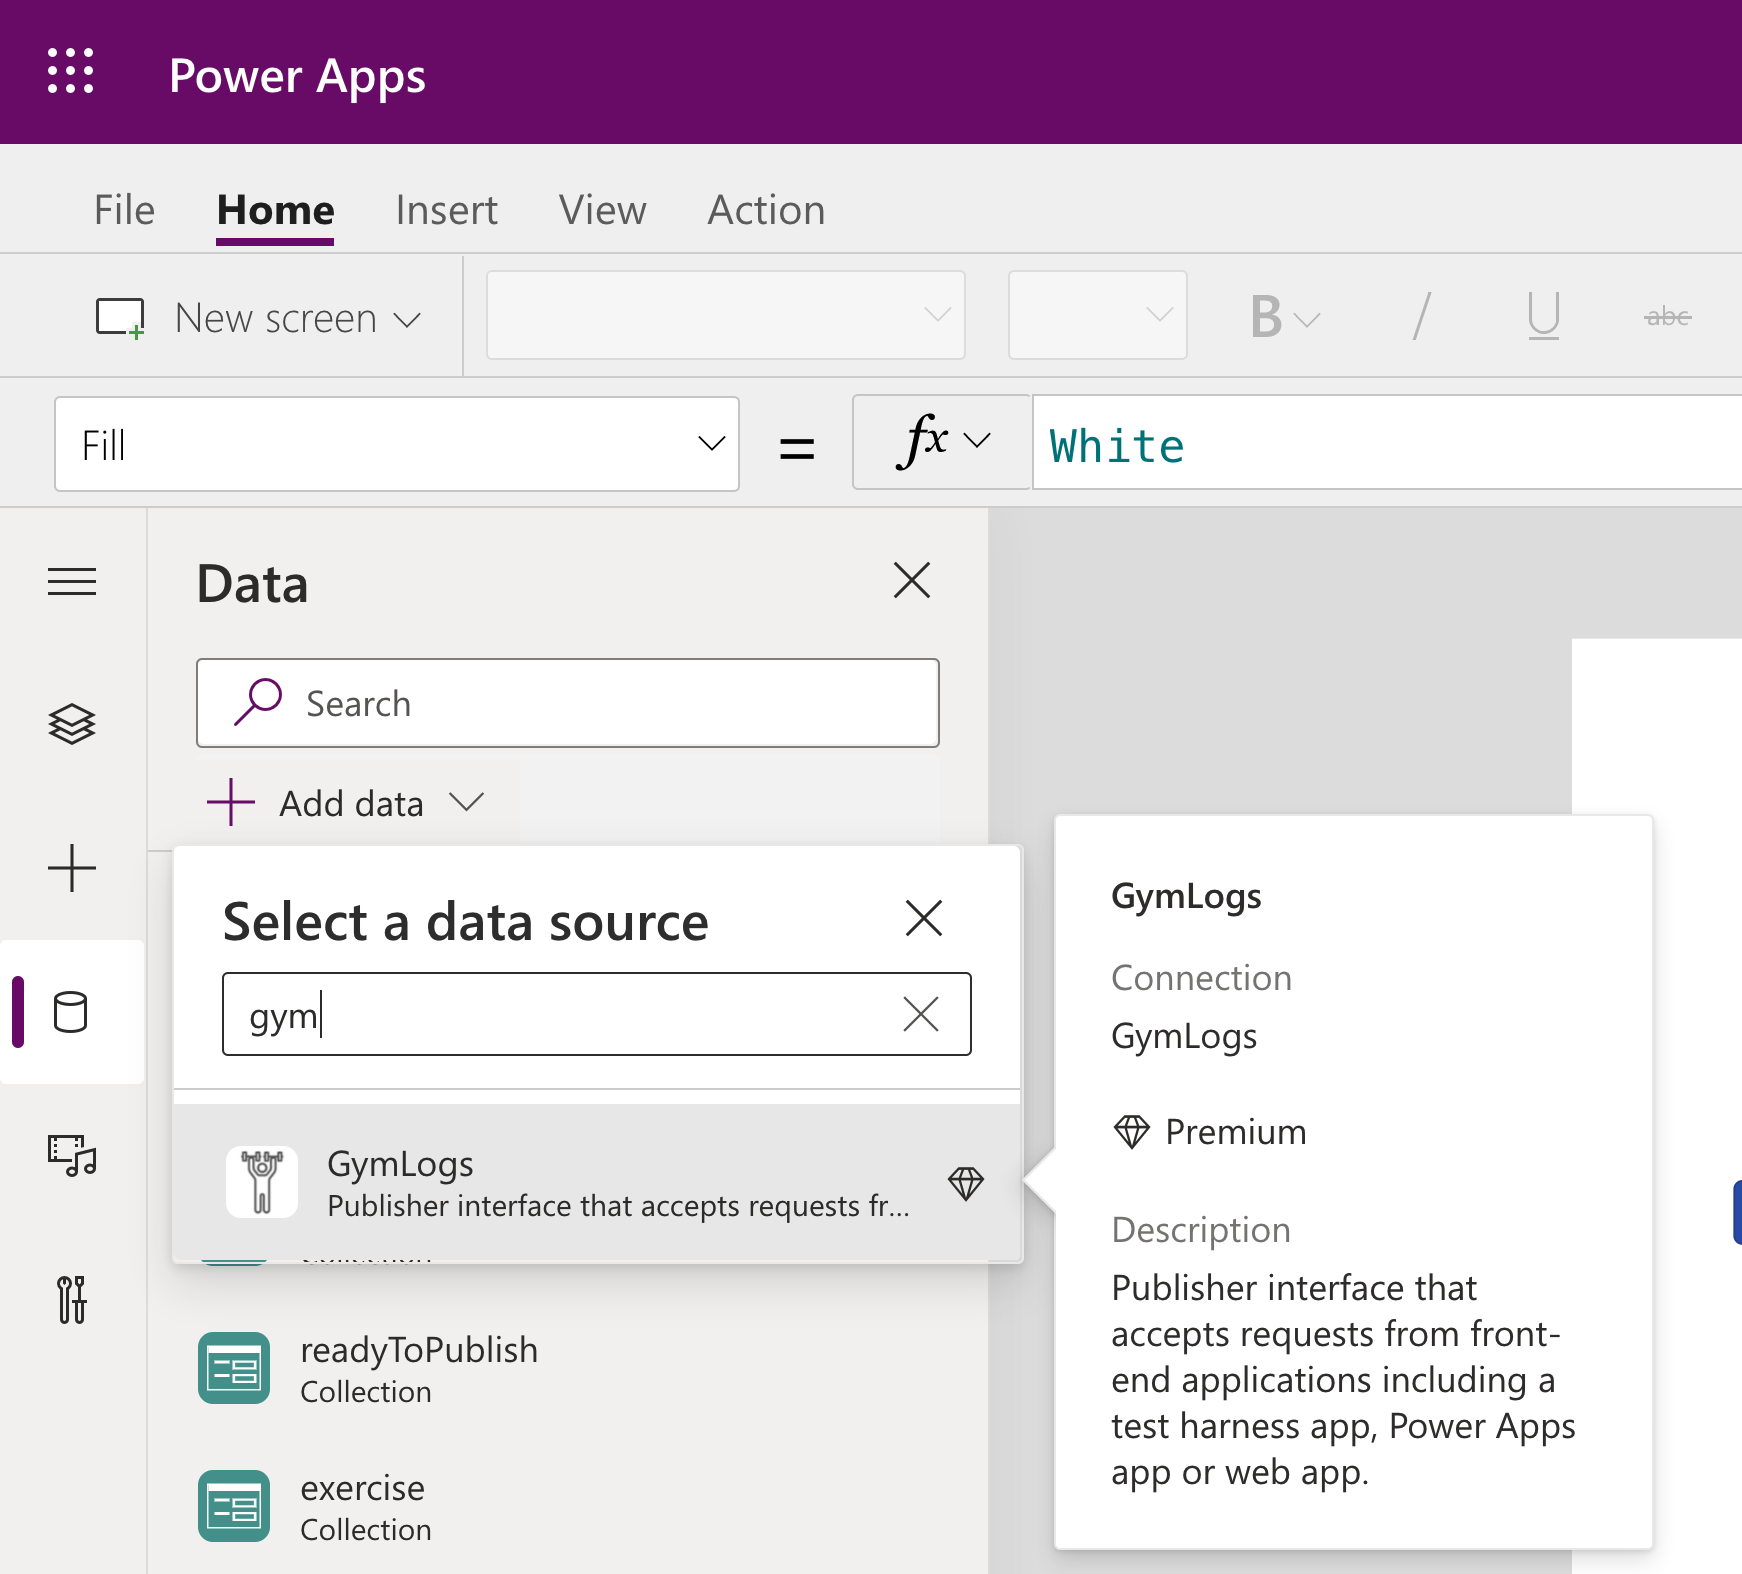
Accessing Custom Connector in Power Apps
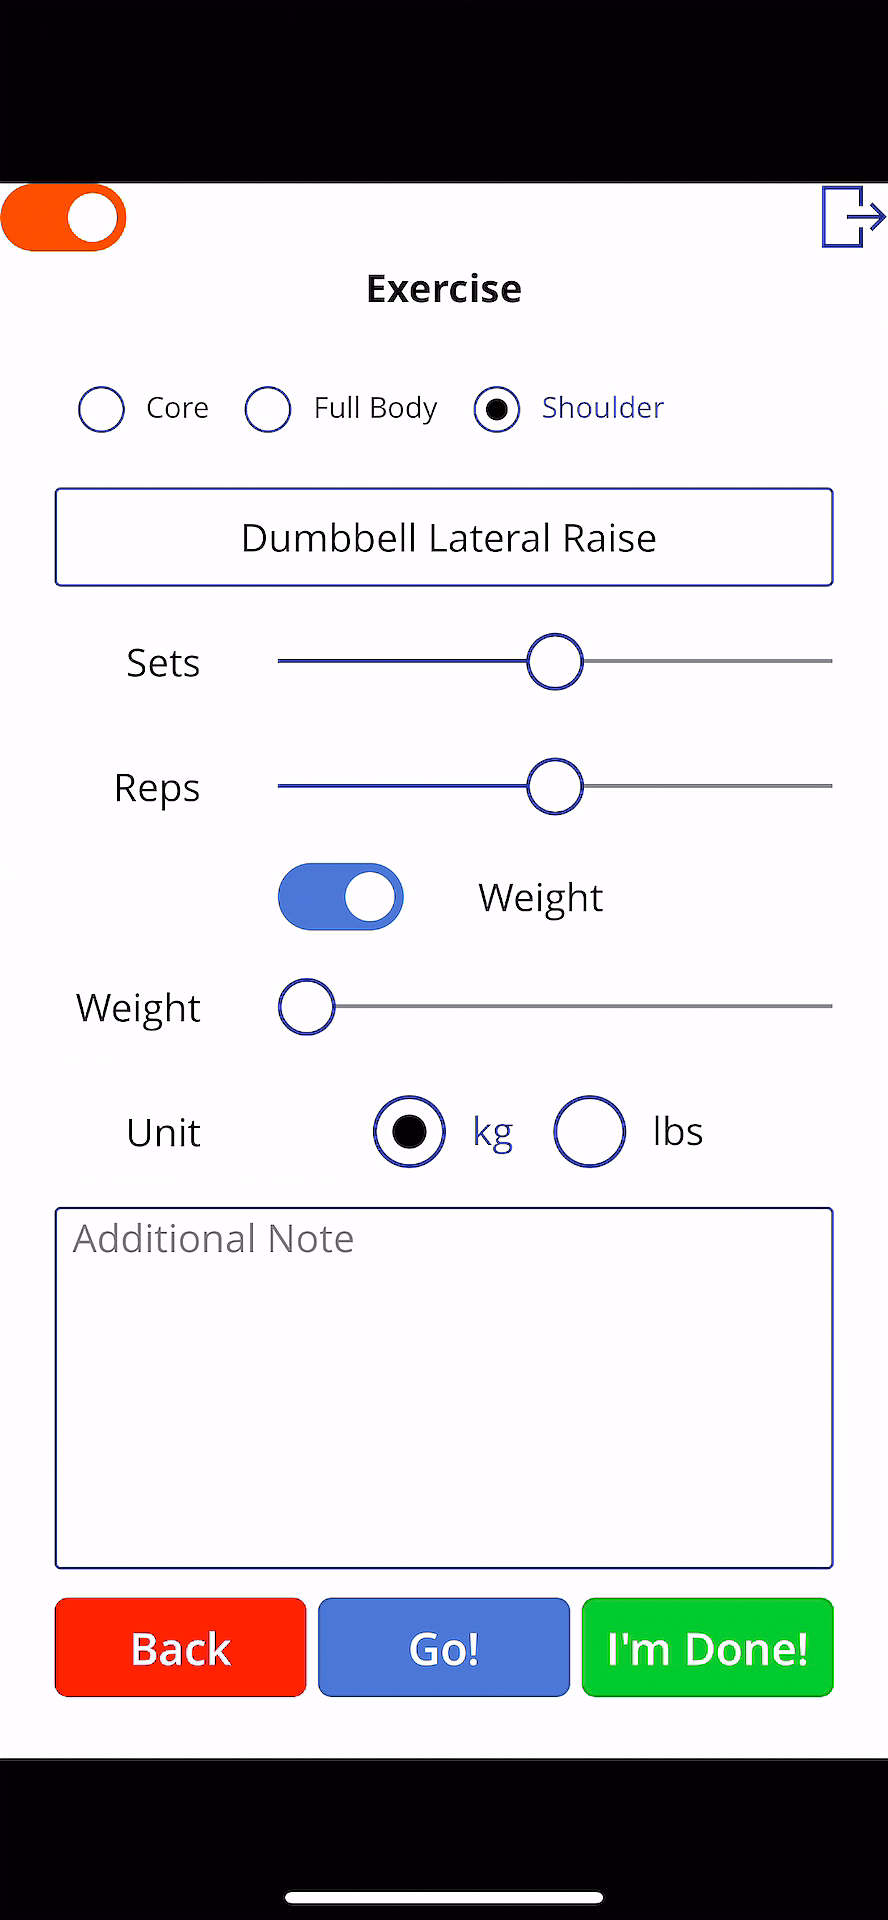
Ji Min is now able to enter her members’ workout logs through the Power Apps app instead of hand-writing them. Add the custom connector on your Canvas app.
It’s all done! Ji Min finally can manage all the workout logs through the mobile app! Here are a couple of screenshots while using the app.
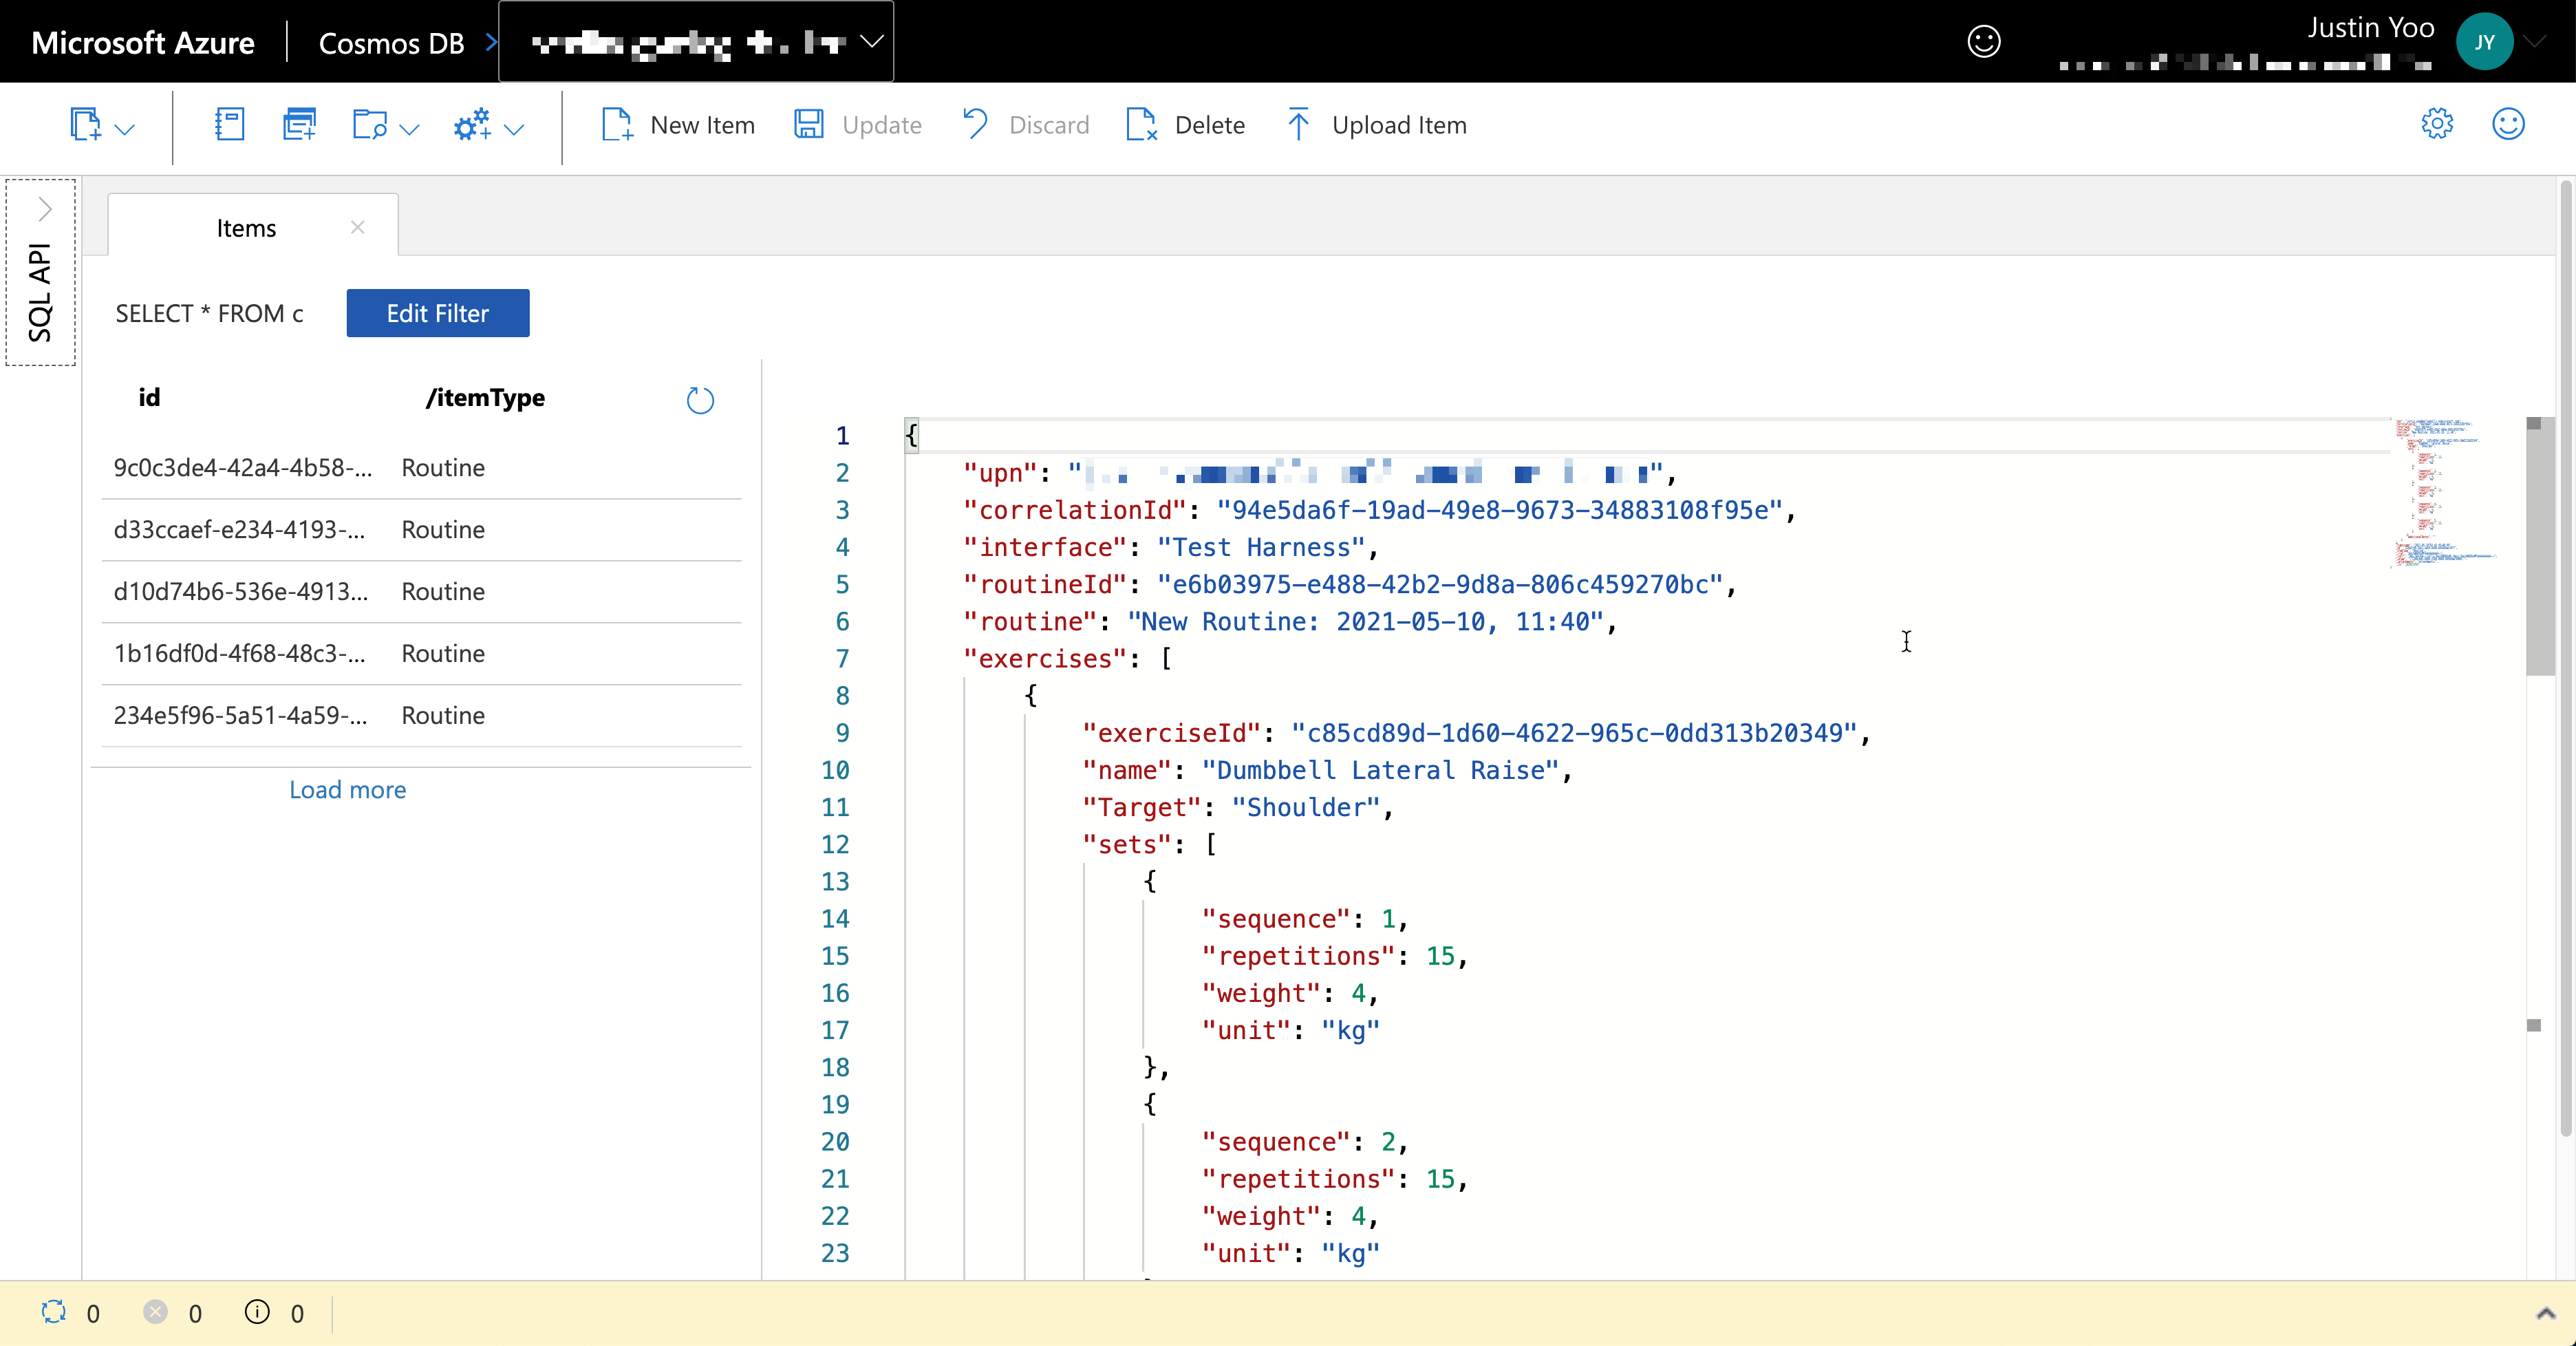
All members’ workout logs are stored into Azure Cosmos DB asynchronously.
Now, Ji Min is happy, her trainer crews are happy, and all members are happy because they can easily record their workout histories.
You can download the GymLogs app directly from the GitHub repository and import it to your Power Apps environment.
So far, we’ve walked through how both citizen developer and pro developer can work together within a fusion team –
Pro devs provide the citizen devs with discoverable APIs by adding an extension to the existing Azure Functions application.
After this collaboration practice, Lamna Healthcare Company can offer better customer experiences with the workout log apps, resulting in their business growth.
Members can freely record their exercises, and
Trainers can analyse the data and offer more personalised workout schedules.
In the next post, let’s trace the end-to-end data flow through Azure Monitoring.
This article was originally published on Dev Kimchi.
This article is contributed. See the original author and article here.
It can be daunting to start something new. Whether it is joining an online community for the first time, or learning the many ins and outs of GitHub, newcomers always need – and deserve – support in getting up to speed.
Removing barriers for new community members and providing educational resources is exactly the aim of Sharing is Caring. The group assists members of the Microsoft 365 Patterns and Practices (PnP) community with free, hands-on training to remove help them contribute.
Each session provides instructive and collaborative guidance on a multitude of topics, from tips on presenting to the configuration of SPFx Workstation and best practices for Docs and GitHub. Office Apps & Services MVP Emily Mancini says that Sharing is Caring provides an important place for collaboration and contribution in a smaller setting.
“Many community members have no previous experience with GitHub proving to be a hurdle to sharing or using samples,” Emily says. “But by the end of the ‘First-Time Contributors’ session, all attendees will have completed their first pull request and navigated through GitHub. Many people learn best by doing, so creating this separate GitHub repository as a safe practice space allows us to learn together.”
“We have found that working directly with community members in a safe space allowed a better opportunity to become familiar and comfortable with GitHub. We also do not record the sessions as we want everyone to feel comfortable asking any questions.”
PnP is a community-driven, open-source initiative where Microsoft and external community members share their learnings around implementation practices for Microsoft 365, including Microsoft Graph, Microsoft Teams, OneDrive and SharePoint. Emily says the Sharing is Caring group often discusses a sense of belonging in the community and focuses on empowering all members to contribute.
As the group removes entry barriers for members, the result is an increase in contributions. “We see many community members taking off like rockets with their articles and sample contributions,” Emily says. “Many of these contributions then grow to become a demo on the bi-weekly SharePoint Framework community calls.”
Moving forward, the group looks to grow further: “We aim to continue expanding our offerings as the community helps us identify more barriers to adoption,” Emily says. “We’ll be adding more in-depth sessions on how to contribute to various open-source repositories.”
For further information or to contact the team, reach out via the website.
This article is contributed. See the original author and article here.
It is common that customers contact the Azure Batch Team to provide instructions on how to install Python using the start task feature. I would like to provide the steps to perform this task in case that someone needs to work in a similar case.
Required steps:
Get the python release that you want to install.
Add the installer into a storage container.
Create the windows pool and define the required start task and the resource files to install the features.
Get the python release that you want to install.
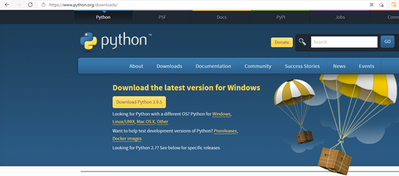
First, download the python installer from the official site (Example below is using the 3.8.0 version for Windows) Download Python | Python.org
Add the installer into a storage container.
Next step is to upload the installer to a Storage Blob Container, this installer will be downloaded to the Azure Batch Node using the Resource Files Feature in feature steps.
Select your Storage Account and create a new container/ select an existing one, then upload the installer.
Create a Windows Pool, and define the required start task and resource files.
Next step is to create our Windows Batch pool. We will use the required fields to create a pool, which requires to enable the Start task section.
By using the start task run on each compute node as it joins the pool, the task will be executing when the node is added to the pool or when the node is restarted.
Once the start task configuration is enabled, we will need to define the required command line for the installation. We are using the following command line cmd /c “python-3.8.10-amd64.exe /quiet InstallAllUsers=1 PrependPath=1 Include_test=0”
However, you can find all the required command lines to execute the installation in the following link.
It is important to set the User Identity to Pool Autouser, Admin to grant administrative privileges.
Additionally, we need to define the Resource files that Azure Batch downloads to the compute node before running the command line, so once you click on the resource files option you need to click on the “pick storage blob” and it will open an interactive window where you can navigate through your storage explorer and select the installer.
Important: Check the Public access level of the blob container, if you leave it as Private(no anonymous access), like in the above example, you will need to specify the “Include SaS key” when you select the resource file, otherwise you will get authentication problems. However, If the access level is set to Blob or Container it will be public.
If you are using a Private access, then it is required to mark the Include SAS and set an expiration date before adding the Resources files
Finally, once the VM node is ready and the Start task finished, you can access the node using RDP and confirm that python is now installed.
You can execute the following command to confirm that the correct python version is installed.


Recent Comments