by Contributed | May 24, 2021 | Technology
This article is contributed. See the original author and article here.
We’re in the midst of our Microsoft Mechanics series on Microsoft Viva, the first employee experience platform (EXP) built for the digital era. In our last video, we dove into Viva Topics, which delivers company knowledge and expertise in the context of your work. Today, we’re taking a look at Viva Connections. I’ve joined Jeremy Chapman, the host of Microsoft Mechanics, to walk through the user experience as well as the steps for IT admins to setup and implement the module, including options for personalizing information sharing by role.
User experience. If you’re a Microsoft SharePoint user, you’ll recognize the experience immediately. Viva Connections expands upon your SharePoint home site and news feed to give you a curated, company-branded experience that brings together relevant news, conversations, and other resources in the context of the apps you use every day, like Microsoft Teams. The experience looks, feels, and functions the same as the SharePoint home site. Some of the integrations are the same too: Microsoft Yammer and Microsoft Stream bring conversations and videos to life in Viva Connections, while the intranet search experience is available from the Teams search experience. The module is currently available on Teams desktop and web as a pinned app in your left sidebar, with mobile coming later this year.
IT admin experience to set up. You might be asking yourself, “Do I need to create a separate SharePoint site to use Viva Connections?” Not at all. The module leverages your existing SharePoint home site and requires just a few steps to integrate it with Teams. You’ll actually start the process in SharePoint by enabling and setting up global navigation. Global navigation brings your SharePoint app bar—home, sites, news, and files—into Teams. Go to aka.ms/SetupGlobalNav for setup details. You’ll also want to add a Yammer Conversations web part to your home site to keep important conversations front and center in Viva Connections.
For now, the last step to create and add a Viva Connections app to your Teams environment happens in PowerShell, but we’ll be adding another option through the Teams admin center soon. To get started, download the viva-connections-desktop PowerShell script from aka.ms/VivaConnectionsPSBlog. Then, find a pair of .png images of your organization’s logo to associate with Viva Connections: one for the app catalog and one for the Teams app navigation bar. You can now run the PowerShell script, which will prompt you for a URL to your home site, a name for the app in Teams, a short and long description of the app, your company name and the URL for your public website, and the icons you selected. Finally, navigate to your Teams admin center, select Manage apps, and upload the PowerShell package you just created. Viva Connections is now available all your users in Teams.
This is a very brief overview of the PowerShell step, and while it’s easy to complete, you’ll want to watch the Microsoft Mechanics video above for exact instructions. The video has additional guidance for pinning the app by default to your users’ Teams app navigation bar.

IT admin experience to personalize. In addition to what comes straight from your SharePoint home site, like company news, Viva Connections uses adaptive cards to bring even more curated and customized resources to your users in a new dashboard view coming later this summer, like time off submission and expense reporting. The adaptive cards are quick informational bites that link out to more details, like a full webpage or Teams app, when tapped.
To add adaptive cards to the dashboard view, you can choose premade cards from Microsoft or Microsoft partners, or create your own. Building your own is an intuitive, visual experience in SharePoint that looks a lot creating a page. In the new Viva Connections Dashboard authoring experience that we’re building into SharePoint, you can choose a template or start from scratch, set card display options, and move the card into different positions on the dashboard. Once your card is ready, you can determine which groups in your organization will see it using the Audience targeting field in the card display options.

You can start using Viva Connections now on Teams desktop as we continue to work on delivering the mobile experience and Dashboard capabilities later this year. Get started by building your SharePoint home site with global navigation enabled, adding Yammer Communities and modern pages, and connect Viva Connections to your Teams environment. This is Part Three of our Microsoft Mechanics video series about Microsoft Viva. Keep visiting this site or aka.ms/VivaMechanics for the rest of the series. If you’d like more information on Viva in the meantime, head over to aka.ms/Viva.
As always, we want to hear from you! If you have any suggestions, questions, or comments, please visit us on our Microsoft Viva Tech Community page. We will also be hosting our first Microsoft Viva Ask Microsoft Anything (AMA) event on June 23, 2021. There will be more information on that event soon.
Learn more:
by Contributed | May 24, 2021 | Technology
This article is contributed. See the original author and article here.
Today, we are announcing a preview NuGet package, template, and Visual Studio v16.10 publishing support for creating OpenAPI enabled Azure Functions.
The OpenAPI Specification is an API description format for REST APIs and has become the leading convention for describing HTTP APIs. An OpenAPI description effectively describes your API surface; endpoints, operation parameters for each, authentication methods, and other metadata. As a part of the ecosystem already rich with tools and open-source packages for .NET, we wanted to extend this capability to Azure Functions.
In the early days of Azure Functions, there was a preview feature that allow you to use the OpenAPI specification to document your functions or endpoints. This feature experience was built into the Azure Portal, but never realized in the GA version of the product.
Brady Gaster showed the benefit of a well-designed API using ASP.NET Core and OpenAPI in this post on the ASP.NET Blog.
Getting Started
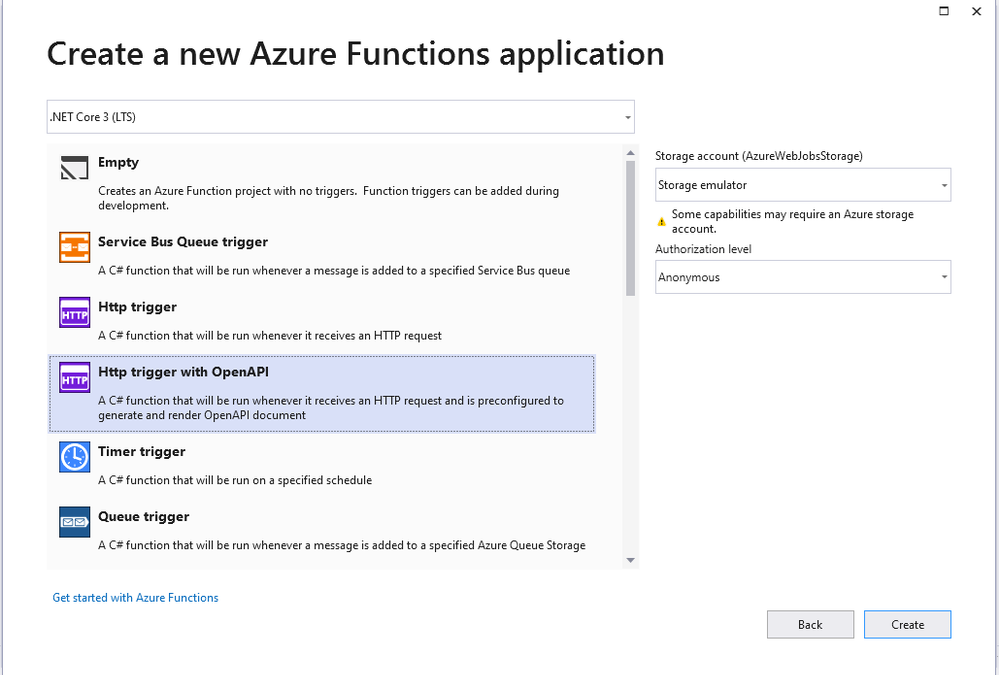
Using Visual Studio 16.10 or later, create a new Azure Functions project and choose the HttpTrigger template – “Http Trigger with OpenAPI”.

The new function is bootstrapped with the necessary implementation for OpenAPI support. When running the application, notice not only does the function emit the “Function1” endpoint as expected but also additional routes for a dynamic endpoint for OpenAPI document, Swagger document in JSON or YAML, Authentication redirects and the Swagger UI interactive app.

The additional routes are encapsulated when the function app is deployed, meaning that they are there but not exposed as public viewable routes.
Browsing to the `/api/swagger/ui` endpoint show the Swagger UI page which can be thought of as interactive documentation

The dynamic endpoint for the OpenAPI document accepts the version (v2 or v3) of the specification and the extension preferred (json or yaml). In the following example /api/openapi/v2.json returns the appropriate version of the specification in JSON. Note that the emitted JSON includes the operationId, an attribute used to provide a unique string-based identifier for each operation in the API. See more about generating HTTP API clients using Visual Studio Connected Services.

Publish and CI/CD support
As you can imagine, yes right click publish support is here for you. Using the known publishing dialog, pushing your OpenAPI enable function to AppService or Containers and provisioning the needed Azure resources are all handled.

Nothing has changed with the publishing of a new Azure Function, unless you want to also want to use this as a custom connector for your Power Apps. In Visual Studio 16.9 we added support for publishing to an existing Azure API Management service instances and creating new Consumption-mode instances of Azure API Management so you can use the monitoring, security, and integration capabilities of API Management.
In Visual Studio 16.10, the functionality is extended to support the Azure Function project that includes OpenAPI capabilities. When you are publishing an Azure Function with OpenAPI, the API Management tab allowing for selecting an existing instance or creating a new one.

Once the publish operation completes, you’ll be able to view and test the API operations within the API Management portal blade.
As an additional option, the provisioning and deployment of the Azure Function and related resources is now also available as a GitHub Action if your code in committed to a repository.

On finishing the publish dialog, a GitHub Action is created and committed to the repository triggered by a push of any change.

Using either method publishes or updates your Azure Function, creates or updates the API Management instance AND imports the function for you.
Azure API Management
Typically when adding a new API to the API Management instance you would have to manually define names, operations, parameters, endpoints and other metadata. When using the OpenAPI Extension, this is all done for you and any subsequent updates are also handled automatically. The following image shows the “Run” operation from the Azure Function along with all the configuration complete.

Add OpenAPI support to existing projects
For adding OpenAPI support to your existing Azure Functions, the Microsoft.Azure.WebJobs.Extensions.OpenApi package is available for .NET functions using the HttpTrigger. With just a few method decorators, the package makes your existing functions endpoints optimized for discovery.
public static class SayHello
{
    [FunctionName("SayHello")]
    [OpenApiOperation(operationId: "Run", tags: new[] { "name" })]
    [OpenApiParameter(name: "name", In = ParameterLocation.Query, Required = true, Type = typeof(string), Description = "Who do you want to say hello to?")]
    [OpenApiResponseWithBody(statusCode: HttpStatusCode.OK, contentType: "text/plain", bodyType: typeof(string), Description = "The OK response")]
    public static async Task<IActionResult> Run(
        [HttpTrigger(AuthorizationLevel.Anonymous, "get", "post", Route = null)] HttpRequest req,
        ILogger log)
    {
        log.LogInformation("C# HTTP trigger function processed a request.");
        string name = req.Query["name"];
        …
        return new OkObjectResult(responseMessage);
        }
    }
}
In this example, the AuthorizationLevel is set to “Anonymous”, however with the OpenApiSecurity decorator, using either “code” through querystring or “x-functions-key” through headers; additional security can be applied.
Summary
To learn more about the Azure Functions OpenAPI extension, visit the project on GitHub and checkout the preview documentation. As always. We’re interested in your feedback, please comment below and/or provide more in the issues tab on the repository.
We can’t wait to see what you build.
by Contributed | May 24, 2021 | Technology
This article is contributed. See the original author and article here.
When you see your cloud-based application architecture, no matter it is microservices architecture or not, many systems are inter-connected and send/receive messages in real-time, near real-time or asynchronously. You all know, in this environment, at some stage, some messages are often failed to deliver to their respective destinations or halted while processing them.
In the cloud environment, components in a system run with their rhythm. Therefore, you should assume that a particular component gets hiccup at any point in time and design the architecture based on this assumption. Therefore, to minimise message loss, you should be able to trace them from one end to the other end. We use the term “Observability” and “Traceability” for it.
In my previous post, a citizen dev in a fusion team uses an Azure Functions app that enables the OpenAPI capability, and build a Power Apps app. This time, I’m going to add a capability that traces the workout data from the Power Apps app to Azure Cosmos DB through Azure Monitor and Application Insights. I will also discuss how this ability is related to the concepts from Open Telemetry.
You can find the sample code used in this post at this GitHub repository.
Scenario
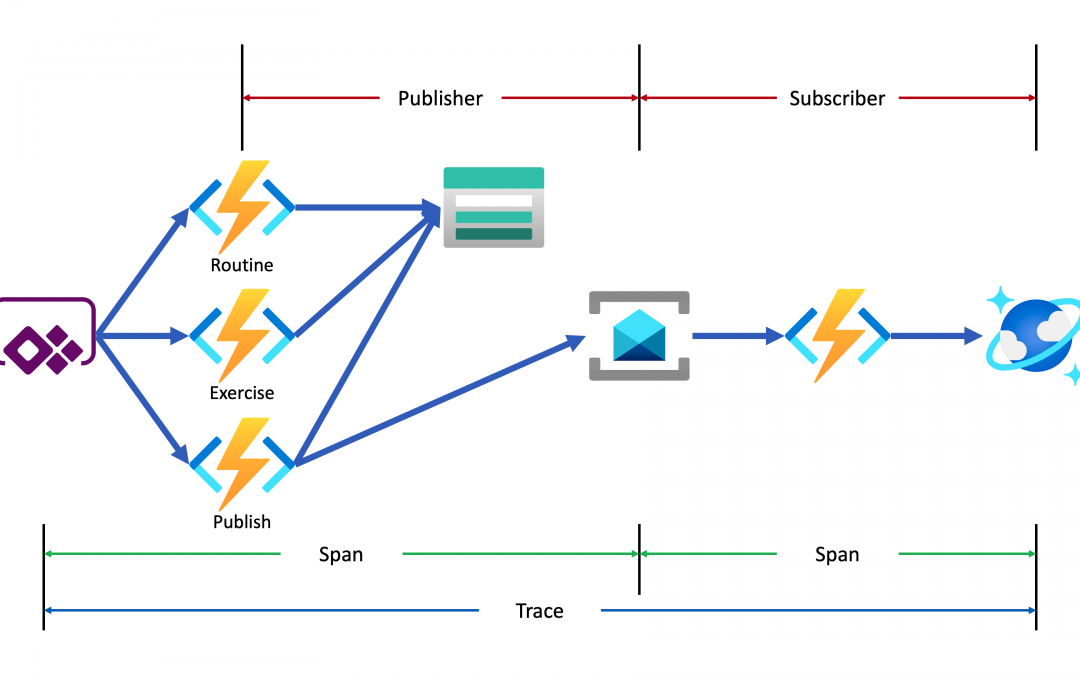
Lamna Healthcare Company runs a fitness centre in Korea for their members. The centre provides their members with a Power Apps app to record their workout details. Ji Min, the trainer team lead, recently got some feedback from her members that the app gets crashed while putting their workout logs. As she represents the trainers in the fusion team, she started discussing this issue with Su Bin, the pro dev in the team. As a result, Su Bin decided to add a tracing logic into the Function app. Here’s the high-level diagram that describes the data processing flow.
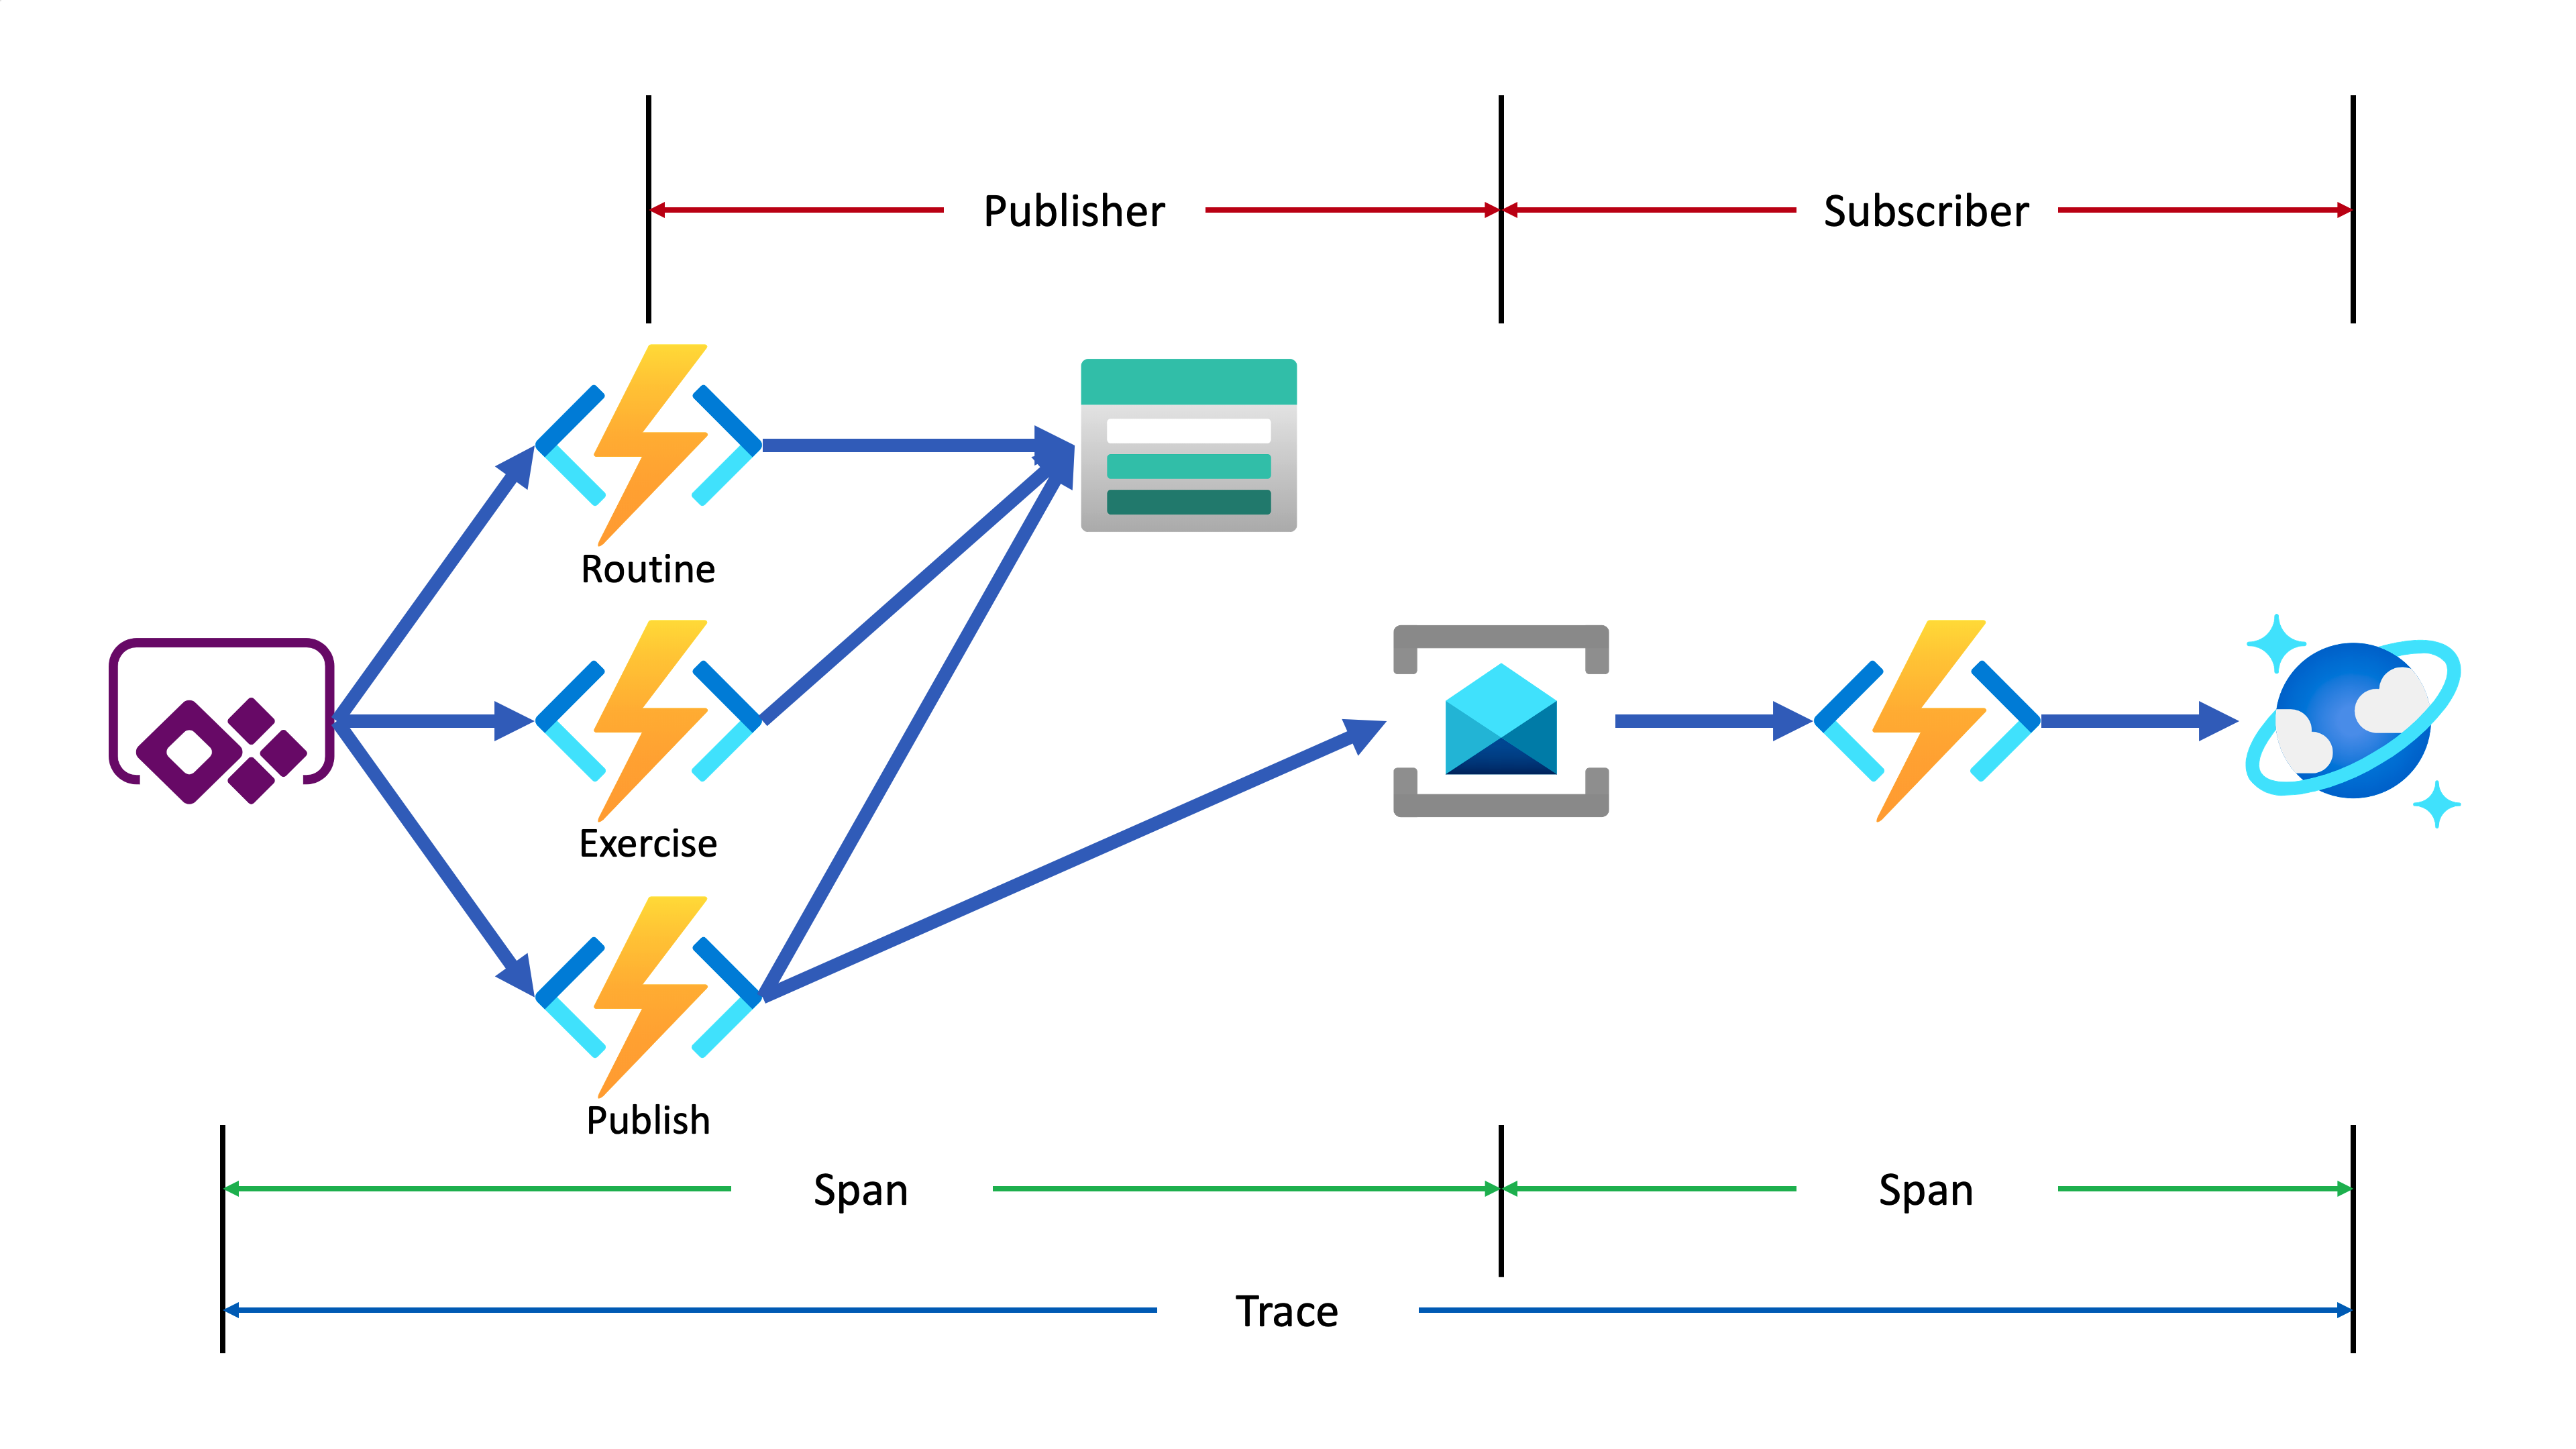
Let’s analyse the diagram based on the Open Telemetry spec.
- The entire data flow from Power Apps to Cosmos DB is called “Trace“.
- The whole flow is divided into two distinctive parts by Azure Service Bus because both sides are totally different and independent applications (Publisher and Subscriber). So, these two individual parts are called “Span“. In other words, the Span is a unit of work that handles messages.
In the picture above, the Publisher consists of three actions, routine, exercise and publish. Although you can split it into three sub Spans, let’s use one Span for now.
- The Subscriber receives the message from Azure Service Bus, transforms the message and stores it to Cosmos DB.
- When a message traverses over spans, you need a carrier for metadata so that you can trace the message within the whole Trace. The metadata is called “Span Context“.
Power Apps Update
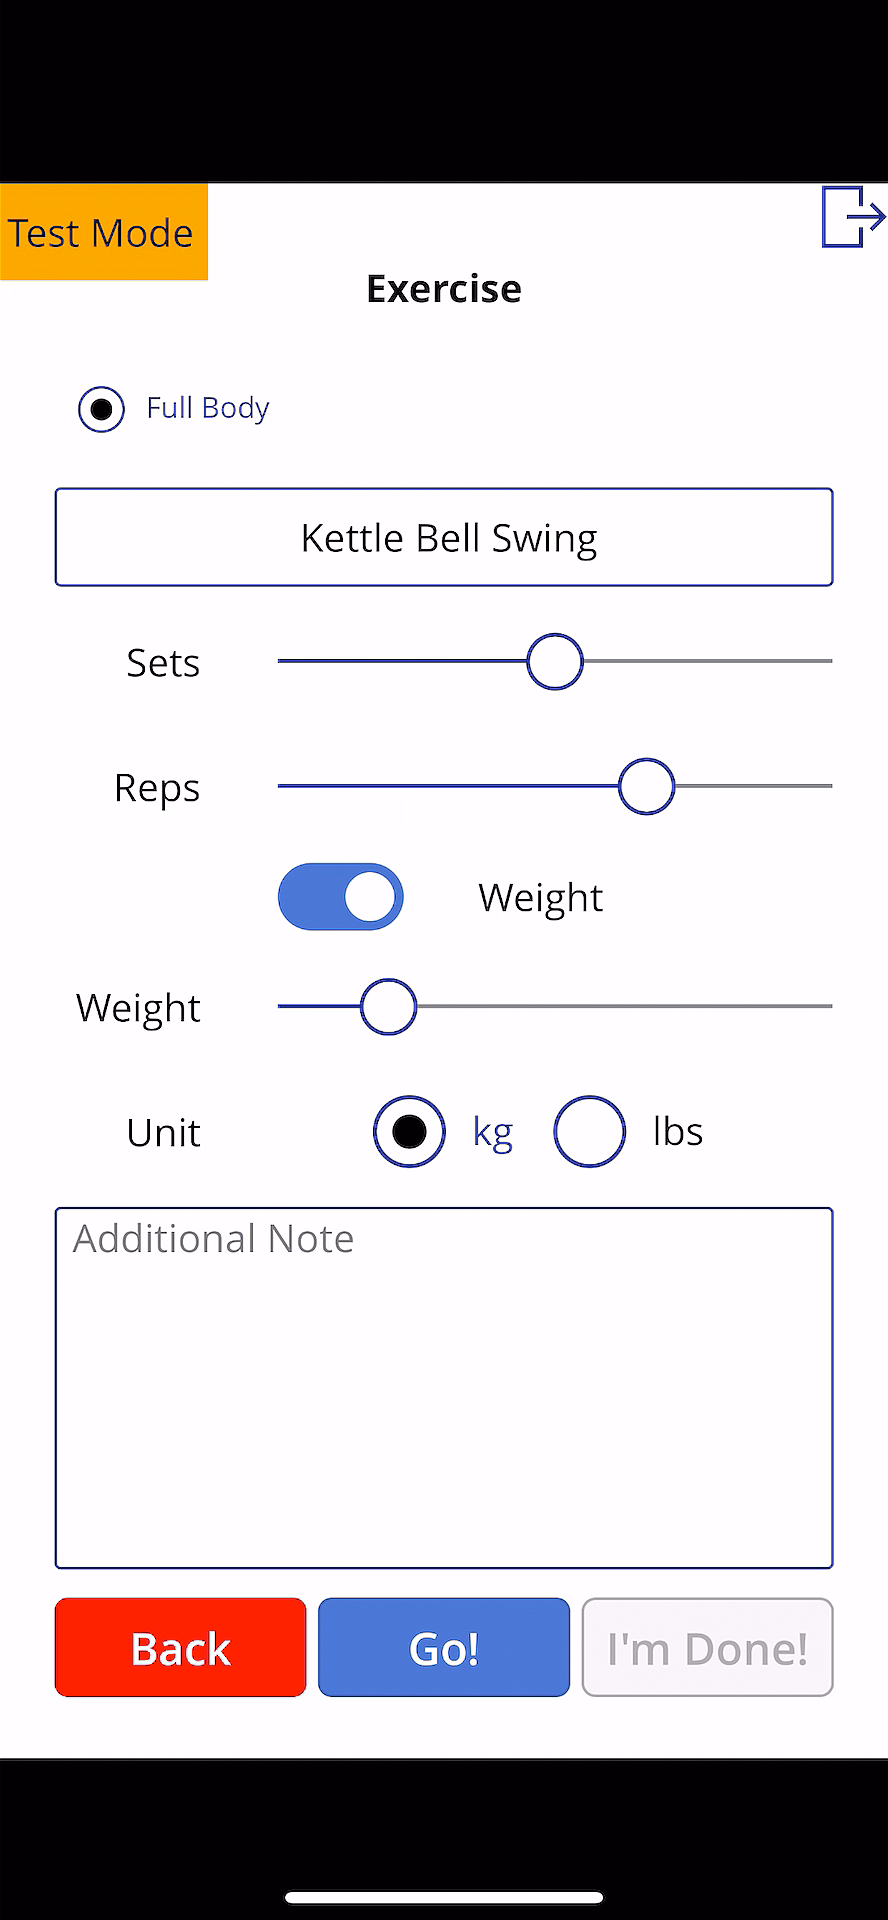
As mentioned earlier, trace starts from the Power Apps app. Therefore, the app needs an update for the tracing capability. Generate both correlationId and spanId when tapping the Start button and send both to API through the routine action.

By doing so, you know the tracing starts from the Power Apps app side while monitoring, and the first Span starts from it as well. Both correlationId and spanId travels until the publish action is completed. Moreover, the correlationId is transferred to the other Span through the Span Context.
Backend Update
As long as the Azure Functions app knows the instrumentation key from an Application Insights instance, it traces almost everything. OpenTelemetry.NET is one of the Open Telemetry implementations, which has recently released v1.0 for tracing. Both metrics and logging are close to GA. However, it doesn’t work well with Azure Functions. Therefore, in this post, let’s manually implement the tracing at the log level, which is sent to Application Insights.
Publisher – HTTP Trigger
When do we take the log?
In this example, the backend APIs consist of routine, exercise and publish actions. Each action stores data to Azure Table Storage, by following the event sourcing approach. So, it’s good to take logs around the data handling as checkpoints. In addition to that, while invoking the publish action, it aggregates the data stored from the previous actions and sends the one to Azure Service Bus, which is another good point that takes the log as a checkpoint.
All the logging features used in Azure Functions implement the ILogger interface. Through this interface, you can store custom telemetry values to Application Insights. Then, what could be the values for the custom telemetry?
- Event Type: Action and its invocation result –
RoutineReceived, ExerciseCreated or MessageNotPublished
- Event Status: Success or failure of the event –
Succeeded or Failed
- Event ID: Azure Functions invocation ID – whenever a new request comes in a new GUID is assigned.
- Span Type: Type of Span –
Publisher or Subscriber
- Span Status: Current Span status –
PublisherInitiated, SubscriberInProgress or PublisherCompleted
- Span ID: GUID assigned to Span each time it is invoked
- Interface Type: Type of user interface –
Test Harness or Power Apps App
- Correlation ID: Unique ID for the whole Trace
It could be the bare minimum stored to Application Insights. Once you capture them, you will be able to monitor in which trace (correlation ID) the data flow through which user interface (interface type), span (span type), and event (event type) successfully or not (event status).
Here’s the extension method for the ILogger interface. Let’s have a look at the sample code below that checks in the request data from Power Apps is successfully captured on the routine action. Both correlationId and spanId are sent from Power Apps (line #9-10). The invocationId fro the Azure Functions context has become the eventId (line #12). Finally, event type, event status, span type, span status, interface type and correlation ID are logged (line #14-17).
public async Task<IActionResult> CreateRoutineAsync(

    [HttpTrigger(AuthorizationLevel.Function, HttpVerbs.Post, Route = “routines”)] HttpRequest req,

    ExecutionContext context,

    ILogger log)

{

    var request = await req.ToRequestMessageAsync<RoutineRequestMessage>().ConfigureAwait(false);

    var @interface = request.Interface;
    var correlationId = request.CorrelationId;

    var spanId = request.SpanId;
    var eventId = context.InvocationId;
    log.LogData(LogLevel.Information, request,

                EventType.RoutineReceived, EventStatusType.Succeeded, eventId,

                SpanType.Publisher, SpanStatusType.PublisherInitiated, spanId,

                @interface, correlationId);
    …

}
The code below shows another checkpoint. Store the request data to Azure Table Storage (line #14). If it’s successful, log it (line #18-23). If not, throw an exception, handle it and log the exception details (line #29-34).
public async Task<IActionResult> CreateRoutineAsync(

    [HttpTrigger(AuthorizationLevel.Function, HttpVerbs.Post, Route = “routines”)] HttpRequest req,

    ExecutionContext context,

    ILogger log)

{

    …
    try

    {

        …
        await this._client.CreateTableIfNotExistsAsync(this._settings.GymLog.StorageAccount.Table.TableName).ConfigureAwait(false);

        var table = this._client.GetTableClient(this._settings.GymLog.StorageAccount.Table.TableName);

        var response = await table.UpsertEntityAsync(entity).ConfigureAwait(false);
        …
        log.LogData(response.Status.ToLogLevel(), res.Value,

                    EventType.RoutineCreated, EventStatusType.Succeeded, eventId,

                    SpanType.Publisher, SpanStatusType.PublisherInProgress, spanId,

                    @interface, correlationId,

                    clientRequestId: response.ClientRequestId,

                    message: response.Status.ToResponseMessage(res));

    }

    catch (Exception ex)

    {

        …
        log.LogData(LogLevel.Error, res.Value,

                    EventType.RoutineNotCreated, EventStatusType.Failed, eventId,

                    SpanType.Publisher, SpanStatusType.PublisherInProgress, spanId,

                    @interface, correlationId,

                    ex: ex,

                    message: ex.Message);

    }
    …

}
In similar ways, the other exercise and publish actions capture the checkpoint logs.
Publisher – Span Context
The publish action in the Publisher Span doesn’t only capture the checkpoint log, but it should also implement Span Context. Span Context contains metadata for tracing, like correlation ID. Depending on the message transfer method, use either the HTTP request header or message envelope. As this system uses Azure Service Bus, use the ApplicationProperties dictionary in its message envelope.
Let’s have a look at the code for the publish action. This part describes that the message body is about the workout details (line #23-24). Other data is stored to CorrelationId and MessageId properties of the message object (line #26-27) and the ApplicationProperties dictionary so that the subscriber application makes use of them (line #30-33). Finally, after sending the message to Azure Service Bus, capture another checkpoint that message has been successfully sent (line #37-42).
public async Task<IActionResult> PublishRoutineAsync(

    [HttpTrigger(AuthorizationLevel.Function, HttpVerbs.Post, Route = “routines/{routineId}/publish”)] HttpRequest req,

    Guid routineId,

    ExecutionContext context,

    [ServiceBus(GymLogTopicKey)] IAsyncCollector<ServiceBusMessage> collector,

    ILogger log)

{

    var request = await req.ToRequestMessageAsync<PublishRequestMessage>().ConfigureAwait(false);

    var @interface = request.Interface;
    var correlationId = request.CorrelationId;

    var spanId = request.SpanId;
    var eventId = context.InvocationId;
    try

    {

        …
        var messageId = Guid.NewGuid();

        var subSpanId = Guid.NewGuid();

        var timestamp = DateTimeOffset.UtcNow;

        var message = (RoutineQueueMessage)(PublishResponseMessage)res.Value;

        var msg = new ServiceBusMessage(message.ToJson())

        {

            CorrelationId = correlationId.ToString(),

            MessageId = messageId.ToString(),

            ContentType = ContentTypes.ApplicationJson,

        };

        msg.ApplicationProperties.Add(“pubSpanId”, spanId);

        msg.ApplicationProperties.Add(“subSpanId”, subSpanId);

        msg.ApplicationProperties.Add(“interface”, @interface.ToString());

        msg.ApplicationProperties.Add(“timestamp”, timestamp.ToString(CultureInfo.InvariantCulture));
        await collector.AddAsync(msg).ConfigureAwait(false);
        log.LogData(LogLevel.Information, msg,

                    EventType.MessagePublished, EventStatusType.Succeeded, eventId,

                    SpanType.Publisher, SpanStatusType.PublisherInProgress, spanId,

                    @interface, correlationId,

                    messageId: messageId.ToString(),

                    message: EventType.MessagePublished.ToDisplayName());
        …

    }

    catch (Exception ex)

    {

        …

    }
    …

}
Subscriber – Service Bus Trigger
As the tracing metadata is transferred from Publisher via Span Context, Subscriber simply uses it. The following code describes how to interpret the message envelop. Restore the correlation ID (line #10) and Message ID (line #13). And capture another checkpoint whether the message restore is successful or not (line #16-19).
public async Task IngestAsync(

    [ServiceBusTrigger(GymLogTopicKey, GymLogSubscriptionKey)] ServiceBusReceivedMessage msg,

    ExecutionContext context,

    ILogger log)

{

    …
    var @interface = Enum.Parse<InterfaceType>(msg.ApplicationProperties[“interface”] as string, ignoreCase: true);
    var correlationId = Guid.Parse(msg.CorrelationId);

    var spanId = (Guid)msg.ApplicationProperties[“subSpanId”];
    var messageId = Guid.Parse(msg.MessageId);

    var eventId = context.InvocationId;
    log.LogData(LogLevel.Information, message,

                EventType.MessageReceived, EventStatusType.Succeeded, eventId,

                SpanType.Subscriber, SpanStatusType.SubscriberInitiated, spanId,

                @interface, correlationId);
    …

}
Then, store the message to Azure Cosmos DB (line #12), log another checkpoint (line #16-21). If there’s an error while processing the message, handle the exception and capture the checkpoint as well (line #25-30).
public async Task IngestAsync(

    [ServiceBusTrigger(GymLogTopicKey, GymLogSubscriptionKey)] ServiceBusReceivedMessage msg,

    ExecutionContext context,

    ILogger log)

{

    …
    try

    {

        …
        var response = await container.UpsertItemAsync<RoutineRecordItem>(record, new PartitionKey(record.ItemType.ToString())).ConfigureAwait(false);
        …
        log.LogData(LogLevel.Information, message,

                    EventType.MessageProcessed, EventStatusType.Succeeded, eventId,

                    SpanType.Subscriber, SpanStatusType.SubscriberCompleted, spanId,

                    @interface, correlationId,

                    recordId: record.EntityId.ToString(),

                    message: response.StatusCode.ToMessageEventType().ToDisplayName());

    }

    catch (Exception ex)

    {

        log.LogData(LogLevel.Error, message,

                    EventType.MessageNotProcessed, EventStatusType.Failed, eventId,

                    SpanType.Subscriber, SpanStatusType.SubscriberCompleted, spanId,

                    @interface, correlationId,

                    ex: ex,

                    message: ex.Message);
        …

    }

}
So far, all paths the data sways have been marked as checkpoints and store the check-in log to Application Insights. Now, how can we check all the traces on Azure Monitor?
KUSTO Query on Azure Monitor
This time, Ji Min received another feedback that a new error has occurred while storing the workout details with screenshots.
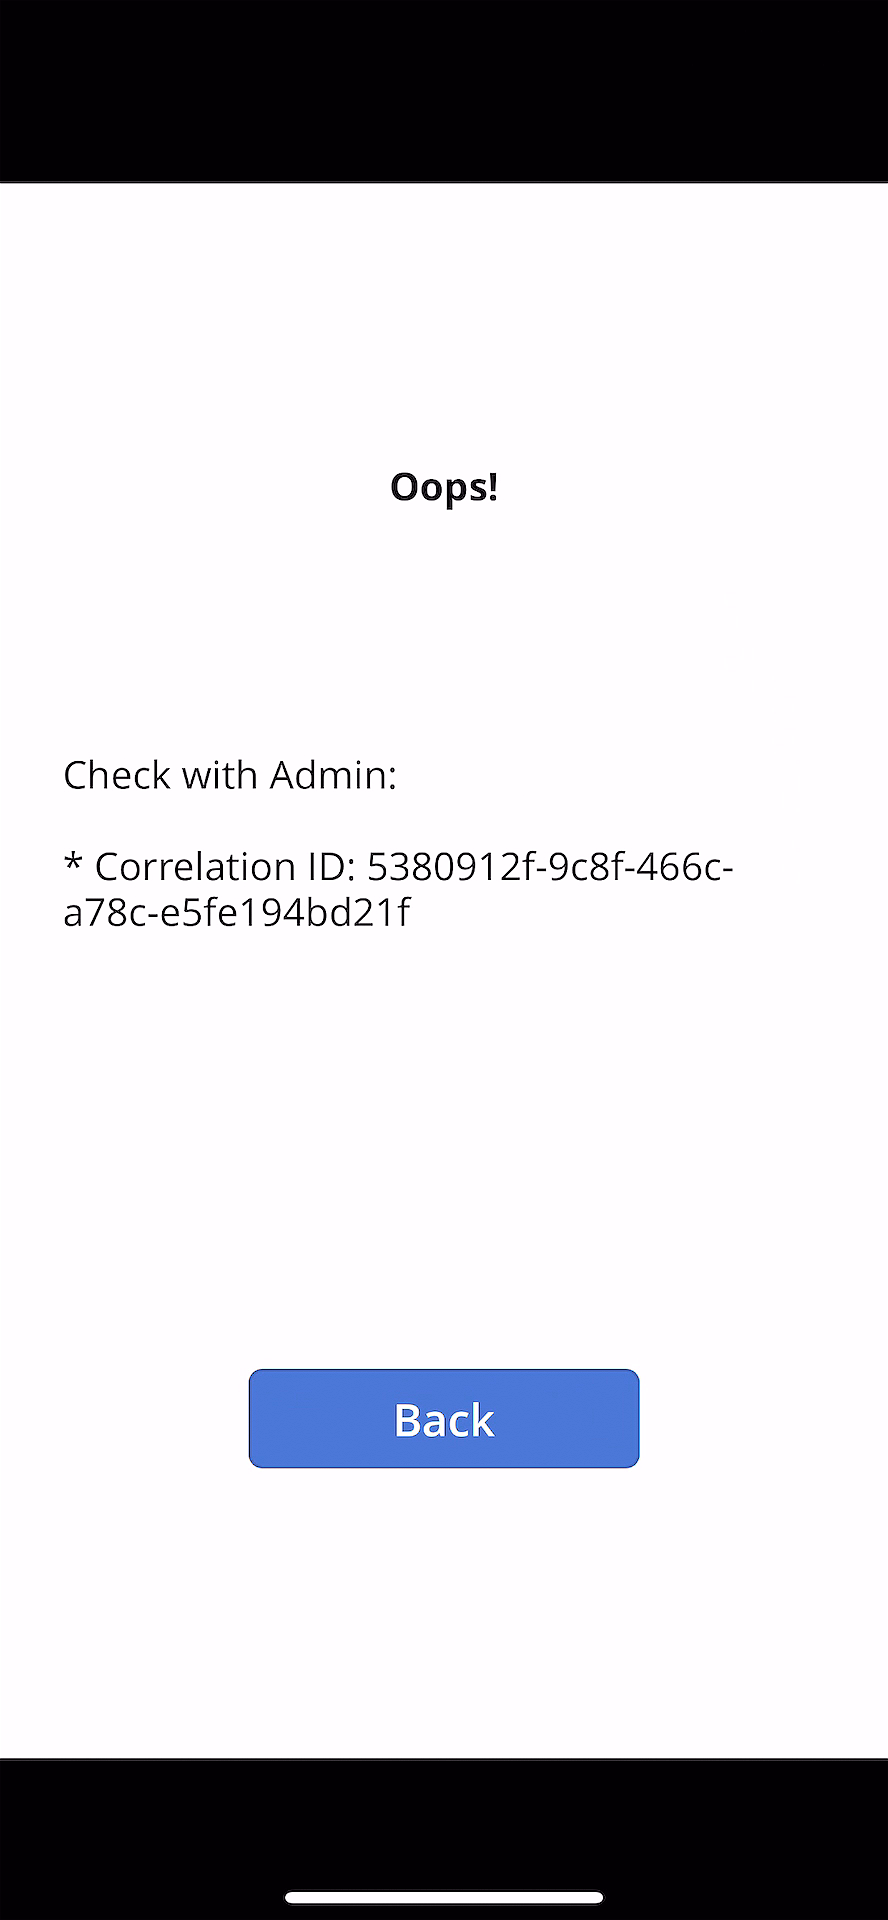
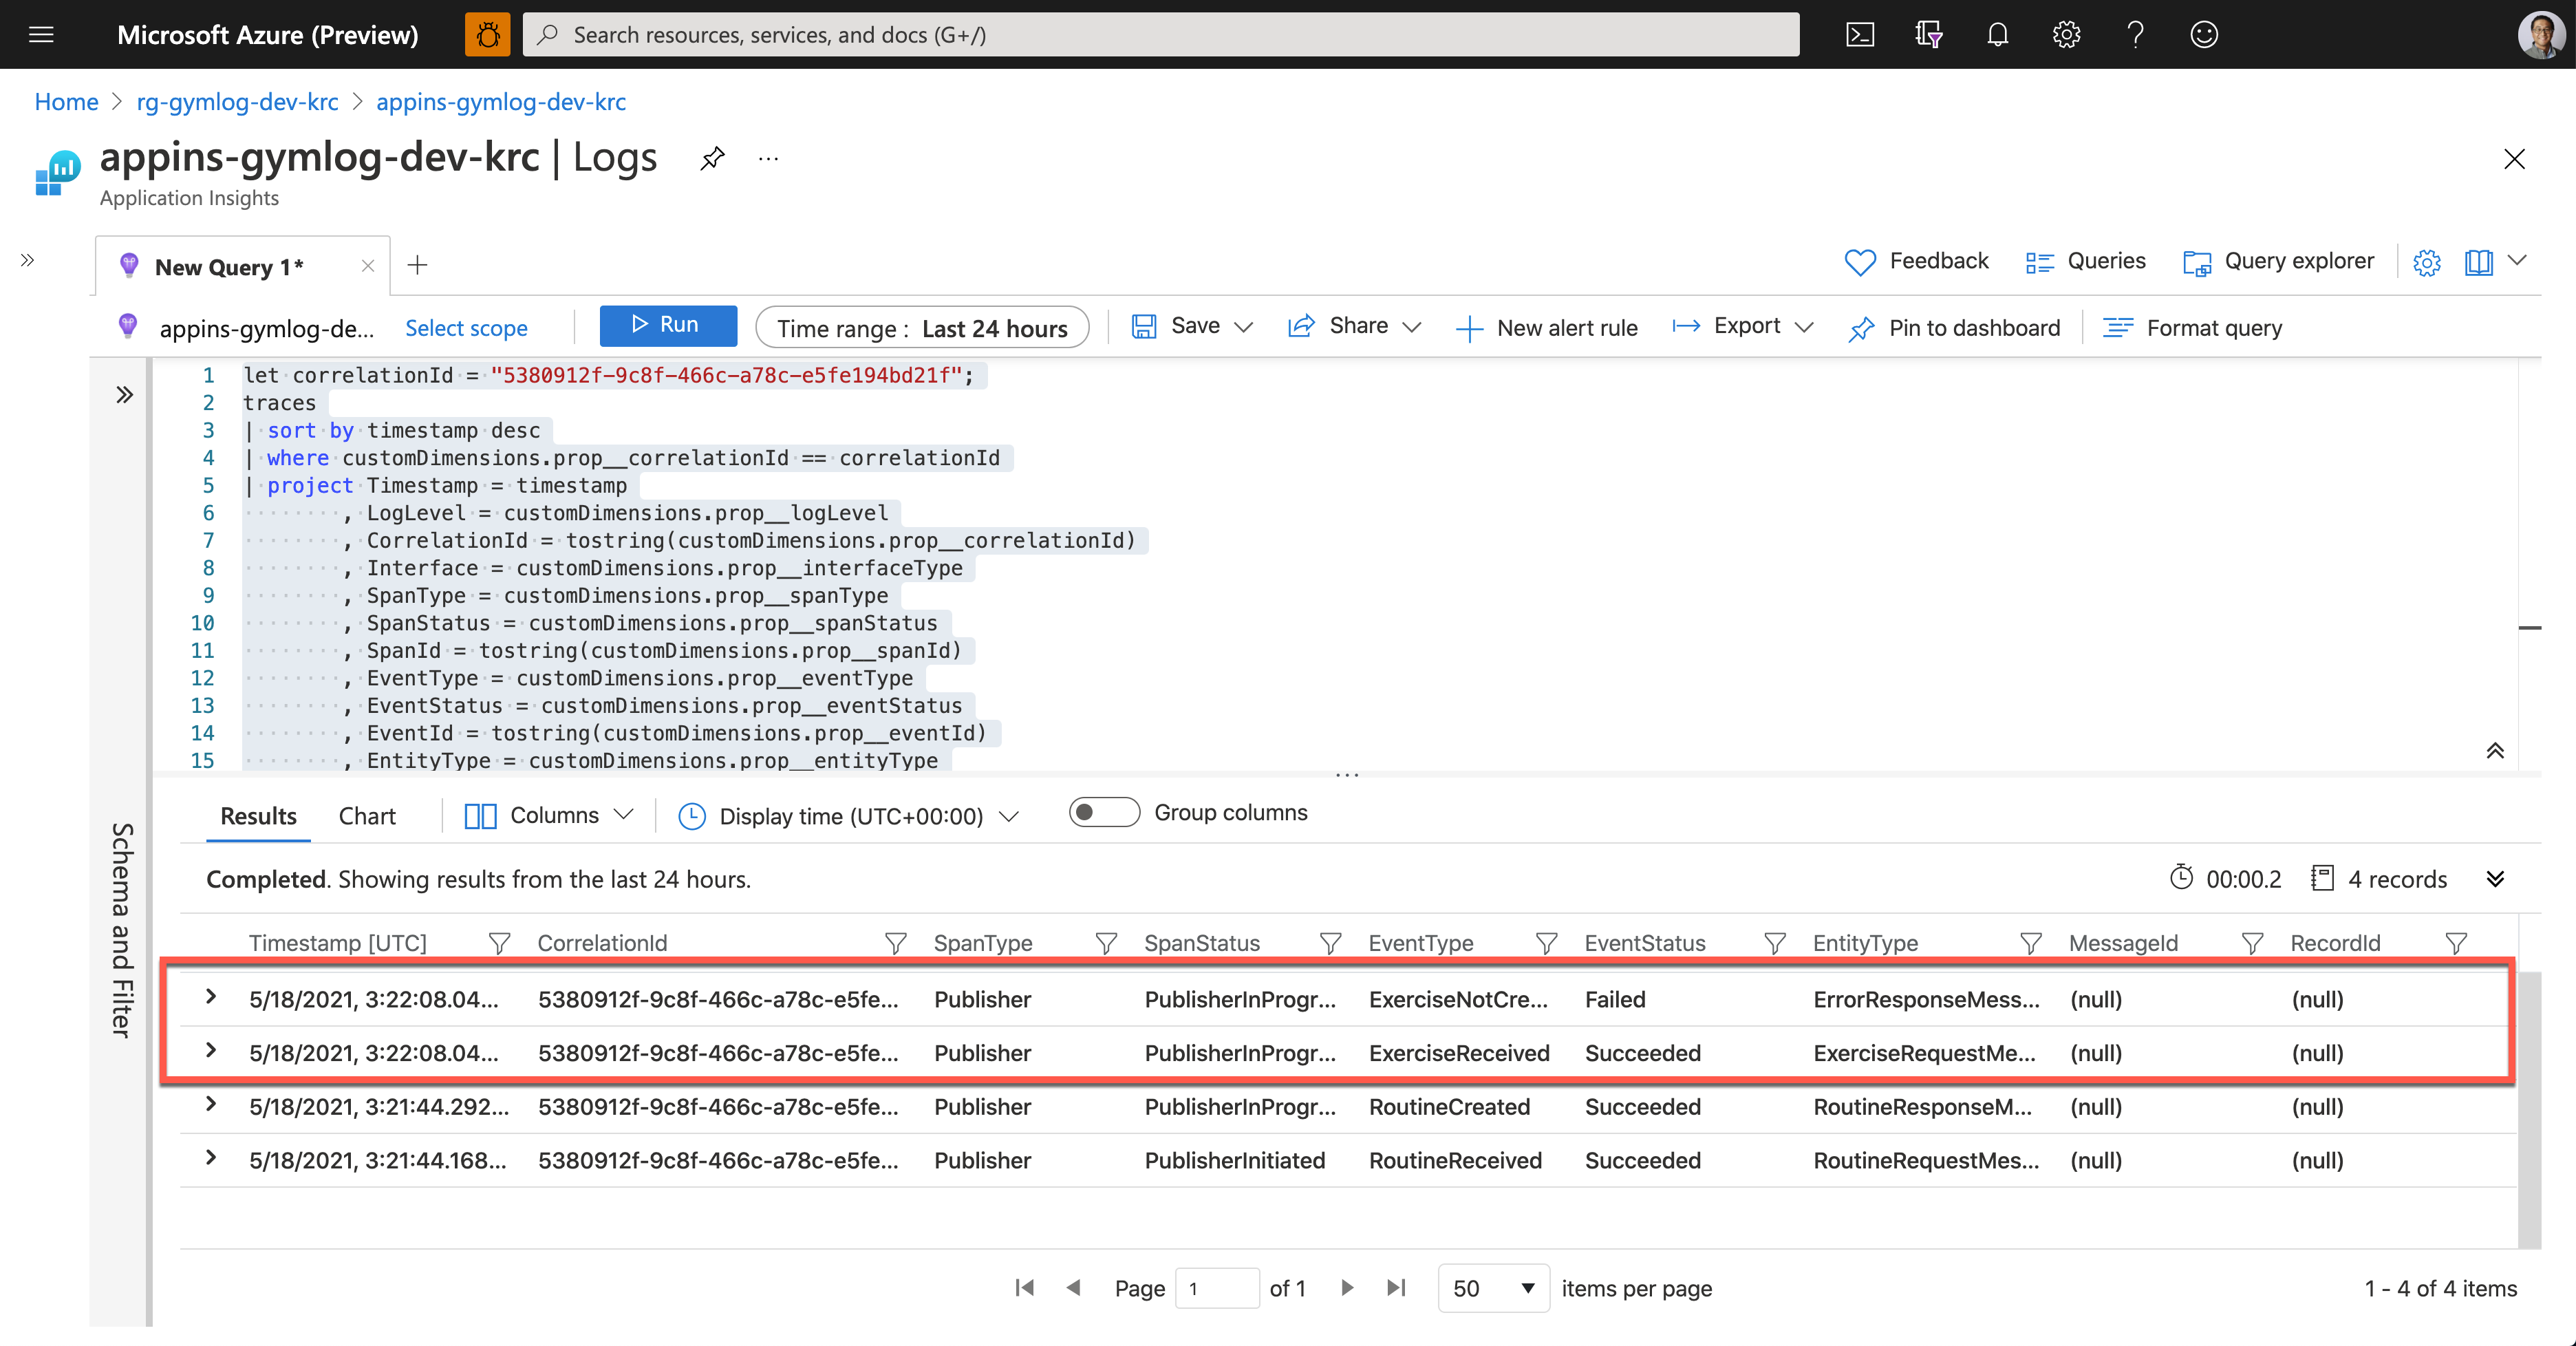
As soon as Ji Min shared the pictures with Su Bin, Su Bin wrote a Kusto query and ran it on Application Insights. Assign the correlationId value for tracing (line #1). Then use the custom telemetry values for the query. As all the custom properties start with customDimensions.prop__, include them in the where clause with the correlation ID for filtering (line #4), and in the project clause to select fields that I want to see (line #5-18).
let correlationId = “5380912f-9c8f-466c-a78c-e5fe194bd21f”;

traces

| sort by timestamp desc

| where customDimensions.prop__correlationId == correlationId

| project Timestamp = timestamp

          , LogLevel = customDimensions.prop__logLevel

          , CorrelationId = tostring(customDimensions.prop__correlationId)

          , Interface = customDimensions.prop__interfaceType

          , SpanType = customDimensions.prop__spanType

          , SpanStatus = customDimensions.prop__spanStatus

          , SpanId = tostring(customDimensions.prop__spanId)

          , EventType = customDimensions.prop__eventType

          , EventStatus = customDimensions.prop__eventStatus

          , EventId = tostring(customDimensions.prop__eventId)

          , EntityType = customDimensions.prop__entityType

          , ClientRequestId = customDimensions.prop__clientRequestId

          , MessageId = customDimensions.prop__messageId

          , RecordId = customDimensions.prop__recordId

| project Timestamp

          , CorrelationId

          , SpanType

          , SpanStatus

          , EventType

          , EventStatus

          , EntityType

          , MessageId

          , RecordId
And here’s the query result. It says it was OK to receive the exercise data, but it failed to store it to Azure Table Storage.
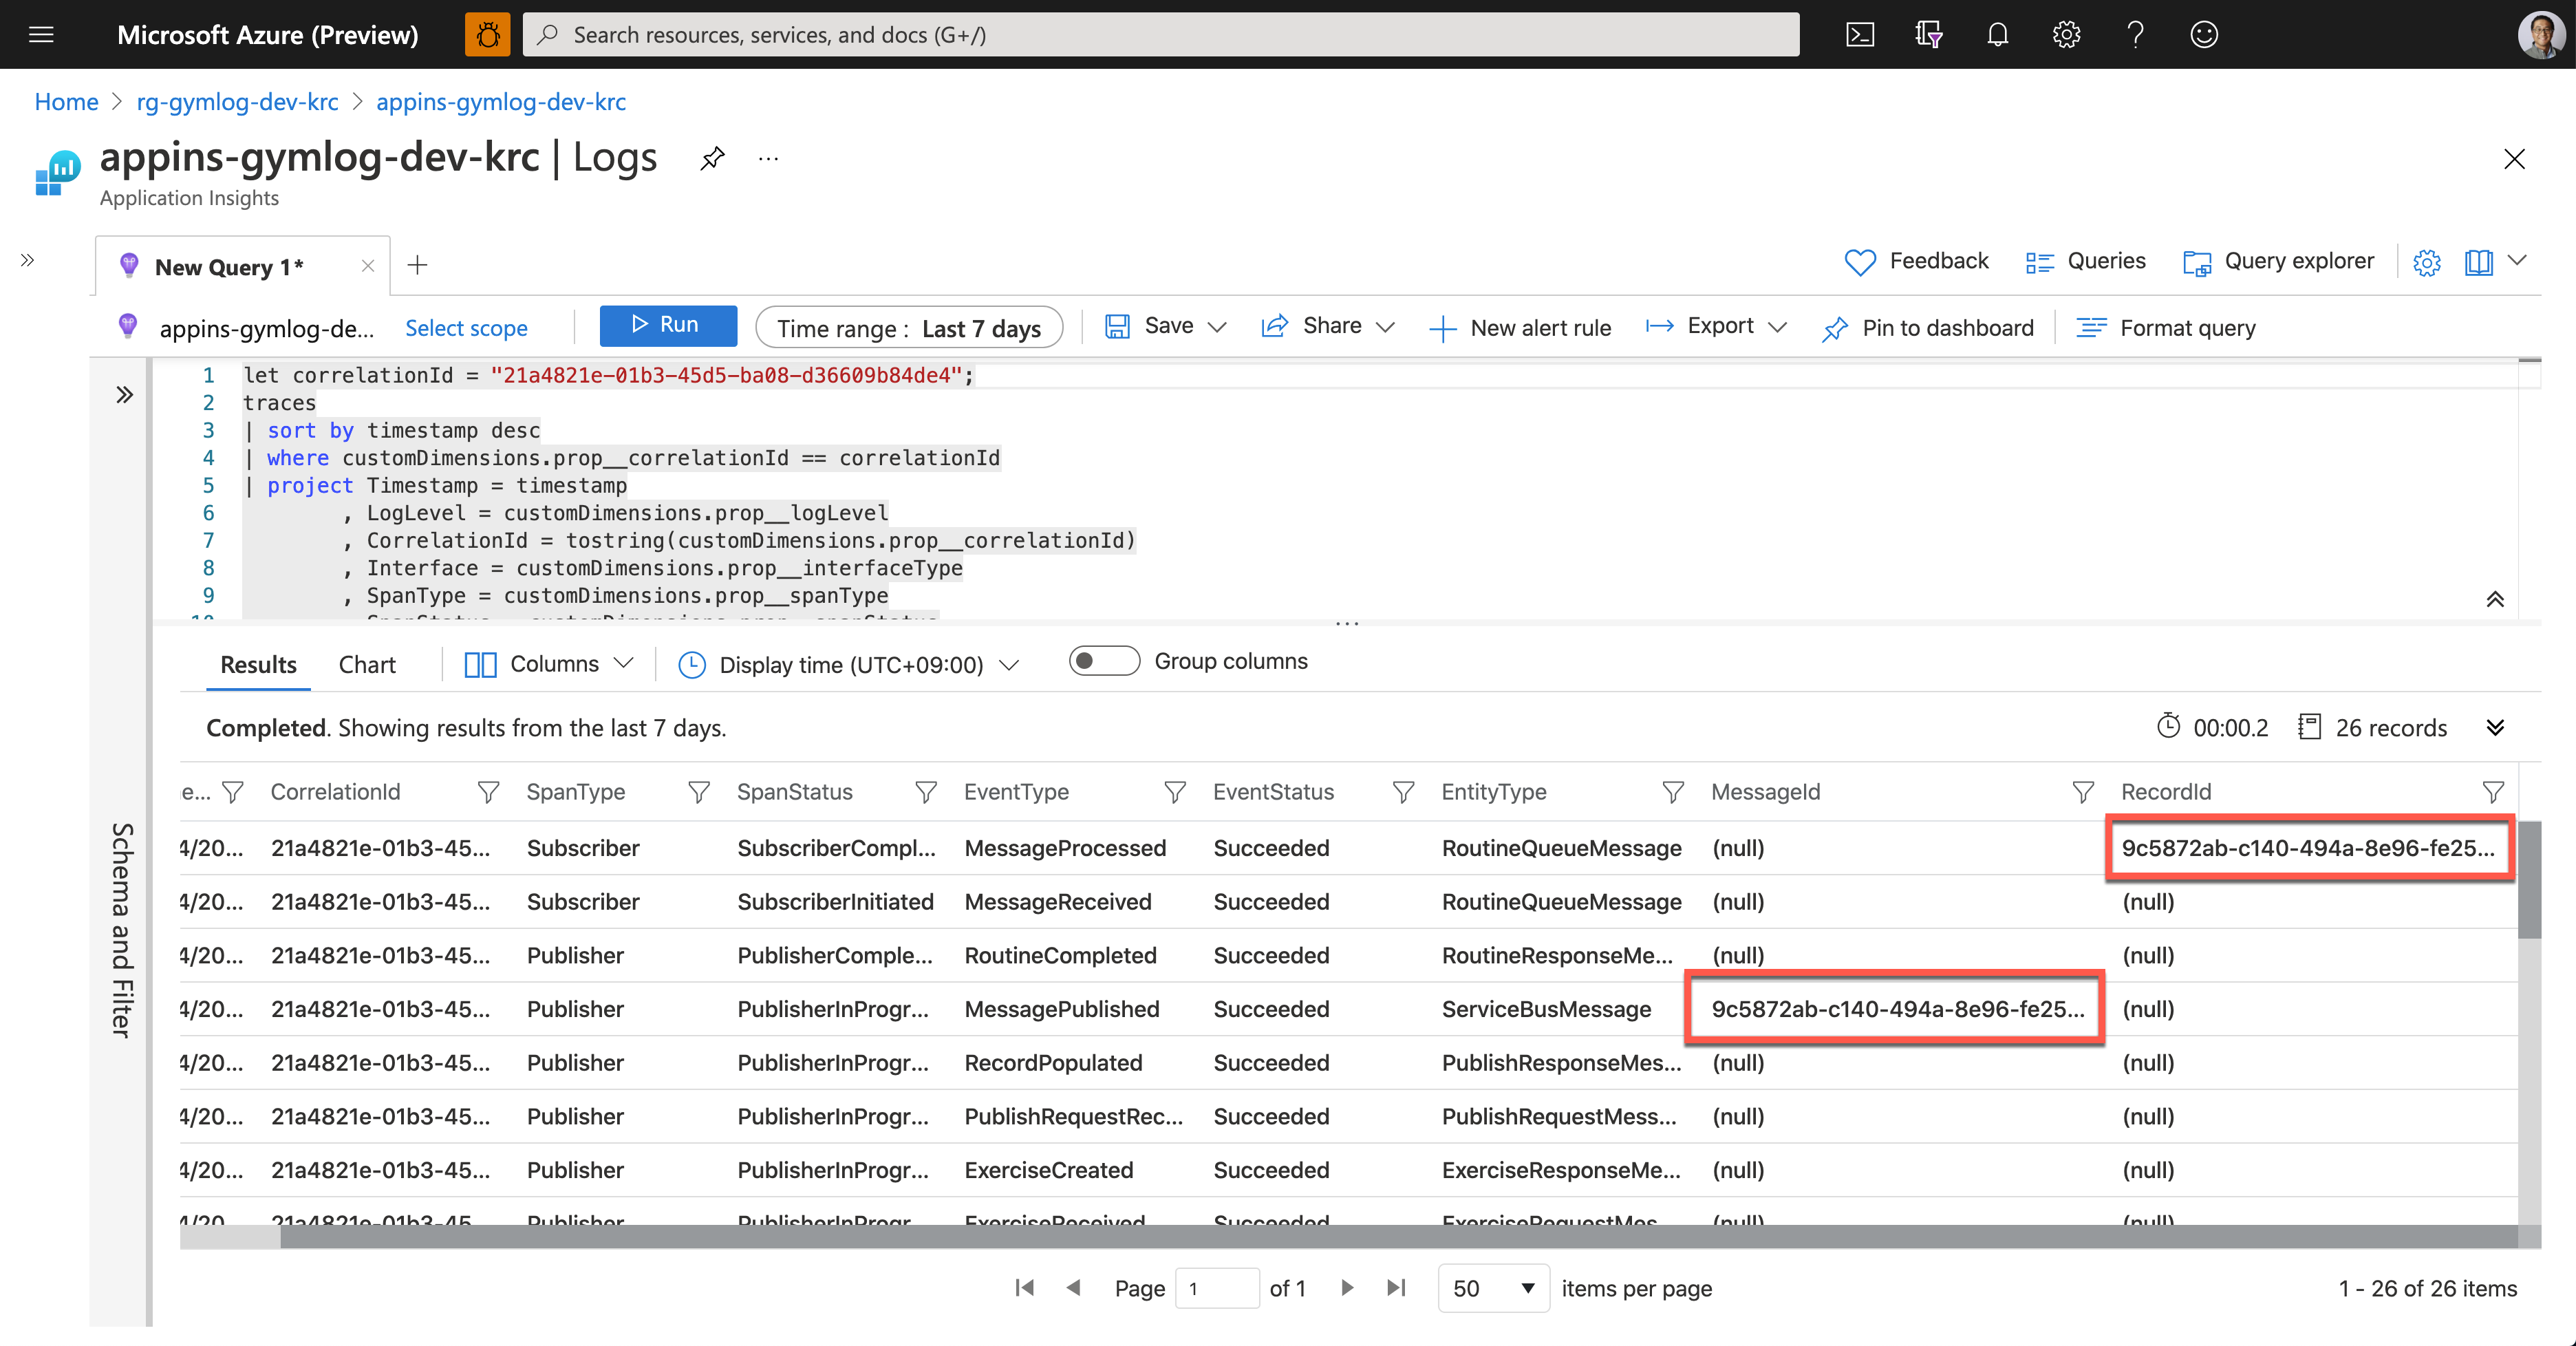
Now, Su Bin found out where the error has occurred. She fixed the code and deployed the API again, and all is good! The following screenshot shows one of the successful end-to-end tracking logs. A Message sent from Publisher has processed well on the Subscriber side, and the message has become a record based on the logic implemented on the Subscriber side.
So, we confirm that the data tracing logic has been implemented by following the Open Telemetry concepts through Application Insights. Ji Min and her trainer crews, and all the members in the gym are now able to know the reference ID for tracing.
So far, we’ve walked through the implementation of data tracing logic with the concept of Open Telemetry, from Power Apps to Cosmos DB through Application Insights.
Unfortunately, the OpenTelemetry.NET doesn’t work in Azure Functions as expected for now. But we can still implement the concept through Application Insights for the time being. In the next post, let’s try the DevOps journey with Power Apps.
This article was originally published on Dev Kimchi.


Recent Comments