by Contributed | Jun 14, 2021 | Technology
This article is contributed. See the original author and article here.
Hey HLS Blog Members!
We’ve been thinking about this for a while and we’ve decided that its time to share a bit more about Microsoft and its journey into the hardware world. We’re taking you down the road to learn a bit more about the Microsoft Surface Business. We’ll be sharing weekly recordings of the current state of the hardware world and how it fits into the world of Health and Life Sciences. We ask that you join us and watch the session available on youtube.

by Contributed | Jun 14, 2021 | Technology
This article is contributed. See the original author and article here.
Microsoft partners like Soft Flow, jtwo solutions, and CloudCheckr deliver transact-capable offers, which allow you to purchase directly from Azure Marketplace. Learn about these offers below:
|
Soft Flow Managed Service Backup: In this offer, Soft Flow will set up and manage Microsoft Azure Site Recovery and Azure Backup to ensure your company’s workloads replicate on physical and virtual machines, especially during outages. Soft Flow engineers and consultants will make sure your data is always safe, available, and recoverable.
|
 |
cloudstep: cloudstep from jtwo solutions provides cloud cost modeling and financial analysis, enabling chief financial officers and IT managers to answer such key questions as “How much would this application cost to deliver?” and “How would it compare to other options?” Seize the benefits of the cloud while avoiding the pitfalls of overspending.
|
 |
CloudCheckr CMx for Multi-Cloud Governance: CloudCheckr CMx delivers total visibility in Azure and other public clouds, making complex cloud infrastructure easy to manage and govern. Customizable dashboard alerts and reporting help you take control of your Azure or multi-cloud infrastructure and scale with confidence.
|
|
by Contributed | Jun 14, 2021 | Technology
This article is contributed. See the original author and article here.
Overview
Thanks to @Matt_Lowe (Program Manager – Azure Sentinel) and @BenjiSec (Program Manager – Azure Sentinel) for the technical brainstorming, contribution, implementation and proof reading!
Microsoft Secure score is a security analytics solution that gives you visibility into your security portfolio and how to improve it. Azure Sentinel is a SaaS Security Information and Event Management solution providing visibility and management of the threats in an environment. The following blog shows how you can leverage Azure Sentinel to gain visibility into Microsoft Secure Score alongside other security data.
Requirements & Use Cases
SOC team want to pull and ingest Microsoft Secure Score data, recommendations, profiles, Azure Defender , Microsoft 365, Microsoft Defender for Endpoint, and Microsoft Cloud App Security data to Azure Sentinel for further investigation, compliance and hygiene security purpose to have a consolidated unified security posture view in addition to the following use cases:
- Monitor, track and report on their organization configuration baseline and score in downstream reporting tools.
- Integrate the data into compliance or cybersecurity insurance applications.
- Integrate Secure Score data to drive a hybrid or multi-cloud framework for security analytics.
Microsoft Secure Score
Microsoft Secure Score helps organizations:
- Report on the current state of the organization’s security posture.
- Improve their security posture by providing discoverability, visibility, guidance, and control.
- Compare with benchmarks and establish key performance indicators (KPIs).
To help you find the information you need more quickly, Microsoft improvement actions are organized into groups:
- Identity (Azure Active Directory accounts, roles, Microsoft Defender for Identity)
- Device (Microsoft Defender for Endpoint)
- Apps (email and cloud apps, including Office 365 & Microsoft Cloud App Security)
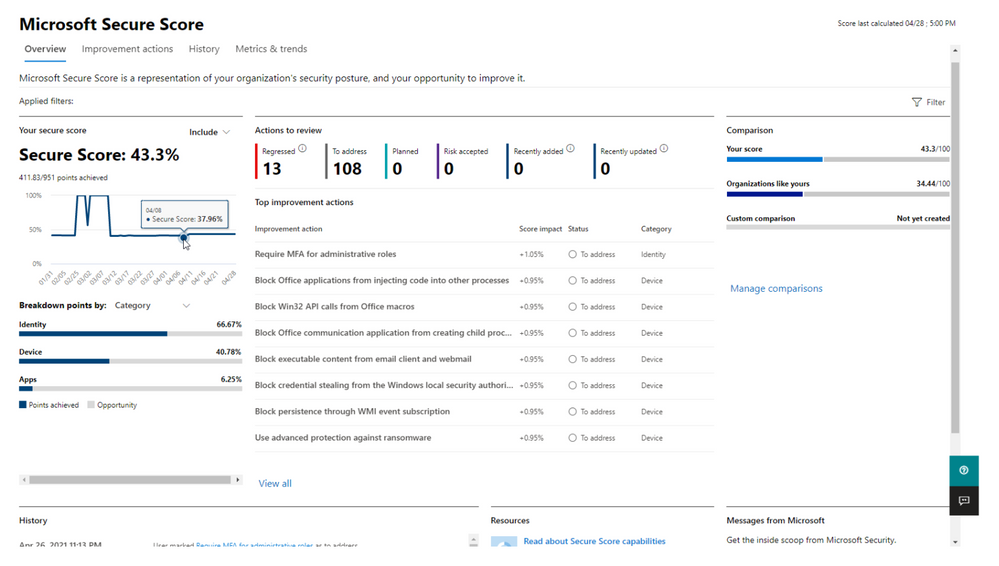
In the Microsoft Secure Score overview page (under the Microsoft 365 Security Portal), view how points are split between these groups and what points are available. You can also get an all-up view of the total score, historical trend of your secure score with benchmark comparisons, and prioritized improvement actions that can be taken to improve your score:
You’re given points for the following actions:
- Configuring recommended security features
- Doing security-related tasks
- Addressing the improvement action with a third-party application or software, or an alternate mitigation
The following are scores you can add to your view of your overall score to give you a fuller picture of your overall score:
- Planned score: Show projected score when planned actions are completed
- Current license score: Show score that can be achieved with your current Microsoft license
- Achievable score: Show score that can be achieved with your Microsoft licenses and current risk acceptance
Your score is updated in real time to reflect the information presented in the visualizations and improvement action pages. Secure Score also syncs daily to receive system data about your achieved points for each action.
For more details, please visit Assess your security posture with Microsoft Secure Score & Microsoft Secure Score
Implementing Secure Score data into Azure Sentinel
The Security API in Microsoft Graph makes it easy to connect with Microsoft Secure Score in the Intelligent Security Graph. It allows you to more readily realize and enrich the value of these solutions.
Acquiring the Secure Score data from the API requires you to setup a few pre-requisites:
- 1st, you should choose your consumption model. If you plan to have a non-user-interactive application to retrieve data from the API, you should opt for the Service-To-Service Authentication model, If your application will require an administrator to provide their logon credentials each time you pull data from the API, you should opt for the user OAuth model. Reference information about this model is located here. If you are a CSP application developer partner you can also find information here.
- 2nd, you will need to register your application in Azure Active Directory in order to call the API. You need to grant the SecurityEvents.Read.All and SecurityEvents.ReadWrite.All permission scopes.
Below is the list of Secure Score exposed APIs:
Step(1): Register an App
Create and register Azure AD App to handle the authentication and authorization to collect the Secure Score data from the Graph API and Microsoft Defender for Endpoint API. Here are the steps – navigate to the Azure Active Directory blade of your Azure portal and follow the steps below:
- Click on ‘App Registrations’
- Select ‘New Registration’
- Give it a name and click Register.
- Click ‘API Permissions’ blade.
- Click ‘Add a Permission’.
- Click ‘Microsoft Graph’.
- Click ‘Application Permissions’.
- Search for ‘SecurityEvents’, Check SecurityEvents.Read.All and SecurityEvents.ReadWrite.All and ‘Click ‘Add permissions’.
- Click ‘grant admin consent’.
- Click ‘Certificates and Secrets’.
- Click ‘New Client Secret’
- Enter a description, select ‘never’. Click ‘Add’.
- Note– Click copy next to the new secret and store it somewhere temporarily. You cannot come back to get the secret once you leave the blade.
- Copy the client Id from the application properties and store it.
- Copy the tenant Id from the main Azure Active Directory blade and store it.
- Now we need to add permissions connected to Microsoft Defender for Endpoint:
- Click on +Add a permission and click on APIs my organization use. Search for WindowsDefenderATP and select it. Select Application permissions and then search and select Score.Read.All and click on Add permission
- Click on +Add a permission and click on APIs my organization use. Search for WindowsDefenderATP and select it. Select Application permissions and then search and select SecurityRecommendation.Read.All and click on Add permission
- Click on +Add a permission and click on APIs my organization use. Search for WindowsDefenderATP and select it. Select Application permissions and then search and select Vulnerability.Read.All and click on Add permission

Next, go to Azure portal (portal.azure.com) and get your Log Analytics Workspace ID & Key. Search for Log Analytics workspaces, and open workspace on which you have Sentinel connected to. Click on Agents management from left menu and copy Workspace ID and Primary key.
Additionally, we need to make sure that our Microsoft Cloud Application Security data connector is on and that we are ingesting Shadow IT data (Cloud Discovery Logs). If MCAS data connector isn’t enabled, please follow this instructions – Connect Cloud App Security data to Azure Sentinel | Microsoft Docs.
Step(2): Deploy Microsoft Security Posture Connector – Playbook
The M365 Security Posture connector template will deploy an Azure Logic App that is configured to ingest data from the different M365 Defender products to highlight the statuses of entities within the environment. The connector calls upon HTTP API to gather this data from the different products, with the products being:
- Microsoft Defender for Endpoint
- Microsoft 365 Defender
Azure Defender and Microsoft Cloud App Security data will be referenced in the related workbook via the built-in connectors and data ingestion channels.
The connector will be fetching logs such as:
- MDE Secure Score
- MDE Exposure Score
- MDE Recommendations
- MDE Vulnerabilities
- M365 Secure Score
The workbook will also be referencing data from Azure Security Center and Microsoft Cloud App Security such as:
- ASC Secure Score
- ASC Recommendations and Regulatory Compliance
- MCAS ShadowIT
Option (1):
- Click on the “Deploy to Azure” button (Showing below)
- Once in the Azure Portal, select the Subscription and Resource Group that Azure Sentinel is under.
- Enter the details that are required for the Playbook.
- Click “Review and Create”.
- Click “Create”.
- Within a minute or two, the template should deploy and the Playbook should appear within the Azure Sentinel environment.

Option (2):
- Enter the template within the GitHub folder.
- In the top right corner, select Raw.
- Copy the raw text within the template.
- Go to the Azure Portal.
- Within the search bar at the top, type “Deploy” and select “Deploy a custom template”.
- Select “build my own template in the editor”.
- Within the template space, paste the text copied from GitHub.
- Select the Subscription and Resource Group that Azure Sentinel is under.
- Enter the details that are required for the Playbook.
- Click “Review and Create”.
- Click “Create”.
- Within a minute or two, the template should deploy and the Playbook should appear within the Azure Sentinel environment.

Step(3): Deploy Microsoft Security Posture Workbook
Purpose of this Workbook is to show different Microsoft Secure Scores at one place with the information about possible vulnerabilities and recommendations how to improve secure score. We will be covering Azure Security Center, Microsoft 365, Microsoft Defender for Endpoint, and Microsoft Cloud App Security data.
We need to ingest the data from Microsoft 365 Security about secure scores and exposure score, as well as the list of controls, vulnerabilities, and recommendations.
Now we can create a new workbook and update the json (M365SecurityPosture.json – workbook json code uploaded to Azure Sentinel official github repo), go to Sentinel environment and click on Workbooks and click on +Add workbook. Click on Edit and choose Advanced editor , then Enter the name of you Workbook (ex. Microsoft Security Posture) and click on Save:


Notes & Consideration
- You can customize the parsers at the connector’s flow with the required and needed attributed / fields based on your schema / payload before the ingestion process, also you can create custom Azure Functions once the data being ingested to Azure Sentinel
- Azure Function can be used to create the custom connector as well
- Couple of points to be considered while using Logic Apps:
Get started today!
We encourage you to try it now!
You can also contribute new connectors, workbooks, analytics and more in Azure Sentinel. Get started now by joining the Azure Sentinel Threat Hunters GitHub community.
by Contributed | Jun 14, 2021 | Technology
This article is contributed. See the original author and article here.
Tasks happen everywhere. They can pop up in an email thread, working file, or team chat—really, wherever you work most often. But ad hoc tasks like this are disruptive and often forgotten. We’ve all been there: you promise yourself (maybe even out loud) that you’ll definitely remember so-and-so’s request only to forget it a minute later.
That’s why one of our goals at Microsoft is to help you quickly capture those kinds of informal tasks the moment they happen. We’ve done this for emails in Outlook and comments in Word, Excel, and PowerPoint docs—and starting today, you can create tasks from Microsoft Teams messages on desktop and web.
This update also addresses one of the most requested asks from customers. Before, lots of people were using third-party apps or creating Power Automate flows to convert Teams asks to tasks; now, that conversion is natively built into the Teams experience.
Converting a Teams message into a task on desktop or web is super easy: hover over the message, select the ellipses (…) from the pop-out menu > More actions > Create task.

A task created this way opens a pop-out window directly in Teams for editing its details. Here, you can choose to add your task to the default Tasks list in To Do or a specific Planner plan. Added tasks will show up in both Tasks in Teams and the standalone To Do or Planner apps. The editable task details are slightly different depending on which option you select:
- If you add the task to the To Do Tasks list, you can edit the task name, priority, due date, and notes.
- If you add the task to a Planner plan, you can edit the task name, priority, due date, notes, progress, and bucket. You can also assign the task and decide whether to post a reply about it to the original Teams message thread.
 Task editing options for adding your task to the To Do Tasks list (left) and a Planner plan (right)
But you’re busy, and this might seem like a lot to fill out for a simple task—especially if you don’t know all the details up front. That’s why Teams auto-populates the task name and notes fields for you, getting your task in the queue right away so it’s not forgotten while you wait on more information. The default name matches the first paragraph of the message, while the default notes field includes details from and a link to the original message.
Choosing to post a reply helps everyone on your team track the task and keeps those assigned to it accountable. This option produces a short summary graphic in the original Teams message with a button to open the task in the Tasks app, where you can manage that task in the context of your Tasks list or the underlying Planner plan.
 Summary graphic from posting a reply about the created task
This new way to capture tasks is perfect for tracking requests that come out of informal Teams messages and gives your team additional control and confidence over ad hoc requests. If your team asks a question you can’t answer without more research, convert that ask into a task. If your manager pings you for updated sales numbers, assign that ask to your sales lead as a task. If a colleague needs help finishing her presentation, get your entire team involved to deliver it on time. Tasks from Teams messages automatically appear alongside your other tasks in the Tasks app and To Do or Planner, so you can nix the sticky notes and instead manage all your tasks together. Plus, creating tasks out of ad hoc requests relieves the stress of trying to remember (or find) what was asked of you—all those requests are in one place.
Bonus coverage! Creating tasks from Teams messaging isn’t the only Tasks app news this month. You can now delete and rename any task from Planner and To Do directly in Tasks. Before, you had to do this from each standalone app.
We’d love to hear your thoughts on other ways we can help you capture tasks from wherever you’re working. Post a comment below with your ideas or feedback. You can also send us feature suggestions and report a problem directly in Teams: simply select Help in the button left corner of the app and choose the best option for your input. And keep visiting our Tech Community Blog for all the latest Tasks in Teams and Planner news.


Recent Comments