by Contributed | Jun 15, 2021 | Technology
This article is contributed. See the original author and article here.
Summary
As previously announced, we are deprecating all /microsoft org container images hosted in Docker Hub repositories on June 30th, 2021. This includes some old azure-cli images (pre v2.12.1), all of which are already available on Microsoft Container Registry (MCR).
In preparation for the deprecation, we are removing the latest tag from the microsoft/azure-cli container image in Dockerhub. If you are referencing microsoft/azure-cli:latest in your automation or Dockerfiles, you will see failures.
What should I do?
To avoid any impact on your development, deployment, or automation scripts, you should update docker pull commands, FROM statements in Dockerfiles, and other references to microsoft/azure-cli container images to explicitly reference mcr.microsoft.com/azure-cli instead.
What’s next?
On June 30th we will remove all version tags from Dockerhub for microsoft/azure-cli . After that date the only to consume the container images will be via MCR.
How to get additional help?
We understand that there may be unanswered questions. You can get additional help by submitting an issue on GitHub.

by Contributed | Jun 15, 2021 | Technology
This article is contributed. See the original author and article here.
ORCA is an open-source software solution which helps academic institutions assess the effectiveness of online learning by analyzing data on students’ attendance and engagement with online platforms and content. As a group of students at University College London (UCL), we had the chance to develop ORCA through UCL’s Industry Exchange Network (IXN) programme in collaboration with Microsoft as part of a course within our degree.
Guest post by team leads Lydia Tsami and Omar Beyhum
Although we’re currently busy working on our dissertation projects as part of our degrees, 2 of our developers – Lydia Tsami and Omar Beyhum – are joining Ayca Bas from the Microsoft 365 Advocacy team in this webinar to talk about how we designed, developed, and delivered ORCA.
What is ORCA?
ORCA is designed to complement the online learning and collaboration tools of schools and universities, most notably Moodle and Microsoft Teams. In brief, it can generate visual reports based on student attendance and engagement metrics, and then provide them to the relevant teaching staff. To accomplish this, it leverages Microsoft Graph to cross reference student identities across different platforms and listen to events such as participants joining meetings. Data can be synthesized via templated Sharepoint lists or Power BI dashboards, then shared to the relevant staff members based on an institution’s Azure Active Directory.
You can check the full webinar below if you’re interested in seeing a demo of ORCA in use, how it was implemented, and how to get started with installing it or contributing to the project!
Make your own apps
Keen on developing your own applications on top of services like Teams, Sharepoint, and Microsoft Graph? Make sure to check out these resources, we found them pretty useful when we first got started:
by Contributed | Jun 15, 2021 | Technology
This article is contributed. See the original author and article here.
I’m excited to announce the second step in our normalization journey. Following our networking schema, we now extend our Azure Sentinel Information Model (ASIM) guidance and release our DNS schema. We expect to follow suit with additional schemas in the coming weeks.
Special thanks to Yaron Fruchtmann and Batami Gold, who made all this possible.
This release includes additional artifacts to ensure easier use of ASIM:
- All the normalizing parsers can be deployed in a click using an ARM template. The initial release contains normalizing parsers for Infoblox, Cisco Umbrella, and Microsoft DNS server.
- We have migrated analytic rules that worked on a single DNS source to use the normalized template. Those are available in GitHub and will be available in the in product gallery in the coming days. You can find the list at the end of this post.
With a single click deployment and support for normalized content in analytic rules, we believe we will see an accelerated adaption of the Azure Sentinel Information Model.
Join us to learn more about Azure Sentinel information model in two webinars:
- The Information Model: Understanding Normalization in Azure Sentinel
- Deep Dive into Azure Sentinel Normalizing Parsers and Normalized Content
Why normalization, and what is the Azure Sentinel Information Model?
Working with various data types and tables together presents a challenge. You must become familiar with many different data types and schemas, write and use a unique set of analytics rules, workbooks, and hunting queries for each, even for those that share commonalities (for example, DNS servers). Correlation between the different data types necessary for investigation and hunting is also tricky.
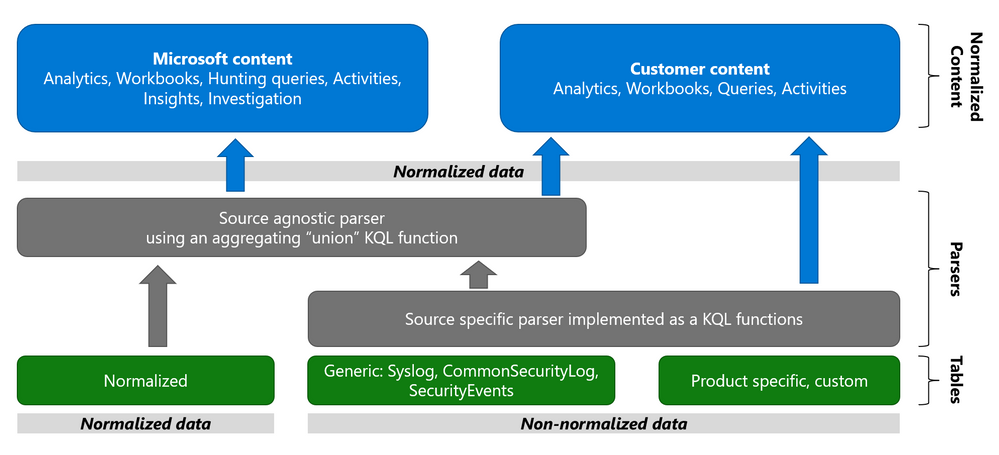
The Azure Sentinel Information Model (ASIM) provides a seamless experience for handling various sources in uniform, normalized views. ASIM aligns with the Open-Source Security Events Metadata (OSSEM) common information model, promoting vendor agnostic, industry-wide normalization. ASIM:
- Allows source agnostic content and solutions
- Simplifies analyst use of the data in sentinel workspaces
The current implementation is based on query time normalization using KQL functions. And includes the following:
- Normalized schemas cover standard sets of predictable event types that are easy to work with and build unified capabilities. The schema defines which fields should represent an event, a normalized column naming convention, and a standard format for the field values.
- Parsers map existing data to the normalized schemas. Parsers are implemented using KQL functions.
- Content for each normalized schema includes analytics rules, workbooks, hunting queries, and additional content. This content works on any normalized data without the need to create source-specific content.
Why normalize DNS data?
ASIM is especially useful for DNS. Different DNS servers and DNS security solutions such as Infoblox, Cisco Umbrella & Microsoft DNS server provide highly non-standard logs, representing similar information, namely the DNS protocol. Using normalization, standard, source agnostic content can apply to all DNS servers without customizing it to each DNS server. In addition, an analyst investigating an incident can query the DNS data in the system without specific knowledge of the source providing it.
Analytic Rules added or updated to work with ASim DNS
- Added:
- Excessive NXDOMAIN DNS Queries (Normalized DNS)
- DNS events related to mining pools (Normalized DNS)
- DNS events related to ToR proxies (Normalized DNS)
- Updated to include normalized DNS:
- Known Barium domains
- Known Barium IP addresses
- Exchange Server Vulnerabilities Disclosed March 2021 IoC Match
- Known GALLIUM domains and hashes
- Known IRIDIUM IP
- NOBELIUM – Domain and IP IOCs – March 2021
- Known Phosphorus group domains/IP
- Known STRONTIUM group domains – July 2019
- Solorigate Network Beacon
- THALLIUM domains included in DCU takedown
- Known ZINC Comebacker and Klackring malware hashes
by Contributed | Jun 15, 2021 | Technology
This article is contributed. See the original author and article here.
Seeing that this is a relatively new development, I wanted to share information about automated diagnostics that customers can run inside of the Microsoft 365 admin center. The goal of these is to help you to solve various support-related issues that you might encounter, without having to open a support ticket.
Currently, the way to interact with available diagnostics is via the Need help? button in the Microsoft 365 admin center:
There are a few things you might see when you search in the text field that will come up; for example:
Let’s say you’d like to increase the Exchange Web Services (EWS) throttling setting for your tenant to be able to use a 3rd party migration tool when moving to Exchange Online. If you search for “EWS” you’ll see an auto-suggested option that says “Increase EWS Throttling Policy”. If you choose that, there are several sections that you will see:

The sections you might get will vary based on your search, but let me explain the 3 that are shown in the screenshot:
- Section 1: the Diagnostics section and the button indicate that there are diagnostics associated with your query; pressing that button will run these diagnostics, which might require additional choices until the action is completed. Not all queries will result in diagnostics (there are over 50 of them currently with more coming, but there are many more possible questions!)
- Section 2: the Insights section is the explanation of what you can do to get help with your query. There are many more Insights than there are Diagnostics. When there is a diagnostic, the insight will typically relate to the shown diagnostic.
- Section 3: this section provides ‘top search results’ based on your query.
Recommended articles are usually a ‘wider net’ used to try to answer your question. Insights are targeted to what you typed (there are 100s of these, made for the most frequent things our customers search for). Diagnostics are the most targeted and typically allow you to take specific action without leaving the “Need help?” section.
Which Exchange and Outlook diagnostics are available?
Seeing that this is the Exchange blog, here is a link to the article that lists currently available related diagnostics:
Self-help diagnostics for issues in Exchange Online and Outlook
But wait, there is more!
Various other teams (including SharePoint, OneDrive and Teams) have also created diagnostics and documents listing what is available.
An additional very cool and new initiative is Diagnostics for Social Good, where Microsoft will donate a percentage of realized support savings to charity. To read about this new initiative and see information about SharePoint, OneDrive, and Teams diagnostics, please see Diagnostics for Social Good.
If you have feedback about these diagnostics or insights, please comment below!
Nino Bilic

by Contributed | Jun 15, 2021 | Technology
This article is contributed. See the original author and article here.
Introduction
Azure Purview is a unified Data Governance tool used to manage and govern your on-premises, multicloud, and SaaS data. For those of you who have used Azure Purview previously, you will know that to scan sources such as Azure data assets (Blobs, Azure Data Lake Service, etc.) you will need an authentication methodology leveraging either a Purview managed identity or perhaps a service principal. This applies to a wide array of assets, however, there is also a method to use self-hosted integration runtimes (SHIR) that will let you scan data sources in Azure Purview. This is particularly useful to install into your machines when scanning a resource in a private network (on-prem or VNET). One of the top use cases for this is around the scanning of on-prem SQL Servers, which is a frequent ask from customers.
In this blog we will review how to set up a self-hosted integration runtime in Azure Purview and demonstrate how to use it in setting up a scan for an on-prem SQL Server.
Background on Self-Hosted Integration Runtimes
The Integration Runtime (IR) is compute infrastructure used by Azure Data Factory to provide data integration capabilities across different network environments. You can set a linked service which defines a target data store or a compute service along with a defined activity. The IR is the bridge between the activity and linked service and provides the compute environment where the activity either runs on or gets dispatched from. There are several types of Integration Runtime (IR) but we will be focusing on Self-hosted integration runtimes.
Walkthrough
- First navigate to the Management Center in the Purview Studio and select Integration Runtimes.
- Select New at the top, select Self-Hosted and press Continue.

- Enter the name that you want for the Integration Runtime along with any description you would like to add and click Create.

- Then follow the steps for the Manual setup. Make sure to download and install the integration runtime into the self-hosted machine where you want to run it.

- Navigate through the Setup Wizard to install the Integration Runtime


- After finishing this you will have to insert the authentication key in step 4 into the input box shown in the image below. You will not need to change the proxy.

- After the key is verified, go ahead and register the runtime. Verify the information regarding the node name and click finish.

Now that you have set up the SHIR on-premises, you can use it to bring certain sources into Purview. We will demonstrate this with the scanning of SQL Server on-prem.
Now we will assume that you have a SQL Server with access to the master database and we can authenticate using SQL authentication – for more information on this see https://docs.microsoft.com/en-us/azure/purview/register-scan-on-premises-sql-server#storing-your-sql-login-password-in-a-key-vault-and-creating-a-credential-in-purview to ensure that you have the right credentials formulated and stored accordingly. This is highly important for the scan to work.
.
- Navigate to Azure Purview and Register a SQL Server source

- Make sure to enter the name of the source along with the Server endpoint

- After this, configure your scan by entering the following information on Scan name, selection of the Integration Runtime we have created from earlier, Server endpoint (which should already be filled in), and the credential for SQL Authentication. Continue through and run through the scan similarly to other sources by selecting the rule sets and recurrences.

Congratulations! You have now set up your Integration Runtime and can scan through SQL Servers and much more!

Recent Comments