by Contributed | Jul 13, 2021 | Technology
This article is contributed. See the original author and article here.
Overview
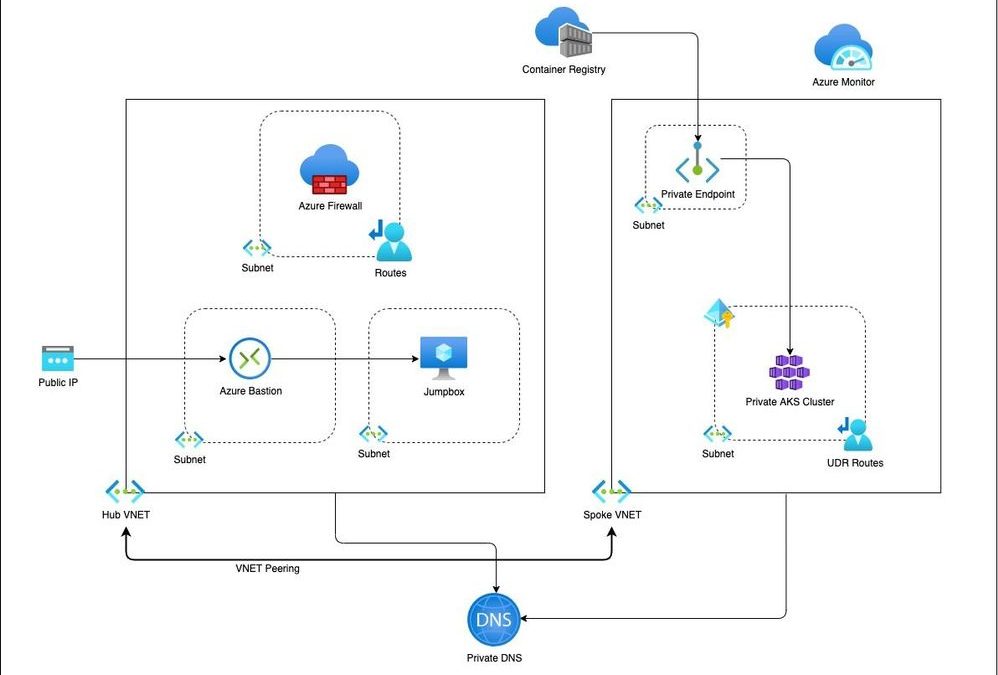
This is a blog on how to use a modular approach for Infrastructure as Code (IaC) in provisioning a private AKS cluster and other related resources. The Bicep modules in the repository are designed keeping the AKS baseline architecture in mind. You can start using these modules as is or modify to suit your own needs.
Architecture

Setup
The Bicep modules will provision the following Azure Resources under subscription scope:
- A Resource Group with Baseline variables
- Hub VNet with required subnets
- Azure Firewall Subnet
- Azure Bastion Subnet
- A jumpbox subnet
- Spoke VNET with AKS cluster subnet and additional subnet for other services like Azure Container Registry etc.
- Azure Firewall and required routes
- Azure Bastion resource and a jumpbox VM without public IP for securing traffic
- Azure Container Registry for storing images.
- A Private Endpoint for ACR
- Private DNS Zone
- AAD Enabled, Managed Private AKS Cluster with monitoring Addon and Azure Policy enabled
- Private AK Cluster need the UDR routes enabled via Firewall.
Resource Provisioning
Clone the repo
git clone https://github.com/ssarwa/bicep

cd bicep

# You could use deploy.azcli as your working file. Don’t run the script as is!
Login to Azure
az login
az account set -s <Subscription ID>
Initialize variables
# Change the variables as required (baseline and location) on deploy.azcli

# Deploy the bicep script

az deployment sub create -n $baseline‘Dep’ -l $location -f main.bicep
The deployment could take somewhere around 20 to 30 mins. Once provisioning is completed you can use the cluster for your needs.
Next Steps
- Enable GitOps using Flux operator for Application deployment
- Enable IaC using CI/CD pipelines on Github Actions
by Contributed | Jul 12, 2021 | Technology
This article is contributed. See the original author and article here.
At Microsoft, we believe your data should be controlled by you. We are transparent about why we collect your data and how we use it across all of our products and services.
Organizations are generating and sharing more personal data than ever before as their employees fluidly transition between work and personal devices and networks. At the same time, the number of data breaches is increasing exponentially. There were over 800 data breaches in the first half of 2021 – 76% of 2020’s total breaches[1]. To protect consumer data from being compromised by increasingly sophisticated breaches, legislatures across the globe are introducing new privacy regulations. A recent study predicted that by 2023, 65% of the world’s population will have its personal information covered under modern privacy regulations, up from 10% today[2]. Most organizations still use spreadsheets, emails, and in-person communication for data mapping, and struggle to identify and effectively manage personal data in their environments.
Microsoft wants to help you on your privacy journey. Starting this week, organizations can use privacy capabilities for Microsoft 365 in preview. These capabilities help organizations gain visibility into the private data in their environment, proactively identify and protect against privacy risks, and manage subject rights requests (commonly known as ‘data subject requests’) at scale. Additionally, to meet organizations where they are in their privacy journey, we are enabling integration with our privacy capabilities to help customers deliver a unified response to subject rights requests.
Get Started
You can access the privacy capabilities for Microsoft 365 from the Microsoft compliance center.
Learn More
Read this document to learn more about privacy capabilities for Microsoft 365.
[1] First half 2021 Data Breach Analysis, ITRC
[2] New Privacy laws outside Europe and California: A global cheat sheet, Gartner
by Contributed | Jul 10, 2021 | Technology
This article is contributed. See the original author and article here.
In July we love to celebrate a whole month of IoT, sharing blog posts, videos, lessons, labs and other content created by Microsoft folks and the community. You can read more about this fun month on the JulyOT blog post. We hope this will inspire you to learn about the Internet of Things, create your own projects and share them with us. We also hope this might give you inspiration for summer projects if you are in the northern hemisphere, capstone projects for you or your students, or ideas for fun lessons on IoT.
What happened last week
Last week we shared a load of great content on AI and IoT, running AI models on IoT devices or Edge devices. From a TinyML powered nose, to a Lego Boost self-driving car powered by Azure Percept, we had fun projects for everyone interested in IoT and AI.

What’s happening this week
This week for JulyOT we are focusing on beginners, makers, students and teachers with the release of the IoT for beginners curriculum, a 24 lesson curriculum designed for teachers to use during a 12 week semester, or for students to use for self-guided learning on your own or in study groups. You can read more on the announcement post, but this week we’re encouraging you to dive deep, learn new things, and share your learnings.
We’re also running some live streams to teach the IoT for beginners content, with live lessons and office hours where you can join to discuss what you just learned. Head to the Microsoft Reactor Hello IoT page and sign up.

What’s happening next?
We don’t want to give away our secrets, so you’ll have to keep checking the JulyOT blog post for more details. This is updated every Thursday with links to the content for the week.
Get involved
We want you to get involved in #JulyOT and share your creations! Share what you have done on social media such as Twitter, Instagram or LinkedIn and we’ll share it with the world.
by Contributed | Jul 9, 2021 | Technology
This article is contributed. See the original author and article here.
This blog is part of the Change Data Capture in Azure SQL Databases Blog Series, which started with the announcement on releasing CDC in Azure SQL Databases in early June 2021. You can view the release announcement here: https://aka.ms/CDCAzureSQLDB
In this tutorial, you will create an Azure Data Factory pipeline that copies change data from Change Data Capture tables in an Azure SQL database to Azure Blob Storage.
Change Data Capture
Change Data Capture (CDC) is currently available in SQL Server (all supported versions), Azure SQL Managed Instance, and Azure SQL Database (Preview). CDC records insert, update, and delete activity that applies to a table. This makes the details of the changes available in an easily consumed relational format. Column information and the metadata that is required to apply the changes to a target environment is captured for the modified rows and stored in change tables that mirror the column structure of the tracked source tables. Table-valued functions are provided to allow systematic access to the change data. Learn more about CDC here.
Azure Data Factory
Azure Data Factory is a cloud-based data integration service that orchestrates and automates the movement and transformation of data. You can create data integration solutions using the Data Factory service that can ingest data from various data stores, transform/process the data, and publish the result data to the data stores. Learn more about Azure Data Factory here.
Azure Blob Storage
Azure Blob storage is Microsoft’s object storage solution for the cloud. Blob storage is optimized for storing massive amounts of unstructured data. Unstructured data is data that doesn’t adhere to a particular data model or definition, such as text or binary data. Learn more about Azure Blob Storage here.
Using Azure Data Factory to send Change Data Capture data from an Azure SQL Database to Azure Blob Storage
Prerequisites:
Steps:
- Create a data source table in Azure SQL:
- Launch SQL Server Management Studio and connect to your Azure SQL database.
- In Server Explorer, right-click your database and choose the New Query.
- Run the following SQL command against your Azure SQL database to create a table named “customers” as data source store.
create table customers
(
customer_id int,
first_name varchar(50),
last_name varchar(50),
email varchar(100),
city varchar(50), CONSTRAINT “PK_Customers” PRIMARY KEY CLUSTERED (“customer_id”)
);
- Enable Change Data Capture on your database and source table.
EXEC sys.sp_cdc_enable_db
EXEC sys.sp_cdc_enable_table
@source_schema = ‘dbo’,
@source_name = ‘customers’,
@role_name = ‘null’,
@supports_net_changes = 1
- Insert some data into the customers table.
INSERT INTO customers (customer_id, first_name, last_name, email, city)
VALUES
(1, ‘Chevy’, ‘Leward’, ‘cleward0@mapy.cz’, ‘Reading’),
(2, ‘Sayre’, ‘Ateggart’, ‘sateggart1@nih.gov’, ‘Portsmouth’),
(3, ‘Nathalia’, ‘Seckom’, ‘nseckom2@blogger.com’, ‘Portsmouth’);
- Create an Azure Data Factory pipeline
- Launch the Azure Portal. In the left menu, go to Create a resource -> Data + Analytics -> Data Factory.
- Select your Azure subscription in which you want to create the data factory.
- For the Resource Group, do one of the following steps:
- Select Use existing and select an existing resource group from the drop-down list.
- Select Create new and enter the name of a resource group.
- Select the region for the data factory. Only locations that are supported are displayed in the drop-down list. The data stores (Azure Storage, Azure SQL Database, etc.) and computes (HDInsight, etc.) used by data factory can be in other regions.
- Enter ADFCDCTutorial in name. Note that this name must be globally unique.
- Select V2 for version.
- Click Review + Create.
- Once the deployment is complete, click on Go to resource.
- Click Author and monitor tile to launch the Azure Data Factory user interface (UI) in a separate tab.
- In the get started page, switch to the Author tab in the left panel.
- Create an Azure Storage linked service
- In Manage, click Linked services and click + New.
- In the New Linked Service window, select Azure Blob Storage, and click Continue.
- In the New Linked Service window, do the following steps:
- Enter AzureStorageLinkedService for Name.
- Select your Azure Storage account for Storage account name.
- Click Create.
- Create an Azure SQL Database linked service
- Click Linked services and click + New.
- In the New Linked Service window, select Azure SQL Database, and click Continue.
- In the New Linked Service window, do the following steps:
- Enter AzureSqlDB for the Name field.
- Select your SQL server for the Server name field.
- Select your SQL database for the Database name field.
- Enter name of the user for the User name field.
- Enter password for the user for the Password field.
- Click Test connection to test the connection.
- Click Create to save the linked service.
- Create a dataset to represent source data
- In Author, click + (plus) and Dataset
- Select Azure SQL Database and continue.
- In the Set properties tab, set the dataset name and connection information:
- Insert AzureSQLCDCCustomers for Name.
- Select AzureSqlDB for Linked service.
- Select [dbo].[dbo_customers_CT] for Table name. Note: this table was automatically created when CDC was enabled on the customers table. Changed data is never queried from this table directly but is instead extracted through the CDC functions.
- Click OK.
- Create a dataset to represent data copied to sink data store
- In the treeview, click + (plus), and click Dataset.
- Select Azure Blob Storage, and click Continue.
- Select DelimitedText, and click Continue.
- In the Set Properties tab, set the dataset name and connection information:
- Select AzureStorageLinkedService for Linked service.
- Enter raw for container part of the filePath.
- Enable First row as header
- Click Ok
- Create a pipeline to copy the change data
- In the treeview, click + (plus), and click Pipeline.
- Change the pipeline name to IncrementalCopyPipeline
- Expand General in the Activities toolbox, and drag-drop the Lookup activity to the pipeline designer surface. Set the name of the activity to GetChangeCount. This activity gets the number of records in the change table for a given time window.
- Switch to the Settings in the Properties window:
- Specify the SQL DB dataset name for the Source Dataset field.
- Select the Query option and enter the following into the query box:
DECLARE @from_lsn binary(10), @to_lsn binary(10);
SET @from_lsn =sys.fn_cdc_get_min_lsn(‘dbo_customers’);
SET @to_lsn = sys.fn_cdc_map_time_to_lsn(‘largest less than or equal’, GETDATE());
SELECT count(1) changecount FROM cdc.fn_cdc_get_all_changes_dbo_customers(@from_lsn, @sto_lsn, ‘all’)
3. Enable First row only
- Click the Preview data button to ensure a valid output is obtained by the lookup activity.
- Expand Iteration & conditionals in the Activities toolbox, and drag-drop the If Condition activity to the pipeline designer surface. Set the name of the activity to HasChangedRows.
- Switch to the Activities in the Properties window:
- Enter the following Expression: @greater(int(activity(‘GetChangeCount’).output.firstRow.changecount),0)
- Click on the pencil icon to edit the True condition.
- Expand General in the Activities toolbox and drag-drop a Wait activity to the pipeline designer surface. This is a temporary activity in order to debug the If condition and will be changed later in the tutorial.
- Click on the IncrementalCopyPipeline breadcrumb to return to the main pipeline.
- Run the pipeline in Debug mode to verify the pipeline executes successfully.
- Next, return to the True condition step and delete the Wait activity. In the Activities toolbox, expand Move & transform, and drag-drop a Copy activity to the pipeline designer surface. Set the name of the activity to IncrementalCopyActivity.
- Switch to the Source tab in the Properties window, and do the following steps:
- Specify the SQL dataset name for the Source Dataset field.
- Select Query for Use Query.
- Enter the following for Query.
DECLARE @from_lsn binary(10), @to_lsn binary(10);
SET @from_lsn =sys.fn_cdc_get_min_lsn(‘dbo_customers’);
SET @to_lsn = sys.fn_cdc_map_time_to_lsn(‘largest less than or equal’, GETDATE());
SELECT * FROM cdc.fn_cdc_get_all_changes_dbo_customers(@from_lsn, @to_lsn, ‘all’)
4. Click preview to verify that the query returns the changed rows correctly.
5. Switch to the Sink tab, and specify the Azure Storage dataset for the Sink Dataset field.
6. Click back to the main pipeline canvas and connect the Lookup activity to the If Condition activity one by one. Drag the green button attached to the Lookup activity to the If Condition activity.
7. Click Validate on the toolbar. Confirm that there are no validation errors. Close the Pipeline Validation Report window by clicking >>.
8. Click Debug to test the pipeline and verify that a file is generated in the storage location.
9. Publish entities (linked services, datasets, and pipelines) to the Data Factory service by clicking the Publish all button. Wait until you see the Publishing succeeded message.
This process is very similar to moving change data from Azure SQL MI to Blob Storage, which is documented here: Incrementally copy data using Change Data Capture – Azure Data Factory | Microsoft Docs
Blog Series for Change Data Capture in Azure SQL Databases
We are happy to continue the bi-weekly blog series for customers who’d like to learn more about enabling CDC in their Azure SQL Databases! This series explores different features/services that can be integrated with CDC to enhance change data functionality.
by Contributed | Jul 8, 2021 | Technology
This article is contributed. See the original author and article here.
Tracking your project’s software dependencies is an integral part of the machine learning lifecycle. But managing these entities and ensuring reproducibility can be a challenging process leading to delays in the training and deployment of models. Azure Machine Learning Environments capture the Python packages and Docker settings for that are used in machine learning experiments, including in data preparation, training, and deployment to a web service. And we are excited to announce the following feature releases:
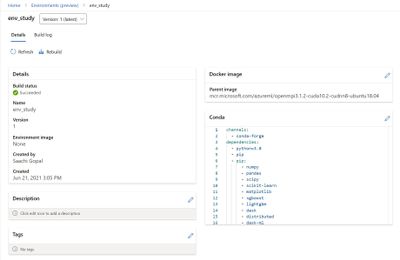
Environments UI in Azure Machine Learning studio
The new Environments UI in Azure Machine Learning studio is now in public preview.
- Create and edit environments through the Azure Machine Learning studio.
- Browse custom and curated environments in your workspace.
- View details around properties, dependencies (Docker and Conda layers), and image build logs.
- Edit tag and description along with the ability to rebuild existing environments.

Curated Environments
Curated environments are provided by Azure Machine Learning and are available in your workspace by default. They are backed by cached Docker images that use the latest version of the Azure Machine Learning SDK and support popular machine learning frameworks and packages, reducing the run preparation cost and allowing for faster deployment time. Environment details as well as their Dockerfiles can be viewed through the Environments UI in the studio. Use these environments to quickly get started with PyTorch, Tensorflow, Sci-kit learn, and more.
Inference Prebuilt Docker Images
At Microsoft Build 2021 we announced Public Preview of Prebuilt docker images and curated environments for Inferencing workloads. These docker images come with popular machine learning frameworks and Python packages. These are optimized for inferencing only and provided for CPU and GPU based scenarios. They are published to Microsoft Container Registry (MCR). Customers can pull our images directly from MCR or use Azure Machine Learning curated environments. The complete list of inference images is documented here: List of Prebuilt images and curated environments.
The difference between current base images and inference prebuilt docker images:
- The prebuilt docker images run as non-root.
- The inference images are smaller in size than compared to current base images. Hence, improving the model deployment latency.
- If users want to add extra Python dependencies on top of our prebuilt images, they can do so without triggering an image build during model deployment. Our Python package extensibility solution provides two ways for customers to install these packages:
- Dynamic Installation: This method is recommended for rapid prototyping. In this solution, we dynamically install extra python packages during container boot time.
- Create a requirements.txt file alongside your score.py script.
- Add all your required packages to the requirements.txt file.
- Set the AZUREML_EXTRA_REQUIREMENTS_TXT environment variable in your Azure Machine Learning environment to the location of requirements.txt file.
- Pre-installed Python packages: This method is recommended for production deployments. In this solution, we mount the directory containing the packages.
- Set AZUREML_EXTRA_PYTHON_LIB_PATH environment variable, and point it to the correct site packages directory.
https://channel9.msdn.com/Shows/Docs-AI/Prebuilt-Docker-Images-for-Inference/player
Dynamic installation:
https://docs.microsoft.com/en-us/azure/machine-learning/how-to-prebuilt-docker-images-inference-python-extensibility#dynamic-installation
Summary
Use the environments to track and reproduce your projects’ software dependencies as they evolve.

Recent Comments