
by Contributed | Nov 2, 2021 | Business, Microsoft 365, Technology
This article is contributed. See the original author and article here.
In the past 20 months, we’ve witnessed an explosive growth of virtual interactions, with people collaborating more—both inside and outside their organizations, with greater frequency and across more applications than ever before. The question facing us now is, how can we shift from merely adapting to thriving with hybrid work?
The post Stay in the flow of work with new collaborative apps for Microsoft Teams appeared first on Microsoft 365 Blog.
Brought to you by Dr. Ware, Microsoft Office 365 Silver Partner, Charleston SC.
by Contributed | Nov 1, 2021 | Technology
This article is contributed. See the original author and article here.
By: @DomAllen, Senior Program Manager and @Jeff_Mitchell_MSFT, Principal Cloud Solution Architect
Customers today recognize the cloud enables digital transformation for the enterprise, while consistently meeting unique requirements for business growth. Cloud services are deployed at hyperscale, allowing you to consistently manage and optimize governance and operations management controls beyond on-premises environments—extending unified management across any infrastructure to multicloud and the edge.
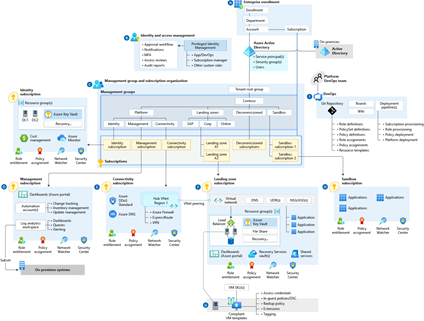
To help you prepare for your cloud adoption journey, we are excited to announce the availability of Azure landing zone conceptual architecture—your environment’s strategic design path and target technical state. It represents scale and maturity decisions based on experiences and feedback from customers who have successfully adopted Azure. To realize the value of the agility the cloud can provide, we recommend that environments be implemented to enable consistent scale—while meeting your business needs by creating consistent ways to govern and manage resources, not just by type, but also by organization, cost, and security.
Besides designing an architectural platform, you must implement and maintain the platform and design a systematic architectural and technical delivery approach to building patterns for success on the platform. We recommend developing a continuous engineering loop to ensure that environment lifecycles align with the Azure roadmap. Your process should validate new services in the context of enterprise controls—and it should deliver its learnings back to the platform, inputs for future iterations.
Azure landing zone conceptual architecture
Through a landing zone accelerator approach and a reference implementation, you enable the effective construction and operationalization of landing zones on Azure—at scale, aligned with the Azure roadmap and Microsoft Cloud Adoption Framework for Azure. Landing zone accelerator architecture represents the strategic design path and target technical state of your Azure environment. The architecture will continue evolving with the Azure platform, ultimately shaped by design decisions that are aligned with the architectural implementation best practices to safeguard your Azure journey.
Not all organizations adopt Azure in the same way. Enterprise-scale landing zone architectures, (as illustrated in Figure 1 below) might vary between customers, depending on enterprise requirements. Varied design considerations and recommendations might yield different trade-offs, depending on your organization’s cloud adoption path. Variation along your path is expected—but if you follow core recommendations, the target architecture that results will set you on a path to sustainable scale on Azure.
Figure 1
You can download PDF files of the Azure landing zone conceptual architecture diagrams with:
or download a Visio diagram (VSDX) file with a diagram of both Virtual WAN and hub-and-spoke architectures.
Getting your environment ready, faster: Azure landing zone accelerator
Azure landing zone accelerator enables your organization to make templatized landing zone deployments, with baked-in, repeatable best practices for governance, security, and compliance and it comes with a set of design principles for managing the platform at scale. These principles serve as a compass for subsequent design decisions across critical technical domains. Deploy the Azure landing zone accelerator (see Figure 2, below) directly within the Azure portal to speed up your implementation—allowing you to customize environment configurations for compliance, security, and operations management controls. GitHub integration will help your team to set up CI/CD pipelines—if your cloud operating model includes Infrastructure as Code (IaC) DevOps practices for infrastructure management.

Figure 2
While your organization may have already adopted third party automation toolchain products, you may need to start with a smaller implementation of the Azure landing zone conceptual architecture. Explore more open source and partner landing zone implementation options.
Our conversations with customers and partners help us recognize that organizations may be at different stages along their cloud journey when reviewing landing zone implementation options. The deployment recommendations that advance your specific, strategic design path and target technical state will match the stage you’re in along your cloud path. Get started with the best next steps for your own cloud adoption path, and review your journey to the target architecture. Some organizations with a conceptual architecture matching the operating model and resource structure they plan to use can launch the ready-to-deploy experience with the Azure landing zone accelerator.
Picture Azure landing zone guidance as a large highway that leads to the cloud (your target architecture). You’re whizzing down this long and spacious-laned highway, and you see on-ramps and exits flashing by. Your highway will have several onramps feeding into its large asphalt path towards cloud adoption.
Three points reflect the most common customer journeys—customer experiences centering on three landing zone implementation stages: Start, Align, and Enhance.
Start is for those beginning their cloud adoption journey—who wish to develop a new cloud environment, without dependencies—where no production workloads are deployed. Perhaps, to begin with—your organization might have a blank sheet of paper, and you’re looking for the best route to get to your target end-state— the target technical state and strategic design path that guides the very beginning of your cloud adoption—always in alignment with the conceptual architecture. Launch the ready-to-deploy experience with the Azure landing zone accelerator, explore various other design area topics that help you determine where you need to customize, and explore other implementation options within Azure landing zones.
Align is for those who have already implemented services in Azure. Perhaps your organization is looking for ways to change your environment to more closely resemble the conceptual architecture.
We see a growing trend of organizations that might undergo requirements to introduce controls or design patterns because of a new workload being deployed. This would require specific environment configurations able to meet business or compliance requirements.
We recognize cloud environments are never static implementations. As your unique business requirements change (or your team’s capabilities expand), configurations of landing zones may need to iterate. For example, as your organization begins its cloud journey, it may choose to run with a baseline security configuration (made necessary by business requirements) to run a workload in the cloud. This may expand over time to require more sophisticated security services like Azure Sentinel to address more detailed security requirements.
Enhance represents the cusp of the Ready methodological approach and the continuous deployment of consistent, unified security, governance, and operational management controls supported by the methodologies of Secure, Manage, and Govern within the Microsoft Cloud Adoption Framework for Azure.
We’re excited about new updates to our Azure landing zone guidance in the Cloud Adoption Framework—about its potential to prepare for, and unlock, your successful and balanced digital transformation. Some organizations with conceptual architectures matching the operating model and resource structure they plan to use will launch the ready-to-deploy Azure landing zone accelerator experience—with baked in governance, compliance, and security. Other organizations, already in line with best practices—looking to add additional controls or features, may forge ahead and enhance guidance for management, governance, or security. These technical considerations are part of maturing key ongoing processes for cloud environments, like management, governance, and security.
Learn more about Azure landing zone conceptual architecture—or get started deploying the Azure landing zone accelerator (see Figure 2, above) directly within the Azure portal to accelerate your implementation, and customize environment configurations for compliance, security, and operations management controls. Or, simply benefit from deployments providing a full implementation of the conceptual architecture, with ready-to-deploy configurations for key components such as management groups and policies.
Check out our Channel 9 episodes on Azure landing zones today, on IT Ops Talk and the Azure Enablement Show!
by Contributed | Oct 30, 2021 | Technology
This article is contributed. See the original author and article here.
In today’s digital world tasks are coming our way from many sources. And with that rapid integration with technology, we worry about missing any tasks that are important to us. Microsoft To Do is committed to providing a complete task management solution that keeps people at the center. We want to offer you a single pane of glass for all your tasks by aggregating all tasks that you care for.
To fulfil our promise, we are now integrated with Microsoft Teams for your personal life. Yes, Microsoft Teams isn’t just for work anymore. Now you can connect with your family and friends outside of the office and make calls, chat, plan, and organize things in one place.
Teams for personal use allows users to create group chats and once in a group chat, you can create a shared to-do list and assign tasks to others in the group. Users can create and assign tasks from Teams web, Desktop, and Mobile applications.
Task assignment in shared lists from Teams for personal use – Desktop (above) and Mobile (below)

Another endpoint to track tasks from? Well, To Do is here to help you!
With this integration, all the tasks assigned to a user in Teams for personal use will now be visible to them under their ‘Assigned to me’ list in To Do. And with this, everything that you are supposed to do from your Teams’ shared lists is now aggregated in one place. No more fear of missing out!
The Richness of To Do
Once in To Do, you can apply some of the rich features of To Do on these tasks. You can mark them important, add sub-steps, add due dates, add to My Day while planning, or add notes to keep track of any information related to the task. To provide the users with more context, the task details in To Do specify the Teams shared list name as well.
 To Do aggregates tasks from shared lists of Teams for personal use in the ‘Assigned to me’ list
Is that all?
Not really! Teams for personal use allows users to capture tasks from their messages in mobile devices. With a long press on the message, you can invoke the message extension menu and from there you can convert your message into a task and add it to either your personal To Do lists or shared lists. Isn’t it amazing?
With this feature you can capture and track tasks in your personal lists, or capture and assign them to either yourself or others in shared lists. And just like we mentioned above, anything assigned to you will again be present in the ’Assigned to me’ list in To Do. To link the assigned tasks back to the chat context, users can click on the deep link provided in the task details in To Do and jump to the message from where the task was created in Teams conversation.
 Tasks from Teams messages can be captured into users’ shared lists or personal To Do lists.
If you’re new to Teams, you can download the Teams app to get started today. And To Do, you can download it here.
We can’t wait to hear how To Do is making task management easy for you – let us know in the comments below or over on Twitter and Facebook.
You can also write to us at todofeedback@microsoft.com.
by Contributed | Oct 30, 2021 | Technology
This article is contributed. See the original author and article here.
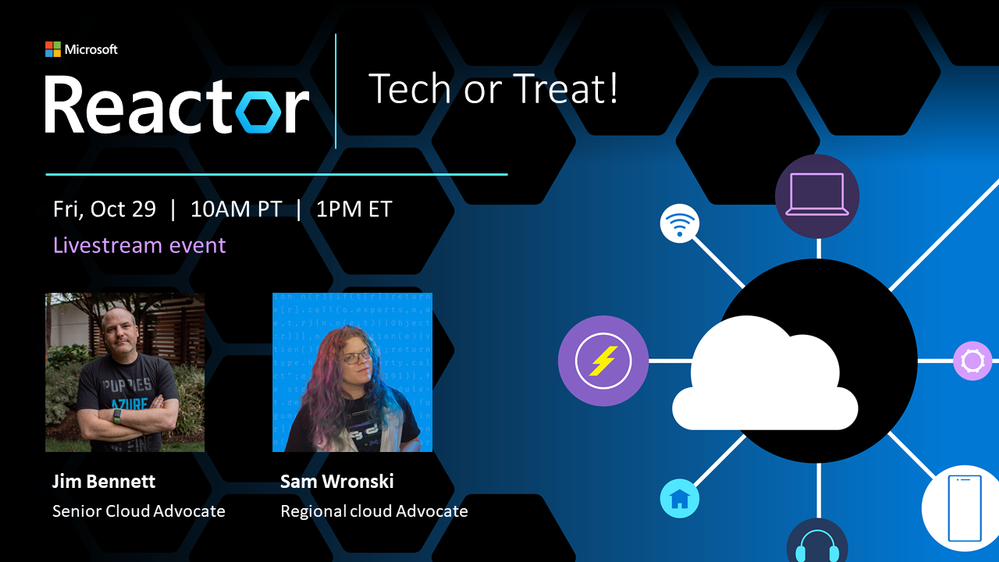
Tech or Treat!
For those who celebrate Halloween, October is spooky season. As the northern hemisphere heads into the chill of winter, and the Southern Hemisphere warms up towards summer, October is a month of ghost, ghouls, and other scary things like bugs in your code and failing unit tests…
Pumpkins are a great way to decorate your house, even better if they are powered by cool tech, and light up or make spooky sounds. Sam Wronski and I decided it would be fun to create some Tech or Treat pumpkins.
Check out the 10-second video below to see what I created.
This was using a Raspberry Pi, some programmable LEDs (WS2812Bs, or NeoPixels as they are also known), and a little bit of Python. Add in some Azure IoT central and I have internet controlled pumpkins.
Sam created these beauties:
 A smiling one-eyed pumpkin
 A glowing flask
Sam used some cool .NET IoT bindings to control the LEDs. It’s always great when there are multiple ways to do something using the technology you know and love!
We had a live stream showing how we got our pumpkins lit up, and you can watch the video below:
If you want to create a pumpkin yourself, check out our Tech or Treat GitHub repo to see some examples of how we did each part, and maybe build your own pumpkin and share it with us!
Lights are for life, not just for Halloween. You can take these code samples and use them for lights for any festive occasion, cool outfit, or just because you can. And if you do – please share in the comments below!

Recent Comments