
by Contributed | Dec 17, 2021 | Technology
This article is contributed. See the original author and article here.
Searching a FHIR resource is simple. But what if you want to create a highly reusable search form? In this article we walk through a highly reusable search control.
FHIR Search Scenario
Let’s say we have a list of patients. Our app displays patients in a table (first 3 rows displayed below):
ID
|
Name
|
Date of Birth
|
0001
|
Joe Patient
|
01/13/81
|
0002
|
Jane Patient
|
02/13/80
|
If we have 1000 patients, we might want to allow users to search by ID and Name.
First Attempt
In the past we were tempted to create custom Blazor forms like:

Then on submit of this form we could assemble a search criteria.
 public async Task<IList<Patient>> SearchPatient(string givenName, string familyName, string identifier )
        {
            Bundle bundle;

            if (!string.IsNullOrEmpty(identifier))
            {
                bundle = await _fhirClient.SearchByIdAsync<Patient>(identifier);

                if (bundle != null)
                    return bundle.Entry.Select(p => (Patient)p.Resource).ToList();
            }

            if (!string.IsNullOrEmpty(familyName))
            {
                bundle = await _fhirClient.SearchAsync<Patient>(criteria: new[] { $"family:contains={familyName}" });

                if (bundle != null)
                    return bundle.Entry.Select(p => (Patient)p.Resource).ToList();
            }

            return await GetPatientsAsync();
        }
Great! But there’s trouble ahead as soon as we start adding more search criteria.
A Growing Form
Now let’s say we want to support searching by birth date. Our first thought might be to add another field and end up with a form like this.

Our form is quickly growing. And so is our submit code.
 public async Task<IList<Patient>> SearchPatient(string givenName, string familyName, string identifier, string birthdate )
        {
            Bundle bundle;

            if (!string.IsNullOrEmpty(identifier))
            {
                bundle = await _fhirClient.SearchByIdAsync<Patient>(identifier);

                if (bundle != null)
                    return bundle.Entry.Select(p => (Patient)p.Resource).ToList();
            }

            if (!string.IsNullOrEmpty(familyName))
            {
                bundle = await _fhirClient.SearchAsync<Patient>(criteria: new[] { $"family:contains={familyName}dateofbirth:contains{birthdate}" });

                if (bundle != null)
                    return bundle.Entry.Select(p => (Patient)p.Resource).ToList();
            }

            return await GetPatientsAsync();
        }
Now what happens if we want to add search by Telephone, address, or by anything in the Patient object? Our form is going to get longer and longer. Pretty soon it’s going to be gigantic! Even worse we can’t reuse this component for searching other FHIR resources. For example, our search for Questionnaires will look 100% different! After all Questionnaires don’t have Family Names, or Birthdates.
A better approach
Instead, we started to use a much simpler form:
The code for this component is similarly simple:
private async Task<IList<Patient>> SearchPatient(IDictionary<string, string> searchParameters)
        {
            var searchResults = new List<Patient>();
            IList<string> filterStrings = new List<string>();
            foreach (var parameter in searchParameters)
            {
                if (!string.IsNullOrEmpty(parameter.Value))
                {
                    filterStrings.Add($"{parameter.Key}:contains={parameter.Value}");
                }
            }
            Bundle bundle = await _fhirService.SearchAsync<Patient>(criteria: filterStrings.ToArray<string>());

            if (bundle != null)
            {
                searchResults = bundle.Entry.Select(p => (Patient)p.Resource).ToList();
            }
            return searchResults;
        }
But the magic is that each Resource that uses the component uses a method like this to build search criteria:
So now using that simple component our users can search for id like this:
Id:0001
Search for Birthdate like this:
birthdate:01/26/82
Or do a combined search:
Id:0001 birthdate:01/26/82
And for Questionnaires we can use the same component and search for a Questionnaire with complex search terms like:
Name:health description:nutrition
See it in Action
View our implementation of this component in FHIR Blaze- our sample FHIR + Blazor app.
Caveats
Ux: Though we have a simplified form- it’s no longer clear what available search fields. How is your user supposed to know that “family:” is how one searches for last name? To resolve this, we recommend visual hints or auto complete. For example, below the text box you could include simple text explaining the most likely search terms as well as linking to a document with all the terms defined.
Performance: Since our search routine uses “contains” our search uses much more Rus than if we included an exact search term. Consider including keyword to allow exact searches.
Spaces: Our search routine does a simple split. This means we can’t search for anything with a space (ex: a family name of “De Luis”. Consider modifying our sample code to more intelligently split search terms.
Cancelling search: Our code assumes submitting the search with no terms is to cancel the search. This isn’t apparent and might be confusing.
by Contributed | Dec 16, 2021 | Technology
This article is contributed. See the original author and article here.
Attack Simulation Training is an intelligent phish risk reduction tool that measures behavior change and automates the deployment of an integrated security awareness training program across an organization. It is available with Microsoft 365 E5 or Microsoft Defender for Office 365 P2 plan. In a phishing simulation, admins can use end user email notifications to inform targeted users about their participation in the campaign or to appreciate a successful phishing report.
We’re pleased to announce that these can now be localized, customized, and targeted based on the user’s locale. Security admin will be able to customize 2 different types of notifications:
- Positive Reinforcement Notification
- Simulation Notification
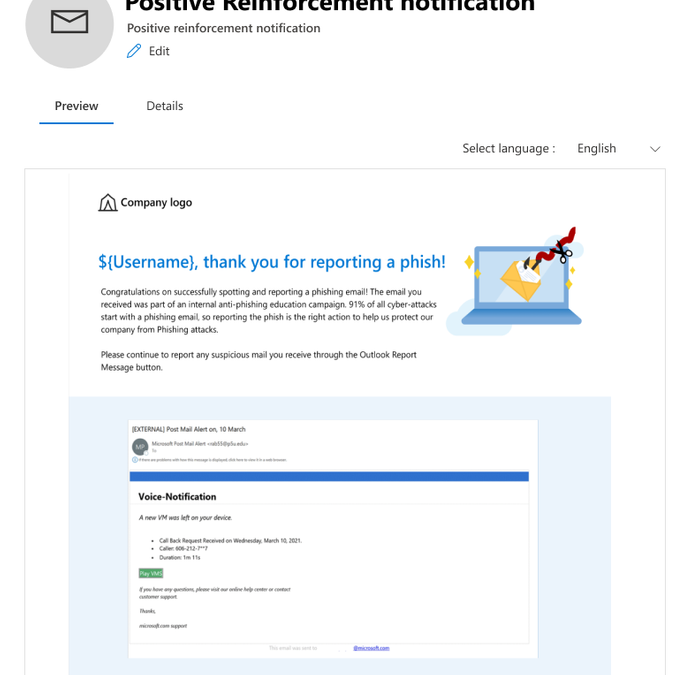
Positive Reinforcement Notification
Positive Reinforcement Notification allows you to send an appreciation mail to the users who report a phish to reinforce positive behavior. You can choose to send these notifications during the campaign as well as after it completes.
Simulation Notification
Simulation Notification allows you to send a notification to the users to inform them about their participation in the phishing campaign when no trainings are assigned to them. You can assign this notification to all users, users who clicked, or to the users who were compromised, and a notification will be sent to those users after the campaign ends.
How to create or access these notifications?
A new library of notifications is provided under a new tab called ‘End user notifications’ which will be used to create, edit, copy and delete notifications. Notifications are either Microsoft curated or customized by a customer.
1. Microsoft curated notifications (Global)
Enables you to choose from Microsoft curated notifications in 12 languages for a ‘click and go’ experience.

2. Custom notification created by a tenant (Tenant)
Enables you to tailor the notification to your requirements in 12 languages. For example, include your own branding, messaging, code, and more.
Creating a custom notification is a great option for enterprises who want to create a notification from scratch using Rich Text Editor. The notification can be created either by using the text tab (RTE) where the content can be created within the editor, copied from external sources, or by using the code tab to input the HTML code.
- Dynamic tag: Allows you to choose the user’s first name, last name, UPN, email address, and payload dynamically.
- Use from Default: Allows you to choose Microsoft defaults landing page with predefined formatting and make additional modifications as necessary.
- Company Logo/images: Allows you to paste the image/logos of your choice and insert videos of up to 4MB.
- Body: Allows you to create content/text of your choice.
- Shows the content of the payload chosen
- The “code” tab that comes along with the rich text editor can be leveraged for additional sophisticated design requirements using HTML code. The code can be saved and reused for new simulations.

How to use notifications in simulations?
A new node called ‘Select end user notification’ is added to the launch simulation and simulation automation workflow where you can choose to not deliver any notification, choose from Microsoft defaults or customized end user notifications. Positive reinforcement notification can be delivered during the campaign or after the campaign whereas Simulation Notification would be delivered after the campaign ends as per the users’ actions-all users, clicked, and compromised.

We hope you enjoy using custom end user notifications in a simulation. Looking forward to your experience and feedback!
Want to learn more about Attack Simulation Training?
Get started with the available documentation today and check out the blogs for Setting up a New Phish Simulation Program-Part One and Part Two. In addition to these, you can read more details about new features in Attack Simulation Training.
by Contributed | Dec 15, 2021 | Technology
This article is contributed. See the original author and article here.
At-scale data processing systems typically store a single table in storage as multiple files. In the Azure Purview data catalog, this concept is represented by using resource sets; a resource set is a single object in the catalog that represents many assets in storage.
For example, suppose your Spark cluster has persisted a DataFrame into an Azure Data Lake Storage (ADLS) Gen2 data source. In Spark, the table looks like a single logical resource, but on the disk there are likely thousands of Parquet files, each of which represents a partition of the total DataFrame’s contents.
IoT data and web log data have the same challenge. Imagine you have a sensor that outputs log files several times per second. It won’t take long until you have hundreds of thousands of log files from that single sensor. In Azure Purview, resource sets allow for these partitions to be handled as a single data asset, allowing for easy consumption and preventing oversaturation of the data catalog.
How Azure Purview detects resource sets
Azure Purview supports resource sets in Azure Blob Storage, ADLS Gen1, ADLS Gen2, Azure Files, and Amazon S3.
Azure Purview automatically detects resource sets when scanning. This feature looks at all the data that’s ingested via scanning and compares it to a set of defined patterns.
For example, suppose you scan a data source whose URL is https://myaccount.blob.core.windows.net/mycontainer/machinesets/23/foo.parquet. Azure Purview looks at the path segments and determines if they match any built-in patterns. It has built-in patterns for GUIDs, numbers, date formats, localization codes (for example, en-us), and so on. In this case, the number pattern matches 23. Azure Purview assumes this file is part of a resource set named https://myaccount.blob.core.windows.net/mycontainer/machinesets/{N}/foo.parquet.
Or, for a URL such as https://myaccount.blob.core.windows.net/mycontainer/weblogs/en_au/23.json, Azure Purview matches both the localization pattern and the number pattern, producing a resource set named https://myaccount.blob.core.windows.net/mycontainer/weblogs/{LOC}/{N}.json.
Using this strategy, Azure Purview would map the following resources to the same resource set, https://myaccount.blob.core.windows.net/mycontainer/weblogs/{LOC}/{N}.json:
Note: Azure Purview intentionally doesn’t try to classify document file types such as Microsoft Word, Microsoft Excel, and PDFs as resource sets.
Advanced resource sets
Azure Purview can customize and further enrich your resource set assets through the Advanced Resource Sets capability. When advanced resource sets are enabled, Azure Purview runs extra aggregations to compute the following information about resource set assets:
- Up-to-date schema and classifications to accurately reflect schema drift from changing metadata.
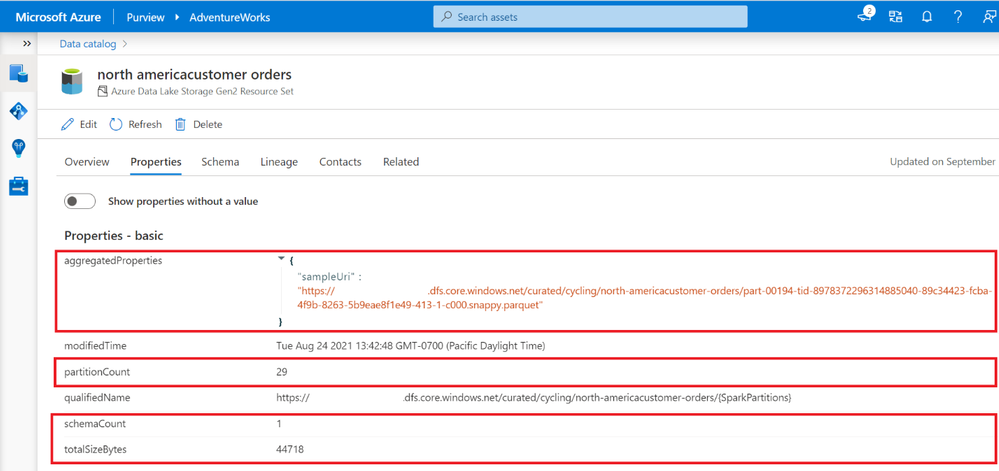
- Sample file paths of assets that comprise the resource set.
- A partition count that shows how many files make up the resource set.
- A schema count that shows how many unique schemas were found. This value is either a number between 1 and 5, or for values greater than 5, 5+.
- A list of partition types when more than a single partition type is included in the resource set. For example, an IoT sensor might output both XML and JSON files, although both are logically part of the same resource set.
- The total size of all files that comprise the resource set.
These properties can be found on the asset details page of the resource set.
Enabling advanced resource sets also allows for the creation of resource set pattern rules that customize how Azure Purview groups resource sets during scanning.
Enabling advanced resource sets
The advanced resource sets feature is off by default in all new Azure Purview instances. Advanced resource sets can be enabled from Account information in the management hub.

After enabling advanced resource sets, the additional enrichments will occur on all newly ingested assets. The Azure Purview team recommends waiting an hour before scanning in new data lake data after toggling on the feature.
Customizing resource set grouping using pattern rules
When scanning a storage account, Azure Purview uses a set of defined patterns to determine if a group of assets is a resource set. In some cases, Azure Purview’s resource set grouping might not accurately reflect your data estate. These issues can include:
- Incorrectly marking an asset as a resource set
- Putting an asset into the wrong resource set
- Incorrectly marking an asset as not being a resource set
To customize or override how Azure Purview detects which assets are grouped as resource sets and how they are displayed within the catalog, you can define pattern rules in the management center. Pattern rules are only available when the advanced resource sets feature is enabled. For step-by-step instructions and syntax, please see resource set pattern rules.

Get started today!
by Contributed | Dec 14, 2021 | Technology
This article is contributed. See the original author and article here.
Organizational charts can be an essential tool for any growing organization, especially now when new hires are trying to figure out their place in the company without actually meeting their colleagues in person. Org charts can help visualize reporting structures and quickly provide employees with information they need—such as titles, roles, and responsibilities—to move processes forward. They can also be a practical tool for planning and evaluating re-structuring efforts or identifying open positions that need to be filled.
The Microsoft Visio desktop app has long supported the creation of org charts, complete with photos and personnel information, and the ability to automatically create org structures from data sources like Excel, Exchange, and Azure Active Directory.
As of today, users with a Visio Plan 1 or Visio Plan 2 license can now create org charts in the Visio web app, too. Alternatively, they can start creating org charts from data directly in Excel using the Data Visualizer add-in and further edit those diagrams using new org chart shapes in Visio for the web.
New org chart stencils and layouts in Visio for the web
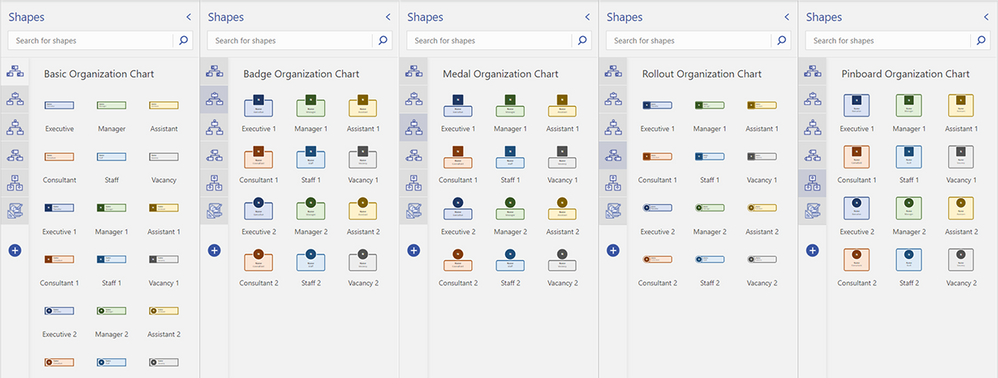
As part of this release, we’ve added five org chart stencils—Basic, Badge, Medal, Rollout, and Pinboard—with predefined, color-coded shapes that can easily be dragged onto the canvas to represent each employee or vacancy in your team, department, or organization. You can also choose from shapes that populate the initials of your employees’ names. Once you’ve added the new shapes to the canvas, you can add information, such as name, title/role, contact details, and location. Then, use connectors to show the hierarchy.
Five available org chart stencils now available—Basic, Badge, Medal, Rollout, and Pinboard—and shapes included in Visio for the web
We’ve also added eight new layout options—top to bottom, bottom to top, left to right, right to left, side-by-side, and hybrid combinations—so you can quickly visualize the hierarchy of your team, department, or organization how you want. Once your shapes are connected, select Layouts from the Organization Chart tab. Then, select your preferred layout.
 Eight org chart layout options available from the Organization Chart tab in Visio for the web
To help you get started quickly, we’ve also provided a few starter diagrams, representing various org chart scenarios, including HR management and Scrum Team structure.
 Available templates showing different organization charts in Visio for the web
To get started, visit office.com/launch/visio, select your preferred diagram template, and start visualizing your team structure. Visit our support article on how to create an organization chart in Visio to learn more.
Starting from the Visio Data Visualizer add-in in Excel
The Data Visualizer add-in is available for Excel on PC, Mac, and Excel for the web with a Microsoft 365 work or school account. You can access the add-in from the Visio Data Visualizer button in the ribbon of the Insert tab. If you are unable to find the button in the ribbon, select Get Add-ins and search for “Visio Data Visualizer” in the search box. Once the add-in has been added, you can select the Visio Data Visualizer button to quickly create a diagram from Excel data.
Select one of the five organization chart layouts available in the Data Visualizer add-in.
 Blank Excel spreadsheet showing the five org chart layout options available from the Visio Data Visualizer add-in
You can quickly replace the sample data in the Excel table with your organization’s data—including Employee ID, Name, Manager ID, Title, and Role Type—for each person you want to include in your org chart, then select Refresh.
 Data table and org chart in an Excel spreadsheet
If you have a subscription to Visio, you can further edit the diagram by changing the theme, modifying the layout, and adding and formatting the text. To further edit the org chart in Visio for the web, select either Edit in the diagram area or the ellipses (…) > Open in web.
After opening your diagram in Visio for the web, you will see the Basic Organization Chart stencil and shapes pinned to the Shapes pane. You can update your diagram using these basic shapes or also search for new shapes by typing a keyword in the search box and selecting the magnifying glass. Drag the shape you want from the stencil onto the canvas or pin the stencil to the Shapes pane for easy access.
 Organization chart in Visio for the web
When you’re done, hit the Share button in the upper right corner to invite your colleagues to collaborate on your diagram and provide feedback.
Please note: Any changes made in Visio for the web—beyond adding and formatting text, changing the theme, or changing the diagram’s layout—cannot be synced back to the original Excel source file. For more details on how to create an org chart based on Excel data using the Visio Data Visualizer add-in, please review our support article.
We’re excited about the future of Visio, and we look forward to hearing your feedback to make the Visio web app the diagramming tool to convey information and processes more effectively. Please tell us what you think in the comments below or send feedback via our new Feedback portal!
Continue the conversation by joining us in the Microsoft 365 Tech Community! Whether you have product questions or just want to stay informed with the latest updates on new releases, tools, and blogs, Microsoft 365 Tech Community is your go-to resource to stay connected!
by Contributed | Dec 13, 2021 | Technology
This article is contributed. See the original author and article here.
With the continued evolution and adoption of hybrid work, we know how critical a strong identity and governance control plane is for IT scalability and a seamless user experience. Today, we are excited to share new Azure Active Directory (Azure AD) capabilities and best practices that can help organizations with these needs. With these updates, organizations will now be able to allow password writeback from the cloud when using Azure AD Connect cloud sync, provision to on-premises applications, verify their SCIM provisioning endpoints, and more.
Allow users to reset their password regardless if they are on-premises or in the cloud
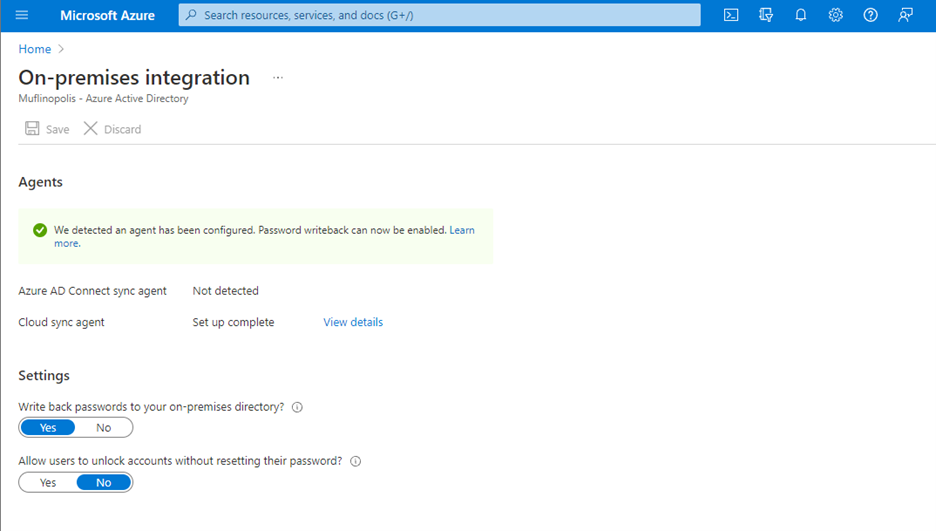
Password writeback allows an on-premises synched user to initiate password changes in the cloud and have the password written back to the user’s on-premises Active Directory Domain Services (AD DS) environment in real time. This enables users to seamlessly transition between cloud and on-premises applications without worrying about managing multiple passwords. No matter where the password is updated, it remains in sync across the cloud and on-premises.
Now in public preview, Azure AD Connect cloud sync password writeback includes support for users synced from disconnected environments. Organizations can sync users from multiple disconnected domains into a central Azure AD tenant and reset passwords for these users from Azure AD.
Simplify provisioning to cloud and on-premises applications
At Microsoft Ignite, we announced that an open public preview is available for Azure AD to provisioning to on-premises applications that support SCIM, SQL, and LDAP. Organizations can manage provisioning to their on-premises applications the same way they’re used to with popular SaaS applications such as monday.com, Miro, and Asana. Building on this momentum, we’ve now added the ability to provision users into third-party LDAP directories such as OpenLDAP.

Simplify building and testing your provisioning end point in compliance with the SCIM standard
A limited preview is now available of a SCIM validation tool. This enables partners and customers to validate that their end point is compatible with the Azure AD SCIM client, reducing onboarding time to the Azure AD app gallery. Once you have built your new application as per the guidelines, you can request an invite to the preview here.

Upgrade to the latest version of Azure AD Connect sync to future-proof your environment
Legacy versions of Azure AD Connect sync rely on components such as SQL2012 and ADAL that are being retired in the coming year. As such, all customers must upgrade to Azure AD Connect sync v2.0 or evaluate switching to Azure AD Connect cloud sync to ensure uninterrupted provisioning support. Azure AD Connect sync v1.x versions will be retired effective August 30, 2022.
To provide better predictability for IT planning cycles, we have also established a consistent retirement cadence for Azure AD Connect sync versions. Moving forward, we will retire each version 18 months after a new version is released.
Use date comparisons to drive provisioning logic
Attribute expression mapping enables you to control and transform data before writing to target systems. Based on your feedback, we have added new built-in date functions Now(), DateAdd() and DateDiff() to help you compare dates and define granular attribute provisioning based on date time values. You can nest and combine them with other functions in your user provisioning flow to implement scenarios such as:
- Based on user type, set user account expiry date in a SaaS application or on-premises application to “X” number of days after current provisioning time.
- Find the interval difference between current date and HR hire date and use it to determine account activation / data flow logic.
As always, we’d love to hear from you! Feel free to leave comments down below or reach out to us on aka.ms/AzureADFeedback.
Learn more about Microsoft identity:

Recent Comments