ESP32 with Arduino IDE – Your MQTT bridge into Azure IoT Hub

ESP32 with Arduino IDE – Your MQTT bridge into Azure IoT Hub

This article is contributed. See the original author and article here.

I have been on a journey to explore Azure IoT and push the thousands of events that flow through my local MQTT broker (Mosquitto) into Azure IoT.


After my last post in using the Azure IoT SDK for Python conjunction with Paho MQTT I thought my work here was complete. But I have just recently been made aware that there is native support for various Arduino devices by Microsoft and Espressif. How awesome is that!


Before you get too excited given the requirements of such libraries, this is not going to work on your Arduino Uno, Arduino Mega 2560 and so on. Support for Azure IoT Hub is (for now) reserved for the newer generation of boards from Espressif (ESP32ESP8266) and the Realtek Ameba D. These boards can contain megabytes, not kilobytes of RAM, multi-core CPU’s and are able to load in a TCP/IP stack, MQTT and so on.


If there is a theme for my house, it is bookended with reliability, and with that, it’s time to put my rack-mounted Raspberry Pi away and adopt a microcontroller. A Raspberry Pi, as great as it is, is an SBC (Single Board Computer) that needs to be updated, watered and fed. It uses a file system, a flash memory subsystem. How does this bode for reliability, and have you ever had a corrupt file system on a microcontroller?


Like any good, opinionated architect, I would urge you to stop, put away your Raspberry Pi’s and take a different approach: a microcontroller.


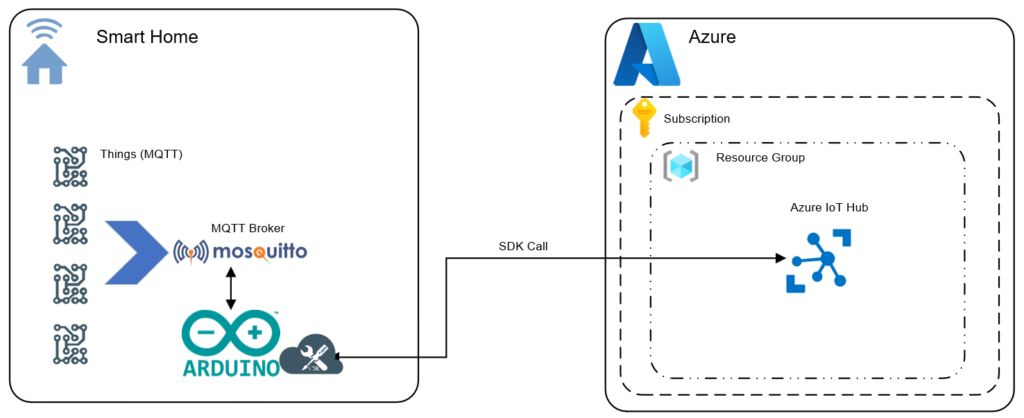
Today, I leverage around 30 outputs on an Arduino Mega 2560 with an Ethernet and PoE shield using MQTT (The pub/sub client library) but it’s time to modernise, and given my love of ESP devices with Tasmota, I decided to purchase an ESP32 for this very task.In this post I will illustrate how to build a bridge from Mosquitto MQTT into Azure IoT Hub using this ESP32 device.


I covered in a prior post why I am going down this path of publishing telemetry to Azure IoT Hub, along with the several ways I have illustrated how one can go about achieving this goal. From direct connection to Azure IoT Hub (via MQTT and SAS tokens) through to Azure IoT Edge running locally with MQTT and finally the SDK’s.I have been able to achieve my goals with varying levels of success but have a few concerns on the approaches I have tried thus far.


  • Direct-Connection to Azure IoT Hub introduces latency to the cloud.

  • Authentication, from SAS tokens to X509 certificates: it’s not anonymous and some of my tiny devices (Tasmota) dont bode well.

  • Topic structure: it is defined (devices/{DeviceID}/messsages/events/) and not free form. It means reconfiguration, which isn’t hard, but a lot of friction.

  • Reliability: all solutions thus far have relied on a OS which require patching, updating and are even whilst small an administrative burden.


My goals for building a solution


  1. No reconfiguration of any of my MQTT devices (Home Assistant, PLC, Arduino Mega 2560, ~75 Tasmota devices).

  2. Bridge my existing MQTT broker (Mosquitto) in to Azure IoT.

  3. Run on microcontroller, as I want to be reliable.


Pretty lofty goals, you may even say I am being lazy, but the reality is I want a low friction away to derive operational intelligence from the many thousands of events each day (read below, it’s over 10K per day!)


What we are going to build


To overcome, the limitations described above we are going to use an ESP32 microcontroller with C++ code with a libraries. Just incase you are not familar, let me introduce you to the ESP32.


ESP32


Where do I start? What is not love about this SOC? The ESP32 is a modern, powerful Arduino compliant microcontroller that power many devices from my irrigation controller (Opensprinkler) through to my kids learning robot (MBot) they are either using an ESP32 or an older derivative such as an ESP8266. Today I am using this as a software bridge but there is a plethora of I/O and support for PWM, I2c and more which make them a versatile all rounder.


The ESP32 is a series of low-cost, low-power system on a chip microcontrollers with integrated Wi-Fi and dual-mode Bluetooth. The ESP32 series employs either a Tensilica Xtensa LX6 microprocessor in both dual-core and single-core variations, Xtensa LX7 dual-core microprocessor or a single-core RISC-V microprocessor and includes built-in antenna switches, RF balun, power amplifier, low-noise receive amplifier, filters, and power-management modules. ESP32 is created and developed by Espressif Systems, a Shanghai-based Chinese company, and is manufactured by TSMC using their 40 nm process. It is a successor to the ESP8266 microcontroller.


ESP32 – Wikipedia


Let’s build.


Code Summary


See the steps below as I tease out this solution or my GitHub repo for the full Arduino sketch. To give you a better understanding on how this works I will break it down in to the logical steps below required to receive messages from Mosquitto over MQTT using


‘PubSubClient’ and to then re-publish them in to Azure IoT Hub using the ‘Esp32MQTTClient’.


Step 1 – Arduino IDE – Add ESP32 to the Board Manager


The Arduino IDE does not know about the ESP32 so the very first step we need to do leverage the the Arduino IDE’s ‘Board Manager’ capability to provide support for the ESP32. In the Arduino IDE, open ‘Preferences’ and enter in one of the following URL’s


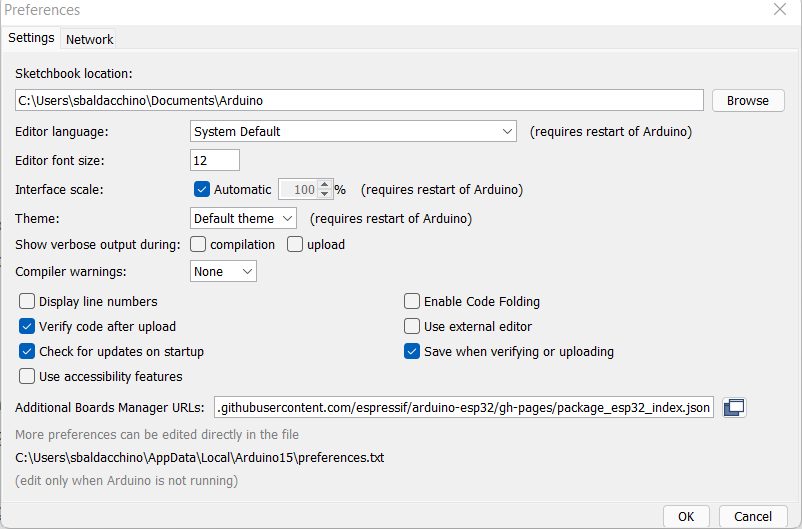
Open ‘Boards Manager’ from ‘Tools’ > ‘Board’ menu. Search for an install ‘ESP32’. Select your specific ESP32 board from the menu post installation.


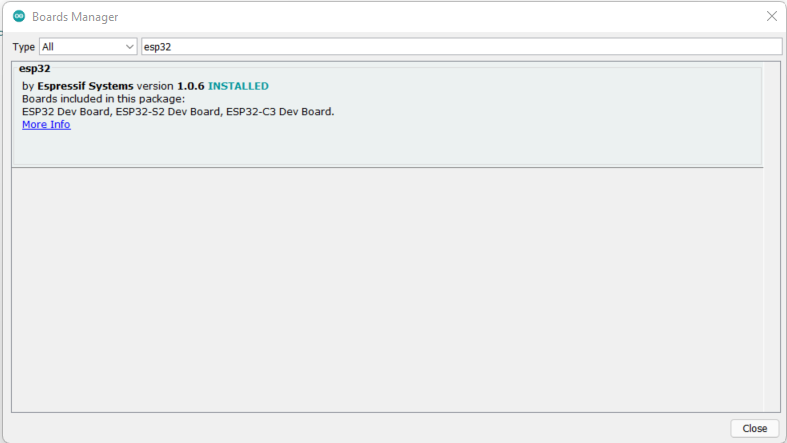
Restart the Arduino IDE.


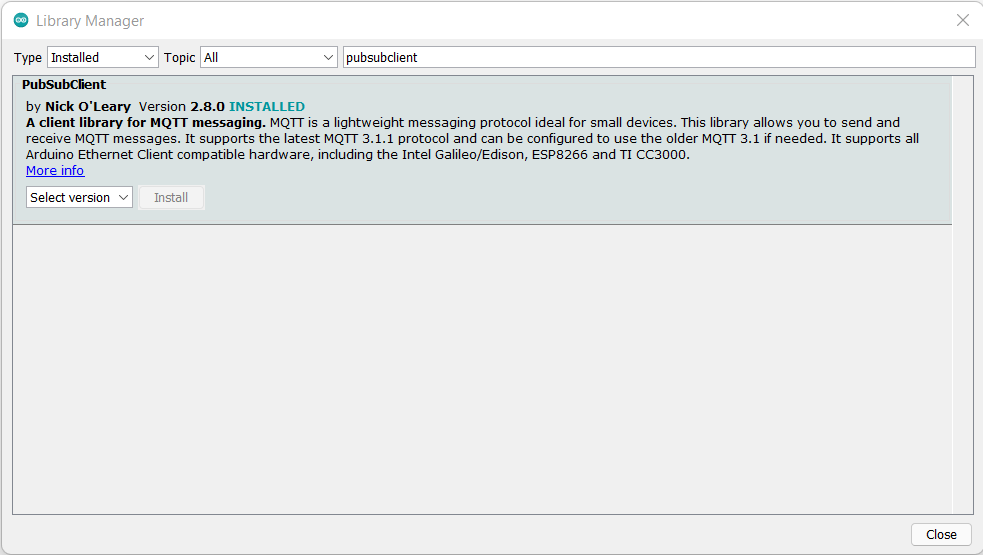
Step 2 – We Need A Library – PubSubClient


Whilst we now have support for the ESP32, we need to add a library that will allow us to subscribe to and receive MQTT messages from our Mosquitto broker. For this very purpose we need a MQTT library. There are many but I have used ‘PubSubClient’ in the past on other projects without any issues. To install, ‘Tools’ > ‘Manage Libraries’ > ‘PubSubClient’


Step 3 – Author Some Code (Libraries and Variables)


After validating your board is working (I would suggest uploading a Blink sketch) we can start coding. This example is based off the ‘Examples > ESP32 Azure IoT Arduino > Simple MQTT’;


We need to include some libraries, we will be using the Wi-Fi (for connectivity), PubSubClient (for Mosquitto MQTT) and the ESP32MQTTClient (for Azure IoT Hub).


#include <WiFi.h>
#include <PubSubClient.h>
#include "Esp32MQTTClient.h"
 
const char* ssid = "Wifi SSID";
const char* password =  "Wifi Password
const char* mqttServer = "IP Address of MQTT Server";
const int mqttPort = 1883;
String MQTTTopic;
String MQTTPayload;


Regarding Azure IoT Hub you will need to define your connection string. This post does not cover creating an IoT Hub or creating a device and assumed you have created this prior. See Use the Azure portal to create an IoT Hub | Microsoft Docs for more information on creating an Azure IoT Hub, adding a device and obtaining a device connection string.


//Azure IOT Hub Setup
static const char* connectionString = "*******************=";
static bool hasIoTHub = false;


Step 4 – Author Some Code (Setup Function: Connect to Wi-Fi , Azure and Mosquitto MQTT)


Our ‘setup’ function will establish connection to our LAN via Wi-Fi and then connect in to Azure where as the ‘MQTTConnect’ function not only connects to our local MQTT broker, but it defines the MQTT topics to subscribe to. You can subscribe to multiple MQTT topics by having multiple subscribe lines. You can also use MQTT wildcard filters to match events using fewer subscriptions.


Plus sign (+): It is a single level wildcard that matches any name for a specific topic level. We can use this wildcard instead of specifying a name for any topic level in the topic filter.


Hash (#): It is a multi level wildcard that we can use only at the end of the topic filter, as the last level and matches any topic whose first levels are the same as the topic levels specified at the left-hand side of the # symbol.


Understanding wildcards | MQTT Essentials – A Lightweight IoT Protocol (packtpub.com)


The serial monitor is handy in debugging any issues either with Wi-Fi or connecting in to Azure IoT Hub.


client.on_message = on_message  

void setup() {
  //Set baud rate
  Serial.begin(115200);
  WiFi.begin(ssid, password);
  while (WiFi.status() != WL_CONNECTED) {
    delay(500);
    Serial.println("ESP32 : Connecting to WiFi...");
  }
  Serial.println("ESP32 : WiFi connected");
  Serial.println("ESP32 : IP address: ");
  Serial.println(WiFi.localIP());
  //Set MQTT details
  client.setServer(mqttServer, mqttPort);
  client.setCallback(callback);
 
  //Connect to Azure IOT
  if (!Esp32MQTTClient_Init((const uint8_t*)connectionString))
  {
    hasIoTHub = false;
    Serial.println("Azure IoT Hub : Initializing IoT hub failed.");
    return;
  }
  hasIoTHub = true;
 
}
    
void MQTTConnect() {
  // Loop until we're reconnected
  while (!client.connected()) {
    Serial.print("MQTT : Attempting MQTT connection...");
    // Attempt to connect
    if (client.connect("ESP32Client")) {
      Serial.println("MQTT : Connected");
      // Once connected, publish an announcement...
      client.publish("stat/ESP32/IP_Address","Your IP Address");
      //Subscribe to topics, one topic per line.
      client.subscribe("stat/+/POWER");      
    } else {
      Serial.print("MQTT : Failed to connect to MQTT , rc=");
      Serial.print(client.state());
      Serial.println("MQTT : Trying again to connect to MQTT in 5 seconds");
      // Wait 5 seconds before retrying
      delay(5000);
    }
  }
}


Step 4 – Author Some Code (MQTT Call Back & Publish To Azure)


After the setup functions we now need to create a function that will listen for incoming MQTT messages that match our subscription (callback), extract the topic and payload before massaging this data and sending to Azure via another function (AzureIoTHub).


void callback(char* topic, byte* payload, unsigned int length) {

  MQTTTopic = String(topic);
  MQTTPayload = ""; 
  for (int i = 0; i < length; i++) {
    // Serial.print((char)payload[i]); - Use for debugging
    MQTTPayload = String(MQTTPayload + (char)payload[i]);
  }    
}


void AzureIoTHub() {
  if (hasIoTHub)
      {
        String tempString;
        tempString = "{" + MQTTTopic + ":" + MQTTPayload + "}";
        if (Esp32MQTTClient_SendEvent(tempString.c_str()))
        {
          Serial.println("Azure IoT Hub : Sending data to Azure IoT Hub succeed");
        }
        else
        {
          Serial.println("Azure IoT Hub : Failure...");
        }
      MQTTPayload = "";
      MQTTTopic = "";

   }
}


Step 5 – Author Some Code (Our Main Loop)


The main loop is leveraging all of these functions and its logic can be best sumarised in to a few points. Connect to MQTT if there is no connection


If there is a MQTT Topic/Message which was decoded via our ‘callback’ function send this to Azure IoT Hub and re-connect if there is no connection.


void loop() {
   //Connect to MQTT and reconnect if connection drops
   if (!client.connected()) {
     MQTTConnect();
   }
   //Respond to messages received
   if (MQTTTopic != "") { 
      Serial.println("MQTT : Topic is [" + MQTTTopic +"]");
      Serial.println("MQTT : Payload is [" + MQTTPayload + "]");
      AzureIoTHub(); 
  }
  client.loop();
}


Pulling It All Together


Here is a complete copy of the above, plus a bit more. You could cut and paste the below or clone my GitHub repository.


#include <WiFi.h>
#include <PubSubClient.h>
#include "Esp32MQTTClient.h"
 
const char* ssid = "****";
const char* password =  "****";
const char* mqttServer = "****";
const int mqttPort = 1883;
String MQTTTopic;
String MQTTPayload;

//Azure IOT Hub Setup
static const char* connectionString = "****";
static bool hasIoTHub = false;
 
WiFiClient espClient;
PubSubClient client(espClient);
 
void callback(char* topic, byte* payload, unsigned int length) {

  MQTTTopic = String(topic);
  MQTTPayload = ""; 
  for (int i = 0; i < length; i++) {
    // Serial.print((char)payload[i]); - Use for debugging
    MQTTPayload = String(MQTTPayload + (char)payload[i]);
  }    
}


void MQTTConnect() {
  // Loop until we're reconnected
  while (!client.connected()) {
    Serial.print("MQTT : Attempting MQTT connection...");
    // Attempt to connect
    if (client.connect("ESP32Client")) {
      Serial.println("MQTT : Connected");
      // Once connected, publish an announcement...
      client.publish("stat/ESP32/IP_Address","Your IP Address");
      //Subscribe to topics, one topic per line.
      client.subscribe("stat/+/POWER");      
    } else {
      Serial.print("MQTT : Failed to connect to MQTT , rc=");
      Serial.print(client.state());
      Serial.println("MQTT : Trying again to connect to MQTT in 5 seconds");
      // Wait 5 seconds before retrying
      delay(5000);
    }
  }
}

void setup() {
  //Set baud rate
  Serial.begin(115200);
  WiFi.begin(ssid, password);
  while (WiFi.status() != WL_CONNECTED) {
    delay(500);
    Serial.println("ESP32 : Connecting to WiFi...");
  }
  Serial.println("ESP32 : WiFi connected");
  Serial.println("ESP32 : IP address: ");
  Serial.println(WiFi.localIP());
  //Set MQTT details
  client.setServer(mqttServer, mqttPort);
  client.setCallback(callback);
 
  //Connect to Azure IOT
  if (!Esp32MQTTClient_Init((const uint8_t*)connectionString))
  {
    hasIoTHub = false;
    Serial.println("Azure IoT Hub : Initializing IoT hub failed.");
    return;
  }
  hasIoTHub = true;
 
}

void loop() {
   //Connect to MQTT and reconnect if connection drops
   if (!client.connected()) {
     MQTTConnect();
   }
   //Respond to messages received
   if (MQTTTopic != "") { 
      Serial.println("MQTT : Topic is [" + MQTTTopic +"]");
      Serial.println("MQTT : Payload is [" + MQTTPayload + "]");
      AzureIoTHub(); 
  }
  client.loop();
}

void AzureIoTHub() {
  if (hasIoTHub)
      {
        String tempString;
        tempString = "{" + MQTTTopic + ":" + MQTTPayload + "}";
        if (Esp32MQTTClient_SendEvent(tempString.c_str()))
        {
          Serial.println("Azure IoT Hub : Sending data to Azure IoT Hub succeed");
        }
        else
        {
          Serial.println("Azure IoT Hub : Failure...");
        }
      MQTTPayload = "";
      MQTTTopic = "";

   }
}


Seeing This In Action


Lets drop to a video to see this in working end-to-end, to validate messages are flowing in to Azure IoT Hub I can use the Azure CLI (AZ-CLI) to monitor the output coupled with the Arduino Serial monitor.


az iot hub monitor-events --output table --device-id devicename --hub-name hubname --output json


For the purpose of this demo, I have left a handful of messages at QoS level 2 and set LWT (Last Will and Testament) to true.


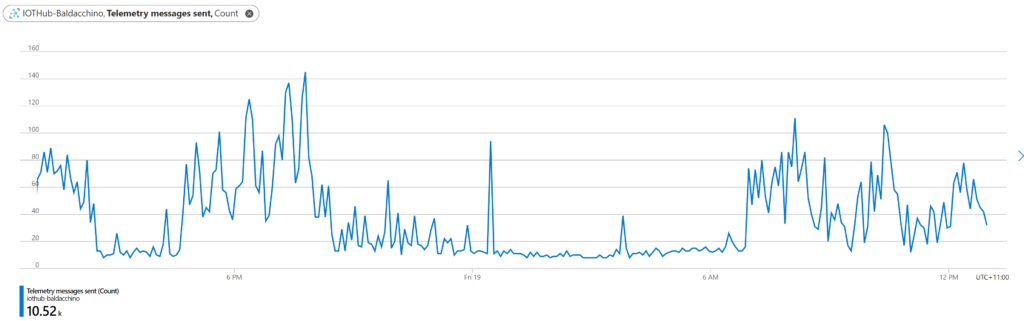
After 24 hours of running, we can see I have published 10.52K of messages in to Azure IoT Hub and there are certain ebbs and flows that occur in my house.


24 hour period of messages flowing in to Azure IoT Hub


Conclusion


There are many ways to skin this code cat. My requirements was to publish messages in to Azure and we have been able to achieve this via different ways (I am sure there is more). Automation is a journey, which path will you take?


We illustrated a transparent side-car approach that will listen to an existing broker, on topics you desire and push these in to Azure IoT, all without making any configuration changes (the most important thing for my implementation). This method runs on a microcontroller, consumes less than 5w of power and just works.


Are there any draw backs? Sure there are. Right now this is one way in direction (simplex) and allows me to push messages in to Azure IoT but not receive messages back.


Personally, I like this approach, it combines the elegance of a SDK as it’s my code and couples the reliability of a microcontroller. It’s my code, my choices on what I do, but I do understand this is not for everyone. We now have my messages, my events, in Azure and it’s time to make some friends and learn how to derive operational intelligence from visualizations through to machine learning and beyond.


Think big and happy building


Shane

Continuous Access Evaluation in Azure AD is now generally available!

Continuous Access Evaluation in Azure AD is now generally available!

This article is contributed. See the original author and article here.

Howdy folks,


We’re thrilled to announce the General Availability (GA) of Continuous Access Evaluation (CAE) as part of the overall Azure AD Zero Trust Session Management portfolio!


CAE introduces real-time enforcement of account lifecycle events and policies, including:


  • Account revocation

  • Account disablement/deletion

  • Password change

  • User location change

  • User risk increase


On receiving such events, app sessions are immediately interrupted and users are redirected back to Azure AD to reauthenticate or reevaluate policy. With CAE, we have introduced a new concept of Zero Trust authentication session management that is built on the foundation of Zero Trust principles–Verify Explicitly and Assume Breach. With the Zero Trust approach, the authentication session lifespan now depends on session integrity rather than on a predefined duration. This work is consistent with an industry effort called Shared Signals and Events, and we’re proud to be the first company in the group with a generally available implementation of continuous access!


In fact, we’re so excited about CAE that we auto-enabled it for all tenants. Azure AD Premium 1 customers can make configuration changes or disable CAE in a session blade of Conditional Access


Session blade of CAE for customizing configurationsSession blade of CAE for customizing configurations


With this GA, you’ll be more secure and resilient because the real-time enforcement of policies can safely extend session duration. In case of any Azure AD outages, users with CAE sessions can ride out these outages without ever noticing them.


“With CAE, gone are the days where we are waiting for the session to be revoked or the user to be reauthenticated for critical services like Exchange Online and SharePoint Online. If we ever had a security incident pop with a user identity, knowing that the token can be revoked instantly, is confidence inspiring. Further, the long default session lifetime with CAE is another benefit we welcome, particularly from the perspective of additional resilience to potential outages.”


— BRIDGEWATER


CAE has been one of our most popular preview features and has already been deployed successfully by thousands of customers across millions of users. You can learn more about CAE here, including a full list of apps that support CAE today.


As always, we’d love to hear any feedback or suggestions you have. Let us know what you think in the comments below or on the Azure AD feedback forum


Best regards,


Alex Simons (Twitter: @alex_a_simons)


Corporate Vice President Program Management


Microsoft Identity Division


Learn more about Microsoft identity:


SQl Injection: example of SQL Injections and Recommendations to avoid it.

SQl Injection: example of SQL Injections and Recommendations to avoid it.

This article is contributed. See the original author and article here.

I want to share with you here in this article an example of SQL Injection, how it can be used to access sensitive data and harm the database, and what are the recommendations and steps that can be done to protect your application or website from being vulnerable to SQL Injection.


I created a simple web site  with a few lines of code:


  1. Added System.Data and System.Data.SqlClient Namespaces.

  2. Create connection, command and Data Adapter objects to execute an SQL command and fill the data table object.

  3. The command is a Select command query on one of database tables and the result set is filtered by email address, the value that is entered by the user before hitting search button.

  4. The result will be shown on a grid view object on the page.


The Web Page code:


using System;
using System.Collections.Generic;
using System.Linq;
using System.Web;
using System.Web.UI;
using System.Web.UI.WebControls;
using System.Data;
using System.Data.SqlClient;
namespace SqlInjection
{
    public partial class _Default : Page
    {
        protected void Page_Load(object sender, EventArgs e)
        {
        }
        protected void BtnSearch_Click(object sender, EventArgs e)
        {

            string connetionString;
            System.Data.SqlClient.SqlConnection cnn;
            connetionString = @"Data Source=xxx.database.windows.net;Initial Catalog=xxx;User ID=xxx  ;Password=xxx ";
            cnn = new SqlConnection(connetionString);
            cnn.Open();
            SqlCommand command = new SqlCommand("SELECT customerid as ID,Firstname + ' ' + lastname as Name,companyname as Company, emailaddress as Email,phone FROM saleslt.customer WHERE EmailAddress = '" + txtEmail.Text + "'", cnn);
            SqlDataAdapter MyDataadapter;
            MyDataadapter = new SqlDataAdapter(command);
            command.Parameters[0].Value = txtEmail.Text;
            command.ExecuteScalar();
            DataTable Datatbl;
            Datatbl = new DataTable();
            MyDataadapter.Fill(Datatbl);
            GridView.DataSource = Datatbl;
            GridView.DataBind();
             cnn.Close();
        }
    }
}


The application is working fine and retrieves data from the database as below screenshot:


Picture1.jpg


But, if I change the email address value to be ‘ or 1=1 or 1=’  instead of any email address, I will get all the data of the “customers” table, as below screenshot:


Picture2.jpg


If I try something else, like searching for  example: ‘ or 1=2 union select object_id,name,schema_name(schema_id), name , name from sys.tables; select 0 where  1= ‘


Here I did not get the query’s table data, I added union statement to get database tables names using sys.tables system view, and I’ve got  the following result:


Picture3.jpg


Now I am able to simply get the list of all database tables and view any table I want, using same SQL injection scenario.


Also, I tried to insert the value : ‘ or 1=2; truncate table dbo.product; select 0 where  1= ‘ ,and I was able to truncate the product table.


The Queries that have been executed on the database are:


(@0 nvarchar(110))SELECT customerid as ID,Firstname + ' ' + lastname as Name,companyname as Company, emailaddress as Email,phone FROM saleslt.customer WHERE EmailAddress = '' or 1=2 union select object_id,name,schema_name(schema_id), name , name from sys.tables; select 0 where  1= ''
(@0 nvarchar(58))SELECT customerid as ID,Firstname + ' ' + lastname as Name,companyname as Company, emailaddress as Email,phone FROM saleslt.customer WHERE EmailAddress = '' or 1=2; truncate table dbo.product; select 0 where  1= ''


How to avoid SQL Injection:


Use Parameters:


I Modified my C# code and added the required parameter to the SQL Command  as the following:


        protected void BtnSearch_Click(object sender, EventArgs e)
        {

            string connetionString;
            System.Data.SqlClient.SqlConnection cnn;
            connetionString = @"Data Source=xxx.database.windows.net;Initial Catalog=xxx;User ID=xxx  ;Password=xxxxx ";
            cnn = new SqlConnection(connetionString);
            cnn.Open();
            SqlCommand command = new SqlCommand("SELECT customerid as ID,Firstname + ' ' + lastname as Name,companyname as Company, emailaddress as Email,phone FROM saleslt.customer WHERE  EmailAddress = @0", cnn);
            command.Parameters.Add(new SqlParameter("0", 1));
            SqlDataAdapter MyDataadapter;
            MyDataadapter = new SqlDataAdapter(command);
            command.Parameters[0].Value = txtEmail.Text;
            command.ExecuteScalar();
            DataTable Datatbl;
            Datatbl = new DataTable();
            MyDataadapter.Fill(Datatbl);
            GridView.DataSource = Datatbl;
            GridView.DataBind();
            cnn.Close();
        }


Now, if I try the SQL injection it is not working any more, it is giving no result at all:


Picture4.jpg


Whatever the value I write on the email text box, the query that is executed on the database is always the following:


(@0 nvarchar(26))SELECT  customerid as ID,Firstname + ' ' + lastname as Name,companyname as Company, emailaddress as Email,phone FROM saleslt.customer WHERE  EmailAddress = @0


Microsoft Defender:


Microsoft Defender for Cloud – an introduction | Microsoft Docs


Microsoft Defender for Cloud (Azure Security center)  can detect such attacks and notify the customer, I received the following email alert:


tarashee_0-1641745024671.png


MEDIUM SEVERITY


An application generated a faulty SQL statement on database ‘xxxx’. This may indicate that the application is vulnerable to SQL injection.


Activity details


Severity


Medium


Subscription ID


xxx


Subscription name


xxx


Server


xx


Database


xx


IP address


81.xx.xx.xx


Principal name


tr*****


Application


.Net SqlClient Data Provider


Date


November 28, 2021 14:50 UTC


Threat ID


2


Potential causes


Defect in application code constructing faulty SQL statements; application code doesn’t sanitize user input and may be exploited to inject malicious SQL statements.


Investigation steps


For details, view the alert in the Azure Security Center.
To investigate further, analyze your audit log.


Remediation steps


Read more about SQL Injection threats, as well as best practices for writing safe application code. Please refer to Security Reference: SQL Injection.


Give the Application the minimum required permissions:


In the example I shared, the attacker was able to get any data he wants, table names and even was able to truncate or drop tables and more. Maybe it is easier to give permissions as sysadmin or db_owner in one step, but it recommended to give only required permissions (execute permission for example) and only on specific objects required by the application.


Use Application to validate data:


In my web page, the user should use the email address to search for data, it should have an expression special for the email address, and it could not contain spaces and  part like 1=1 or  .


I added a “Reqular expression Validator” object to the page and linked it to the text box I use for the email address.


Below is the validation expression for the email address:


Picture5.jpg


Now I am not able to run the SQL injection again, I get a validation error instead:


Picture6.jpg

Barracuda Virtual Reactor on Azure

Barracuda Virtual Reactor on Azure

This article is contributed. See the original author and article here.

We are thrilled to welcome Barracuda Virtual Reactor® on Azure.  With this technology, engineers can simulate fluid, particulate-solid, thermal and chemically reacting behavior in industrial fluid-particle processes while gaining the on-demand and virtually unlimited computing capacity of Azure. 


Virtual ReactorTM is the industry-standard tool for many applications in refining, petrochemicals, cement manufacture, power generation and other energy-intensive industries.  Today, the same award-winning technology is enabling, and reducing the time to market for, multiple sustainability technologies that are changing our planet for the better.  Examples include advanced recycling of plastics, waste-to-energy/fuels/chemicals, renewable fuels, hydrogen production and other decarbonization applications. 


Fluid-particle systems in these industries tend to operate 24/7 for years on end, and hence, even small improvements in reliability and performance lead to a tremendous economic impact.  Barracuda® reduces the risk of making changes to existing processes by identifying the root cause(s) of underperformance, performing virtual testing of changes and identifying additional optimization opportunities.  Similarly, the software empowers those developing new technologies to economically explore a wide range of possibilities during R&D while compressing development, scale-up and commercialization timeframes.


We recently tested Virtual Reactor on Azure’s state-of-the-art NDv4 virtual machines (VMs)to showcase performance scalability across a variety of models.  We have highlighted the results of the Virtual Reactor with our ND96asr_v4 VM, and the performance is shown below across 8 different sizes.


gauharj_0-1641588176777.png


Smaller simulations which in our tests had less than 25 million computational particles, achieved maximum speed-up when running in multi-GPU mode using two NVIDIA A100 Tensor Core GPUs.  Larger simulations achieved maximum speed-up when using four GPUs.  The speed-up scaling1 from one to four GPUs is shown below for benchmark case 82.


NOTE: Case 8 is a simulation benchmark case containing 55M particles; for additional GPU scaling questions please contact CPFD


gauharj_1-1641588176786.png


The ND A100 v4 series starts with a single virtual machine and eight NVIDIA A100 Tensor Core GPUs.  ND A100 v4-based deployments can scale up to thousands of GPUs with 1.6 Tb/s of interconnect bandwidth per VM.  Each GPU within the VM is provided with its own dedicated, topology-agnostic NVIDIA Quantum 200Gb/s InfiniBand networking.  These connections are automatically configured between VMs occupying the same virtual machine scale set, and support GPUDirect RDMA.


Each GPU features third-generation NVIDIA NVLink connectivity for communication within the VM, and the instance is also backed by 96 physical second-generation AMD Epyc™ CPU cores.


These instances provide excellent performance for many AI, ML and analytics tools that support GPU acceleration ‘out-of-the-box,’ such as TensorFlow, Pytorch, Caffe, RAPIDS and other frameworks.  Additionally, the scale-out InfiniBand interconnect is supported by a large set of existing AI and HPC tools built on NVIDIA’s NCCL2 communication libraries for seamless clustering of GPUs.


“Azure’s multi-GPU virtual machines powered by NVIDIA A100 Tensor Core GPUs provide the global Barracuda Virtual Reactor user community with instant access to the latest high performance computing resources without the overhead of purchasing and maintaining on-premise hardware.  The observed speed-ups of over 200x, combined with the convenience of the Azure Platform, provide our clients with virtually unlimited, on-demand, compute bandwidth as they tackle some of our planet’s toughest engineering, energy and sustainability challenges.”


Peter Blaser, Vice President of Operations, CPFD Software   


“We welcome Barracuda Virtual Reactor to Azure and are excited to showcase this exciting technology to customers in process industries who will benefit immensely from our purpose-built NVIDIA GPU hosts that are designed to deliver superior cost performance for this workload.  Azure and CPFD have joined forces to offer customers a compelling range of options to explore Virtual Reactor on Azure and pick the best VM sizing suited to their use case requirements.”


Kurt Niebuhr, Azure Compute HPC | AI Workload Incubation & Ecosystem Team Lead


About CPFD


CPFD Software is advancing multiphase simulation and technology.  Our flagship product, Barracuda Virtual Reactor, is a physics-based engineering software package capable of predicting fluid, particulate-solid, thermal and chemically reacting behavior in fluidized bed reactors and other fluid-particle systems reducing the risk associated with design, scale-up, commercialization, and trouble-shooting of industrial processes.  The Virtual Reactor technology is accessible through software licensing, consulting, or engineering services.


NOTE:


1For additional GPU scaling questions please contact CPFD


2Case 8 is a simulation benchmark case containing 55M particles


Microsoft Defender for Cloud Apps Ninja Training: December 2021 Updates

Microsoft Defender for Cloud Apps Ninja Training: December 2021 Updates

This article is contributed. See the original author and article here.

What’s New??


Since our last update in September 2021, we have published new training content to support the features and functionality added to Microsoft Defender for Cloud Apps during the previous quarter.  The new materials are included in our Microsoft Defender for Cloud Apps | December 2021 blog post.   If you previously completed the Defender for Cloud Apps Ninja Training and want to view only updated content, we have highlighted and linked to the new material for your convenience.


Legend:


CTang885_0-1641240980093.png   Product videos  CTang885_1-1641240980133.png   Webcast recordings CTang885_2-1641240980118.png Tech Community
CTang885_3-1641240980123.png Docs on Microsoft CTang885_4-1641240980128.png   Blogs on Microsoft CTang885_5-1641240980114.png GitHub

⤴ External


CTang885_6-1641240980139.png   Interactive guides  


Module (ordered by Competency Level)


What’s new


Microsoft Cloud Apps for Security – Fundamental Level:


Module 2. Microsoft Defender for Cloud Apps Introduction


Microsoft Cloud Apps for Security – Fundamental Level:


Module 3. Initial Setting


Microsoft Cloud Apps for Security – Intermediate Level:


Module 3. Information Protection and Real-Time Control


Microsoft Cloud Apps for Security – Intermediate Level:


Module 4. Threat Detection