by Contributed | Jun 22, 2022 | Technology
This article is contributed. See the original author and article here.
The world has changed a lot in two years. Even as offices and other workspaces open up again, the flexible nature of hybrid work continues to prove indispensable. We’ve become accustomed to a decentralized workplace where in-person collaboration is complemented with real-time and asynchronous online solutions. Microsoft Loop components extend the capabilities of Microsoft Teams and Outlook, supporting small-group collaboration and flexibility so you can remain in sync—anywhere, anytime.
Last year we shared ways you can get started using Loop components. Loop components are live and can be copied and pasted across Teams and Outlook — staying in sync in all the places they exist. Loop components enable your team to go from unfinished ideas to great outcomes quickly while staying in the flow of their work.
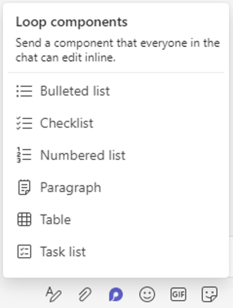
Loop component types include task list, bulleted list, checklist, numbered list, paragraph list, and table.
An image providing an example of the Loop components pop-up menu in Microsoft Teams.
These components are available in Microsoft Teams chat and coming soon to Outlook (and currently available in preview for Office Insiders). Keep reading for some examples of how teams can use Loop components!
Example 1: Collaborative task lists
Loop task list components are a great way to help teams stay in sync and accomplish tasks in a flexible way. Let’s look at an example:
Jóhanna is leading a team that is planning a product announcement in a couple of weeks. There is a lot that needs to be accomplished, but she has a great team! Although Jóhanna lives in the U.S., her team is spread out across several time zones, making it difficult to find a convenient meeting time for all. Instead, Jóhanna begins a Loop task list component in chat, capturing actions the team needs to complete, and assigning responsibilities and due dates – setting clear expectations for each person. She pins the task list component to the chat for easy reference later.
Tip: Pin a Loop component to a chat by right clicking on the component and choosing “Pin”. It’s now visible at the top of the window so you can quickly reference it later.
Because Loop components are always live and in sync, team members can add new tasks and check off completed tasks when it’s best for them. No matter when and where changes are made, the task list component remains the source of truth for what needs to get done.
Cameron, a team member in the U.S., begins completing tasks after he drops off his kids at school and continues working throughout the day. By the time he leaves to pick up his kids, Cameron has checked off several completed tasks and added a few new tasks assigned to his team member, Pradeep, in India.
Cameron doesn’t have to take time to write a message to Pradeep detailing where he left off. Pradeep simply sees the new tasks as he begins his day several hours later. To complete one of the tasks, Pradeep needs help from Joni who works on a different team. Joni wasn’t involved in the original meeting, but it’s easy to involve her with Loop components and Outlook. Pradeep adds a task and assigns it to Joni, then Pradeep copies and pastes the task list component into an email where he includes some context and asks Joni for her help. Joni reads the email after she returns from lunch and begins helping Pradeep. Typically, an email with a list of tasks would become obsolete quickly as the task list changes. But since this is a Loop component, it stays live and up to date – there is no need for a long chain of emails!
As progress is made by the team members in India, the rest of the team can see the completed tasks wherever they are viewing it. So, when Cameron gets back online the following day, he knows which task to jump into next without needing to bother Pradeep during his evening.
Throughout the week, Jóhanna reviews the status of the project without needing to interrupt her team’s workflow. She sends out an email update with the task list component to her manager early in the week. Because the component in Jóhanna’s email stays up to date throughout the week, there’s no need for her to send additional updates as the project moves forward. Even though the list has been shared many times, Jóhanna does not have to worry about updating multiple sources since the task list component syncs across all the places it lives.
Although organizing the announcement is a lot of work involving various tasks, the Loop task list component enables flexibility so each team member can contribute while maintaining their preferred schedules. It also reduces the number of ad hoc check-ins and interruptions to workflows required since everyone related to the announcement can see the task list component as it’s updated in real time.
Tip: For each Loop component, you can decide which team members can access or edit the component.
 An image providing an example of available permission settings for Loop components in Microsoft Teams.
Example 2: Collaborative tables
Loop table components are excellent for gathering evolving information from various people all in one place. Here’s one example:
Adele runs a daily stand-up meeting for her Research and Design team. She wants to ensure everyone has a chance to provide input and flag any concerns, but it’s difficult to find a time that works for all team members because of conflicting schedules and varied time zones.
So, Adele begins a Loop table component in a group Teams chat. She includes objectives, notes, and next steps in the table component. Adele loves that each team member can provide input when it’s convenient for them, wherever they are, and it’s all one place – no one needs to compile the information.
Tip: In a table component, use shift+enter to start a new line in the same cell.
Some team members, like Lee, need input from partners they work with. Lee starts an Outlook email to his research partner in another group. He copies and pastes the table component into it. Lee’s partner can provide input directly into the table component in Outlook while Adele, along with other team members, can see the new input immediately in the table component in Teams chat.
In Adele’s weekly meeting with her manager, she shares the table component in the Teams chat. Adele’s manager would like to know the timing of some critical pieces. Adele simply adds a column for timing to the table component in her current chat, and @mentions her team members asking them to add input for the new column. The team members immediately see the new category in their original Teams chat.
Tip: Loop components are saved automatically to your OneDrive, which means you can find them on Office.com in addition to Teams. Try giving your components easy-to-remember titles (the title is also used for the file name) to help you search for and find them quickly.
Adele can stay focused on the information because it’s in one place even though it came from several people across different apps. Her team members appreciate getting to provide their feedback and raise concerns in a way that works best for them, allowing for the team to prioritize their time without missing out on the conversation.
Tip: When editing a Loop component, type a forward-slash “/ “ to insert an @mention, date, or another component.
Here’s a few more quick suggestions of how to use Loop components:
- A Loop numbered list component can help you develop consensus about the order of priorities with the rest of the team.
- The Loop paragraph component can be used to take notes or construct a report draft that everyone in the Teams channel can collaborate on. Some users find that using a Loop component is preferable to saving a Word document for just a few sentences because Loop components are less formal, and people feel more comfortable making suggestions or changes.
- A Loop checklist component can help you brainstorm activities or items needed for group events.
Tip: In the upper right corner you can track who is viewing and editing the component. To understand who can view or edit the component, select the See who has access button.
Microsoft Loop lets you work flexibly
Loop components allow groups to collaborate wherever they are, whether it’s across town or spanning multiple time zones—all with a single click within a Teams chat or Outlook email. When you @mention people, Loop will send that person a Teams notification along with an email. And for peace of mind, every component you create in Teams is automatically saved to a file in OneDrive. You can easily find all your Loop components on Office.com.
We look forward to hearing your feedback to help us make the Microsoft Loop experience even better. To learn more about Loop components, check out these helpful resources:
Continue the conversation by joining us in the Microsoft 365 Tech Community! Whether you have product questions or just want to stay informed with updates on new releases, tools, and blogs, Microsoft 365 Tech Community is your go-to resource to stay connected.
by Contributed | Jun 21, 2022 | Technology
This article is contributed. See the original author and article here.
Edge computing gives customers the ability to move cloud-like workloads out of the data center to the very places where data is collected—delivering real-time intelligence, and solving intermittent connectivity issues. Yet as the number of devices making up IoT increases, so do the IoT security risks that companies must address.
A recent study conducted by Microsoft in partnership with Ponemon Institute included a survey of companies that have adopted IoT solutions and 65% of them mentioned that security is a top priority when implementing IoT. Attacks targeting IoT devices put businesses at risk. Impacted devices can be bricked, held for ransom, employed as launch points for further network attacks, or used for malicious purposes. Among many consequences we often see stolen IP and data theft, and compromised regulatory status, all of which can have brand and financial implications on the business.
In keeping with the Microsoft end-to-end security promise and our belief that every IoT device should be secured by design, we are excited to announce General Availability of our Edge Secured-core program for Windows IoT devices. Below, we’ll share how Edge Secured-core addresses vulnerabilities and helps enterprise customers, device manufacturers, and solution builders accelerate the development and deployment of secure, scalable IoT solutions.
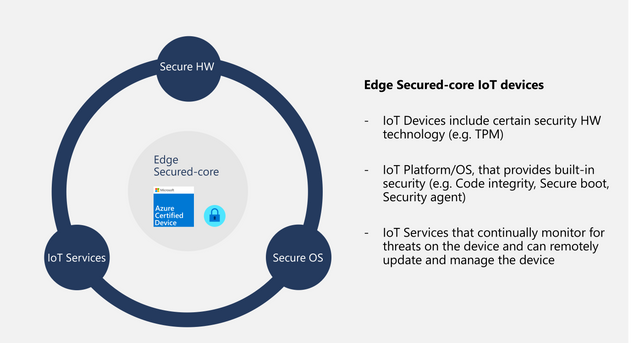
Edge Secured-core devices meet additional security requirements
Edge Secured-core is a new certification in the Azure Certified Device program for IoT devices running a full operating system such as Linux (in preview) or Windows 10 IoT (available now). Edge Secured-core certified devices meet additional security requirements around device identity, secure boot, operating system hardening, device updates, data protection, and vulnerability disclosures. All of this is designed to help prevent attacks, protect your data, and defend against those attempting to infiltrate your infrastructure.
Building on the expertise Microsoft developed around Secured-core for commercial Windows 10 PCs, Edge Secured-core takes a similar approach for IoT devices. This certification can be used to validate that certified devices include specific security hardware technology, have an operating system with built-in security, and use IoT services such as Microsoft Defender for IoT that continually monitor for threats on the device.
For companies building devices, Edge Secured-core provides a low-cost differentiator that enables customers to easily identify your device that has been configured to meet a higher security standard.
Edge Secured-core drives scalable security
Through the use of Edge Secured-core, companies can trust that IoT devices are built with a foundation of security and can be deployed seamlessly and securely. It also provides enterprises and solution builders with the confidence that the devices they’re purchasing deliver the following security promises:
- Hardware-based device identity
- Capable of enforcing system integrity
- Stays up to date and is remotely manageable
- Provides data-at-rest protection
- Provides data-in-transit protection
- Built-in security agent and hardening
Here are a few specific scenarios where you can see the added value for Edge Secured-core devices compared to devices without it.
Scenario
|
Device without Edge Secured-core
|
Edge Secured-core device
|
Six months after purchasing the device, there’s a vulnerability. The device receives an update and the vulnerability is fixed.
|
At the discretion of the OEM to supply device updates.
|
OEMs required to supply device updates for a period of at least 60 months from the date of submission.
|
A malicious actor attempts to identify vulnerable devices to install malware on.
|
At the discretion of the OEM to supply device updates and OT to keep device secure.
|
Microsoft Defender for IoT monitors traffic and devices for malicious actors and vulnerabilities.
|
A malicious actor attempts to decrypt user data in transit.
|
At the discretion of the OEM or OT to utilize modern protocols to protect data.
|
The device must support modern protocols & algorithms to protect data at rest and in transit.
|
A malicious actor attempts to hijack a gateway device stored in a secure location.
|
At the discretion of the device builder to correctly implement device identities and enforcing system integrity.
|
The device is validated to have correctly implemented a modern device identity and an approved form of enforcing system integrity.
|
Learn more about Edge Secured-core certification
To get started with Edge Secure-core certification, check out the following resources:

by Contributed | Jun 20, 2022 | Technology
This article is contributed. See the original author and article here.
Education Insights aims to facilitate data-driven decisions, as we believe that data-informed educators and education leaders make the most significant impact in their schools. As an education professional, supporting students’ learning journeys while protecting their wellbeing is what you do. We’re here to help you identify needs and provide support from an informed perspective. We also highly value individual and organizational privacy and are committed to defending and protecting privacy for every student.
For those reasons, we provide Education Insights with attention to maintaining the highest external compliance standards, meeting GDPR, FERPA and other industry standards, as well as our own rigorous ethical and responsibility standards as established by Microsoft principles for Responsible AI.
In this blog, we will review some of the guidelines and practices Education Insights uses to help you leverage data to support your students, while maintaining peace of mind regarding your students’ data privacy and security. Additionally, we will provide some suggestions for to how to communicate Education Insights to your school community.
Guidelines and practices
1. High compliance standards
The information collected and shown through Insights meets national, regional, and industry-specific regulations for data collection and use, including GDPR and the Family Education Rights and Privacy Act (FERPA) for students and children’s security.
2. Students learning data only
Students’ digital activity data collected by Insights includes only their activity in the context of the class and of the learning journey, such as accessing learning materials, participating in meetings, uploading a resume, etc. We do not collect information about students’ private activities such as message content or working on personal files. We also respect educators’ privacy, hence no activity data from educators is displayed
3. Supportive and non-judgmental language
We believe that educators know their students best and are well positioned to make decisions about supporting their students. Education Insights doesn’t make judgements about students or educators. It aims to shine a light on student learning and digital engagement trends by providing meaningful activity data, leaving it up to the educator to follow up with students and to adapt instruction as they see fit.
4. Data access only for those who need it
To preserve students’ privacy, each person in the school community has access only to data relevant to them:
- Educators can only see the activity of students assigned to their classes. They cannot access data from other classes unless a collaborating educator has shared it with them.
- Education leaders get an organizational view of their students’ activity that depends on their role, organization affiliation, and the permissions assigned to them by the IT Admin.
Education Insights data belongs to the school or institution. Microsoft simply collects the data, analyzes, and stores it. Microsoft engineering does not have direct access to student data and all access is strictly controlled, logged and audited, you can learn more about it here.
5. Transparency for everyone
We are transparent in the data that is collected and how we use it. Each individual student also has a dedicated support page with authenticated access allowing them to see activity signals collected on them, along with instructions on how to contest the activity signals with their educators. Additionally, the IT admin can choose not to collect activity signals at any time; in which case Insights will not be available for the institution.
Communicating Education Insights to guardians and students
While data is critical to thoroughly support students, and while Education Insights provides data with high standards of ethical use, privacy, and security, we also understand that it is vital to communicate clearly to students and guardians the collection of data and the value it provides.
Here is a suggested baseline for communication in case it would be helpful to start a positive conversation with guardians and students. You can also share this blog for further details and links to resources :)
“Our priority as a school/district is always our students, and we aspire to equip them with the skills they need for success in school and beyond. Even before digital teaching practices were expedited by the outbreak of COVID-19, we knew that technology would make up a large part of lifelong learning.
Now, with students spending more educational time on digital platforms, our organization collects their digital activity in Microsoft Teams to support educators in adapting and supporting students’ learning and wellbeing in this changing environment. Data collected includes digital engagement, assignments status and grades, and their self-reflection of their wellbeing at school.
Any data collected is only in the context of the learning activity, non-learning activity data is not being collected. The data is shared only with the people that need it to best support the student, and with the intention of providing each student with the best educational possibilities for them and helping them thrive in school and life.
Students’ data is being collected, stored, and presented in a responsible manner, rigorously following and meets applicable national, regional, and industry-specific regulations for data collection and use, including GDPR and the Family Education Rights and Privacy Act (FERPA) .”
|
Some technical details for you
For those of you who are interested in some of the “backbone” of how Insights data is collected and stored:
Where do we store the ? Insights is deployed in Europe and the United States. Data for European-based users is stored on servers in Europe. Data for Australian-based and US-based users is stored on servers in the United States. Data for users outside of Europe, Australia, or the United States, will be stored in one of our geographic regions.
do we handle large volumes of data with high reliability? Insights leverages the power of Azure to ingest, process and store large amounts of signals in near-real time and with high reliability. All this is implemented on top of M365 secure environments. Each of these resources is provisioned in multiple geographical locations to honor the data locality explained above. Insights has a rich monitoring and alerting system which helps us track and mitigate potential data lost in the pipeline.
Learning more about data privacy in Education Insights
We’re always looking for ways to make Education Insights better. Have questions, comments, or ideas? Let us know! Add your ideas here or share your comment below.
by Contributed | Jun 19, 2022 | Technology
This article is contributed. See the original author and article here.
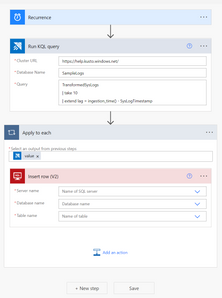
Azure Data Explorer connector for Power Automate, Logic Apps, and Power Apps enables you to automate alerts and notifications, orchestrate business workflows, and build low-code, no-code apps. This is done by using native Azure Data Explorer actions to execute KQL queries and commands on your cluster.
Some of the key scenarios that can be built using integration of Azure Data Explorer with Power Automate and Logic Apps:
- Automation of alerts and notifications
- Automation of recurring tasks and business workflows
- Automation of copy of data scenarios
- Automation of export of data
- Integration with Microsoft or 3rd party services
Some of the key scenarios that can be built using integration of Azure Data Explorer with Power Apps:
- Management of reference data
- Data entry scenarios such as audit in manufacturing plants
- Decision making apps e.g. in energy and utilities industry, one of the common scenario is to predict the maintenance of machines and sending a technician to respond to those scenarios.
Check out the usage example documentation to get started.
by Contributed | Jun 18, 2022 | Technology
This article is contributed. See the original author and article here.
Row-level security (RLS) provides an important layer of security and is available as of PostgreSQL 9.5. It is also frequently used to implement data security for multi-tenant and SaaS applications. In this article, we will look at row level security on Azure Database for PostgreSQL – Hyperscale (Citus) to help you better understand how this feature might be used to implement data security in your application.
Before we get to RLS, here’s how Azure Database for PostgreSQL – Hyperscale helps with the distribution (sharding) of data. It brings the sharding logic to data layer and manages the shards across the nodes which make up the server group. Once you choose a relevant distribution key, Citus distributes the data. If you are a SaaS provider, the distribution key could be customer / tenant identifier. In such a case, with RLS, you can ensure the right set of data is visible to different users of the database across organizations while Citus can manage their data within single database cluster / server group.
Having looked at why, let’s jump right into how of this. We’re going to walk you through the steps to configure and test row level security in Azure Database for PostgreSQL – Hyperscale. You should start by Creating Azure PostgreSQL Hyperscale (Citus) instance / server group.
Once the hyperscale server group is created and ready for connection, let’s proceed with the next steps.
Create a Table and Load Some Sample Data:
We’re going to create a new schema which will hold the table(s) where we want to enable RLS. This is not really required but just to ensure that you get full understanding of how this should work in the real environment.
CREATE SCHEMA test1;
In this schema, we’ll create a distributed table and load some data into it.
Create table:
CREATE TABLE test1.events(
tenant_id int,
id int,
type text
);
Shard the table on ‘tenant_id’ column:
SELECT create_distributed_table(‘test1.events’,’tenant_id’);
Load dummy data into the table:
INSERT INTO test1.events VALUES (1,1,’push’);
INSERT INTO test1.events VALUES (2,2,’push’);
INSERT INTO test1.events VALUES (1,2,’push’);
INSERT INTO test1.events VALUES (2,1,’push’);
After adding this dummy data into the new table, next step is to add roles other than the default admin (citus) which will have access to data as per the need.
Add Additional Roles as Required:
To do this, you need to login to Azure Portal as the default role ‘citus’ isn’t given privileges to create new roles.
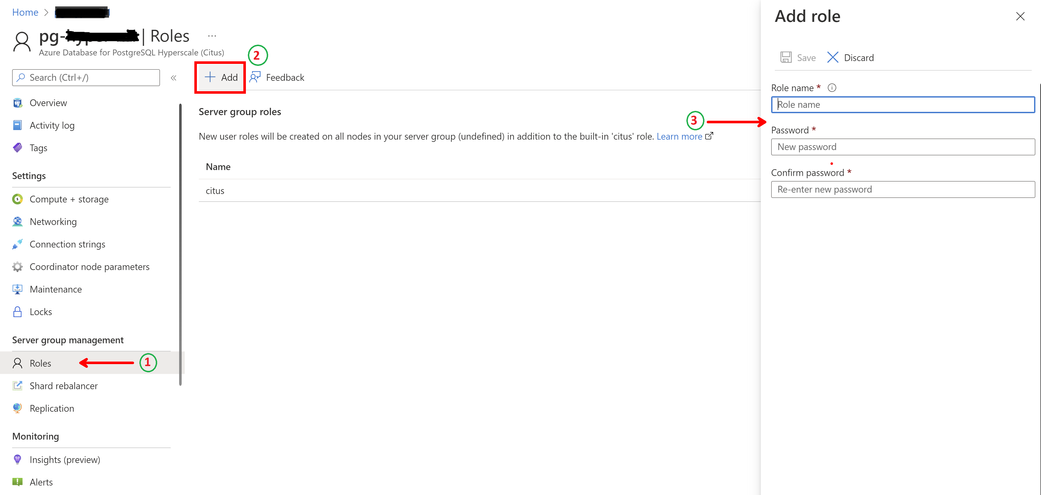
As shown below, once you navigate to the hyperscale server group on the portal –
Step 1 – click on ‘Roles’ under Server group management,
Step 2 – click on ‘+ Add’ to add new role
Step 3 – provide a name for the new role and assign a password to it.
For this exercise, we’ll create two roles, namely – tenant1 and tenant2. The reason we chose the role names is to ensure that shard key (in this case tenant_id) can be part of the name of the role and hence 1 and 2. You will see in the next section, why this is important.
Once this is done, grant privileges to these roles as needed.
Grant Required Privileges to the New Role(s):
Since we created a new schema to hold the distributed table, first step is to ensure that the new roles have access to this schema.
GRANT usage ON SCHEMA test1 TO tenant1, tenant2;
Without this step, if you try to assign privileges directly, PostgreSQL will return an error suggesting the role doesn’t have permission to access the schema.
Next, assign actual privileges on the table(s) to the roles.
GRANT SELECT, UPDATE, INSERT, DELETE
ON test1.events TO tenant1, tenant2;
At this time, we have given the required privileges on the table to the newly created roles. However, if a user logs in with these, they will be able to see all the data across shards.
This is where the row level security comes into picture.
Configure Row Level Security:
To ensure that the primary role (citus) has access to all the data when we add new roles and enable RLS, create a policy which is applicable to this role:
CREATE POLICY admin_all ON test1.events
TO citus — apply to this role
USING (true) — read any existing row
WITH CHECK (true);
Note that the policy will come into effect once row level security is enabled for the table.
The next step is to create a policy which will define the check on rows accessible by users.
CREATE POLICY user_mod ON test1.events
USING (current_user = ‘tenant’ || tenant_id::text);
— lack of CHECK means same condition as USING
The policy defines which rows user has access to as it concatenates string ‘tenant’ with the tenant_id column of the table. If you scroll back to where we created the roles and why we chose those names for the roles, it should make sense now.
And then finally enable the RLS on the table.
ALTER TABLE test1.events ENABLE ROW LEVEL SECURITY;
To further simplify this – the rows in the table have tenant_id values 1 or 2. Policy defines expression (‘tenant’ || ‘1’) as role name to have access to rows where tenant_id is 1 and so on. Of course, you need to create more roles as you keep adding rows to the table with different tenant IDs.
This check is pushed down to all the worked nodes in the hyperscale server group and will ensure that the access to the data is governed by the policy created by row level security.
This is it! Go ahead, login with the new role and try to fetch or change the rows in the table.
On the dummy data defined here, when ‘tenant1’ logs in and runs the following query –
SELECT * FROM test1.events;
The output is this –

This ensures that the role ‘tenant1’ only has access to rows with tenant_id being 1 and similarly role ‘tenant2’ will have access to rows with tenant_id being 2 and so on.
Stay tuned for more!
FastTrack for Azure: Move to Azure efficiently with customized guidance from Azure engineering. FastTrack for Azure – Benefits and FAQ | Microsoft Azure


Recent Comments