This article is contributed. See the original author and article here.
Row-level security (RLS) provides an important layer of security and is available as of PostgreSQL 9.5. It is also frequently used to implement data security for multi-tenant and SaaS applications. In this article, we will look at row level security on Azure Database for PostgreSQL – Hyperscale (Citus) to help you better understand how this feature might be used to implement data security in your application.
Before we get to RLS, here’s how Azure Database for PostgreSQL – Hyperscale helps with the distribution (sharding) of data. It brings the sharding logic to data layer and manages the shards across the nodes which make up the server group. Once you choose a relevant distribution key, Citus distributes the data. If you are a SaaS provider, the distribution key could be customer / tenant identifier. In such a case, with RLS, you can ensure the right set of data is visible to different users of the database across organizations while Citus can manage their data within single database cluster / server group.
Having looked at why, let’s jump right into how of this. We’re going to walk you through the steps to configure and test row level security in Azure Database for PostgreSQL – Hyperscale. You should start by Creating Azure PostgreSQL Hyperscale (Citus) instance / server group.
Once the hyperscale server group is created and ready for connection, let’s proceed with the next steps.
Create a Table and Load Some Sample Data:
We’re going to create a new schema which will hold the table(s) where we want to enable RLS. This is not really required but just to ensure that you get full understanding of how this should work in the real environment.
CREATE SCHEMA test1;
In this schema, we’ll create a distributed table and load some data into it.
Create table:
CREATE TABLE test1.events(
tenant_id int,
id int,
type text
);
Shard the table on ‘tenant_id’ column:
SELECT create_distributed_table(‘test1.events’,’tenant_id’);
Load dummy data into the table:
INSERT INTO test1.events VALUES (1,1,’push’);
INSERT INTO test1.events VALUES (2,2,’push’);
INSERT INTO test1.events VALUES (1,2,’push’);
INSERT INTO test1.events VALUES (2,1,’push’);
After adding this dummy data into the new table, next step is to add roles other than the default admin (citus) which will have access to data as per the need.
Add Additional Roles as Required:
To do this, you need to login to Azure Portal as the default role ‘citus’ isn’t given privileges to create new roles.
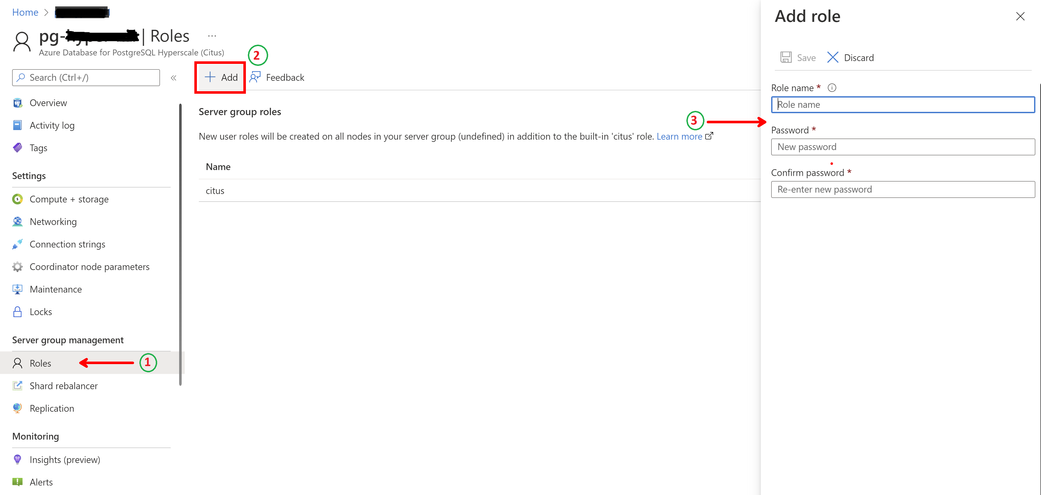
As shown below, once you navigate to the hyperscale server group on the portal –
Step 1 – click on ‘Roles’ under Server group management,
Step 2 – click on ‘+ Add’ to add new role
Step 3 – provide a name for the new role and assign a password to it.
For this exercise, we’ll create two roles, namely – tenant1 and tenant2. The reason we chose the role names is to ensure that shard key (in this case tenant_id) can be part of the name of the role and hence 1 and 2. You will see in the next section, why this is important.
Once this is done, grant privileges to these roles as needed.
Grant Required Privileges to the New Role(s):
Since we created a new schema to hold the distributed table, first step is to ensure that the new roles have access to this schema.
GRANT usage ON SCHEMA test1 TO tenant1, tenant2;
Without this step, if you try to assign privileges directly, PostgreSQL will return an error suggesting the role doesn’t have permission to access the schema.
Next, assign actual privileges on the table(s) to the roles.
GRANT SELECT, UPDATE, INSERT, DELETE
ON test1.events TO tenant1, tenant2;
At this time, we have given the required privileges on the table to the newly created roles. However, if a user logs in with these, they will be able to see all the data across shards.
This is where the row level security comes into picture.
Configure Row Level Security:
To ensure that the primary role (citus) has access to all the data when we add new roles and enable RLS, create a policy which is applicable to this role:
CREATE POLICY admin_all ON test1.events
TO citus — apply to this role
USING (true) — read any existing row
WITH CHECK (true);
Note that the policy will come into effect once row level security is enabled for the table.
The next step is to create a policy which will define the check on rows accessible by users.
CREATE POLICY user_mod ON test1.events
USING (current_user = ‘tenant’ || tenant_id::text);
— lack of CHECK means same condition as USING
The policy defines which rows user has access to as it concatenates string ‘tenant’ with the tenant_id column of the table. If you scroll back to where we created the roles and why we chose those names for the roles, it should make sense now.
And then finally enable the RLS on the table.
ALTER TABLE test1.events ENABLE ROW LEVEL SECURITY;
To further simplify this – the rows in the table have tenant_id values 1 or 2. Policy defines expression (‘tenant’ || ‘1’) as role name to have access to rows where tenant_id is 1 and so on. Of course, you need to create more roles as you keep adding rows to the table with different tenant IDs.
This check is pushed down to all the worked nodes in the hyperscale server group and will ensure that the access to the data is governed by the policy created by row level security.
This is it! Go ahead, login with the new role and try to fetch or change the rows in the table.
On the dummy data defined here, when ‘tenant1’ logs in and runs the following query –
SELECT * FROM test1.events;
The output is this –

This ensures that the role ‘tenant1’ only has access to rows with tenant_id being 1 and similarly role ‘tenant2’ will have access to rows with tenant_id being 2 and so on.
Stay tuned for more!
FastTrack for Azure: Move to Azure efficiently with customized guidance from Azure engineering. FastTrack for Azure – Benefits and FAQ | Microsoft Azure
Brought to you by Dr. Ware, Microsoft Office 365 Silver Partner, Charleston SC.

Recent Comments