
by Contributed | Jul 18, 2023 | AI, Business, Microsoft 365, Technology
This article is contributed. See the original author and article here.
Today, at Microsoft Inspire 2023, we announced the next steps in our journey to empower every person on the planet to work in a new AI-powered way.
The post Introducing Bing Chat Enterprise, Microsoft 365 Copilot pricing, and Microsoft Sales Copilot appeared first on Microsoft 365 Blog.
Brought to you by Dr. Ware, Microsoft Office 365 Silver Partner, Charleston SC.
by Contributed | Jul 17, 2023 | Technology
This article is contributed. See the original author and article here.
Microsoft partners like Connecting Software and Varonis deliver transact-capable offers, which allow you to purchase directly from Azure Marketplace. Learn about these offers below:
|
CB Dynamics 365 to SharePoint Permissions Replicator: This solution from Connecting Software secures your Microsoft Dynamics 365 CRM documents stored in SharePoint. It covers full security roles, logic support, business unit hierarchy, sharing, cascading behavior, position-based hierarchy, and more.
CB Exchange Server Sync: CB Exchange Server Sync from Connecting Software synchronizes and migrates data between different servers, domains, and versions of Microsoft Exchange and Outlook. It’s ideal for large companies that need to manage shared resources across separate business units.
CB Seamless Attachment Extractor for Dynamics 365: Documents and attachments that harm CRM performance and undermine its functionality often take up most of the space used. Save valuable Microsoft Dynamics 365 database space by automatically moving attachments to alternative storage.
|
 |
Varonis: Find, Monitor, and Protect Sensitive Data: Varonis is a data security platform that protects data with low-touch, accurate security outcomes by classifying more data, revoking permissions, enforcing policies, and triggering alerts for the Varonis incident response team to review on your behalf.
|
by Contributed | Jul 14, 2023 | Technology
This article is contributed. See the original author and article here.
Last month, I presented at Women in Tech Global Conference on the topic. During the conference and afterwards, I received a lot of queries on:
- Do I as a Technologist have a role to play in ‘Sustainability’?
- What is Technology’s role in Sustainability?
- How is Technology getting influenced by ‘Sustainability’?
In this blog, I am answering these frequently asked questions.
We often relate to Sustainability as an initiative or agenda through which carbon footprint of any product is shared and some organizations share their commitment to reduce the same.
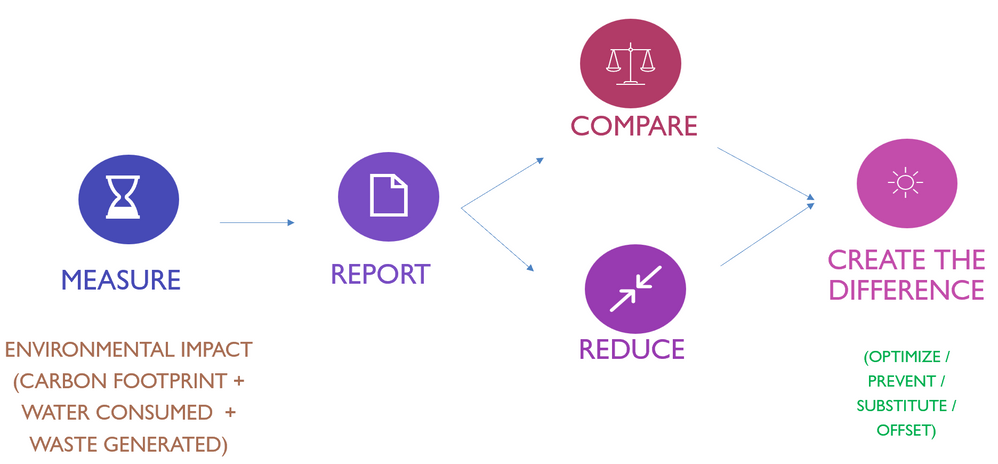
Here is the high-level summary of the journey any enterprise or business function needs to take to become sustainable. It starts with measuring the current environmental impact of the business, which enables monitoring and leads to corrective action and thereby creating a difference by minimizing environmental impact.
What is ‘Environmental Impact’? Carbon emissions, Waste generation, water consumption and land use are key impacts to ‘Environment’ that any industrialization process brings along, digital technology included.
To make this relatable, and understand how sustainability can be factored into every business process, let’s wear a hat of Garments industry Customer.
Just imagine, you come across a great deal (in terms of price):

|
Your deciding factors primarily will be:
- Value of Product
- Price, you pay for it (in terms of money)
|
Now what if some additional information is provided:

With this additional information, the decision of purchase will add an entirely new dimension, to consider the ‘Environmental Impact’ of this purchase decision. It will add additional factors:
- Is the ‘Environmental Impact’ of this product worth the value?
- What are the alternative options?
- How can I maximize the usage of this product to minimize the ‘Environmental Impact’?
This transparency will lead the Garment manufacturers to explore the best available options across their whole business process from sourcing through manufacturing, distribution, and operations to ensure minimal environmental impact, there by staying competitive. This leads to prioritization for Sustainability at each stage of business enabled by technology.
To summarize, if we start measuring and sharing the environmental impact of every business, this will lead to consciousness and drive towards minimizing the impact.
These insights will lead to efficiencies across the product lifecycle leveraging the overall ecosystem. Each participant in this ecosystem has a role here in terms of sustainability, be it producer, operator, or consumer.
On the same lines, as a technologist we need to know:
- What is the environmental impact of the business application we are supporting / leveraging?
- How is this impact compared to other products available in the market?
- How can you optimize the usage of these products, thereby minimizing the ‘Environmental Impact’?
So, whether you are a technology consumer or producer, we all have a role to play to ensure environmental impact is taken into account at every decision point.
We all have a role to play and responsibility here.
Who can leverage these solutions and resources?
Any technology customer needs to be conscious about the environmental impact their business is generating, thereby making a conscious decision during every stage of their business, be it procurement, operations, customer support or even disposition.
As of now this is heavily prioritized by the regional and industry-based compliance and competitive landscape, but it is not far that every business decision will be made with awareness and consideration of impact and responsibility towards the environment.
All these products and offerings enabling Sustainability awareness and transparency are at initial stages right now but are developing on rapid pace owing to the growing awareness and demand of having this transparency in addition to the Dollar price.
by Contributed | Jul 14, 2023 | Technology
This article is contributed. See the original author and article here.
We are excited to announce the public preview of new alerts for IT admins managing Cloud PCs in Intune to better inform them about Cloud PCs in a grace period. This capability is available for Windows 365 Enterprise customers today!
We heard you. You want to receive proactive alerts on Cloud PCs so you can easily take appropriate actions based on this information. This can help reduce risk in situations where an IT admin may not be fully aware of Windows 365 provisioning controls and, therefore, make changes to user licensing or group membership that inadvertently trigger the grace period. Then you need this capability to extend to automated scripts, ensuring comprehensive coverage and proactive notification.
With this Windows 365 IT admin alerts, an email is delivered whenever a Cloud PC enters the grace period state. This provides admins with greater awareness of their environment so they can take appropriate actions and acts as a preventive measure against unintended Cloud PC deprovisioning.
Windows 365 IT admin alerts offer the following features:
- Admins can establish and customize system-based alerts for Cloud PCs in the grace period based on their preferences.
- IT admins can define alert rules by selecting from the available options, setting thresholds, specifying frequency, and choosing notification channels for receiving alerts.
- IT admins are able to assess their environment and take informed decisions to either reprovision or end the grace period for specific Cloud PCs as needed.
Enabling the functionality to generate alerts when a Cloud PC enters the grace period is a critical, precautionary measure. It acts as a safety net in scenarios such as Cloud PC license expiration or inadvertent changes made by IT admins to groups, resulting in a Cloud PC being set to deprovision within seven days.
Why is this important? Windows 365 Enterprise users are granted a seven-day grace period to continue using a Cloud PC once it enters that state. After the grace period elapses, the user is logged off, loses access to the Cloud PC, and the Cloud PC undergoes deprovisioning. Deprovisioning is a significant and irreversible action. By proactively notifying IT admins, unnecessary deprovisioning of Cloud PCs can be mitigated.
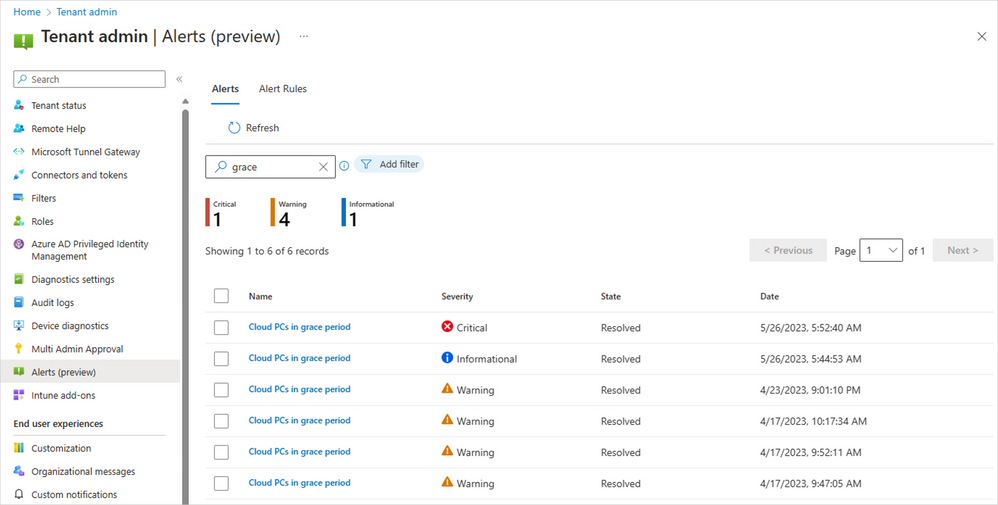
The Alerts (preview) in Microsoft Intune
In the Microsoft Intune admin center, under Tenant admin, you can review the alert history and monitor the status of a Cloud PC alert event, including details such as severity, state, and date.
Screenshot of Tenant admin in Alerts (preview) menu
Easy-to-understand alert insights
The event summary page provides a more detailed overview of the specific alert event that needs attention. This enables you to promptly investigate issues related to Cloud PCs in the grace period and gain a comprehensive understanding of the impact.
 Screenshot of Alerts (preview) menu with a red highlight on the reports “Show all Cloud PCs in grace period”
When you select Show all Cloud PCs in grace, you are redirected to the corresponding alert event page, as displayed below. This page offers additional information about the alert event, enabling you to take appropriate actions to resolve the issue.
 Screenshot of All Cloud PCs tab under the Windows 365 menu with a red highlight over the status of devices in grace period
If you select In grace period for a particular Cloud PC, a fly-out will appear, providing details about the impact of Cloud PCs in the grace period. You can then choose to either Reprovision Cloud PC or End the grace period.
 Screenshot of CPC-SB pop up menu showing the option to “reprovision Cloud PC” or “end grace period”
Managing alert rules and email notifications
With this new capability, you have the flexibility to customize and enable or disable the alert rules, including conditions, settings, and notifications, depending on their specific requirement.
Additionally, you have the flexibility to configure your preferred notification methods for events by choosing options such as portal pop-up and email. We also provide support for email localization, allowing you to customize the language in which you prefer to receive alert notifications.
 Screenshot of Alerts (preview) under the Alert Rules tab showing the optional notification methods
 Screenshot of the Cloud PCs in grace period menu under the Alert rules tab showing more details on notification options
Prerequisites and what’s next
Windows 365 system-based alerts are currently available for Windows 365 Enterprise customers and only with Microsoft Intune. The account needs to have the Intune Global Admin, Intune Admin, or Windows 365 Admin roles assigned.
Enhanced IT admin alerts for Cloud PCs that are unable to connect are coming soon. You’ll also soon have the ability to proactively notify IT admins when Cloud PCs encounter issues such as unhealthy hosts, persistent connection errors, suspected infrastructure problems, or other systemic issues. These new capabilities will also provide valuable insights to assist in resolving the problem promptly.
For a demo on this new alerts capability for Cloud PCs in a grace period, now in public preview, please check out this video:
Learn more
Looking to see what the latest capabilities in Windows 365 alerts look like up close? See our documentation on Alerts in Windows 365.
Finally, have feedback or suggestions? Visit this forum to share your ideas and help shape the future of Windows 365!
Continue the conversation. Find best practices. Bookmark the Windows Tech Community and follow us @MSWindowsITPro on Twitter. Looking for support? Visit Windows on Microsoft Q&A.
by Contributed | Jul 13, 2023 | Technology
This article is contributed. See the original author and article here.
Like you, professionals around the world know that the cloud is transforming the business landscape for the better, while offering unparalleled opportunities for innovation and growth. As you look to the cloud to do more with less and to help support your organization’s goals and success, we’re confident that Azure can help you do exactly that—from saving money by migrating your apps and data to the cloud, to optimizing those cloud costs, and then reinvesting those savings to drive progress.
Knowing how critical these areas are, our mission is for Azure to be the world’s computer, so you can do what you do best—innovate, create, and differentiate your business. We also know that you need to focus on strategy and decision-making rather than on navigating the technical complexities of the cloud, even while you explore Azure costs and benefits, along with its ability to help solve your organization’s challenges.
So, where can you find an Azure overview?
We’re happy to introduce the new Get to know Microsoft Azure cloud platform: An overview for business professionals learning path on Microsoft Learn, crafted with you and your learning goals, needs, and preferences in mind. This free practical resource is designed to bridge the gap between cloud platform knowledge and business strategy—with no technical background required. Plus, you can complete it in about 90 minutes, which makes this an extremely time-efficient investment.
Created to help you quickly learn the advantages of Azure and how it can support your organization’s success, this learning path focuses on real-world examples across multiple industries. It demonstrates how cloud adoption can benefit your operations, drive cost savings, fuel growth, and more.
What can you expect to learn?
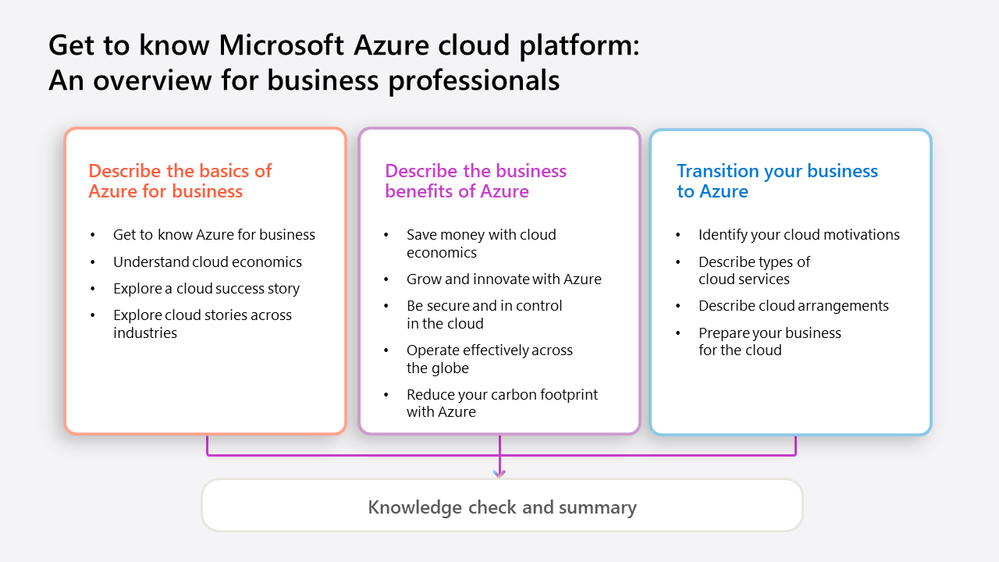
We know that business leaders want the innovation and agility that the cloud enables, but you need to learn at your own pace and on your own schedule. So we’ve distilled the essential aspects of Azure into concise modules, helping you to get the maximum value from your time. With practical insights and real-life case studies, we highlight the transformative power of cloud adoption, offering the inspiration and confidence to explore the possibilities of Azure in three modules:
- Describe the basics of Azure cloud for business details what the cloud is, what Azure is, and how your business can grow and transform with Azure and cloud economics.
- Describe the business benefits of Azure covers cost efficiency, innovation, agility, and security.
- Transition your business to Azure examines the various decisions to anticipate as you move to the cloud. Review strategic considerations and best practices for migrating to Azure and look ahead to the Microsoft Cloud Adoption Framework.
Modules and lessons included in the “Get to know Microsoft Azure cloud platform: An overview for business professionals” learning path
What other new learning paths are available for business leaders?
Like the cloud, AI has the power to change how organizations around the world operate, compete, and build value. And AI is ushering in a transformative era of innovation, efficiency, and unprecedented possibilities. We recently announced another new free educational series on Microsoft Learn, Transform Your Business with Microsoft AI, created to help you build your AI knowledge, insights, and skills.
This curriculum, which complements the new Azure overview for business leaders, explores:
- The competitive advantage and potential of AI.
- How to make informed decisions about its adoption.
- Examples from the Microsoft AI journey.
- Guidance from Microsoft experts and other industry leaders.
With an emphasis on responsible AI, including ethics, fairness, transparency, and accountability, this learning path aims to empower organizations of all sizes to harness the potential of AI. For more details, read AI for business leaders: Discover AI advantages in this Microsoft AI learning series.
Make the most of the new Azure training
When you take this 90-minute cloud journey, you gain insight into the transformative power of Azure, enhancing your cloud fluency and examining strategic decisions that can help drive your business forward. With Microsoft Azure as your trusted cloud provider, you get not only security and privacy but also a reliable business partner invested in your success. Embrace the benefits of cloud computing, explore how it can solve your challenges, and discover the potential savings it offers, with this new learning path for business leaders.

Recent Comments