
by Scott Muniz | Jul 6, 2020 | Azure, Microsoft, Technology, Uncategorized
This article is contributed. See the original author and article here.
As part of our recent Azure Security Center (ASC) Blog Series, we are diving into the different controls within ASC’s Secure Score. In this post we will be discussing the control of “Secure management ports”. This control is worth 8 points and is made up of 3 recommendations. More information on secure score can be found here. From an Azure network security standpoint, this a great starting point to improve your overall security posture. The full list of ASC’s Network recommendations are here.
The Control – Secure management ports
Management ports are a requirement for system admins to access and control their machines. The common ports used are 3389(RDP) and 22(SSH). While extremely useful for management, these ports are also common targets for attackers. Your goal should be to reduce exposure and limit the availability of open ports. Bottom line: management ports don’t always need to be open and accessible. They only need to be open when you need them, for example to perform management or maintenance tasks.

The “Secure management ports” control consists of 3 different network related recommendations:
- Internet-facing virtual machines should be protected with Network Security Groups
- Management ports should be closed on your virtual machines
- Management ports of virtual machines should be protected with just-in-time network access control
Like the rest of the Secure Score controls, all three recommendations must be remediated in order to get the full points and drive up your Secure Score (you can review all of the recommendations here). Also, you will notice above that one of the recommendations has a “Quick Fix!” No excuses not to remediate that one, just click the button and you are done.
Recommendation #1 - Virtual machines should be protected with Network Security Groups
This one comes up a lot, I am a strong believer in not having any VM face the internet directly (with the exception of NVAs). I prefer to use Azure Policy to deny a deployment of a VM with a NIC containing a public IP address. Needless to say, there are still legitimate reasons to have public facing VMs, and that’s where this recommendation comes into play. Whether is a Dev environment, or someone used a GitHub template; it happens. Those VM’s are now prime targets for RDP and SSH brute force attacks because management ports are typically left in an open state. More information on this in Recommendation #2.
Protect your VM from potential threats by restricting access to it with a Network Security Group (NSG). NSGs contain access-control lists (ACL) and can be assigned to the VM’s NIC or subnet. The ACL rules allow or deny network traffic to the assigned resource. To learn more about controlling traffic with NSGs, NSG Overview.
If you are looking for more of a programmatic way to manage NSGs, you can used PowerShell, REST or Azure CLI, more information on managing NSGs here. You can always use Azure Security Center’s Just-in-time (JIT) VM access to lock down inbound traffic to your Azure VMs by demand, we will cover that in Recommendation #3.
Recommendation #2 – Management ports should be closed on your virtual machines
This recommendation takes into consideration one of the biggest default risks of the cloud. Most templates or marketplace VMs will have management ports open… Management ports usually consist of the ports that you used to connect to your Azure virtual machines i.e. Remote Desktop Protocol (RDP) and the Secure Shell (SSH) protocol. These protocols enable admins to manage VMs from remote locations and are common management ports. The potential security problem with using these protocols over the internet, is that attackers can use brute force techniques to gain access to Azure virtual machines. After the attackers gain access, they can use your VM as a launch point for compromising other machines on your virtual network or even attack networked devices outside of Azure.
This is such an important part of your security, that we added it to the wizard. As you see below, a Basic NSG only allowing RDP (this is a Windows VM, it would be SSH for a Linux VM) is selected by default.

We recommend that you disable direct RDP and SSH access to your Azure virtual machines from the internet or even better do not allow VMs to have NICs with Public IP addresses.
For customers desiring a more comprehensive solution to internet exposed services, a rethinking of network design may be appropriate. It is often more secure to allocate only private IP addresses for VMs rather than allowing each to have its own Public IP Address. While NSGs can be used in combination with JIT to control access to public resources, the management of inbound VM access can be centralized using other strategies such as:
- DNAT Rules on Azure Firewall – Allows centralized management of inbound access to any resource on an internal VNET. For example, RDP, SSH, and other custom management ports can be forwarded into resources on your private networks, and all activity is logged centrally via Azure Diagnostic Logs. Azure Firewall also integrates with JIT so ports do not have to be permanently open.
- Azure Bastion – Centralized management of RDP and SSH to private networks via a virtual bastion host. All activity is logged centrally via Azure Diagnostic Logs.
To read more about network designs, please visit the Azure Architecture Center.
This recommendation requires a moderate level of effort and has a moderate impact on users. If users or administrators have always accessed their VMs over the internet, this will require a change in how they connect. Use the following steps to manually remediate and restrict access to your virtual machines:
- Select a VM to restrict access to.
- In the ‘Networking’ blade, click on each of the rules that allow management ports (e.g. RDP-3389, WINRM-5985, SSH-22).
- Either change the ‘Action’ property to ‘Deny’ or improve the rule by applying a less permissive range of source IP ranges.
- Click ‘Save’.
Recommendation #3 – Management ports of virtual machines should be protected with just-in-time network access control
This is one of my favorite recommendations and it requires the Standard tier to be enabled. Just-in-time (JIT) allows you to lock down and designate a specific amount of time, that inbound traffic to your Azure VMs would be allowed. This reduces exposure to attacks while providing easy access to connect to VMs when needed.
The description of this recommendation is: “Azure Security Center has identified some overly-permissive inbound rules for management ports in your Network Security Group. Enable just-in-time access control to protect your VM from internet-based brute-force attacks”. It is a low impact to users and requires a low level of effort to implement as it comes with a “Quick fix” option. You will notice that resources are flagged as “Unhealthy”, “Healthy” or “Not Applicable”.

For more information on Just in Time (JIT) VM access, and how to enable it for your virtual machines, please see this blog post here.
Next Steps
Wrapping up this blog post, I’d like you to keep in mind this is a small fraction of what ASC and the Enhanced Secure Score can offer to you, to strengthen your security posture and increase your secure score. This blog post details some robust steps you can leverage to increase your own comfort level in protecting your environments / assets.
I hope you enjoyed this article and learned something that will assist you on your continued journey of cybersecurity. Please continue to enjoy our ASC Secure Score blog series and I look forward virtually seeing you in the next one. If you would like more information on how to protect network resources in Azure Security Center visit our docs or our full list of network recommendations.
Continue to remediate based on ASC’s recommendations and don’t hesitate to use Workflow automation to do so. If you need assistance in integration Workflow automation with ITSM, take a look at this blog on how to integrate ServiceNow with ASC.
Reviewer and Acknowledgements
Yuri Diogenes, Senior Program Manager – CxE ASC Team
Thank you to @Anthony Roman, for assisting in the Azure Network security options.
Thank you, Doug Birch for writing the original version of this article.
by Scott Muniz | Jul 6, 2020 | Azure, Microsoft, Technology, Uncategorized
This article is contributed. See the original author and article here.
Howdy folks!
Michele Ferrari here from the Premier Field Engineer- Azure Team in San Francisco, here today to talk about how to use the famous ClaimsXRay application with AzureAD to troubleshoot problems with SAML single sign-on for 3rd party tool applications.
Why you might want to read this blog:
You have an Application that you want to integrate with AzureAD providing the Single Sign-on experience for your users. This Application supports a SAML-based protocol but requires some ad-hoc claims to work properly, for example it expects specific Claims to identify your users, attributes that only exist in your on-premises Active Directory and not in Azure Active Directory (yet).
If you have been working in AD FS, you probably came across this awesome tool called: Claims X-Ray (https://adfshelp.microsoft.com/ClaimsXray/TokenRequest) to debug and troubleshoot problems with claims issuance in AD FS. Today, we’re going to re-use this tool with AzureAD !
At the end of this blog you will be able to:
- Integrate ClaimsXRay with an AzureAD application to test SAML claims issuance
- Understand how to use Directory Schema Extension Attributes for sending user data to applications in token claims
- rfc1274 – did you know there is an attribute called ‘drink’ in Microsoft’s Active Directory?
- Learn about the Tenant Schema Extension App in your tenant
Ready? Let’s do it, follow me!
- Integrate AD FS Help ClaimsXRay with AzureAD
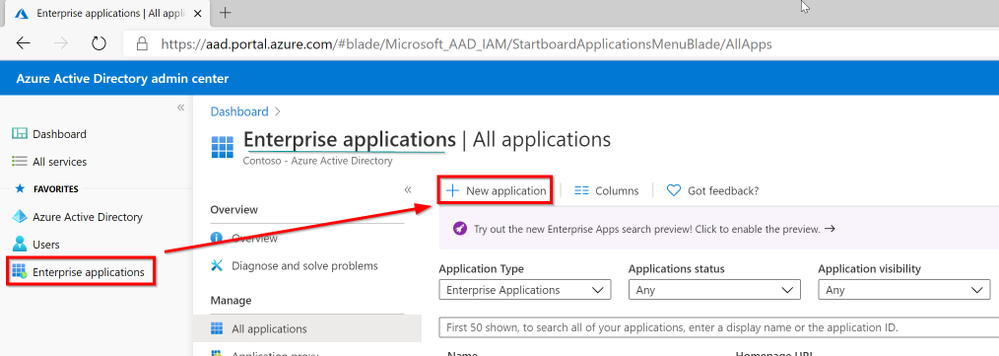
Open AzureAD Admin Center https://aad.portal.azure.com/ and then click on Enterprise Application

Add a Non-Gallery Application:

Choose the name for your application:

Click on Single-Sign-On

Click on the pencil to Edit the Basic SAML Configuration

As Identifier we are going to use urn:microsoft:adfs:claimsxray
As a Reply URL: https://adfshelp.microsoft.com/ClaimsXray/TokenResponse
|
Identifier (Entity ID)
|
Uniquely identifies the application. Azure AD sends the identifier to the application as the Audience parameter of the SAML token. The application is expected to validate it.
|
|
Reply URL
|
Specifies where the application expects to receive the SAML token. The reply URL is also referred to as the Assertion Consumer Service (ACS) URL
|
Since we are re-using the ADFS ClaimsXRay published by Microsoft, we need to use the Identifier it is expecting and, tell our application where to send/redirect the SAML token.
Note: ClaimsXRay does not enforce the validation of the Identifier. This means that you could potentially have multiple ClaimsXRay applications in your tenant:
If you use different identifiers, you can register multiple versions of ClaimsXRay for various tests (example, one with and one without MFA required, one with session controls, etc.)

At this point Save the configuration.

Click on No, I’ll test later as there is still something we need to configure

Click on Users and groups and then Add User

Search for an User Account and assign it to this Application. This will allow that user to “consume” this app and at the same time, this app will be visible into the myapplications portal

Open a new tab in your favorite browser and go to https://myapplications.microsoft.com/
Search for the name of the application you have just created:

And here the SAML claims with all of its claims:

Now, let’s move into the Claims customizations.
My Application requires the On-premises User Drink attribute to be passed within the SAML assertion to my Application and the onPremisesSamAccountName.
Following this documentation https://docs.microsoft.com/en-us/azure/active-directory/hybrid/how-to-connect-sync-feature-directory-extensions#customize-which-attributes-to-synchronize-with-azure-ad
We’re going to configure ADConnect to synchronize the Drink attribute since the onPremisesSamAccountName is already available in AzureAD.
Connect to your ADConnect server and lunch the Azure AD Connect app. Remember that you must remember to close this application at the end, as this is going to pause the sync engines for the time you work on it.

Click on Configure

Click on Customize synchronization options and click Next

Authenticate with your AzureAD Global Admin user

Click Next

Click Next

Select Directory extension attribute sync and then Next

Search and select Drink and add it to the Selected Attributed and then click Next
Did you know that there is an attribute called ‘drink’ in Microsoft’s Active Directory?
The drink (Favorite Drink) attribute type specifies the favorite drink of an object (or person).
It’s been RFC since 1991! :smiling_face_with_smiling_eyes:

Click on Configure

Click Exit to complete the configuration

I’m going to initiate a Delta Synchronization to avoid waiting until the next sync cycle:
Start-ADSyncSyncCycle -PolicyType Delta

Now, let’s confirm that the Drink attribute flowed into Azure AD. Open the Synchronization Service app

You will notice that as a result of a directory extension change, ADConnect choses to perform a Full Import that, in big environment can take even hours so, always test where possible and plan accordingly as it wont be able to do any other sync operation until it completes the import.
This configuration creates an Inbound Sync Rule to Import the Description attribute From the Connector Space into the Metaverse “In from AD – User DirectoryExtension” and an Outbound SyncRule to export it from the Metaverse into the AzureAD Connector Space where then the object is exported and in AzureAD “Out to AAD – User DirectoryExtension”.
The interesting thing it’s how the Object is named in AzureAD: extension_180973d8aa5f4e049c25bb863c66de18_department

What’s is 180973d8aa5f4e049c25bb863c66de18?
It’s nothing more than the ApplicationId of our Tenant Schema Extension App in our Tenant. Every customer gets a different AppId so do not try to search mine into your tenant.

Directory Schema Extension Attributes provide a way to store additional data in Azure Active Directory on user objects and other directory objects such as groups, tenant details, service principals BUT only extension attributes on user objects can be used for emitting claims to applications and those attributes are always associated with an application in the tenant and are referenced by the application’s applicationId in their name: Tenant Schema Extension App.
As you can see the Identifier for a Directory Schema Extension Attribute is of the form of Extension_xxxxxxxxx_AttributeName, where xxxxxxxxx is the applicationId of the application the extension was defined for.
Once a directory extension attribute created via AD Connect is in the directory, it will show in the SAML SSO claims configuration UI.
Let’s go back to our ClaimsXRay Enterprise Application in the AAD Portal

Then click on Single sign-on

Click on the pencil to edit User Attributes & Claims

Click on Add new claim

Type a Name for your new claim and select the user.drink extension we just created and then click on Save

Open a new tab in your favorite browser and go to https://myapplications.microsoft.com/
And click on your ClaimsXRay application

And we can see the new Favorite_Drink claim we just created, which is a synced attribute from our on-premises AD Department attribute:

This concludes this Blog Post. I want to thank you for your time and I’ll see you soon here!
Michele Ferrari
by Scott Muniz | Jul 6, 2020 | Azure, Microsoft, Technology, Uncategorized
This article is contributed. See the original author and article here.
In the article “Azure Sentinel correlation rules: Active Lists out; make_list() in,” I presented a rule that detects a number of sign-in failures to Azure AD, alongside a sign-in success to AWS from the same IP address. An inherent challenge with the rule was that the time window is defined by rule execution: if the rule is executed every hour, and an attack is split across two rule executions, no alert will be triggered.
In this blog post, we will see how to modify this rule to analyze a sliding time window, and therefore work across rule execution boundaries. While enhancing the rule time window support, we will also add support for delayed events.
This post of part of a series of blog posts on writing rules in Azure Sentinel:
Defining the sliding window
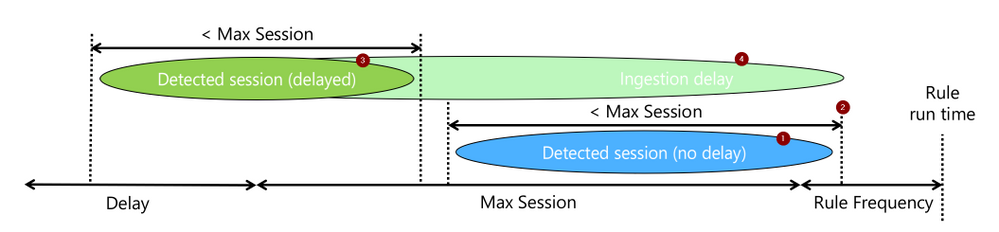
Let start with defining the time variables for the detection:
let rule_frequency = 1h; // how often is the rule executed
let max_session = 24h; // the maximum length of a detected session
let aad_delay = 1h; // the maximum delay we anticipate for events for each source
let aws_delay = 1h;
The rule attempts to detect a sequence of events (1), let’s call them a session, that took less than “max_session” and of which the last occurred within the current rule run (2). When events are expected to be delayed, we will still look for such a session (3), but require that the last event was ingested (4) within the current rule run.

The rest is just the mechanics of how to do the above.
Filtering the relevant AAD events
The rule logic itself starts, as did the simpler version, with filtering Azure AD Sign-in failures. However, if the original version did not explicitly filter on time, this one adds a time condition (green). The time condition go back as much as needed to capture sessions that ended at the beginning of the current run window, even if delayed.
let signin_threshold = 5;
let suspicious_signins =
SigninLogs
| where TimeGenerated > ago (max_session + rule_frequency + aad_delay)
| where ResultType !in ("0", "50125", "50140")
| where IPAddress != "127.0.0.1"
Identifying AAD failure sessions
Next comes the KQL magic that makes sliding windows detection easy:
- The operator row_window_session (green) searches for sessions: sequences of events no longer than max_session. It adds to each event a field, aad_first_time, which includes the time of the first event in the session and would be the same for all events in the session.
- To prepare the data for row_window_session, we sorted (red) as the operator expected sorted input. In this case, we sort by IP address, in addition to time, to ensure sessions are specific to a source IP address.
- Lastly, we analyze using the operator summarize (blue), the data we need from each session: its length and indicative timestamps.
| sort by IPAddress, TimeGenerated asc
| extend aad_first_time = row_window_session (TimeGenerated, max_session, max_session, IPAddress != prev(IPAddress))
| summarize session_count = count(), aad_last_time = max(TimeGenerated), aad_last_ingest=max(ingestion_time()) by aad_first_time , IPAddress
Filtering only relevant sessions
Once we have sessions, we need to check if indeed indicate a detection:
- Was the session count above the detection threshold? (red)
- Did the session end within the latest rule execution, adjusted to an ingestion delay? (blue)
The last line, project-rename, is just makeup. It renames IPAddress to make it easy to identify it as the AAD failure session IP address. This comes in handy after the join when multiple tables add their fields to the result set.
| where session_count >= signin_threshold
| where aad_last_time > ago (rule_frequency + aad_delay)
| project-rename aad_ip_address = IPAddress;
Note that unlike the simpler version, the result of this query part is a table and not a list, and we will use the join operator to correlate it to the AWS events. Why? We need to keep the timestamps and test them after the “join.” It would also help us provide more data to the analyst.
Want to stop here? the general aggregation case
While the rule we explore correlates sign-in failures on Azure with a successful sign-in on AWS, the more common form is simple aggregation. i.e., detection more than X events in a time window. The section we already covered address such a general use case, with the following small modifications:
- Remote the line “let suspicious_signins =“, and the semicolon at the end to make this the primary query in the rule.
- Add the line “| where aad_last_ingest > ago(rule_frequency)” to ensure the session included a new, just ingested, event and therefore was not yet reported on.
Matching the sessions to a successful AWS login event
After finding successful AWS logins (red), we match them on IP addresses to the sessions we identified earlier on using join (blue). For matches, implying we have a session of Azure failures and a successful AWS login for the same address, we test the following:
- Was any of the events ingested in the latest rule execution window (green)? This ensures the detected attack included new information and was not reported yet. This is the primary means used to support delayed events while avoiding duplicate alerting.
- Was the successful AWS event with the time window of the session? (blue). This a simple to implement choice, but not the only one. Other options can also be implemented, such as the AWS success happening after the Azure failure session. Those will require changing this time condition line and may also require extending other timeframes in the query.
The “project-rename” and “extend” operators (orange), are again cosmetic only and makes the AWS fields easy to use and identify in the joined table.
AWSCloudTrail
| where TimeGenerated > ago(max_session + rule_frequency + delay)
| where EventName == "ConsoleLogin"
| extend LoginResult = tostring(parse_json(ResponseElements).ConsoleLogin)
| where LoginResult == "Success"
| project-rename aws_time = TimeGenerated, aws_ip_address = SourceIpAddress
| extend aws_ingest_time = ingestion_time()
| join suspicious_signins on $left. aws_ip_address == $right.aad_ip_address
| where max_of(aws_ingest_time, aad_last_ingest) > ago(rule_frequency)
| where aws_time between (aad_first_time ..aad_last_time)
That’s it. The rest would be just result and entity preparation.
Rule Settings
An analytics rule is not just a query. There are several parameters that you need to set to make it work. The two critical ones are:
- -“Run query every” is the rule execution frequency and should be set to, as expected to “rule_frequency”.
- “Lookup data from the last,” or the rule’s lookback time, has to be at least as long as the most extended time condition in the rule. This would be max_session + rule_frequency + the longer of the delays, aad_delay, and aws_delay.
Also, you should configure alert aggregation based on the source IP address. A sliding window-based rule will alert when new events are extending an existing session. While it is possible to suppress such alerting, it adds information, so generating an alert that will be grouped to the same incidents is the best practice. Aggregation should be by IP address and aad_first_time, to which you should allocate one of the unused entities.
Summary
Aggregation rules and more advanced relations-based rules require careful consideration of time window management to avoid missing alerts or duplicate alerting. This article provides a recipe that should help you implement such rules correctly using a sliding window analysis.
I hope you found it useful!
by Scott Muniz | Jul 6, 2020 | Azure, Microsoft, Technology, Uncategorized
This article is contributed. See the original author and article here.
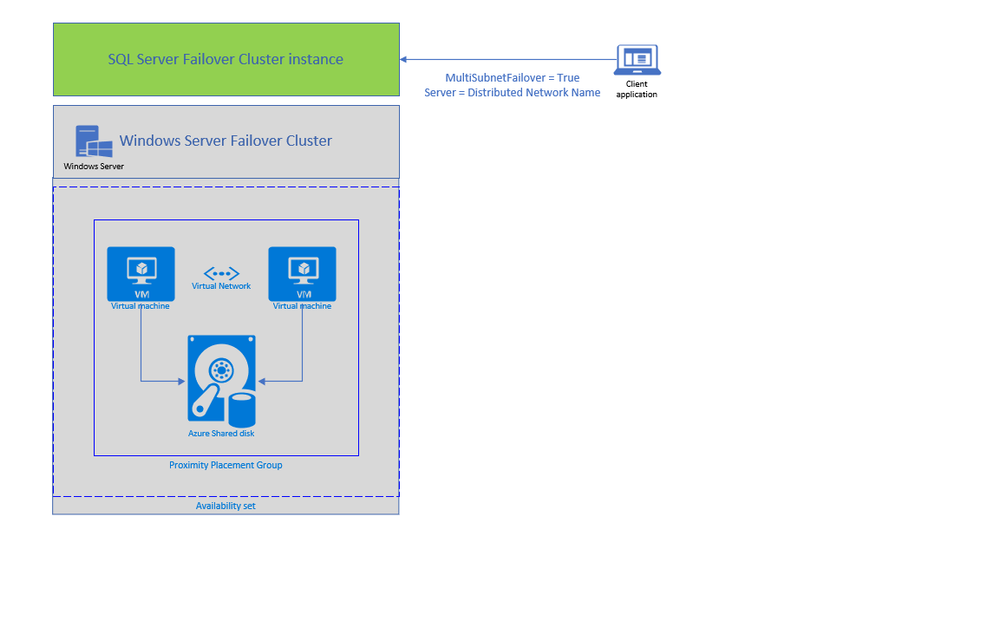
Today, we are announcing two new features enabling lift and shift of Always ON SQL server Failover Cluster instances (SQL FCI) from on-premises to Azure Virtual Machines: Distributed Network Name (DNN) for SQL FCI and Azure Shared Disks for SQL FCI.
SQL FCI has been commonly used for years to protect SQL Server instance in case of a failure (hardware failures, operating system failures, application, or service failures), or a planned upgrade. With SQL FCI, SQL instance will be moved to an available Windows Server Failover Cluster (WSFC) node if the current node fails, transparent to the client or application connecting to SQL Server. SQL FCI protects from failures at the instance level through redundancy and automatic failover and fairly simplifies configuration and management for High Availability.
Azure offers many capabilities for SQL Server to maximize performance, optimize cost, reduce maintenance with SQL VM Resource Provider and achieve world class security. On Azure VMs, you can leverage these capabilities by keeping full control on the platform hosting SQL Server; including control on the VM family and size, storage configuration, SQL Server version and edition, deployment options and HADR architecture.
Previously, rehosting SQL FCI on Azure had some differences compared to on-premises as it required an Azure Load Balancer for automated failover and there was no representative of SAN (Storage Array Network) type storage on Azure. With today’s announcement, both differences are addressed by offering an exact representation of SQL FCI architecture on Azure VMs.
DNN support for SQL FCI
DNN for SQL FCI is supported with SQL Server 2019 CU2 on Windows Server 2016 and later and it enables faster failover, simplifies provisioning and maintenance, and improves robustness by removing the need for an Azure Load Balancer.
Traditionally, SQL Clients leveraged Windows Server Failover Cluster Virtual Network Name (VNN) and Virtual IP access points for SQL FCI connectivity. VNN for SQL FCI provided a unified connection point and allows applications to connect to the VNN without the need to know the current active node. Since Virtual IP works different in Azure environment, you are required to configure an Azure Internal Load Balancer for automated failovers through VNN. Azure Load Balancer distributes inbound flows that arrive at the load balancer’s front end to backend pool instances which should be configured as the Azure Virtual Machines running SQL FCI nodes.
The DNN resource in Windows Server Failover Cluster provides an alternative way for SQL client to connect to the SQL FCI without an Azure Load Balancer. When a DNN resource is created, WSFC binds the DNN DNS name with the IP addresses of all nodes in the cluster. SQL client will try to connect each IP address in this list to find the active node. This connection process can be further accelerated by connecting all IP addresses in parallel with the SQL connection property “MultiSubnetFailover” is set to true, enabling SQL client to connect to the current running FCI instantly. DNN would be helpful in any environment including on-premises where IP Addresses are scarce, and you do not need to connect directly to the cluster group to manage the cluster.
You can configure DNN for SQL FCI connectivity basically in 5 simple steps as shown in the example below. First, create the DNN resource in WFCS for the resource group hosting SQL FCI (for default SQL instance group name is “SQL Server (MSSQLSERVER)”), then set the DNS Name of the DNN resource with “SQL FCI name”, and start the resource (verify owner node list for DNN resource only includes SQL FCI nodes ). At this point DNN resource will be ready to use, so restart SQL Server and update connection string to start using the DNN.
1. Add DNN resource
Add-ClusterResource -Name dnn-demo -ResourceType "Distributed Network Name" -Group "SQL Server (MSSQLSERVER)"
2. Set DNS name of the DNN resource
Get-ClusterResource -Name dnn-demo | Set-ClusterParameter -Name DnsName -Value sqlfciname
3. Start the DNN resource
Start-ClusterResource -Name dnn-demo
4. Restart SQL Server
5. Update Connection String for parallel querying of FCI nodes with Multi Subnet Failover property
Add “MultiSubnetFailover=True” property to SQL connection string and set the Server Name as the DNS name of DNN property.
You can keep using the same name for an existing SQL FCI, to do that simply:
With .NET framework 4.6.1, MultisubnetFailover support is turned on by default; no client-side change is needed if you are using 4.6.1 and higher and same SQL FCI name is used.

Azure Shared Disks for SQL FCI (Preview)
Second feature enabling lift and shift migrations of SQL FCI to Azure is Azure Shared Disks. Azure Shared disks can be attached to multiple VMs in the Windows Failover Cluster at the same time. The VM that can read or write to the disk is chosen by the Cluster service based on the SCSI Persistent Reservations (SCSI PR). SCSI PR is widely leveraged by SQL FCI running on Storage Area Network (SAN) on-premises, and Azure Shared disks enables migrating those to Azure VMs as is.
You should create the Azure Shared disks by setting “Max Shares = 2” for a 2 node SQL FCI, and then attach the disk to both SQL FCI nodes. You can use Failover Cluster Manager and present the shared disk to the cluster as Cluster Shared Volume (CSV) and then use it for SQL Server Data and Log files. Please follow this tutorial to deploy SQL FCI with Azure Shared Disks. You can use Premium SSD Shared disks with SQL FCI 2016 and higher versions, and Ultra Shared Disks with SQL FCI 2019.
To access Azure Shared Disks, both FCI nodes should be placed on the same Availability Set and Proximity Placement Group. Using the same Availability Set guarantees 99.95% HA SLA at the VM level, when one VM is down for planned maintenance the other will be available. Proximity placement groups creates a logical grouping of Azure compute resources which assures that they are physically located close to each other to achieve the lowest network latency. SQL FCI configured with Azure Shared Disks on an availability sets and PPG offers a high-performance HA solution at the instance level for mission critical SQL Server workloads.
Use Azure Migrate to migrate SQL Server workloads to Azure SQL and leverage workload optimizations and total cost of ownership savings today! Get started with a free trial or pre-configured Azure SQL images.
by Scott Muniz | Jul 4, 2020 | Azure, Microsoft, Technology, Uncategorized
This article is contributed. See the original author and article here.
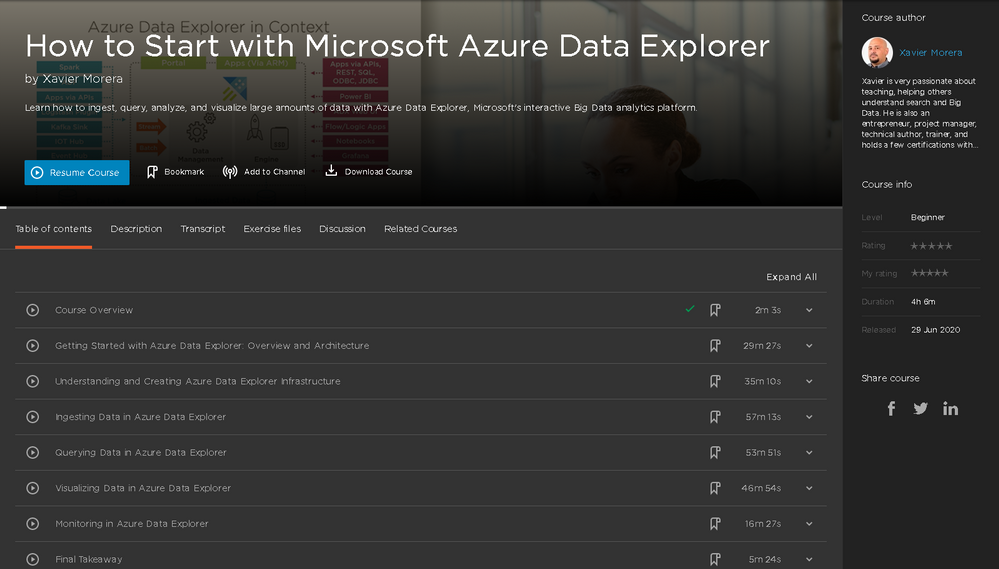
Presenting a brand-new free online course that will teach you everything you ever wanted to know about data analytics with Azure Data Explorer.
Register here to get free access.

It’s long enough to give you everything you need to know about Azure Data Explorer (ADX), but broken up into bite-sized modules so you can do it at your own pace. Pick and choose your favorite topics and come back to specific topics as many times as you want. Each module is a standalone subject with an explanation, demonstration, and example for you to try at home. Do one module to refresh your knowledge of a certain subject. Do them all, and you’ll be an ADX master!

First, you will learn the basic use cases and architecture of ADX. Next, select your cluster size and define a cluster. Then you will ingest data, followed by query with the Kusto Query Language (KQL). Finally, you will explore data visualization options, monitors and alerts, and troubleshooting. When you’re finished with this course, you will have the skills and knowledge of Azure Data Explorer needed for real-time analysis on large volumes of streaming data. Four and a half hours, eight modules in total.


What are you waiting for?
Coming soon (August 2020), Azure Data Explorer Advanced Query Capabilities.
Already here, Basic KQL.

Recent Comments