This article is contributed. See the original author and article here.
Many of our customers use Azure DNS for name resolution when it comes to infrastructure they have in Azure. The setup with Azure DNS works like a charm and provides name resolution to Azure Infrastructure without doing any complex setup. One challenge you may have is that Azure DNS do not log DNS queries from your VM’s, which means you have no visibility into what endpoints their azure infrastructure is trying to connect to or the DNS name resolution queries being used.
In this blog, we will see how Azure Firewall can help our customers overcome this challenge and provide visibility not only to Azure DNS logging but also to control the traffic flows both east-west and to the internet for their Azure resources.
Azure Firewall recently added Custom DNS and DNS proxy capabilities which was a big ask from all of our customers and, these are the features which we will explore in this blog and how it can help you.
Azure DNS
Azure DNS provides name resolution and basic authoritative DNS capabilities of public DNS names. The Azure DNS IP address is 168.63.129.16. Azure DNS provides DNS name resolution for your Azure infrastructure if you do not have your own DNS server hosted. For example, when you setup a new VM in Azure, it can resolve the public names out of the box using Azure provided name resolution (Azure DNS).
Azure Firewall Custom DNS
By Default, Azure Firewall uses Azure DNS to ensure the service can reliably resolve internet based name resolution. Custom DNS allows you to configure Azure Firewall to use your own corporate DNS server or Azure DNS to resolve the DNS queries.
You may configure a single DNS server or multiple servers in Azure Firewall and Firewall Policy DNS settings. We will go through the setup in more detail later on in this blog.
Azure Firewall DNS Proxy
This feature enables Azure Firewall to act as a DNS forwarder for your Infrastructure. When DNS proxy is enabled, your clients can point to Azure Firewall to resolve the DNS queries and act as DNS servers for your infrastructure.
DNS Proxy logs all the queries coming from your infrastructure in Azure Firewall logs, and we will go through the logs in detail later on in this blog.
We hope the above gives you a good understanding of the components involved in the challenge we are trying to resolve. Let’s look at the solution now and see how Azure firewall Custom DNS and DNS proxy will help with getting visibility into Azure DNS logging.
Architecture
The problem we are trying to solve in this blog is even when UDR’s force all traffic to Firewall, DNS traffic goes straight to DNS which means you cannot log the DNS traffic or control the traffic flow going from your infrastructure to Azure DNS. With this architecture, you can centrally log all DNS traffic going to Azure DNS using Azure Firewall.
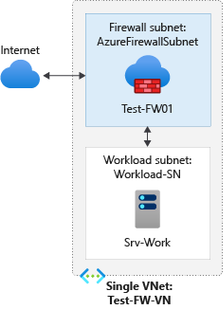
In this architecture/deployment we will use a hub and spoke model is recommended, where the firewall is in its own Virtual Network. For the purpose of the blog we will assume a simple architecture where both Workload VM and Azure Firewall is in the same Virtual network but deployed in two different subnets as represented in the below Diagram.
Azure Firewall Deployment
You can deploy azure firewall either from Azure Portal, ARM, REST or CLI. Here is the article which you can follow to setup the above configuration step by step using azure portal.
Tutorial: Deploy & configure Azure Firewall using the Azure portal | Microsoft Docs
From the above article, you only need to follow the first five steps
- Prerequisites
- Set up the network
- Deploy the firewall
- Create a default route
- Configure an application rule
- Configure a DNAT rule
Once you have followed the above steps, you have an Azure Firewall and you can connect to your workload VM using the Azure Firewall Public IP.
Custom DNS and DNS Proxy Configuration
We will now configure Custom DNS and DNS proxy in Azure Firewall.
Configure custom DNS servers and DNS Proxy – Azure portal
- Under Azure Firewall Settings, select DNS Settings.
- Under DNS servers, Select Default (Azure provided).
- Under DNS Proxy, Select Enabled
- Select Save.

Now the Azure firewall directs DNS traffic to Azure DNS for name resolution and Azure Firewall is configured as a DNS proxy.

Enable Diagnostic logs for Azure Firewall
- In the Azure portal, Select the Azure firewall.
- Under Monitoring, select Diagnostic settings.
For Azure Firewall, four service-specific logs are available:
- AzureFirewallApplicationRule
- AzureFirewallNetworkRule
- AzureFirewallThreatIntelLog
- AzureFirewallDnsProxy
- Select Add diagnostic setting. The Diagnostics settings page provides the settings for the diagnostic logs.
- In this example, Azure Monitor logs stores the logs, so type Firewall log analytics for the name.
- Under Log, select AzureFirewallApplicationRule, AzureFirewallNetworkRule, AzureFirewallThreatIntelLog, and AzureFirewallDnsProxy to collect the logs.
- Select Send to Log Analytics to configure your workspace.
- Select your subscription.
- Select Save.
Configure Azure Firewall as a DNS server
You can configure DNS server settings directly on the Network interface of virtual machine or you can specify directly at Virtual network. Below you can see both the methods.
Configure Azure Firewall as DNS server on your Workload Virtual Machine
- In the Azure portal, Select the Workload Virtual Machine.
- Under Settings, select Networking.
- The Networking page, click on Network Interface.
- This will open up the Network Interface page, under Settings, Select DNS servers.
- In DNS Server Page, Select Custom and enter the internal IP of the Azure Firewall.

Configure Azure Firewall as DNS Server directly on the Virtual network
- In the search box at the top of the portal, enter virtual networks in the search box. When Virtual networks appear in the search results, select it.
- From the list of virtual networks, select the virtual network for which you want to change DNS servers for.
- Select DNS servers, under SETTINGS. Select Custom and enter the internal IP of the Azure Firewall.

Now, we are all set up and will quickly review how azure firewall provides us the visibility of DNS logs from our Azure infrastructure going to Azure Provided DNS.
- Azure Firewall is set up and using its default Custom DNS configuration, which is Azure DNS.
- Azure Firewall is now configured as DNS proxy and acts as a DNS server for our workload VM.
- Workload VM is configured to use Azure Firewall as a DNS server.
- Azure Firewall Diagnostic settings are configured and logging to Log analytics workspace.
Connect to your workload client and access internet.
- RDP to your workload Virtual machine.
- Open browser and browse to www.google.com
Azure Firewall DNS log fields with explanations
Format: {remote}:{port} – {id} {type} {class} {name} {protocol} {size} {do} {bufsize} {rcode} {rflags} {rsize} {duration}
{remote}: client’s IP address, for IPv6 addresses these are enclosed in brackets: [::1]
{port}: client’s port
{id}: query ID
{type}: type of the request
{class}: class of the request
{name}: name of the request
{protocol}: protocol used (tcp or udp)
{size}: request size in bytes
{do}: is the EDNS0 DO (DNSSEC OK) bit set in the query
{bufsize}: the EDNS0 buffer size advertised in the query
{rcode}: response CODE
{rflags}: response flags, each set flag will be displayed, e.g. “aa, tc”. This includes the qr bit as well
{rsize}: response size
{duration}: response duration
Check the Azure Firewall DNS logs
- In the Azure portal, Select the Azure firewall.
- Under Monitoring, select Diagnostic settings.
- In Diagnostics settings page, Click on workspace name under Log Analytics Workspace which will open the Log analytics workspace blade for you.
- In the left Menu, select logs and copy/paste the following query and click on Run.
AzureDiagnostics

| where Category == "AzureFirewallDnsProxy"

| parse msg_s with "DNS Request: " ClientIP ":" ClientPort " - " QueryID " " Request_Type " " Request_Class " " Request_Name ". " Request_Protocol " " Request_Size " " EDNSO_DO " " EDNS0_Buffersize " " Responce_Code " " Responce_Flags " " Responce_Size " " Response_Duration

| project-away msg_s

| summarize by TimeGenerated, ResourceId, ClientIP, ClientPort, QueryID, Request_Type, Request_Class, Request_Name, Request_Protocol, Request_Size, EDNSO_DO, EDNS0_Buffersize, Responce_Code, Responce_Flags, Responce_Size, Response_Duration, SubscriptionId
- You will see an output like the one below and can see all the DNS queries your workload VM is making to Azure provided DNS.

As you can see that now your organization has visibility into all the DNS requests which your Azure Infrastructure is making to Azure Provided DNS and how you can utilize Azure Firewall to control traffic flows. We hope you find this blog useful.
Brought to you by Dr. Ware, Microsoft Office 365 Silver Partner, Charleston SC.

Recent Comments