This article is contributed. See the original author and article here.
High throughput streaming ingestion into Synapse SQL Pool is now available. Read the blog post here on the announcement.
Interestingly, I have been working with an enterprise customer which has streaming data in XML and produces close to 60GB/minute of streaming data. In this blog post, I will walk through the steps to implement a custom deserializer to stream XML events in .NET which will be deployed as Azure Stream Analytics (ASA) job. The data deserialized will be further ingested into Azure Synapse SQL Pool (provisioned data warehouse).
With custom deserializer programming, it is flexible to handle almost any types of data formats.
Create Azure Stream Analytics Application in Visual Studio
Launch Visual Studio 2019. Make sure you have Azure Stream Analytics tools for Visual Studio is installed. Follow the instruction here to install.
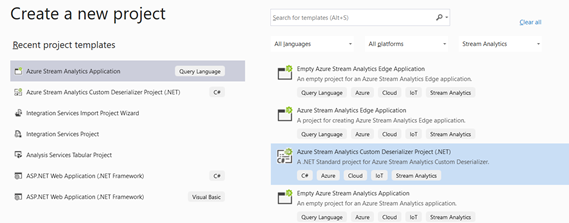
Click Create a new Project and select Azure Stream Analytics Custom Deserializer Project (.NET). Give the project a name and click Create.
Once the project is created, next is to create the deserializer class. Events that are parsed in certain formats, needs to be flatten into a tabular format. This is addressed as deserialization. Let’s create a new class that will be instantiated to deserialize the incoming events.
Right click the project > Add New Item > Class. Name the C# class as Grocery and click Add.

Once the C# class file is created, next is to create the class members which defines the properties of the object. In our example, the object is an XML event which captures the grocery transactions happening at Point of Sales.
Here is how the event records looks like in XML for each stream.

<Groceries>
<Grocery>
 <name>Roasting Pan</name>
 <storeId>1008</storeId>
 <category>Kitchen</category>
 <producttype>5</producttype>
 <price>17.99</price>
 <timestamp>1606185743.597676</timestamp></Grocery>
<Grocery>
 <name>Cutting Board</name>
 <storeId>1005</storeId>
 <category>Kitchen</category>
 <producttype>10</producttype>
 <price>12.99</price>
 <timestamp>1606185747.236039</timestamp>
</Grocery>
<Groceries>
Open the Grocery.cs file, and modify the class with the properties as below:
public class Grocery
    {
        public string storeId { get; set; }

        public string timestamp { get; set; }

        public string producttype { get; set; }

        public string name { get; set; }

        public string category { get; set; }

        public string price { get; set; }

    }
Check out the docs here for the Azure Stream Analytics supported data types.
Next, we just need to code the block that calls the Deserialize function of XmlSerializer class and specify the class that needs to be instantiated as a type of, in this case, as a type of Grocery.
Open the ExampleDeserializer.cs file, and replace the entire body of the Deserialize function with the code below:
XmlSerializer serializer = new XmlSerializer(typeof(List<Grocery>), new XmlRootAttribute("Groceries"));

List<Grocery> productList = (List<Grocery>)serializer.Deserialize(stream);

foreach (var Product in productList)
{
    yield return new Grocery()
    {
        category = Product.category,
        name = Product.name,
        price = Product.price,
        storeId = Product.storeId,
        producttype = Product.producttype,
        timestamp = Product.timestamp
    };
}
There are errors highlighted and this indicates that the reference to the XMLSerializer dll is yet to be referenced. Point over to the XMLSerializer class and press Ctrl + . (dot notation) in your keyboard and add the reference to System.XML.Serialization.

Repeat the same for Grocery.

Replace the return type of the Deserialize method from CustomEvent to Grocery. The method should like as below:

1. The code block above receives the incoming streaming events as a type of Stream.
2. New serializer object instantiated specifying the class of how each event records should be read as, in this case, as a type of Grocery.
3. Incoming stream input is being parsed as argument to the Deserializer method and a type cast to Grocery specifies that the object should be returned as a type of Grocery.
4. The deserialized object is instantiated as a type of Grocery and its attribute properties are initialized and the object is returned back to the caller. At this point, any customization such as discount calculations can be implemented if required. It is programming, almost anything can be programmed. :smiling_face_with_smiling_eyes:
Next, replace the return type from CustomEvent to the CustomCSVDeserializer class instantiation as shown below:

That’s all for the programming of the deserializer. We will need to build the project so that the DLL can be compiled. Right click on the project and click Build project.
Next, we will need to create an Azure Stream Analytics application which can then be deployed to as a Azure Stream Analytics job. Add new Project to the same solution. Right click on the solution > Add > New Project > Azure Stream Analytics Application. Give a name to the project and click Create.

Once the Azure Stream Analytics project is created, right click on References > Projects > select the only project shown.

With the deserializer project added as a reference, next is to specify the input and output for the Azure Stream Analytics job. We will first configure the input to the Azure Event Hub. This blog assumes that the application at the Point-Of-Sale machine has already been configured to stream its events to Azure Event Hub. Check out our documentation here to understand this configuration.
In the Azure Stream Analytics application, expand the Inputs folder and double click on the Input.json file. Ensure the Source Type is set to Data Stream and the Source is set to Event Hub. The rest of the configuration is just to specify the Azure Event Hub resource. I have specified as below:

Next, the Output needs to be configured. At present, Visual Studio does not support the Output option to Azure Synapse Analytics. However, this can be easily configured once the Azure Stream Analytics job is deployed to Azure. For now, let’s configure the output to Azure Data Lake Storage. Expand Output folder and double click Output.json file.
Select the Sink to Azure Data Lake Storage Gen2/Blob Storage. The remaining of the fields requires the container name (create one if there are none) in the Azure Data Lake Storage and the storage account key. Configure this as required. I have configured as below:

We are done configuration the Azure Stream Analytics project. Right click the project and click Build.
Once build succeeded with no errors, right click the project, and click on Publish to Azure. Select the option to create a job and configure the subscription and the resource group to deploy the ASA job.

Do note that custom deserializer currently only supports limited regions which includes West Central US, North Europe,East US, West US, East US 2 and West Europe. You can request support for additional regions. Please refer to our documentation here.
Once the project is successfully published, changing the output to Azure Synapse SQL Pool (provisioned data warehouse) will be the next step.
Configuring Output to Azure Synapse Analytics
With Visual Studio open, you can click the icon from the ASA job deployed summary pane itself as shown below.

In the Azure Portal, click on the Azure Stream Analytics job output. Click Add output and select Azure Synapse Analytics (formerly SQL DW).

Prior selecting the destination to Azure Synapse SQL data warehouse, please ensure the table is created in the provisioned SQL Pool.
The Output configuration specifies the destination table. I have configured as below:

Once the Output configured successfully, next we can configure the job to stream the output to Azure Synapse SQL data warehouse. The older Output to Azure Data Lake Storage Gen2 can be deleted if wanted to. Click on the job query, type in the query as below and click Save query.
SELECT
   category,
   name,
   price,
   storeId,
   producttype,
   timestamp
INTO
    [factgrocerysales]
FROM
    [Input]
The INTO clause above specifies the destination data warehouse with the alias named as above.
That’s all. We are now ready to run the job. Navigate back to the job page and click Start. This will resume the job.

As the job is running, I have triggered the event producer which simulates the Point-Of-Sales scenario which captures the transactions as XML events.
Querying the table in SSMS, shows the events are streamed and written to Azure Synapse Analytics data warehouse successfully.

Brought to you by Dr. Ware, Microsoft Office 365 Silver Partner, Charleston SC.

Recent Comments