by Scott Muniz | Aug 7, 2020 | Uncategorized
This article is contributed. See the original author and article here.
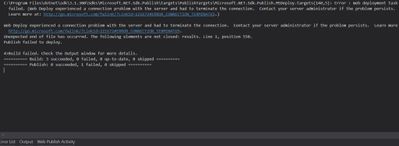
While publishing an application from Visual Studio to Azure App Service, you may come across this error message:
Web Deploy experienced a connection problem with the server and had to terminate the connection.
Learn more at: http://go.microsoft.com/fwlink/?LinkId=221672#ERROR_CONNECTION_TERMINATED

In the case I worked on, the project publishes successfully to Local IIS and Azure Functions but not to Azure App Service.
Solution
Follow the steps below to find a solution to this issue:
- Uninstall security software in the server and try again
- Make sure Management Services are installed (Add Role and Features > Web Server)
- Check if Web Management Services and Web Deploy Agent Service are running
- Make sure Fiddler or any other similar software is not running during the publish
- Check if TCP port 8172 are open
by Scott Muniz | Aug 7, 2020 | Uncategorized
This article is contributed. See the original author and article here.
In order to troubleshoot slowness in web, system administrators should analyze IIS logs, Failed Request Tracing logs, dump files, and HTTP.SYS logs to narrow down the issue.
In a slowness issue I worked on, these records in HTTPERR file took my attention:
2020-07-26 14:09:01 10.123.12.12 35316 10.12.123.123 80 - - - - - Timer_MinBytesPerSecond
2020-07-26 14:09:01 10.123.12.12 48012 10.12.123.123 80 - - - - - Timer_MinBytesPerSecond
Apparently, requests take more than 35 seconds to response due to a Timer_MinBytesPerSecond related issue.
What is MinBytesPerSecond?
It’s a parameter HTTP.SYS uses to determine what speed is allowed for the response to the client.
From the official document:
Specifies the minimum throughput rate, in bytes, that HTTP.sys enforces when it sends a response to the client. The minBytesPerSecond attribute prevents malicious or malfunctioning software clients from using resources by holding a connection open with minimal data. If the throughput rate is lower than the minBytesPerSecond setting, the connection is terminated.
The current implementation only terminates the connection after the time it would have taken to stream the entire response back to the connecting client at the minimum bandwidth transfer rate has elapsed. If the transfer rate goes below the value specified by minBytesPerSecond only for a small period of time, but the overall transfer rate is higher, the connection will not be terminated.
The default value is 240.
Solution
HTTP.SYS logs above shows that the root cause of the issue is the slow response throughput. The client is not receiving IIS response at a reasonable speed.
For Windows Server 2012 R2 (it was the server I worked on), IIS wants to send response at minimum 240 bytes per second. If the client cannot receive it at this minimum speed, IIS terminates the connection. This logic prevents the server against denial-of-service (DoS) attacks.
- Find out which clients are causing this issue
- The client machines might be in a slow network. If the issue is caused by the same client(s), you may be able to improve their condition to solve the issue
- Find out client IP addresses in the HTTPERR file and investigate their network as well as their OS
Remove or alter the threshold for minimum response rate
- If the client IPs are legit (not malicious sources or possible attackers), set
minBytesPerSecond to 0
- If the issue doesn’t happen again, play around the value (Try 500). It’s not recommended to set it 0 because it may make your application vulnerable to DoS attacks
- Steps for changing
minBytesPerSecond:
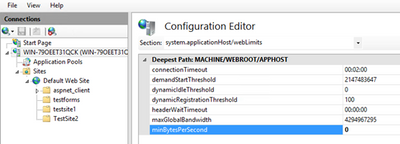
- Go to IIS Manager
- Click on the server name
- Double click on Configuration Editor
- Go to “system.applicationHost/webLimits”
- Configure
minBytesPerSecond
- Reset IIS

by Scott Muniz | Aug 7, 2020 | Uncategorized
This article is contributed. See the original author and article here.
Update 2008 for the Technical Preview Branch of Microsoft Endpoint Configuration Manager has been released.
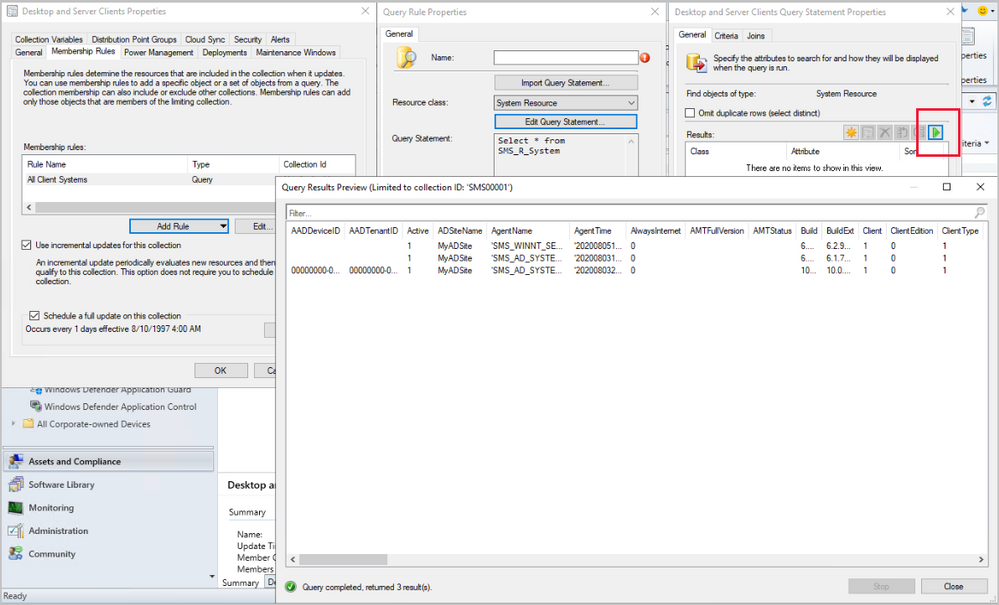
Based on your feedback, you can now preview the query results when you’re creating or editing a query for collection membership. Preview the query results from the query statement properties dialog to validate collection membership. When you select Edit Query Statement, select the green triangle on the query properties for the collection to show the Query Results Preview window. You can stop and resume a long running query.

Learn more about Collection query preview.
This preview release also includes:
Analyze SetupDiag errors for feature updates – With the release of Windows 10, version 2004, the SetupDiag diagnostic tool is included with Windows Setup. If there’s an issue with the upgrade, SetupDiag automatically runs to determine the cause of the failure. Configuration Manager now gathers and summarizes SetupDiag results from feature update deployments with Windows 10 servicing. The Windows 10 Servicing dashboard in the Software Library workspace of the Configuration Manager console now includes a tile for Collection Errors.
Collection evaluation view – We’ve integrated the functionality of Collection Evaluation Viewer into the Configuration Manager console. This change provides administrators a central location to view and troubleshoot the collection evaluation process. The console now displays the following information:
- Historic and live information for full and incremental collection evaluations
- The evaluation queue status
- The time for collection evaluations to complete
- Which collections are currently being evaluated
- The estimated time that a collection evaluation will start and complete
Delete Aged Collected Diagnostic Files task – You now have a new maintenance task available for cleaning up collected diagnostic files. Delete Aged Collected Diagnostic Files uses a default value of 14 days when looking for diagnostic files to clean up and doesn’t affect regular collected files. The new maintenance task is enabled by default.
See task sequence size in the console – This release continues to iterate on changes in technical preview version 2004 and version 2007 to help you manage the size of task sequences. When you view the list of task sequences in the Configuration Manager console, add the Size (KB) column. Use this column to identify large task sequences that can cause problems.
Monitor scenario health – Configuration Manager is complicated to troubleshoot. It’s especially complex to understand system latency and the backlog between components. Cloud service-attached features increase that complexity. You can now use Configuration Manager to monitor the health of end-to-end scenarios. It simulates activities to expose performance metrics and failure points. These synthetic activities are similar to methods that Microsoft uses to monitor some components in its cloud services. Use this additional data to better understand timeframes for activities. If failures occur, it can help focus your investigation.
Import objects to current folder – Based on your feedback, now when you import an object in the Configuration Manager console, it imports to the current folder. Previously, Configuration Manager always put imported objects in the root node. This new behavior applies to applications, packages, driver packages, and task sequences.
Update 2008 for Technical Preview Branch is available in the Microsoft Endpoint Configuration Manager Technical Preview console. For new installations, the 2007 baseline version of Microsoft Endpoint Configuration Manager Technical Preview Branch is available on the Microsoft Evaluation Center. Technical Preview Branch releases give you an opportunity to try out new Configuration Manager features in a test environment before they are made generally available.
We would love to hear your thoughts about the latest Technical Preview! Send us Feedback about product issues directly from the console and our UserVoice page for ideas about new features.
Thanks,
The Configuration Manager team
Configuration Manager Resources:
Documentation for Configuration Manager Technical Previews
Try the Configuration Manager Technical Preview Branch
Documentation for Configuration Manager
Microsoft Endpoint Manager announcement
Microsoft Endpoint Manager vision statement
Configuration Manager Forums
Configuration Manager Support
by Scott Muniz | Aug 7, 2020 | Uncategorized
This article is contributed. See the original author and article here.
This blog is co-written by Christian Holsing, Principal Product Manager – SAP on SUSE and Sameeksha Khare, Program Manager – Azure Monitor for SAP Solutions.
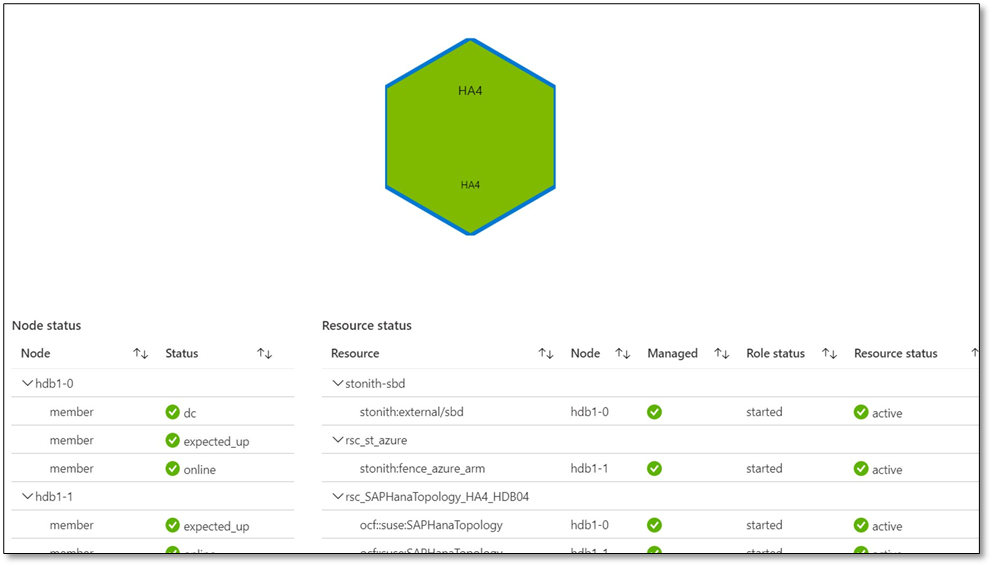
Microsoft and SUSE have collaborated to enable high availability cluster (Pacemaker) monitoring within Azure Monitor for SAP Solutions (AMS). Customers can view cluster health based upon underlying node and resource statuses within the Azure Portal.
High availability cluster telemetry is collected by configuring High availability cluster (pacemaker) ‘provider’ within AMS. As part of configuring the provider, customers are required to deploy ha_cluster_exporter on each of the cluster nodes. The ha_cluster_exporter is developed by SUSE as part of the new open source monitoring solution for SAP and is hosted on the Cluster Lab’s open source project.
SUSE and Microsoft are committed to serve our common customers and provide value to them through our growing partnership. In context of this collaboration, customers receive integrated support provided by SUSE and Microsoft with just one ticket to solution.
AZURE MONITOR FOR SAP SOLUTIONS
Microsoft recently announced the launch of Azure Monitor for SAP Solutions (AMS) in Public Preview– an Azure native monitoring solution for customers who run SAP workloads on Azure. With AMS, customers can view telemetry of their SAP landscapes within the Azure Portal and efficiently corelate telemetry between database and infrastructure. AMS can be used with both Azure Virtual Machine and SAP HANA on Azure (Large Instances). AMS is an available through Azure Marketplace; it provides simple and easy set-up and maintenance experience.
With AMS, customers can currently monitor the following components – SAP HANA DB telemetry: Customers can collect and view HANA Backup and HSR telemetry, in addition to the infrastructure utilization data from various SAP HANA instances in one location with the Azure portal. Microsoft SQL Server telemetry: Customers can get telemetry from Microsoft SQL Server, can visualize and correlate telemetry data—such as CPU and memory with top SQL statements—and can also get information about ‘Always On.’ High-availability (HA) cluster telemetry: Customers can get telemetry data from Pacemaker clusters and identify which clusters are healthy versus unhealthy and correlate this with the health of underlying node and resource health.

MONITORING CAPABILITIES BY SUSE
SUSE has included the monitoring capabilities (including the ha_cluster_exporter) as part of the recent Service Pack 2 of the SUSE Linux Enterprise Server for SAP Applications 15 (SLES for SAP 15). It is also backported to all supported SLES for SAP versions, it is available starting with SLES for SAP 12 SP3 and existing environments can also benefit from that.
As monitoring capabilities are part of the regular product, SUSE will provide full support to Azure Monitor for SAP Solutions customers in a seamless way together with the Microsoft experts. If customers want to extend their monitoring they can do so. The newly added SLES for SAP monitoring capabilities collect monitoring data not only on the operating system level but also provide data for SAP HANA, S/4 HANA, Netweaver, as well as the status of the High availability solution based on Pacemaker, latter is integrated with Azure Monitor for SAP Solutions.
SUSE plans to continue to enhance the capabilities even further – As the whole project is OpenSource and intended to be open in all directions, the integration of the component that provides the data – called Prometheus Exporter – can also be integrated with other OpenSource solutions based on Prometheus and Grafana. SUSE is already shipping a full solution in combination with the SUSE Manager and the first customers are live already. For the next releases of the SUSE Operating system the intention is to build upon this foundation and provide additional features around log data analysis and aggregation, as well as alerting.
Learn more about SUSE capabilities:
Deployment Automation and Monitoring in SLES for SAP Applications
SUSE Monitoring capabilities
SUSE on Azure
Learn more about Azure Monitor for SAP Solutions:
Announcement
Official Documentation
QuickStart video
Integration b/w Lighthouse & AMS
GitHub: Azure/AzureMonitorForSAPSolutions
Create your Azure free account today
by Scott Muniz | Aug 7, 2020 | Alerts, Microsoft, Technology, Uncategorized
This article is contributed. See the original author and article here.
Scenario:
Transport Layer Security (TLS) and its deprecated predecessor Secure Sockets Layer (SSL), are cryptographic protocols designed to provide communications security over a computer network. SSL/TLS have some available versions to use, but the newer versions were created because of the security issues found on the previous ones.
It’s important to use the latest TLS version to make sure to have a secure way to exchanging keys, encrypt data and authenticate message integrity during all the communications..
This means the client and server should support the same SSL/TLS version.
Azure Cache for Redis can currently support TLS 1.0, 1.1 and 1.2, but there are some changes planned on TLS version and cypher Suites supported by Azure Cache for Redis:
- Azure Cache for Redis will stop supporting TLS versions 1.0 and 1.1.
After this change, your application will be required to use TLS 1.2 or later to communicate with your cache.
- Additionally, as a part of this change, Azure Cache for Redis will remove support for older, insecure cypher suites. The supported cypher suites will be restricted to the following when the cache is configured with a minimum TLS version of 1.2.
- TLS_ECDHE_RSA_WITH_AES_256_CBC_SHA384_P384
- TLS_ECDHE_RSA_WITH_AES_128_CBC_SHA256_P256
These changes were announced more than one year ago, and should have already occurred but were postponed due to COVID 19. Please be updated on theses changes in this link:
Remove TLS 1.0 and 1.1 from use with Azure Cache for Redis
Actions:
As the client and server should support the same SSL/TLS version, the client application will be required to use TLS 1.2 or later to communicate with your cache.
1. Changing client application to use TLS 1.2
In StackExchange.Redis and in most of other client libraries you may need to change your connection string and add ssl=true and sslprotocols=tls12 parameters, but this may be a little bit different on each one of client libraries. Also some other changes may be needed.
You can follow this documentation Configure your application to use TLS 1.2 to verify what changed are needed and if some other client environment changes are needed to use the latest TLS version in your client application.
.NET Framework: StackExchange.Redis, ServiceStack.Redis
.NET Core: all .NET Core clients
Java: Jedis, Lettuce, and Redisson
Node.js: Node Redis, IORedis
PHP: Predis, PhpRedis
Python: Redis-py
GO: Redigo
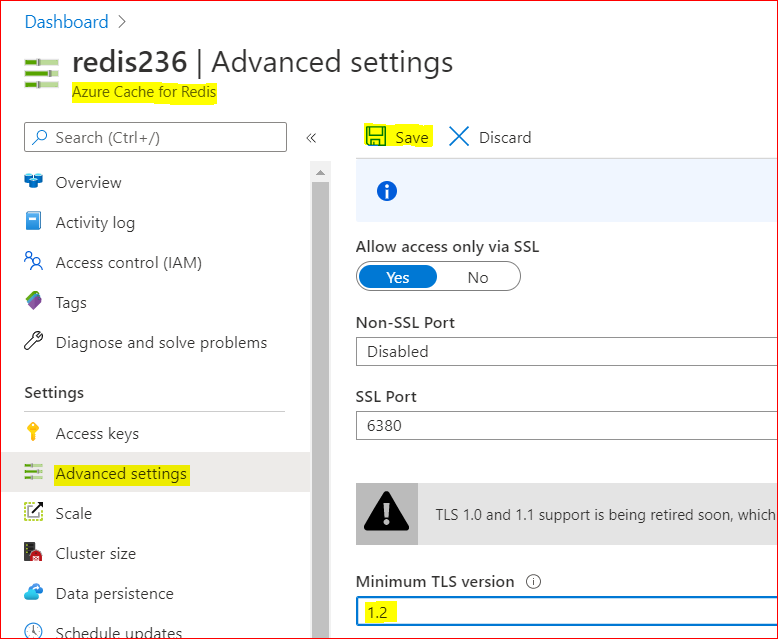
2. Changing Redis Minimum TLS version on Azure side
To disable old TLS versions on your Azure Redis instance, you may need to change the minimum TLS Version to 1.2.
This may take some minutes to be applied and you may use the Powershell script bellow to make sure the changes have been applied.
– Using Azure Portal :
– On Azure Portal, on your Azure Redis blade, choose Advanced Settings
– Change the minimum TLS Version to 1.2
– Save the changes

– Using PowerShell
You can do the same using PoweShell. You need the Az.RedisCache module already installed before run the command:
Set-AzRedisCache -Name <YourRedisName> -MinimumTlsVersion "1.2"
– Using CLI
Using CLI, the –minimum-tls-version are available only at Redis creation time and changing minimum-tls-version on an existing Azure Redis instance is not supported.
3. Check TLS versions supported by Redis endpoint
You can use this PowerShell script to verify what TLS versions are supported by your Azure Cache for Redis endpoint.
If your Redis instance have VNET integration implemented, you may need to run these PowerShell script from some VM inside your VNET, to have access to Azure Redis Instance:
param(
[Parameter(Mandatory=$true)]
[string]$redisCacheName,
[Parameter(Mandatory=$false)]
[string]$dnsSuffix = ".redis.cache.windows.net",
[Parameter(Mandatory=$false)]
[int]$connectionPort = 6380,
[Parameter(Mandatory=$false)]
[int]$timeoutMS = 2000
)
$redisEndpoint = "$redisCacheName$dnsSuffix"
$protocols = @(
    [System.Security.Authentication.SslProtocols]::Tls,
    [System.Security.Authentication.SslProtocols]::Tls11,
    [System.Security.Authentication.SslProtocols]::Tls12
)
$protocols | % {
    $ver = $_
    $tcpClientSocket = New-Object Net.Sockets.TcpClient($redisEndpoint, $connectionPort )
    if(!$tcpClientSocket)
    {
        Write-Error "$ver- Error Opening Connection: $port on $computername Unreachable"
        exit 1;
    }
    else
    {
        $tcpstream = $tcpClientSocket.GetStream()
        $sslStream = New-Object System.Net.Security.SslStream($tcpstream,$false)
        $sslStream.ReadTimeout = $timeoutMS
        $sslStream.WriteTimeout = $timeoutMS
        try
        {
            $sslStream.AuthenticateAsClient($redisEndpoint, $null, $ver, $false)
            Write-Host "$ver Enabled"
        }
        catch [System.IO.IOException]
        {
            Write-Host "$ver Disabled"
        }
        catch
        {
            Write-Error "Unexpected exception $_"
        }
    }
}
Conclusion:
Despite Azure Cache for Redis still currently support TLS 1.0, 1.1 and 1.2, it’s important to move only to TLS 1.2. Apart of the insecure TLS 1.0 and 1.1 versions, these versions will be deprecated soon from Azure Cache for Redis service.
For that reason is mandatory that all client applications can be adapted in advance to support TLS 1.2 on their Azure Cache for Redis connections, to avoid any downtime in the service.
Related documentation:
Remove TLS 1.0 and 1.1 from use with Azure Cache for Redis
PowerShell Az.RedisCache module
CLI Az Redis Create command
TLS security blog
I hope this can be useful !!!

by Scott Muniz | Aug 7, 2020 | Uncategorized
This article is contributed. See the original author and article here.
Scenario:
Sometimes we need to know what happened to some Redis keys. We expected to read the keys from Redis service, but the keys disappeared.
Some times the keys were deleted or evicted, other times the TTL expired and we are not aware of that.
In these cases to monitor operations in the keys, we can enable the Redis Keyspace Notifications as described here to receive a notification when something happen: https://redis.io/topics/notifications
There are a list of Redis events that can be monitored as described in Events generated by different commands section in the Redis.io documentation.
Keyspace notifications allow clients to subscribe to two channels in order to receive events affecting the Redis data set in some way. Examples of the events that are possible to receive are the following:
- All the commands affecting a given key.
- All the keys receiving an specific operation (Set, Delete, etc)
- All the keys expiring in the database.
Keyspace notifications are implemented by sending two distinct types of events for every operation affecting the Redis data space:
- Key-space notification: to monitor specific keys
- Key-event notification: to monitor specific events
By default keyspace notifications are disabled because may have some impact on the Redis performance using some CPU power.
Actions:
To enable Keyspace notifications and receive the events, first we need to enable and configure the Redis notification Keyspace.
When using Azure Cache for Redis, Keyspace notifications can be enabled in Azure Portal, on Redis blade.
Setting the parameter to the empty string disables notifications. In order to enable the feature a non-empty string is used, composed of multiple characters, where every character has a special meaning according to the following table:
K     Keyspace events, published with __keyspace@<db>__ prefix.
E     Keyevent events, published with __keyevent@<db>__ prefix.
g     Generic commands (non-type specific) like DEL, EXPIRE, RENAME, ...
$     String commands
l     List commands
s     Set commands
h     Hash commands
z     Sorted set commands
t     Stream commands
x     Expired events (events generated every time a key expires)
e     Evicted events (events generated when a key is evicted for maxmemory)
m     Key miss events (events generated when a key that doesn't exist is accessed)
A     Alias for "g$lshztxe", so that the "AKE" string means all the events except "m".
At least K or E should be present in the string, otherwise no event will be delivered regardless of the rest of the string.
For instance to enable just Key-space events for lists, the configuration parameter must be set to Kl, and so forth.
The string KEA can be used to enable every possible event.
1. Enable and configure the Redis Keyspace notifications
– Using Azure Portal
As CONFIG command is not supported in Azure Cache for Redis, as described in this documentation, Redis commands not supported in Azure Cache for Redis, we will enable and configure the Redis notifications using Azure Portal. As example we will configure ‘AKE’ to receive all notifications. As described in the table above, we may want to configure only some type of notifications.
To Enable Redis notifications using Azure Portal, we need:
– In Azure Portal, on Redis blade, click on “Advanced Settings” at the left.
– In Notify-Keyspace-Events box, write “AKE”
– Save the changes

With that, we enabled Redis Keyspace for all notifications. Removing all the text leaving a empty box and saving, will disable the Redis Keyspace notifications.
2. Subscribing Keyspace notifications
As described above, two types of events can be subscribed using PSUBSCRIBE command, in this format:
 psubscribe __keyspace@<database>__:<mykey>
 psubscribe __keyevent@<database>__:<operation>
– using Azure portal console:
In this case we will use the psubscribe command using Redis Console available in Azure Portal to subscribe both types of events in any database, for all events and all keys:
psubscribe '__key*__:*'
– using Redis-cli console:
The same as above using redis-cli console command line:
redis-cli --csv psubscribe '__key*__:*'
– using .NET (Stackexchange.Redis) application:
Using Stackexchange.Redis client library to subscribe notifications, we may need to develop some app and use this Class. To subscribe just call NotificationsExample method passing the connection as ConnectionMultiplexer object, in the method parameter:
class RedisKeyspaceNotifications
    {
        /// <summary>
        /// NOTE: For this sample to work, you need to go to the Azure Portal and configure keyspace notifications with "Kxge$" to
        ///       1) turn on expiration notifications (x),
        ///       2) general command notices (g) and
        ///       3) Evicted events (e).
        ///       4) STRING operations ($).
        ///       or AKE for all events, all notifications
        /// IMPORTANT
        ///       1) MAKE SURE YOU UNDERSTAND THE PERFORMANCE IMPACT OF TURNING ON KEYSPACE NOTIFICATIONS BEFORE PROCEEDING
        ///          See http://redis.io/topics/notifications for more details
        ///       2) THIS DOES NOT WORK CORRECTLY ON CLUSTERED REDIS INSTANCES
        ///          See https://github.com/StackExchange/StackExchange.Redis/issues/789 for details
        public static void NotificationsExample(ConnectionMultiplexer connection)
        {
            var subscriber = connection.GetSubscriber();
            string db = "*"; // default db is 0 - Redis DB do you want notifications

            // ----------------------------------------------------------------------
            // subscribing the channel keyspace
            // ----------------------------------------------------------------------
            // keyspace
            string notificationChannel = "__keyspace@" + db + "__:*";             // all events - The Key-space channel receives as message the name of the event.
            //string notificationChannel = "__keyspace@" + db + "__:key25";         // only key25 events

            // keyevent
            //string notificationChannel = "__keyevent@" + db + "__:set";           // all set
            //string notificationChannel = "__keyevent@" + db + "__:del";           // all del
            //string notificationChannel = "__keyevent@" + db + "__:rename_to";     // all rename to
            //string notificationChannel = "__keyevent@" + db + "__:rename_from";   // all rename from
            //string notificationChannel = "__keyevent@" + db + "__:expired";       // all expired
            //string notificationChannel = "__keyevent@" + db + "__:evicted";       // all evicted
            // ----------------------------------------------------------------------
            // ----------------------------------------------------------------------


            Console.WriteLine("Subscribed to notifications...: " + notificationChannel);


            //--------------------------------------------------
            // we only have to do this once, then your callback will be invoked.
            //--------------------------------------------------
            subscriber.Subscribe(notificationChannel, (channel, notificationType) =>
            {
                var msg = GetKey(channel);
                switch (notificationType) // use "Kxge" keyspace notification options to enable all of the below...
                {
                    // looking for some events
                    case "expire": // requires the "Kg" keyspace notification options to be enabled
                        Console.WriteLine("Expiration Set for Key: " + msg);
                        break;
                    case "expired": // requires the "Kx" keyspace notification options to be enabled
                        Console.WriteLine("Key EXPIRED: " + msg);
                        break;
                    case "rename_from": // requires the "Kg" keyspace notification option to be enabled
                        Console.WriteLine("Key RENAME(From): " + msg);
                        break;
                    case "rename_to": // requires the "Kg" keyspace notification option to be enabled
                        Console.WriteLine("Key RENAME(To): " + msg);
                        break;
                    case "del": // requires the "Kg" keyspace notification option to be enabled
                        Console.WriteLine("KEY DELETED: " + msg);
                        break;
                    case "evicted": // requires the "Ke" keyspace notification option to be enabled
                        Console.WriteLine("KEY EVICTED: " + msg);
                        break;
                    case "set": // requires the "K$" keyspace notification option to be enabled for STRING operations
                        Console.WriteLine("KEY SET: " + msg);
                        break;

                    // other events may be added following https://redis.io/topics/notifications - events section

                    // looking for other events
                    default:
                        Console.WriteLine("KEY " + notificationType + ": " + msg);
                        break;
                }
            });


        private static string GetKey(string channel)
        {
            var index = channel.IndexOf(':');
            if (index >= 0 && index < channel.Length - 1)
                return channel.Substring(index + 1);

            //we didn't find the delimeter, so just return the whole thing
            return channel;
        }
    }
From: JonCole RedisKeyspaceNotifications Example
3. Receiving notifications
The notifications will be received in the same console application used to subscribe the Keyspace notifications.
To test and run some command to fire some events, we need to open a different console application (or running our dev/test/prod application).
Below we used Redis Console available in Azure Portal.
In Azure Redis console 1 we can see:
- in blue, the result of subscribing both types of events in any database, for all events and all keys, using the command above.
After setting ‘key1’ with value ‘value1’ (using Azure Redis console 2), we can see the notifications in console 1:
- in pink – the keyspace notification for key ‘key1’
- in red – the keyevent notification for command ‘set’

Because we subscribed both types of events (keyspace and keyevent), we received two notifications.
The command ran in Azure Redis console 2 was setting ‘key1’ with value ‘value1’:

Conclusion:
There are a few other methods to monitor Redis instances. Specially using Azure Cache for Redis, we have Azure Monitor, Metrics, Alerts and Diagnostics features to Monitor Redis instances.
Redis Keyspace Notifications allow us to monitor some specific key or some specific operations apart of all other notifications.
Related documentation:
Azure Monitor for Azure Cache for Redis (preview)
Azure Redis Metrics with Azure Monitor
Azure Alerts for Azure Redis
Activity Logs for Azure Redis
Diagnostic Settings
I hope this can be useful !!!

Recent Comments