
by Contributed | Dec 14, 2020 | Business, Microsoft, Technology, Tips and Tricks
This article is contributed. See the original author and article here.
Hi there, I am Matt Balzan, and I am a Microsoft Modern Workplace Customer Engineer who specializes in SCCM, APP-V and SSRS/PowerBI reporting.
Today I am going to show you how to write up SQL queries, then use them in SSRS to push out beautiful dashboards, good enough to send to your boss and hopefully win that promotion you’ve been gambling on!
INGREDIENTS
- Microsoft SQL Server Management Studio (download from here)
- A SQL query
- Report Builder
- Your brain
Now that you have checked all the above, let us first go down memory lane and do a recap on SQL.
WHAT EXACTLY IS SQL?
SQL (Structured Query Language) is a standard language created in the early 70s for storing, manipulating and retrieving data in databases.
Does this mean that if I have a database with data stored in it, I can use the SQL [or T-SQL] language to grab the data based on conditions and filters I apply to it? Yep, you sure can!
A database is made up of tables and views and many more items but to keep things simple we are only interested in the tables and views.
Your table/view will contain columns with headers and in the rows is where all the data is stored.

The rows are made up of these columns which contain cells of data. Each cell can be designed to have text, datetime, integers. Some cells can have no values (or NULL values) and some are mandatory to have data in them. These settings are usual setup by the database developer. But thankfully, for reporting we need not worry about this. What we need is data for our reports, and to look for data, we use t-SQL!
But wait! – I have seen these queries on the web, and they all look double-Dutch to me!
No need to worry, I will show you how to read these bad boys with ease!
ANATOMY OF A SQL QUERY
We have all been there before, someone sent you a SQL query snippet or you were browsing for a specific SQL query and you wasted the whole day trying to decipher the darn thing!
Here is one just for simplicity:
select Name0,Operating_System_Name_and0 from v_R_System where Operating_System_Name_and0 like ‘%server%’
My quick trick here is to go to an online SQL formatter, there are many of these sites but I find this one to be perfect for the job: https://sql-format.com/
Simply paste the code in and press the FORMAT button and BOOM!

Wow, what a difference!!! Now that all the syntax has been highlighted and arranged, copy the script, open SSMS, click New Query, paste the script in it and press F5 to execute the query.
This is what happens:

- The SELECT command tells the query to grab data, however in this case it will only display 2 columns (use asterisk * to get all the columns in the view)
- FROM the v_R_System view
- WHERE the column name contains the keyword called server using the LIKE operator (the % tells the filter to bring back zero, one, or multiple characters)
- The rows of data are then returned in the Results pane. In this example only all the server names are returned.
TIPS!
Try to keep all the commands in CAPITALS – this is good practice and helps make the code stand out for easier reading!
ALWAYS use single quotes for anything you are directing SQL to. One common mistake is to use code copied from the browser or emails which have different font types. Paste your code in Notepad and then copy them out after.
Here is another example: Grab all the rows of data and all the columns from the v_Collections view.
SELECT * FROM v_Collections
The asterisk * means give me every man and his dog. (Please be mindful when using this on huge databases as the query could impact SQL performance!)
Sometimes you need data from different views. This query contains a JOIN of two views:
SELECT vc.CollectionName
,vc.MemberCount
FROM v_Collections AS vc
INNER JOIN v_Collections_G AS cg ON cg.CollectionID = vc.CollectionID
WHERE vc.CollectionName LIKE ‘%desktop%‘
ORDER BY vc.CollectionName DESC
OK, so here is the above query breakdown:
- Grab only the data in the column called vc.CollectionName and vc.MemberCount from the v_Collections view
- But first JOIN the view v_Collections_G using the common column CollectionID (this is the relating column that both views have!)
- HOWEVER, only filter the data that has the word ‘desktop‘ in the CollectionName column.
- Finally, order the list of collection names in descending order.
SIDE NOTE: The command AS is used to create an alias of a table, view or column name – this can be anything but generally admin folk use acronyms of the names (example: v_collections will be vc) – Also noteworthy, is that when you JOIN tables or VIEWS you will need to create the aliases, they probably might have the same column names, so the alias also solves the problem of getting all of the joined columns mixed up.
T-SQL reference guide: https://docs.microsoft.com/en-us/sql/t-sql/language-reference?view=sql-server-ver15
OK, SO WHAT MAKES A GOOD REPORT?
It needs the following:
- A script that runs efficiently and does not impact the SQL server performance.
- The script needs to be written so that if you decide to leave the place where you work, others can understand and follow it!
- Finally, it needs to make sense to the audience who is going to view it – Try not to over engineer it – keep it simple, short and sweet.
SCENARIO: My customer wants to have a Task Sequence report which contains their company logo, the task sequence steps and output result for each step that is run, showing the last step run.
In my lab I will use the following scripts. The first one is the main one, it will join the v_r_System view to the vSMS_TaskSequenceExecutionStatus view so that I can grab the task sequence data and the name of the device.
SELECT vrs.Name0
,[PackageID]
,[AdvertisementID]
,vrs.ResourceID
,[ExecutionTime]
,[Step]
,[GroupName]
,[ActionName]
,[LastStatusMsgID]
,[LastStatusMsgName]
,[ExitCode]
,[ActionOutput]
FROM [vSMS_TaskSequenceExecutionStatus] AS vtse
JOIN v_R_System AS vrs ON vrs.ResourceID = vtse.ResourceID
WHERE AdvertisementID = @ADVERTID
ORDER BY ExecutionTime DESC
The second script is for the @ADVERTID parameter – When the report is launched, the user will be prompted to choose a task sequence which has been deployed to a collection. This @ADVERTID parameter gets passed to the first script, which in turn runs the query to grab all the task sequence data rows.
Also highlighted below, the second script concatenates the column name pkg.Name (this is the name of the Task Seq) with the word ‘ to ‘ and also with the column name col.Name (this is the name of the Collection), then it binds it altogether as a new column called AdvertisementName.
So, for example purposes, the output will be: INSTALL SERVER APPS to ALL DESKTOPS AND SERVERS – this is great, as we now know which task sequence is being deployed to what collection!
SELECT DISTINCT
adv.AdvertisementID,
col.Name AS Collection,
pkg.Name AS Name,
pkg.Name + ‘ to ‘ + col.Name AS AdvertismentName
FROM v_Advertisement adv
JOIN (SELECT
PackageID,
Name
FROM v_Package) AS pkg
ON pkg.PackageID = adv.PackageID
JOIN v_TaskExecutionStatus ts
ON adv.AdvertisementID = (SELECT TOP 1 AdvertisementID
FROM v_TaskExecutionStatus
WHERE AdvertisementID = adv.AdvertisementID)
JOIN v_Collection col
ON adv.CollectionID = col.CollectionID
ORDER BY Name
LET US BEGIN BY CREATING THE REPORT
- Open Microsoft Endpoint Configuration Manager Console and click on the Monitoring workspace.
- Right-click on REPORTS then click Create Report.
- Type in the name field – I used TASK SEQUENCE REPORT
- Type in the path field – I created a folder called _MATT (this way it sits right at the top of the folder list)
- Click Next and then Close – now the Report Builder will automatically launch.
- Click Run on the Report Builder popup and wait for the UI to launch. This is what it looks like:

STEP 1 – ADD THE DATA SOURCE

To get the data for our report, we need to make a connection to the server data source.
Right-click on Data Sources / Click Add Data Source… / Click Browse… / Click on Configmr_<yoursitecode> / Scroll down to the GUID starting with {5C63 and double-click it / Click Test Connection / Click OK and OK.
STEP 2 – ADD THE SQL QUERIES TO THEIR DATASETS

Copy your scripts / Right-click on Datasets / click on Add Dataset… / Type in the name of your dataset (no spaces allowed) / Select the radio button ‘Use a dataset embedded in my report’ / Choose your data source that was added in the previous step / Paste your copied script in the Query window and click OK / Click the radio button ‘Use the current Window user’ and click OK.
STEP 3 – ADJUST THE PARAMETER PROPERTIES

Expand the Parameters folder / Right-click the parameter ADVERTID / Select the General tab, under the Prompt: field type DEPLOYMENT – leave all the other settings as they are.

Click on Available Values / Click the radio button ‘Get values from a query’ / for Dataset: choose ADVERTS, for Value field choose AdvertisementID and for Label field choose AdvertisementName / Click OK.
Now when the report first runs, the parameter properties will prompt the user with the DEPLOYMENT label and grab the results of the ADVERTS query – this will appear on the top of the report and look like this (remember the concatenated column?):

OK cool – but we are not done yet. Now for the fun part – adding content!
STEP 4 – ADDING A TITLE / LOGO / TABLE

Click the label to edit your title / change the font to SEGOE UI then move its position to the centre / Adjust some canvas space then remove the [&ExecutionTime] field.

From the ribbon Insert tab / click Image, find a space on your canvas then drag-click an area / Click Import…, choose ALL files (*.*) image types then find and add your logo / Click OK.

Next click on Table, choose Table Wizard… / Select the TASKSEQ dataset and click Next / Hold down shift key and select all the fields except PackageID, AdvertisementID & ResourceID.
Drag the highlighted fields to the Values box and click Next / Click Next to skip the layout options / Now choose the Generic style and click Finish.
Drag the table under the logo.
STEP 5 – SPIT POLISHING YOUR REPORT

* A Placeholder is a field where you can apply an expression for labels or text, you wish to show in your report.
In my example, I would like to show the Deployment name which is next to the Task Sequence title:

In the title text box, right-click at the end of the text TASK SEQUENCE: / Click Create Placeholder… / under Value: click on the fx button / click on Datasets / Click on ADVERTS and choose First(AdvertisementName).
Finally, I wanted the value in UPPERCASE and bold. To do this I changed the text value to: =UCASE(First(Fields!AdvertisementName.Value, “ADVERTS”)) , click on OK.
I then selected the <<Expr>> and changed the font to BOLD.
Do not forget to save your report into your folder of choice!
Once you have finished all the above settings and tweaks, you should be good to run the report. Click the Run button from the top left corner in the Home ribbon.
If you followed all the above step by step, you should have now a report fit for your business – this is the output after a Deployment has been selected from the combo list:

- To test the Action Output column, I created a task sequence where I intentionally left some errors in the Run Command Line steps, just to show errors and draw out some detail.
- To avoid massive row height sizes, I set the cell for this column to font size 8.
- To give it that Azure report style look and feel, I only set the second row in the table with the top border being set. You can change this to your own specification.
Please feel free to download my report RDL file as a reference guide (Attachment on the bottom of this page)
LESSONS LEARNED FROM THE FIELD
- Best advice I give to my customers is to start by creating a storyboard. Draw it out on a sheet of blank or grid paper which gives you an idea where to begin.
- What data do you need to monitor or report on?
- How long do these scripts take to run? Test them in SQL SERVER MANAGEMENT STUDIO and note the time in the Results pane.
- Use the free online SQL formatting tools to create proper readable SQL queries for the rest of the world to understand!
- Who will have access to these reports? Ensure proper RBAC is in place.
- What is the target audience? You need to keep in mind some people will not understand the technology of the data.
COMING NEXT TIME…
My next blog will go into a deep dive in report design. I will show you how to manipulate content based on values using expressions, conditional formatting, design tips, best practices and much more….Thanks for reading, keep smiling and stay safe!
DISCLAIMER
The sample files are not supported under any Microsoft standard support program or service. The sample files are provided AS IS without warranty of any kind. Microsoft further disclaims all implied warranties including, without limitation, any implied warranties of merchantability or of fitness for a particular purpose. The entire risk arising out of the use or performance of the sample files and documentation remains with you. In no event shall Microsoft, its authors, or anyone else involved in the creation, production, or delivery of the files be liable for any damages whatsoever (including, without limitation, damages for loss of business profits, business interruption, loss of business information, or other pecuniary loss) arising out of the use of or inability to use the sample scripts or documentation, even if Microsoft has been advised of the possibility of such damages.
Matt Balzan | Modern Workplace Customer Engineer | SCCM, Application Virtualisation, SSRS / PowerBI Reporting
by Contributed | Dec 4, 2020 | Microsoft 365, Office 365, Technology, Tips and Tricks
This article is contributed. See the original author and article here.
Whether your team is working hybrid or working around the world, it’s always great to stay connected personally and professionally with members of your team. Many teams use scheduled get-together meetings in Teams to hold book clubs, celebrate a special moment, or just gather together and catch up on weekend plans. Conversations are always central in these meet ups – but we also know that every get together can be more fun and connecting with quizzes and games. Within Microsoft Teams, there are several good options for hosting these events, virtually.
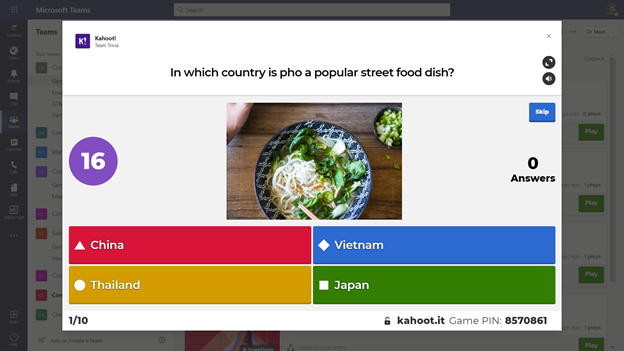
Running Kahoot! Quizzes and Trivia in your meeting
Who doesn’t love great trivia or a friendly competitive quiz? For hosting these for your team, a good option is to use Kahoot! – which is available as a standalone app and with an associated integration directly within Microsoft Teams. Kahoots are engaging quizzes and challenges you can create and re-use within your team. These quizzes can be questions for learning or adding interactivity to presentation experiences, and in addition, you can also use Kahoot! to create team trivia challenges for your next team gathering.
With the Kahoot integration inside of Microsoft Teams, you can see a dashboard of your designed Kahoots, and use them during meetings to spur friendly competition. Before the meeting, design your Kahoots and add questions and answers. In addition to exploring and using questions from popular Kahoots via the Discover option, consider mixing in various forms of general trivia, trivia specific to topics for your team, or maybe trivia about your team specifically.
When it is time for the meeting itself, you can launch a Kahoot from the Kahoot app tab within Teams. Expand the Kahoot! gameplay window, and then share that during a meeting by sharing your screen. Make sure to use the Include computer sound option when you share. Once the Kahoot! gameplay screen is shared, attendees can join in and answer questions from their own devices. Answering question quickly matters, and you’ll soon see a friendly competition bloom. You can find out more about Kahoot! on kahoot.com, and you can add the Kahoot! integration for Microsoft Teams from AppSource.
Using Jackbox Games with Microsoft Teams screen sharing
Jackbox Games are the makers of several party games that are great to play together in person or virtually. From speech games like Talking Points to drawing games like Drawful and witty quip games like Quiplash – there are a wide variety of games and styles to suit every taste. Most games run for about 15-25 minutes with straightforward rules and quick tutorials, so they are easy to pick up and play. Most games support up to 8-10 players, and some have additional audience viewing options if you have extra visitors.
Jackbox Games are available for a wide variety of devices and consoles, but if you want to use Jackbox within a virtual Microsoft Teams streaming session, we’d recommend getting Jackbox on your PC or Mac. The host of the virtual get-together will need a copy; the attendees in the meeting can follow along on their devices. Every player will join the meeting and then connect to the Jackbox game with a room code – which they can do in a web browser or on a separate device, like their phone. It is easy and takes seconds to get everyone started on a game.
You’ll likely want to use Steam – a service for purchasing and installing games – to get Jackbox games. These games come in Party Packs of 5 games each – so each Party Pack provides a lot of choices for different gameplay styles. No one will be bored, and any party pack will work well – the most recent Jackbox Party Pack 7 features both Quiplash 3 and Blather ‘Round which work well in virtual game settings.
As you host your virtual get-together, you’ll want to start up the Jackbox Party pack of your choice. Use the screen sharing option in Teams, and make sure you check the “Include computer sound” option.

From there, start up a game and your room code will be visible, and attendees can join in.
Tips for using Jackbox Games in a Teams meeting
As you start your Jackbox Games, we recommend a couple of options:
In almost every Jackbox Game, there is a “Family Friendly” checkbox – you may want to consider checking that for your work conversations.
In a few Jackbox Games, there is also an option to filter out US-centric content, if you want to have questions or prompts that are more broadly relevant to teammates around the world.

Also, to keep the sound of the game from potentially drowning out your virtual guests and conversation while attending, in some cases you may want to consider turning down the background music.

Also, some more advanced tips can help your virtual party even more:
- If you have it, hosting a game with two screens (e.g., your laptop screen plus a plugged-in monitor) can work better, as you can place Teams on one screen and Jackbox on the other. That way, it is always easy to see your teammates and the game at the same time.
- Using headphones can also help with isolating the sound of the game from the conversation.
We hope you get to explore the wide variety of games and quiz options for having fun, virtually, with your teammates. While the centerpiece of any virtual gathering is the conversations that you’ll have virtual activities through Kahoot! and Jackbox Games, you can help to break the ice, provide some memorable experiences, and heck – have some fun! – in almost any meeting you run.
by Scott Muniz | Nov 26, 2020 | Security, Technology, Tips and Tricks
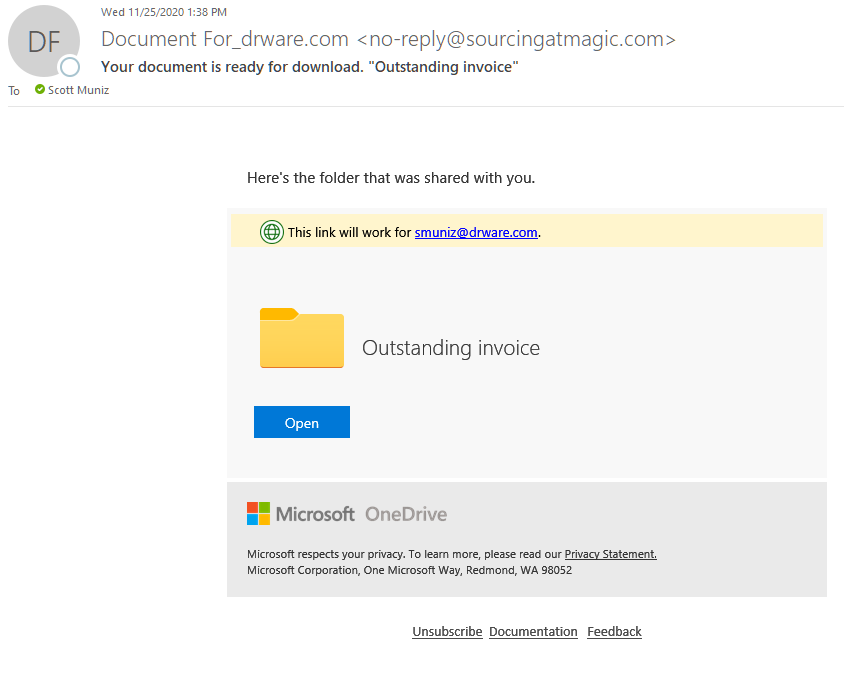
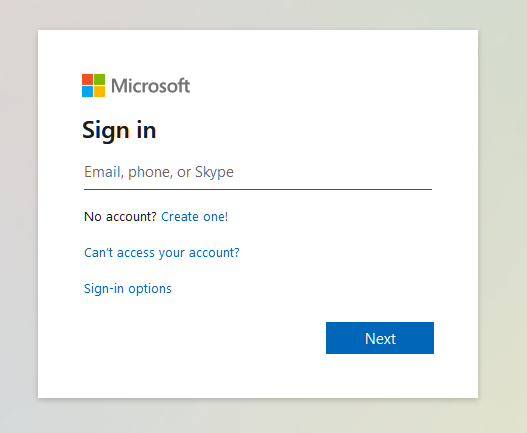
The OneDrive phishing scam is particularly dangerous because of how insidious it is. A seemingly innocuous email shows up in your Inbox with a subject something like this, “Document for [your name].” In the body of the email you see what looks like a familiar OneDrive notice about an available document that has been shared with you by someone you know. Upon clicking on the link or the folder you are forwarded to a familiar Microsoft 365 sign in box.

You enter your email, which is accepted, and then you enter your password, which fails on the first attempt but succeeds on the second. You may end up at office.com or OneDrive but you don’t have access or you don’t see the shared document. At this point you may become suspicious but it’s too late. They now have your Microsoft 365 email and password. They can get into your email, send spam in your name, see/edit/delete your OneDrive files. If you have administrative privileges they can wreak even more havoc. How can you avoid this scam?
How to Vet Your Email Messages
Every email that appears in your Inbox should be vetted no matter if it’s from a friend or foe (see image below).
- Are you expecting this email?
- Check the “sender,” not just the name, but also the email address.
- Hover over (don’t click) all links. A bubble will appear with the link destination.
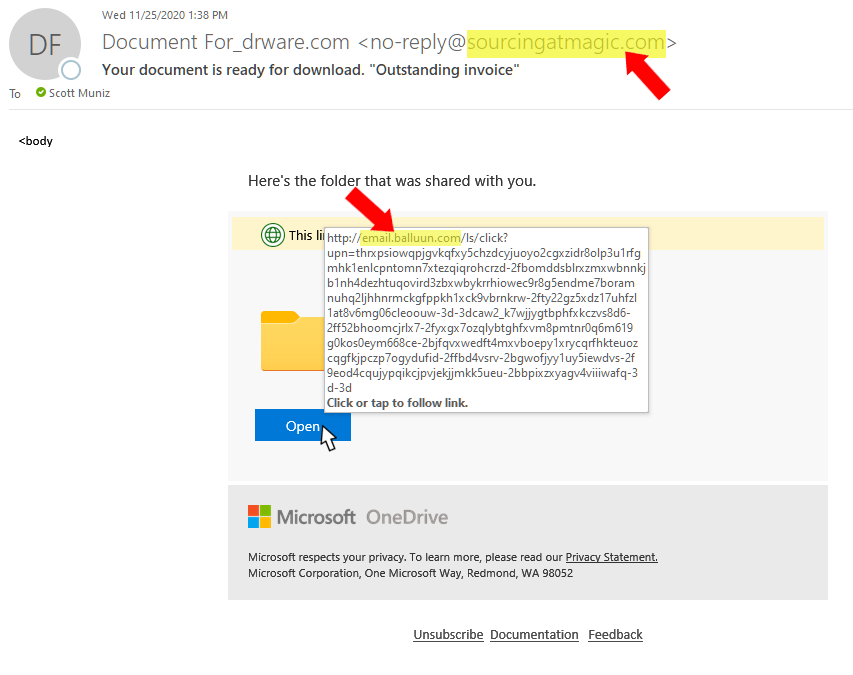
Now you’re equipped with all the information you need. If this is not an expected email then do not click on anything and contact the sender to see if they actually sent you this message. If it is expected or typical for the sender still do steps 2 and 3 above. If either do not match then do not click on anything. You may still want to alert the sender so they can check to see if their email has been hacked.
Additional Steps
Multifactor authentication would completely prevent this type of attack. When your Microsoft 365 administrator activates multifactor authentication then each time you log into Microsoft 365 you are asked for a verification code via text or call. You might even use the Microsoft Authenticator app. This extra step thwarts scammers. Even if someone were to fall for this scam, and the scammer had their Microsoft 365 email and password, when the scammer tries using their credentials a text, call, or email would go to the real user for verification and that would stop the scammer in their tracks. It would also alert the user that their account has been compromised allowing them to take steps to change their password. I strongly recommend multifactor authentication.
The other usual steps are:
- Always keep your Windows OS up-to-date by activating automatic Windows updates.
- Keep your antivirus up-to-date and run frequent virus checks.
- Never ever give anyone your Microsoft 365 password and change it regularly.
- Listen to your gut. If it looks fishy (phishy) then delete it and call or text the sender
Online scams are on a meteoric rise. Diligence will keep you safe. Please be careful!
by Scott Muniz | Jun 27, 2020 | Technology, Tips and Tricks, Uncategorized
This article is contributed. See the original author and article here.

In this post I will demonstrate how to run Linux GUI (Graphical User Interface) applications on Windows Desktop platform.
For now, it is necessary to install a third-party App to run the GUI Apps, but Microsoft announced on //build 2020 that they will release soon an improvement that will not require any third-party component to run Linux GUI Apps on Windows Desktop.
Pre-requirements:
If you want to know how to install WSL on Windows 10, please check the following post:
 Using WSL2 in a Docker Linux container on Windows to run a Minecraft Java Server
Installing the X Server
The X server is a provider of graphics resources and keyboard/mouse events. I am using the VcXsrv Windows X Server that is open-source and is frequently update.
The first step is to install the third-part display manager called VcXsrv Windows X Server available at:
https://sourceforge.net/projects/vcxsrv/
During setup is important to disable the access control to avoid the permission denied error when trying to run a GUI application:

To warranty that the “Disable access control” will be always checked, save the configuration and always launch VcXsrv using the configuration file (config.xlaunch):

The next step is to set the DISPLAY environment variable on Linux to use the Windows host’s IP address as WSL2 and the Windows host are not in the same network device. It is necessary to run the following bash command to load the correct IP address on launch:
export DISPLAY="`grep nameserver /etc/resolv.conf | sed 's/nameserver //'`:0"
Running the following command, it is possible to see that the $DISPLAY environment variable now has the Windows Host’s IP set:
Echo $DISPLAY

To avoid having to run that command every time that WSL is launched, you can include the command at the end of the /etc/bash.bashrc file:

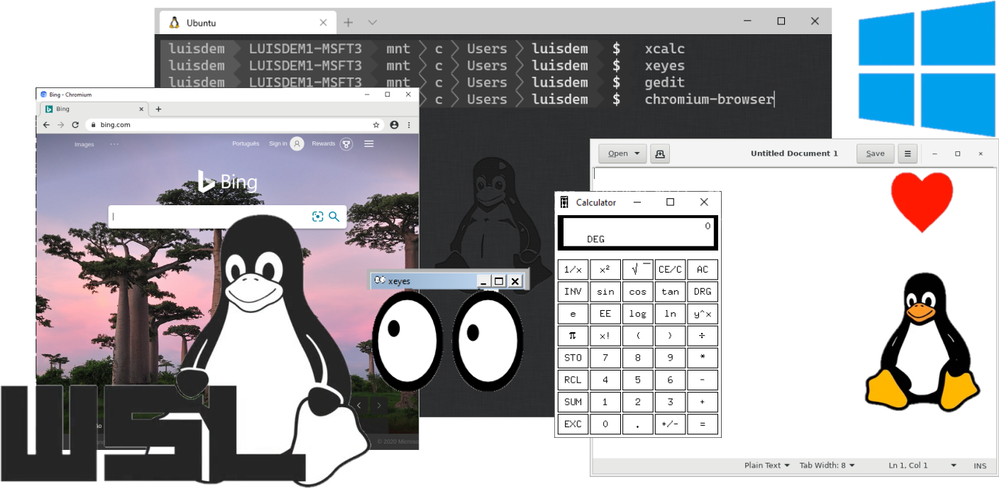
Done! Now you can run the Linux GUI Apps on Windows desktop.
Let’s try this out!
Follows some Apps that you can use to test:
Install Chromium Dev :
sudo add-apt-repository ppa:saiarcot895/chromium-dev
sudo apt-get update
sudo apt-get install chromium-browser
Install GEDIT:
sudo apt install gedit
gedit
Install x11-apps:
sudo apt install x11-apps
xeyes
xcalc
Make sure that XLaunch is running and before calling the Linux GUI Apps on Windows Desktop environment.


What about accessing the Linux Desktop Environment via RDP?
The first thing that you need to do is to install a Linux Desktop Environment. I will user Xfce as it is a lightweight one.
Run the following commands to install Xfce:
sudo apt install xfce4
The next step is to install the xrdp that provides a graphical login to remote machines using RDP (Microsoft Remote Desktop Protocol).
sudo apt install xrdp
Type the following command to get the WSL IP address:
ip a

Make sure that xrdp service is running:

Run the Remote Desktop Client (MSTSC) and type the WSL IP address to connect to xfce4:

Done! Now you can access your favorite Linux IDE on WSL.


In this post we see how to run GUI Linux Apps using XServer on Windows Desktop environment and how to access the full WSL Linux desktop environment.
I hope you liked!


Recent Comments