Azure Functions Auth via OpenAPI in 6 Ways

Azure Functions Auth via OpenAPI in 6 Ways

This article is contributed. See the original author and article here.

Azure security baseline for Azure Functions well describes the security consideration in general while developing an Azure Functions application. In addition to that, Azure Functions offers a built-in authentication method through the functions key. If you use the OpenAPI extension for Azure Functions, you can define the endpoint authentication and authorisation for each API endpoint in various ways. You can even try them through the Swagger UI page. Throughout this post, I’m going to discuss six different approaches for access control to Azure Functions API endpoints using the OpenAPI extension.


This GitHub repository contains the sample app used in this post.


OpenAPI Spec for Authentication


It could be a good idea to take a look at the authentication spec defined in OpenAPI before going further.


  • type: defines what type of authentication method will be used. Currently, it accepts API Key, HTTP, OAuth2, and OpenID Connect. But, the OpenAPI v2 spec doesn’t support the OpenID Connect.

  • name: declares the auth key name. It’s required for API Key.

  • in: defines the location of the auth key. It’s required for API Key and accepts query, header, or cookie.

  • scheme: declares the auth scheme. It’s required for HTTP auth and accepts either Basic or Bearer.

  • bearerFormat: uses JWT in most cases when using the Bearer token through the HTTP auth.

  • flows: is required for the OAuth2 auth. Its value can be implicit, password, clientCredentials, or authorizationCode.

  • openIdConnectUrl: is necessary for the OpenID Connect auth. However, it is advised to use either OAuth2 or Bearer auth for the OpenAPI v2 spec.


Based on the understandings above, let’s apply the different auth approach to Azure Function endpoints through the OpenAPI extension.


APK Key in Querystring


This is the built-in feature of Azure Functions. Let’s take a look at the code below. If you installed the OpenAPI extension, you could add the decorators. Spot on the OpenApiSecurityAttribute(…) decorator, which sets the value (line #6-9).


  • Type: SecuritySchemeType.ApiKey

  • In: OpenApiSecurityLocationType.Query

  • Name: code


    public static class ApiKeyInQueryAuthFlowHttpTrigger
{
[FunctionName(nameof(ApiKeyInQueryAuthFlowHttpTrigger))]
[OpenApiOperation(operationId: “apikey.query”, tags: new[] { “apikey” }, Summary = “API Key authentication code flow via querystring”, Description = “This shows the API Key authentication code flow via querystring”, Visibility = OpenApiVisibilityType.Important)]

[OpenApiSecurity(“apikeyquery_auth”,
SecuritySchemeType.ApiKey,
In = OpenApiSecurityLocationType.Query,
Name = “code”)]

[OpenApiResponseWithBody(statusCode: HttpStatusCode.OK, contentType: “application/json”, bodyType: typeof(Dictionary<string, string>), Summary = “successful operation”, Description = “successful operation”)]
public static async Task Run(
[HttpTrigger(AuthorizationLevel.Function, “GET”, Route = null)] HttpRequest req,
ILogger log)
{
log.LogInformation(“C# HTTP trigger function processed a request.”);

var queries = req.Query.ToDictionary(q => q.Key, q => (string) q.Value);
var result = new OkObjectResult(queries);

return await Task.FromResult(result).ConfigureAwait(false);
}
}


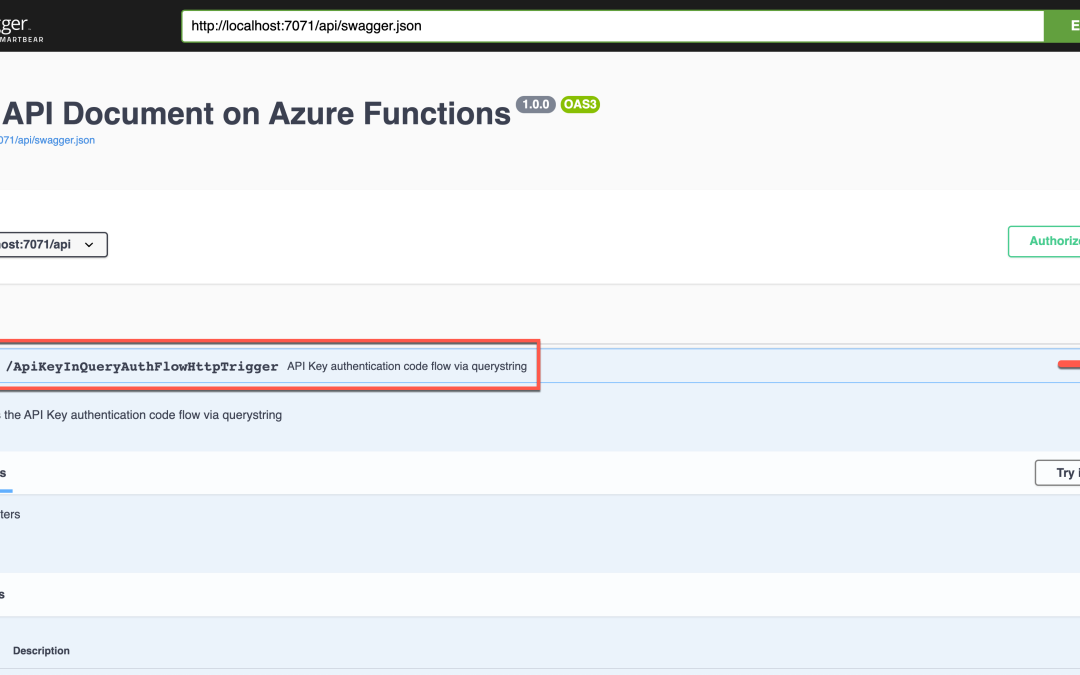
Run the function app, and you will see the Swagger UI page.


Swagger UI - Query


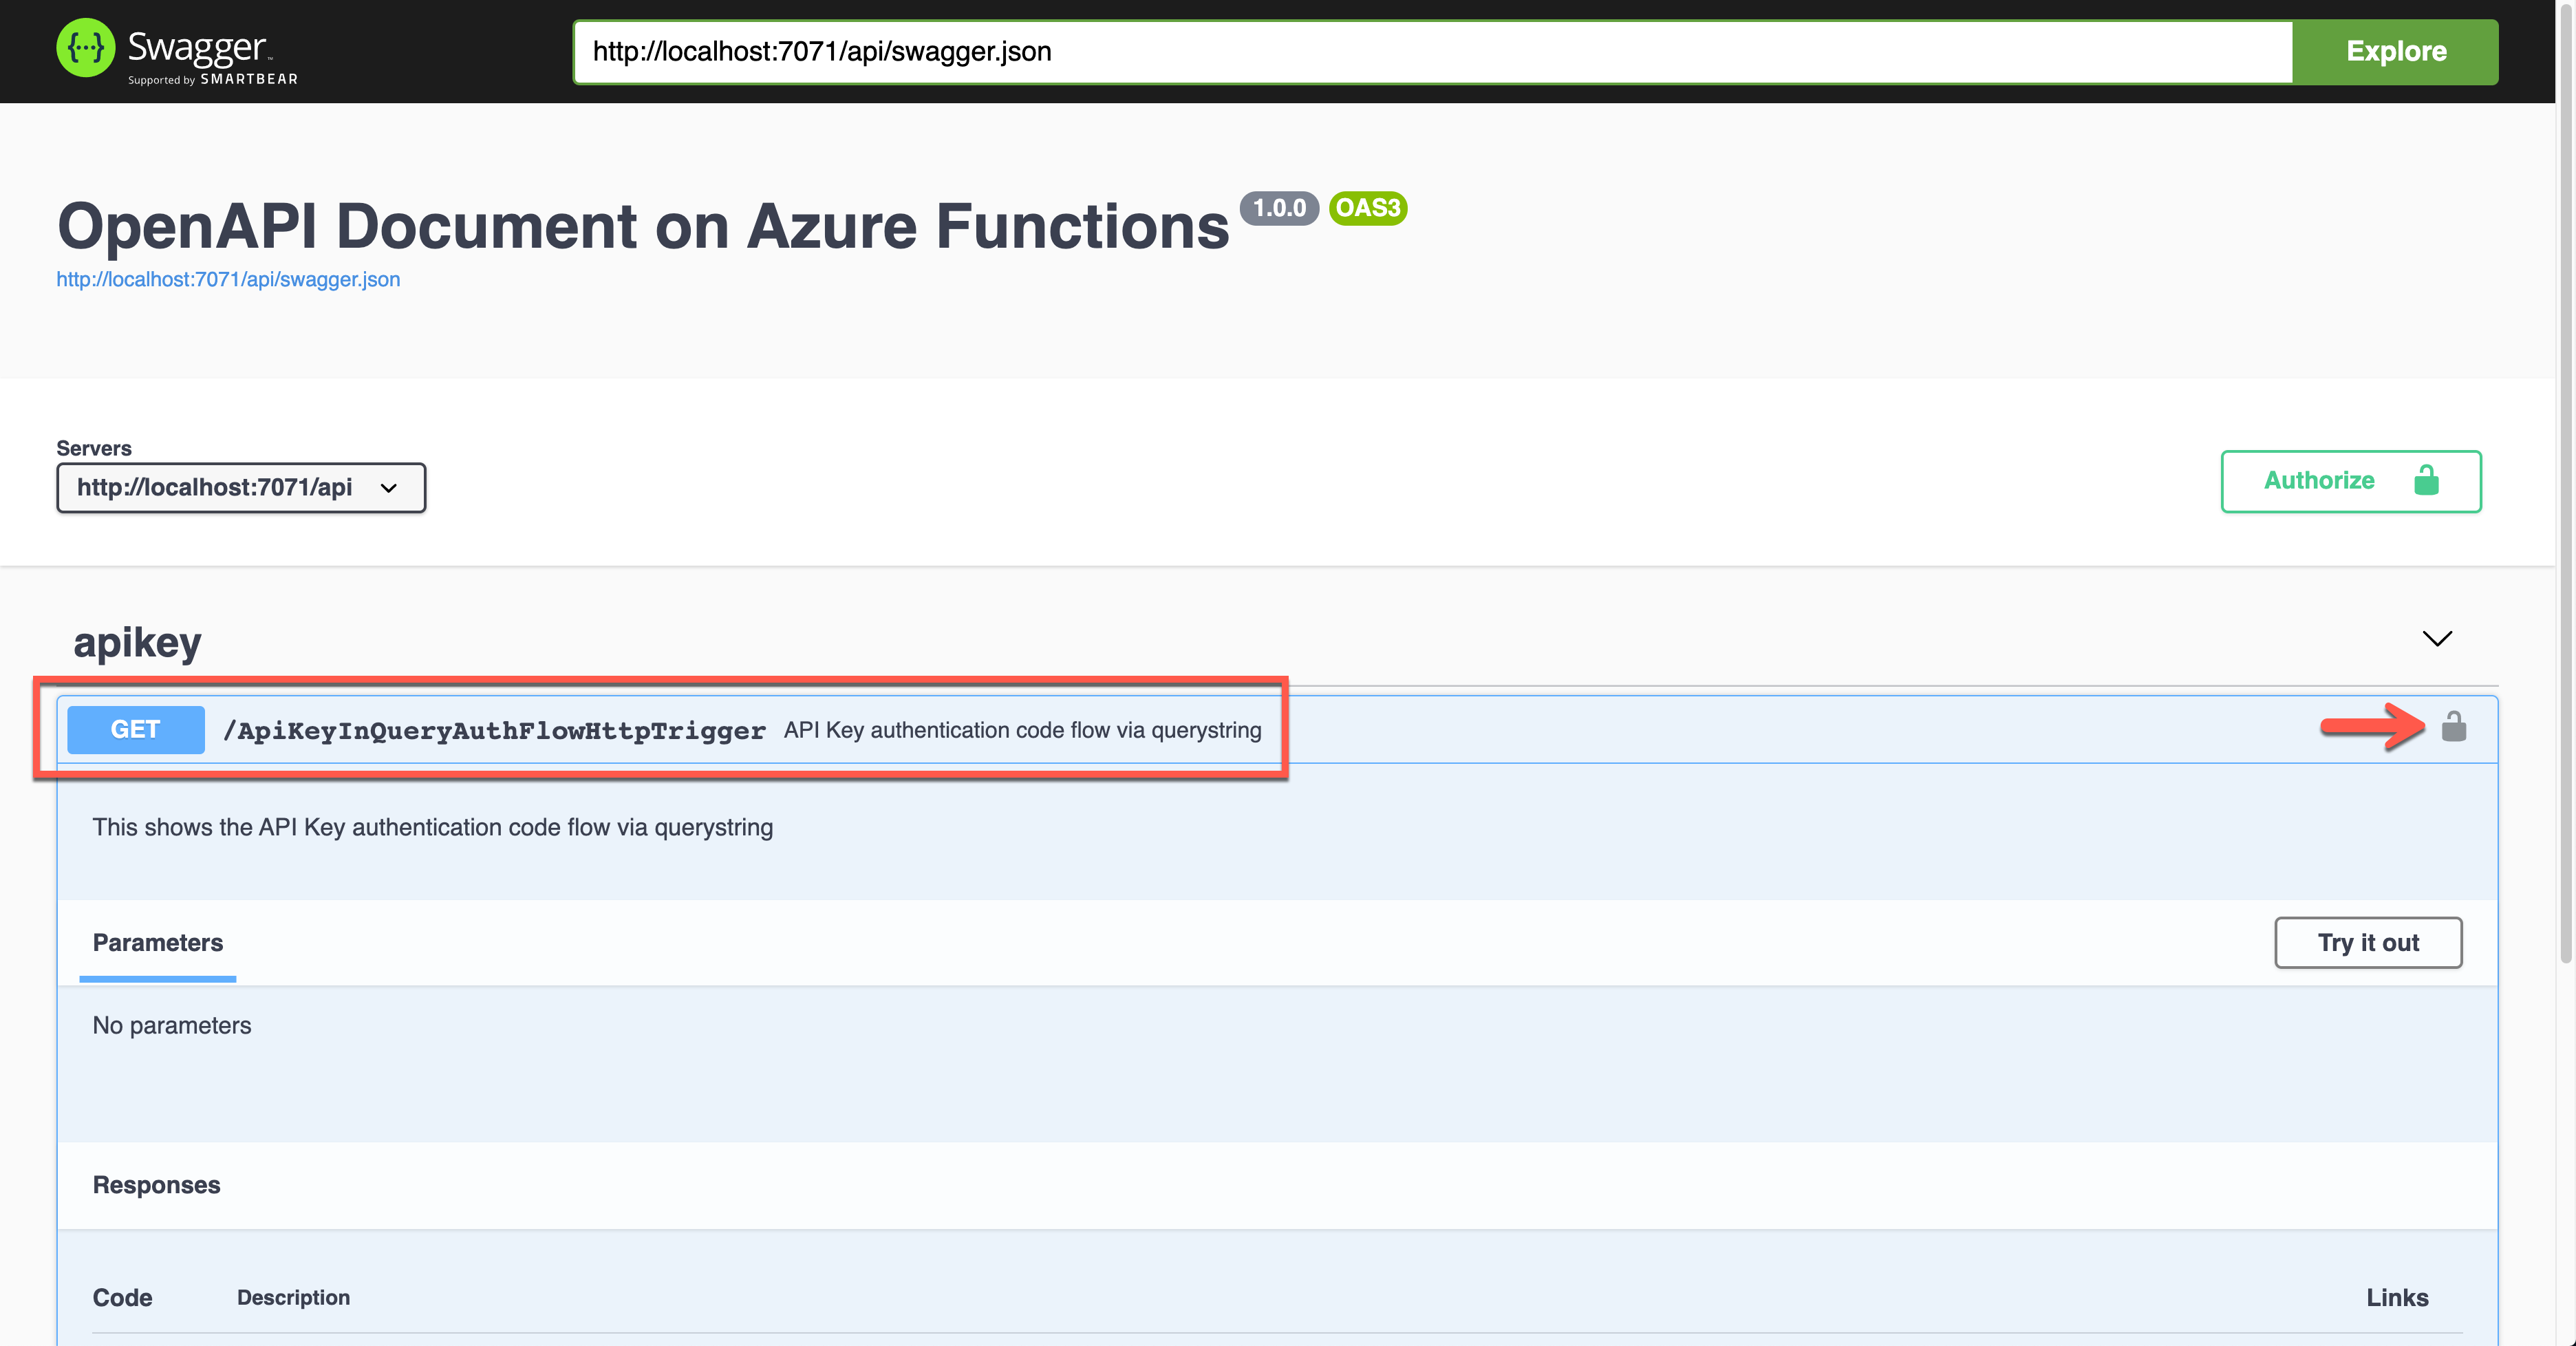
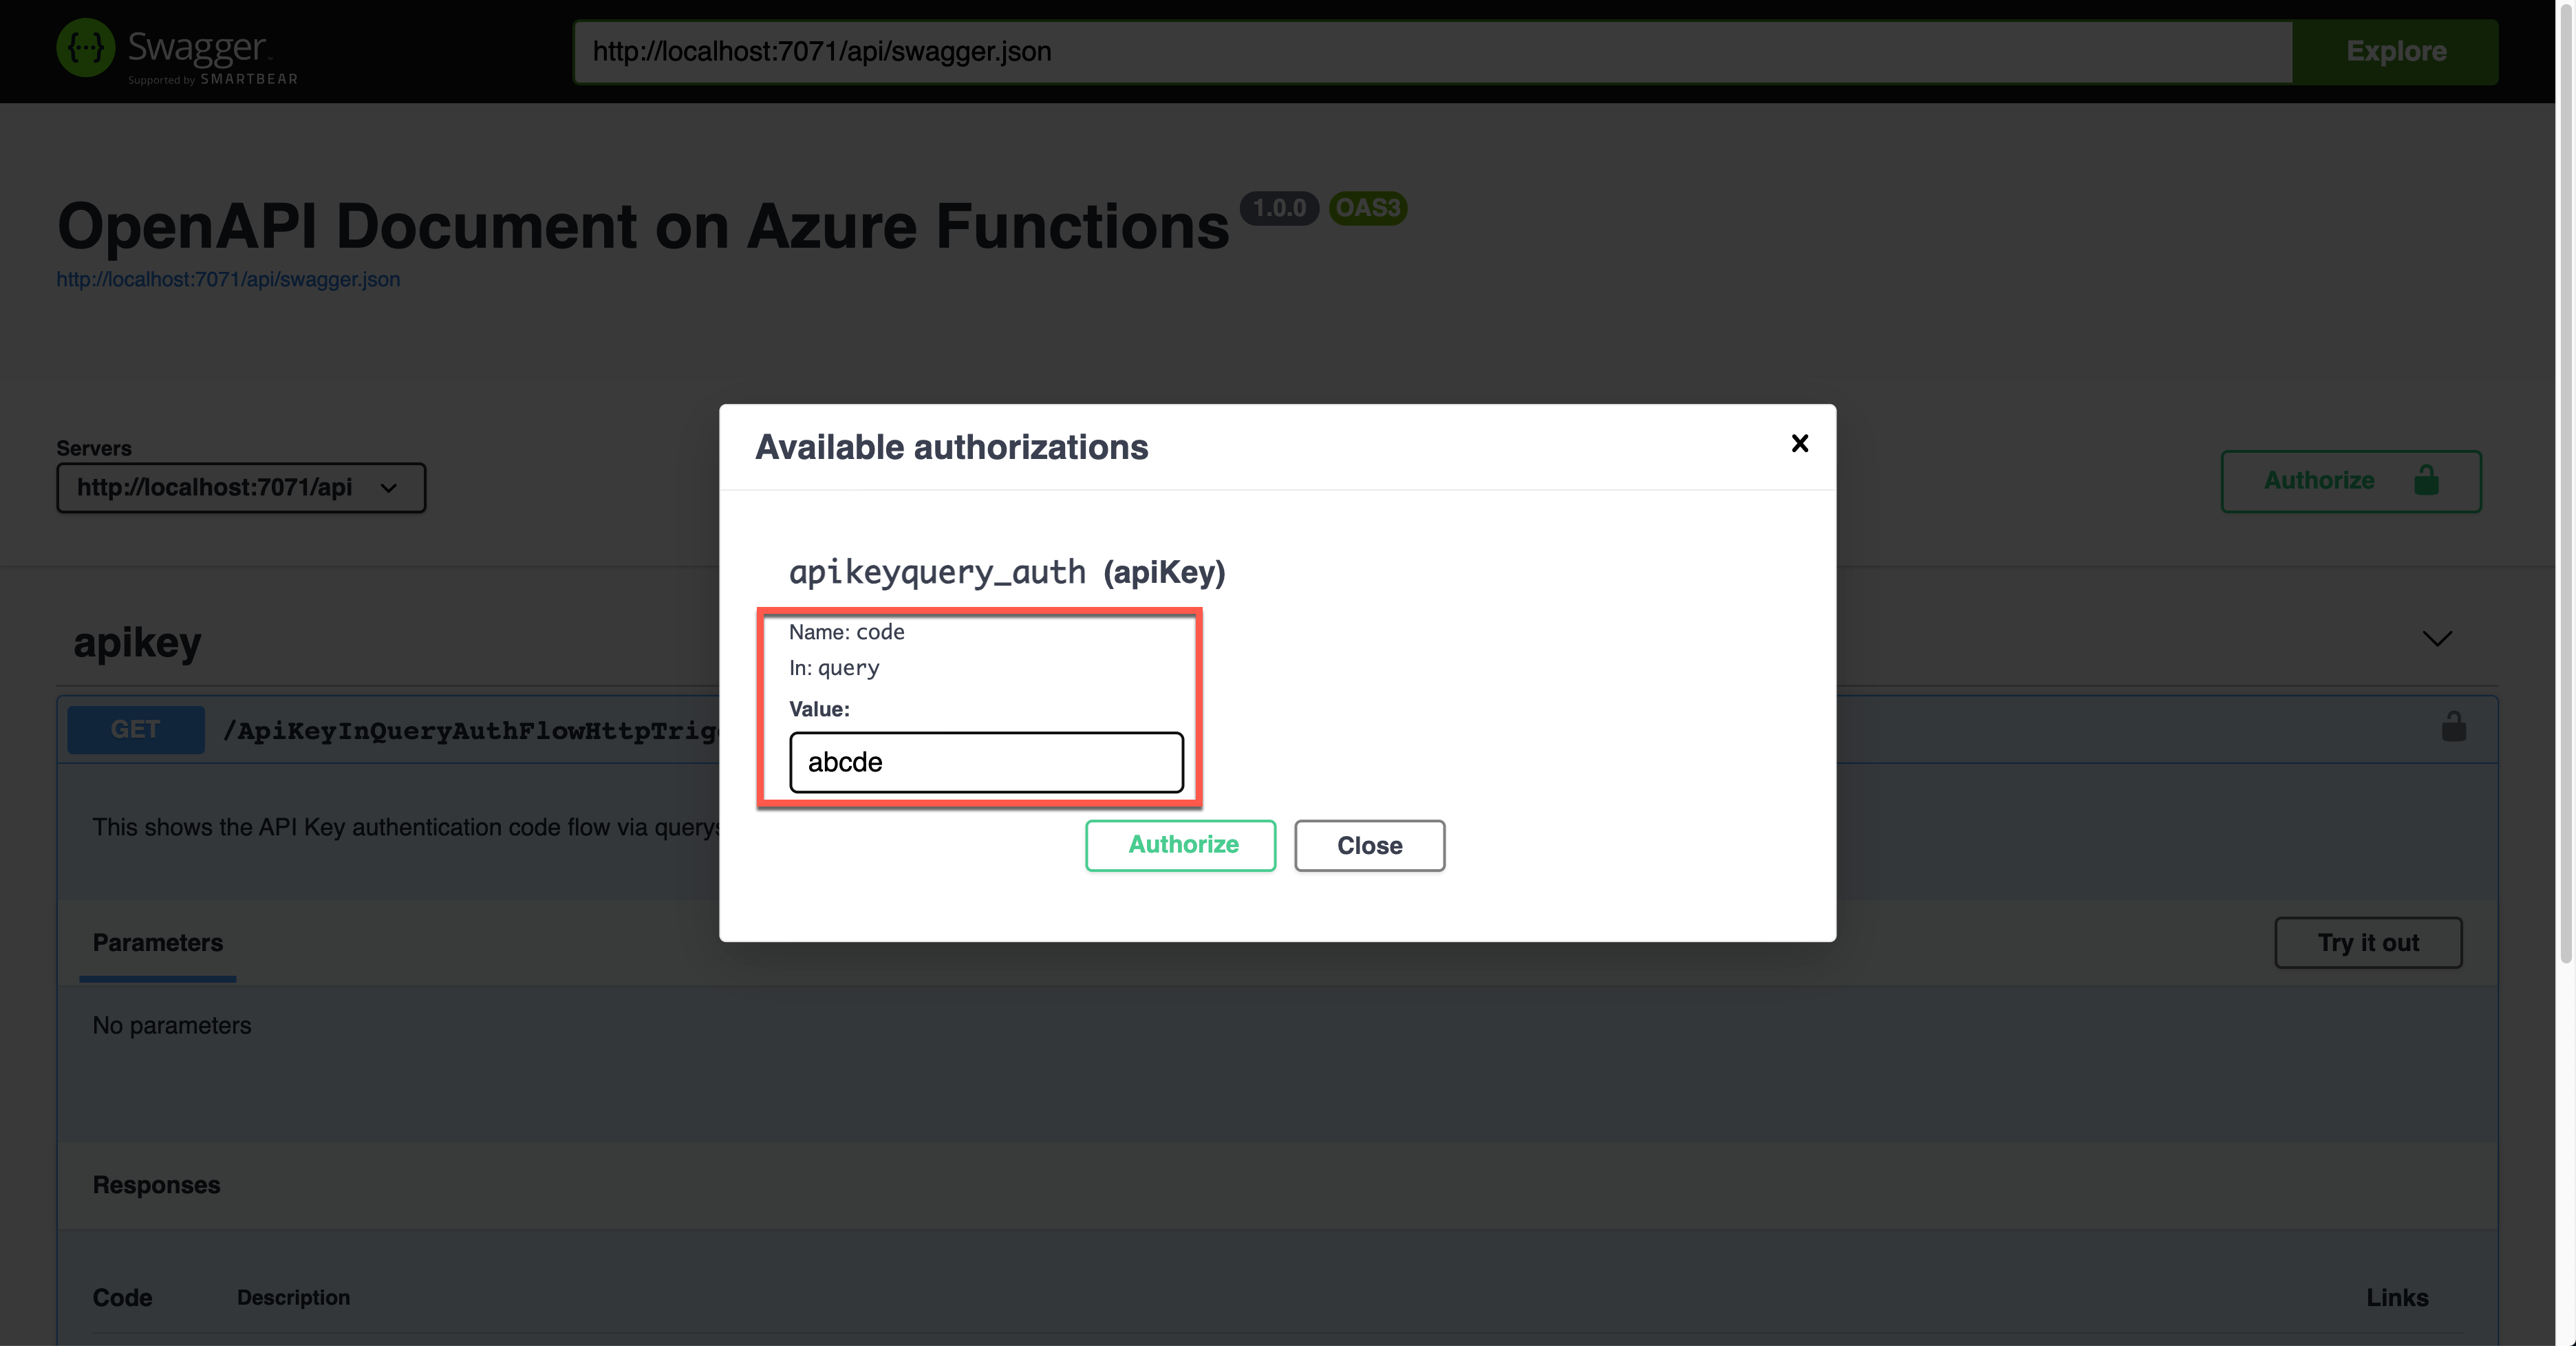
Click the lock button on the right-hand side to enter the API key value. This value will be appended to the querystring parameter.


Swagger UI - Query - API Key


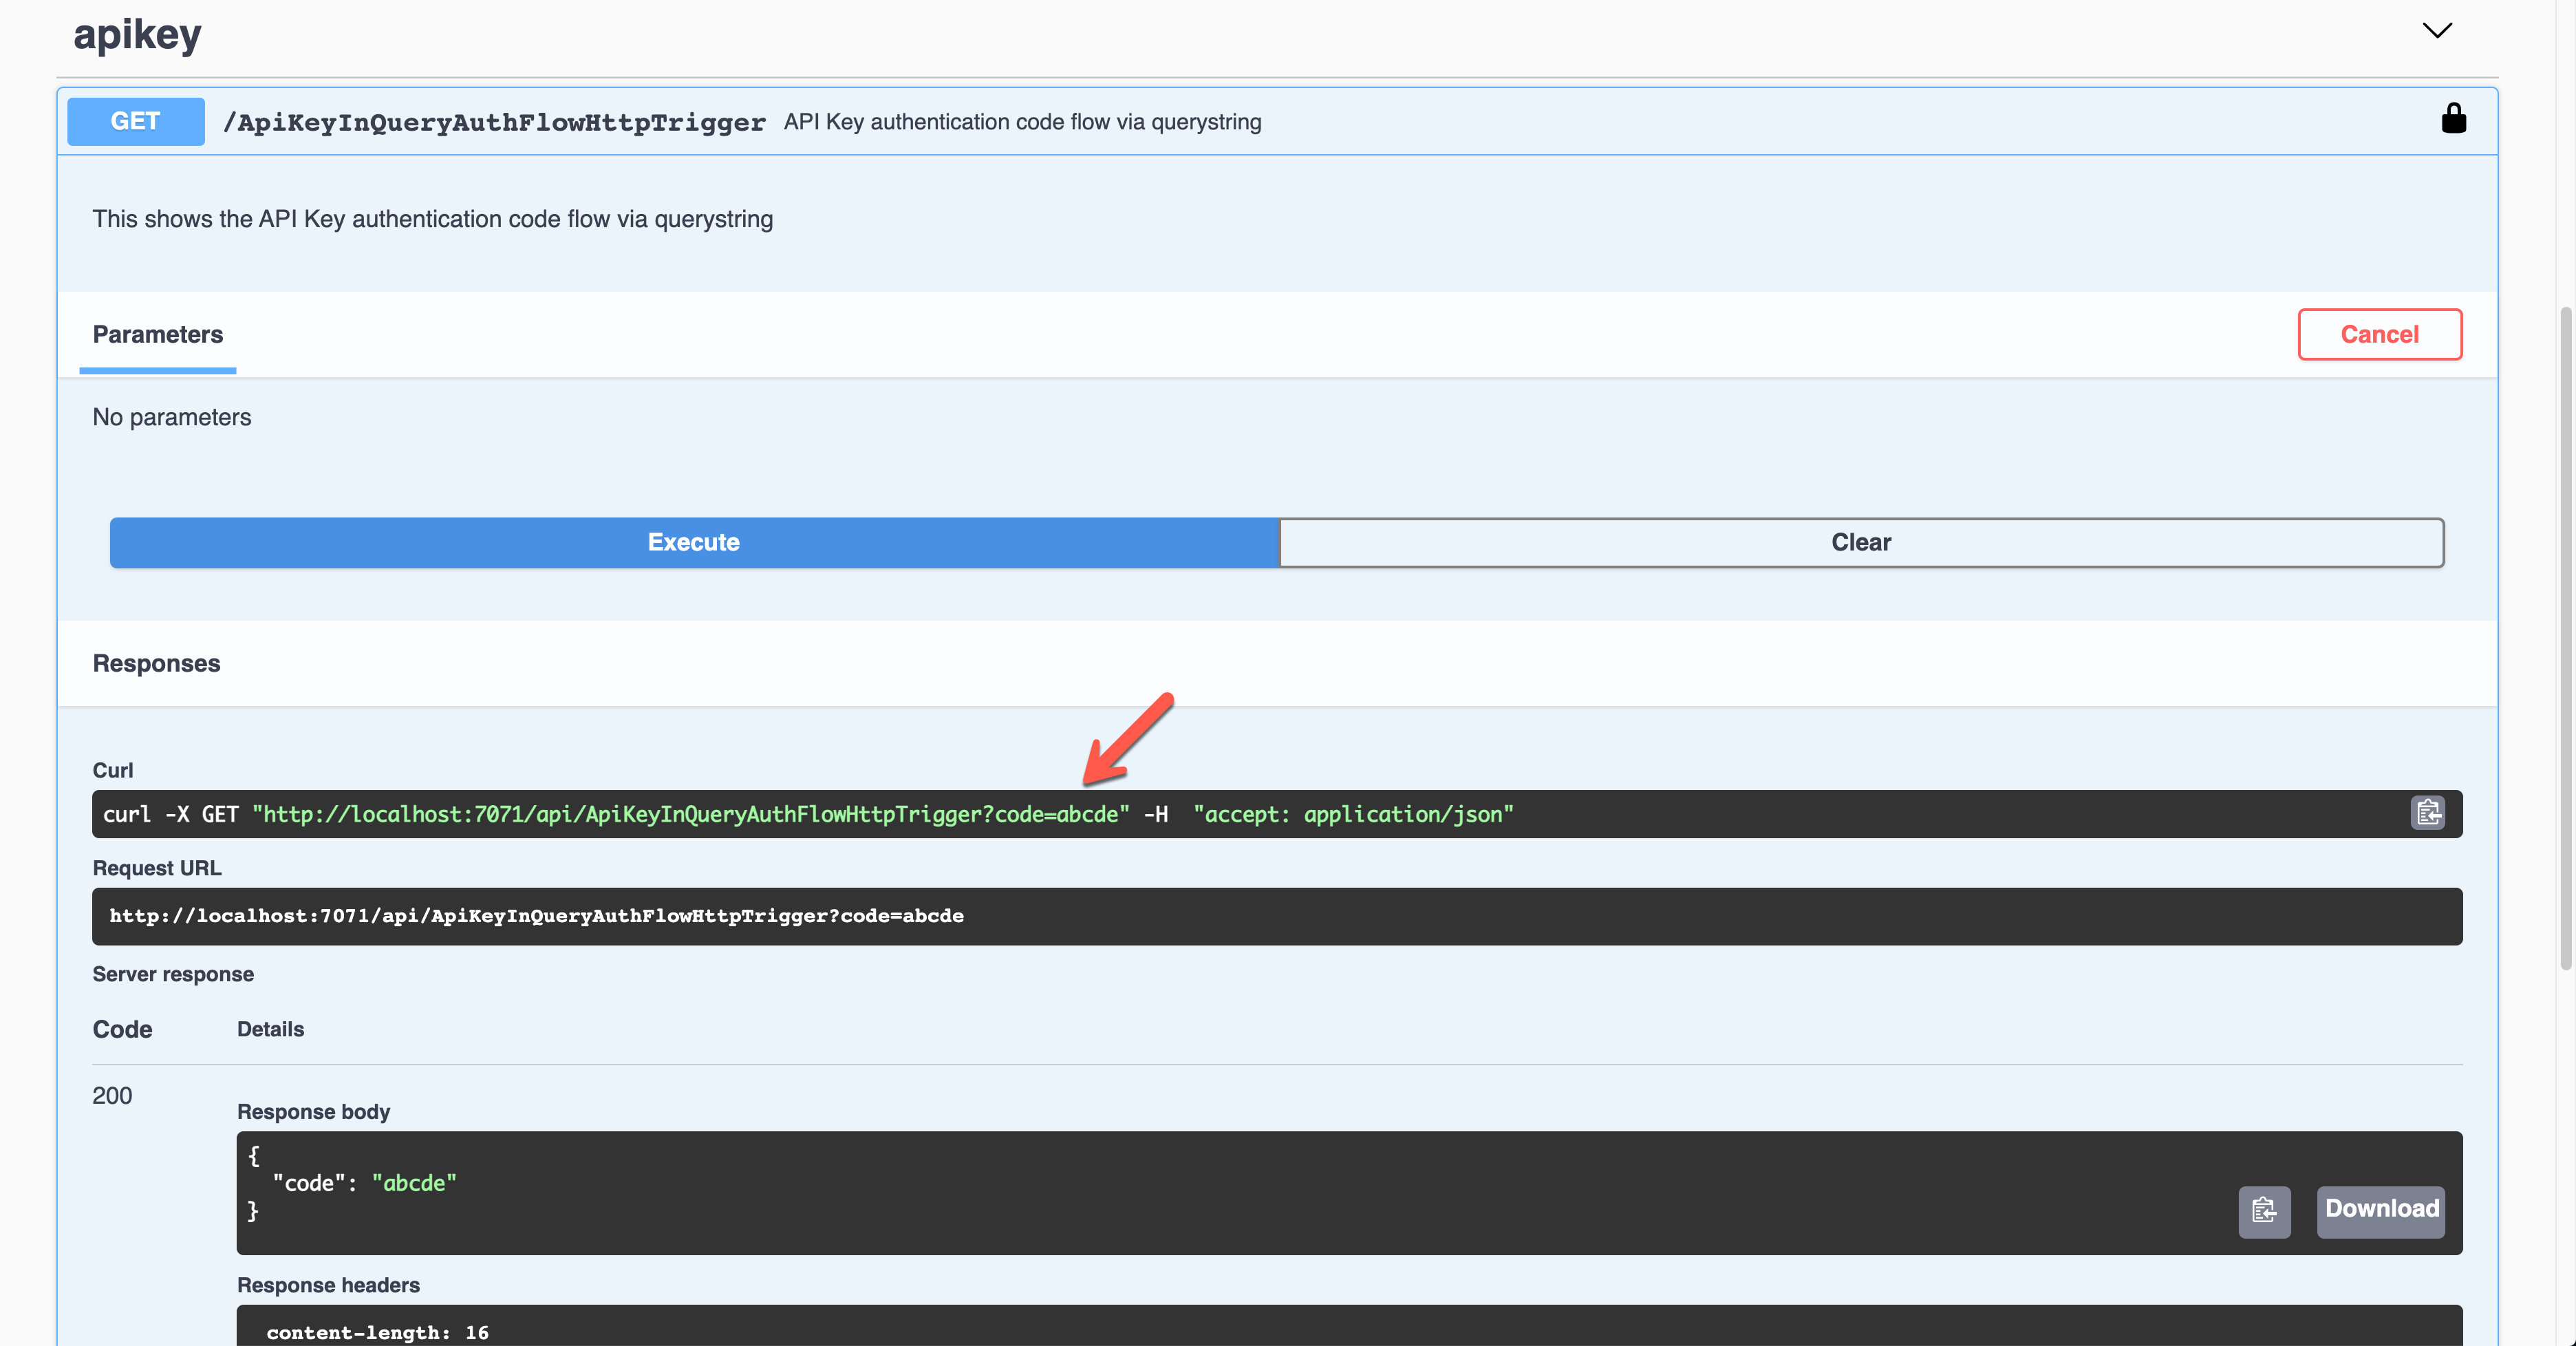
The result screen shows the API key passed through the querystring parameter, code.


Swagger UI - Query - Result


API Key in Request Header


It’s also the Azure Function’s built-in feature. This time, set the value of the OpenApiSecurityAttribute(…) decorator like below (line #6-9).


  • Type: SecuritySchemeType.ApiKey

  • In: OpenApiSecurityLocationType.Header

  • Name: x-functions-key


    public static class ApiKeyInHeaderAuthFlowHttpTrigger
{
[FunctionName(nameof(ApiKeyInHeaderAuthFlowHttpTrigger))]
[OpenApiOperation(operationId: “apikey.header”, tags: new[] { “apikey” }, Summary = “API Key authentication code flow via header”, Description = “This shows the API Key authentication code flow via header”, Visibility = OpenApiVisibilityType.Important)]

[OpenApiSecurity(“apikeyheader_auth”,
SecuritySchemeType.ApiKey,
In = OpenApiSecurityLocationType.Header,
Name = “x-functions-key”)]

[OpenApiResponseWithBody(statusCode: HttpStatusCode.OK, contentType: “application/json”, bodyType: typeof(Dictionary<string, string>), Summary = “successful operation”, Description = “successful operation”)]
public static async Task Run(
[HttpTrigger(AuthorizationLevel.Function, “GET”, Route = null)] HttpRequest req,
ILogger log)
{
log.LogInformation(“C# HTTP trigger function processed a request.”);

var headers = req.Headers.ToDictionary(q => q.Key, q => (string) q.Value);
var result = new OkObjectResult(headers);

return await Task.FromResult(result).ConfigureAwait(false);
}
}


Run the function app and see the Swagger UI page.


Swagger UI - Header


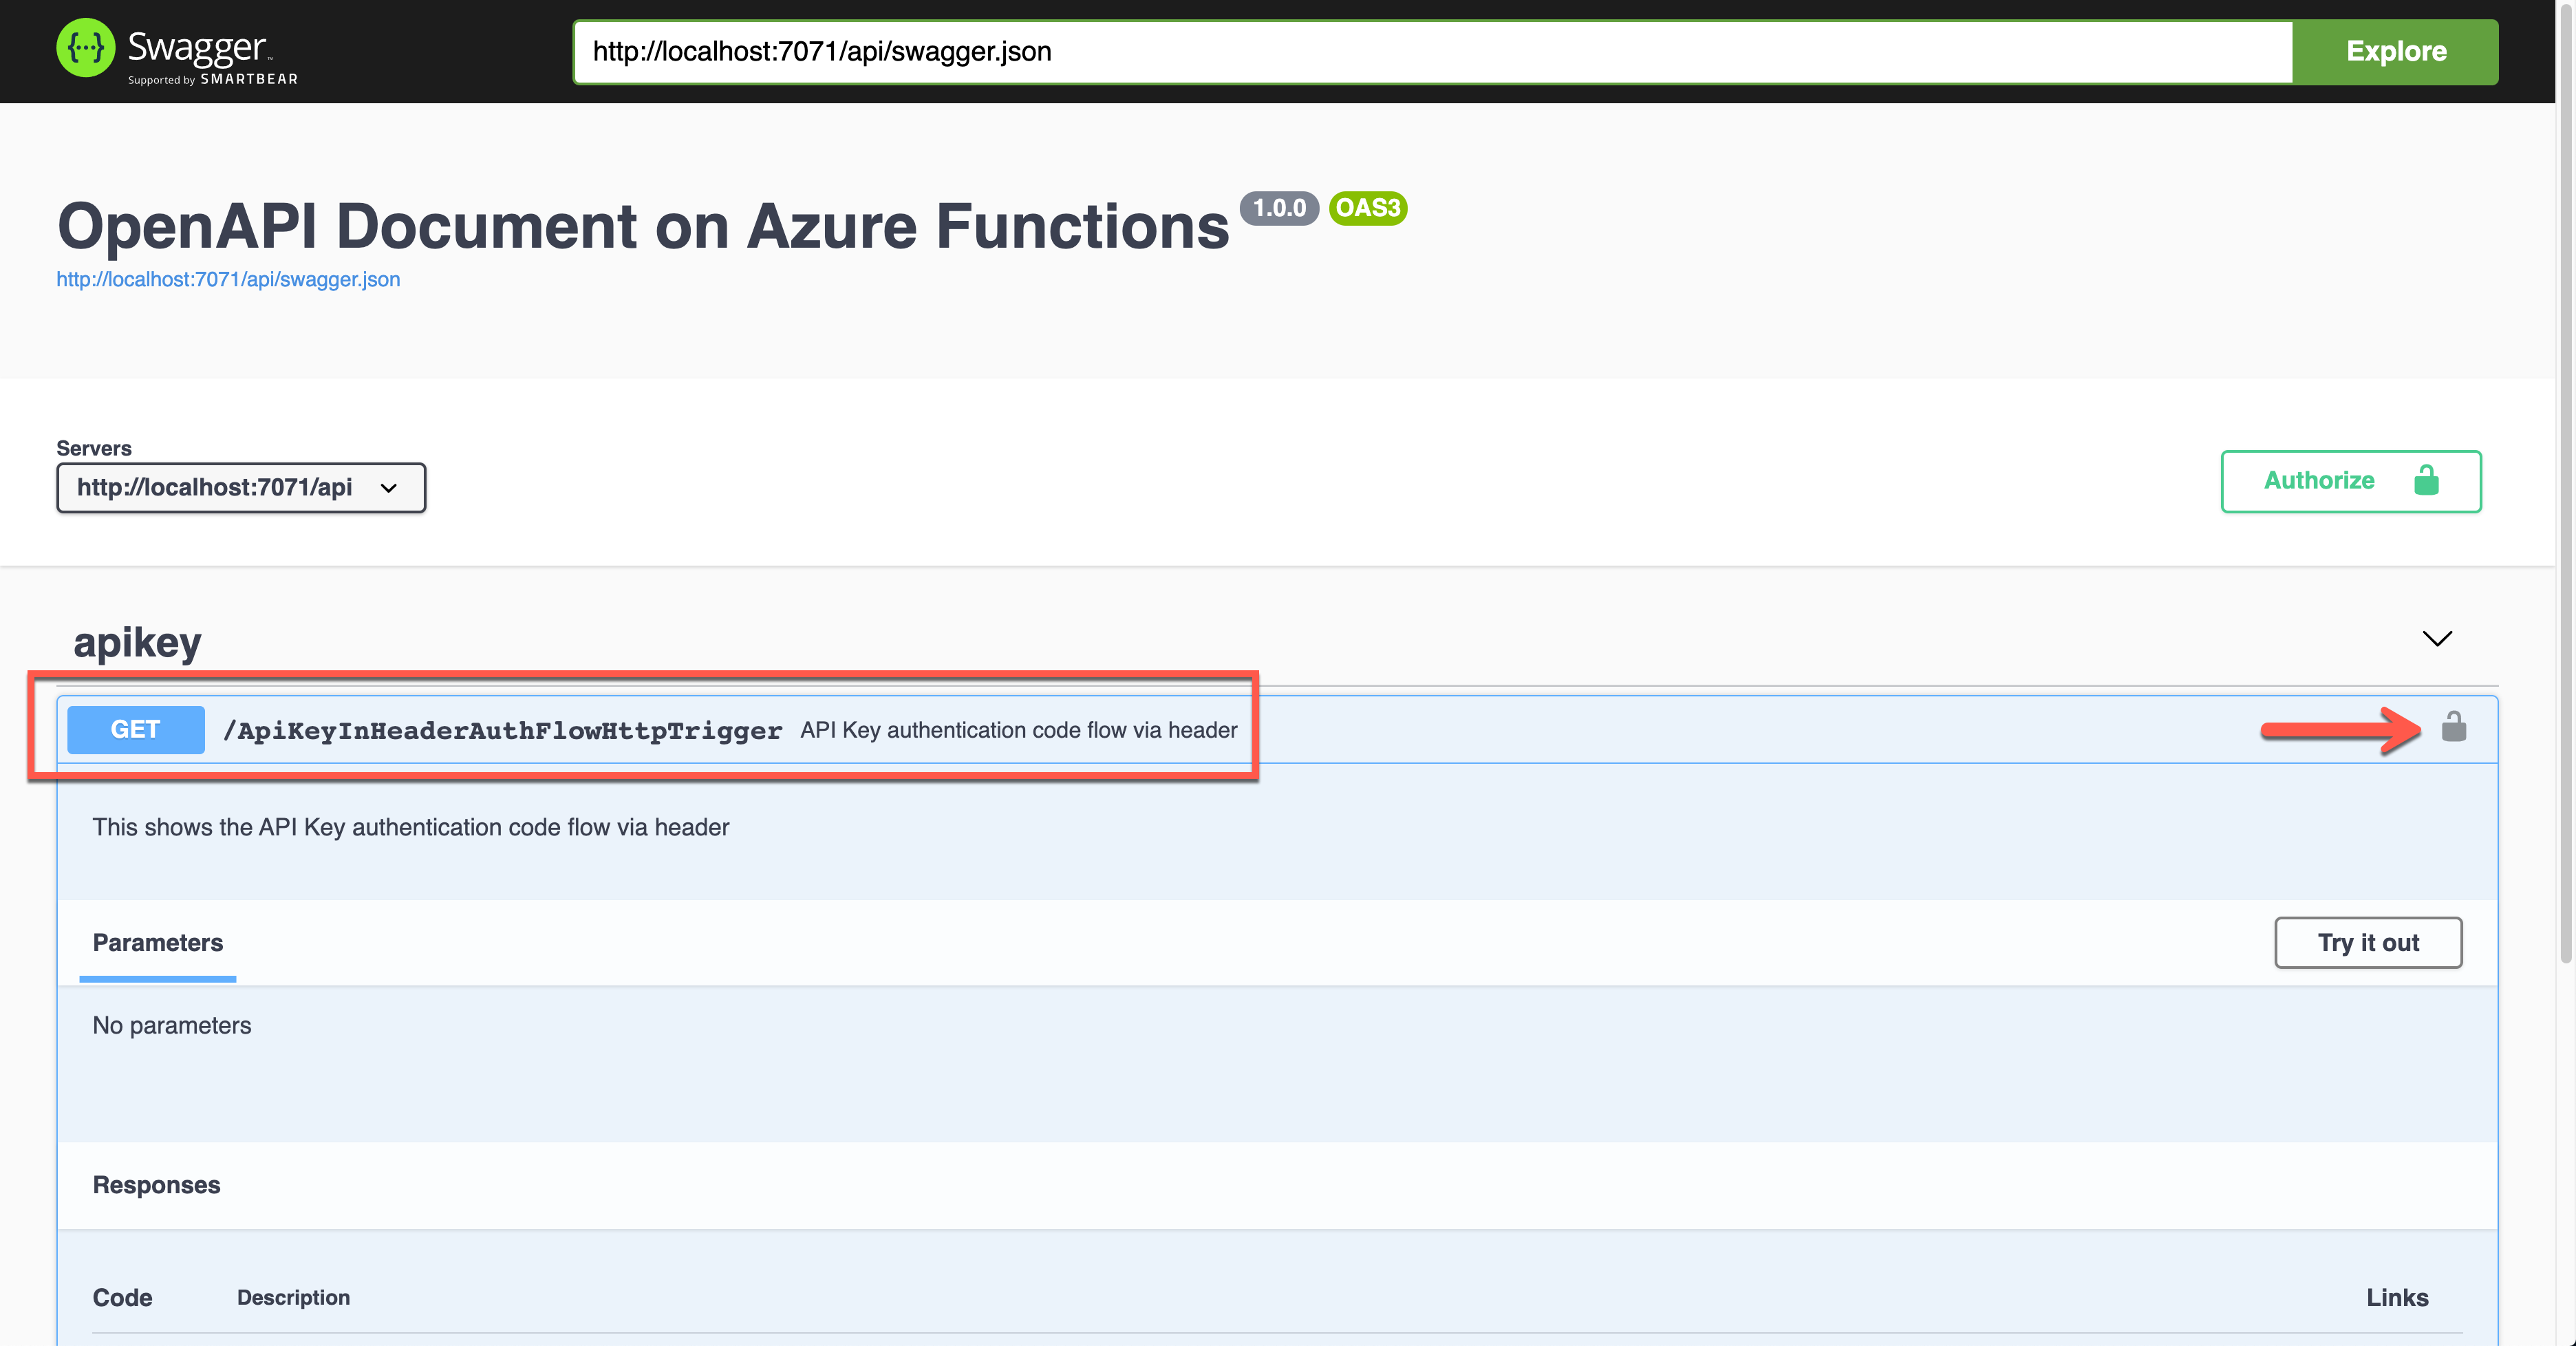
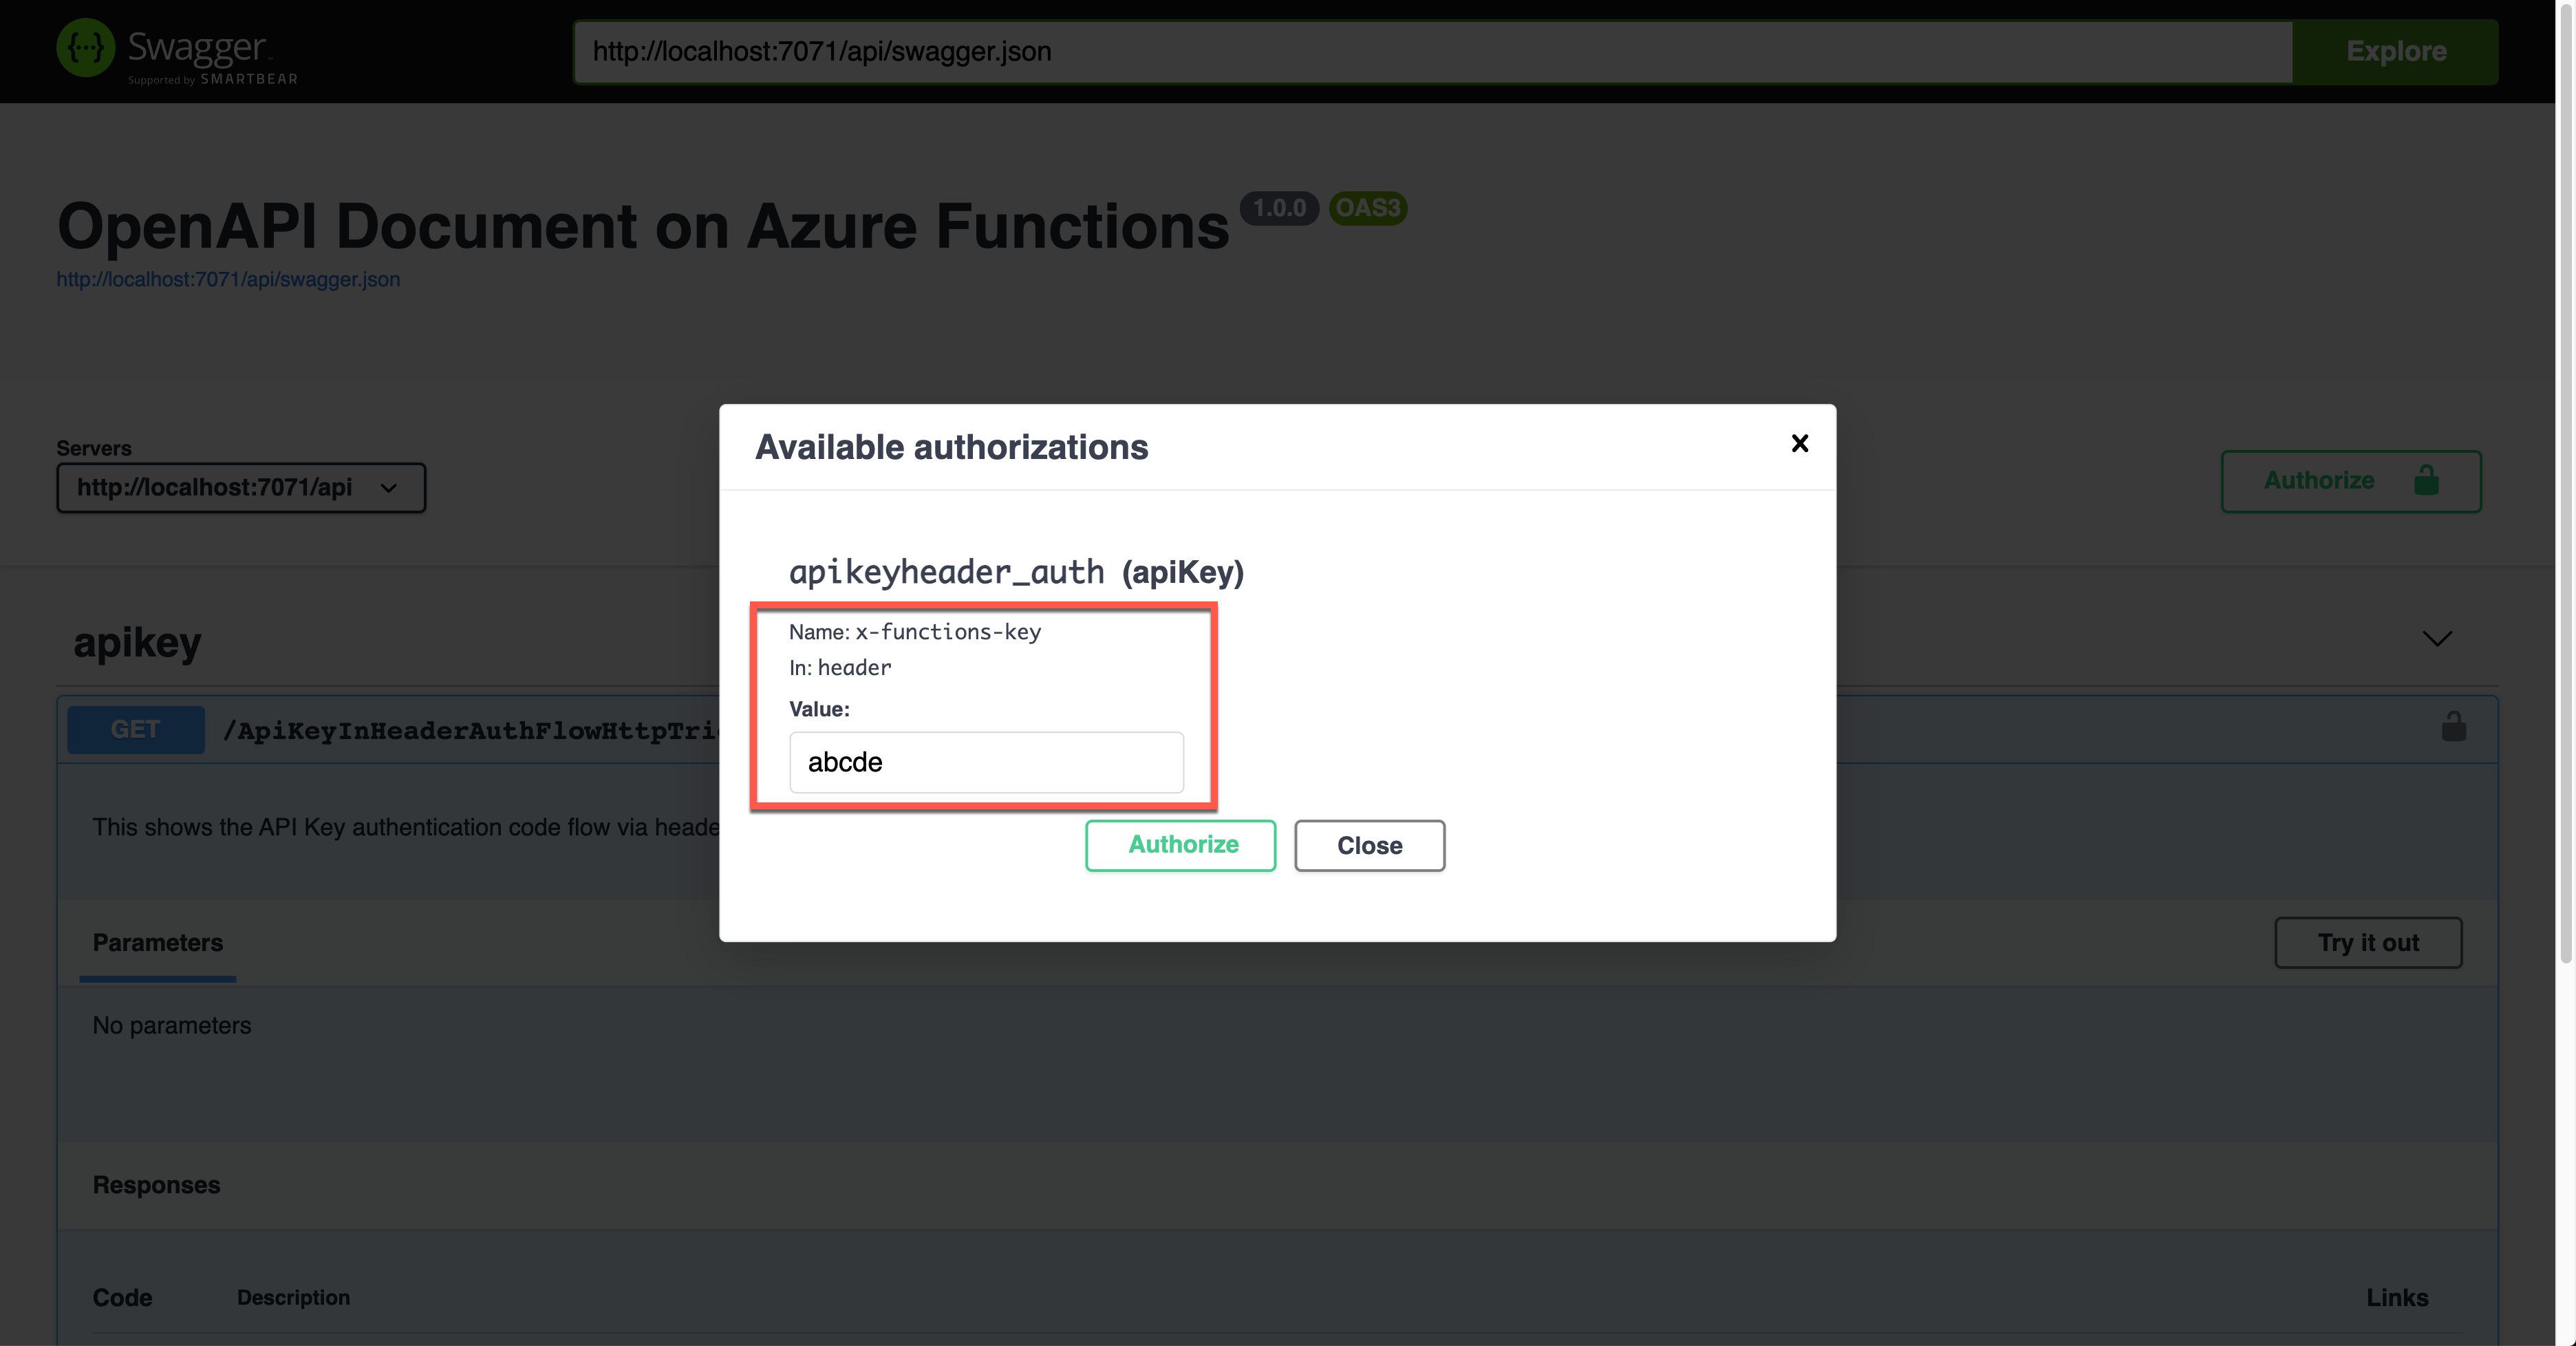
If you want to authenticate the endpoint, enter the API key value to the field, labelled as x-functions-key.


Swagger UI - Header - API Key


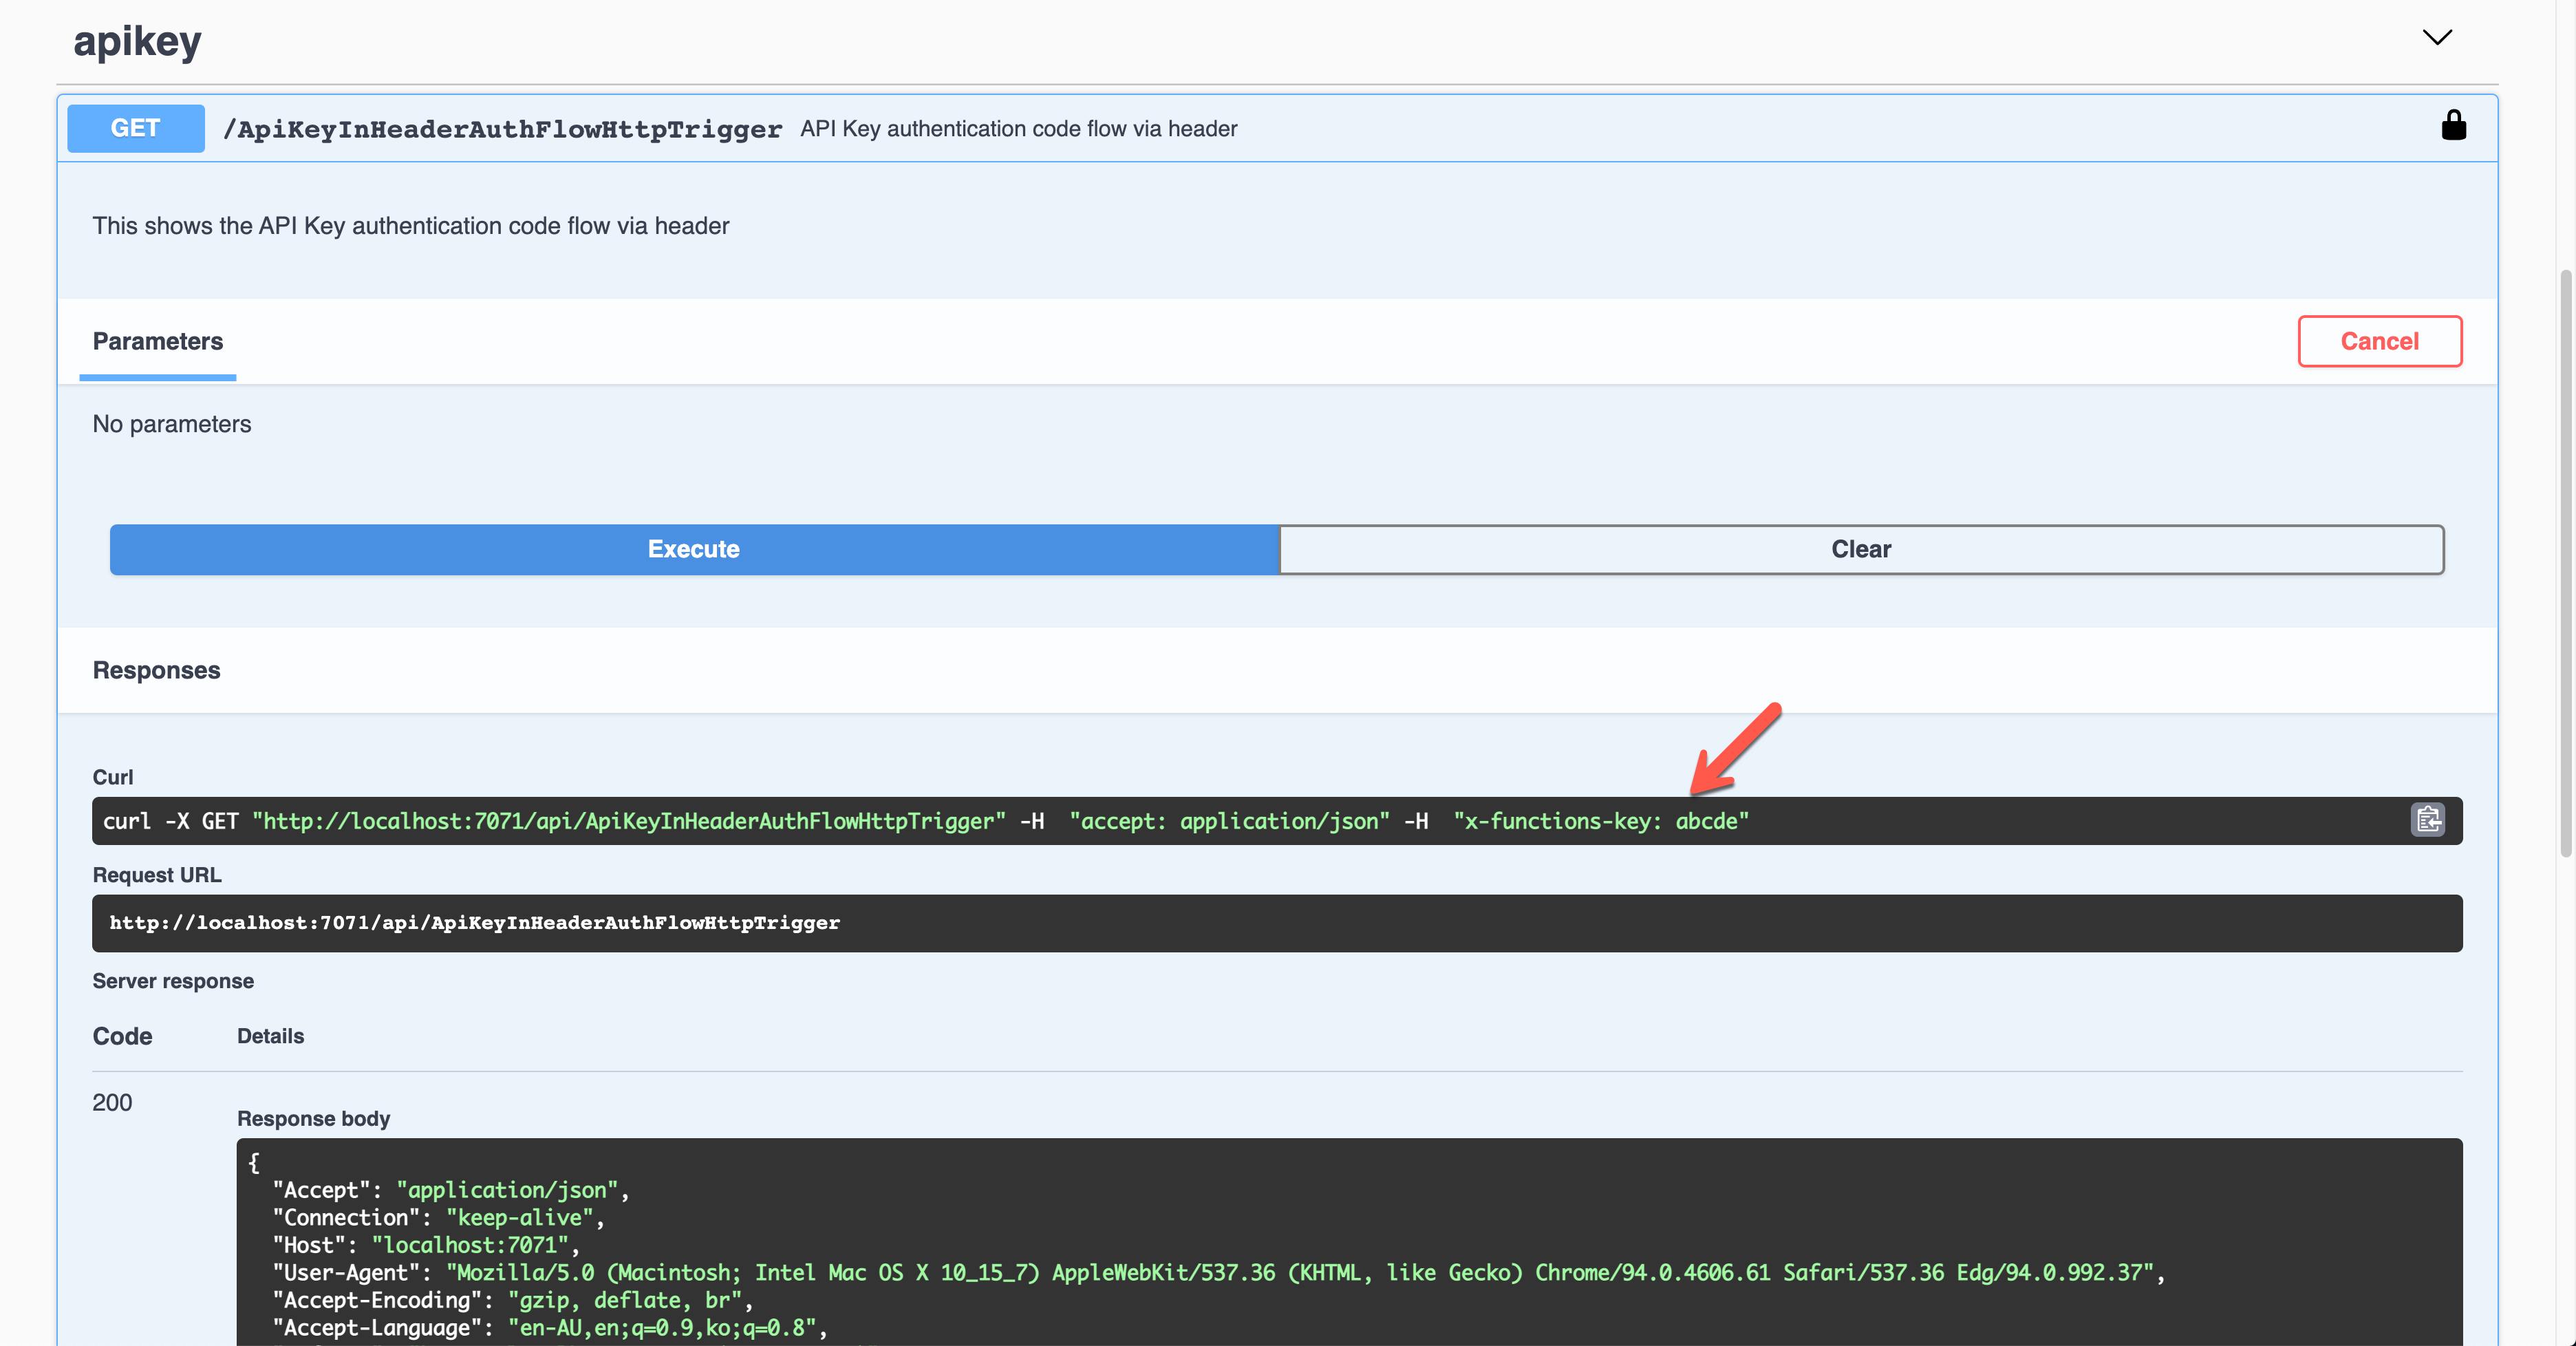
As a result, the API key was sent through the request header, x-functions-key.


Swagger UI - Header - Result


Basic Auth Token


Let’s use the Basic auth token this time. Set the property values of OpenApiSecurityAttribute(…) (line #6-8).


  • Type: SecuritySchemeType.Http

  • Scheme: OpenApiSecuritySchemeType.Basic


As this is not the built-in feature, you can use this approach for additional auth methods or replace the built-in feature. If you don’t want to use the built-in API key, you should set the auth level value of the HttpTrigger binding to AuthorizationLevel.Anonymous (line #12).


    public static class HttpBasicAuthFlowHttpTrigger
{
[FunctionName(nameof(HttpBasicAuthFlowHttpTrigger))]
[OpenApiOperation(operationId: “http.basic”, tags: new[] { “http” }, Summary = “Basic authentication token flow via header”, Description = “This shows the basic authentication token flow via header”, Visibility = OpenApiVisibilityType.Important)]

[OpenApiSecurity(“basic_auth”,
SecuritySchemeType.Http,
Scheme = OpenApiSecuritySchemeType.Basic)]

[OpenApiResponseWithBody(statusCode: HttpStatusCode.OK, contentType: “application/json”, bodyType: typeof(Dictionary<string, string>), Summary = “successful operation”, Description = “successful operation”)]
public static async Task Run(
[HttpTrigger(AuthorizationLevel.Anonymous, “GET”, Route = null)] HttpRequest req,
ILogger log)
{
log.LogInformation(“C# HTTP trigger function processed a request.”);

var headers = req.Headers.ToDictionary(q => q.Key, q => (string) q.Value);
var result = new OkObjectResult(headers);

return await Task.FromResult(result).ConfigureAwait(false);
}
}


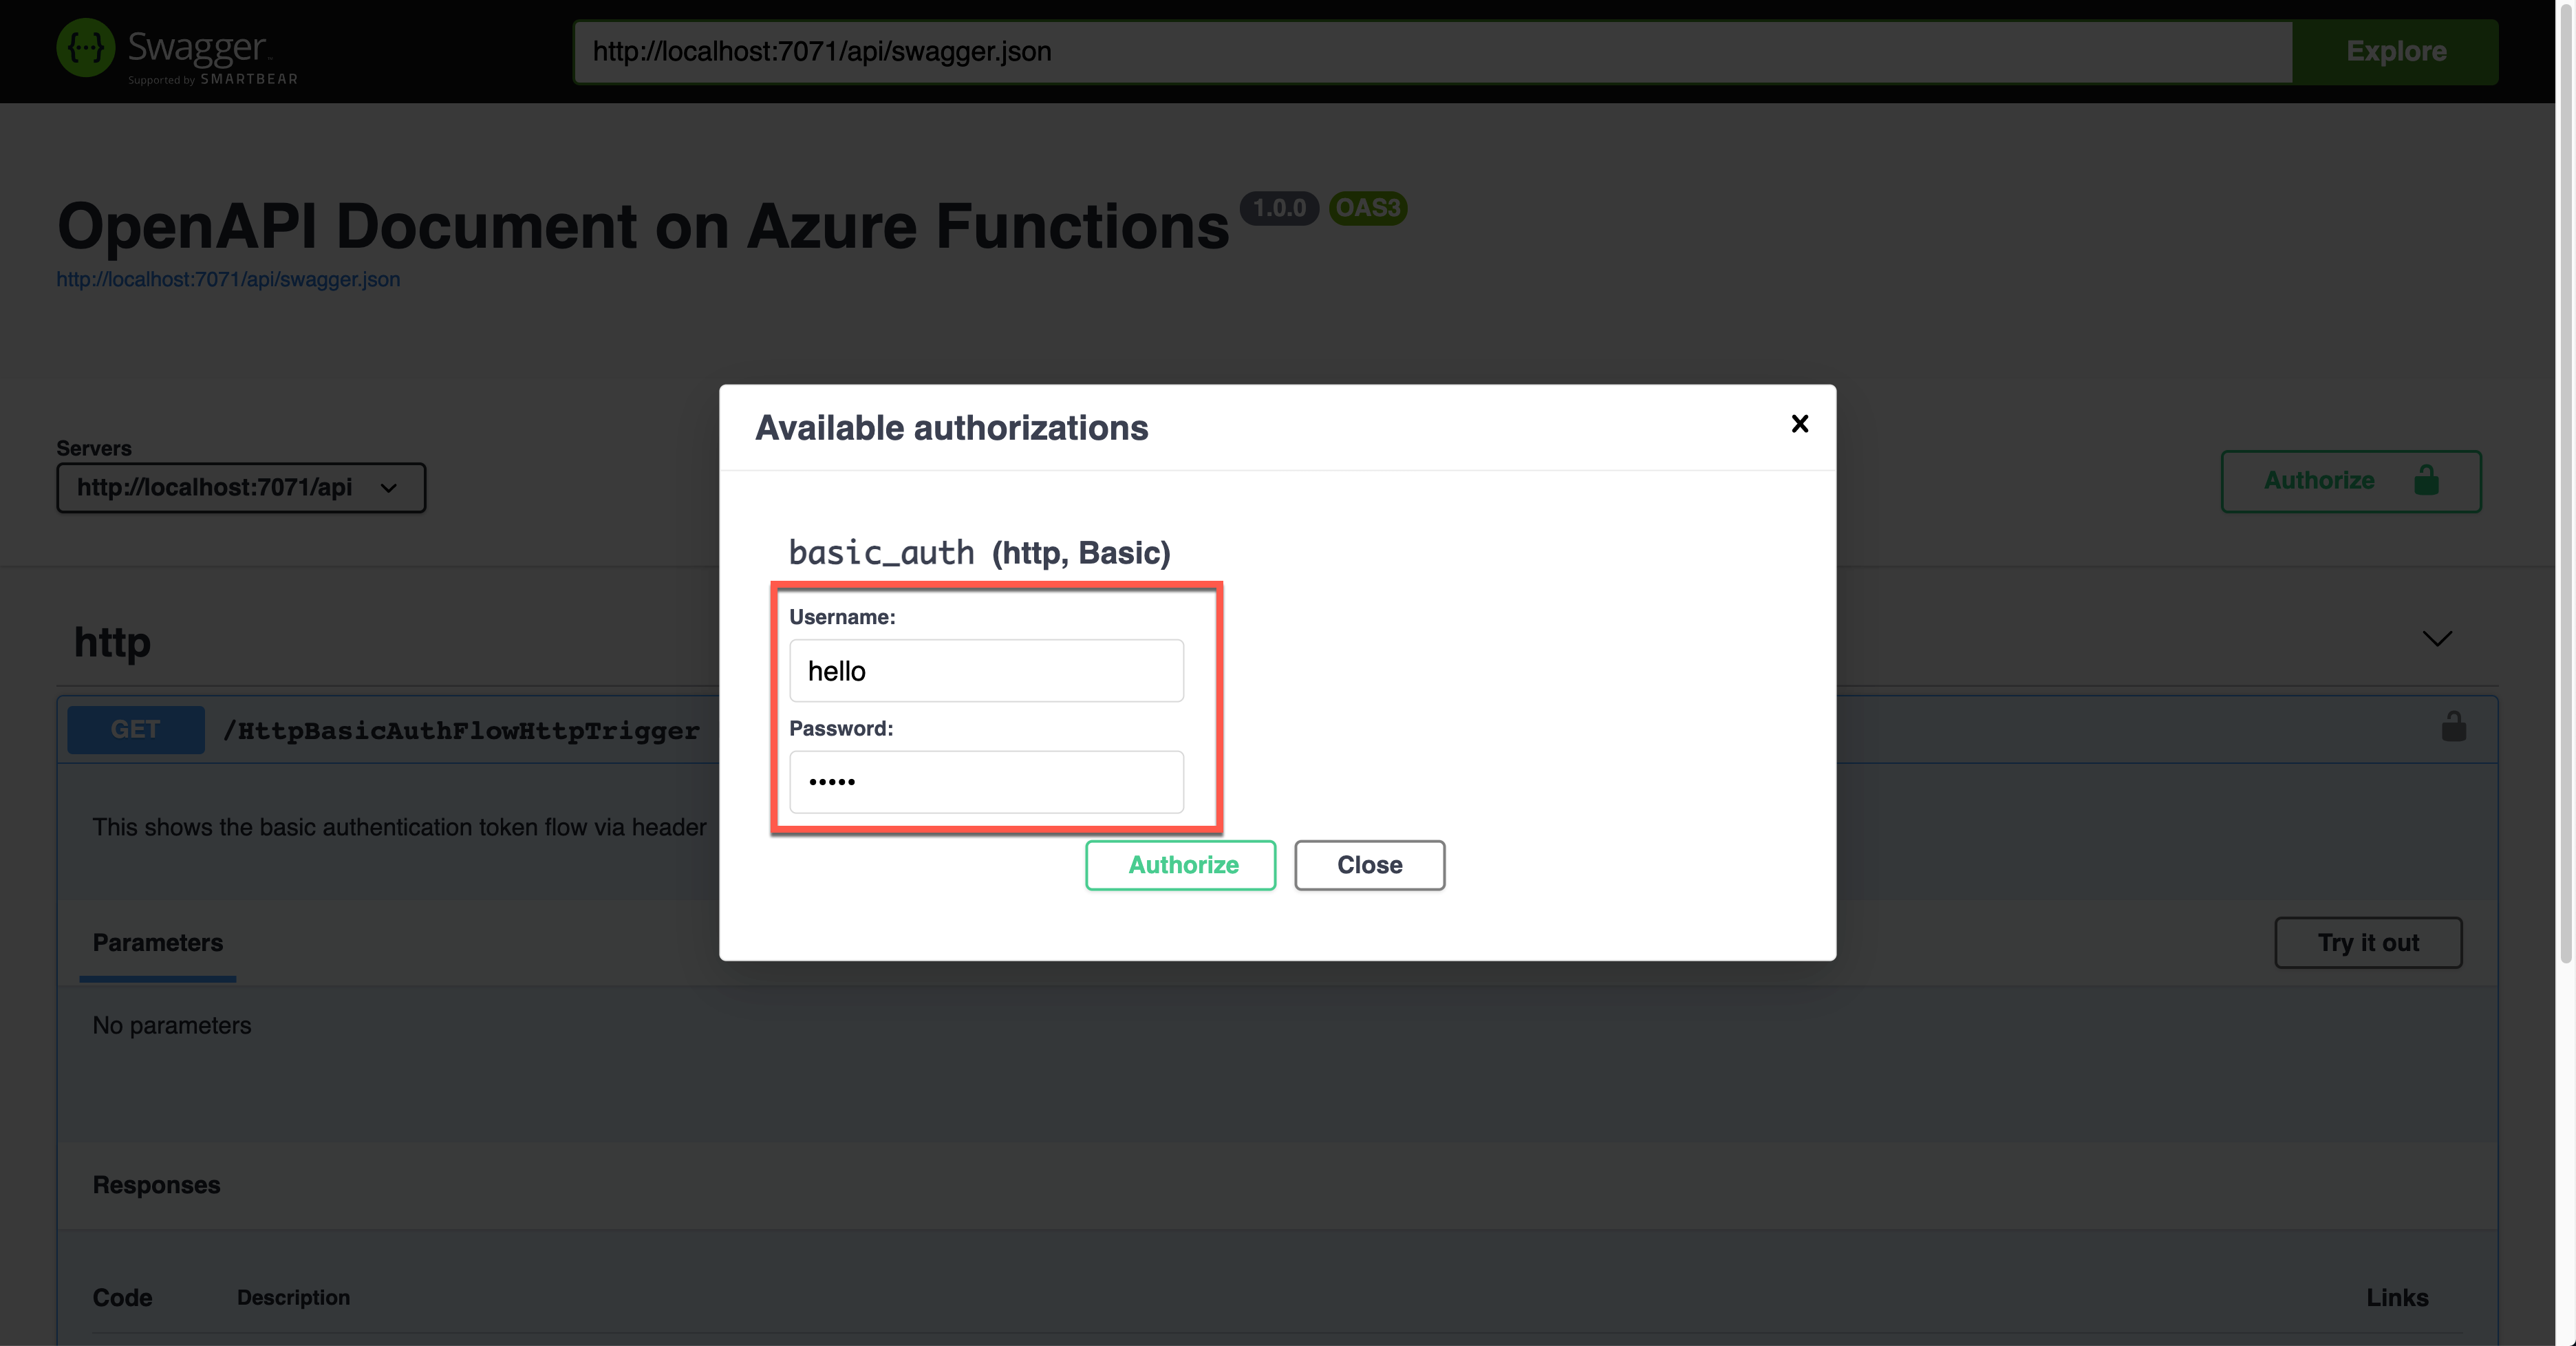
Run the app to see the Swagger UI like below.


Swagger UI - Basic Auth


To authenticate your endpoint, you should enter the Username and Password, added to the Authorization header.


Swagger UI - Basic Auth - Details


The result screen shows the request header of Authorization with the base64 encoded value.


Swagger UI - Basis Auth - Result


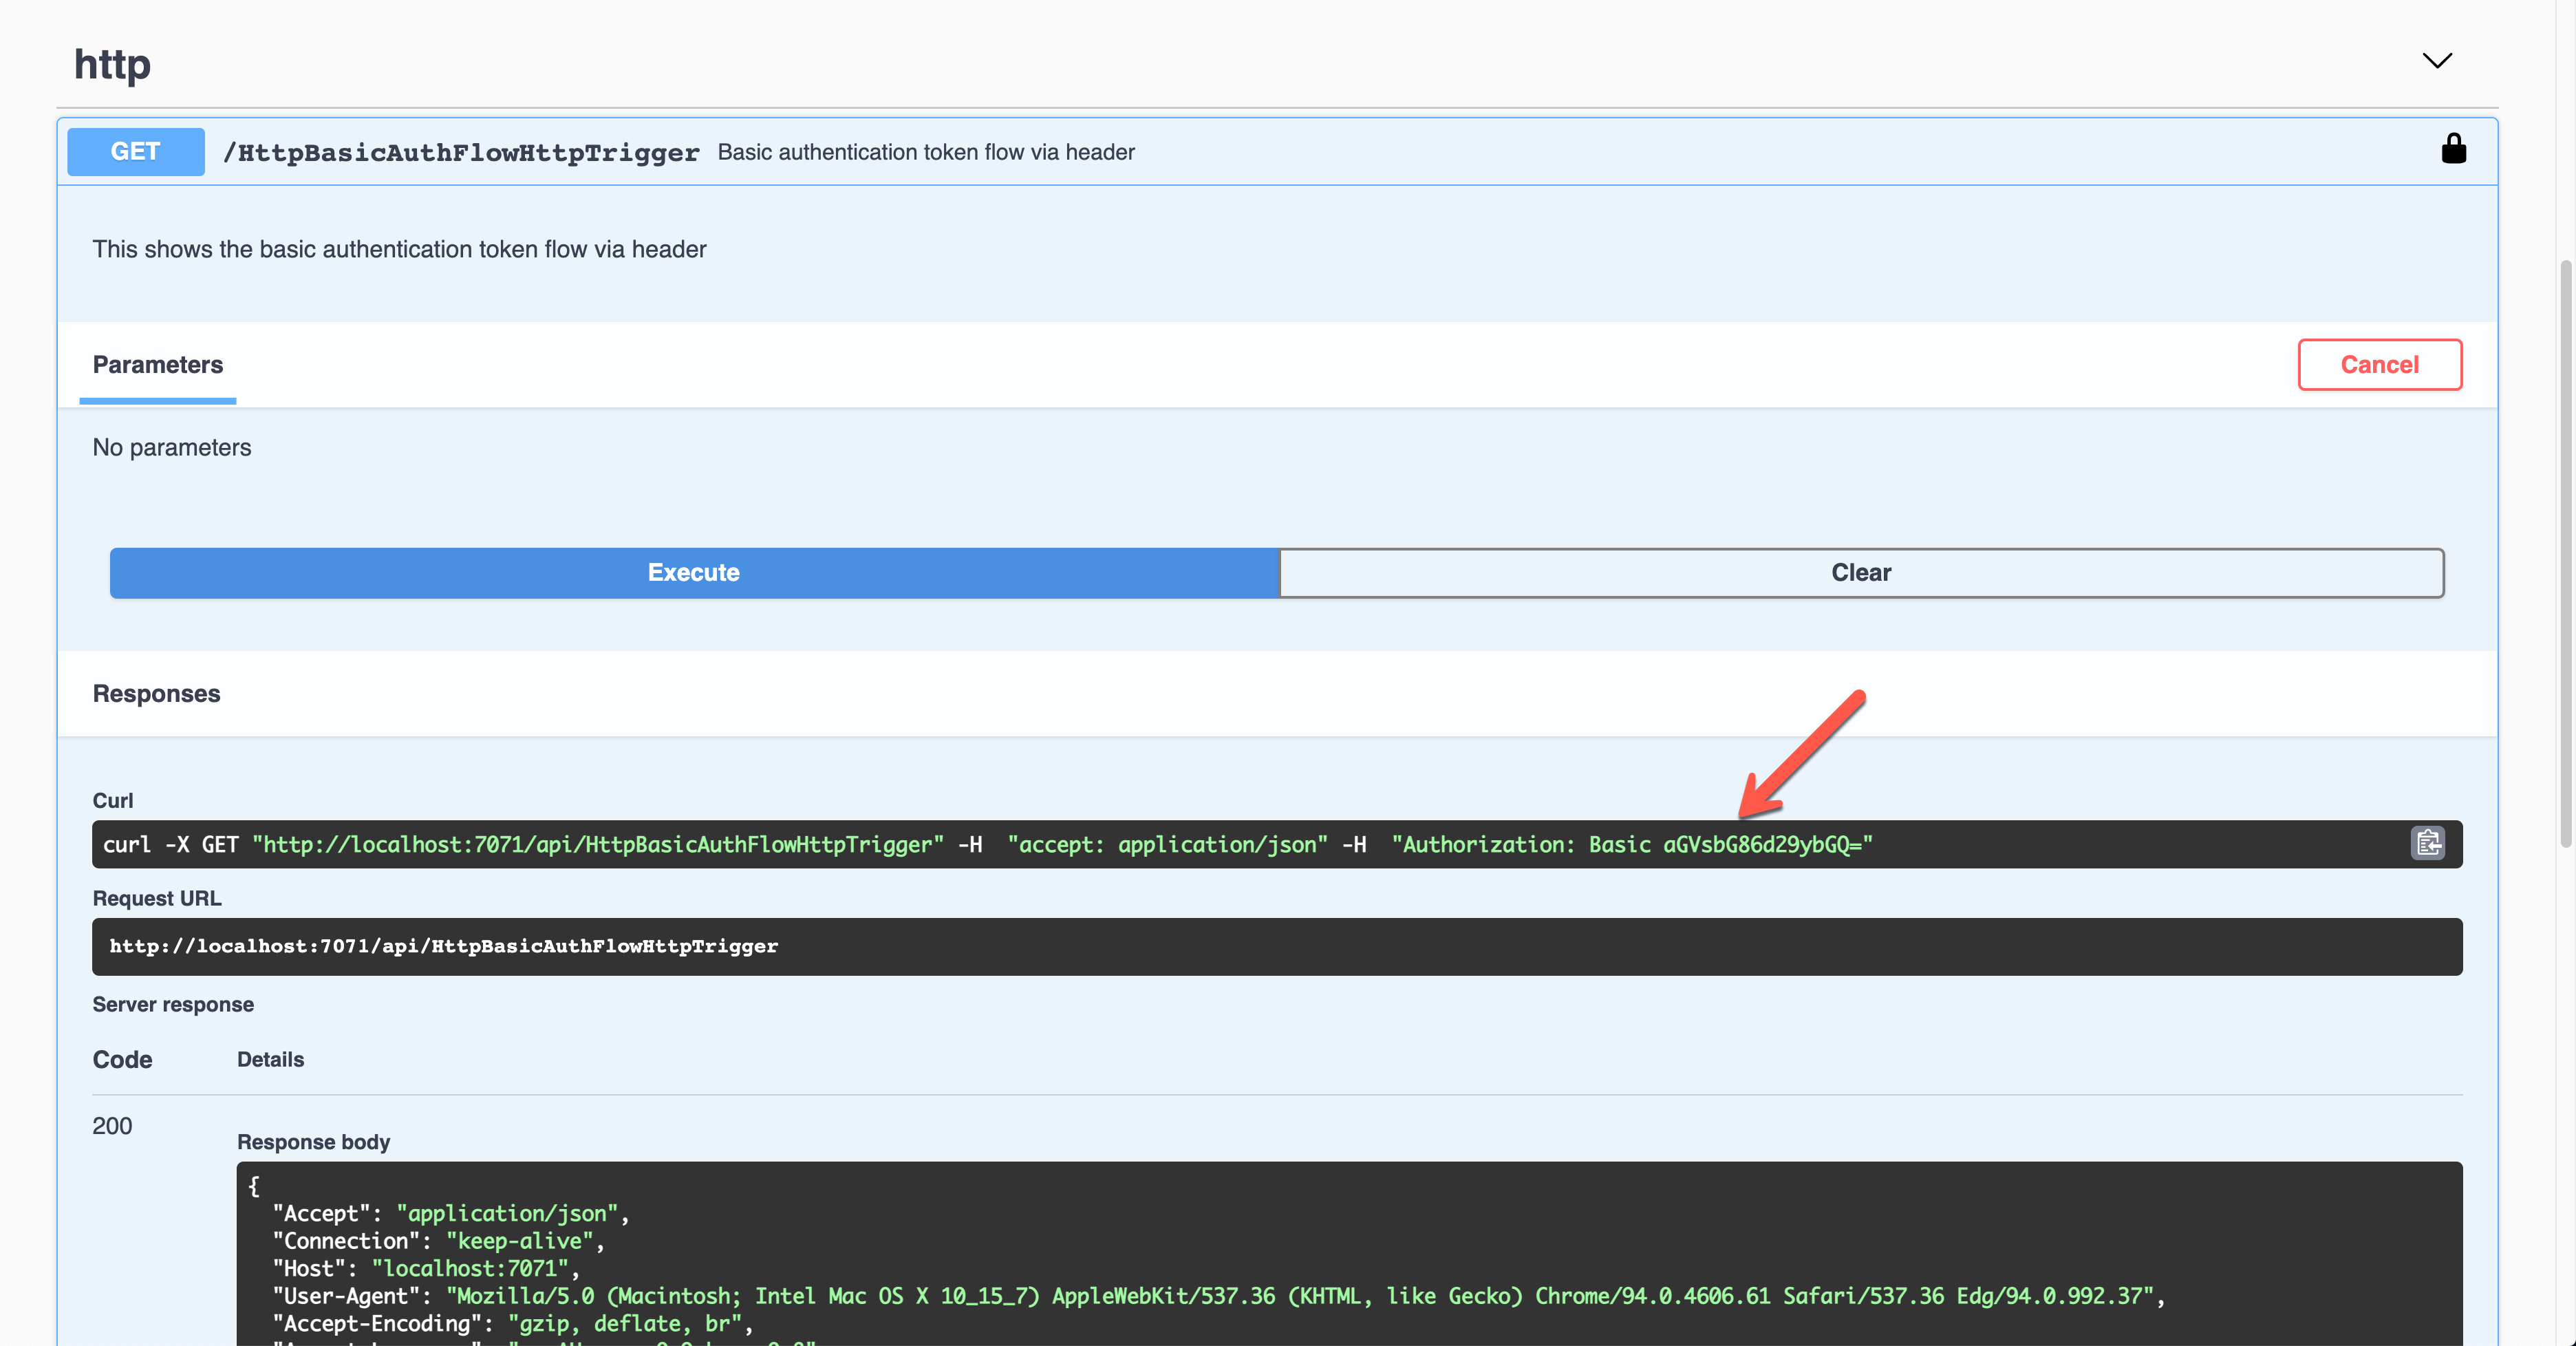
Then, you should validate the auth details with your custom logic.


Bearer Auth Token


Similarly, this time, let’s use the Bearer auth token. Set the property values of OpenApiSecurityAttribute(…) (line #5).


  • Type: SecuritySchemeType.Http

  • Scheme: OpenApiSecuritySchemeType.Bearer

  • BearerFormat: JWT


You now know how to set the auth level of the HttpTrigger binding to AuthorizationLevel.Anonymous (line #13).


    public static class HttpBearerAuthFlowHttpTrigger
{
[FunctionName(nameof(HttpBearerAuthFlowHttpTrigger))]
[OpenApiOperation(operationId: “http.bearer”, tags: new[] { “http” }, Summary = “Bearer authentication token flow via header”, Description = “This shows the bearer authentication token flow via header”, Visibility = OpenApiVisibilityType.Important)]

[OpenApiSecurity(“bearer_auth”,
SecuritySchemeType.Http,
Scheme = OpenApiSecuritySchemeType.Bearer,
BearerFormat = “JWT”)]

[OpenApiResponseWithBody(statusCode: HttpStatusCode.OK, contentType: “application/json”, bodyType: typeof(Dictionary<string, string>), Summary = “successful operation”, Description = “successful operation”)]
public static async Task Run(
[HttpTrigger(AuthorizationLevel.Anonymous, “GET”, Route = null)] HttpRequest req,
ILogger log)
{
log.LogInformation(“C# HTTP trigger function processed a request.”);

var headers = req.Headers.ToDictionary(q => q.Key, q => (string) q.Value);
var handler = new JwtSecurityTokenHandler();
var token = handler.ReadJwtToken(headers[“Authorization”].Split(‘ ‘).Last());
var claims = token.Claims.Select(p => p.ToString());
var content = new { headers = headers, claims = claims };

var result = new OkObjectResult(content);

return await Task.FromResult(result).ConfigureAwait(false);
}
}


Run the function app and see the Swagger UI page.


Swagger UI - Bearer Auth


During the authentication, you are asked to enter the Bearer token value. The Authorization header will add the value.


Swagger UI - Bearer Auth - Details


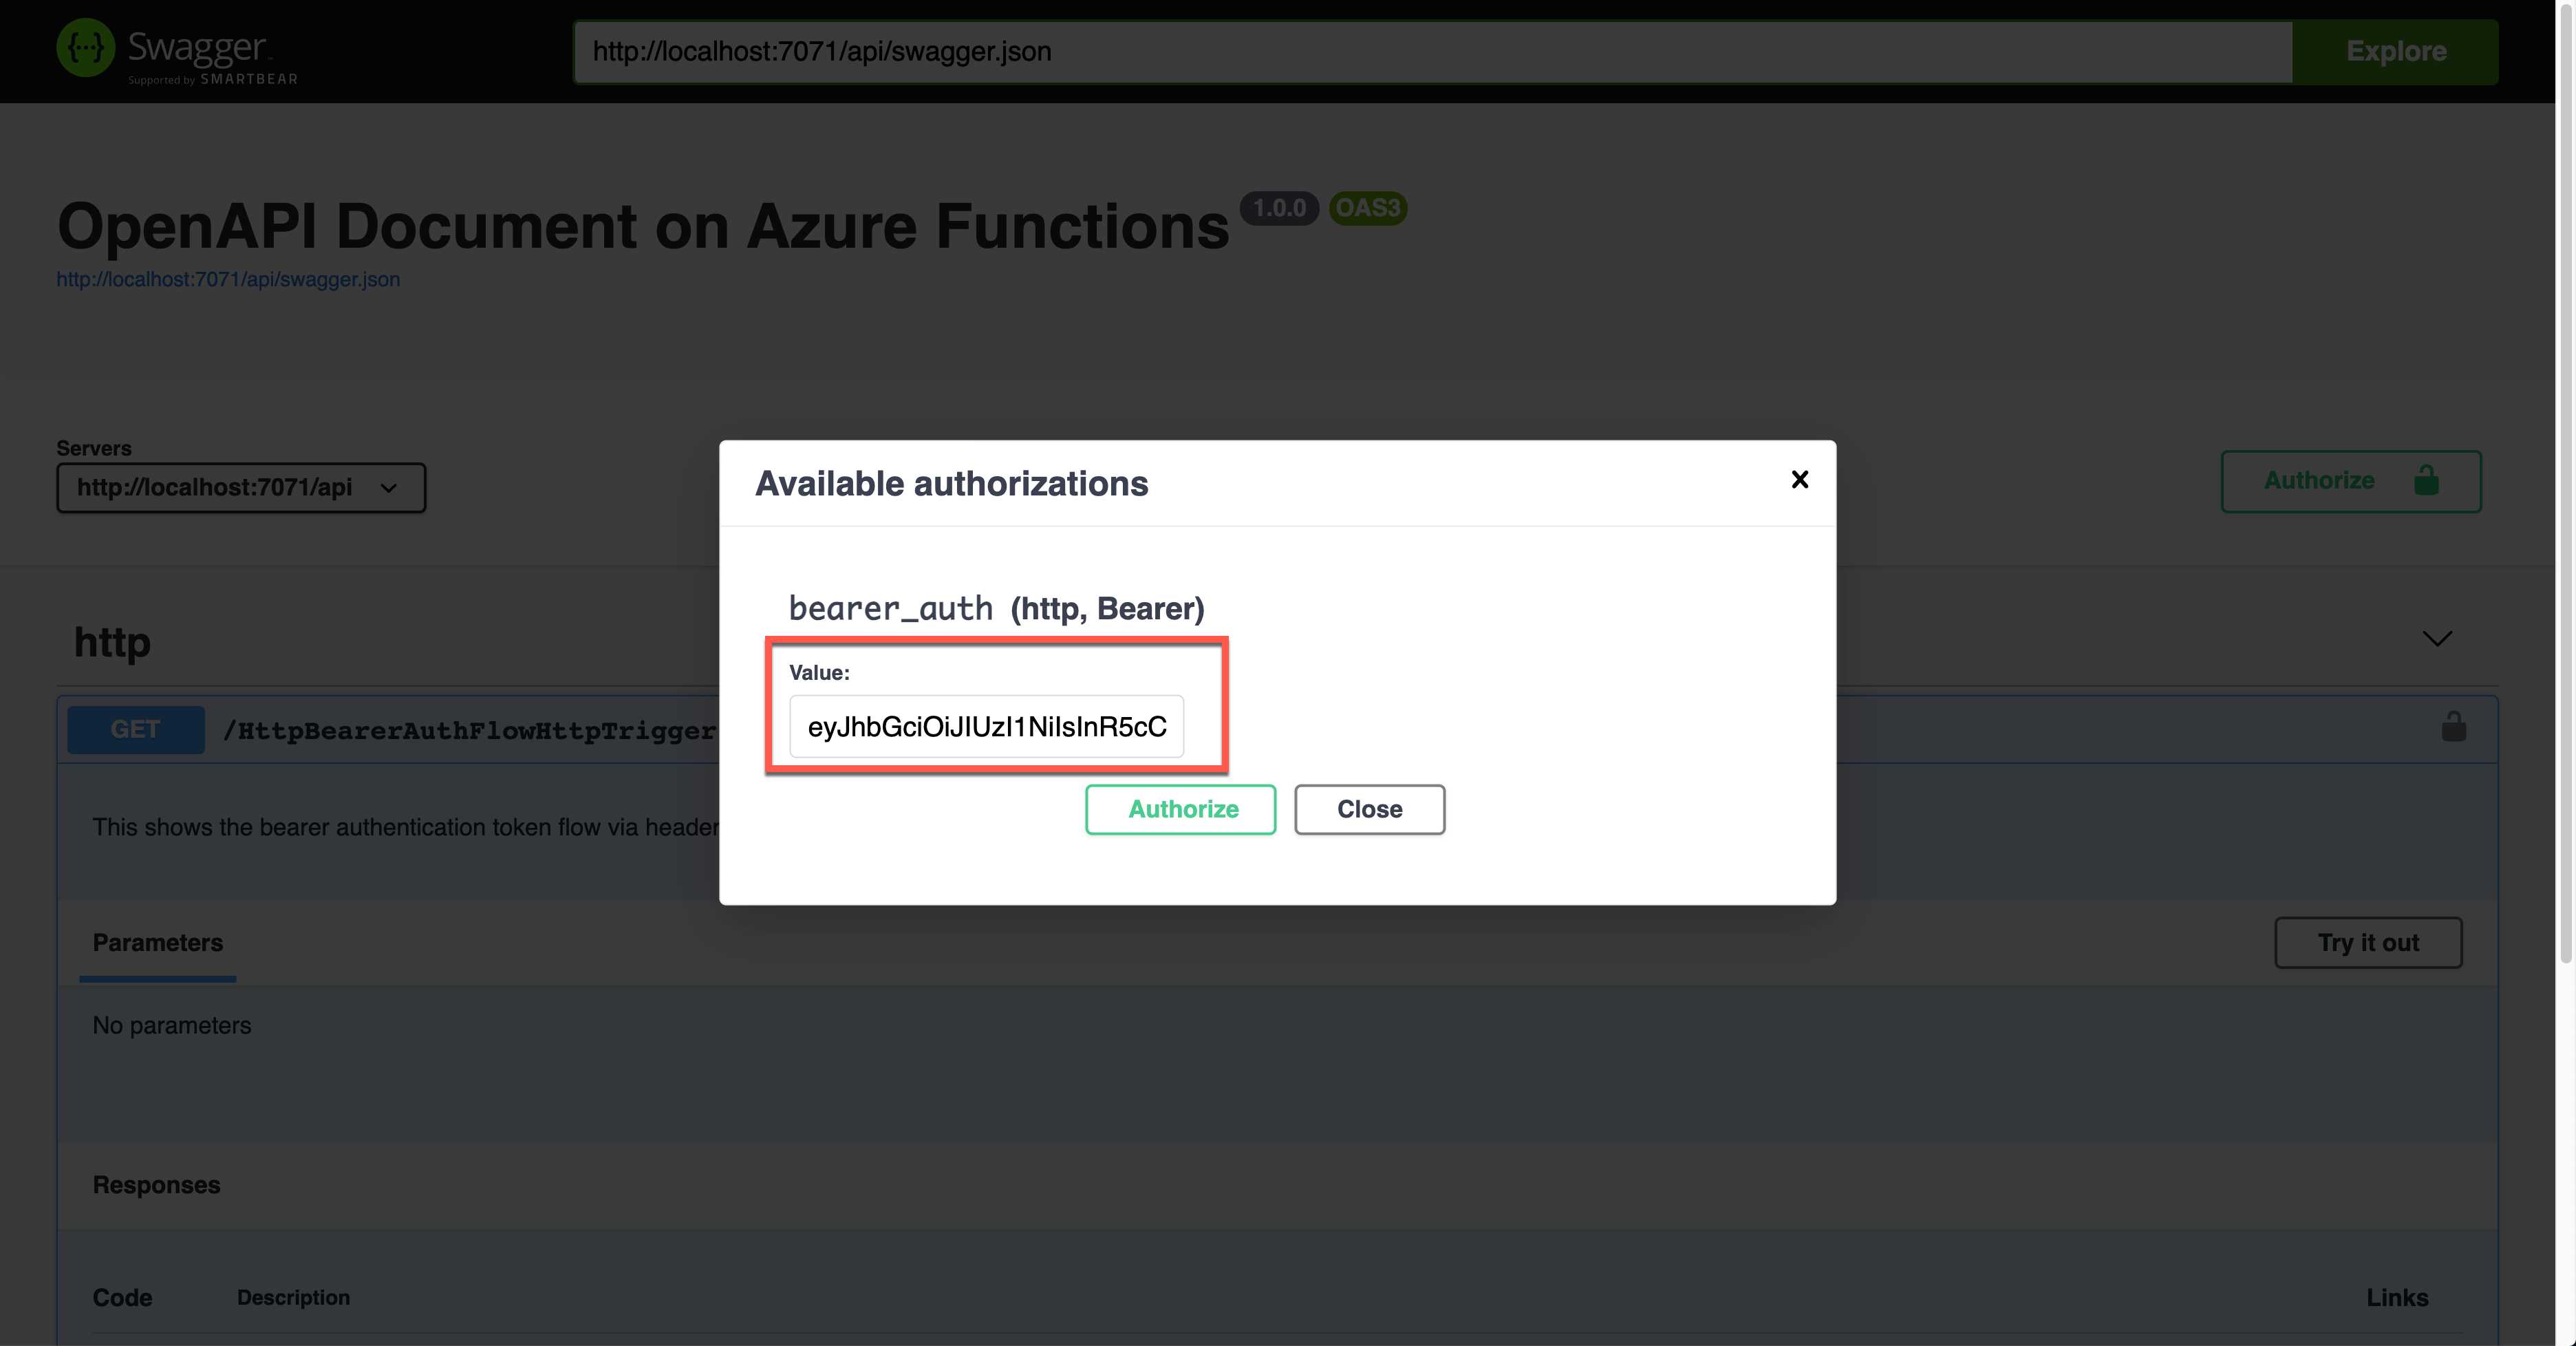
The result screen shows the JWT value in the Authorization header.


Swagger UI - Bearer Auth - Result


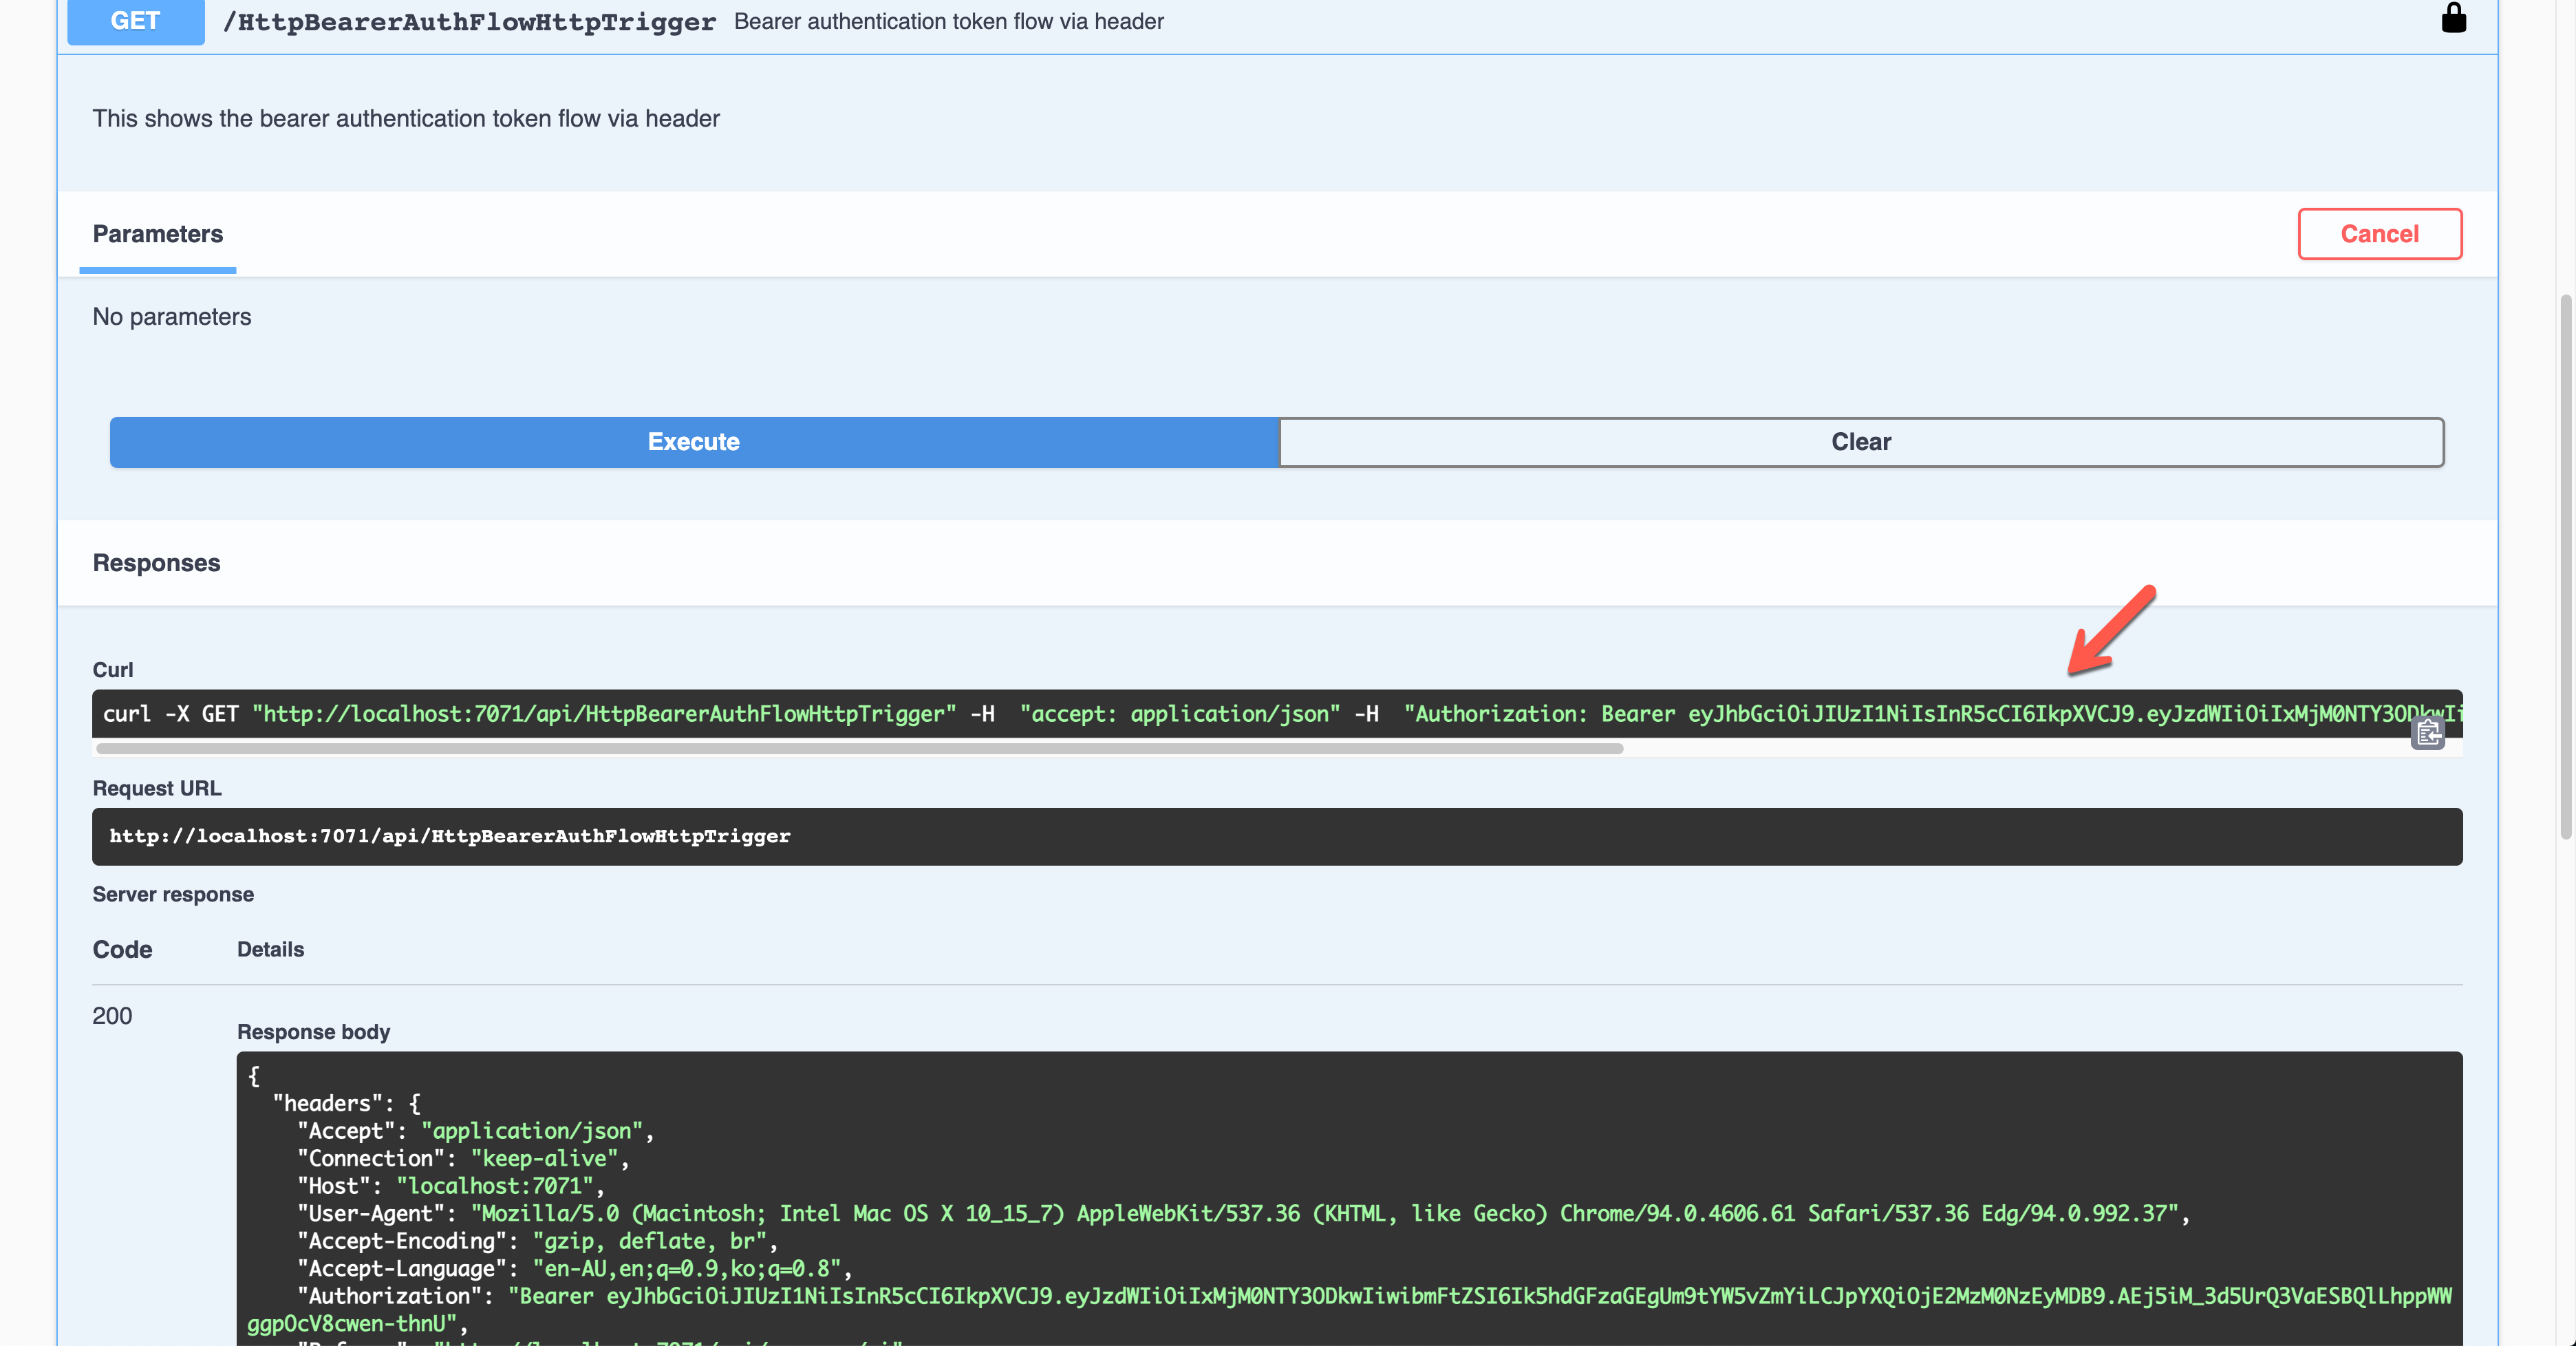
You should decode the JWT and find the appropriate claims and validate them for further processing.


OAuth2 Implicit Auth Flow


Although there are many ways in the OAuth2 authentication flow, I’m going to use the Implicit flow for this time. Set the properties of OpenApiSecurityAttribute(…) (line #6-8).


  • Type: SecuritySchemeType.OAuth2

  • Flows: ImplicitAuthFlow


Auth level is also set to Anonymous (line #12).


    public static class OAuthImplicitAuthFlowHttpTrigger
{
[FunctionName(nameof(OAuthImplicitAuthFlowHttpTrigger))]
[OpenApiOperation(operationId: “oauth.flows.implicit”, tags: new[] { “oauth” }, Summary = “OAuth implicit flows”, Description = “This shows the OAuth implicit flows”, Visibility = OpenApiVisibilityType.Important)]

[OpenApiSecurity(“implicit_auth”,
SecuritySchemeType.OAuth2,
Flows = typeof(ImplicitAuthFlow))]

[OpenApiResponseWithBody(statusCode: HttpStatusCode.OK, contentType: “application/json”, bodyType: typeof(IEnumerable), Summary = “successful operation”, Description = “successful operation”)]
public static async Task Run(
[HttpTrigger(AuthorizationLevel.Anonymous, “GET”, Route = null)] HttpRequest req,
ILogger log)
{
log.LogInformation(“C# HTTP trigger function processed a request.”);

var headers = req.Headers.ToDictionary(p => p.Key, p => (string) p.Value);
var handler = new JwtSecurityTokenHandler();
var token = handler.ReadJwtToken(headers[“Authorization”].Split(‘ ‘).Last());
var claims = token.Claims.Select(p => p.ToString());

var result = new OkObjectResult(claims);

return await Task.FromResult(result).ConfigureAwait(false);
}
}


You can see ImplicitAuthFlow as the flow type. Since it uses Azure Active Directory, it sets AuthorizationUrl, RefreshUrl, and Scopes values. It also takes the single tenant type, which requires the tenant ID (line #3-6, 10, 14-15). Scopes has the default value (line #17).


    public class ImplicitAuthFlow : OpenApiOAuthSecurityFlows
{
private const string AuthorisationUrl =
“https://login.microsoftonline.com/{0}/oauth2/v2.0/authorize”;
private const string RefreshUrl =
“https://login.microsoftonline.com/{0}/oauth2/v2.0/token”;

public ImplicitAuthFlow()
{
var tenantId = Environment.GetEnvironmentVariable(“OpenApi__Auth__TenantId”);

this.Implicit = new OpenApiOAuthFlow()
{
AuthorizationUrl = new Uri(string.Format(AuthorisationUrl, tenantId)),
RefreshUrl = new Uri(string.Format(RefreshUrl, tenantId)),

Scopes = { { “https://graph.microsoft.com/.default”, “Default scope defined in the app” } }
};
}
}


Run the function app and check the Swagger UI page.


Swagger UI - OAuth2 Implicit Auth


When you click the lock button, it asks you to enter the client ID value, redirecting you to sign in to Azure Active Directory. Then, you will get the access token.


Swagger UI - OAuth2 Implicit Auth - Details


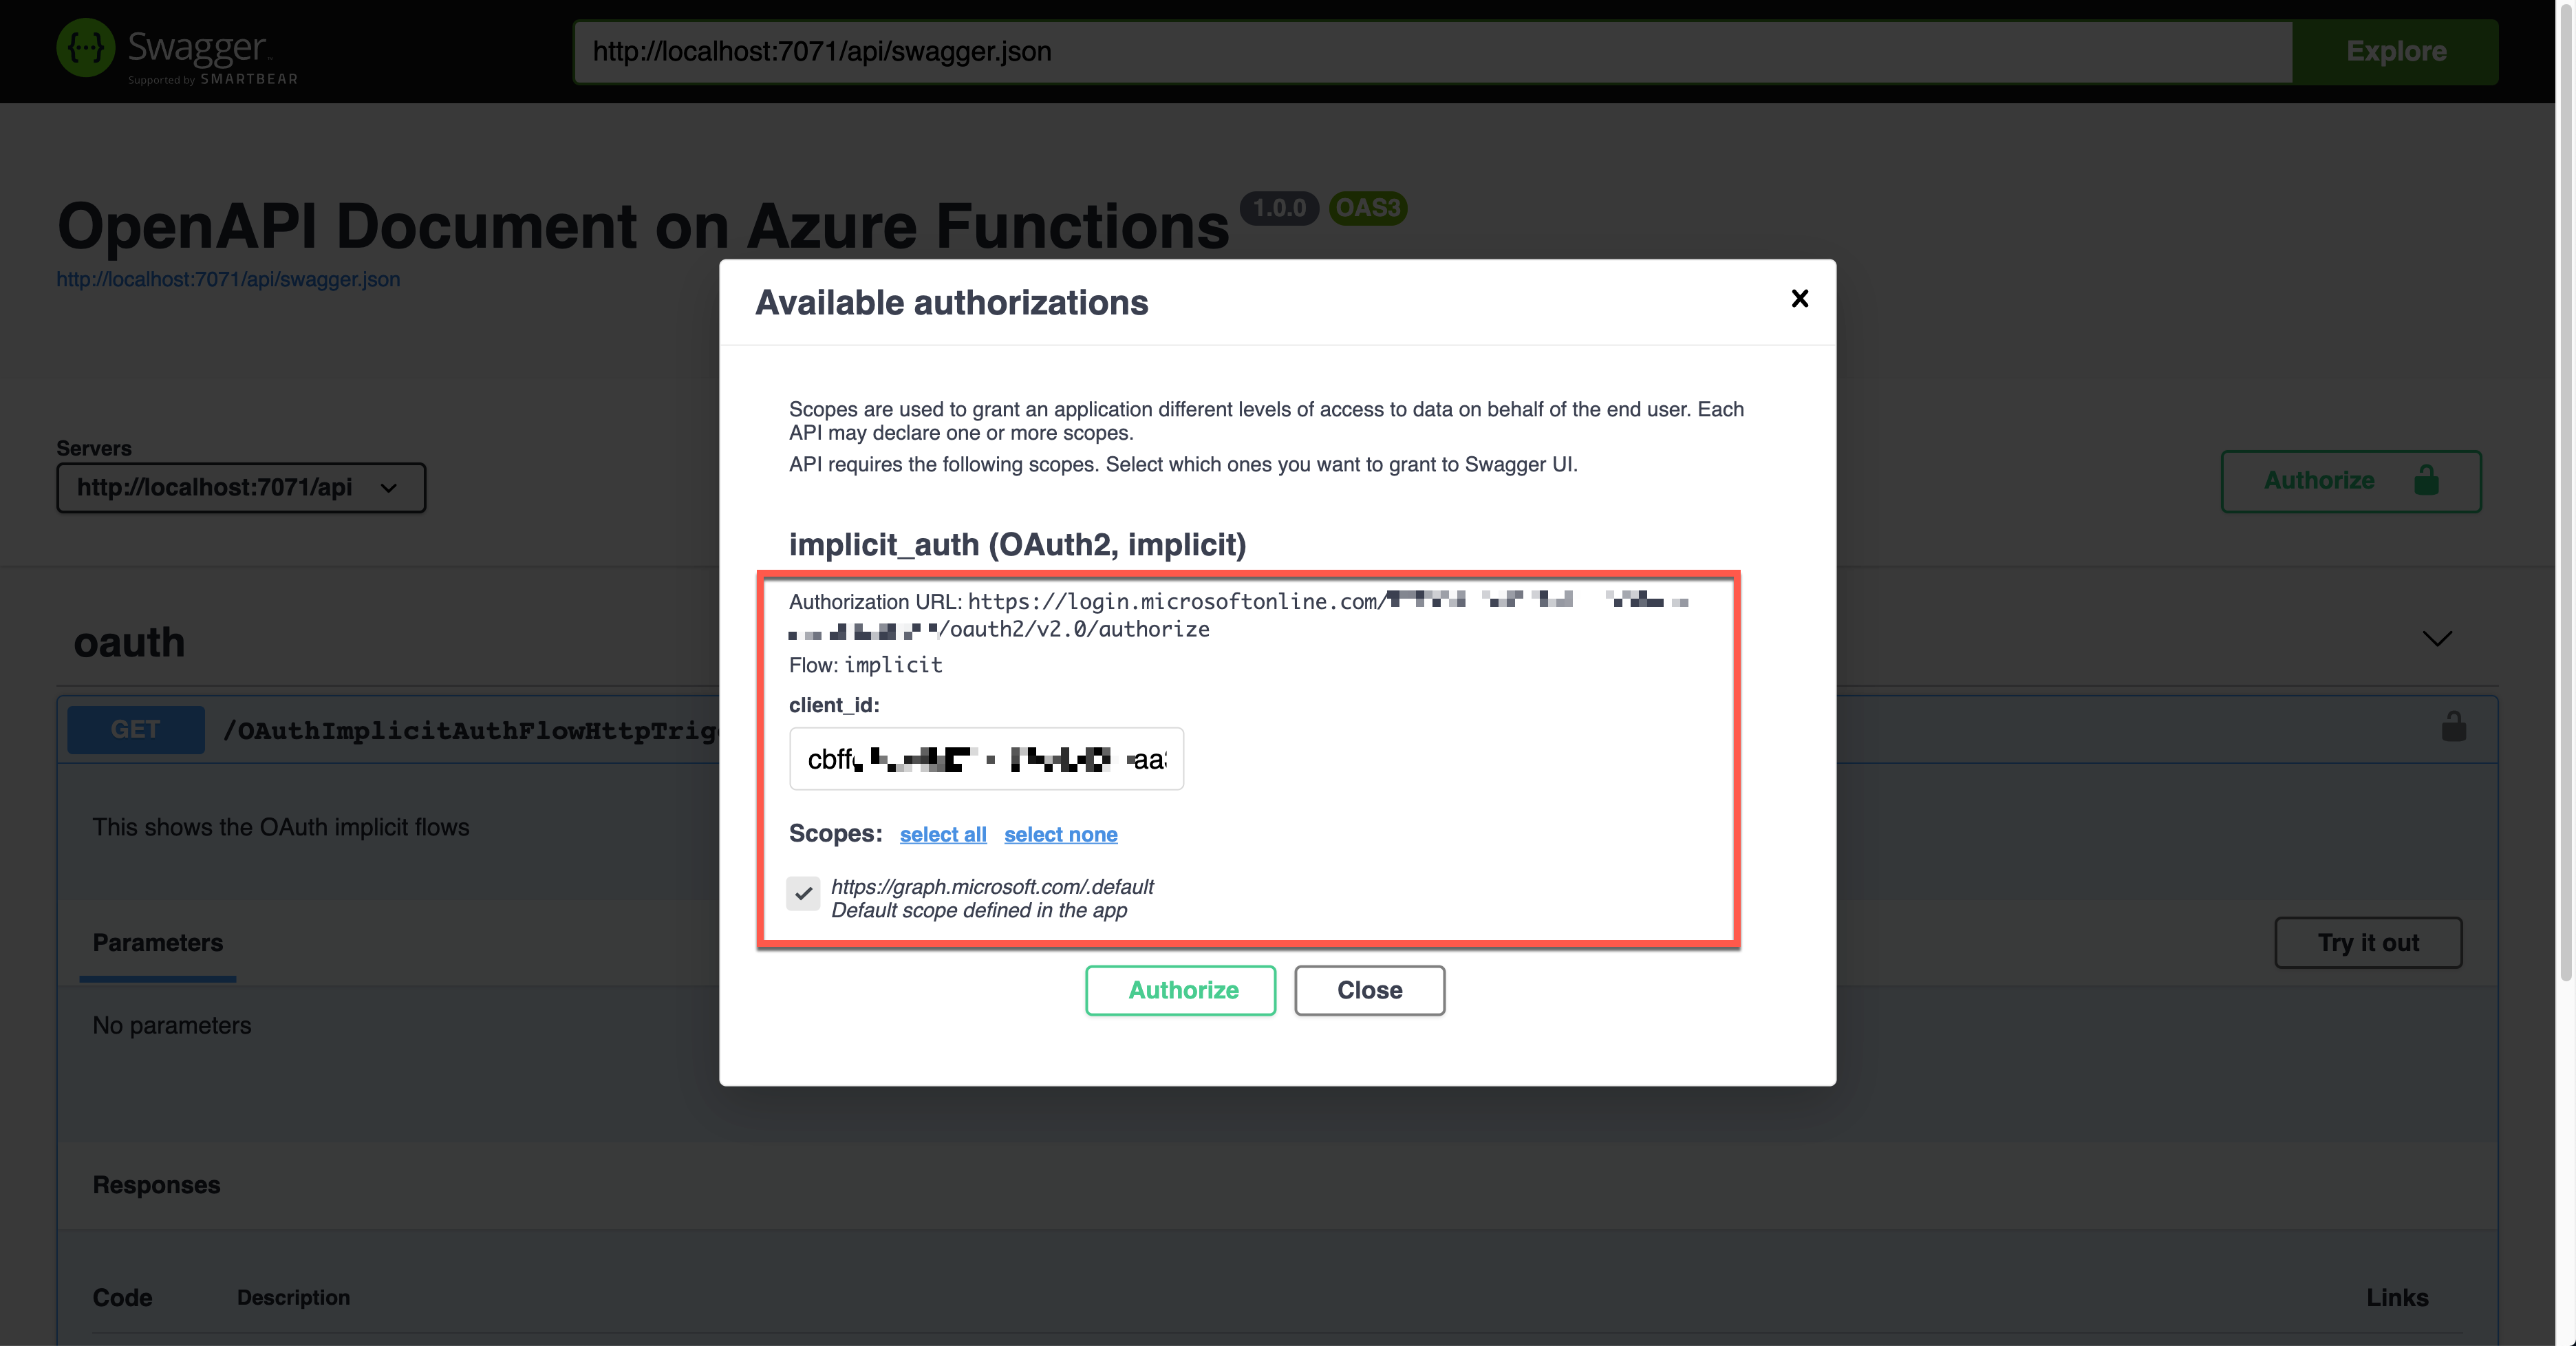
The result shows the Authorization header with the access token in the JWT format.


Swagger UI - OAuth2 Implicit Auth - Result


That JWT is now decoded and verified for further processing.


OpenID Connect Auth Flow


Finally, let’s use the OpenID Connect auth flow. OpenApiSecurityAttribute(…) contains the following definitions (line #6-9).


The {tenant_id} value, of course, should be replaced with the real tenant ID. With this OpenID Connect URL, it automatically discovers the OAuth2 auth flows. Then, set the auth level to Anonymous (line #12).


    public static class OpenIDConnectAuthFlowHttpTrigger
{
[FunctionName(nameof(OpenIDConnectAuthFlowHttpTrigger))]
[OpenApiOperation(operationId: “openidconnect”, tags: new[] { “oidc” }, Summary = “OpenID Connect auth flows”, Description = “This shows the OpenID Connect auth flows”, Visibility = OpenApiVisibilityType.Important)]

[OpenApiSecurity(“oidc_auth”,
SecuritySchemeType.OpenIdConnect,
OpenIdConnectUrl = “https://login.microsoftonline.com/{tenant_id}/v2.0/.well-known/openid-configuration”,
OpenIdConnectScopes = “openid,profile”)]

[OpenApiResponseWithBody(statusCode: HttpStatusCode.OK, contentType: “application/json”, bodyType: typeof(IEnumerable), Summary = “successful operation”, Description = “successful operation”)]
public static async Task Run(
[HttpTrigger(AuthorizationLevel.Anonymous, “GET”, Route = null)] HttpRequest req,
ILogger log)
{
log.LogInformation(“C# HTTP trigger function processed a request.”);

var headers = req.Headers.ToDictionary(p => p.Key, p => (string) p.Value);
var handler = new JwtSecurityTokenHandler();
var token = handler.ReadJwtToken(headers[“Authorization”].Split(‘ ‘).Last());
var claims = token.Claims.Select(p => p.ToString());
var content = new { headers = headers, claims = claims };

var result = new OkObjectResult(content);

return await Task.FromResult(result).ConfigureAwait(false);
}
}


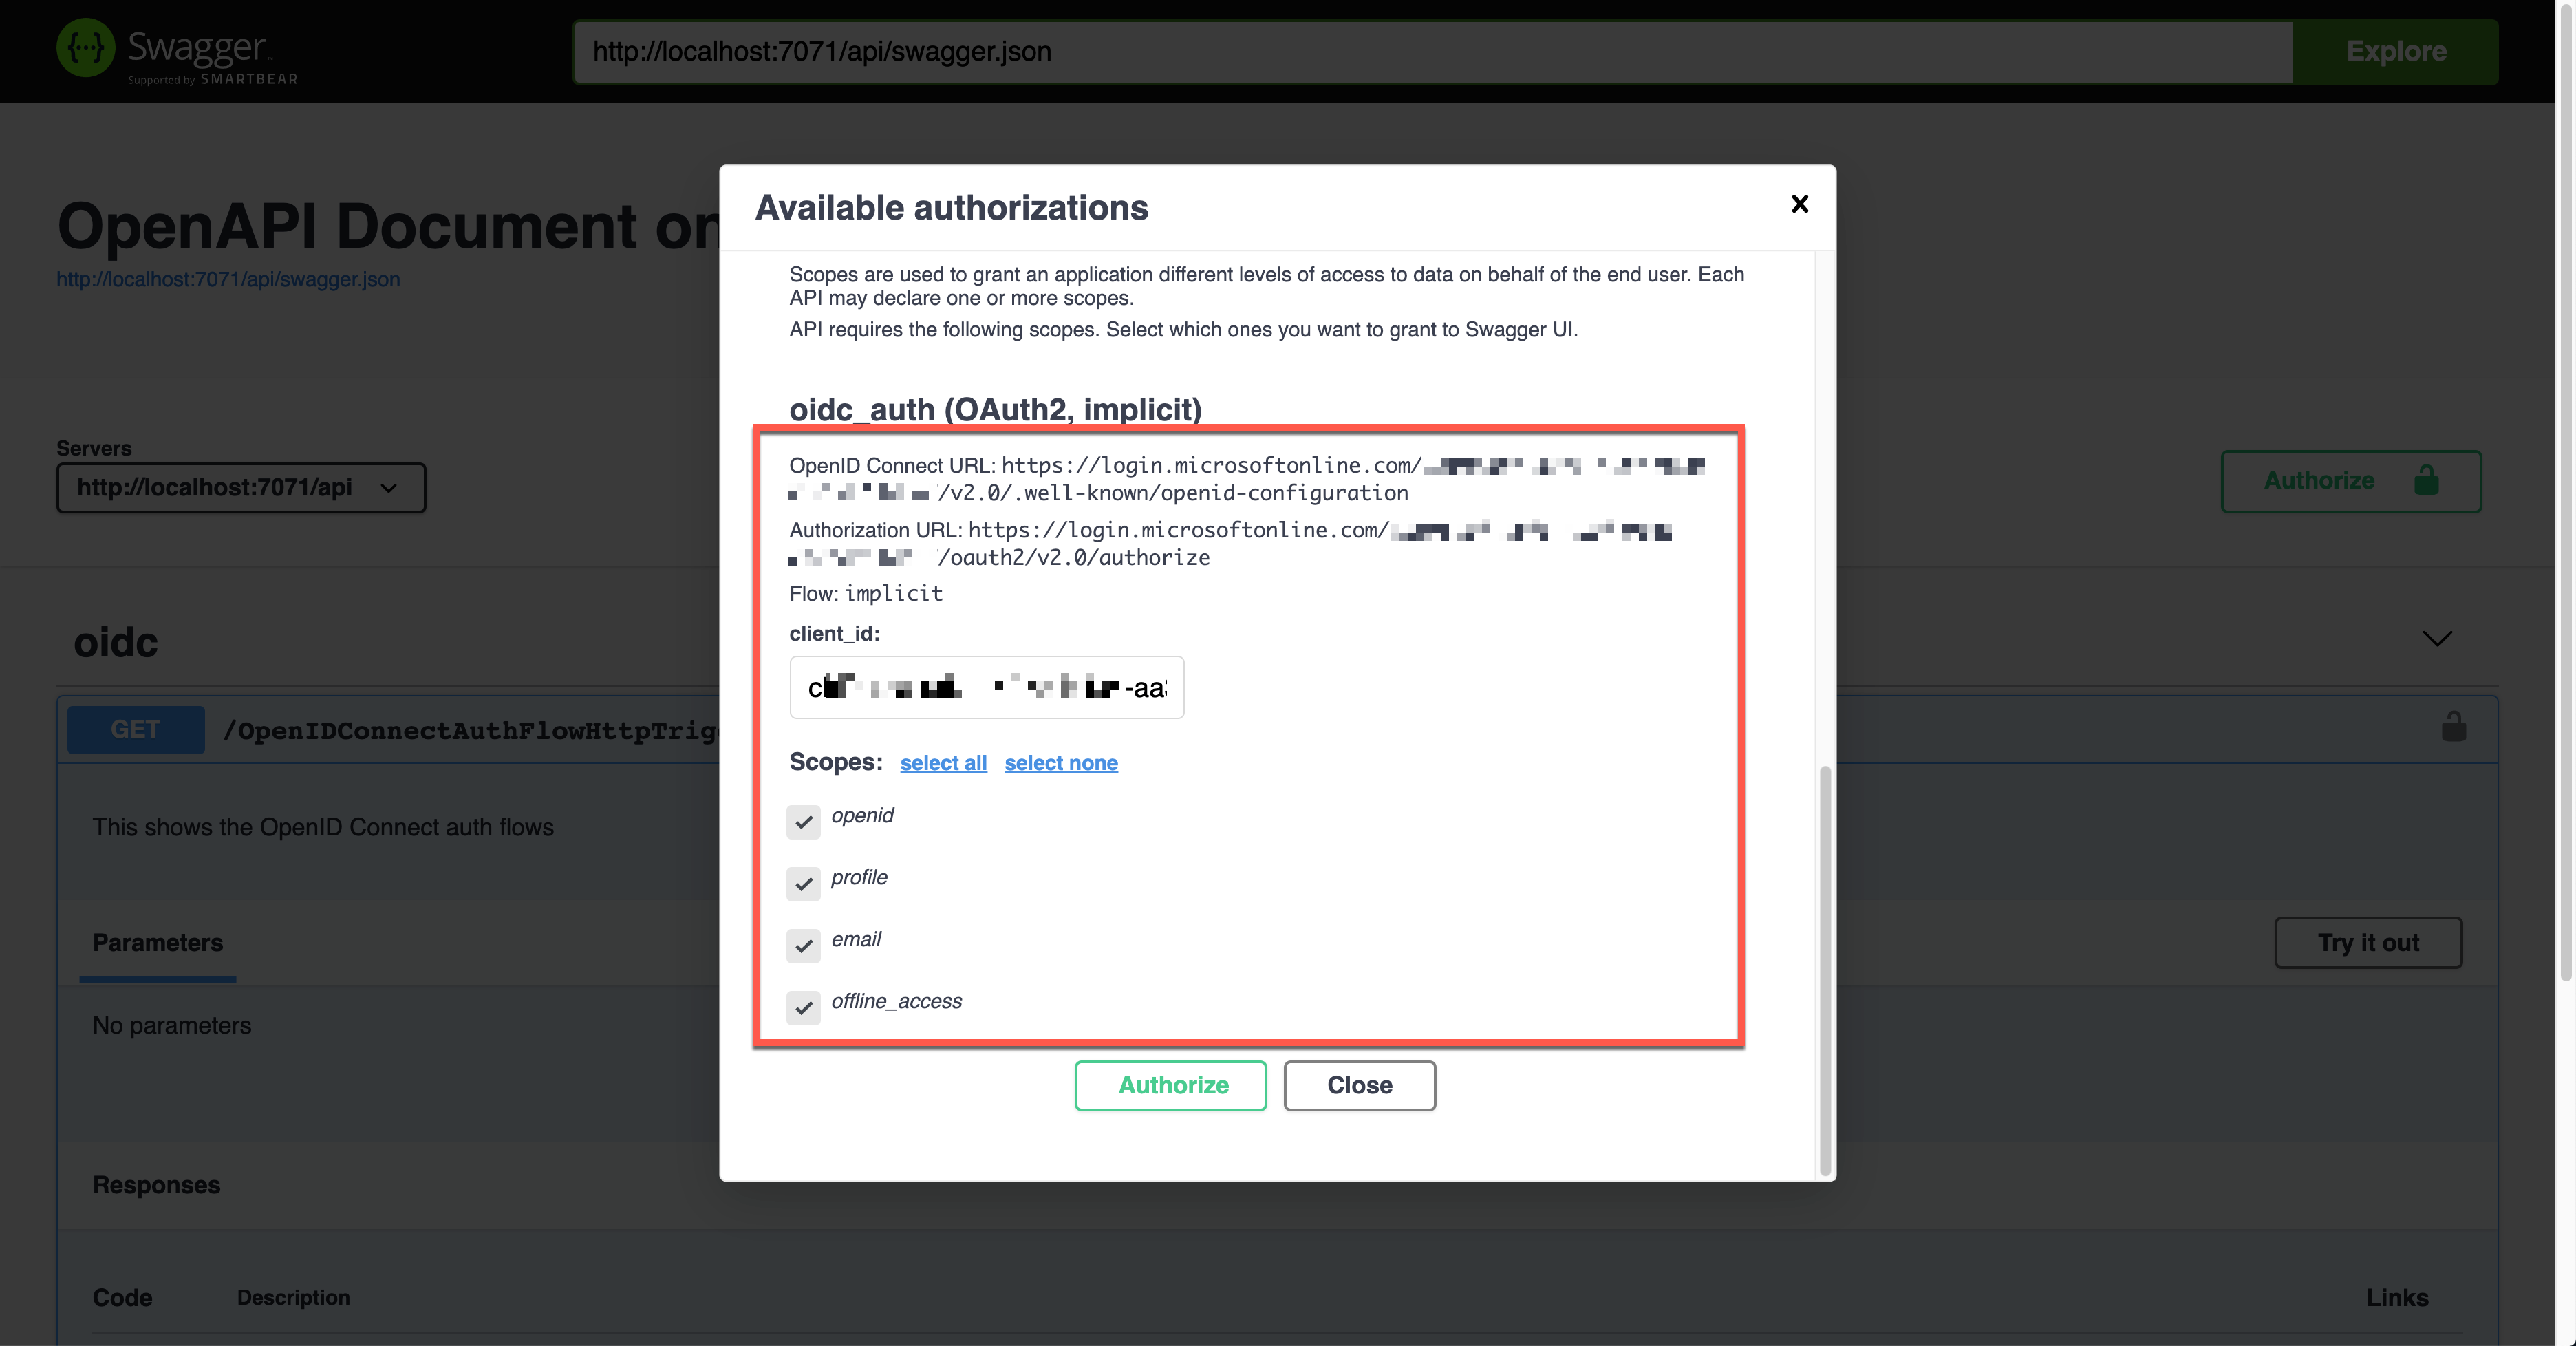
Run the function app and find the Swagger UI page.


Swagger UI - OpenID Connect Auth


Unlike other auth flows, this OpenID Connect auth flow shows two methods. The first one is the authentication code flow, and the other one is the implicit flow. Let’s use the second one and enter the client ID value. It will redirect you to Azure Active Directory to sign in and give you the access token.


Swagger UI - OpenID Connect Auth - Details


Once execute the endpoint, the access token is passed through the Authorization header in the JWT format.


Swagger UI - OpenID Connect Auth - Result


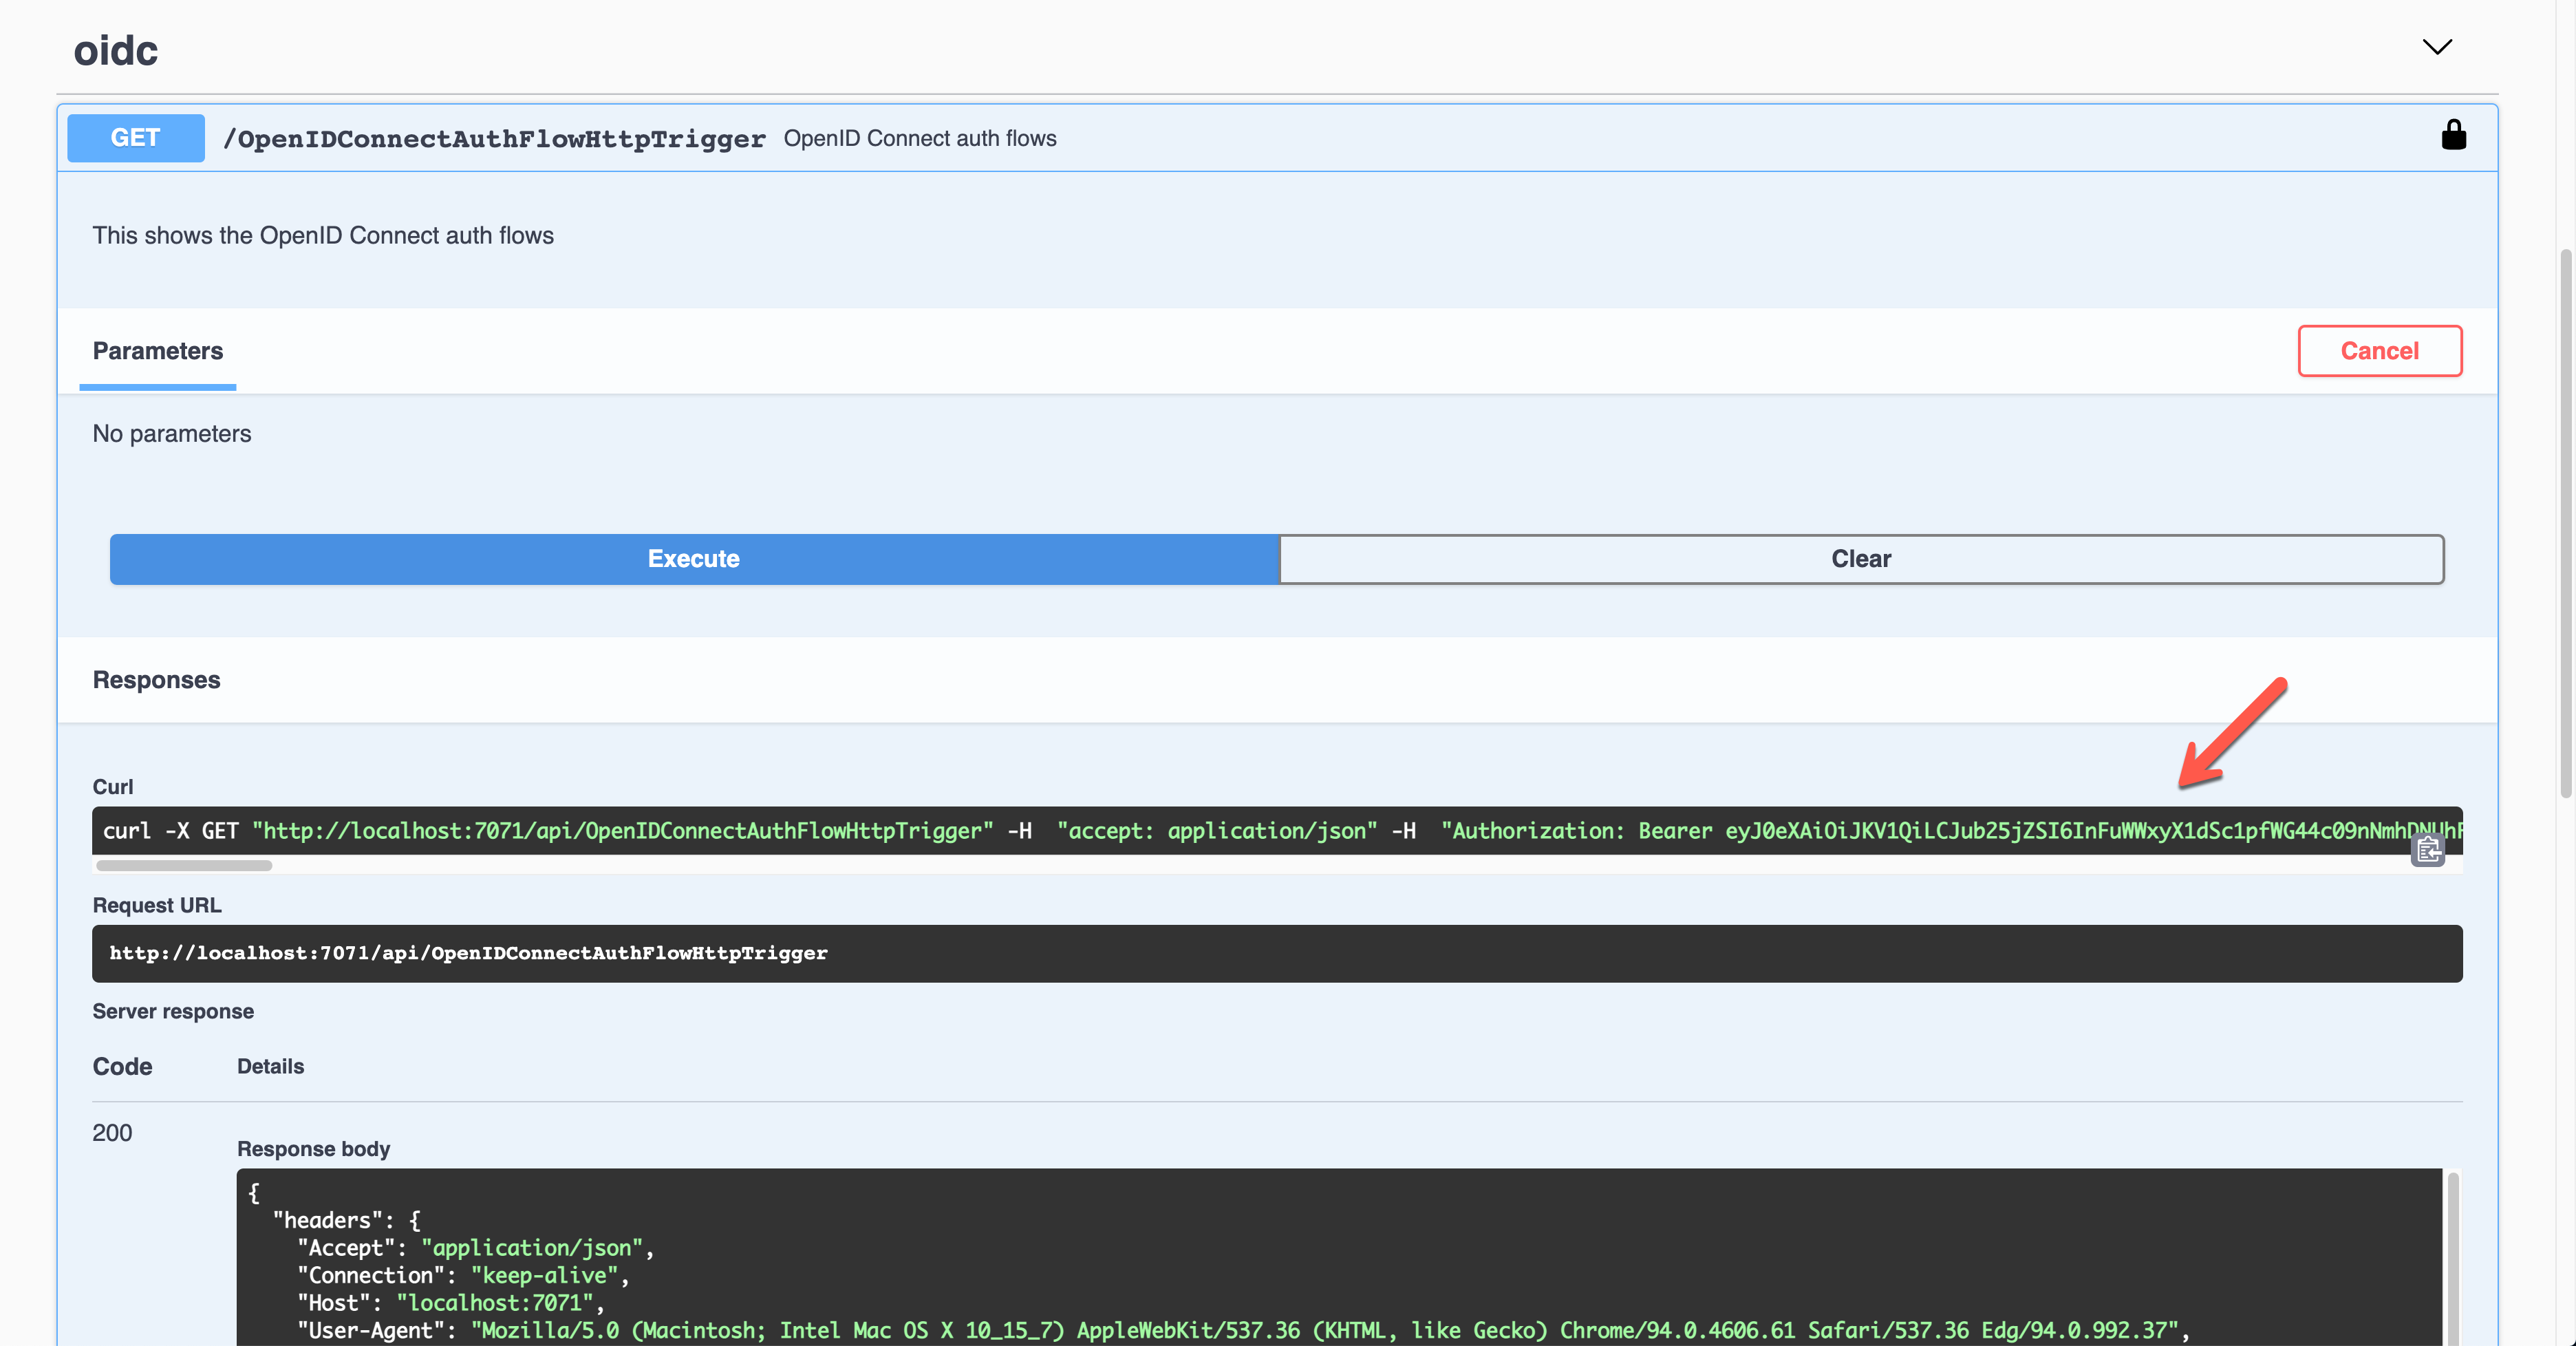
Decode and validate the token for further processing.


So far, we’ve covered six different ways to authenticate the HTTP trigger endpoints with the OpenAPI extension. These six ways are the most commonly used ones. Therefore, if you need, you can pick up one approach and implement it.


This article was originally published on Dev Kimchi.

Meet a recent Microsoft Learn Student Ambassador graduate: Vivekkumar Parmar

Meet a recent Microsoft Learn Student Ambassador graduate: Vivekkumar Parmar

This article is contributed. See the original author and article here.

This series highlights Microsoft Learn Student Ambassadors who achieved the Gold milestone and have recently graduated from university. Each blog features a different student and highlights their accomplishments, their experience with the Student Ambassadors community, and what they’re up to now.


Today we’d like to introduce Vivekkumar Parmar who is from India and recently graduated from Dharmsinh Desai University.


Gold Student Ambassador: Vivekkumar ParmarGold Student Ambassador: Vivekkumar Parmar


Responses have been edited for clarity and length.


When you first joined the Student Ambassadors community in 2018, did you have specific goals you wanted to reach, such as a particular skill or quality?  What were they?  Did you achieve them? How has the community impacted you in general? 

When I joined, I didn’t have any prior experience hosting events and giving seminars on technical topics, but I was very excited to share my knowledge with fellow students. What I saw and experienced at my campus was that students were building amazing projects as part of a curriculum or even for self-learning or as a hobby, but once the development was completed, the code used to reside on a code repository hosting service like GitHub, but there was no practical usage of it.  If it had been deployed on a cloud service platform and made available to anyone on the internet, then that same project could have been useful to solve real life problems, so after I became a Student Ambassador, I decided to make the cloud my primary area of focus and conducted various workshops and seminars on Azure. In order to host events on Azure, I had to first learn the concepts, so I explored this domain in depth and gained a thorough understanding, which has helped me in my career too.


What is an accomplishment that you’re the proudest of and why?


I’m proudest of the very first event that I hosted in February 2019 at my university, “Introduction to Cloud Services”. Since I didn’t have any prior experience in event management and delivering speeches, with the help of my classmates (shout out to them – Kaushal, Hardik, Sameer, Utsav & Virat), we planned and successfully organized the event which was attended by 80+ students.


Now why is that event very special to me? That event planted the seeds of cloud at my university. At that time, most of the students on my campus were not familiar with cloud technologies. There were a few technical clubs, but I don’t remember any event being hosted around the cloud domain. With my event, Azure was introduced in our university. It was a half day event.  We started with introducing the cloud, Azure, and its services and also had a hands-on workshop at the end. [Thanks to Microsoft for those Azure student credits and Subway meal support!!] Students were really amazed to see various services offered by Azure and how they could implement it in their college projects. After attending that event, a few students took a deep dive into Azure.  I used to receive messages from them regarding their queries, and I felt very proud to see them using various Azure services in their projects.  


What are you doing now that you’ve graduated?


I’m passionate about cloud computing and community building. Currently, I’m mentoring a few tech communities of my university and am planning to take a few Azure certification exams in the coming months.  I would like to start my career as a DevOps engineer and later become a developer advocate/evangelist.  I would love to continue to speak occasionally on Azure, Cloud, DevOps, etc. to share my knowledge.


If you could redo your time with the Student Ambassadors community, is there anything you would have done differently?


Yes.  I wasn’t able to interact much with Student Ambassadors from other regions. I would have loved to collaborate with Student Ambassadors from all over the world and host global hackathons and initiate projects with them.


If you were to describe the community to a student who is interested in joining, what would you say about it to convince him or her to join?  

Rather than a program, I would describe Microsoft Learn Student Ambassadors as a family, a family of like-minded, amazing people from all around the world who are passionate about technology and always excited to share their knowledge and learn something new.

Being part of this community will give you an immense opportunity to represent yourself, your local community, and your university at a global level. It’ll help you grow and strengthen your skill set. And most importantly, you’ll create valuable memories that will stay with you for a very long period!  


What advice would you give to new Student Ambassadors?


If you’ve recently joined this community, then first of all, congratulations and welcome! Here are few words of advice from my own experience:


  •          Don’t be shy. Interact as much as you can with fellow students at your college, other Student Ambassadors from across the globe, and the program team. You’ll learn many things just by communicating with them.

  •          “Every expert was once a beginner.” It’s never too late to start something new. You may face challenges and obstacles in the beginning, but don’t be afraid. Have faith in yourself. Members of our community are very helpful. You can reach out to anyone for help, and I’m sure that you’ll definitely find the solution.

  •          Participate in various events and activities going on in Teams [Editor’s note: this is the platform through which the Student Ambassadors and the program team communicate and collaborate] and hackathons, etc. as per your interests. Acquire knowledge and do some mini-projects to get hands-on experience and later share it with others by hosting events, writing blogs, or creating video tutorials. Microsoft Learn is one of the best platforms on which to gain a deep understanding of Microsoft technologies.

  •          Don’t just host events for the sake of doing it or achieving milestones. Enjoy that experience and live that moment that you experience even if only one attendee out of all the participants does something extra after attending your event like exploring in depth a particular technology that was taught, building a project around it, or winning hackathons using any of those technologies.  That feeling of happiness and pride you feel will put you on cloud nine. Trust me!


Do you have a motto in life, a guiding principle that drives you?

“Learning is a lifelong process”, so keep exploring something new every day.


What is one random fact few people know about you?

Since my early teen years, I wanted to have martial arts training because it helps you build focus, discipline, and mental and physical strength. But unfortunately, I never got an opportunity. Hopefully someday if I get the time and chance to pursue it, then I’m up for it!


Best of luck to you in the future, Vivekkumar!


NSA Releases Guidance on Avoiding the Dangers of Wildcard TLS Certificates and ALPACA Techniques

This article is contributed. See the original author and article here.

The National Security Agency (NSA) has released a Cybersecurity Information (CSI) sheet with guidance to help secure the Department of Defense, National Security Systems, and Defense Industrial Base organizations from poorly implemented wildcard Transport Layer Security (TLS) certificates and the exploitation of Application Layer Protocols Allowing Cross-Protocol Attacks (ALPACA). A malicious cyber actor with network access can exploit this vulnerability to access sensitive information.

CISA encourages administrators and users to review NSA’s CSI sheet on Avoiding Dangers of Wildcard TLS Certificates and the ALPACA Technique for more information.

Apache Releases HTTP Server version 2.4.51 to Address Vulnerabilities Under Exploitation

This article is contributed. See the original author and article here.

On October 7, 2021, the Apache Software Foundation released Apache HTTP Server version 2.4.51 to address Path Traversal and Remote Code Execution vulnerabilities (CVE-2021-41773, CVE-2021-42013) in Apache HTTP Server 2.4.49 and 2.4.50. These vulnerabilities have been exploited in the wild. 

CISA is also seeing ongoing scanning of vulnerable systems, which is expected to accelerate, likely leading to exploitation. CISA urges organizations to patch immediately if they haven’t already—this cannot wait until after the holiday weekend.

Automatically route deals to the right sellers by using segments in assignment rules

Automatically route deals to the right sellers by using segments in assignment rules

This article is contributed. See the original author and article here.

Dynamics 365 Sales helps teams better understand business relationships, take actions based on insights, and close opportunities faster. One of the many ways the app helps sales teams succeed is enabling them to build segments for use in assignment rules to ensure leads and opportunities are routed to the right sellers.

What is a segment?

A segment is a collection of leads and opportunities that are grouped together based on certain conditions, such as location, deal value, language, and product. You can create segments for both lead and opportunity entities. For details, see this article: Create and activate a segment.

You can use segments in assignment rules and sequences. With segments, you can choose the set of characteristics a lead or opportunity should have in order to get assigned to relevant sellers or to connect to a certain sequence, without the need to create the same conditions repeatedly.

When a new lead or opportunity is created in Dynamics 365 Sales and matches the conditions of a specified segment, it will automatically become a member of that segment, and will assign to sellers and connect to a sequence based on how you build your organization’s process automation.

Let’s take an example to understand how it works.

Define segment conditions

The following segment is defined with simple conditions, to catch all leads coming from the company’s website and that have an email address.

Using an assignment rule in Dynamics 365 Sales to capture leads with an email address.

A segment can also include more complex parameters, using groups of AND/OR conditions or a link to a related entity. For example, you can create a segment that will capture all opportunities that are interested in printers or monitors, and that are related to one of two relevant accounts.

Simulate segment members

You can simulate the results based on existing data in your system, to make sure the segment will catch the lead or opportunity with the desired characteristics. The simulation results are not actual members of that segment and are just an example of the types of leads the segment will capture when it is activated.

Important highlights and limitations

  • A lead or opportunity will be evaluated for a segment when it is created, and again when it is being updated. For example, a lead can enter the system without a populated email address, but after going through a nurturing process, an email address will be added, and the lead will become a member of the “Nurtured leads from website” segment in the above example.
  • Your segment must be activated to catch new leads or opportunities.
  • A lead or opportunity can become a member of only one segment. If a lead matches the conditions of more than one segment, it will randomly become a member of one of them.
  • When a lead is added to a segment and assigned to a seller or connected to a sequence, it can’t be added to a different segment, seller, or sequence.

How to use a segment in assignment rules

When creating assignment rules for a lead or opportunity, you can use a segment to define the type of record that will be assigned to sellers via each rule. You can create multiple rules based on the same segment and add specific conditions to each rule to match your business process.

In the following example, we can select the “Nurtured leads from website” segment. This means that all leads that will become members of that segment will be assigned to sellers by this rule’s conditions.

Create rule for adding leads to a segment in Dynamics 365 Sales.

We can add another condition to that segment that will route the hot leads from the segment to the most experienced sellers.

For this scenario, we can create two rules: one rule to capture hot leads from the segment, and another rule to catch all remaining leads from the segment.

By placing the rule for assigning hot leads above the default rule, hot leads will be evaluated first and will be assigned to experienced sellers. The rest of the leads will be assigned by the default rule.

Next steps

For more information about segments, read the documentation:

The post Automatically route deals to the right sellers by using segments in assignment rules appeared first on Microsoft Dynamics 365 Blog.

Brought to you by Dr. Ware, Microsoft Office 365 Silver Partner, Charleston SC.

How to find the right Azure SQL SKU for your SQL workloads | Data Exposed

This article is contributed. See the original author and article here.

 Are you looking to modernize your on-premises databases to Azure SQL? Join Alexandra Ciortea, Raymond Truong, Wenjing Wang, and Anna Hoffman to understand how you can size your Azure SQL target accordingly, based on the current performance and business requirements. We will walk you through several approaches and models that can suit your needs.