This article is contributed. See the original author and article here.
CISA, the Federal Bureau of Investigation (FBI), U.S. Cyber Command Cyber National Mission Force (CNMF), the United Kingdom’s National Cyber Security Centre (NCSC-UK), and the National Security Agency (NSA) have issued a joint Cybersecurity Advisory (CSA) detailing malicious cyber operations by Iranian government-sponsored advanced persistent threat (APT) actors known as MuddyWater.
MuddyWater is conducting cyber espionage and other malicious cyber operations as part of Iran’s Ministry of Intelligence and Security (MOIS), targeting a range of government and private-sector organizations across sectors—including telecommunications, defense, local government, and oil and natural gas—in Asia, Africa, Europe, and North America.
We are excited to announce a new suite of features entering into public preview for Microsoft Sentinel. This suite of features will contain:
Basic ingestion tier: new pricing tier for Azure Log Analytics that allows for logs to be ingested at a lower cost. This data is only retained in the workspace for 8 days total.
Archive tier: Azure Log Analytics has expanded its retention capability from 2 years to 7 years. With that, this new tier for data will allow for the data to be retained up to 7 years in a low-cost archived state.
Search jobs: search tasks that run limited KQL in order to find and return all relevant logs to what is searched. These jobs search data across the analytics tier, basic tier. and archived data.
Data restoration: new feature that allows users to pick a data table and a time range in order to restore data to the workspace via restore table.
Basic Ingestion Tier:
The basic log ingestion tier will allow users to pick and choose which data tables should be enrolled in the tier and ingest data for less cost. This tier is meant for data sources that are high in volume, low in priority, and are required for ingestion. Rather than pay full price for these logs, they can be configured for basic ingestion pricing and move to archive after the 8 days. As mentioned above, the data ingested will only be retained in the workspace for 8 days and will support basic KQL queries. The following will be supported at launch:
where
extend
project – including all its variants (project-away, project-rename, etc.)
parse and parse-where
Note: this data will not be available for analytic rules or log alerts.
During public preview, basic logs will support the following log types:
The archive tier will allow users to configure individual tables to be retained for up to 7 years. This introduces a few new retention policies to keep track of:
retentionInDays: the number of days that data is kept within the Microsoft Sentinel workspace.
totalRetentionInDays: the total number of days that data should be retained within Azure Log Analytics.
archiveRetention: the number of days that the data should be kept in archive. This is set by taking the totalRetentionInDays and subtracting the workspace retention.
Data tables that are configured for archival will automatically roll over into the archive tier after they expire from the workspace. Additionally, if data is configured for archival and the workspace retention (say 180 days) is lowered (say 90 days), the data between the original and new retention settings will automatically be rolled over into archive in order to avoid data loss.
Configuring Basic and Archive Tiers:
In order to configure tables to be in the basic ingestion tier, the table must be supported and configured for custom logs version 2. For steps to configure this, please follow this document. Archive does not require this but it is still recommended.
Currently there are 3 ways to configure tables for basic and archive:
REST API call
PowerShell script
Microsoft Sentinel workbook (uses the API calls)
REST API
The API supports GET, PUT and PATCH methods. It is recommended to use PUT when configuring a table for the first time. PATCH can be used after that. The URI for the call is:
Note: null is used when telling the API to not change the current retention setting on the workspace.
PowerShell
A PowerShell script was developed to allow users to monitor and configure multiple tables at once for both basic ingestion and archive. The scripts can be found here and here.
To configure tables with the script, a user just needs to:
Run the script.
Authenticate to Azure.
Select the subscription/workspace that Microsoft Sentinel resides in.
Select one or more tables to configure for basic or archive.
Enter the desired change.
Workbook
A workbook has been created that can be deployed to a Microsoft Sentinel environment. This workbook allows for users to view current configurations and configure individual tables for basic ingestion and archive. The workbook uses the same REST API calls as listed above but does not require authentication tokens as it will use the permissions of the current user. The user must have write permissions on the Microsoft Sentinel workspace.
To configure tables with the workbook, a user needs to:
Go to the Microsoft Sentinel GitHub Repo to fetch the JSON for the workbook.
Click ‘raw’ and copy the JSON.
Go to Microsoft Sentinel in the Azure portal.
Go to Workbooks.
Click ‘add workbook’.
Clicl ‘edit’.
Click ‘advanced editor’.
Paste the copied JSON.
Click save and name the workbook.
Choose which tab to operate in (Archive or Basic)
Click on a table that should be configured.
Review the current configuration.
Set the changes to be made in the JSON body.
Click run update.
The workbook will run the API call and will provide a message if it was successful or not. The changes made can be seen after refreshing the workbook.
Search jobs allow users to specify a data table, a time period, and a key item to search for the in the data. As of now, Search jobs use simple KQL, which will support more complex KQL over time. In terms of what separates Search jobs from regular queries, as of today a standard query using KQL will return a maximum of 30,000 results and will time out at 10 minutes of running. For users with large amounts of data, this can be an issue. This is where search jobs come into play. Search jobs run independently from usual queries, allowing them to return up to 1,000,000 results and up to 24 hours. When a Search job is completed, the results found are placed in a temporary table. This allows users to go back to reference the data without losing it and being able to transform the data as needed.
Search jobs will run on data that is within the analytics tier, basic tier, and also archive. This makes it a great option for bringing up historical data in a pinch when needed. An example of this would be in the event of a widespread compromise that has been found that stems back over 3 months. With Search, users are able to run a query on any IoC found in the compromise in order to see if they have been hit. Another example would be if a machine is compromised and is a common player in several raised incidents. Search will allow users to bring up historical data from the past int the event that the attack initially took place outside of the workspace’s retention.
When results are brought in, the table name will be structured as so:
Table searched
Number ID
SRCH suffix
Example: SecurityEvents_12345_SRCH
Data Restoration:
Similar to Search, data restoration allows users to pick a table and a time period in order to move data out of archive and back into the analytics tier for a period of time. This allows users to retrieve a bulk of data instead of just results for a single item. This can be useful during an investigation where a compromise took place months ago that contains multiple entities and a user would like to bring relevant events from the incident time back for the investigation. The user would be able to check all involved entities by bringing back the bulk of the data vs. running a search job on each entity within the incident.
When results are brought in, the results are placed into a temporary table similar to how Search does it. The table will take a similar naming scheme as well:
Table restored
Number ID
RST suffix
Example: SecurityEvent_12345_RST
Performing a Search and Restoration Job:
Search
Users can perform Seach jobs by doing the following:
Go to the Microsoft Sentinel dashboard in the Azure Portal.
Go to the Search blade.
Specify a data table to search and a time period it should review.
In the search bar, enter a key term to search for within the data.
Once this has been performed, a new Search job will be created. The user can leave and come back without impacting the progress of the job. Once it is done, it will show up under saved searches for future reference.
Note: Currently Search will use the following KQL to perform the Search: TableName | where * has ‘KEY TERM ENTERED’
Restore
Restore is a similar process to Search. To perform a restoration job, users need to do the following:
Go to the Microsoft Sentinel dashboard in the Azure Portal.
Go to the Search blade.
Click on ‘restore’.
Choose a data table and the time period to restore.
While Search, Basic, Archive, and Restore are in public preview, there will not be any cost generated. This means that users can begin using these features today without the worry of cost. As listed on the Azure Monitor pricing document, billing will not begin until April 1st, 2022.
Search
Search will generate cost only when Search jobs are performed. The cost will be generated per GB scanned (data within the workspace retention does not add to the amount of GB scanned). Currently the price will be $0.005 per GB scanned.
Restore
Restore will generate cost only when a Restore job is performed. The cost will be generated per GB restored/per day that the table is kept within the workspace. Currently the cost will be $.10 per GB restored per day that it is active. To avoid the recurring cost, remove Restore tables once they are no longer needed.
Basic
Basic log ingestion will work similar to how the current model works. It will generate cost per GB ingested into Azure Log Analytics and also Microsoft Sentinel if it is on the workspace. The new billing addition for basic log ingestion will be a query charge for GB scanned for the query. Data ingested into the Basic tier will not count towards commitment tiers. Currently the price will be $.50 per GB ingested in Azure Log Analytics and $.50 per GB ingested into Microsoft Sentinel.
Archive
Archive will generate a cost per GB/month stored. Currently the price will be $.02 per GB per month.
Learn More:
Documentation is now available for each of these features. Please refer to the links below:
This article is contributed. See the original author and article here.
Across industries, companies are finding practical ways to bridge physical reality and digital experiences using hands-free headsets and augmented reality solutions to inform decisions and action on insights produced by smart, connected solutions.
Mixed realitya set of technologies that superimposes digital data and images in the physical worldbrings new opportunities that have become instrumental to how we tap into unique real-world, human capabilities. This technology is becoming more widely used across organizations today and has proven to be transformative to task performance, learning and retention, and collaboration. In fact, the augmented and virtual reality market is expected to reach $372.1 billion by the end of 2022, and swell to $542.8 billion by the end of 2025 according to new data from the IDC.1
Microsoft HoloLens 2 and mixed reality solutions are driving material ROI across industries
Based on the Microsoft-commissioned Forrester Total Economic Impact (TEI) report, Microsoft HoloLens 2 is delivering 177 percent return on investment (ROI) and a net present value (NPV) of $7.6 million over three years with a payback of 13 months.2 Customers across leading industries are realizing significant value from deploying mixed reality solutions in their most common, critical work scenarios.
Manufacturing
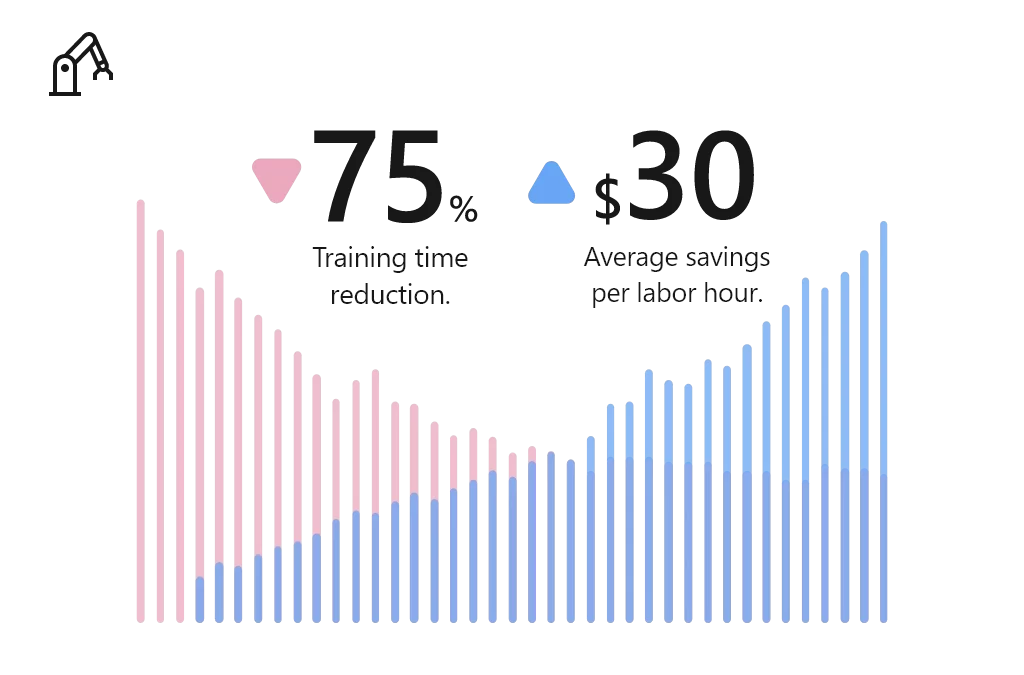
Manufacturing companies deploying Microsoft HoloLens 2 and mixed reality applications to train their workforces, accelerate employee proficiency, and build more agile factories. Using Microsoft mixed reality, Manufacturers reduced training time by 75 percent, at an average savings of $30 per labor hour.2
Common scenarios in which manufacturers benefit from mixed reality on Microsoft HoloLens 2:
Guided assembly and training: Empower employees to learn new skills and complex assembly tasks with holographic step-by-step instructions, no instructor necessary.
Remote inspection and audits: Enable remote employees to solve business problems in real time, using 3D annotations to access, share, and bring critical information into view.
Connected field service: Connect field technicians with remote experts to collaborate seamlessly, heads-up and hands-free with content capture abilities, interactive annotations, and contextual data overlays.
“When you describe a problem, imagine that we are speaking different languages. When you explain it, someone on the other side may not understand precisely what’s happening, but when you show it in real time with the HoloLens, people understand.”Eaton Vehicle Group. Read more about the Eaton Vehicle Group customer story.
Education
Educators are turning to Microsoft HoloLens 2 and mixed reality applications to help students embrace a new way of learning. For example, education institutions reduced 520 annual hours of instruction per expert by 15 percent.2
Common scenarios in which educators benefit from mixed reality on Microsoft HoloLens 2:
Augmented teaching: Captivate students and bring education to life with impressionable, high-impact 3D visualization models that enable virtual collaboration and instruction.
Experiential learning: Enable educators to build an experience-based lesson plan, integrating textbook concepts into physical environments to create a simple “learn by doing” approach for studentshands-on and unmediated.
Scaled learning and research: Develop a scalable research collaboration model that improves efficiency of research, lab work, and medical training.
“We did a trial back with our medical students. The students that had been in the HoloLens lab scored 50 percent better compared to the rest of the med school class.”Case Western. Read more about the Case Western customer story.
Healthcare
Mixed reality is empowering providers, payors, and health science experts to reimagine healthcare by accelerating diagnoses, reducing time-to-care, and enabling personalization. Using Microsoft mixed reality, healthcare providers reduced average consumables by 80%, saving $4,000 per trainee.2
Common scenarios in which healthcare providers benefit from mixed reality on Microsoft HoloLens 2:
Holographic patient consultation: Enable healthcare providers to project 3D holographic visualizations of patients’ internal systems that provide procedural understandingbuilding confidence in upcoming procedures and/or treatments.
Remote expert consultation: Support remote consultation and enable medical staff to consult colleagues with heads-up and hands-free through an interactive collaborative experience from anywhere in the world.
Training simulations: Train medical staff with holographic step-by-step guidance without subject matter experts being physically present.
“Using Dynamics 365 Remote Assist, doctors wearing HoloLens, can hold “hands-free” and “heads-up” Teams video calls with colleagues and experts anywhere in the world. They can receive advice, interacting with the caller and the patient at the same time, while medical notes and X-rays can also be placed alongside the call in the wearer’s field of view.”Imperial College Healthcare NHS Trust. Read more about the Imperial College Healthcare NHS Trust customer story.
Architecture, engineering, and construction
With Mixed Reality, architecture, engineering, and construction (AEC) firms are empowered to overcome design, modeling, collaboration, and building site challenges to enhance project quality, decision-making, improve productivity. For example, AEC firms have reduced rework by 75 percent, saving $44 per hour.2
Common scenarios in which AEC organizations benefit from mixed reality on Microsoft HoloLens 2:
Clash detection: Enable onsite workers to preemptively identify issues, detect clashes, and gain buy-in of onsite workers and key stakeholders with overlay designs on physical locations. This mitigates late-stage design changes that could result in rework, budget overrun, and project delays.
3D plan and model demonstrations: Empower project leaders, designers, and engineers and improve customer service and sales with 3D demonstration and immersive visualizations.
Self-guided learning: Equip onsite workers to view task instructions, essential data, and model visualizations while in the flow of work, increasing speed, quality, and safety.
“We use Dynamics 365 Remote Assist on HoloLens 2 to work more effectively and share expertise at critical milestones. This not only saves us money but also helps us construct datacenters for our customers more quickly.”Microsoft. Read the full customer story.
The Forrester TEI study validates how mixed reality solutions on Microsoft HoloLens 2 are empowering enterprises across industries to achieve more. We believe these technologies have offered not only innovative results, but long-term and sustainable solutions for training, remote collaboration, inspections and audits, field service, and more.
Next steps
We look forward to continuing this blog series with a deep dive spotlight on each of these leading industries. In the meantime, learn more about mixed reality applications on Microsoft HoloLens 2 and get started today:
Request a Dynamics 365 Mixed Reality demo on Microsoft HoloLens 2. Book an appointment with our Microsoft Stores team today. Select ‘Other’ under Choose topic and reference HoloLens 2 demo in “What can we help with”.
This article is contributed. See the original author and article here.
Summary
The Sandworm actor, which the United Kingdom and the United States have previously attributed to the Russian GRU, has replaced the exposed VPNFilter malware with a new more advanced framework.
The United Kingdom’s (UK) National Cyber Security Centre (NCSC), the Cybersecurity and Infrastructure Security Agency (CISA), the National Security Agency (NSA), and the Federal Bureau of Investigation (FBI) in the U.S. have identified that the actor known as Sandworm or Voodoo Bear is using a new malware, referred to here as Cyclops Blink. The NCSC, CISA, and the FBI have previously attributed the Sandworm actor to the Russian General Staff Main Intelligence Directorate’s Russian (GRU’s) Main Centre for Special Technologies (GTsST). The malicious cyber activity below has previously been attributed to Sandworm:
Cyclops Blink appears to be a replacement framework for the VPNFilter malware exposed in 2018, and which exploited network devices, primarily small office/home office (SOHO) routers and network attached storage (NAS) devices.
This advisory summarizes the VPNFilter malware it replaces, and provides more detail on Cyclops Blink, as well as the associated tactics, techniques and procedures (TTPs) used by Sandworm. An NCSC malware analysis report on Cyclops Blink is also available.
It also provides mitigation measures to help organizations defend against malware.
A series of articles published by Cisco Talos in 2018 describes VPNFilter and its modules in detail. VPNFilter was deployed in stages, with most functionality in the third-stage modules. These modules enabled traffic manipulation, destruction of the infected host device, and likely enabled downstream devices to be exploited. They also allowed monitoring of Modbus SCADA protocols, which appears to be an ongoing requirement for Sandworm, as also seen in their previous attacks against ICS networks.
VPNFilter targeting was widespread and appeared indiscriminate, with some exceptions: Cisco Talos reported an increase of victims in Ukraine in May 2018. Sandworm also deployed VPNFilter against targets in the Republic of Korea before the 2018 Winter Olympics.
In May 2018, Cisco Talos published the blog that exposed VPNFilter and the U.S. Department of Justice linked the activity to Sandworm and announced efforts to disrupt the botnet.
Activity since its exposure
A Trendmicro blog in January 2021 detailed residual VPNFilter infections and provided data which showed that although there had been a reduction in requests to a known C2 domain, there was still more than a third of the original number of first-stage infections.
Sandworm has since shown limited interest in existing VPNFilter footholds, instead preferring to retool.
Cyclops Blink
Active since 2019
The NCSC, CISA, the FBI, and NSA, along with industry partners, have now identified a large-scale modular malware framework (T1129) which is targeting network devices. The new malware is referred to here as Cyclops Blink and has been deployed since at least June 2019, fourteen months after VPNFilter was disrupted. In common with VPNFilter, Cyclops Blink deployment also appears indiscriminate and widespread.
The actor has so far primarily deployed Cyclops Blink to WatchGuard devices, but it is likely that Sandworm would be capable of compiling the malware for other architectures and firmware.
Note: Note that only WatchGuard devices that were reconfigured from the manufacturer default settings to open remote management interfaces to external access could be infected
Malware overview
The malware itself is sophisticated and modular with basic core functionality to beacon (T1132.002) device information back to a server and enable files to be downloaded and executed. There is also functionality to add new modules while the malware is running, which allows Sandworm to implement additional capability as required.
Post exploitation, Cyclops Blink is generally deployed as part of a firmware ‘update’ (T1542.001). This achieves persistence when the device is rebooted and makes remediation harder.
Victim devices are organized into clusters and each deployment of Cyclops Blink has a list of command and control (C2) IP addresses and ports that it uses (T1008). All the known C2 IP addresses to date have been used by compromised WatchGuard firewall devices. Communications between Cyclops Blink clients and servers are protected under Transport Layer Security (TLS) (T1071.001), using individually generated keys and certificates. Sandworm manages Cyclops Blink by connecting to the C2 layer through the Tor network.
Mitigations
Cyclops Blink persists on reboot and throughout the legitimate firmware update process. Affected organizations should therefore take steps to remove the malware.
WatchGuard has worked closely with the FBI, CISA, NSA and the NCSC, and has provided tooling and guidance to enable detection and removal of Cyclops Blink on WatchGuard devices through a non-standard upgrade process. Device owners should follow each step in these instructions to ensure that devices are patched to the latest version and that any infection is removed.
If your device is identified as infected with Cyclops Blink, you should assume that any passwords present on the device have been compromised and replace them (see NCSC password guidance for organizations.
You should ensure that the management interface of network devices is not exposed to the internet.
This advisory has been compiled with respect to the MITRE ATT&CK® framework, a globally accessible knowledge base of adversary tactics and techniques based on real-world observations.
The actors most likely deploy modified device firmware images by exploiting an externally available service
Execution
T1059.004
Command and Scripting Interpreter: Unix Shell
Cyclops Blink executes downloaded files using the Linux API
Persistence
T1542.001
Pre-OS Boot: System Firmware
Cyclops Blink is deployed within a modified device firmware image
T1037.004
Boot or Logon Initialization Scripts: RC Scripts
Cyclops Blink is executed on device startup, using a modified RC script
Defense Evasion
T1562.004
Impair Defenses: Disable or Modify System Firewall
Cyclops Blink modifies the Linux system firewall to enable C2 communication
T1036.005
Masquerading: Match Legitimate Name or Location
Cyclops Blink masquerades as a Linux kernel thread process
Discovery
T1082
System Information Discovery
Cyclops Blink regularly queries device information
Command and Control
T1090
Proxy
T1132.002
Data Encoding: Non-Standard Encoding
Cyclops Blink command messages use a custom binary scheme to encode data
T1008
Fallback Channels
Cyclops Blink randomly selects a C2 server from contained lists of IPv4 addresses and port numbers
T1071.001
Application Layer Protocol: Web Protocols
Cyclops Blink can download files via HTTP or HTTPS
T1573.002
Encrypted Channel: Asymmetric Cryptography
Cyclops Blink C2 messages are individually encrypted using AES-256-CBC and sent underneath TLS
T1571
Non-Standard Port
The list of port numbers used by Cyclops Blink includes non-standard ports not typically associated with HTTP or HTTPS traffic
Exfiltration
T1041
Exfiltration Over C2 Channel
Cyclops Blink can upload files to a C2 server
A Cyclops Blink infection does not mean that an organization is the primary target, but it may be selected to be, or its machines could be used to conduct attacks.
Organizations are advised to follow the mitigation advice in this advisory to defend against this activity, and to refer to indicators of compromise (not exhaustive) in the Cyclops Blink malware analysis report to detect possible activity on networks.
UK organizations affected by the activity outlined in should report any suspected compromises to the NCSC at https://report.ncsc.gov.uk/.
Further Guidance
A variety of mitigations will be of use in defending against the malware featured in this advisory:
About This Document
This advisory is the result of a collaborative effort by United Kingdom’s National Cyber Security Centre (NCSC), the United States’ National Security Agency (NSA), the Federal Bureau of Investigation (FBI), and Department of Homeland Security (DHS) Cybersecurity and Infrastructure Security Agency (CISA).
CISA, FBI, and NSA agree with this attribution and the details provided in the report.
This advisory has been compiled with respect to the MITRE ATT&CK® framework, a globally accessible knowledge base of adversary tactics and techniques based on real-world observations.
Disclaimers
This report draws on information derived from NCSC and industry sources. Any NCSC findings and recommendations made have not been provided with the intention of avoiding all risks and following the recommendations will not remove all such risk. Ownership of information risks remains with the relevant system owner at all times.
DISCLAIMER OF ENDORSEMENT: The information and opinions contained in this document are provided “as is” and without any warranties or guarantees. Reference herein to any specific commercial products, process, or service by trade name, trademark, manufacturer, or otherwise, does not constitute or imply its endorsement, recommendation, or favoring by the United States Government, and this guidance shall not be used for advertising or product endorsement purposes.
For NSA client requirements or general cybersecurity inquiries, contact the Cybersecurity Requirements Center at 410-854-4200 or Cybersecurity_Requests@nsa.gov.
Contact Information
To report suspicious or criminal activity related to information found in this joint Cybersecurity Advisory:
U.S. organizations contact your local FBI field office at fbi.gov/contact-us/field-offices, or the FBI’s 24/7 Cyber Watch (CyWatch) at (855) 292-3937 or by email at CyWatch@fbi.gov. When available, please include the following information regarding the incident: date, time, and location of the incident; type of activity; number of people affected; type of equipment used for the activity; the name of the submitting company or organization; and a designated point of contact. To request incident response resources or technical assistance related to these threats, contact CISA at Central@cisa.gov.
Australian organizations should report incidents to the Australian Signals Directorate’s (ASD’s) ACSC via cyber.gov.au or call 1300 292 371 (1300 CYBER 1).
U.K. organizations should report a significant cyber security incident: ncsc.gov.uk/report-an-incident (monitored 24 hrs) or for urgent assistance, call 03000 200 973.
This article is contributed. See the original author and article here.
We’re releasing a new service sample to help you build secure voice, video, and chat applications. This sample provides you with an easy to deploy, trusted authentication service to generate Azure Communication Services identities and access tokens. It is available for both node.js and C#.
Azure Communication Services is designed with a bring-your-own-identity (BYOI) architecture. Identity and sign-on experiences are core to your unique application. Apps like LinkedIn have their own end-user identity system, while healthcare apps may use identity providers as part of existing middleware, and other apps may use 3rd party providers such as Facebook.
We’ve designed the ACS identity system to be simple and generic, so you have the flexibility to build whatever experience you want.
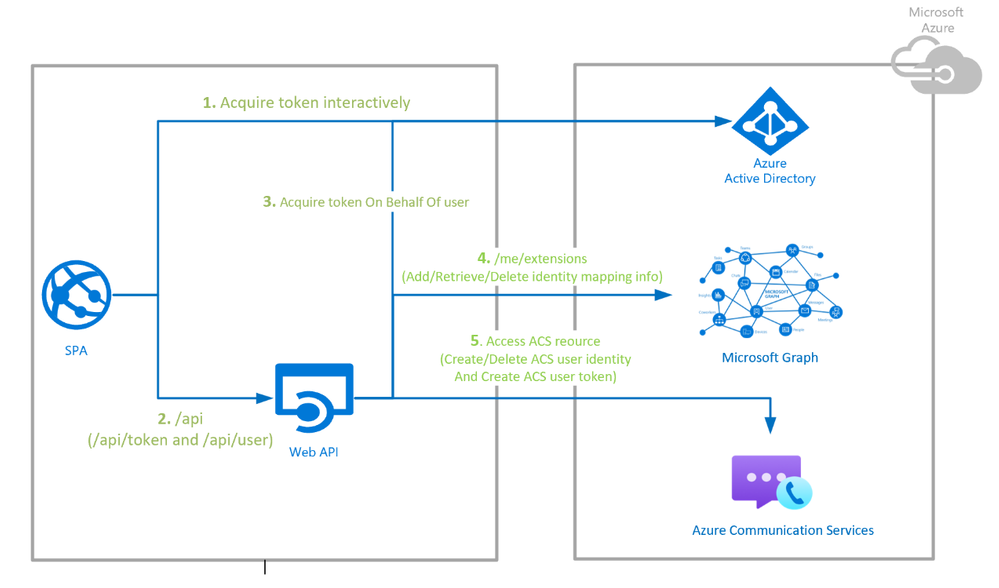
This new sample uses Azure App Service to authenticate users with Azure Active Directory (AAD), maps those users to ACS identities using Graph as storage, and finally generates ACS tokens when needed. We chose AAD for this sample because it’s a popular access management back-end, recognized for its security and scalability. It also integrates with 3rd party identity providers and OpenID interfaces. But you can use this sample as a launching point for integrating whatever identity provider or external system you want.
The sample provides developers a turn-key service which uses the Azure Communication Service Identity SDK to create and delete users, and generate, refresh, and revoke access tokens. The data flows for this sample are diagrammed below, but there is a lot more detail in GitHub with both node.js and C#repositories. An Azure Resource Manager (ARM) template is provided that generates the Azure subscription and automate deployment with a few clicks.
NOTE – The static web app Pipeline Task currently only works on Linux machines. When running the pipeline mentioned below, please ensure it is running on a Linux VM.
Create a static web app project in Bitbucket
NOTE – If you have an existing app in your repository, you may skip to the next section.
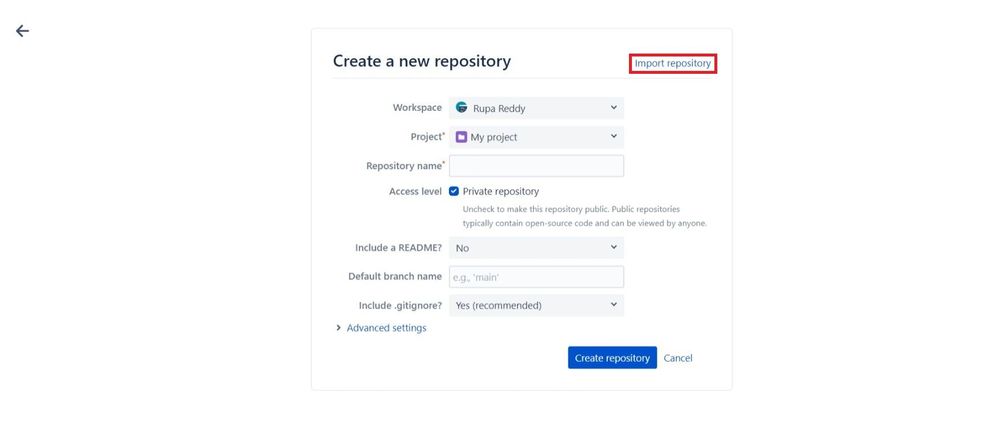
After creating a new project, select Create repository and then click on Import repository.
Select Import repository to import the sample application.
In the Create your first pipeline screen, select Starter pipeline.
Copy the following YAML and replace the generated configuration in your pipeline with this code.
pipelines:
branches:
main:
- step:
name: Deploy to test
deployment: test
script:
- pipe: microsoft/azure-static-web-apps-deploy:dev
variables:
APP_LOCATION: '$BITBUCKET_CLONE_DIR/src'
API_LOCATION: '$BITBUCKET_CLONE_DIR/api'
OUTPUT_LOCATION: '$BITBUCKET_CLONE_DIR'
API_TOKEN: $deployment_token
NOTE –  If you are not using the sample app, the values for  APP_LOCATION, API_LOCATION, and OUTPUT_LOCATION  need to change to match the values in your application.
Note that you have to give the values for  APP_LOCATION, API_LOCATION, and OUTPUT_LOCATIONonly after  $BITBUCKET_CLONE_DIR  as shown above.  i.e. $BITBUCKET_CLONE_DIR/<APP_LOCATION>
The API_TOKEN value is self-managed and is manually configured.
Property
Description
Example
Required
app_location
Location of your application code.
Enter/ if your application source code is at the root of the repository, or /app if your application code is in a directory called app.
Yes
api_location
Location of your Azure Functions code.
Enter /api if your app code is in a folder called api. If no Azure Functions app is detected in the folder, the build doesn’t fail, the workflow assumes you don’t want an API.
No
output_location
Location of the build output directory relative to the app_location.
If your application source code is located at /app, and the build script outputs files to the /app/build folder, then set build as the output_location value.
No
Select Add variables.
Add a new variable in Deployments section.
Name the variable deployment_token (matching the name in the workflow).
Copy the deployment token that you previously pasted into a text editor.
Paste in the deployment token in the Value box.
Make sure the Secured checkbox is selected.
Select Add.
Select Commit file and return to your pipelines tab.
You can see that the pipeline run is in progress with name Initial Bitbucket Pipelines configuration.
Once the deployment is successful, navigate to the Azure Static Web Apps Overview which includes links to the deployment configuration. Note how the Source link now points to the branch and location of the Bitbucket repository.
Select the URL to see your newly deployed website.
Clean up resources
Clean up the resources you deployed by deleting the resource group.
From the Azure portal, select Resource group from the left menu.
Enter the resource group name in the Filter by name field.
Select the resource group name you used in this tutorial.


Recent Comments