This article is contributed. See the original author and article here.
Update Compliance enables organizations to monitor security, quality, and feature updates for Windows 10 or 11 Professional, Education, and Enterprise editions. It’s also one of many services powered by the Windows diagnostic data processor configuration, which allows IT administrators to authorize data to be collected from devices under their management. This blog prepares you for an upcoming set of changes in the requirements for Update Compliance.
The Windows diagnostic data processor configuration was announced in 2021. IT administrators leveraging this configuration are considered the data controllers for Windows diagnostic data collected from their enrolled devices. As defined by the European Union General Data Protection Regulation (GDPR), the data controller role allows you to determine the purposes and means of the processing of personal data.
To use the Windows diagnostic data processor configuration, targeted devices must be Azure Active Directory (Azure AD) joined or hybrid Azure AD joined. As a result, beginning October 15, 2022, devices that are neither joined nor hybrid joined to Azure AD will no longer appear in Update Compliance. All Windows diagnostic data processor prerequisites must be met to continue using the service after that date. The timeline for this change is as follows:
How to prepare for this change
Whether you are a current or new Update Compliance user, ensure that you meet the Azure AD requirement before October 15, 2022 to ensure continuity of your reporting. If your organization has not yet moved to Azure AD, we recommend that you begin your deployment now in preparation for this change. Additionally, if you do not yet have your CommercialID configured, you can do so now. Joining Azure AD and ensuring that your CommercialID is properly configured are two independent steps that can be taken in any order. As of October 15th, both steps will need to be taken to use or continue using Update Compliance. These steps can be taken in any order prior to October 15th and further guidance will be released in the coming months.
What is the difference between Active Directory and Azure AD?
Azure AD is suitable for both cloud-only and hybrid organizations of any size or industry and can reduce the cost of managing Windows devices (except Home editions). Key capabilities include single sign-on (SSO) for both cloud and on-premises resources, Conditional Access through mobile device management (MDM) enrollment and MDM compliance evaluation, and self-service password reset and Windows Hello PIN reset on the lock screen. To learn more, see What is an Azure AD joined device?
Note: Workplace Join does not meet the requirements for Update Compliance after October 15, 2022
Whether or not your devices are already Azure AD joined (or hybrid joined), you can enroll in and configure Update Compliance by following these instructions: Get started with Update Compliance.
To summarize, if your devices are still using on-premises Azure Directory, we recommend that you plan for this upcoming change to Update Compliance. In early 2023, we will replace the use of CommercialID in Update Compliance with Azure AD tenant ID. We will provide additional steps to help you register your Azure AD tenant ID so your targeted devices are properly configured for Update Compliance in the near future. Follow the Windows IT Pro Blog, or @MSWindowsITPro on Twitter, to be informed when these steps are available.
This article is contributed. See the original author and article here.
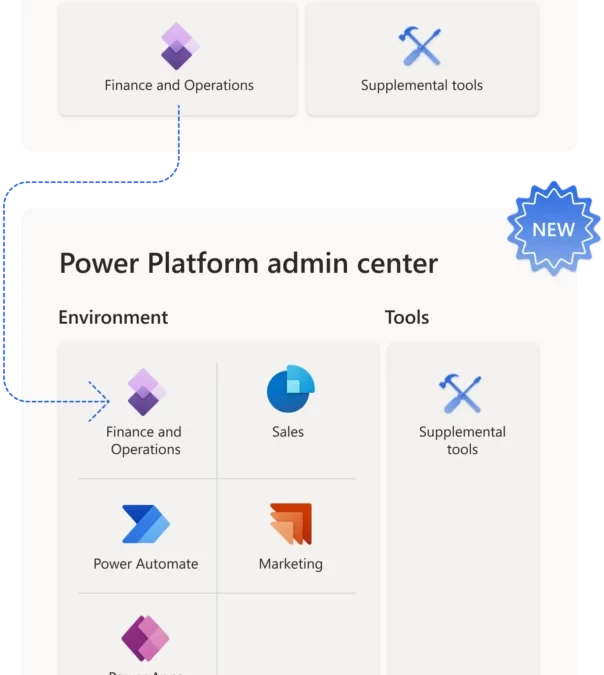
More and more customers are using process orchestration between their front-office and back-office business applications. Low-code and no-code tools are proliferating. Fusion teamsin which pro developers, IT admins, and citizen developers collaborate to build softwareare popular. It’s no wonder the job of administering these applications has become a growing challenge. We’re making that job a little easier by bringing the management of Finance and Operations apps and other Microsoft Dynamics 365 apps into a single experience for the first time.
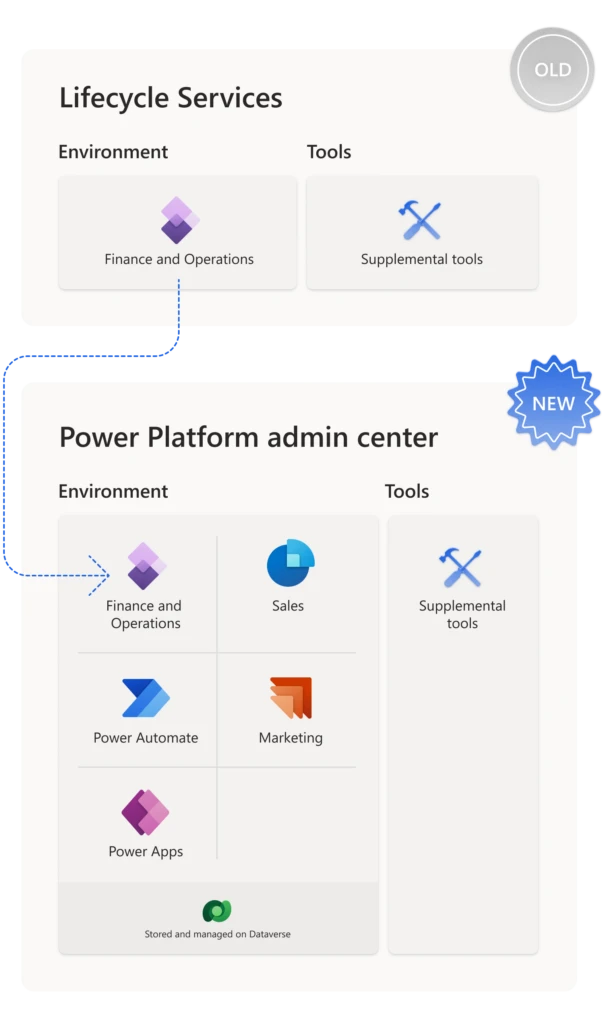
While other Dynamics 365 apps are managed in the Power Platform admin center, today admins must manage Finance and Operations apps in a dedicated portal called Lifecycle Services. Over the next several release waves, we’re making Finance and Operations apps available to be installed and managed in the Power Platform admin center.
Manage Dynamics 365 applications all in one place
Today, every instance of a Finance and Operations application is considered an environment. Customers are entitled to a sandbox and a production environment when they purchase licenses for Finance, Supply Chain Management, Commerce, or Project Operations, and they deploy these environments in Lifecycle Services.
In the Power Platform admin center, you have more flexibility. A single environment can govern many Dynamics 365 apps, such as Marketing, Sales, and Field Service, as well as hosting Power Automate flows and Power Apps. The improvement we’re introducing is that Finance and Operations apps can be installed in the Power Platform environment model like any other Dynamics 365 application.
Giving Finance and Operations admins more choices
Administrators have differing needs based on the applications their company uses. If you don’t need Power Platform capabilities, you can continue to use Lifecycle Services to manage your Finance and Operations environments and apps. In the future, we’ll provide a way to migrate environments from Lifecycle Services to the admin center, should you choose to do so.
If you want to manage all your Dynamics 365 apps in a single environment and admin center, the new capability is available for Project Operations trials. Project Operations environments come with dual-write, business events, and virtual entity support, drastically reducing setup time. We’re adding support for Finance, Supply Chain Management, and Commerce trials, and will support sandbox and production environments in the future as well. Eventually, customers will be able to choose the Power Platform admin center for all their administration and governance needs.
This article is contributed. See the original author and article here.
Imagine your eagerly awaited brand-new speakers finally arriveand they don’t work. The first thing you do is call customer support, expecting a quick response. You hear crickets instead. How likely are you to buy from that company again? According to a recent study, two-thirds of shoppers would stop doing business with a brand after just two to three poor customer service experiences. Organizations let customers go unattended at their peril. Use of a fallback queue to catch misrouted queries is imperative.
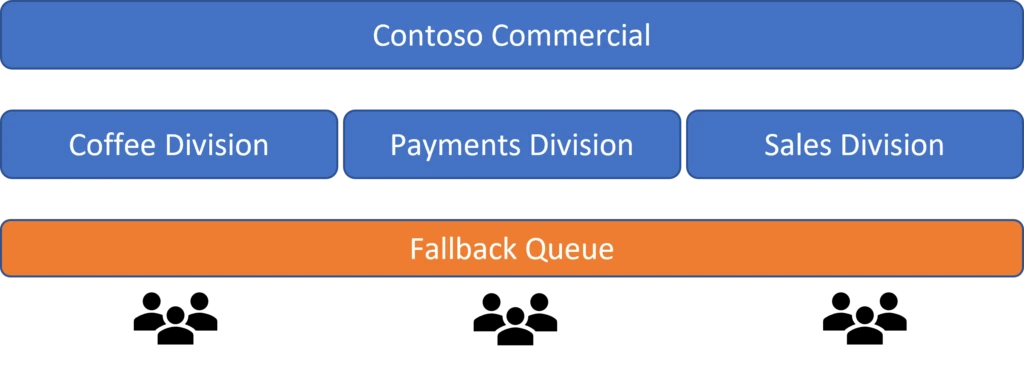
One fallback queue for multiple divisions is a customer service nightmare
Businesses use fallback queues to make sure no customer query falls into a crack. For organizations with multiple divisions, however, managing a fallback queue becomes a tedious task if only one queue is used for this purpose.
In this scenario, supervisors must be hyper-vigilant for any work that’s sent to the fallback queue. Agents in different divisions who are assigned to a monolithic queue may receive cases that they aren’t proficient in solving. They may also lack access to data outside of their division that they need to resolve a case.
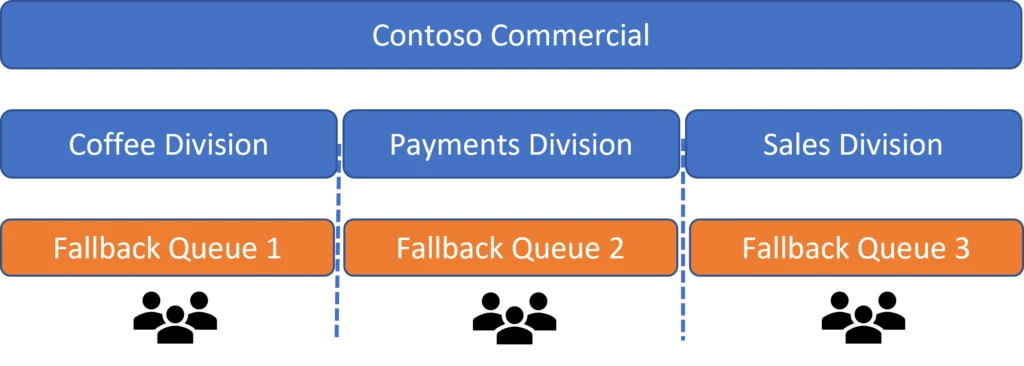
Introducing workstream-level fallback queues in unified routing
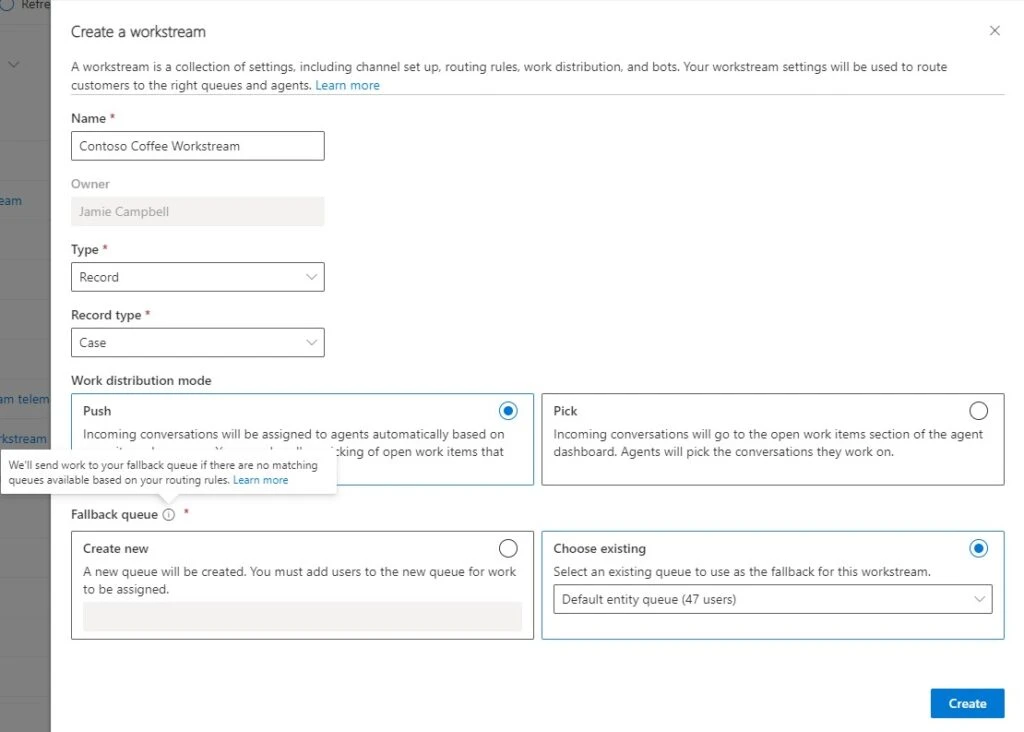
Microsoft Dynamics 365 Customer Service is introducing an enhancement in unified routing to address these issues: workstream-level fallback queues.
Workstreams group the same type of customer queries. We’ve also seen businesses using workstreams to differentiate between their internal groups or divisions. Organizations can now create different fallback queues for each of their workstreams in the unified routing settings. Whenever the routing system can’t identify the queue to which an incoming work item should go, it routes the query to a workstream-level fallback queue.
Administrators can create a new fallback queue or choose an existing queue to use as a fallback. They can assign a fallback queue to a different workstream at any time. Admins can assign agents to fallback queues according to their business requirements.
Managing fallback queues is easy with Power Automate
It isn’t enough to have a fallback queue for each workstream, however. Businesses also need to monitor their routing systems so that the fallback queues themselves don’t become a customer query graveyard. Organizations can use a Power Automate workflow to notify internal stakeholders, like supervisors and administrators, whenever a work item is routed to a fallback queue. Here’s how:
Send an email when a work item is routed to a workstream-level fallback queue
When a query is routed to a queue, the queue is associated with the work item in the Conversations table. We’ll use that action to trigger our flow. In the same action, we’ll determine whether the associated queue is a fallback queue by matching its ID. That’s Step 1 in the screenshot below.
Steps 2 and 3 get the name of the workstream and the “friendly” name of the fallback queue. The friendly name will be more helpful than the queue ID when we include it in the email that we send in Step 4.
Step 1: When a work item is routed to a queue, determine whether the queue is a fallback queue
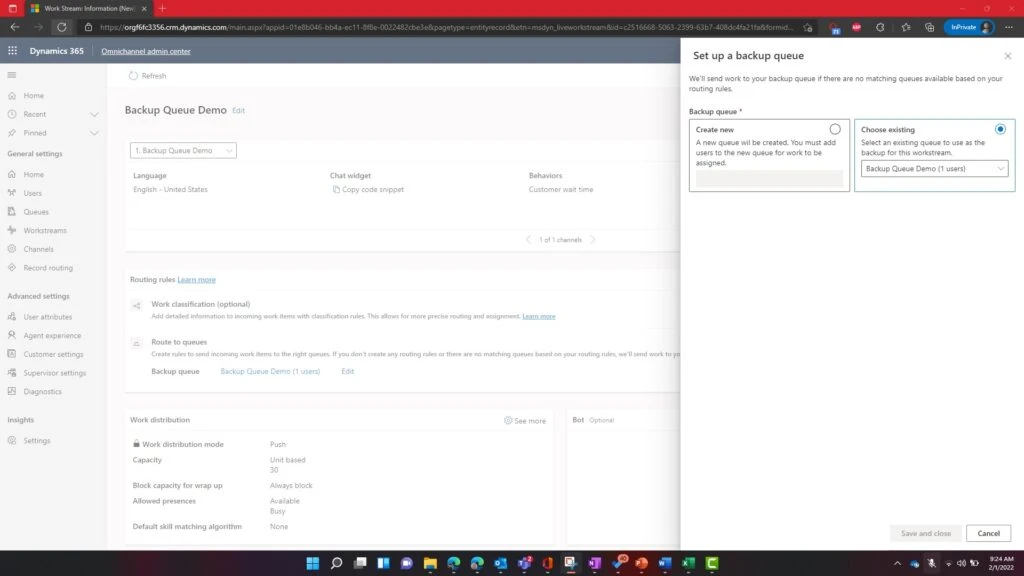
Open your fallback queue in the Customer Service admin center.
In the URL, find the string that starts with “queueRecordId”%3A” and ends with “%2C and copy everything between the quotation marks. This is the queue ID. For example, if the URL contains “queueRecordId”%3A”5ee5b674-7eb9-ec11-983f-0022483d69c5″%2C, the queue ID is 5ee5b674-7eb9-ec11-983f-0022483d69c5.
In Power Automate, create an automated cloud flow. Select the Microsoft Dataverse trigger When a row is added, modified or deleted.
Set Change type to Modified, Table name to Conversations, and Scope to Organization.
In Select columns, enter the following string: msdyn_cdsqueueid
In Filter rows, enter the following string, replacing {queue ID} with the ID you found in step 1: _msdyn_cdsqueueid_value eq {queue ID}
Step 2: Find the name of the workstream that’s associated with the conversation
Insert a new step. Select Microsoft Dataverse as the connector and Get a row by Workstream as the action.
Set Table name to Work Streams.
In Row ID, select the dynamic content Work stream (Value).
Step 3: Find the name of the queue that’s associated with the workstream
Insert a new step. Select Microsoft Dataverse as the connector and Get a row by Queue as the action.
Set Table name to Queues.
In Row ID, select the dynamic content Queue (Value).
Step 4: Send an email
Insert a new step. Select Office 365 Outlook as the connector and Send an email (V2) as the action.
In To, enter the address or addresses to notify when a work item is routed to the fallback queue.
Enter the subject and body of the email. In our example, we’ve included both the IDs and the names of the workstream and fallback queue using dynamic text that was collected in the preceding steps.
Save and test your flow.
Here’s the entire flow. Numbered steps in red arrows correspond to the steps provided earlier.
It’s been our constant goal in unified routing to provide customers with robust and flexible routing solutions. Fallback queue enhancement not only gives freedom to businesses in terms of distributing their incoming workload. It also makes it easier for supervisors to monitor and manage their organization’s fallback queues.
This article is contributed. See the original author and article here.
Just last month, we released our 2022 Annual Work Trend Index to better understand how work has changed over the past two years. The biggest takeaway is clear: we’re not the same people that went home to work in early 2020.
This article is contributed. See the original author and article here.
Unified routing in Dynamics 365 Customer Service considers both work item requirements and your agents’ capabilities to direct incoming work items to the agent that’s best suited to handle them. Routing configurations can be complex. When unified routing issues occur and work items aren’t assigned as expected, you need to track down and fix the problem.
Unified routing diagnostics help by giving you advanced tools for analyzing your routing configurations. Often, however, you have to verify settings manually in different parts of the system, requiring a call to customer support. To help you resolve these routing issues on your own, unified routing diagnostics now include assignment trace and error indication capabilities.
Diagnose assignment issues with assignment trace
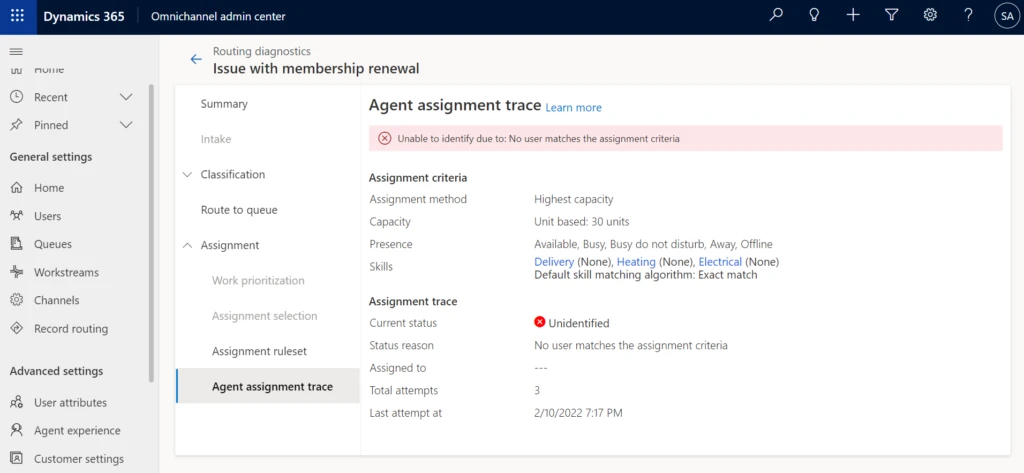
Assignment trace gives you insights into why some work items are taking longer to get assigned. In addition to showing the current assignment status, it provides details of the assignment criteria to help you understand why a certain work item is getting assigned incorrectly or is not getting assigned at all.
Identify routing issues with error indicators
Error indicators help you identify and understand the configuration misses that may be preventing a work item from being classified and assigned to the right agent. You can access these enhanced diagnostics at the record level in the Diagnostics tab in the system.
Scenario: Issue with skill matching algorithm criteria
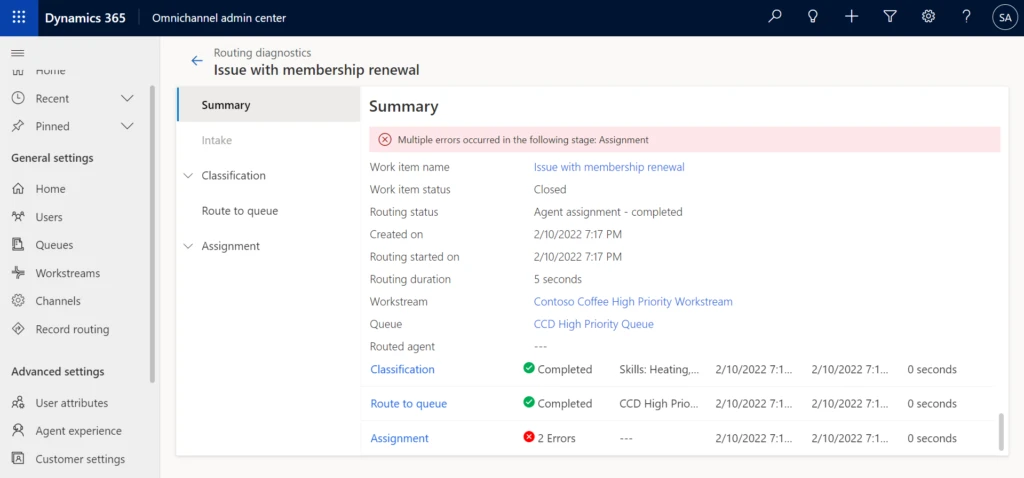
Let’s consider a scenario with Contoso Coffee, which sells coffee beans. A new queue in its Consumer Division handles high-priority queries from Contoso Club members. Renee, the supervisor, added two new agents to the queue. While doing her daily analytics report check, she observes that although there is a new work item in the queue, it has not been assigned yet. She decides to diagnose the reason for it.
Drilling down into the logs per routing stage, Renee quickly finds out with the help of the new error indicator that no agent matched the criteria that were specified in the routing rules. She decides to take a closer look at the assignment trace details to understand the assignment criteria. After looking at the criteria, Renee realizes that the default skill matching algorithm has been set to Exact Match. Although both agents have the required skills to handle the work item, their skills weren’t an exact match. Since the criteria weren’t met, the work item wasn’t assigned.
Having error messages and assignment trace with criteria specified in the diagnostics saved Renee a great deal of time. She has all the information she needs to diagnose and fix the problem, all in one place.
This article is contributed. See the original author and article here.
Continuous integration and continuous delivery (CI/CD) culture started to get popular, and it brought the challenge of having everything automatized, aiming to make processes easier and maintainable for everyone.
One of the most valuable aspects of CI/CD is the integration of the Infrastructure as Code (IaC) concept, with IaC we can version our infrastructure, save money, creating new environments in minutes, among many more benefits. I won’t go deeper about IaC, but if you want to learn further visit: The benefits of Infrastructure as Code
IaC can also bring some challenges when creating resources needed for the projects. This is mostly due to creating all the scripts for the infrastructure is a task that is usually assigned to the infrastructure engineers, and it happens that we can’t have the opportunity to be helped for any reason.
As a Data Engineer, I would like to help you understand the CI/CD process with a hands-on. You’ll learn how to create Azure Databricks through Terraform and Azure DevOps, whether you are creating projects by yourself or supporting your Infrastructure Team.
In this article, you´ll learn how to integrate Azure Databricks with Terraform and Azure DevOps and the main reason is just because in this moment I’ve had some difficulties getting the information with these 3 technologies together.
First of all, you’ll need some prerequisites
Azure Subscription
Azure Resource Group (you can use an existing one)
Azure DevOps account
Azure Storage Account with a container named “tfstate”
Visual Studio Code (it’s up to you)
So, let’s start and have some fun
Please, go ahead and download or clone this GitHub repository databrick-tf-ado and get demo-start branch.
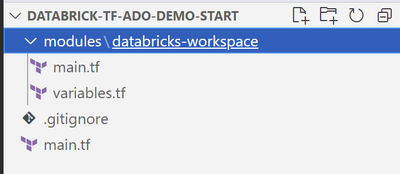
In the folder you’ll see a file named main.tf and 2 more files in the folder modules/databricks-workspace
there you need to change the value of resource_group_name and storage_account_name for the values of you subscription, you can find those values in your Azure Portal, they need to be already created.
In main.tf file inside root folder there’s a reference to a module called “databricks-workspace”, now in that folder you can see 2 more files main.tf and variables.tf.
main.tf contains the definition to create a databricks workspace, a cluster, a scope, a secret and a notebook, in the format that terraform requires and variables.tf contains the information of the values that could change depending on the environment.
Now that you changed the values mentioned above into a GitHub or DevOps repository if you need assistance for that visit these pages: GitHub or DevOps.
At this moment we have our github or devops repository with the names that we require configured, so let´s create our pipeline to deploy our databricks environment into our Azure subscription.
First go to your azure subscription and check that you don’t have a databricks called demodb-workspace
You’ll need to install an extension so DevOps can use terraform commands so go to Terraform Extension.
Once is installed in your project in Azure DevOps click on Pipelines-Release and Create “new pipeline”, it appears the option by creating the pipeline with YAML or with the Editor, I’ll choose the Editor so we can see it clearer.
In Add an Artifact in the Artifact section of the pipeline select your source type (provider where you uploaded your repository) and fill all the required information, like the image below and click “Add”
Then click on Add stage in Stages section and choose empty Job and name the stage as “DEV”
After that click on Jobs below the name of the stage
In the Agent job, press the “+” button and search for “terraform” select “Terraform tool installer”
Leave the default information
Then Add another 3 tasks of “Terraform” task
Name the second task after Installer as “Init” and fill the information required like the image:
For all these 3 tasks set the information of your subscription, resource group, storage account and container, and there’s also a value labeled key, there you have to set “dev.terraform.tfstate” is a key that terraform uses to keep tracking of your Infrastructure changes.
Name next task as “Plan”
Next task “Apply”
Now change the name of your pipeline and save it
And we only need to create a Release to test it
You can monitor the progress
When it finished, if everything was good you’ll see your pipeline as successful
Lastly let´s confirm in the azure portal that everything is created correctly
then login in your workspace and check the and run the notebook, so you can test that the cluster, the scope, the secret and the notebook are working correctly.
With that you can easily maintain your environments safe from the changes that contributors can do, only one way to accept modifications into your infrastructure.


Recent Comments