by Scott Muniz | Jul 14, 2020 | Azure, Microsoft, Technology, Uncategorized
This article is contributed. See the original author and article here.
We are delighted to introduce the Public Preview for the Anomalous RDP Login Detection in Azure Sentinel’s latest machine learning (ML) Behavior Analytics offering. Azure Sentinel can apply machine learning to Windows Security Events data to identify anomalous Remote Desktop Protocol (RDP) login activity. Scenarios include:
- Unusual IP – the IP address has rarely or never been seen in the last 30 days.
- Unusual geolocation – the IP address, city, country, and ASN have rarely or never been seen in the last 30 days.
- New user – a new user logs in from an IP address and geolocation, both or either of which were not expected to be seen based on data from the last 30 days.
Configure anomalous RDP login detection
- You must be collecting RDP login data (Event ID 4624) through the Security events data connector. Make sure that in the connector’s configuration you have selected an event set besides “None” to stream into Azure Sentinel.
- From the Azure Sentinel portal, click Analytics, and then click the Rule templates tab. Choose the (Preview) Anomalous RDP Login Detection rule, and move the Status slider to Enabled.
As the machine learning algorithm requires 30 days’ worth of data to build a baseline profile of user behavior, you must allow 30 days of Security events data to be collected before any incidents can be detected.
by Scott Muniz | Jul 14, 2020 | Azure, Microsoft, Technology, Uncategorized
This article is contributed. See the original author and article here.
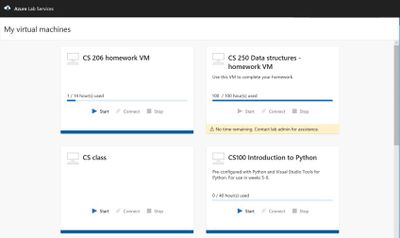
Azure Lab Services allow you to Invite users to access lab resources right away. When they sign in, they’ll see a full list of VMs they can access across multiple labs. With one click they can connect and start working—no Azure subscription needed.
- Immediate access to VMs for invited users, with no need to share your Azure subscription
- Custom templates to quickly provision lab VMs and use repeatedly across labs
- Scheduling feature to automatically shut down and start VMs and limit usage hours
- Provisioning and scaling to hundreds of VMs with a single click—with the service managing all underlying infrastructure
Cost optimization and tracking
Manage your lab budget with usage control features. Schedule designated usage times or set up recurring auto-shutdowns and start times. Track individuals’ hourly usage or limit usage by setting up quotas.
Automatic management and scaling
As a managed service, Lab Services gives you automatic provisioning and management of your lab’s underlying infrastructure. Just prepare the right lab experience for your users and the service will handle the rest—rolling out and scaling your lab to hundreds of VMs with a single click.
by Scott Muniz | Jul 14, 2020 | Azure, Microsoft, Technology, Uncategorized
This article is contributed. See the original author and article here.
Azure DMS Hybrid (Preview) is helpful when you want to migrate from On-Premise SQL server to Azure and don’t have site-to-site connectivity between the both, also, if there is limited site-to-site connectivity bandwidth. Azure DMS Hybrid (Preview) uses a migration worker which is hosted On-Premise together with an instance of Azure DMS running in the cloud. You can use Azure Database Migration Service hybrid mode to migrate data from an on-premises instance of SQL Server to Azure SQL Database
Note:- The Azure Database Migration Service hybrid installer runs on Microsoft Windows Server 2012 R2, Window Server 2016, Windows Server 2019, and Windows 10.
Note:- The Azure Database Migration Service hybrid installer requires .NET 4.7.2 or later. To find the latest versions of .NET, see the Download .NET Framework page.
In this article we will be using Azure DMS Hybrid (preview) for online database migration from On-Premise to Azure Managed Instance. Below are the steps to perform the mentioned operation:
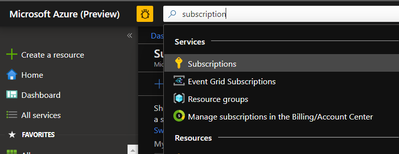
- Sign into Azure portal and go to the subscription where you want to deploy Database Migration Service.

- Look for Resource providers, search for migration, and then register Microsoft.DataMigration.


- In the global search, look for Azure Database Migration Services.

- Give the required information and select service mode as Hybrid (Preview)

- Review networking and tags. Once done, create Database Migration Services.

- Go to the properties of Azure DMS and copy the resource ID. This will be needed later.

- Now, we need to register the application in the Azure Active Directory. Registering the application means that your developers can use Azure AD to authenticate users and request access to user resources such as email, calendar, and documents.
Any member of your directory (not guests) can register an application, otherwise known as creating an application object.
Registering an application allows any user to do the following:
- Get an identity for their application that Azure AD recognizes
- Get one or more secrets/keys that the application can use to authenticate itself to AD
- Brand the application in the Azure portal with a custom name, logo, etc.
- Apply Azure AD authorization features to their app, including:
- Role-Based Access Control (RBAC)
- Azure Active Directory as oAuth authorization server (secure an API exposed by the application)
- Declare required permissions necessary for the application to function as expected, including:
- App permissions (global administrators only). For example: Role membership in another Azure AD application or role membership relative to an Azure Resource, Resource Group, or Subscription
- Delegated permissions (any user). For example: Azure AD, Sign-in, and Read Profile
For knowing who can add application on to Azure AD instance please refer https://docs.microsoft.com/en-us/azure/active-directory/develop/active-directory-how-applications-are-added#who-has-permission-to-add-applications-to-my-azure-ad-instance
For registering app in Azure Active directory:- Go to Azure active directory> App registration > New Registration

- In new registration provide display name (This can be changes later). Click register.

- Go to DMS > Access control (IAM) > Add > Add role assignment > assign contributor role to your application ID (you can also create custom roles as well by following MSDN).
Note:- To add role assignments, you must have Microsoft.Authorization/roleAssignments/write and Microsoft.Authorization/roleAssignments/delete permissions, such as User Access Administrator or Owner

- Once role is assigned, go to Hybrid blade under settings of Azure Database Migration Service. Download the installer folder by clicking on Installer download.

- Unzip the downloaded folder and open dmsSettings.Json file in notepad.

- In the dmsSettings file provide the Application ID of your registered application and resource ID of your DMS and leave rest of the settings as it is. Save the file.

- Now we would need to generate certificate which Azure Database Migration Service will use to authenticate the communication from the hybrid worker. For generating certificate go the location of your recently downloaded folder and run the below command in admin cmd.
<drive>:<folder>Install>DMSWorkerBootstrap.exe -a GenerateCert

A certificate would get generated in the mentioned location.

14. Now upload the recently created certificate to Certificates & secrets of your application.

- After uploading certificates create a new client secret. Please copy and save the value of Client Secret, we will need it later.

- Now we need to install Azure Database Migration Service hybrid worker on your on-premise machine. For this go the location of your folder which we have recently downloaded and unzipped, and run below command in admin Command Prompt.
<drive>:<folder>Install>DMSWorkerBootstrap.exe -a Install -IAcceptDMSLicenseTerms -d
Once above command is successful you will see Database Migration Service status as Online.

- In your subscription, assign contributor role to your application ID.
For this go to your subscription > Access Control (IAM) > Add
Select “Contributor” role from the drop down and Select “search for your Application ID”

- Once the above operation is successful, we will start online Migration of the database. For this,
go to Azure Database Migration Service, on the overview blade, select New Migration Project.

- Enter Project Name > choose type of activity > Online Data Migration. (Note:- This article is about online Migration)

- Under select source > enter on-premises SQL server`s FQDN and credentials.

- Under select target > provide the application ID and in the key column enter Client secret of your Application. Also, provide the target MI credentials.

- Under Select Databases > select Source database which you wish to migrate to MI.

- Before starting the migration, please make sure that On-premise SQL server service has required permission on the backup folder ( the folder where you have kept required backup of your database).
Go to your backup folder > right click – > Properties > Security > Edit > Add your On-Premise SQL Service and give read and write permission to it.


Note: – We also need give read/write permission to the windows account which will impersonate the DMS.
- Under Configure migration settings > please provide the network share location of the backup folder and Azure storage location, where DMS will upload the file.
Note:- To get network share location go to your backup folder location > Right click- > Sharing > Share


- Provide migration activity name and click on run migration.

Once migration has started check the status of the migration.

- On the migration activity page click on the database name to see the status of the migration.
Once backup status shows restored, you can start cutover based upon your business requirements.


Once cutover is completed you can close the complete cutover window.

- Once cutover is completed, Database migration to MI is successful. It can also be verified using Azure portal or SSMS.

by Scott Muniz | Jul 14, 2020 | Azure, Microsoft, Technology, Uncategorized
This article is contributed. See the original author and article here.
Machine Learning Services is a feature of Azure SQL Managed Instance (preview) that provides in-database machine learning, supporting both Python and R scripts. The feature includes Microsoft Python and R packages for high-performance predictive analytics and machine learning. The relational data can be used in scripts through stored procedures, T-SQL script containing Python or R statements, or Python or R code containing T-SQL.
Learn more about the preview here https://docs.microsoft.com/en-us/azure/azure-sql/managed-instance/machine-learning-services-overview
Please reach out to me for further details!
Thanks,
Michelle
by Scott Muniz | Jul 14, 2020 | Azure, Microsoft, Technology, Uncategorized
This article is contributed. See the original author and article here.
One of the major benefits of Azure SQL Database is that the Azure platform provides additional protection for your database against SQL Injection attacks and Data Exfiltration, amongst other threats. In this episode, Joseph D’Antoni teaches you how to configure advanced threat detection and some of the protections it offers.
Watch on Data Exposed
Additional Resources:
Learn more about Microsoft Most Valuable Professionals (MVPs)
View/share our latest episodes on Channel 9 and YouTube!


Recent Comments