by Scott Muniz | Aug 4, 2020 | Alerts, Microsoft, Technology, Uncategorized
This article is contributed. See the original author and article here.
For organizations that operate a hybrid environment with a mix of on-premises and cloud apps, shifting to remote work in response to COVID-19 has not been easy. VPN solutions can be clumsy and slow, making it difficult for users to access legacy apps based on-premises or in private clouds. For today’s “Voice of the Customer” post, Nitin Aggarwal, Global Identity Security Engineer at Johnson Controls, describes how his organization overcame these challenges using the rich integration between Azure Active Directory (Azure AD) and F5 BIG-IP Access Policy Manager (F5 BIG-IP APM).
Enabling remote work in a hybrid environment
By Nitin Aggarwal, Global Identity Security Engineer, Johnson Controls
Johnson Controls is the world’s largest supplier of building products, technologies, and services. For more than 130 years, we’ve been making buildings smarter and transforming the environments where people live, work, learn and play. In response to COVID-19, Johnson Controls moved 50,000 non-essential employees to remote work in three weeks. As a result, VPN access increased by over 200 percent and usage spiked to 100 percent throughout the day. People had trouble sharing and were forced to sign in multiple times. To address this challenge, we enabled capabilities in F5 and Azure AD to simplify access to our on-premises apps and implement better security controls.
Securing a hybrid infrastructure
Our organization relies on a combination of hybrid and software-as-a-solution (SaaS) apps, such as Zscaler and Workday, to conduct business-critical work. Our hybrid application set contains some legacy apps that are built on a code base that can’t be updated. One example is a directory access app that we use to look up employee information like first name, last name, global ID, and phone number. It’s critical that we keep this data protected, yet we also need to make our apps available to employees working offsite.
Johnson Controls uses Azure AD to make over 150 Microsoft and non-Microsoft SaaS apps accessible from anywhere. Many of our legacy apps, however, use header-based authentication, which does not easily integrate with modern authentication standards. To enable single sign-on (SSO) to legacy apps for workers inside the network, we used a Web Access Management (WAM) solution. Remote workers used a VPN. The long-term strategy is to modernize these apps, eliminate them, or migrate them to Azure. In the meantime, we need to make them more accessible.
About five months ago we began an initiative to enable authentication to our legacy apps using Azure AD. We wanted to make access easier and apply security controls, including conditional access. Initially we planned to rewrite the authentication model to support Azure AD, but all these apps use different code. Some were built with .NET. Others were written in Java or Linux. It wasn’t possible to apply a single approach and quickly modernize authentication.
Migrating legacy apps to Azure AD in less than one hour
When our Microsoft team learned about our issues with our on-premises apps, they suggested we talk to F5. Johnson Controls uses F5 for load balancing, and F5 offers a product, F5 BIG-IP Access Policy Manager (F5 BIG-IP APM), that leverages the load-balancing solution to easily integrate with Azure AD. It requires no timely development work, which was exactly what we were looking for.
If an app is already behind the F5 load balancer and the right team is in place, it can take as little as one hour to migrate apps to Azure AD authentication using F5 BIG-IP APM. We just needed to create the appropriate configurations in F5 and Azure AD. Once the apps are onboarded, whenever a user signs in, they are redirected to Azure AD. Azure AD authenticates the user, sends the attributes back to the legacy app and inserts them in the header. For users, the experience is the same whether they are accessing an on-premises app or a cloud app. They sign in once using SSO and gain access to both cloud and legacy apps. It’s completely seamless.
We started the onboarding process in November. After we moved to remote work in response to the epidemic, we accelerated the schedule. So far, we’ve migrated about 30 apps. We have 15 remaining.
Implementing a Zero Trust security strategy
With authentication for our apps handled by Azure AD, we can put in place the right security controls. Our security strategy is driven by a Zero Trust model. We don’t automatically trust anything that tries to access the network. As we move workloads to the cloud and enable remote work, it’s important to verify the identity of devices, users and services that try to connect to our resources.
To protect our identities, we’ve enabled a conditional access policy in conjunction with multi-factor authentication (MFA). When users are inside the network on a domain-joined device or connected via VPN, they can access with just a password. Anybody outside the networks must use MFA to gain access. We are also using Azure AD Privileged Identity Management to protect global administrators. With Privileged Identity Manager, users who want to access sensitive resources sign in using a different set of credentials from the ones they use for routine work. This makes it less likely that those credentials will be compromised.
With Azure AD, we also benefit from Microsoft’s scale and availability. Before we migrated our apps from the WAM to Azure AD, there were frequently problems with access related to the WAM. With Azure AD we no longer worry about downtime. Remote work is easier for employees, and we feel more secure.
Support enabling remote work
If your organization relies on legacy apps for business-critical work, I hope you’ve found this blog useful. In the coming months, as you continue to support employees working from home, refer to the following resources for tips on improving the experience for you and your employees.
Top 5 ways you Azure AD can help you enable remote work
Developing applications for secure remote work with Azure AD
Microsoft’s COVID-19 response
by Scott Muniz | Aug 4, 2020 | Alerts, Microsoft, Technology, Uncategorized
This article is contributed. See the original author and article here.
Final Update: Tuesday, 04 August 2020 07:38 UTC
We’ve confirmed that all systems are back to normal with no customer impact as of 08/04, 02:42 UTC. Our logs show the incident started on 08/04, 00:35 UTC and that during the 2 hours and 7 minutes that it took to resolve the issue some of the customers might have experienced delayed alerts. Alerts would have eventually fired.
- Root Cause: The failure was due to an issue in one of our back-end services.
- Incident Timeline: 2 Hours & 7 minutes – 08/04, 00:35 UTC through 08/04, 02:42 UTC
We understand that customers rely on Azure Monitor as a critical service and apologize for any impact this incident caused.
-Saika
by Scott Muniz | Aug 4, 2020 | Alerts, Microsoft, Technology, Uncategorized
This article is contributed. See the original author and article here.
Hello Folks,
As we announced last month (Announcing the general availability of Azure shared disks and new Azure Disk Storage enhancements) Azure shared disks are now generally available.
Shared disks, is the only shared block storage in the cloud that supports both Windows and Linux-based clustered or high-availability applications. It now allows you to use a single disk to be attached to multiple VMs therefore enabling you to run applications, such as SQL Server Failover Cluster Instances (FCI), Scale-out File Servers (SoFS), Remote Desktop Servers (RDS), and SAP ASCS/SCS running on Windows Server. Thus, enabling you to migrate your applications, currently running on-premises on Storage Area Networks (SANs) to Azure more easily.
Shared disks are available on both Ultra Disks and Premium SSDs.
Ultra disks have their own separate list of limitations, unrelated to shared disks. For ultra disk limitations, refer to Using Azure ultra disks. When sharing ultra disks, they have the following additional limitations:
Shared ultra disks are available in all regions that support ultra disks by default.
Premium SSDs
- Currently only supported in the West Central US region.
- Currently limited to Azure Resource Manager or SDK support.
- Can only be enabled on data disks, not OS disks.
- ReadOnly host caching is not available for premium SSDs with maxShares>1.
- Disk bursting is not available for premium SSDs with maxShares>1.
- When using Availability sets and virtual machine scale sets with Azure shared disks, storage fault domain alignment with virtual machine fault domain is not enforced for the shared data disk.
- When using proximity placement groups (PPG), all virtual machines sharing a disk must be part of the same PPG.
- Only basic disks can be used with some versions of Windows Server Failover Cluster, for details see Failover clustering hardware requirements and storage options.
For this post we’ll deploy a 2-node Windows Server Failover Cluster (WSFC) using clustered shared volumes. That way both VMs will have simultaneous write-access to the disk, which results in the ReadWrite throttle being split across the two VMs and the ReadOnly throttle not being used. And we’ll do it using the new Windows Admin Center Failover clustering experience.
Azure shared disks usage is supported on all Windows Server 2008 and newer. And Azure shared disks are supported on the following Linux distros:
Currently only ultra disks and premium SSDs can enable shared disks. Each managed disk that have shared disks enabled are subject to the following limitations, organized by disk type:
Ultra disks
Ultra disks have their own separate list of limitations, unrelated to shared disks. For ultra disk limitations, refer to Using Azure ultra disks.
When sharing ultra disks, they have the following additional limitations:
Shared ultra disks are available in all regions that support ultra disks by default, and do not require you to sign up for access to use them.
Premium SSDs
- Currently only supported in the West Central US region.
- Currently limited to Azure Resource Manager or SDK support.
- Can only be enabled on data disks, not OS disks.
- ReadOnly host caching is not available for premium SSDs with maxShares>1.
- Disk bursting is not available for premium SSDs with maxShares>1.
- When using Availability sets and virtual machine scale sets with Azure shared disks, storage fault domain alignment with virtual machine fault domain is not enforced for the shared data disk.
- When using proximity placement groups (PPG), all virtual machines sharing a disk must be part of the same PPG.
Let’s get on with the creation of our cluster. In my test environment I have 2 Windows Server 2019 that will be used as our cluster Nodes. They are joined to a domain through a DC in the same virtual network on Azure. Windows Admin Center (WAC) is running on a separate VM and ALL these machine are accessed using an Azure Bastion server.
When creating the VMs you need to ensure that you enable Ultra Disk compatibility in the Disk section. If your shared Ultra Disk is already created, you can attach it as you create the VM. In my case I will attach it to existing VM in the next step.
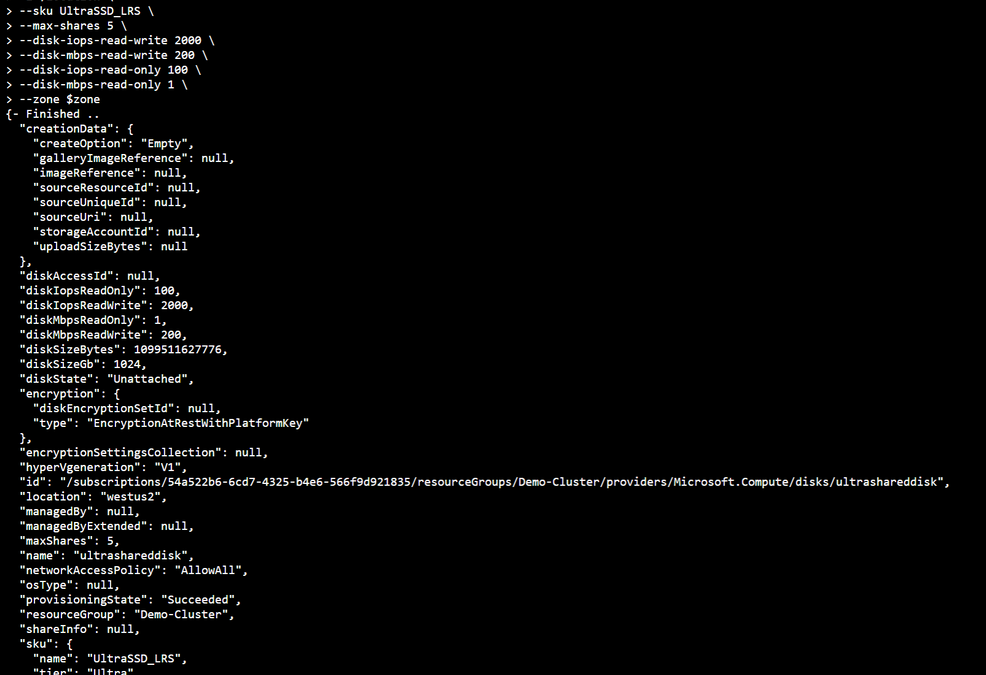
First, we need to Deploy an ultra disk as a shared disk. To deploy a managed disk with the shared disk feature enabled, you must ensure that the “maxShares” parameter is set to a value greater than 1. This makes the disk shareable across multiple VMs. I used the cloud shell through the portal and the following Azure CLI commands to perform that operation. Notice that we also need to set the zone parameter to the same zone where the VMs are located (Azure Shared Disk across availability zones is not yet supported)
location = "westus2"
rgname = "Demo-Cluster"
diskname = "ultrashareddisk"
zone = 1

az disk create
     -g $rgname
     -n $diskname
     --size-gb 1024
     -l $location
     --sku UltraSSD_LRS
     --max-shares 5
     --disk-iops-read-write 2000
     --disk-mbps-read-write 200
     --disk-iops-read-only 100
     --disk-mbps-read-only 1
     --zone $zone
We end up with the following result:

Once the Shared Disk is created, we can attach it to BOTH VMs that will be our clustered nodes. I’ve attached the disk to the VMs through the Azure portal by navigating to the VM, and in the Disk management pane, clicking on the “+ Add data disk” and selecting the disk I created above.

Now that the shard disk is attached to both VM, I use the WAC cluster deployment workflow to create the cluster.
To launch the workflow, from the All Connections page, click on “+Add” and select “Create new” on the server clusters tile.

You can create hyperconverged clusters running Azure Stack HCI, or classic failover clusters running Windows Server (in one site or across two sites). I’m my case I’m deploying a traditional cluster in one site.
The cluster deployment workflow is included in Windows Admin Center without needing to install an extension.
At this point just follow the prompts and walk through the workflow. Just remember that whenever, in the workflow, you are asked for an account name and password. the username MUST be in the DOMAINUSERNAME format.

Once I walked through the workflow, I connected to Node 1 and added the disk to my clustered shard volume.

and verified on the other node that I could see the Clustered Shared Volume.

That’s it!! My traditional WSFC is up and running and ready to host whatever application I need to migrate to Azure.
I hope this helped. Let me know in the comments if there are any specific scenarios you would like us to review.
Cheers!
Pierre
by Scott Muniz | Aug 4, 2020 | Alerts, Microsoft, Technology, Uncategorized
This article is contributed. See the original author and article here.
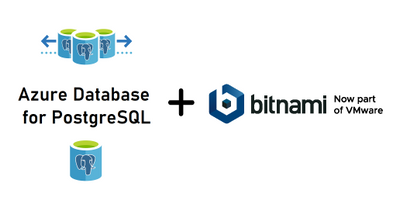
Today I am happy to announce an expansion of our longstanding partnership with Bitnami (now part of VMware) to deliver a collection of production-ready templates on the Azure marketplace for our open source database services—namely, MySQL, MariaDB, and Postgres.
In this blog post you can learn about the Bitnami Certified Apps (what many of us call “templates”) for our Azure Database for PostgreSQL services are available on the Azure Marketplace and are production-ready. You can also find Bitnami templates using Azure Database for MySQL and MariaDB.

More importantly, these Bitnami templates make it easy for you to manage the complexity of modern software deployments.
And when we say the Bitnami templates make it easy, we mean easy: these templates for our Azure open source databases give you a one-click solution to deploy your applications for production workloads. Bitnami packages the templates following industry standards—and continuously monitors all components and libraries for vulnerabilities and application updates.
Invent with purpose on Azure with Bitnami templates !
Bitnami templates available with PostgreSQL on Azure Marketplace
The current collection of Bitnami production-ready templates on the Azure marketplace are for these applications.
- Airflow for PostgreSQL
- CKAN for Postgres—with Hyperscale (Citus)
The Bitnami Community Catalog on the Azure Marketplace give you certified applications that are always up-to-date, highly secure, and built to work right out of the box.
In these solution templates for the Azure open source database services, our Azure and Bitnami engineering teams have worked together to incorporate all the best practices for performance, scale, and security—to make the Bitnami templates ready for you to consume, with no additional integration work necessary.
Airflow with PostgreSQL on Azure

Caption: Airflow with Azure Database for PostgreSQL
You can build and manage your company’s workflows using Apache Airflow solution that gives you high availability, better performance, and scalability. This Bitnami template for Airflow uses two virtual machines for the application front-end and scheduler, plus a configurable number of worker virtual machines. It also uses Azure Database for PostgreSQL and Azure Cache for Redis to store application data and queue tasks.
Try Airflow with Azure Database for PostgreSQL
CKAN with PostgreSQL & Hyperscale (Citus)

Caption: CKAN with Hyperscale PostgreSQL (Citus)
With this Bitnami template for CKAN, you can now build an open data management system on Azure that is based on CKAN. CKAN is used by various governments, organizations and communities around the world when they need store and process large amounts of data from census data to scientific data. This is a scalable solution that uses several virtual machines instances to host the applications which also include virtual machines for Solr , Memcahced and managed databases using Hyperscale (Citus) on Azure Database for PostgreSQL.
Try CKAN with Hyperscale Citus PostgreSQL
If you’re building an application on Azure using CKAN or Airflow with Azure Database for PostgreSQL or Hyperscale Citus, here are a few of the reasons I recommend you consider taking advantage of the Bitnami templates on the Azure Marketplace.
Bitnami templates lower your TCO
These Bitnami production-ready templates are available to you at no additional cost than the underlying Azure services being used to host the application. These services are already optimized to reduce the total cost of ownership using the elastic cloud infrastructure.
You also get Azure advisor recommendations for your managed database service, so you can scale up or down based on your usage telemetry.
Managed database services on Azure enable you to focus on your application—not your database
Azure managed database services provide high availability with 99.9% SLA and ease of scale up or down your servers based on what your application needs are. You can easily backup and perform point-in-time restore for business continuity and disaster recovery. Using Hyperscale (Citus) on Azure Database for PostgreSQL, you can scale out horizontally your multi-tenant app on Azure—or build a real-time operational analytics app that gives your customers sub-second performance even with billions of rows.
Security benefits that are built into Azure
With these Bitnami templates on Azure, you can use built-in security features like using SSL connectivity to the database server and using Azure Role-based access control (RBAC) to control who has access to the server.
You can also use our Advanced Threat Protection feature for the managed databases to detect anomalous activities indicating unusual and potentially harmful attempts to access or exploit databases.
You can also read this blog post from Bitnami (now part of VMWare). We are thrilled to work with Bitnami and focus on simplifying the experience for developers to build solutions using community based applications like CKAN and Airflow.
What our leaders are saying about the Bitnami & Azure collaboration
Sunil Kamath is Director of Product Management for OSS databases at Microsoft Azure Data—here is Sunil’s take on the importance of our partnership:
“Developers want simple, fast ways to deploy production-ready solutions on the cloud. We have been excited about our partnership with Bitnami—now part of VMware—to deliver what customers say they care about the most. Today, together with Bitnami, we are thrilled to launch new production-ready and enterprise-grade Bitnami templates for WordPress, Drupal, Magento, and more, making it easier than ever for developers to run these solutions on the Azure cloud. These solutions are built to fully utilize the best-in-class intelligence, enterprise security, and scalability offered by Azure database services for MySQL, MariaDB, and PostgreSQL.“
Daniel Lopez is the former CEO/Founder of Bitnami and is now Sr. Director R&D at VMware. When asked for his perspective on the partnership with Microsoft Azure, Daniel said:
“Bitnami has worked closely with Microsoft for many years to provide Azure customers with a wide array of ready to deploy open source software in a variety of formats including virtual machines, containers, Helm Charts, and ARM Templates; and across environments including Azure and Azure Stack. Our recent expansion of this partnership with the Azure Data team is a particularly exciting area of development as we’re bringing together the convenience and simplicity of Bitnami applications with the power and scalability of Azure Data services; creating a low-friction and high-value win for customers. We’re also proud of this collaboration in highlighting the type of innovation and benefits the cloud operating model allows us to unlock.”
Want to learn more about Azure open source databases & Bitnami?
Below are some resources if you want to dig in further and try out some of these Bitnami production-ready templates with our Azure open source databases.
Oh and if you have ideas for more Bitnami templates we should create that you think you and other developers would benefit from on the Azure Marketplace, please provide feedback on UserVoice. We would love your input.
by Scott Muniz | Aug 4, 2020 | Alerts, Microsoft, Technology, Uncategorized
This article is contributed. See the original author and article here.
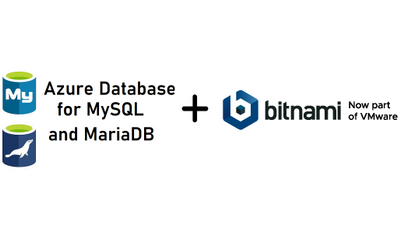
Today I am happy to announce an expansion of our longstanding partnership with Bitnami (now part of VMware) to deliver a collection of production-ready templates on the Azure marketplace for our open source database services—namely, MySQL, MariaDB, and Postgres.
In this blog post you can learn about the Bitnami Certified Apps (what many of us call “templates”) for our Azure Database for MySQL and Azure Database for MariaDB services are available on the Azure Marketplace and are production-ready. You can also find Bitnami templates using Azure Database for PostgreSQL.

More importantly, these Bitnami templates make it easy for you to manage the complexity of modern software deployments.
And when we say the Bitnami templates make it easy, we mean easy: these templates for our Azure open source databases give you a one-click solution to deploy your applications for production workloads. Bitnami packages the templates following industry standards—and continuously monitors all components and libraries for vulnerabilities and application updates.
Invent with purpose on Azure with Bitnami templates !
Bitnami templates available with PostgreSQL on Azure Marketplace
The current collection of Bitnami production-ready templates on the Azure marketplace are for these applications.
- Magento for MySQL
- Moodle for MySQL
- WordPress for MariaDB
- Drupal for MariaDB
The Bitnami Community Catalog on the Azure Marketplace give you certified applications that are always up-to-date, highly secure, and built to work right out of the box.
In these solution templates for the Azure open source database services, our Azure and Bitnami engineering teams have worked together to incorporate all the best practices for performance, scale, and security—to make the Bitnami templates ready for you to consume, with no additional integration work necessary.
Magento with MySQL on Azure

Caption : Magento with Azure Database for MySQL
Since so many of us are staying at home right now, I suspect that many of you are using some type of online retailer to purchase groceries and everyday home items. Many online retailers are built on top of Magento, an open source e-commerce solution developed in PHP. Bitnami simplifies the deployment of Magento on Azure with an Azure Marketplace solution that runs Magento on a Virtual machine and uses Azure Database for MySQL for data storage with ProxySQL for load balancing.
Try Magento Bitnami template that works with Azure Database for MySQL
Moodle with MySQL on Azure

Caption : Moodle with Azure Database for MySQL
With schools trying to provide online education to their students whether it is an elementary school or a university, Moodle can help you build a learning hub quickly and with ease. This Bitnami template for Moodle uses a virtual machine for the application front-end and the Azure Database for MySQL service for the application data. It is also configured to provide high availability, ease of scaling, and high performance.
Try Moodle with Azure Database for MySQL
WordPress with MariaDB on Azure

Caption: WordPress with Azure Database for MariaDB
You can create a hassle-free WordPress application for a company blog website or eCommerce Website using this template for Azure. This solution uses a virtual machine for the application front-end and the Azure Database for MariaDB service for the application data in addition to ProxySQL load-balancer. You get high availability with the ProxySQL load-balancer as well as high performance.
Check out our Azure Friday video on how to deploy WordPress on Azure using this Bitnami template (and MariaDB of course.)
Try WordPress with Azure Database for MariaDB
Drupal with MariaDB on Azure

Caption: Drupal with Azure Database for MariaDB
Whether you are creating websites for non-profits, healthcare providers, government agencies, or other organizations—it’s easy to build, run, and optimize your Drupal-based websites on Azure.
With our Bitnami template for Drupal, you get a virtual machine for the application front-end and the Azure Database for MariaDB service for the application data. The production-ready template is configured to provide high performance and better database scalability for your application.
Try Drupal with Azure Database for MariaDB
Grafana with MariaDB on Azure

Caption: Grafana with Azure Database for MariaDB
I suspect many of you love Grafana. I know I do. With this Bitnami template for Grafana, you can build an application monitoring application on Azure that can help you troubleshoot and investigate issues with your solutions, no matter where the diagnostics data and metrics are stored. You can process massive amounts of data and visualize the data through customizable dashboards. This Bitnami template for Grafana uses a multi-node Grafana front-end and the Azure Database for MariaDB service for the application data.
Try Grafana with Azure Database for MariaDB
If you’re building an application on Azure using Grafana, Drupal, WordPress, Moodle, or Magento—plus our MySQL or MariaDB managed databases—here are a few of the reasons I recommend you consider taking advantage of the Bitnami templates on the Azure Marketplace.
Bitnami templates lower your TCO
These Bitnami production-ready templates are available to you at no additional cost than the underlying Azure services being used to host the application. These services are already optimized to reduce the total cost of ownership using the elastic cloud infrastructure.
You also get Azure advisor recommendations for your managed database service, so you can scale up or down based on your usage telemetry.
Managed database services on Azure enable you to focus on your application—not your database
Azure managed database services provide high availability with 99.9% SLA and ease of scale up or down your servers based on what your application needs are. You can easily backup and perform point-in-time restore for business continuity and disaster recovery. Using ProxySQL for WordPress and Magento solutions that provides intelligent load balancing across different databases and scalability to transparent route the traffic to read replicas to scale out.
Security benefits that are built into Azure
With these Bitnami templates on Azure, you can use built-in security features like using SSL connectivity to the database server and using Azure Role-based access control (RBAC) to control who has access to the server.
You can also use our Advanced Threat Protection feature for the managed databases to detect anomalous activities indicating unusual and potentially harmful attempts to access or exploit databases.
You can also read this blog post from Bitnami (now part of VMWare). We are thrilled to work with Bitnami and focus on simplifying the experience for developers to build solutions using community based applications like WordPress , Moodle and more.
What our leaders are saying about the Bitnami & Azure collaboration
Sunil Kamath is Director of Product Management for OSS databases at Microsoft Azure Data—here is Sunil’s take on the importance of our partnership:
“Developers want simple, fast ways to deploy production-ready solutions on the cloud. We have been excited about our partnership with Bitnami—now part of VMware—to deliver what customers say they care about the most. Today, together with Bitnami, we are thrilled to launch new production-ready and enterprise-grade Bitnami templates for WordPress, Drupal, Magento, and more, making it easier than ever for developers to run these solutions on the Azure cloud. These solutions are built to fully utilize the best-in-class intelligence, enterprise security, and scalability offered by Azure database services for MySQL, MariaDB, and PostgreSQL.“
Daniel Lopez is the former CEO/Founder of Bitnami and is now Sr. Director R&D at VMware. When asked for his perspective on the partnership with Microsoft Azure, Daniel said:
“Bitnami has worked closely with Microsoft for many years to provide Azure customers with a wide array of ready to deploy open source software in a variety of formats including virtual machines, containers, Helm Charts, and ARM Templates; and across environments including Azure and Azure Stack. Our recent expansion of this partnership with the Azure Data team is a particularly exciting area of development as we’re bringing together the convenience and simplicity of Bitnami applications with the power and scalability of Azure Data services; creating a low-friction and high-value win for customers. We’re also proud of this collaboration in highlighting the type of innovation and benefits the cloud operating model allows us to unlock.”
Want to learn more about Azure open source databases & Bitnami?
Below are some resources if you want to dig in further and try out some of these Bitnami production-ready templates with our Azure open source databases.
Oh and if you have ideas for more Bitnami templates we should create that you think you and other developers would benefit from on the Azure Marketplace, please provide feedback on UserVoice. We would love your input.
by Scott Muniz | Aug 3, 2020 | Alerts, Microsoft, Technology, Uncategorized
This article is contributed. See the original author and article here.
With the ever-growing cloud resources in your environment, I can’t emphasize enough how important it is to prioritize security hygiene and more importantly to constantly monitor the status of the security posture. Azure Security Center continuously assesses your resources, subscriptions for security issues. It mimics the work of a security analyst, reviews security recommendations across all workloads, applies advanced algorithms to determine how critical each recommendation is, and calculates Secure Score based on the active recommendations. Overall secure score is an accumulation of all your recommendation scores and you can view your overall secure score across your subscriptions. The score will vary based on subscription selected, the amount of resources that you have in that subscriptions and the active recommendations on those resources. Read this article to understand more about Azure Security Center Secure Score.
We’ve heard your feedback on being notified when the Secure Score downgrades by X%. We recently uploaded an automation artifact to the Azure Security Center Github repository, a playbook that helps you to monitor the secure score of the subscriptions easily and to send an alert via email once the Secure Score decreases for a configurable percentage value. This blog post explains how this automation works.
How does the automation work?
This playbook uses Secure Score API to pull the Secure Score. At every execution, it pulls the list of subscriptions for the user and for each subscription, it gets the percentage of ‘ascScore’ which is then stored in the Log Analytics workspace with the subscription ID as maximum points and current points. At every occurrence (can be defined during the deployment of the ARM template), it pulls the last scanned points and derives the score in percentage (%) and compares it with the current score. If the Logic app identifies the current score minus last scanned score percentage is greater than or equal to configured score reduction threshold (defined during deployment), it fires an alert over email.
Pre-requisites:
This playbook uses Managed identity. You need to assign reader permissions to the subscriptions you want to export for the Managed identity.
To assign Managed Identity to specific scope:
- Make sure you have owner permissions for this scope.
- Go to the subscription/management group page.
- Press ‘Access Control (IAM)’ on the navigation bar.
- Press ‘+Add’ and ‘Add role assignment’.
- Choose Reader role.
- Assign access to Logic App.
- Choose the subscription where the logic app was deployed.
- Choose ‘Send-SecureScoreReductionAlert’ Logic App. (The name might differ based on what you’ve saved the logicapp as)
- Press ‘save’.
NOTE: You can assign permissions only as an owner and make sure all selected subscriptions registered to Azure Security Center.
To assign reader permissions to subscriptions:
You have three options:
- You can assign reader permissions at the management group level for the managed identity. (preferred)
- You can assign reader permissions for the Managed Identity for each one of the subscriptions you want to get data on.
- You can use the provided PowerShell script Grant-SubscriptionPermissions.ps1 to add the identity to all subscriptions.
Deployment process and details
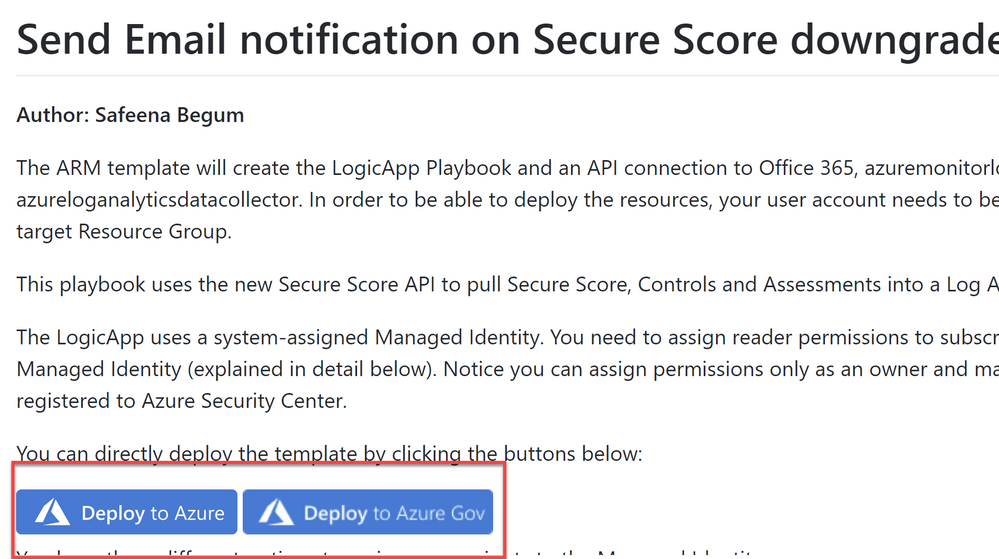
Navigate to Azure Security Center GitHub repository and select “Deploy to Azure” or “Deploy to Azure Gov” (as shown in ‘Image 1’) under Secure Score Reduction Alerts automation

Image 1: Git Hub repository
Once you have clicked on ‘Deploy’ option in the screen above, you should automatically be redirected to the Azure portal Custom deployment page where you can fill in the details of requirement as shown in ‘Image 2’

Image 2: Azure portal, Custom Deployment
Note that all the above fields are customizable per your needs. In my example above, I have filled in the details for your reference.
The ARM template will create the Logic App playbook and as you notice in ‘Image 2’ we are using three API connections O365 for sending notification alerts, Azure log monitor to query and list action for Log Analytics and Azure Log Analytics API to store the data.
During the deployment of the Logic App, you can define the Scanfrequency hour (Occurrence in hours) depending on how often you would want the logic app to scan your subscriptions. You could also define Score Reduction Threshold, where you can specify at what percentage (%) reduction, would you want the logic app to notify you on the reduction.
Once you review and create from ‘Image 2’, you would notice below resources created from the ARM template (Refer Image 3)

Image 3: Summary of the resources created from the ARM template
After the successful deployment, make sure you authorize connections to the Office365API and AzuremonitorlogsAPI. You can do that by simply clicking on Office365API connection and selecting ‘Edit API Connection’ and click on ‘Authorize’ as shown in ‘Image 4’.

Image 4: Authorize O365 API Connection
Similarly authorize the ‘azuremonitorlogs API’ connection too. Refer example ‘Image 5’

Image 5: Authorize AzureMonitorLogs API Connection
NOTE: If you’re specifying an existing workspace, You might have to manually change the connections within the Logicapp (Since the connections cannot be used across the subscriptions (by design), the connection needs to be authorized in the subscription for the first time to the Log Analytics Workspace).
You can easily authorize connection by navigating to the Logic app that’s deployed and selecting ‘Logic app designer’ , when you select the first ‘For each’ loop, under ‘Run query and list results’ variable as shown in ‘Image 6’
That should pop-up a login window asking you to sign-in. After a successful sign-in, you would notice the successful connection as shown in ‘Image 6’

Image 6: Successful connection to Workspace
The logicapp will create another custom log (dailyAscScore_CL) within that workspace. So, for the first 5-10 minutes (soon after the deployment), until the database values are created in the custom table, you might experience failed runs. Once there’s data to display, the runs will always succeed.
Output:
In an event when the Azure Security Center score reduces by the configured percentage and depending on the Scanfrequencyhour you’ve set in ‘Image 1’, it would drop you an alert notification to the email you specified in ‘Image 1’ as shown in ‘Image 7’

Image 7: Email notification alert
This logic app as well as many other can be found here:
Direct Link to GitHub sample
Azure Security Center GitHub Repo
I hope you enjoyed reading this article, go ahead and deploy this playbook in your environment and prioritize monitoring security hygiene.
Reviewer
Special thanks to:
Yuri Diogenes, @Yuri Diogenes, Senior Program Manager (CxE ASC Team)

Recent Comments